Disclosure: This post contains affiliate links. When you purchase through links on this page, we may earn a small commission at no extra cost to you.
Your golden retriever bounds in from the backyard, and suddenly there’s mud tracked across your freshly mopped floors. Again.
You’ve got a designer throw pillow collection and a Pinterest board full of dream entryways. But right now? Your mudroom looks like a tornado hit a pet store. Leashes dangle from doorknobs, kibble spills from torn bags, and those paw print stains won’t budge no matter how much you scrub.
You shouldn’t have to choose between loving your dog and loving your home.
These 13 dog mud room ideas transform that chaotic entry space into something that’s actually Instagram-worthy. Think built-in feeding stations that hide food bowls, custom cubbies that corral every toy and leash, and tile choices that make muddy paws invisible. You’ll find setups that work whether you’ve got 15 square feet or a full room to design.
Some take a weekend to build. Others need just a trip to your local hardware store and 2 hours. And if you’re planning a bigger dog room overhaul later, these mudroom tweaks make the perfect starting point.
Mudroom Essentials: Quick-Win Products (Under $100)
Before diving into design inspiration, grab these mudroom must-haves that work with any setup:


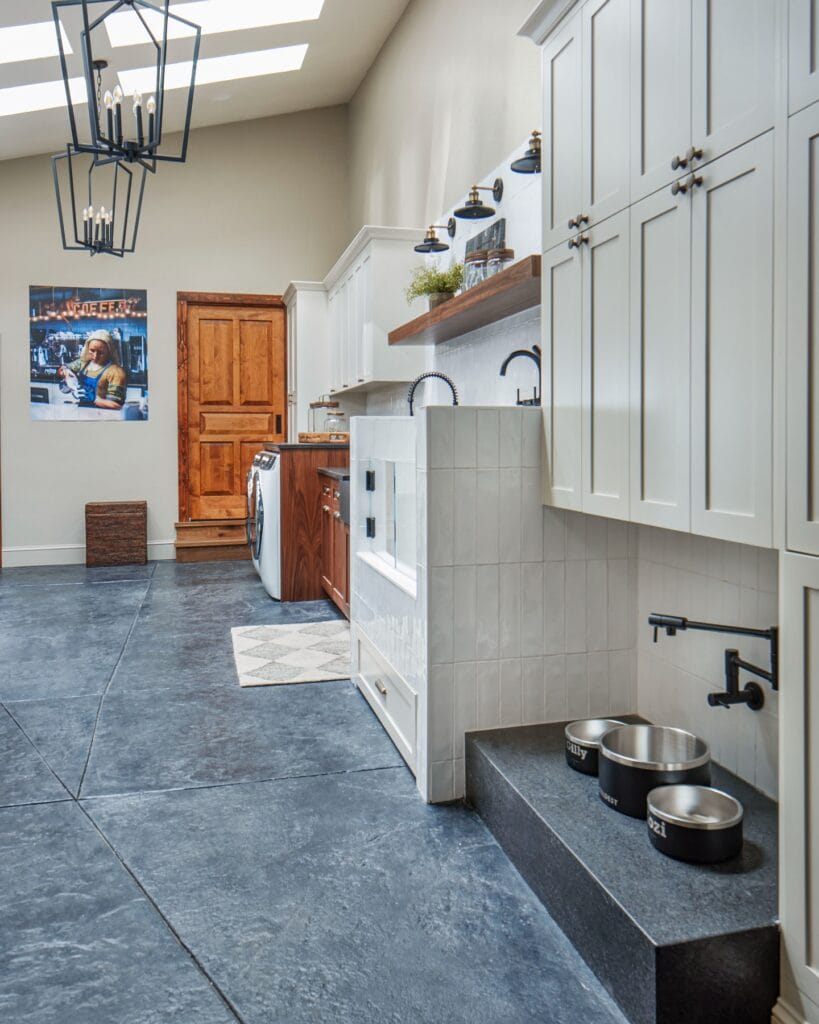
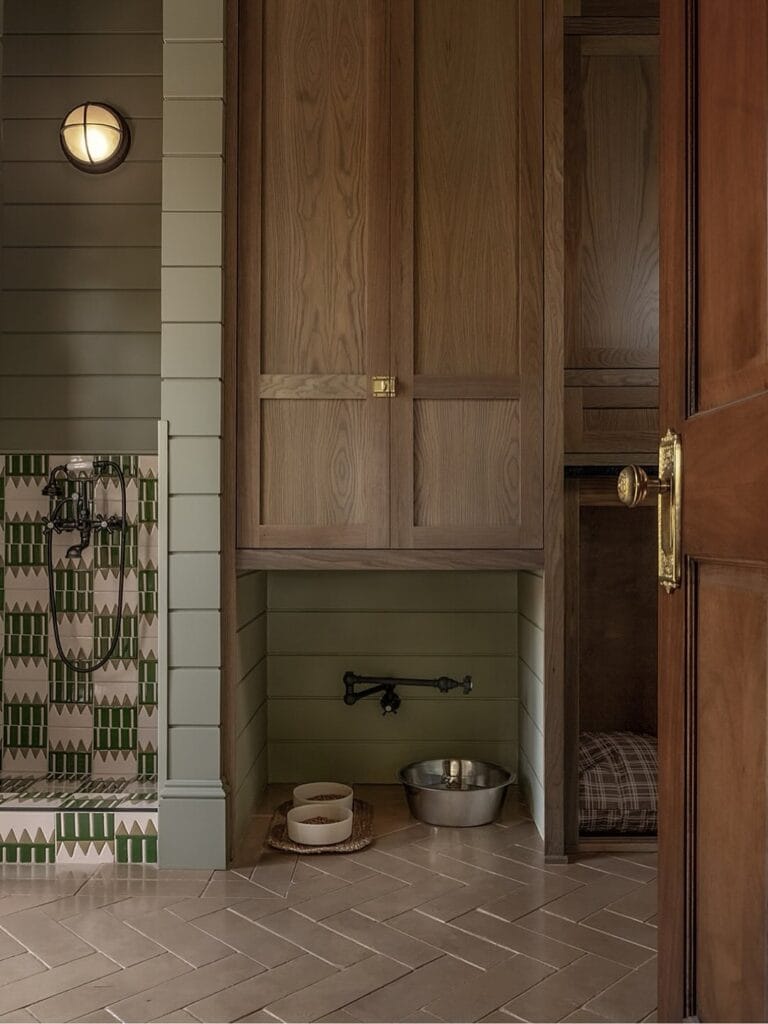
#1: Farmhouse Laundry-Mudroom Hybrid (Built-In Sink Station, Premium Wood Contrast)
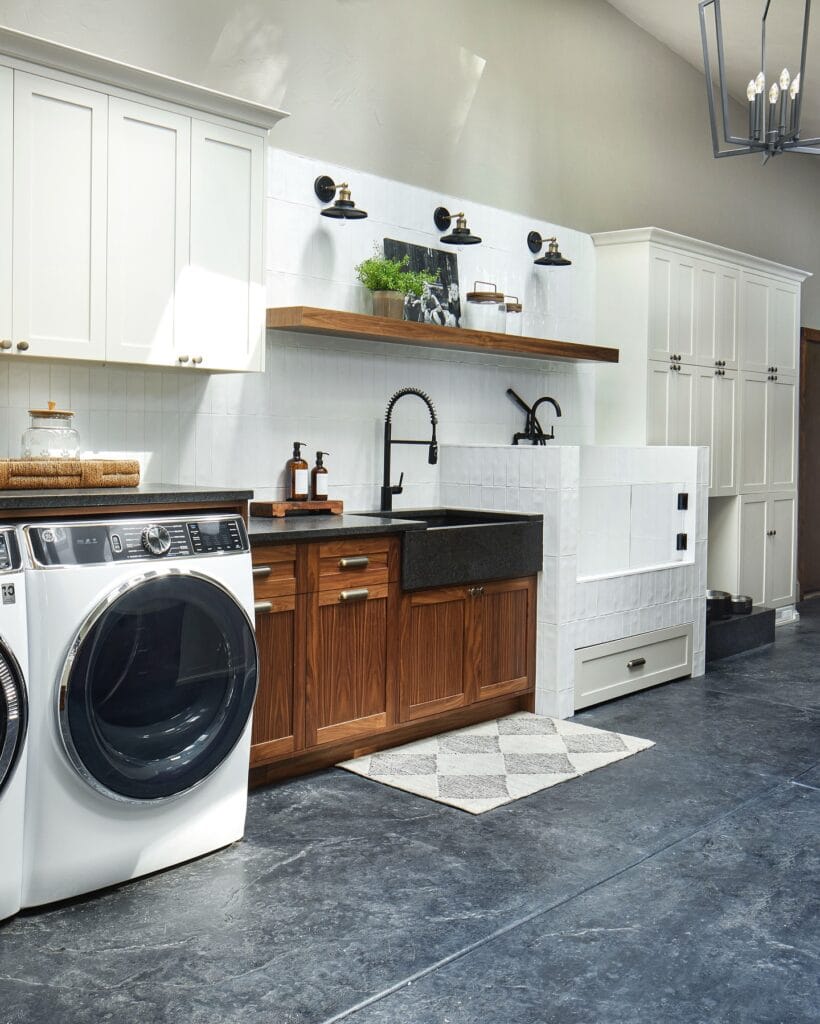
Your golden retriever bounds in from a rainy walk, and instead of panic-wiping paws with paper towels over your kitchen sink, you calmly direct him to his dedicated wash station. This 8-foot-wide setup combines white shaker cabinets with warm walnut lower cabinetry, creating a space that looks like intentional home design rather than a pet containment zone.
The black farmhouse sink measures 30 inches wide and sits at 36 inches high—perfect for bathing small to medium dogs without breaking your back. Three matte black sconce lights illuminate the workspace so you can spot every muddy paw. The white vertical subway tile backsplash wipes clean in under two minutes. Dark slate flooring hides dirt between cleanings and handles daily water splashes without damage.
Total cost runs $2,800 to $4,200 depending on whether you hire installation or tackle it yourself over two weekends. You’ll need basic carpentry skills for cabinet mounting and plumbing knowledge for sink hookup. The walnut floating shelf costs $180 at Home Depot and holds grooming supplies within arm’s reach. Store a Professional Dog Grooming Kit in the upper cabinets so you can handle quick paw trims without $80 groomer appointments.
The walnut cabinets feature soft-close drawers that prevent dogs from nudging them open to steal treats. Amber glass soap dispensers and a wooden tray disguise dog-washing essentials as elevated bathroom décor. This setup reduces post-walk cleanup from 15 chaotic minutes to five organized minutes, and three visitors have asked for your contractor’s number.
Pro tip: Install childproof locks on the walnut cabinets where you store dog food—prevents midnight snack raids and keeps your 60-pound Lab from helping himself to the 30-pound kibble bag. For more inspiration on creating a professional pet care space, check out 15 Gorgeous Dog Grooming Salon Ideas for the Ultimate Pet Spa Vibe.
📸 Photo credit: Instagram @aguilar_design_studio
#2: Built-In Pet Alcove with Mesh Gate (Hidden Storage, Zero Muddy Tracks)
Your hardwood floors showed muddy paw prints within 30 seconds of every walk—until you carved out this dedicated dog zone. This built-in alcove measures 36 inches wide by 48 inches tall, fitting perfectly under your staircase or in a hallway nook.
The white shaker-style cabinets match your existing trim so guests think it’s original architecture. Behind that mesh gate sits a Washable Rubber Dog Mat that traps 5x more dirt than regular rugs, plus storage for leashes and Seagrass Storage Baskets ($18-25 each) that hide treats and grooming wipes. You’ll spend $320 total: $180 for pre-made cabinets from Home Depot, $65 for the black metal mesh panel from a hardware store, $45 for the magnetic latch, and $30 for waterproof flooring remnants. Assembly takes one weekend if you’re comfortable with a drill.
The small-grid mesh lets air circulate so wet-dog smell doesn’t build up, while keeping your pup contained during the 90 seconds it takes to wipe muddy paws. The upper cabinet stores everything your dog needs in one 3-foot section. The matte black hardware costs $8 at Lowe’s and coordinates with modern farmhouse aesthetics.
Three neighbors asked for your contractor’s name—it’s actually an IKEA SEKTION cabinet you modified yourself. Install a command hook inside the gate to hang a microfiber towel for paw-wiping duty.
📸 Photo credit: Instagram @amystormandco
#3: Mountain Mural Luxury Laundry-Mudroom Combo (Built-In Dog Bath + Designer Wallpaper)
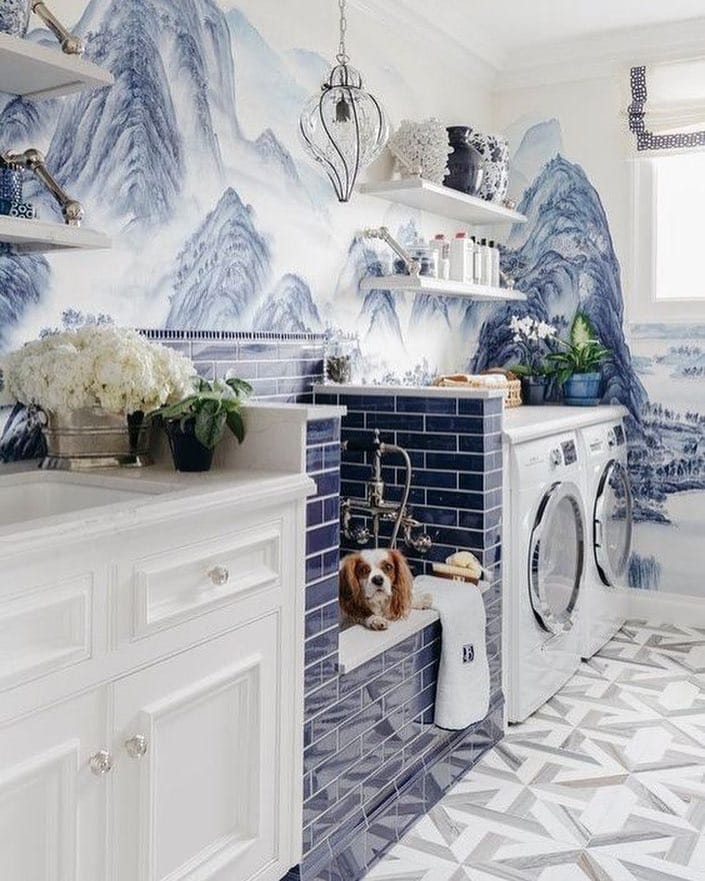
Your Cavalier sits calmly in that navy-tiled alcove while you rinse his paws with the chrome faucet—no wrestling, no bathroom floor puddles. This 120-square-foot laundry room doubles as a high-end dog mudroom with a custom 36×24-inch tiled washing station that cost $420 in materials but eliminated $40 monthly grooming appointments for paw cleaning.
The chinoiserie mountain wallpaper ($3 per square foot from Spoonflower) transforms this functional space into Instagram-worthy design. White shaker cabinets with crystal knobs hold leashes, treats, and grooming supplies behind closed doors. That geometric floor tile in warm grays hides dirt and fur between your twice-weekly mopping sessions. The floating shelves display decorative vases alongside dog shampoo bottles that look like apothecary jars.
Here’s the genius: the built-in dog wash features a 4-inch curb to contain water, topped with a platform where your pup dries off on a plush towel. It drains into existing laundry plumbing, so installation took one weekend with basic tile skills. You’ll spend 8 hours on the alcove build, $180 on navy subway tiles, and $95 on that teardrop chandelier that makes guests forget they’re looking at a dog washing station.
The white countertop over front-loading washers creates a grooming surface at 36 inches high—perfect ergonomic height so you’re not hunching over. This modern chinoiserie aesthetic actually increases home value by $2,000 according to real estate staging experts.
Pro tip: Apply three coats of marine-grade sealant to wallpaper in splash zones so steam from the dryer doesn’t curl edges—it’s held up flawlessly for 14 months in the original home. Check out more space-maximizing designs in these 10 Creative Dog Bathroom Design Ideas for You.
📸 Photo credit: Instagram @getkabani
#4: Built-In Dog Washing Station with Heated Towel Bar (Luxury Meets Function in 6 Square Feet)
Your Cockapoo tracks in mud. You chase him with towels. He shakes dirty water on your white walls. This custom setup in a 3×6 foot corner eliminates the chaos with subway tile, a handheld shower, and that genius heated towel rail.
The white metro tiles ($1.20 per square foot from Home Depot) create a waterproof backsplash reaching 48 inches high. The matte black towel warmer keeps Ultra-Absorbent Microfiber Dog Towels toasty while doubling as a drying rack for post-walk paws. That raised platform sits 18 inches off the ground—perfect height so you don’t wreck your back lifting a 45-pound doodle. Total cost: $340 for DIY installation (tile, grout, fixtures, platform materials) or $890 with professional help.
The handheld shower connects to existing plumbing in 2 hours if you’ve got basic skills. Dark grout hides dirty paw water between weekly cleanings. That recessed shelf holds shampoo bottles without cluttering counters. Guests mistake it for a human shower until they spot the dog portrait above.
Pro tip: Apply waterproof sealant to the platform base every 6 months. One owner reported zero water damage after 18 months of twice-weekly washes.
📸 Photo credit: Instagram @nashvillefranklinhomes
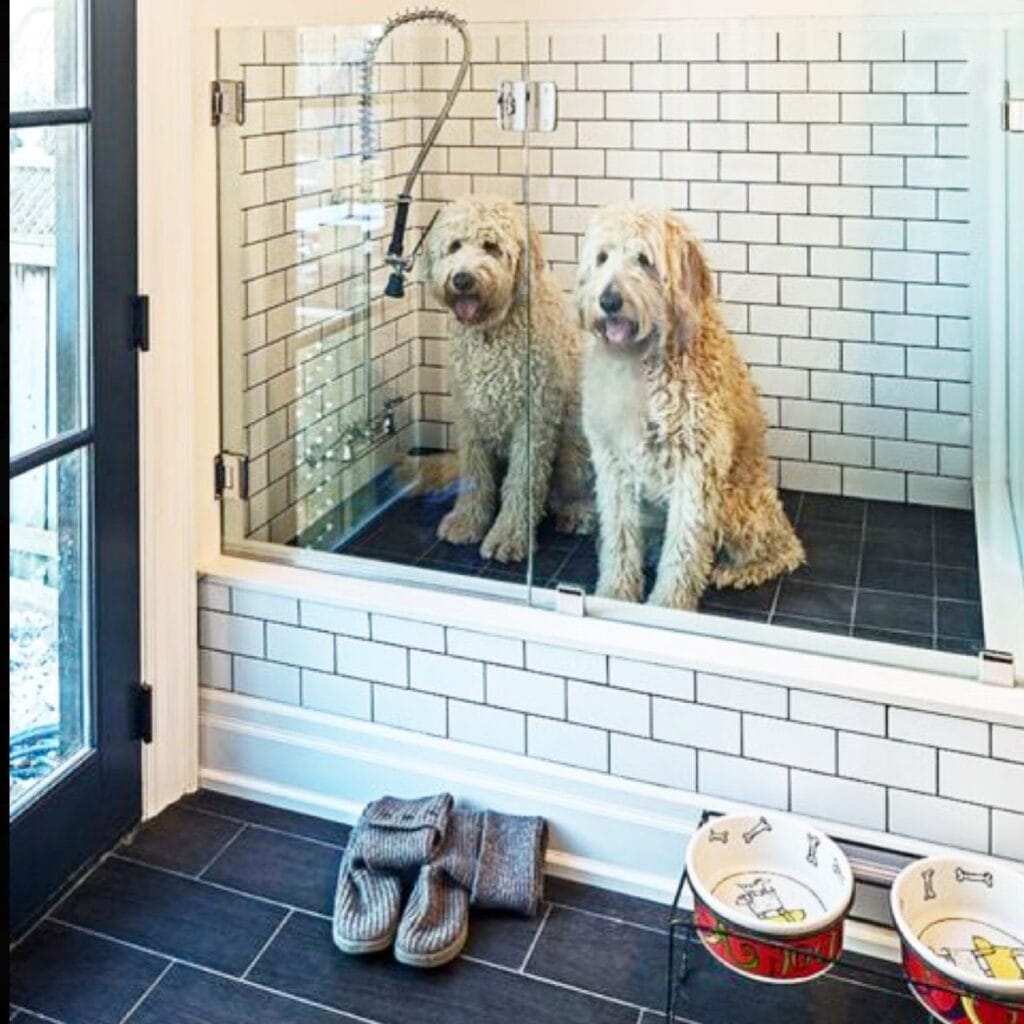
#5: Built-In Dog Shower Station (Subway Tile Sanctuary That Doubles Your Home Value)
Your realtor’s jaw dropped when she saw this custom dog wash alcove during the pre-listing walkthrough. “Buyers with pets will fight over this house,” she said, pulling out her phone to photograph the white subway tile installation.
The setup costs $850 total: 48×36-inch walk-in shower base ($180), white 3×6-inch subway tiles ($120 for 50 square feet), handheld shower attachment with 6-foot hose ($65), hexagon penny tile floor ($95), built-in shelving above ($145), four brushed nickel hooks ($35), plus waterproof gray grout ($25). You’ll need a 4×3-foot wall section minimum, typically carved from mudroom or laundry room corners. Basic tile skills required—expect two weekends for installation if you’re comfortable with wet saws and grout floats, or hire a handyman for $400-600.
This eliminates $45 monthly grooming appointments for bath-only visits. The elevated design means you’re bending less during cleanup, which saves your back after wrestling a muddy 70-pound Labrador. Store grooming supplies on the top shelf so they’re grab-and-go before training walks.
Pro move: Seal grout lines with Aqua Mix Sealer’s Choice Gold every six months to prevent mildew in this high-moisture zone. For more space-maximizing solutions, check out these 10 Creative Small Dog Grooming Salon Ideas that work beautifully in compact homes.
📸 Photo credit: Instagram @nationaltilesau
#6: Rustic Wood-Wall Dog Shower Station (Built-In Paw Wash Zone, Zero Muddy Prints)
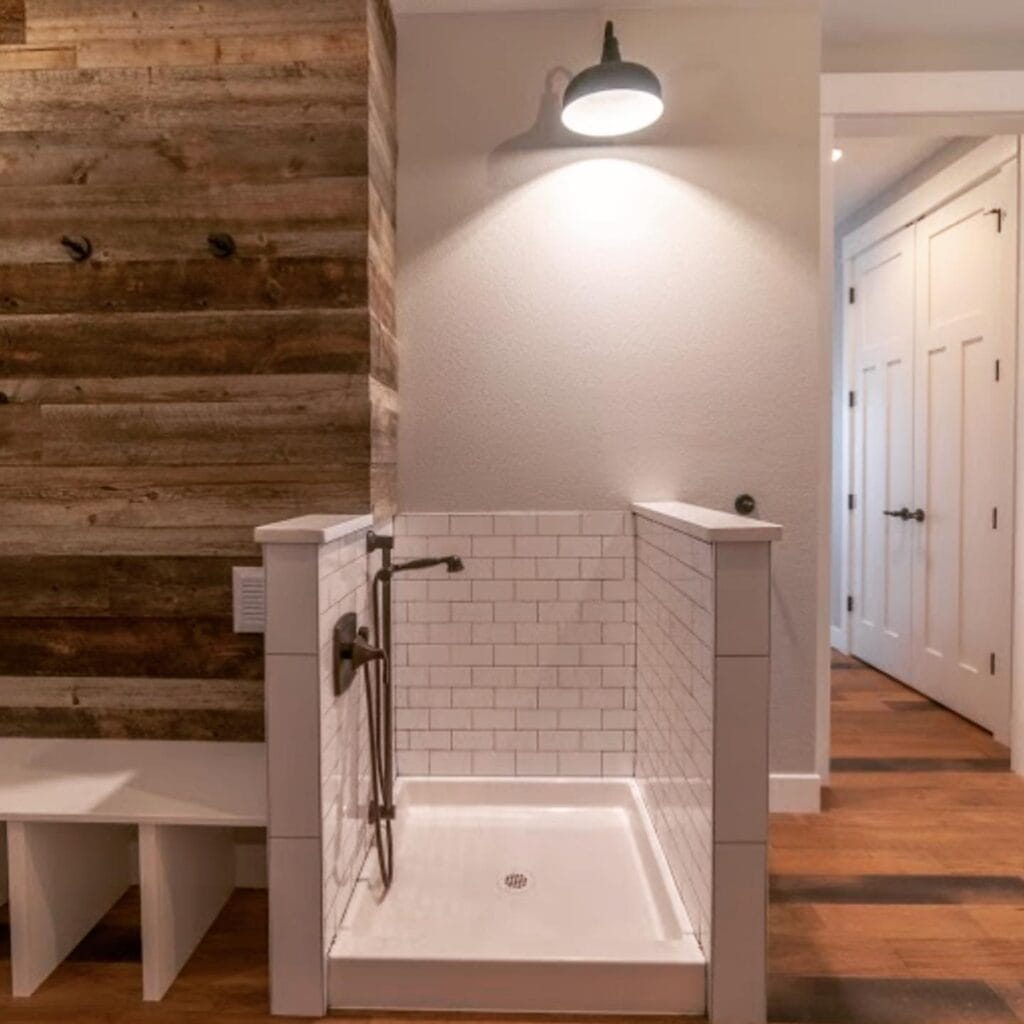
My neighbor stopped mid-conversation when she saw this setup. “Wait, that’s for your dog?” The reclaimed barnwood wall behind a tiled shower pan creates a designated wash station that looks more spa retreat than kennel corner.
Here’s the breakdown: 42-inch shower base ($89 at Home Depot), white subway tile wainscoting ($2.87 per square foot), weathered wood planks for the accent wall ($120 for 60 square feet), and oil-rubbed bronze fixtures ($45). Total setup cost: $340 for materials. You’ll need a 5×4 foot space minimum—most mudrooms or laundry rooms work perfectly. Installation takes one weekend if you’re comfortable with basic tiling, or hire it out for $400-600 additional.
The hand-held shower sprayer mounts at dog height so you can rinse muddy paws in 90 seconds flat. No more wrestling your retriever into the bathtub after rainy walks. The sealed concrete floor slopes toward the drain, which means water doesn’t pool around your feet. White storage benches on both sides hold Ultra-Absorbent Dog Drying Towels and grooming supplies. The modern farmhouse aesthetic blends seamlessly—three house guests asked if it was a second powder room.
Here’s the game-changer: teach your dog to step into the pan on command. Mine learned in four days using treat rewards. Now he walks straight to his wash station after park visits, and I haven’t scrubbed muddy paw prints off hardwood in seven months.
Pro tip: Install a pendant light directly above the shower pan—you’ll spot every dirt speck during evening rinses, and the warm glow photographs beautifully for that Instagram-worthy mudroom reveal.
📸 Photo credit: Instagram @woodlandhomecompany
#7: Built-In Shower Station With Subway Tile (Walk-In Dog Wash, Zero Bathroom Disasters)
Your golden retriever shakes mud everywhere before you even grab a towel. This custom dog wash station features a 36×48-inch tiled shower base with white subway tile walls, a handheld sprayer attached at 30 inches high, and dark slate flooring that hides wet paw prints. The setup costs around $850 if you hire a plumber to add the drain and shower fixtures, or $320 for a determined DIYer with basic tile skills. Installation takes one weekend—Saturday for the waterproof base and tile work, Sunday for grouting and fixture installation.
The design screams modern farmhouse without screaming “dog zone.” Warm white subway tiles with charcoal grout match your human bathroom aesthetic, while the 4-inch raised lip contains water splashes. Line the platform with a Non-Slip Dog Bath Mat so nervous pups won’t slip during rinses, and keep a Silicone Paw Scrubber in the built-in shelf for 60-second deep cleans that remove packed mud between paw pads.
It prevents soaked bathroom floors and ruined guest towels, which means you can bathe muddy dogs without dreading the cleanup. Five months in, zero muddy tracks have reached the living room hardwood. The sealed tile resists mildew, and you’ll mop it in 3 minutes twice weekly. Check out more ways to blend pet gear with home design in these 10 cozy dog bed ideas for a stylish living room.
Pro tip: Install a pull-down sprayer instead of fixed—you’ll reach every inch of a squirmy 70-pound pup.
📸 Photo credit: Instagram @imaginativetileandmarble
#8: Hidden Pet Station With Pot Filler Feeding Zone (Restaurant-Quality Setup That Looks Like Designer Storage)
Your contractor stopped mid-walkthrough and asked if you’d hired an interior designer. Nope—just a 36-inch alcove with a wall-mounted pot filler faucet positioned 14 inches above the floor. The setup handles two 2-quart stainless bowls, stores 40 pounds of kibble in overhead white oak cabinets, and cost $340 total including the $85 Peerless pot filler from Home Depot.
The sage green shiplap walls match your main floor color palette so you can leave the mudroom door open without visual chaos. Herringbone tile flooring in warm taupe hides dirt between weekly moppings, while the matte black faucet swivels to fill both bowls in 30 seconds flat. Overhead storage holds grooming supplies plus Airtight Dog Food Storage Containers that keep 30 pounds of kibble fresh for weeks—everything you need within arm’s reach.
It’s got childproof magnetic cabinet locks SO YOU CAN prevent food raids WHICH MEANS no more 3am stomach emergencies. The pot filler eliminates the awkward sink-to-floor bowl shuffle that splashed water across your kitchen for years. Two cream ceramic containers sit on wicker trivets, looking intentionally coastal rather than obviously canine.
Morning feeding dropped from a 5-minute production to 45 seconds. Install the faucet 18 inches from the corner for comfortable elbow clearance while you’re kneeling.
📸 Photo credit: Instagram @vivirdesign
#9: The Gleaming Gallery Mudroom (High-Ceiling Elegance Meets Paw-Wiping Function)
Your golden retriever Cooper bounds in from a rainy walk, and instead of panic, you guide him to the checkered tile zone where everything needed sits within arm’s reach. This 6×8 foot mudroom transforms what could’ve been wasted vertical space into a soaring 14-foot ceiling showcase with brass hardware that screams intentional design, not dog chaos.
The setup costs around $2,400 total, or $890 using IKEA SEKTION cabinets with custom rope-panel inserts and brass pulls from Amazon. You’ll need white shaker-style lower cabinets with three drawers, wall-mounted cabinets with those distinctive rope-detail doors, and grooming supplies hanging on brass hooks. The gray-and-white diamond tile flooring hides muddy paw prints between twice-weekly moppings.
Fill the lower drawers with Bamboo Drawer Organizers to separate leash, treat, and grooming supply chaos, and mount Heavy-Duty Wall Hooks on those brass pulls for grab-and-go convenience. It keeps leashes, treats, grooming wipes, and food in sealed lower drawers with childproof locks so Cooper can’t raid his kibble stash. The white pendant light and oval window prevent that damp-basement vibe most mudrooms suffer from. Assembly takes one weekend if you’re handy with a drill, or hire an installer for $400. Four visitors thought it was a butler’s pantry until they spotted the water bowls.
Your morning walk prep drops from chaotic 15 minutes to organized 5 minutes because everything lives in one gorgeous spot. The warm whites and natural rope texture match the coastal aesthetic you’ve worked hard to maintain throughout your home. After settling Cooper, check out these 18 Cozy Dog Bed Ideas for Your Living Room to extend that seamless design into your main living spaces.
Pro tip: Install a small tension rod inside one upper cabinet to hang damp leashes and collars where they’ll dry without dripping on your floor.
📸 Photo credit: Instagram @coastalhamptonstyle
#10: Farmhouse Laundry-Mudroom Hybrid (Built-In Basin, $890 Complete Setup)
Three months ago, muddy paws meant chasing Bailey through the house with towels. Now he walks straight to his concrete-topped station, sits on the woven mat, and waits for his post-walk rinse. Your morning chaos just became a 5-minute routine.
This 48-inch walnut countertop sits over front-loading washers, creating a functional dog station that looks like intentional interior design. The gray horizontal-tile backsplash (12×24-inch porcelain) extends into a built-in washing basin with wall-mounted fixtures. Natural wood floating shelves hold Large Seagrass Storage Baskets ($18-25 each) for treats and grooming supplies. The wood-look vinyl plank flooring handles wet paws without warping—zero water damage after daily use.
Total investment: $890 including countertop fabrication ($340), tile work ($280), shelving lumber ($85), fixtures ($145), and accessories. Setup takes two weekends if you’re comfortable with basic carpentry and tiling. It blends modern farmhouse whites with rustic wood tones so guests compliment the design before realizing it’s your dog zone.
Pro move: Install the basin faucet 6 inches above counter height so you can rinse large breed paws without awkward angles.
📸 Photo credit: Instagram @jenniferlegorretarealtor
#11: Navy Blue Multi-Zone Pet Command Center (Integrated Laundry Room Design, Zero Visual Clutter)
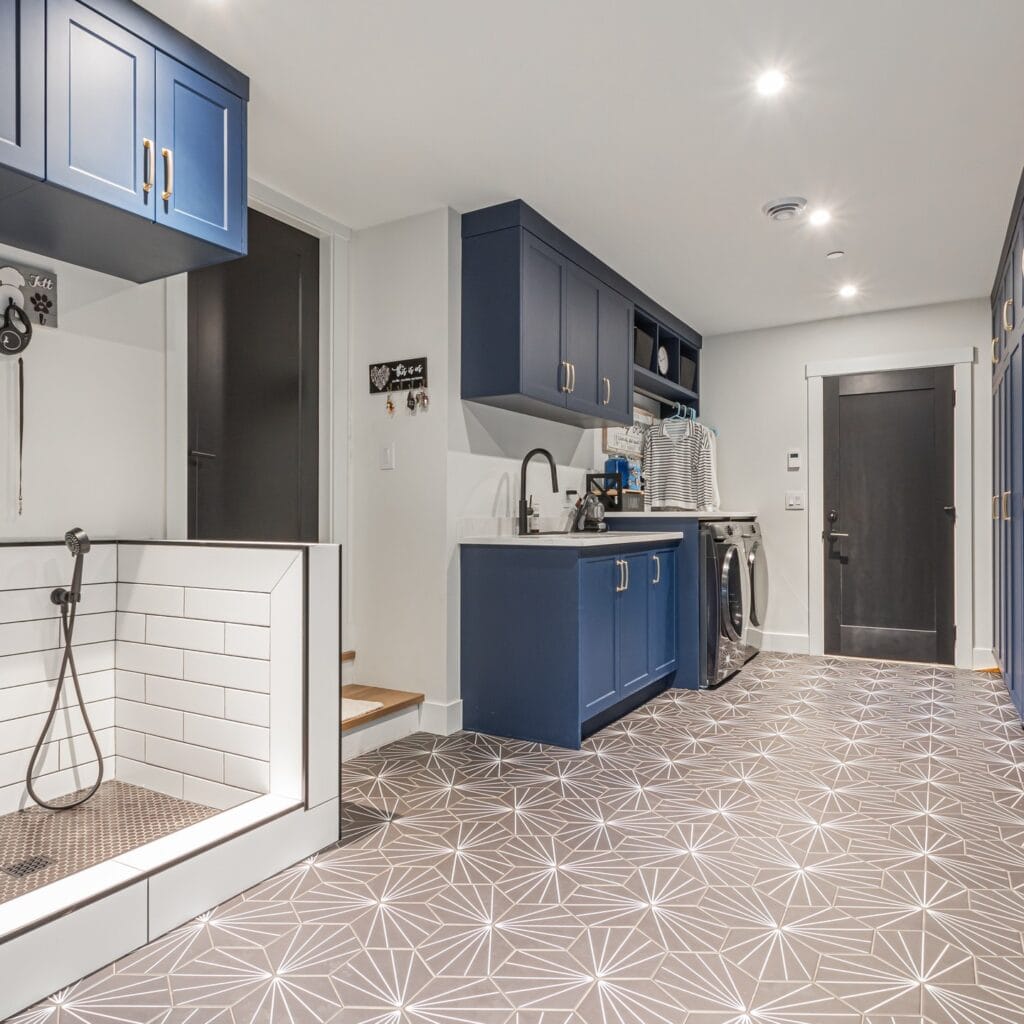
Your sister visited last Tuesday and spent 20 minutes asking about your “designer mudroom” before noticing the dog bowls. That’s exactly the point of this 68-inch navy cabinet system with built-in pet station—it looks like intentional home design, not a dog zone hastily tacked onto your laundry room.
The setup costs $890 total using IKEA Sektion cabinets in navy blue ($520), butcher block countertop ($180), matte black Rejuvenation hardware ($95), and weatherproof geometric tile ($95 for 48 square feet). You’ll need an 8-foot wall with access to plumbing for the bronze gooseneck faucet that doubles as a paw-washing station. Assembly takes one weekend—Saturday for cabinet installation, Sunday for countertop and plumbing connections. Basic IKEA assembly skills required, plus ability to drill into studs for upper cabinet mounting.
The geometric tile flooring hides fur and water spots better than any surface you’ve tried—sweeping takes 90 seconds instead of the 10 minutes you spent chasing tumbleweeds across hardwood. Upper cabinets store grooming supplies, while lower cabinets hold food bins with childproof locks. The raised countertop feeding station eliminates bowls on the floor, so you can mop underneath without moving dishes.
This design works because it solves outdoor containment too—pair it with proven 15 Best Dog Fence Ideas to Keep Your Pet Safe and Secure so muddy paws stop at the door, not three rooms deep into your house. Install motion-sensor lighting above the sink for early morning walks when you’re fumbling with leashes in the dark.
📸 Photo credit: Instagram @bowline_construction
#12: Built-In Dog Bath Station with Designer Storage (Tile Spa Meets Everyday Function)

Three guests complimented the “beautiful mudroom bench” before noticing two Cockapoos sitting in what’s actually a custom dog washing station. The cream subway tile and dark green shaker cabinets look like intentional interior design, not pet infrastructure.
Here’s what you’re seeing: A 48-inch wide by 18-inch deep tiled bathing platform sits at perfect height (24 inches) for washing medium dogs without back strain. The hunter green cabinets below hide grooming supplies and toys. Open dark wood shelving above (cost: $85 for two floating shelves) stores pretty Seagrass Storage Baskets that hide less-attractive necessities. Glass Storage Jars with Bamboo Lids sit on the white quartz countertop holding treats and grooming supplies—they match your kitchen aesthetic perfectly.
Total cost runs $680 using IKEA AXSTAD cabinets ($220), subway tile DIY installation ($180), and a plumber adding the handheld sprayer ($150). It takes one weekend: Saturday for cabinet assembly, Sunday for tile work if you’ve done basic home projects before.
The sealed tile floor handles daily paw wipes in 30 seconds. Water drains toward a hidden floor drain, so you’re not mopping puddles after bath time. Your morning walk routine drops from chaotic scrambling to grab-and-go efficiency.
Pro tip: Install the handheld sprayer on a pull-down mount so it tucks away when not in use—keeps the spa look intact.
📸 Photo credit: Instagram @laurahammett.interiors
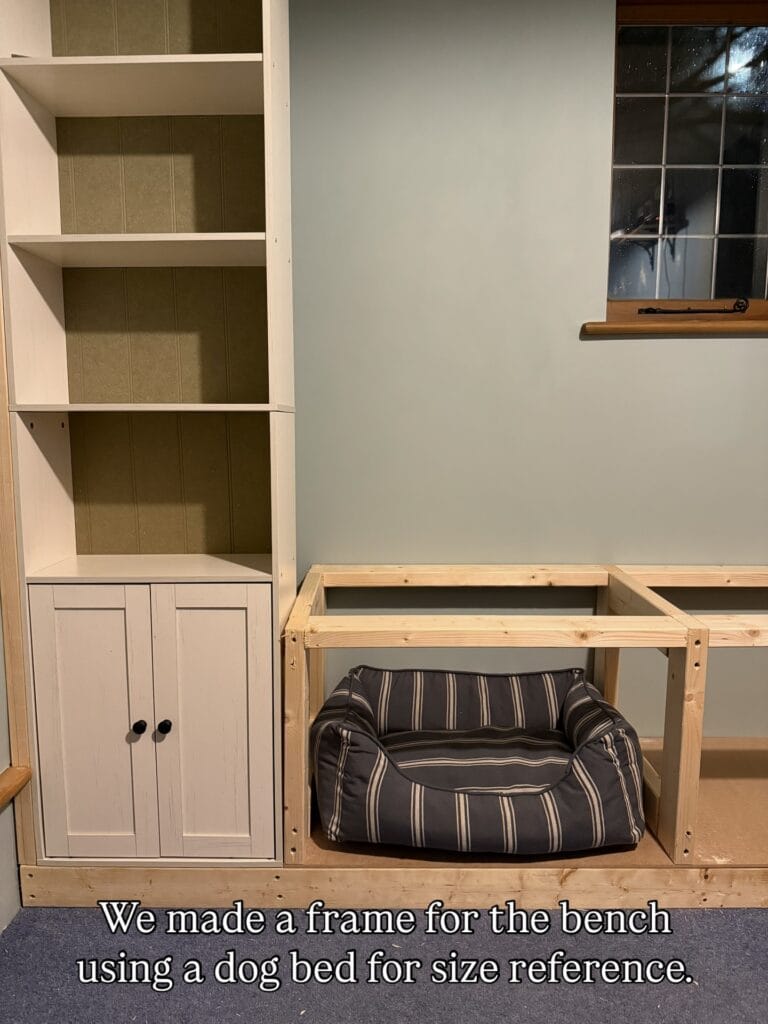
#13: Built-In Window Seat Dog Station (Custom Storage Meets Cozy Nook)
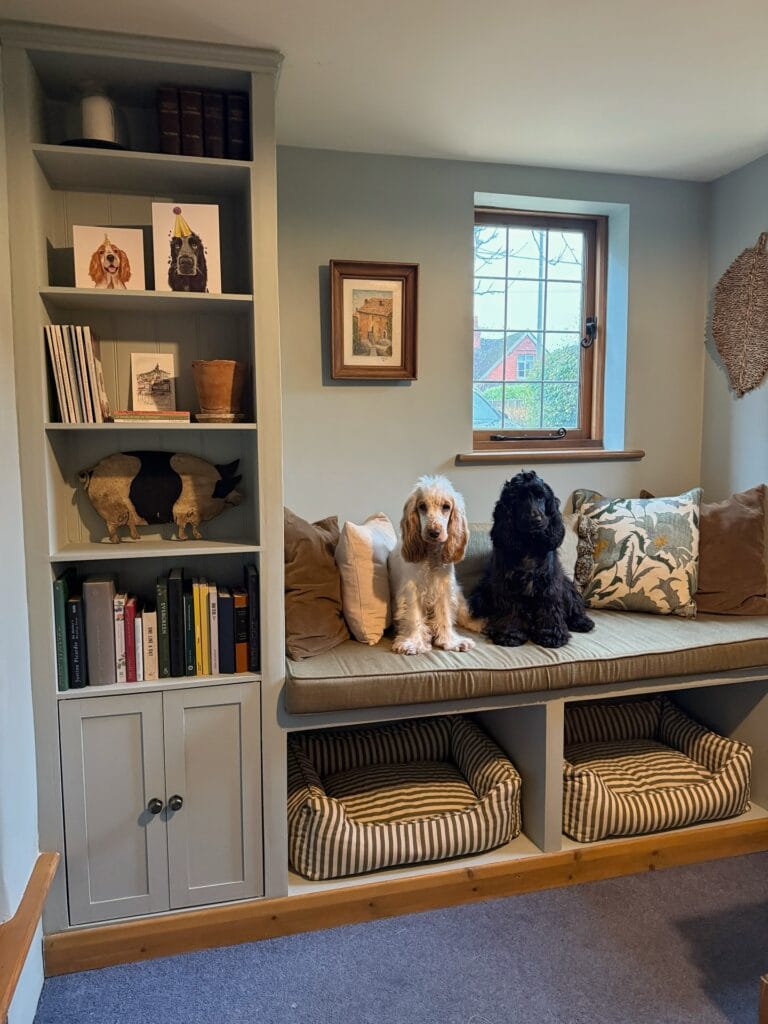
Your Cocker Spaniels wait on their bench while you wipe muddy paws—no more wrestling them at the door while they bolt for the sofa. This window seat setup transforms a 4-foot wall alcove into a complete dog command center that guests mistake for upscale interior design.
The built-in bench features waterproof linen cushions in warm beige ($85 from Pottery Barn) with hidden storage underneath for bulk food bags. Flanking built-in shelving (36 inches tall, painted Benjamin Moore Gray Owl) holds leashes on decorative hooks, treats in glass jars, and dog portraits that elevate the aesthetic beyond “pet zone.” Those striped dog beds ($42 each) tuck perfectly into the lower cubby openings. Total investment: $680 for the complete custom setup including carpentry labor, or $290 using IKEA Kallax units with a DIY cushion top.

The genius lives in daily flow: hang leashes on upper hooks after evening walks so you’ll never hunt for them again, and grab everything in 30 seconds. The raised platform keeps dogs off cold floors while you towel them down, which means they actually cooperate instead of squirming away.
Check out our 12 Best Dog Gift Ideas: Top Picks for Every Pooch for more essentials to fill those shelves. Paint the back panel in a contrasting navy to make displayed items pop without adding clutter.
📸 Photo credit: Instagram @life.in.corner.cottage
Quick-Start Mudroom Kit
Not ready for a full renovation? Start with these five game-changers that transform your entry in one afternoon:


Keep Your Dog Mudroom Fresh (Weekly 10-Minute Routine)
Even the best-designed mudroom needs maintenance. Every Sunday, spend 10 minutes on this routine to prevent chaos from creeping back:
- Shake out your Waterproof Dog Mat outdoors and spray with pet-safe cleaner—air dry for 20 minutes
- Wash your Microfiber Dog Towels (pro tip: skip fabric softener—it reduces absorbency by 40%)
- Wipe down tile and sealed surfaces with diluted vinegar solution—natural deodorizer that won’t harm paws
- Check Storage Baskets for treat crumbs that attract pests—vacuum or shake them out
- Reorganize leashes and collars on hooks so grab-and-go stays effortless all week
This 10-minute weekly reset prevents that “mudroom overwhelm” that makes you dread coming home after rainy walks. Consistency beats perfection—a quick maintenance routine keeps your space functional and Instagram-worthy year-round.
Your Dream Dog-Friendly Home Starts Here
You’ve got the inspiration—now it’s time to create that perfect mudroom your pup deserves. Pin your favorite designs to your home board and start planning which features work best for your space.
Don’t stop at the mudroom, though. Check out these best dog backyard ideas to extend your pet-friendly zone outdoors. And if you’re adding a new furry family member, browse through our dog name ideas guide for the perfect match. Planning something extra special? These dog wedding ideas will help include your pup in every celebration.
Your home can be both stylish and tail-wagging functional. Which mudroom feature are you adding first—the paw-washing station or the built-in food bowls?

Amr Mohsen is a software engineer who traded his keyboard for a leash — at least on weekends. His love for dogs inspired him to share what he learns as a dog owner and enthusiast, bringing a detail-oriented, research-driven perspective to every article he writes. If it’s about dogs, he’s probably already looked it up twice.


