Your dog crate is an eyesore. You know it, I know it, and honestly, your golden retriever probably knows it too — she’s just too sweet to say anything.
Mine used to sit smack in the middle of my living room like a metal cage that had no business being near my throw pillows. Every time I’d spend a weekend getting my space looking just right, that thing would ruin the whole vibe.
And girl, you’ve worked too hard on your home for that.
Here’s the thing — your crate doesn’t have to clash with your decor anymore. These 14 DIY dog crate furniture ideas turn that awkward metal box into something that actually belongs in your space.
The best part: most of these work with a Pinterest aesthetic and survive the chaos of owning a golden retriever.
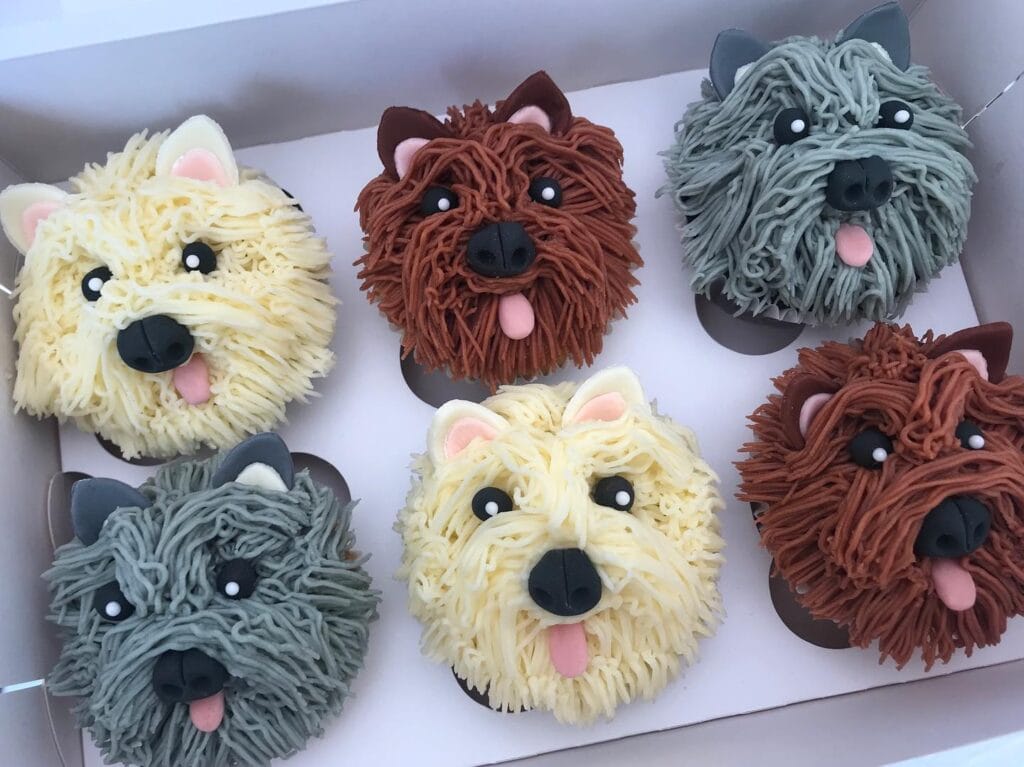
#1: Fluffy Dog Face Cupcakes That Look Almost Too Cute to Eat
You know that moment when your golden retriever gives you those big puppy eyes and you just melt? That’s exactly the energy these cupcakes carry — and honestly, every dog mom needs to make these at least once.
I made a batch of these for my friend’s birthday last spring, and people literally stood around the box just staring at them before anyone touched one. The shaggy cream cheese frosting, the little chocolate nose, that tiny pink tongue peeking out — it’s everything.
Prep Time: 30 minutes | Cooking Time: 18 minutes | Serving Size: 12 cupcakes
Ingredients:
1. 1 box chocolate fudge cake mix (plus eggs, oil, water as directed)
2. 2 cups unsalted butter, room temperature
3. 4 cups powdered sugar
4. 2 tablespoons heavy cream
5. 1 teaspoon pure vanilla extract
6. 12 brown M&Ms or chocolate chips (noses)
7. 24 black pearl sugar beads or mini chocolate chips (eyes)
8. 12 small pink fondant ovals (tongues — about ½ inch each)
9. Ivory and white gel food coloring
Instructions
Bake your chocolate cupcakes according to box directions and let them cool completely — warm cupcakes will destroy your frosting, and that’s a heartbreak nobody needs.
Beat your butter on medium for about 3 minutes until it’s pale and fluffy. Add powdered sugar one cup at a time, then pour in the heavy cream and vanilla. Split the frosting into two bowls. Tint one bowl ivory and keep the other bright white — this two-tone technique is what gives the fur that realistic, layered depth you see in the image.
Load both colors into separate piping bags fitted with a Wilton #233 grass tip. This tip is the secret weapon here — the multi-hole opening creates individual strands that mimic actual dog fur. Start piping from the outer edge of the cupcake and work inward in short, overlapping strokes. Alternate between ivory and white as you go to build dimension. And don’t rush this part, the layering is what makes the whole thing pop.
Press one brown M&M in the center lower third for the nose. Place two black pearl beads just above and on either side for eyes. Tuck the pink fondant oval just below the nose, angled slightly downward so it reads as a happy, open mouth — just like your golden after a good walk.
The #233 tip creates texture that mirrors real fur, which means guests actually pause before eating them — that reaction is priceless at any party.
Chill finished cupcakes for 15 minutes before serving so the frosting holds its shape. If you’re transporting them, a flat-bottom cupcake box is non-negotiable — these faces deserve to arrive intact.
📸 Photo credit: Instagram @laughloudsmilebig
#2: Peanut Butter Frosted Banana Cupcakes (The Ones Your Golden Will Lose Their Mind Over)
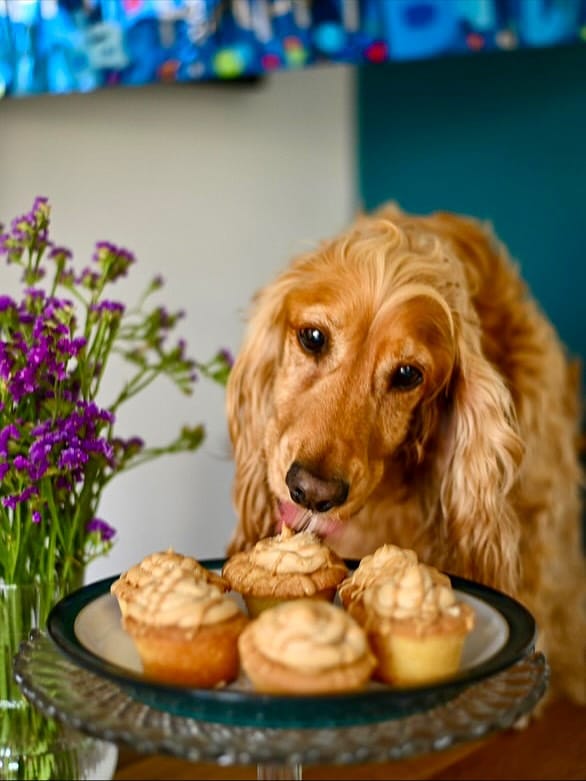
You know that look. Your golden is just tall enough to peek over the counter, nose twitching, eyes locked on whatever you’re baking. That’s basically every Tuesday in my house.
These cupcakes from @peamuttbutteruk are genuinely the cutest thing I’ve seen all week — golden-brown mini cupcakes topped with swirled peanut butter frosting, sitting pretty on a glass cake stand. They look like something straight off your Pinterest board, honestly.
Prep Time: 15 min | Cooking Time: 20 min | Serving Size: 12 mini cupcakes
Ingredients:
1. 2 ripe bananas, mashed
2. 2 eggs
3. 2 cups whole wheat flour
4. ½ cup unsweetened peanut butter
5. ¼ cup coconut oil, melted
6. 1 tsp baking powder (dog-safe, aluminum-free)
7. Frosting:½ cup plain Greek yogurt + ¼ cup unsweetened peanut butter, whipped together
Instructions
Preheat your oven to 350°F. Mix the mashed bananas, eggs, and melted coconut oil in one bowl until combined. Add the flour and baking powder slowly, stirring until you get a thick, dense batter — it won’t be fluffy like human cake batter, and that’s exactly right.
Spoon the batter into a greased mini muffin tin, filling each cup about ¾ full. Bake for 18-20 minutes until the tops are firm and golden. Let them cool completely before frosting — warm cupcakes will melt that yogurt swirl fast.
For the frosting, whip the Greek yogurt and peanut butter together until smooth, then pipe it on using a star tip piping bag for that gorgeous swirl you see in the photo.
Whole wheat flour gives these structure without upsetting your pup’s stomach — sturdy cupcakes mean your golden can hold one between their paws and go absolutely feral for it.
Keep this in mind: dogs with nut sensitivities do better with sunflower seed butter as a swap — if your girl has a sensitive tummy, 5 Best Dog Foods for Allergies is worth a read before baking day.
Store extras in the fridge in an airtight container for up to 4 days. They actually frost better cold.
📸 Photo credit: Instagram @peamuttbutteruk
#3: Blue Paw Birthday Cake Cupcake (The One That’ll Make Your Dog’s Birthday Actually Feel Special)
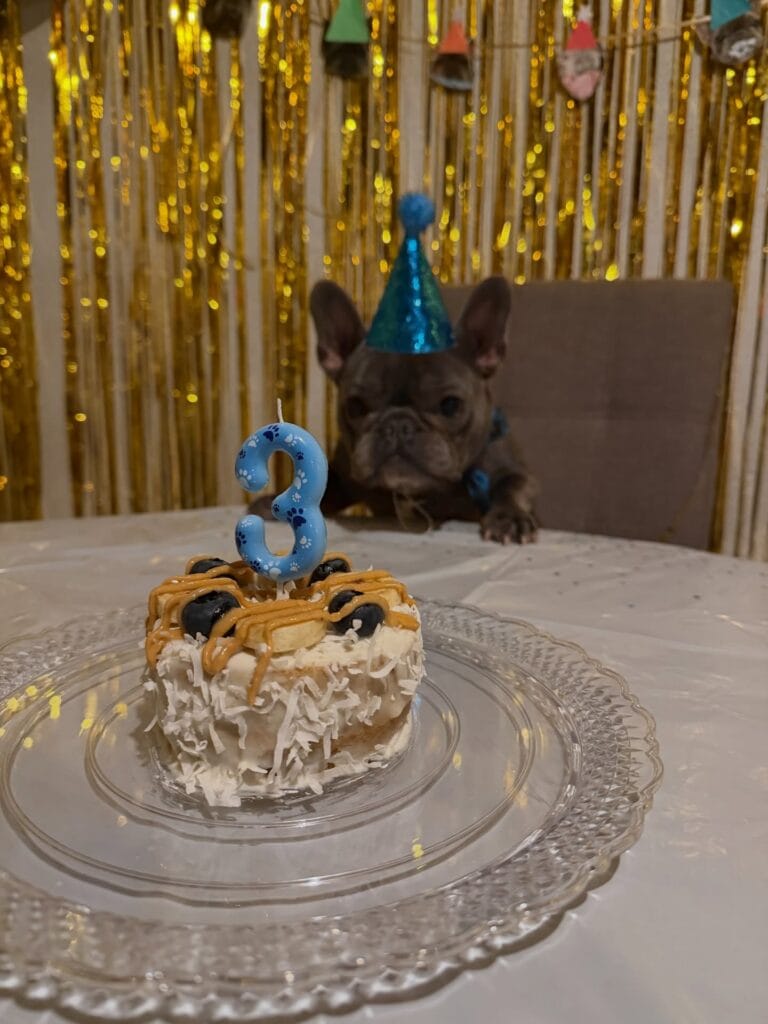
Okay so you know that moment when your golden’s birthday rolls around and you’re like… do I just give her an extra treat and call it a day? Girl, I did that once and felt guilty the entire afternoon. Never again.
This blue paw birthday cake from the photo? It’s giving full celebration energy — and it’s actually made with ingredients your dog can eat without drama.
Prep Time: 20 minutes | Cooking Time: 25 minutes | Serving Size: 4 mini cakes
Ingredients:
1. 1 cup whole wheat flour
2. 1 teaspoon baking powder
3. 2 eggs
4. ¼ cup unsweetened applesauce
5. ¼ cup plain Greek yogurt
6. 2 tablespoons natural peanut butter (xylitol-free — this matters)
7. 1 tablespoon honey
8. ½ cup fresh blueberries (topping)
9. Coconut cream frosting:½ cup chilled coconut cream whipped firm
10. 2 tablespoons peanut butter drizzle (warm slightly for that gorgeous ribbon effect you see in the photo)
11. Shredded unsweetened coconut for the exterior coating
Instructions
Preheat your oven to 350°F and grease a 4-cavity mini cake pan lightly with coconut oil. Mix your dry ingredients — flour and baking powder — in one bowl. Whisk eggs, applesauce, yogurt, peanut butter, and honey in a second bowl until smooth. Pour wet into dry and fold gently. Don’t overmix, or the texture goes dense on you.
Divide the batter between cavities, filling each about ¾ full. Bake for 22-25 minutes until a toothpick comes out clean. Let them cool completely before frosting — I cannot stress this enough, warm cake will melt your coconut cream and you’ll have a beautiful mess.
Once cooled, frost with whipped coconut cream and press shredded coconut around the sides by hand, just like you see in the photo — that white fluffy exterior is everything. Drizzle warm peanut butter across the top in a crosshatch ribbon, press 5-6 fresh blueberries around the edge, and finish with a “3” paw print candle in the center.
And here’s the thing — coconut cream frosting holds its shape, makes the photo pop, and keeps the sugar load zero compared to regular buttercream. That’s the payoff your dog’s tummy actually thanks you for.
If your pup has a sensitive stomach, swapping Greek yogurt for a dog-safe probiotic food topper works beautifully in the batter without changing the texture.
The peanut butter drizzle sets faster than you think in a cool kitchen, so have your blueberries ready before you drizzle — you want to place them while it’s still slightly tacky so they sit firm for the photo.
📸 Photo credit: Instagram @archieoats
#4: Pumpkin & Peanut Butter Dog Cupcakes With Creamy PB Frosting
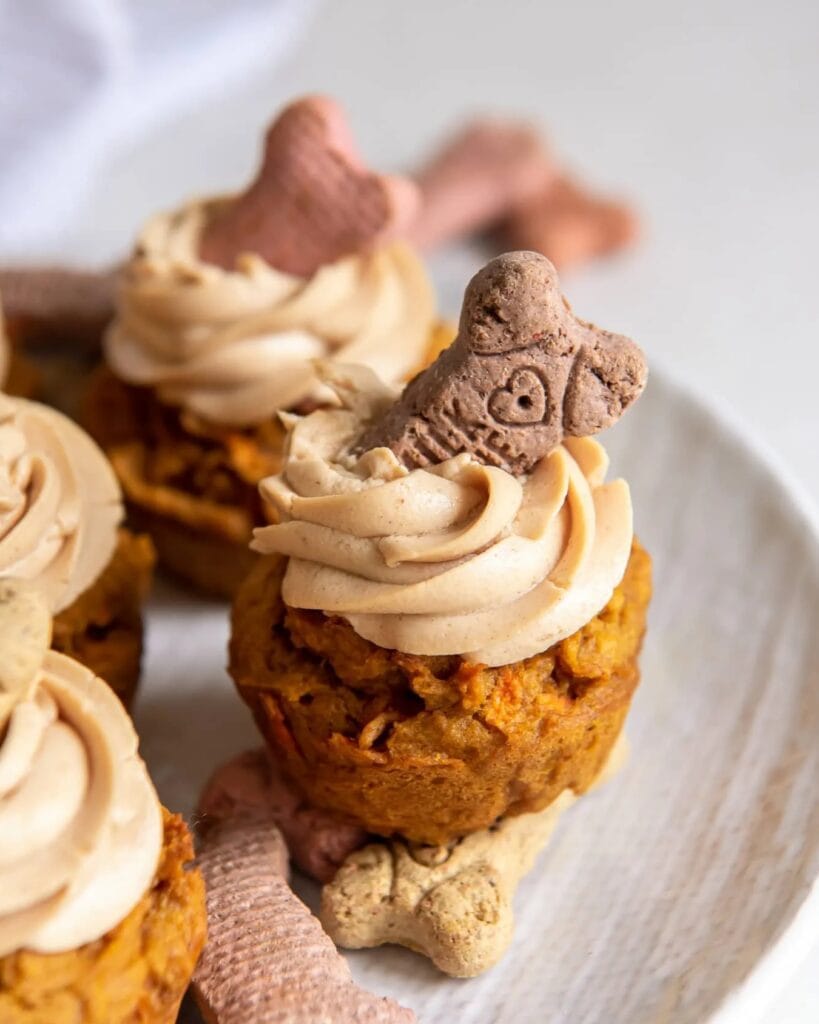
My niece threw her dog a birthday party last fall and honestly? I was more impressed by the cupcakes than anything at my own birthday that year. These little orange muffins topped with swirled peanut butter frosting and a milk-bone topper look like something straight off your Pinterest board — and your golden retriever will absolutely lose her mind over them.
Picture this: fur everywhere, a tail wagging so hard it knocks over your coffee, and you standing there actually proud of something you baked for your dog. That’s the vibe here.
Prep Time: 15 minutes | Cooking Time: 25 minutes | Serving Size: 12 cupcakes
Ingredients:
1. 1 cup canned pumpkin puree (not pie filling)
2. ½ cup natural peanut butter (xylitol-free — this is non-negotiable)
3. 2 eggs
4. ¼ cup unsweetened applesauce
5. 1 ¾ cups whole wheat flour
6. 1 tsp baking powder
7. ½ tsp cinnamon
For the frosting:
1. ½ cup natural peanut butter
2. 4 oz plain cream cheese (softened)
3. 2 tbsp plain Greek yogurt
4. Milk-bone or dog biscuit toppers in bone and bear shapes (as shown — the brown bear-shaped biscuit with the little heart stamp is everything)
Instructions
Preheat your oven to 350°F and line a 12-cup muffin tin with silicone or paper liners. Silicone liners are worth it here — the batter is dense and moist and tends to stick to paper.
Whisk together the pumpkin, peanut butter, eggs, and applesauce in a large bowl until smooth and combined. In a separate bowl, mix the whole wheat flour, baking powder, and cinnamon. Fold the dry ingredients into the wet mixture. Don’t overmix — you want a thick, rough batter, not a smooth one. Overmixing makes the cupcakes tough and dense.
Scoop the batter into each cup about ¾ full. The orange color deepens as it bakes and you’ll get that gorgeous warm amber-brown you see in the photo. Bake for 22-25 minutes until a toothpick comes out clean.
Let them cool completely before frosting. This part matters more than you’d think — warm cupcakes will melt the PB frosting right off.
For the frosting, beat the cream cheese, peanut butter, and Greek yogurt together until the texture is thick, pipeable, and slightly fluffy. Load it into a piping bag fitted with a large star tip and swirl it in that same generous, high-peaked spiral you see in the photo. Press one bear-shaped biscuit and one bone-shaped biscuit into each frosted top for that Pinterest-perfect finish.
Whole wheat flour gives these structure and fiber — which means your dog gets a treat that actually supports her digestion instead of just spiking her blood sugar. That’s the feature-benefit-payoff that makes this recipe worth repeating.
Store leftovers in an airtight container in the fridge for up to 5 days, or freeze unfrosted cupcakes for up to one month.
Swap Greek yogurt for a tiny splash of water if your frosting feels too thick to pipe — it loosens without breaking the texture.
📸 Photo credit: Instagram @ifyougiveablondeakitchen
#5: Peanut Butter Rose Dog Cupcakes With a Bone Topper
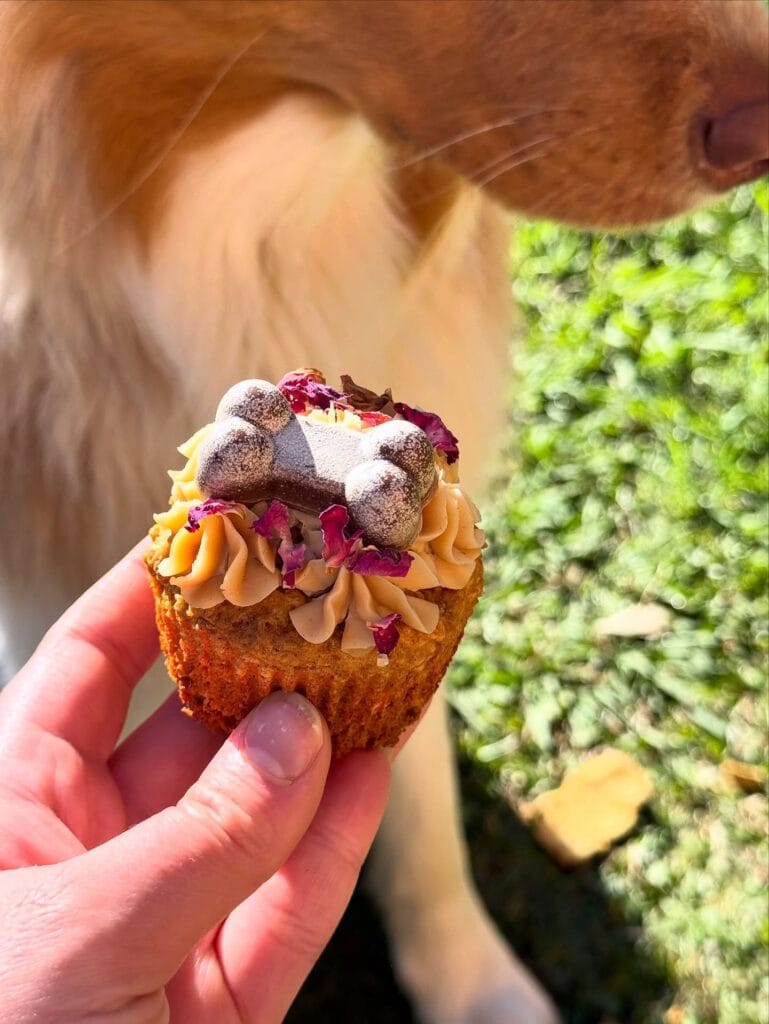
Your golden gives you that look the second you walk into the kitchen. Nose up, ears perked — she already knows something good is happening.
These cupcakes are straight-up Pinterest goals, but they’re actually made for her. The ones in the image have this warm caramel-toned peanut butter frosting piped in a rose swirl pattern, dried rose petals scattered on top, and a gray dog bone-shaped chocolate carob decoration dusted with cocoa powder sitting right in the center. They look like something from a fancy bakery. But every single ingredient is dog-safe.
Ingredients:
1. 1 cup whole wheat flour
2. 1 teaspoon baking soda
3. 1/4 cup unsweetened applesauce
4. 1/4 cup natural peanut butter (xylitol-free)
5. 2 eggs
6. 1/3 cup plain Greek yogurt
7. 1 tablespoon honey
8. For the frosting:1/2 cup peanut butter + 4 oz plain cream cheese, softened
9. Dried food-grade rose petals for garnish
10. Carob melting wafers for the bone topper (use a bone-shaped silicone mold)
Instructions
Preheat your oven to 350°F and line a standard 12-cup muffin tin with paper liners. Whisk the flour and baking soda together in a bowl first — this distributes the leavening so your cupcakes rise without cracking.
In a separate bowl, mix the peanut butter, applesauce, eggs, yogurt, and honey until smooth. Pour the wet mixture into the dry and stir just until combined. Overmixing toughens the crumb, so stop the moment you see no dry streaks.
Fill each liner about 2/3 full and bake for 18-20 minutes. A toothpick inserted in the center should come out clean. Let them cool completely before frosting — warm cupcakes melt the frosting and ruin that rose swirl shape you’re going for.
For the frosting, beat the peanut butter and cream cheese together until fluffy. Load it into a piping bag with a 1M star tip and pipe in tight circular motions starting from the outer edge inward. That’s what creates the rose shape you see in the photo.
Melt your carob wafers and pour into the bone mold. Refrigerate for 15 minutes until set, then dust with a pinch of unsweetened cocoa powder for that stone-like finish. Press gently onto the frosting center. Scatter a few dried rose petals around the bone.
The cream cheese in the frosting acts as a stabilizer — it keeps the swirl shape for hours without collapsing, which means your cupcakes still look gorgeous at the party.
These make a perfect addition to a dog birthday spread, right alongside thoughtful picks from a list of 12 Best Dog Gift Ideas: Top Picks for Every Pooch.
Prep Time: 15 minutes | Cooking Time: 20 minutes | Serving Size: 12 cupcakes
Keep leftover cupcakes refrigerated in an airtight container for up to 3 days. The rose petals will stay vibrant longer if you add them right before serving instead of overnight.
📸 Photo credit: Instagram @chopper.the.aussie
#6: Pumpkin Spice Birthday Cupcakes with Milk-Bone Toppers
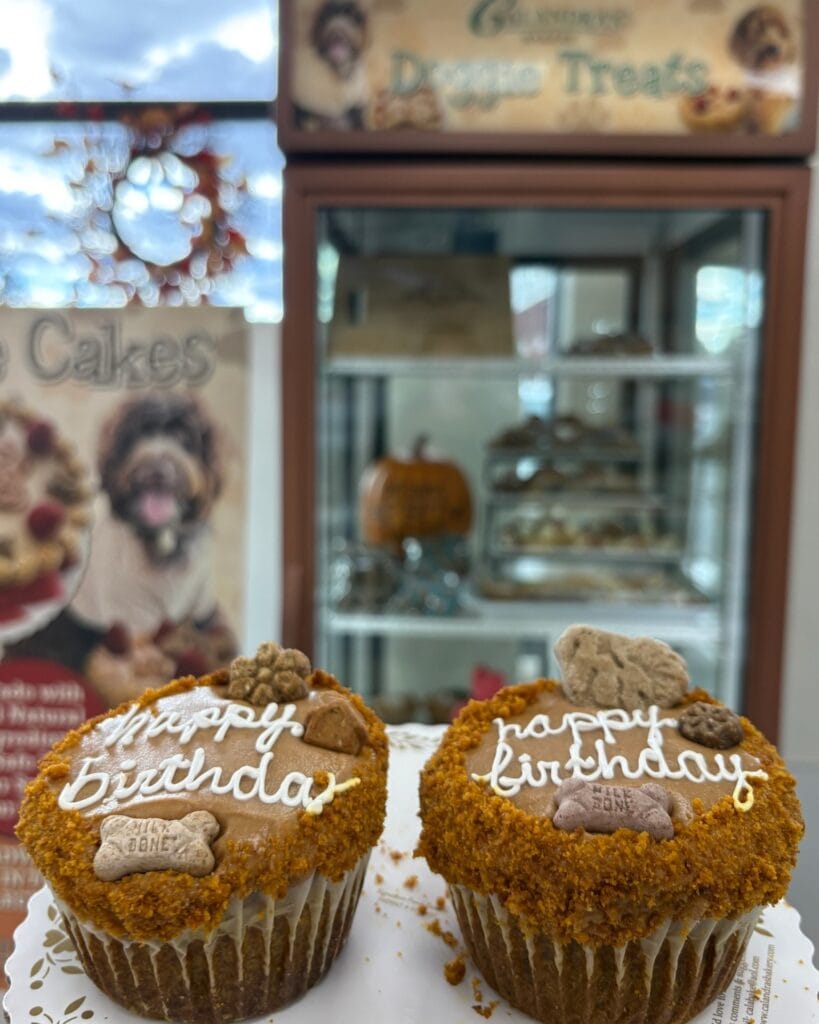
Okay so your golden’s birthday is coming up and you know you’re not just handing him a plain biscuit. You want the full moment — the candles, the photo, the whole thing.
These cupcakes from Calandra’s Bakery stopped me mid-scroll. Two golden-frosted beauties, sides crusted in orange graham cracker crumbs, topped with peanut butter mousse frosting and actual Milk-Bone biscuits. Written right across the top in white icing: happy birthday. Pinterest could never.
Prep Time: 20 min | Cooking Time: 22 min | Serving Size: 12 cupcakes
Ingredients:
1. 1 cup whole wheat flour
2. ½ cup pumpkin purée (plain, not pie filling)
3. ¼ cup natural peanut butter
4. 2 eggs
5. ¼ cup unsweetened applesauce
6. 1 tsp baking soda
7. 1 tsp cinnamon
8. ½ cup crushed graham crackers (for rolling the edges)
9. 1 cup plain Greek yogurt mixed with 2 tbsp peanut butter (for frosting)
10. 12 small Milk-Bone biscuits (toppers)
11. White decorating icing pen for writing
Instructions
Preheat your oven to 350°F and line a 12-cup muffin tin with paper liners. Mix the pumpkin, peanut butter, eggs, and applesauce in one bowl until smooth — no electric mixer needed, your arm works fine here.
In a second bowl, whisk the flour, baking soda, and cinnamon together. Fold the dry ingredients into the wet slowly, stopping the second everything comes together. Overmixing makes them dense, and nobody wants that.
Fill each liner ¾ full — this keeps that perfect domed top. Bake for 20-22 minutes, then test with a toothpick in the center. Let them cool completely before touching the frosting, at least 45 minutes. I skipped this step once. The whole frosting layer slid right off.
And here’s where it gets fun. Spread your peanut butter yogurt frosting generously on top, then immediately roll each cupcake edge through a shallow dish of crushed graham crackers. That crumb coating — peanut butter frosting locks it in place, graham crackers add crunch — means your dog gets texture in every bite instead of just plain cake.
Press one Milk-Bone biscuit on top, then use your white icing pen to write “happy birthday” across the frosting. Work fast, the yogurt base sets up firm once it chills.
Refrigerate for 30 minutes before serving. Store leftovers covered in the fridge for up to 3 days.
The yogurt-based frosting keeps these lower in fat than buttercream, which means zero guilt watching your golden demolish his little birthday moment.
📸 Photo credit: Instagram @calandrasbakery
#7: Honey Lemon Dog Birthday Cupcakes with Paw Print Fondant Toppers

Your golden’s birthday is three days away and you’re standing in the kitchen wondering if a plain milk bone is really going to cut it this year.
It’s not. Trust me on this.
These cupcakes from @thepuppybakery.la are everything — yellow lemon frosting piled high, pink fondant paw prints, little bone toppers, and a matching smash cake that makes the whole setup look like something straight off your Pinterest board.
Prep Time: 25 minutes | Cooking Time: 22 minutes | Serving Size: 12 cupcakes
Ingredients:
1. 2 cups whole wheat flour
2. 1 teaspoon baking soda
3. 1/3 cup honey
4. 2 tablespoons fresh lemon juice
5. 1 teaspoon lemon zest
6. 2 eggs
7. 1/2 cup unsweetened applesauce
8. 1/4 cup coconut oil, melted
9. 1/2 cup plain Greek yogurt (frosting base)
10. Yellow gel food coloring (dog-safe)
11. Pink fondant for paw print and bone toppers
Instructions
Preheat your oven to 350°F and line a 12-cup muffin tin with cupcake liners. Whisk the flour and baking soda together in one bowl. In a separate bowl, mix the honey, lemon juice, lemon zest, eggs, applesauce, and melted coconut oil until everything is combined. Fold the wet ingredients into the dry mix — don’t overmix it, or the texture gets dense and your dog deserves better than that.
Fill each liner 2/3 full and bake for 20-22 minutes. Let them cool completely before frosting, because warm cupcakes melt yogurt frosting fast and you’ll end up with a sad yellow puddle.
For the frosting, whip the Greek yogurt with a tiny drop of yellow gel food coloring and pipe it on with a 1M star tip to get that gorgeous swirl you see in the photo. Roll out your pink fondant to about 1/4 inch thick and use a paw print cutter and a small bone cutter to press out your toppers. Press them gently onto the frosting before it sets.
Here’s the trick: chill your fondant toppers in the fridge for 15 minutes before placing them. They hold their shape so much better and the details stay crisp for photos.
The yogurt-based frosting keeps these lower in fat than buttercream — meaning your pup gets the full celebration experience without the stomach upset the next morning.
These homemade dog treats are so much more personal than anything store-bought. And honestly? Watching your dog sniff that frosting for the first time is the moment.
📸 Photo credit: Instagram @thepuppybakery.la
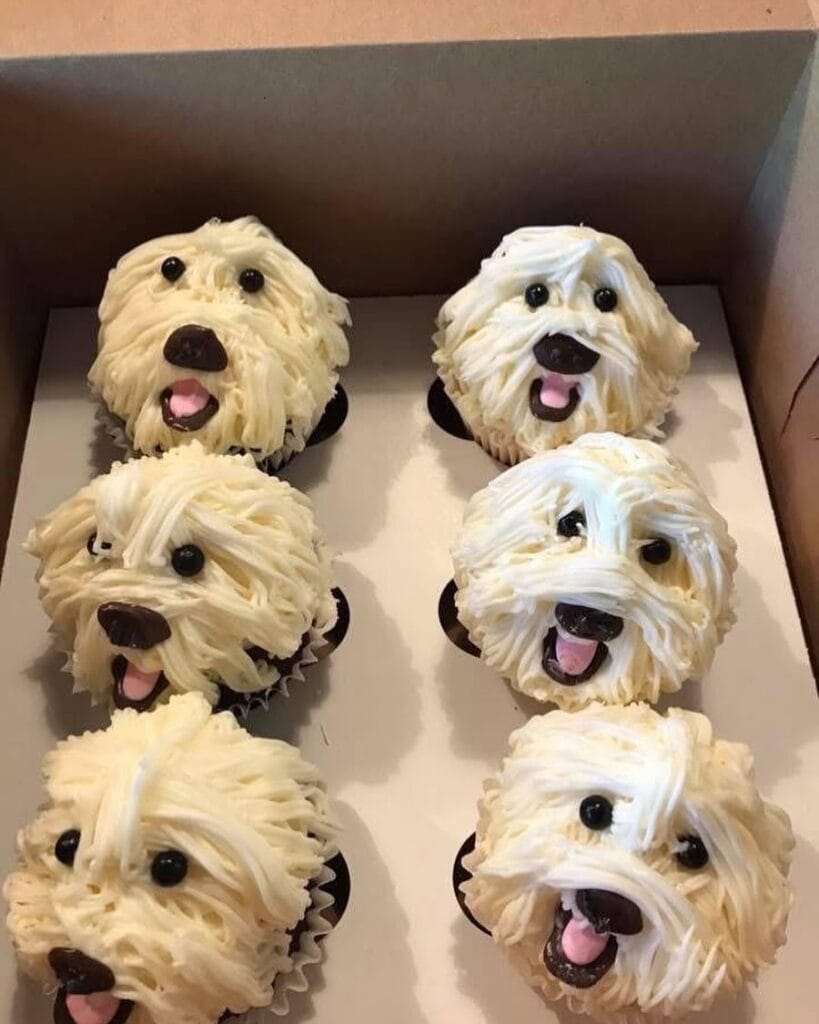
#8: Fluffy Dog Face Cupcakes (The Ones That Look Exactly Like Your Golden)
You know that moment when your golden gives you those big puppy eyes right before you cut the cake? Yeah, these cupcakes will make everyone stop and stare before they even think about eating one.
These are buttercream grass-tip dog face cupcakes — and the photo above shows six of them packed in a bakery box, each one piped in cream/yellow, chocolate brown, and sage gray frosting to mimic fluffy dog coats. The ears, noses, and little pink tongues are black and pink fondant cutouts. So cute it almost hurts.
Ingredients:
1. 2 ½ cups all-purpose flour
2. 1 ½ cups granulated sugar
3. ½ cup unsalted butter, softened
4. 2 large eggs
5. 1 cup whole milk
6. 1 tbsp vanilla extract
7. 2 tsp baking powder
8. ½ tsp salt
9. 4 cups powdered sugar (for buttercream)
10. 1 cup unsalted butter, softened (for buttercream)
11. 3 tbsp heavy cream
12. Gel food coloring: golden yellow, chocolate brown, sage gray
13. Black, pink, and white fondant
Instructions
Preheat your oven to 350°F and line a 12-cup muffin pan with cupcake liners. Cream together ½ cup butter and sugar until pale and fluffy — this takes about 4 minutes with a hand mixer and it’s worth every second because that aeration is what gives you a light, domed cupcake top. Add eggs one at a time, then pour in the vanilla.
Alternate adding the flour mixture and milk, starting and ending with flour. Fill each liner ⅔ full — not more, or your domes will spill and you’ll lose that round face shape. Bake for 18-20 minutes and let them cool completely before touching the frosting. Warm cupcakes melt buttercream fast.
For the buttercream, beat 1 cup butter until white and fluffy, then slowly add powdered sugar and heavy cream. Divide into three bowls and tint each batch with gel coloring. Load each color into a piping bag fitted with a Wilton #233 grass tip — that’s the multi-hole tip that creates those signature fur strands. Pipe from the outside edge inward in short pulls, layering as you go for a full, shaggy coat.
Real talk: the #233 grass tip is the whole secret here. It turns a basic cupcake into something that looks like it took a pastry chef all day — but you can pipe one in under 3 minutes once you get the rhythm.
Roll out black fondant for the nose and eyes, pink fondant for the tongue and inner ears, and tiny white fondant dots for eye highlights. Press them on gently before the buttercream crusts over.
Prep Time: 30 minutes | Cooking Time: 20 minutes | Serving Size: 12 cupcakes
Chill your finished cupcakes for 15 minutes before boxing them — that short rest firms the fur strands so they hold their shape during transport and look just as good at the party as they did on your counter.
📸 Photo credit: Instagram @sweet.mems
#9: The Bark Bakery Dog Cupcake with Peanut Butter Frosting and Fish Treat Platter
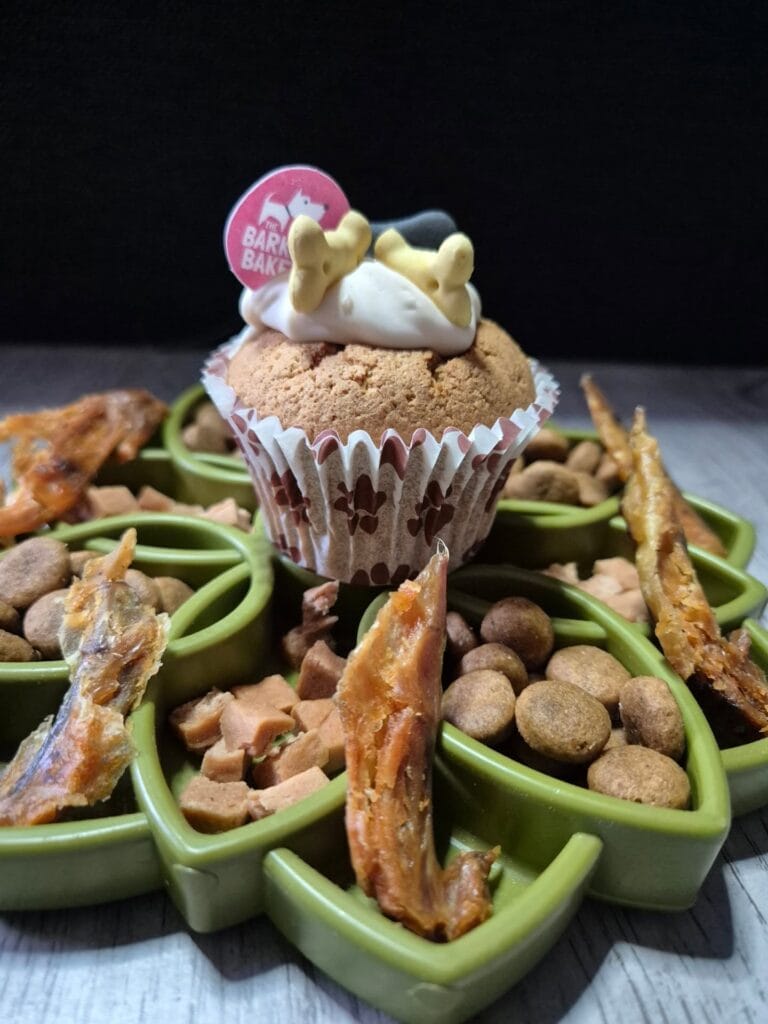
You know that moment when your golden retriever sits right next to you while you’re eating, doing that thing with their eyes? Like they’re saying, “I deserve that more than you do.” Honestly, same.
This one is exactly what a dog birthday spread should look like — and I can’t stop thinking about it.
A golden-brown cupcake sits in a red and white patterned paper liner, topped with a swirl of white yogurt-based frosting and two bone-shaped peanut butter treats pressed right into it. There’s a little pink logo pick from The Bark Bakery tucked in the center, which makes it feel like a real celebration moment.
The cupcake sits inside a green clover-shaped slow-feeder tray divided into individual compartments. Each section holds something different — small round grain-free kibble biscuits, cubed soft chicken or sweet potato chews, and dried fish strips that look crispy and chewy all at once.
Ingredients:
1. 1 cup whole wheat flour
2. 1/4 cup peanut butter (unsalted, xylitol-free)
3. 1/2 cup unsweetened applesauce
4. 1/4 cupcoconut oil for dogs, melted
5. 2 eggs
6. 1 tsp baking soda
7. 1/4 cup plain yogurt (for frosting)
8. Bone-shaped dog biscuits for topping
Instructions
Preheat your oven to 350°F and line a muffin tin with standard cupcake liners. Mix the flour and baking soda together first in a large bowl — dry ingredients always go first so the leavening spreads evenly through the batter.
In a separate bowl, whisk together the peanut butter, applesauce, melted coconut oil, and eggs until the mixture looks smooth and slightly glossy. Pour the wet ingredients into the dry and fold them together with a spatula. Stop mixing the moment you don’t see dry flour — overmixing makes the texture dense and rubbery.
Spoon the batter into 12 lined cups, filling each about two-thirds full. Bake for 18 to 22 minutes. Pull them out when a toothpick comes out clean and the tops are firm and golden.
Let them cool completely before frosting — this is the step people rush and then wonder why the frosting slides off. Spoon a dollop of plain yogurt on top and press two bone biscuits into it while it’s still soft. Add a decorative pick if you want that Bark Bakery moment.
Arrange the finished cupcakes on a clover-shaped slow-feeder tray with dried fish strips and soft chew bites in the surrounding compartments. The slow-feeder setup — that feature — keeps your dog engaged longer, which means zero inhaled treats and way less stomach upset after the party.
Prep Time: 15 minutes | Cooking Time: 22 minutes | Serving Size: 12 cupcakes
Yogurt frosting melts faster than you’d think in warm rooms, so keep these refrigerated until about 10 minutes before serving. And if your golden tends to gulp food fast, the sectioned tray does a lot of the work for you — it’s basically a puzzle and a snack in one.
📸 Photo credit: Instagram @stormthestafford
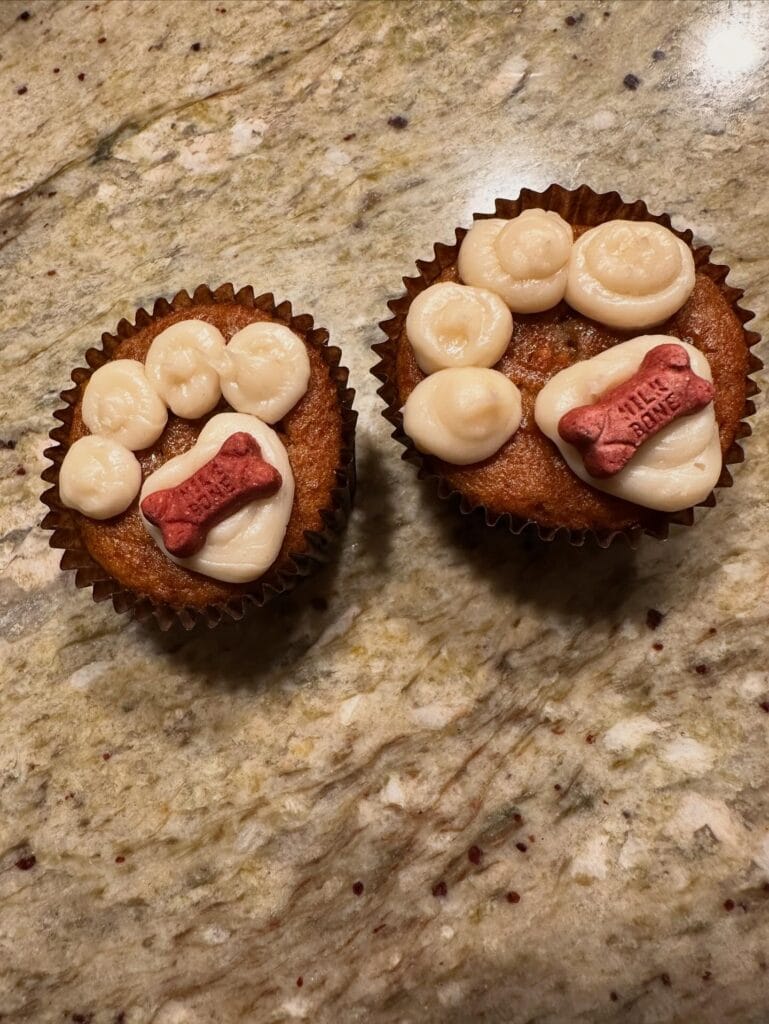
#10: Paw Print Dog Cupcakes With Milk-Bone Toppers
Your golden is staring at you while you frost your own birthday cupcakes. That look. You know the one. Finally, you can make her something that matches the moment.
These paw print cupcakes are genuinely the cutest thing I’ve ever pulled off in my kitchen. The cream cheese frosting gets piped into four small round “toe beans” plus one big center pad — and that mini Milk-Bone biscuit sitting right in the middle? Chef’s kiss. The whole thing sits in a brown cupcake liner and looks straight off Pinterest.
Ingredients:
1. 1 cup whole wheat flour
2. 1 teaspoon baking soda
3. 1/4 cup natural peanut butter (xylitol-free, always)
4. 1/2 cup unsweetened applesauce
5. 2 eggs
6. 1/4 cup water
7. 4 oz plain cream cheese, softened
8. 2 tablespoons plain Greek yogurt
9. Mini Milk-Bone biscuits for topping
Instructions
Preheat your oven to 350°F and line a muffin tin with 12 brown paper liners. Mix the flour and baking soda in one bowl. In a second bowl, whisk together the peanut butter, applesauce, eggs, and water until smooth. Combine both bowls and stir — don’t overmix or the texture gets dense and gummy.
Fill each liner about two-thirds full. Bake for 18-20 minutes until a toothpick comes out clean. Let them cool completely before frosting, because warm cupcakes will melt your design into a sad puddle.
Beat the cream cheese and Greek yogurt together until fluffy. Load it into a piping bag with a round tip. Pipe four small circles at the top for the toes, then one larger swirl at the base for the pad. Press one mini Milk-Bone right into the center frosting. That’s your paw. That’s it.
The cream cheese base keeps things tangy and light — which means your dog gets real flavor without the sugar crash, and you get the cutest topper that holds its shape for photos.
Prep Time: 15 minutes | Cook Time: 20 minutes | Serving Size: 12 cupcakes
Refrigerate any leftovers in an airtight container for up to 3 days. And if your pup has a sensitive stomach, swap the peanut butter for mashed banana — same moisture, zero digestive drama.
📸 Photo credit: Instagram @ngcrowe
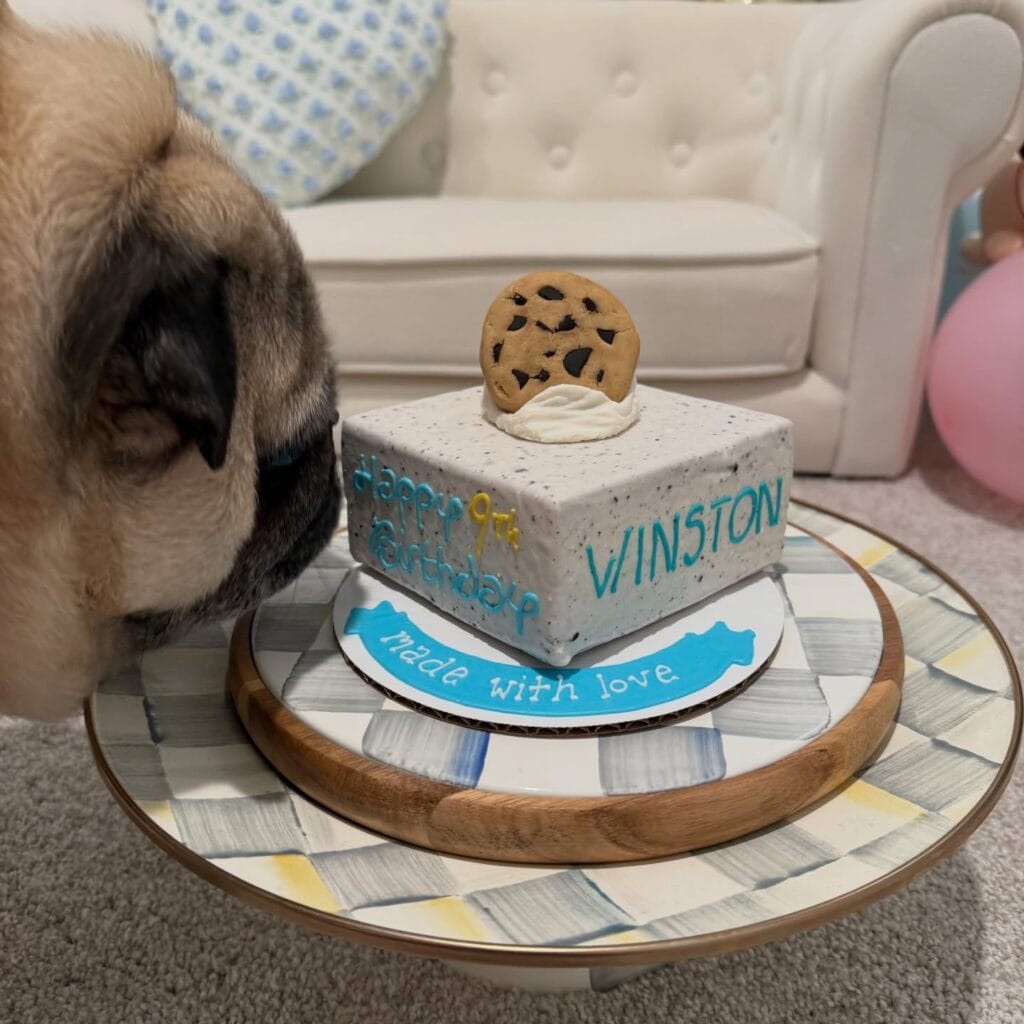
#11: Winston’s Cookie Monster Birthday Cake for Dogs
Your golden’s birthday is coming up and you know you’re already planning the whole thing like it’s a Pinterest board come to life.
This one? It’s for the dog who deserves a full celebration.
Winston’s 9th birthday cake is a square fondant-covered cake decorated in a speckled gray cookies-and-cream finish, with teal blue lettering piped directly onto the sides. The topper is a fondant chocolate chip cookie sitting on a swirl of white vanilla frosting — and it looks almost too good to eat.
Here’s what you need:
1. 2 cups whole wheat flour
2. 1 tsp baking soda
3. 2 eggs
4. ½ cup unsweetened applesauce
5. ¼ cup plain Greek yogurt
6. 2 tbsp peanut butter (xylitol-free)
7. ¼ cup carob chips (never real chocolate)
8. White yogurt coating for the frosting layer
9. Food-safe fondant in gray, teal, and brown
Instructions
Preheat your oven to 350°F. Mix the flour and baking soda first, then fold in the eggs, applesauce, yogurt, and peanut butter until the batter comes together. Stir in the carob chips last — they mimic those chocolate chip spots on the fondant topper.
Pour into a 6-inch square pan and bake for 28-32 minutes. Let it cool completely before you touch the fondant. Seriously, completely. Warm cake tears fondant and you’ll lose that smooth gray finish.
Roll your gray fondant to about ⅛ inch thickness, then press it over the cooled cake. The speckled effect comes from kneading in tiny pinches of black fondant before rolling — don’t fully mix it, just marble it.
Pipe the teal lettering using a #2 round tip with blue-tinted yogurt frosting. Shape your fondant cookie topper by hand, using brown fondant with small black fondant chips pressed in.
One thing to remember: the yogurt-based frosting softens fast at room temp, so keep the finished cake refrigerated until five minutes before the party.
The whole wheat base plus yogurt frosting means your dog gets real protein and fiber — not just sugar — so the treat actually fuels the birthday zoomies instead of crashing them after.
Prep Time: 25 minutes | Cooking Time: 30 minutes | Serving Size: 8-10 dog-sized slices
📸 Photo credit: Instagram @winstogrampug
#12: “Happy 1st Birthday, Isla!” Dog Portrait Cupcakes
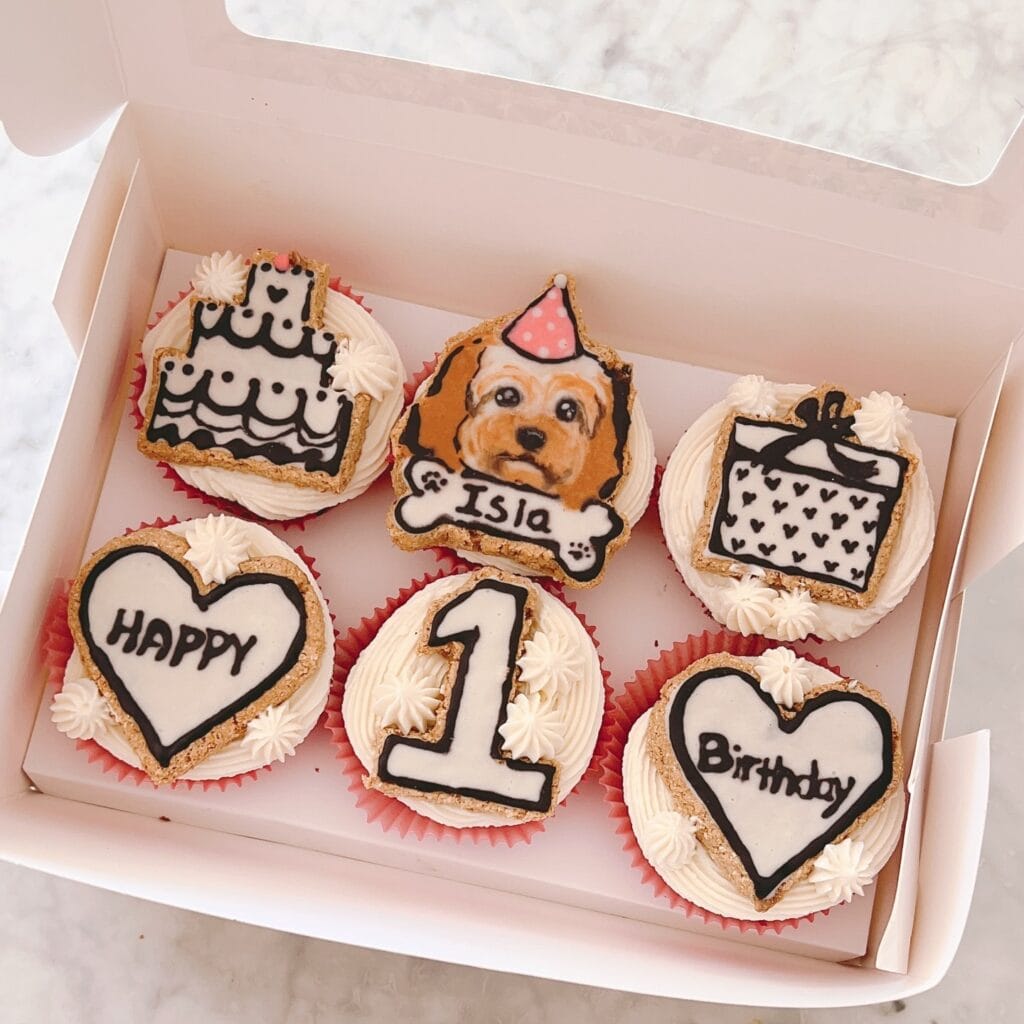
Your golden’s birthday is coming up and you know a plain store-bought treat just won’t cut it. You want something that matches the aesthetic, feels personal, and honestly — looks good enough to post.
These Isla-inspired portrait cupcakes are exactly that.
Six cupcakes sit inside a blush pink box, each topped with a hand-decorated cookie. The set includes a portrait cookie of a golden doodle wearing a pink party hat, two heart-shaped cookies reading “Happy” and “Birthday,” a number 1 cookie, a tiered cake cookie, and a gift box cookie covered in tiny hand-drawn hearts. The frosting underneath is piped in soft ivory swirls, and the red cupcake liners pop against the white.
Ingredients
For the cupcake base:
1. 1 cup whole wheat flour
2. ½ cup unsweetened applesauce
3. ¼ cup peanut butter (xylitol-free)
4. 1 egg
5. 1 tsp baking soda
6. 2 tbsp honey
For the frosting:
1. 8 oz plain cream cheese, softened
2. 2 tbsp plain Greek yogurt
For the decorated cookies:
1. 1½ cups oat flour
2. ¼ cup coconut oil, melted
3. 1 egg
4. 2 tbsp honey
5. Royal icing (made with meringue powder, water, and powdered sugar) for decoration
6. Edible food-safe black and pink gel coloring
Instructions
Preheat your oven to 350°F. Mix the whole wheat flour, baking soda, honey, egg, applesauce, and peanut butter in a bowl until a thick batter forms. Don’t overmix — that makes the cupcakes dense instead of soft. Pour into a 12-cup muffin tin lined with cupcake liners and bake for 18-22 minutes. Let them cool completely before frosting, because cream cheese frosting melts fast.
While those cool, make your cookies. Combine the oat flour, melted coconut oil, egg, and honey into a stiff dough. Roll it to ¼ inch thickness on parchment paper. Cut into heart shapes, a number “1,” a cake silhouette, a gift box, and a dog portrait shape using custom cutters or a sharp knife. Bake at 325°F for 12-15 minutes until golden. These firm up as they cool, which actually makes them easier to decorate.
For the portrait cookie, use a fine-tip piping bag filled with ivory royal icing to sketch the dog face outline. Layer in tan and brown shades while the base layer is still wet so the colors blend. This wet-on-wet technique prevents cracking and gives a smooth, painted look. The party hat gets a pink base coat with white polka dots piped on top after drying.
Beat the cream cheese and Greek yogurt together until fluffy and pipe onto each cooled cupcake using a 1M star tip. Press one decorated cookie into each cupcake so it stands upright.
Cream cheese frosting delivers the soft, mild sweetness dogs love without the sugar overload — and that payoff means no post-birthday tummy troubles.
Want to make sure every ingredient passes the safety check? What Can Dogs Eat? A Comprehensive Guide to Canine Nutrition is a great reference before you bake.
Prep Time: 30 minutes | Cooking Time: 22 minutes | Serving Size: 6 cupcakes
Pipe your frosting right before serving — cream cheese softens fast at room temperature, and freshly piped swirls hold their shape so much better for photos.
📸 Photo credit: Instagram @sophies_doggy_cookie
#13: Peanut Butter Dog Bone Cupcakes With Colorful Liners
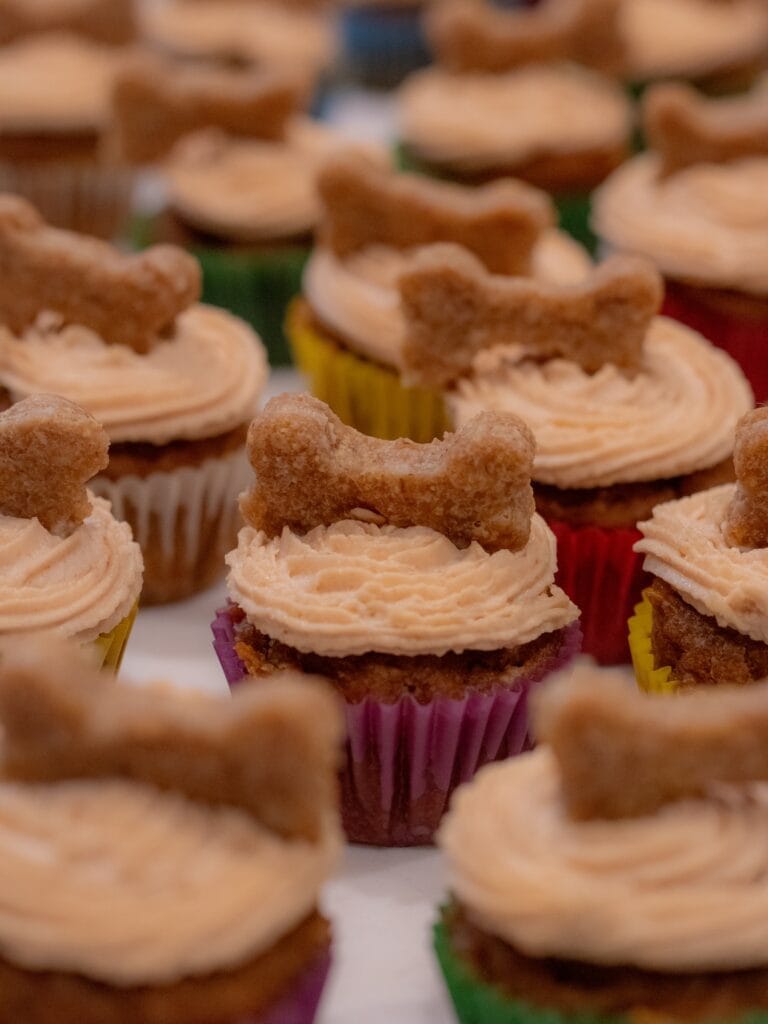
Your golden is already sniffing the air before these even come out of the oven. That warm, nutty smell? It hits different when you know it’s actually made for her.
These cupcakes are honestly the cutest thing at any dog birthday spread. Each one sits in a mini cupcake liner — the batch in the image uses a mix of purple, red, yellow, and green paper liners, which gives the whole tray that Pinterest-worthy pop you’re going to love. The frosting is a swirled peanut butter cream cheese topping, piped into a soft mound, and every single cupcake gets crowned with a small dog bone biscuit right in the center.
The bone-shaped topper isn’t just adorable — it adds a crunchy texture contrast that dogs go absolutely wild for, and that moment when your girl takes her first bite is everything.
Ingredients
1. 1 ½ cups whole wheat flour
2. 1 tsp baking soda
3. ½ cup natural peanut butter (xylitol-free, always check the label)
4. ½ cup unsweetened applesauce
5. 2 eggs
6. ¼ cup honey
7. ½ cup shredded carrots
8. 4 oz plain cream cheese, softened
9. 3 tbsp natural peanut butter (for frosting)
10. 1–2 tbsp unsweetened almond milk (to thin frosting)
11. Mini dog bone biscuits for topping — store-bought or homemade dog biscuits work great here
Prep Time: 15 minutes | Cooking Time: 20 minutes | Serving Size: 12 mini cupcakes
Instructions
Preheat your oven to 350°F and line a 12-cup mini muffin pan with those colorful paper liners. The smaller size is key here — it keeps the portion right for a medium to large dog like a golden.
Whisk your whole wheat flour and baking soda together in a bowl first. Whole wheat flour gives the cupcake that dense, biscuit-like crumb dogs love, and it holds up under the frosting without getting soggy.
In a separate bowl, mix the peanut butter, applesauce, eggs, and honey until smooth. Fold in the shredded carrots last. The carrots melt into the batter during baking — you won’t see them much, but they add natural sweetness and a little fiber boost your pup’s belly will thank you for.
Combine the wet and dry ingredients, stir until just mixed, and fill each liner about ¾ full. Bake for 18–20 minutes. A toothpick should come out clean. Pull them out and let them cool on a rack for at least 30 minutes before frosting — warm cupcakes will melt everything into a sad peanut butter puddle.
For the frosting, beat the cream cheese and peanut butter together until fluffy. Add almond milk one tablespoon at a time until it reaches a thick but pipeable consistency. Load it into a piping bag with a star or round tip and swirl it onto each cooled cupcake in that classic circular mound you see in the image.
Press one mini dog bone biscuit flat into the top of each frosted cupcake. The bone-shaped topper does the double work of decoration and treat — your dog gets the crunch, you get the photo. And honestly, that’s the whole deal.
Store leftovers in the fridge in an airtight container for up to 4 days. The cream cheese frosting needs the cold — don’t leave these out on the counter. If you want to prep ahead, bake and freeze the naked cupcakes, then frost fresh the day of the party.
For a fall version of this same base recipe, the pumpkin swap is a great move — these homemade pumpkin dog treats use a nearly identical batter and your girl will be just as obsessed.
📸 Photo credit: Instagram @mentosacoffee
#14: Birthday Cupcakes for Dogs (With Tiny Dog Toppers!)
Okay, you know that moment when your golden’s birthday rolls around and you want to do something special but a plain dog biscuit just feels… sad?
Girl, same.
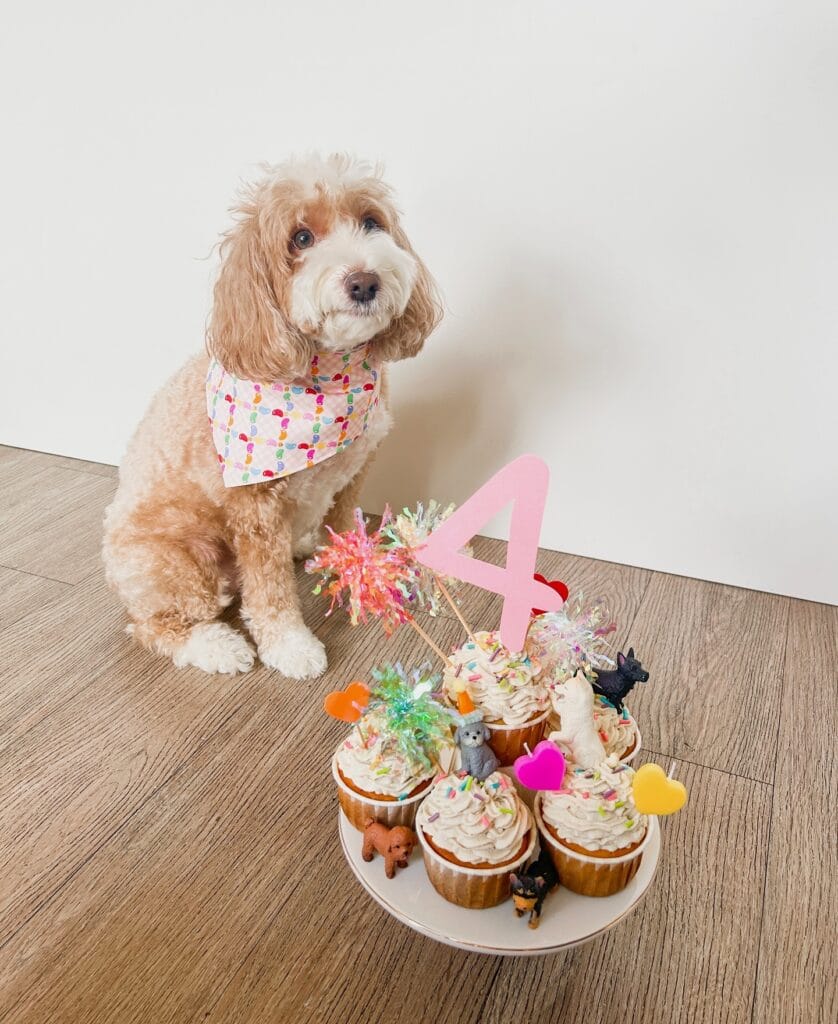
Last year I made my cousin’s cavapoo a full birthday spread and honestly the tiny animal toppers alone had everyone losing their minds. These cupcakes in the photo are giving me all those feelings again.
The base is a peanut butter and banana cupcake baked in standard muffin tins, topped with a swirl of cream cheese and plain Greek yogurt frosting piped with a 1M star tip. The frosting gets a sprinkle of dog-safe rainbow sprinkles on top — those colors are doing serious work visually.
The decorations are the real moment here. Mini plastic dog figurines (the photo uses a gray poodle, orange doodle, black scottie, and black and tan pinscher) sit right at the base. Then colorful tinsel picks, pastel heart candles, and a pink acrylic number “4” topper pull the whole tray together on a round white ceramic plate.
Ingredients
– 1 cup whole wheat flour
– 1 ripe banana, mashed
– ½ cup peanut butter (xylitol-free)
– 2 eggs
– ¼ cup plain Greek yogurt
– 1 tsp baking powder
– 4 oz cream cheese, softened
– ¼ cup plain Greek yogurt (for frosting)
– Dog-safe rainbow sprinkles
Instructions
Preheat your oven to 350°F and line a standard 12-cup muffin tin with paper liners. Mix the flour and baking powder together in one bowl. In a second bowl, combine the mashed banana, peanut butter, eggs, and Greek yogurt until smooth — the batter should look a little thick but pourable. Pour into liners, filling each about two-thirds full, then bake for 18-22 minutes until a toothpick pulls out clean.
Let them cool completely before frosting. This part matters. Warm cupcakes will melt your frosting and you’ll lose that gorgeous swirl shape.
Beat the cream cheese and Greek yogurt together until fluffy. Load it into a piping bag fitted with a 1M tip and pipe in a circular motion starting from the outside edge. The cream cheese base means the frosting holds its shape at room temperature for a couple hours — which is exactly what you want for photos and a little birthday celebration.
Press your mini dog figurines into the base of each cupcake, then add tinsel picks and heart candles last. The number topper goes right in the center of the tray.
Cream cheese frosting keeps the sugar low while still giving your pup that rich, indulgent feel — treat your dog without the guilt. And if you want to go deeper on gut-friendly additions to your dog’s diet, Homemade Probiotics for Dogs — The Ultimate Guide is worth a read before you bake.
Store leftovers in an airtight container in the fridge for up to 3 days.
Prep Time: 15 minutes | Cook Time: 20 minutes | Serving Size: 12 cupcakes
📸 Photo credit: Instagram @pupcakes.dallas
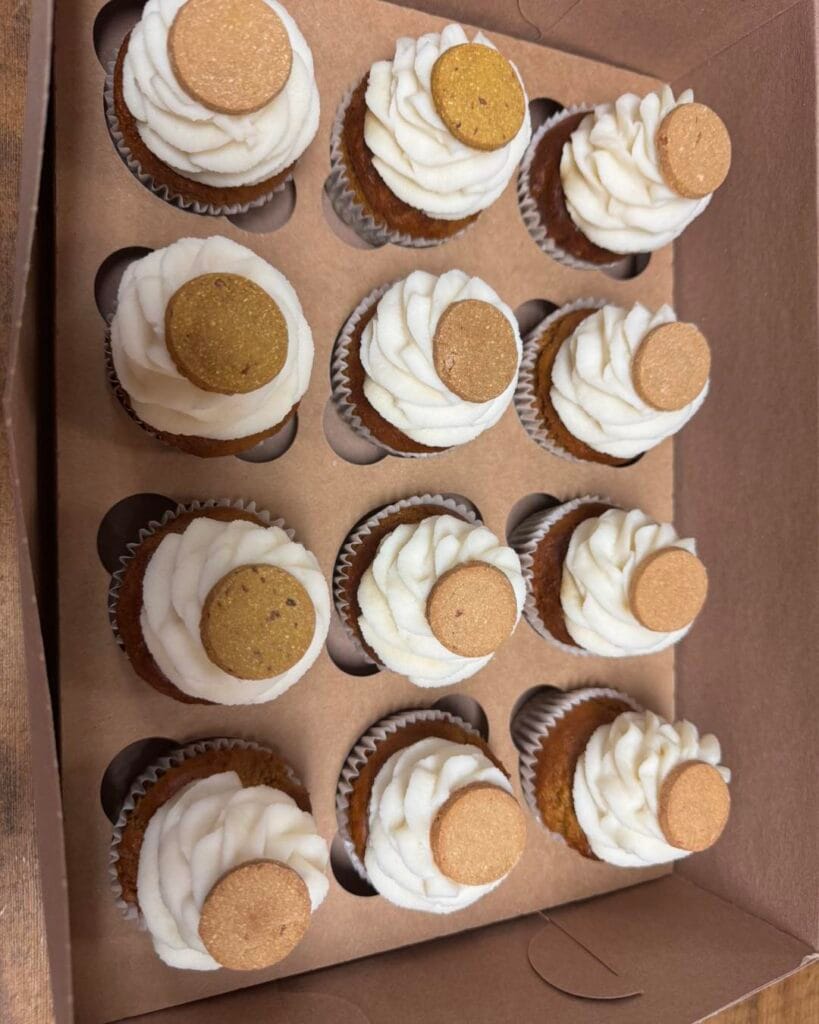
#15: Vanilla Chai Cupcakes with Cream Cheese Frosting and Snickerdoodle Coin
Your golden retriever is staring at your plate again. That slow, patient, soul-melting stare that makes you feel guilty for eating anything without sharing.
These cupcakes? You can actually share them.
Looking at this box, I’m obsessed with how polished they are. Each cupcake sits in a silver foil liner, topped with swirled white cream cheese frosting and crowned with a round snickerdoodle-style cookie disc — golden, slightly speckled, about 1.5 inches in diameter. The cake base is a warm amber-brown, which tells me there’s cinnamon and chai spice baked right in. No artificial dyes. No chocolate. Just warm, dog-safe ingredients that smell like your favorite fall candle.
I made a version of these for my dog’s birthday last year and honestly the hardest part was not eating them myself.
Ingredients (makes 12)
1. 2 cups whole wheat flour
2. 1 tsp cinnamon
3. ½ tsp ground ginger
4. ¼ tsp cardamom
5. 1 tsp baking powder
6. 2 eggs
7. ½ cup unsweetened applesauce
8. ¼ cup honey
9. ½ cup plain Greek yogurt
10. ¼ cup coconut oil, melted
For the cream cheese frosting:
1. 8 oz plain cream cheese, softened
2. 2 tbsp honey
For the snickerdoodle cookie topper:
1. 1 cup oat flour
2. 2 tbsp coconut oil
3. 2 tbsp honey
4. ½ tsp cinnamon
5. 1 tbsp water
Prep Time: 20 minutes | Cooking Time: 22 minutes | Serving Size: 12 cupcakes
Instructions
Preheat your oven to 350°F and line a 12-cup muffin tin with foil liners — the silver ones hold their shape better than paper and give that bakery-box look you see in the photo.
Whisk your dry ingredients first: flour, cinnamon, ginger, cardamom, and baking powder. In a separate bowl, beat the eggs, then mix in the applesauce, honey, yogurt, and melted coconut oil. Fold the wet ingredients into the dry until just combined — overmixing makes the crumb tough, and you want that soft, springy texture.
Fill each liner about two-thirds full. Bake for 20-22 minutes until a toothpick comes out clean. And let them cool completely before frosting — warm cake melts the cream cheese and you’ll lose that beautiful swirl.
For the frosting, beat the cream cheese and honey together until fluffy. Load it into a piping bag with a 1M star tip and pipe in a clockwise spiral from the outside in. That’s exactly how those swirls in the photo get that layered, cloud-like look.
For the cookie toppers, mix all the snickerdoodle ingredients into a dough, roll to ¼-inch thickness, and cut 1.5-inch rounds. Bake at 325°F for 10-12 minutes until golden. The edges should feel firm but the center stays slightly soft when you pull them — they crisp up as they cool.
Press one cookie disc into the center of each frosted cupcake while the frosting is still cold. It grips the frosting and stays upright for photos.
Whole wheat flour gives these structure, the Greek yogurt keeps them moist, and that snickerdoodle topper adds a satisfying crunch your dog will hear across the room. Store leftovers in the fridge in an airtight container for up to 4 days — the cream cheese frosting needs that cold to hold its shape.
📸 Photo credit: Instagram @yumsouthernmarket
The One Baking Mistake That Ruins Dog Cupcakes (And How to Skip It)
Okay, real talk — the biggest mistake people make with dog cupcakes? Using regular flour and calling it a day.
Here’s the thing nobody tells you: wheat flour is actually hard on a lot of dogs’ stomachs. Your golden is probably fine, but after I made a batch for my neighbor’s dog and she had the worst tummy issues, I started researching like crazy.
Swap wheat flour for oat flour or coconut flour. Oat flour keeps the texture moist and holds together without making anyone feel sick.
Another pro tip — xylitol hides in the weirdest places. Peanut butter, yogurt, even some canned pumpkin. Read every single label before it goes into your batter. Xylitol is toxic to dogs, full stop.
And for your frosting? Whipped cream cheese or plain Greek yogurt piped through a zip-lock bag gives you those gorgeous Pinterest swirls without any sketchy ingredients.
If you want to go even further, frozen dog treats use a lot of the same safe ingredients — super easy to batch alongside your cupcakes.
Your Floors Deserve Better Than Muddy Paw Prints
Pick one mat. Try it for a week. You’ll notice the difference after the first rainy walk — no more cringing when your golden comes barreling through the door.
Seriously, your home can look Pinterest-perfect AND survive dog ownership. Those two things aren’t mutually exclusive anymore.
I know how much you love this dog (I mean, same 🐾). Give your floors — and your sanity — a little backup. And hey, if all this paw traffic is stirring up tummy issues too, what to do when your dog vomits is worth a quick read.
So tell me — which mat style fits your home vibe best?

Amr Mohsen is a software engineer who traded his keyboard for a leash — at least on weekends. His love for dogs inspired him to share what he learns as a dog owner and enthusiast, bringing a detail-oriented, research-driven perspective to every article he writes. If it’s about dogs, he’s probably already looked it up twice.