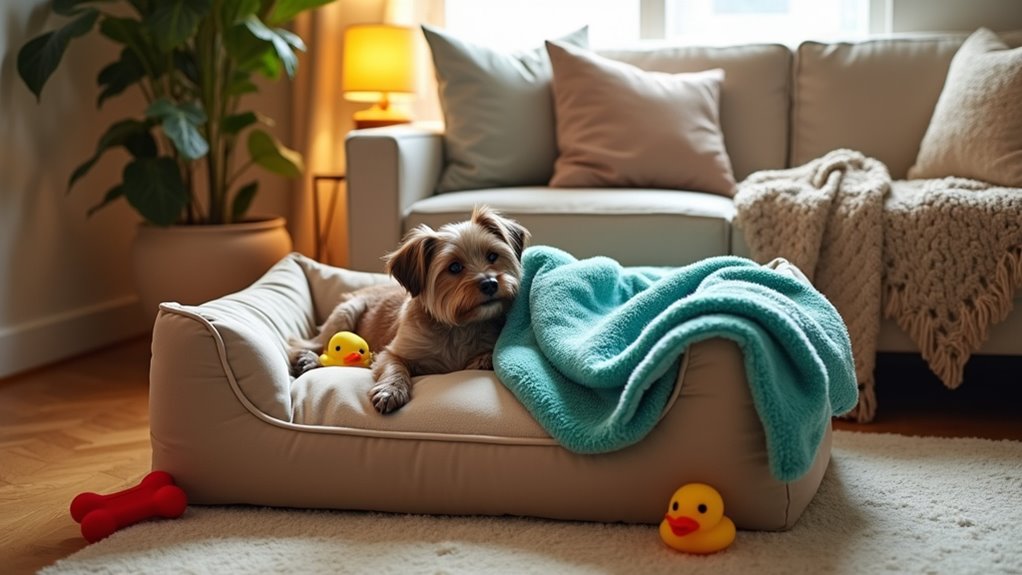
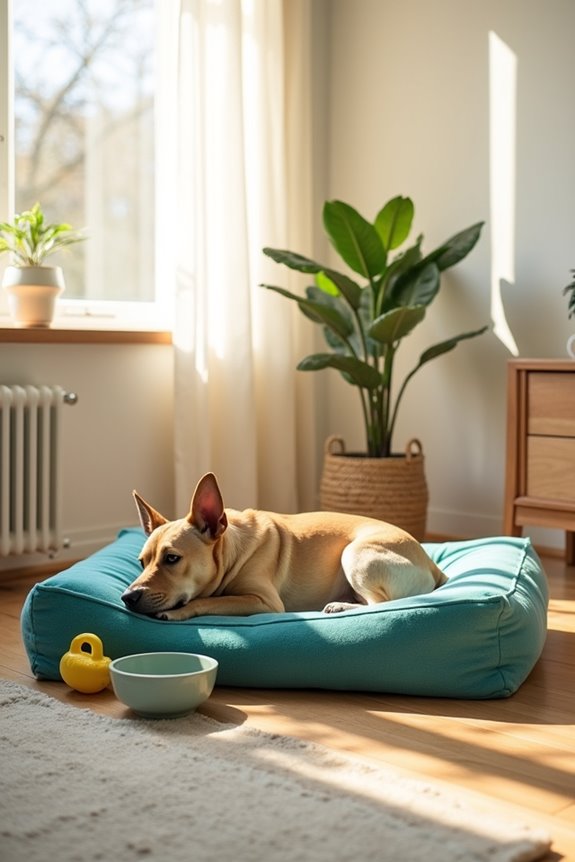
Imagine your cat lounging in a five-star resort you’ve crafted right at home. Sounds wild, right? Well, it’s possible with these seven stylish cat bed DIY projects designed for naptime bliss. You’ll find something for every kitty’s taste—whether they crave a cozy corner or a plush snuggle pod. Curious about which project will turn your cat into the royal napping expert they were born to be? Let’s explore your options together.
Cozy Corner Creations
Creating a cozy corner for your cat can be a fun project, and hey, who doesn’t want to spoil their feline friend a little? Start by finding a quiet spot in your home, one where your cat can snooze in peace.
Next, gather some materials for your cat bed DIY. You might use an old sweater or a sturdy cardboard box—just don’t ask how many times I’ve accidentally tripped over one during crafting.
Take that sweater, stuff it with soft pillows, or cut the box to the right size, ensuring it’s comfy enough for your cat’s naps. You’ll definitely want to add a few toys or a cozy blanket.
In no time, you’ll have a purr-worthy retreat that’ll make your cat feel like royalty.
Our Collection
Now that you’ve crafted those cozy corners, let’s chat about our collection of delightful DIY cat beds.
From the snug faux fur triangular bed to the charming round rattan nest, there’s something for every feline’s fancy.
Don’t you want to give your cat the purr-fect spot for naps?
1. Faux Fur Triangular Bed
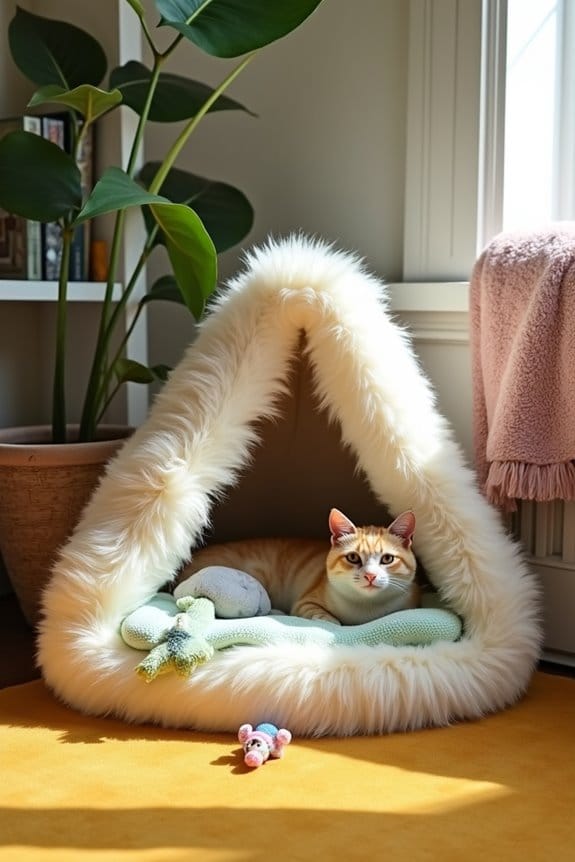
Looking for a way to pamper your furry friend without breaking the bank? This DIY Faux Fur Triangular Bed is cozy, chic, and perfect for any cat who loves to curl up in a snug little corner.
Not only will it save you money compared to store-bought options, but it also adds a touch of style to your home. Imagine your kitty lounging luxuriously in a bed you made just for them. Sounds heartwarming, right?
Materials Needed:
- Faux fur fabric (about 1 yard)
- Thick foam or batting for padding (1-inch thick)
- Scissors
- Sewing machine or needle and thread
- Fabric glue (optional)
- Measuring tape
- Straight pins
- Marker or chalk for marking fabric
Step-by-Step Instructions:
1. Measure and Cut the Fabric: Start by measuring out three equal triangles on your faux fur fabric, each about 18 inches on each side. Use your marker or chalk to outline them, and then carefully cut them out.
Pro tip: Make sure you cut with the fur facing up, so you don’t accidentally mess up the nap.
2. Create the Base: Stack the three triangles on top of each other, with the right sides facing inward. Pin them together to keep everything secure.
At this point, you can imagine how happy your cat will be once it’s all assembled.
3. Sew the Triangles: Using your sewing machine (or needle and thread if you’re feeling adventurous), sew along the edges of the triangles, leaving the bottom edge open.
Take your time to make sure you have a nice, clean seam. And don’t worry if your stitches don’t look perfect — your kitty won’t judge.
4. Prepare the Padding: Cut your foam or batting into an almost identical triangular shape. Slide it into the fabric pocket you just created, pushing gently to get it snug but not too tight.
Think of it like tucking your cat into their very own soft blanket.
5. Close the Opening: Once the padding is in place, fold the open edge inwards and pin it in place. Either sew it shut using a straight stitch, or use fabric glue if you want a no-sew option.
Voila! Almost there.
6. Final Touches: Give your new cat bed a shake, fluff, and place it in a nice sunny spot or their favorite corner.
Watch as your kitty takes to it like a duck to water. You might even get a few slow blinks of approval from them.
Optional Add-ons/Variations:
– Color Pop: Consider using fabric paint to add bright designs or patterns on the faux fur before you cut it.
Think paw prints, hearts, or even your cat’s name.
– Different Shapes: Not a fan of triangles? Feel free to experiment with other geometric shapes, like circles or squares, for a unique twist!
Pro Tip:
If your cat is a scratcher (and let’s face it, most are), consider reinforcing the base with some extra batting or foam.
It helps maintain the bed’s shape and gives your furball more comfort when they’re diving into dreamland.
2. Memory Foam Cushion Bed
Is your furry friend a professional napper? If so, the DIY Memory Foam Cushion Bed is the perfect solution to enhance their napping experience. Not only does it provide superior comfort, but it also saves you money compared to pricey pet beds. Plus, you’ll be shining as the pet parent who makes their dog feel like royalty—talk about a win-win! You can elevate your pet’s style with a luxury grooming kit to make sure they look as good as they feel.
Materials Needed:
- Memory foam (cut into a suitable size for your pet)
- Durable fabric for the cover (like fleece or canvas, about 1 to 1.5 yards)
- Scissors
- Sewing machine or needle and thread
- Measuring tape
- Straight pins
- Marker or chalk for marking fabric
- Optional: zipper for removable cover
Step-by-Step Instructions:
- Measure and Cut the Foam: Start by measuring your dog’s size to determine how large the cushion should be. A good base is usually around 24 x 36 inches. Cut the memory foam using scissors. Trust me, this will shape into your dog’s new favorite spot.
- Create the Cover: Measure and cut your fabric to form a rectangle that’s about 4 inches larger than the foam on all sides (this gives you room for seams). If you want a zipper, cut one side to allow for it. Lay your fabric down and imagine how cozy your dog will be nestled inside.
- Sew the Fabric: With the fabric turned inside out (to hide your seams), pin the pieces together. Sew around the edges, leaving one side open if you’re adding a zipper. If your sewing skills are lacking like mine, don’t stress; a few imperfect stitches just add charm.
- Insert the Foam: Once you’ve sewn the cover and turned it right side out, it’s time to slide in that memory foam. Confirm it fits snug but not too tight. You want it to be comfy enough for your dog to sink into.
- Close It Up: If you’ve added a zipper, simply zip it up. If not, fold the open edge inside and pin it down, then sew it shut. You’re almost done, so resist the urge to pull out the snacks just yet.
- Add Final Touches: Fluff the cushion and place it in your dog’s favorite spot—maybe near the sunny window or next to you. Take a moment to admire your handiwork as your pup jumps right in, ready for a snooze. I mean, who doesn’t love a DIY that gets such an enthusiastic response?
Optional Add-ons/Variations:
- Fabric Fun: Use fabric in playful colors or patterns to match your home decor. You could even print a family photo on the fabric and make it truly personal—your dog deserves it.
- Extra Comfort: Consider adding a removable cover with a zipper, so you can wash it easily. You know how dogs have a knack for bringing the outdoors inside; this way, you keep it clean without a hassle.
Pro Tip:
When choosing your memory foam, opt for a high-density version for better durability. If you’re on a budget, check out online retailers or local craft stores—they often have sales that can save you some bucks.
And don’t forget, a little extra fluff can make a world of difference in comfort for your furry friend.
3. Round Rattan Nest
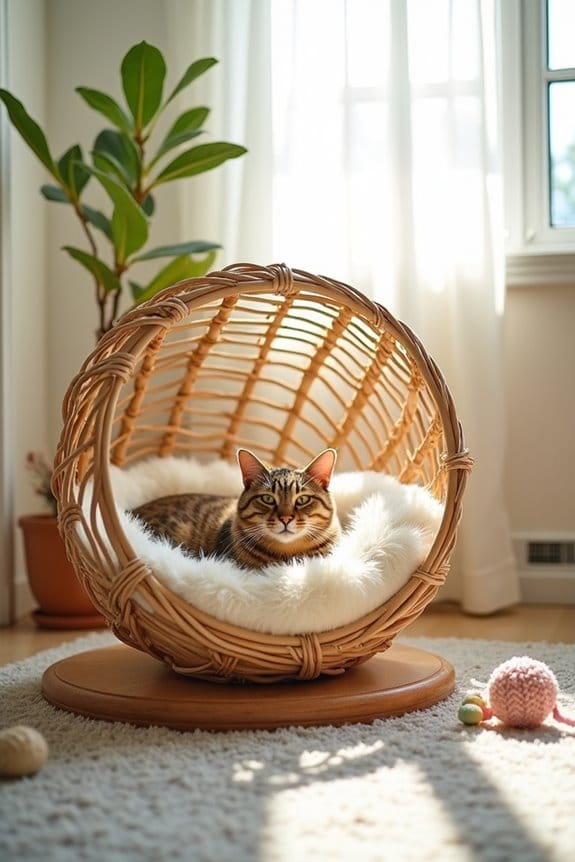
Does your cat love to curl up in cozy spots where they can feel safe and secure? The DIY Round Rattan Nest is a delightful way to create a stylish and cozy bed for your feline friend. Not only does it provide a comfy retreat, but it also adds a touch of elegance to your home—perfect for those Instagram-worthy shots of your kitty snoozing!
Materials Needed:
- Rattan (or willow) branches, preferably 1/4 inch thick
- Strong twine or natural jute cord
- Scissors
- Wire cutters (if needed for branches)
- A circular base (like a wooden board, about 20 inches in diameter)
- Optional: soft cushion or faux fur for added comfort
Step-by-Step Instructions:
- Prepare the Base: Start with your circular base. This is the foundation of your nest. If you’re feeling extra crafty, you can paint or stain it to match your decor. Just make certain it’s totally dry before moving on—nobody wants a messy home.
- Cut the Rattan: Cut your rattan branches into lengths of about 24 inches. This will give you enough versatility to form the walls of your nest. If you’re like me and have a knack for tangling things, lay them out carefully so they don’t end up in an unruly pile.
- Create the Nest Shape: Take one piece of rattan and start looping it around your circular base to create a circular wall. Use the twine to secure it to the base by tying a knot every few inches. Keep going around until you complete a circle, then add some height by layering more rattan pieces vertically and tying them to the bottom loop.
- Build Up the Walls: Continue layering and wrapping the rattan, spiraling upwards while keeping everything secured with twine. You can go as high as you want, but I suggest making it about 15-20 inches tall so your cat has a nice, enclosed space to curl up in. Remember, your feline expects the best—no pressure.
- Finishing Touches: Once you’re happy with the height and shape, tie off any loose ends, and trim off excess twine. If you’ve opted for a cushion or some faux fur, simply place it in the nest for added comfort.
- Place It Somewhere Cozy: Set the finished nest in a quiet spot where your cat likes to hang out, maybe near a window with a view. Sit back and watch as your kitty explores their new little hideaway.
Optional Add-ons/Variations:
- Color Your World: You can paint the rattan in a fun color that complements your home. Or try wrapping the twine in vibrant hues for a pop of personality.
- Accessorize: Add a few soft toys or a warm blanket inside. Your cat may appreciate the extra flair and comfort.
Pro Tip:
Before you start, make certain the rattan branches are free of any sharp edges or splinters. A little sanding goes a long way in keeping your kitty safe.
And, if you want to save a few bucks, try sourcing your rattan from craft stores, or check out local plant shops. They might’ve offcuts you can use for your project. Happy crafting!
4. Hammock-Style Cat Bed
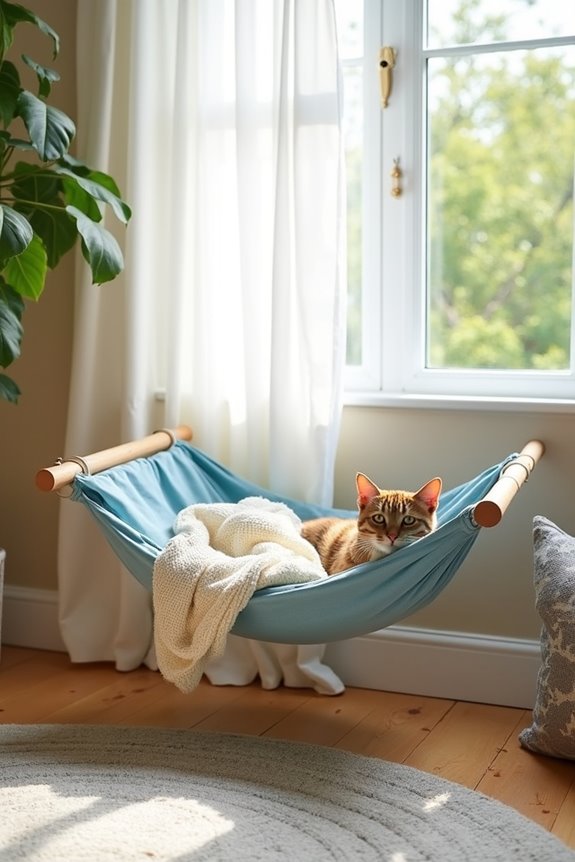
If your feline friend loves to lounge and soak up the sun, a DIY Hammock-Style Cat Bed is the perfect solution. Not only does it provide a comfy spot for your cat to relax and observe their kingdom, but it also saves you money compared to store-bought options. Plus, it adds a stylish touch to your home that your guests will certainly admire (just don’t be surprised if they start asking where you got it!).
Materials Needed:
- Two wooden dowels (about 1 inch in diameter and 2 feet long)
- Soft cotton fabric or canvas (a meter or so, depending on the desired size)
- Strong twine (about 15 feet)
- Scissors
- A saw (optional, if you need to cut the dowels)
- Sewing needle and thread (optional, if you choose to hem the fabric)
Step-by-Step Instructions:
- Prepare Your Fabric: Begin by cutting your fabric to a rectangular shape. A size of around 40 inches by 20 inches works well, but feel free to adjust based on your space and your kitty’s size. If you’re worried about fraying, you can hem the edges, but let’s keep things easy for now.
- Attach Twine to Dowels: Take your two wooden dowels and, using the twine, tie a secure knot around each one, leaving enough length to hang them. You’ll need about 3 feet of twine for each dowel, so cut accordingly. Again, if you have a knack for knots like I do, this might take a few tries. Keep it snug—no one wants a dowel that wiggles.
- Create the Hammock Shape: Now, drape your fabric over the dowels to form the hammock. Make sure the dowels are parallel to each other, about 20 inches apart. Adjust the fabric to achieve the desired sag; give it a light pull down to see what feels cozy. Your cat will appreciate a nice gentle dip—like a soft cloud just for them.
- Secure the Hammock: With the fabric in place, take the extra lengths of twine hanging from the dowels and tie them to a wall or sturdy furniture, making sure the hammock is at a comfortable height. Aim for around 18 inches off the ground, so your aristocat can jump right into their new cozy nook. Just check to make sure it’s not wobbling dangerously—safety first.
- Add Some Comfort: For extra comfort, lay a soft blanket, pillow, or small cushion in the hammock. Cats love a cozy spot, and a little padding can go a long way in making them feel secure.
- Set the Scene: Pick the perfect sunny spot in your home, ideally near a window. Cats are natural sunbathers, after all. Place the hammock bed down and let the magic happen as your furball discovers their new favorite perching spot.
Optional Add-ons/Variations:
- Color Pop: Feel free to choose vibrant, patterned fabric that matches your home decor. You can also add some fun pom-poms or tassels to the edges of the fabric for a little extra flair. Your cat may not care, but your Instagram followers will love it.
- Elevated Design: Want a more sophisticated option? Use sturdy hooks and eye screws to create a wall-mounted hammock, which can make it look even more stylish while saving floor space. Just make sure it’s all securely anchored.
Pro Tip:
If you’re worried about the durability of your hammock, consider opting for a heavier fabric, like canvas, which holds up against scratching and lounging. Believe me, you don’t want to find yourself creating an emergency DIY fix when your cat decides to treat their bed like a trampoline.
5. Woven Cotton Cat Cave
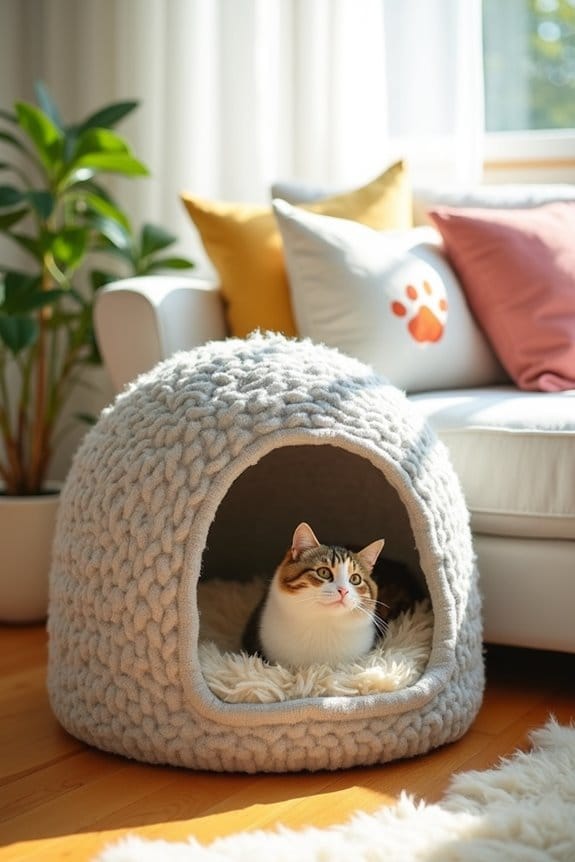
If you’re looking for a cozy spot for your feline friend that also doubles as a stylish decor piece, a DIY Woven Cotton Cat Cave is an ideal project. Not only does it provide a snug retreat for your kitty, but it saves you money compared to pricey pet-store options. Plus, it’s a fun way to get creative and personalize your home.
Materials Needed:
- 1 large cotton T-shirt or old blanket
- A large bowl (to mold the shape)
- Scissors
- Strong needle and thread (or a sewing machine, if you have one)
- Non-toxic fabric glue (optional, if you’re not sewing)
- A comfy pet bed or cushion (for added comfort inside the cave)
Step-by-Step Instructions:
- Cut the Fabric: Start by cutting the T-shirt or blanket. If you’re using a T-shirt, cut off the sleeves and the bottom hem. For a blanket, simply cut it into a large circular shape, about 30 inches in diameter. You want enough fabric to create walls for your cave.
- Create the Base: Flip the fabric inside out and take your large bowl—this will be your mold. Place the bowl upside down in the center of your fabric circle. Gather the edges of the fabric around the bowl, creating a dome shape.
- Secure the Shape: Use your needle and thread to gather the fabric tightly around the bowl. This will help form a secure structure. You can also use fabric glue instead of sewing if that’s more your style—just make sure it’s fully dry before continuing.
- Finish the Top: If you want a real cave vibe, cut a small semicircle in one side of the fabric for an entryway. Just make sure it’s big enough for your cat to wiggle through but not so big that it loses its cave-like feel.
- Turn It Right Side Out: Carefully flip the entire structure right side out. It should have a nice dome shape, resembling a cozy cave. If you’re feeling fancy, you can hand-stitch or glue a few decorative elements to make it even cuter.
- Add Comfort: Place a soft pet bed or cushion inside to make it especially inviting. Cats are all about comfort and will appreciate a plush spot to curl up.
- Find the Perfect Spot: Position the cat cave in a quiet corner of your home, away from loud noises. Maybe somewhere near a window where they can watch the world go by or bask in the sunlight.
Optional Add-ons/Variations:
- Color & Pattern: Use a T-shirt with your pet’s favorite color or a funky pattern. You could even mix and match fabric remnants from old clothes for an eclectic look—why not?
- Personal Touch: Add some fabric paint or embellishments to personalize your cat cave. A paw print or your kitty’s name written on the side could make it truly special.
Pro Tip:
To guarantee durability, be sure to use strong fabric stitched properly, especially in high-stress areas like the entrance. A little extra effort now will ensure your furniture doesn’t become a scratch post later.
And don’t forget, cats are surprisingly keen on soft textures, so pick materials they love to snuggle with to keep them cozy and content.
Happy crafting!
6. Luxury Velvet Snuggle Pod
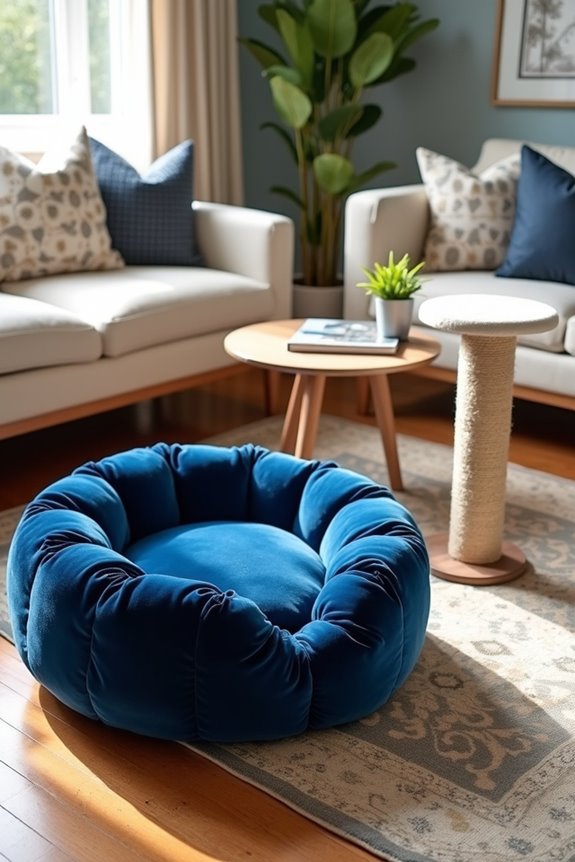
If you’re looking to spoil your furry friend without breaking the bank, consider making a DIY Luxury Velvet Snuggle Pod. This cozy haven not only elevates your pet’s comfort but also adds a touch of elegance to your home decor. Plus, it’s an easy project that can save you money while showcasing your creativity. Your dog will thank you, and your wallet will too.
Materials Needed:
- 1 yard of plush velvet fabric (any color you like)
- 1 large cushion or foam pad (for padding)
- Scissors
- Strong needle and thread (or a sewing machine)
- Measuring tape
- Chalk or fabric marker
- Pins
- Optional: Non-toxic fabric glue
Step-by-Step Instructions:
- Measure and Cut: Begin by measuring the size needed for your pod. You’ll want a circle about 36 inches in diameter for a standard size, but adjust based on your pup’s size. Use chalk or a fabric marker to outline the circle on your velvet fabric. Then, cut out the circle.
- Create a Base: Flip your fabric circle inside out and fold the edges over about an inch. Pin this fold down to secure it while you sew, creating a more polished look. If you don’t want to sew, you can use fabric glue, but sewing is more durable—trust me, I learned the hard way.
- Sew the Shape: Sew around the circle about 1/2 inch from the edge. Leave a small opening so you can turn it right side out later. It might seem tricky, but just take it slow; I promise it’ll be worth it when you see your dog snuggled inside.
- Add Padding: After sewing, flip your fabric right side out and stuff the center with your cushion or foam pad. This part is where your pup’s comfort comes in. Tuck the edges of the opening inward and pin them closed.
- Finish the Pod: Sew or glue the opening shut. At this point, feel free to give the whole thing a little fluffing to make it extra comfy. If you want to add a little pizzazz, you can even sew appliques or fun designs onto the outer fabric.
- Find the Perfect Spot: Look for a cozy corner in your living room, or maybe a sunny spot by a window. Your pup is going to want to lounge in their luxurious new pod, and it’s best to give them prime placement.
Optional Add-ons/Variations:
- Color Choice: Pick a velvet fabric in a bold color or pattern that matches your home decor. You could even use fabric scraps for a fun patchwork effect—just think of it as a trendy doggy art installation.
- Add a Blanket: If your pup loves to burrow, consider sewing on an extra flap of fabric that can act like a mini blanket.
Pro Tip:
Consider reinforcing the seams with extra stitches for durability, especially if your pup is an energetic snuggler. A little extra care in this step means your snuggle pod will last through many cuddle sessions, keeping your pup comfy and you worry-free.
Now grab your supplies, and let’s get crafting a cozy retreat your dog will adore!
7. Heated Lounge Bed

As the temperature drops, our furry companions love to snuggle into something warm and comfortable. A DIY Heated Lounge Bed offers your pet a cozy retreat while being gentle on your wallet. This project not only brings warmth during chilly nights but also adds a personal touch to your home decor. Plus, your dog will have a special spot that feels just like a hug!
Materials Needed:
- 1 large fleece blanket (soft and warm)
- 1 old heating pad (or a microwaveable heat pack)
- 1 large, sturdy dog bed (you can also use an existing bed as the base)
- Scissors
- Measuring tape
- Pins or clips
- Optional: Fabric cover for the heating pad (to protect from wear)
Step-by-Step Instructions:
- Prep Your Heating Pad: Check your heating pad for any instructions. If you’re using a microwaveable heat pack, make sure it’s microwavable and safe for your pet. If you want to be extra cautious, you can create a protective cover using an old towel or fabric.
- Measure and Cut the Blanket: Lay your fleece blanket flat and cut it into a rectangular piece, roughly 30 inches by 48 inches. This measurement is perfect for providing comfort without overwhelming your dog bed. If your pup is particularly large, go a bit bigger—because no one likes a cramped snuggle.
- Create a Sleeping Nook: Take the dog bed, and if necessary, give it a good fluff. Place your heated pad or heat pack in the center of the bed. Make sure it’s secure—nobody wants a surprise heat slide when they settle in.
- Cover with Fleece: Fold the fleece blanket over the heating pad, creating a cozy layer of warmth. Tuck the ends under the bed to keep everything secure. You can use pins or clips to hold the blanket in place, but if you’re feeling adventurous, a bit of good old-fashioned patience will work too.
- Final Touches: Test the heating pad to verify it’s not too hot, and then place the bed in a cozy spot where your dog loves to hang out. Consider adding a few of their favorite toys for an extra inviting atmosphere—because who can resist a warm bed and squeaky toys?
- Enjoy the Snuggles: Now, watch your furry friend curl up in their heated lounge bed. Trust me, nothing warms the heart more than seeing your pup blissfully snoozing, wrapped in warmth and comfort.
Optional Add-ons/Variations:
- Custom Colors: Consider using a fleece blanket in a fun color or pattern that suits your home. Whether it’s polka dots, stripes, or their favorite superhero, the right fabric can change the whole mood of the space.
- Add Pet-Friendly Decorations: You could sew or glue on fun patches, embroidery, or even your dog’s name to personalize the lounge bed further. Just think of it as crafting a signature look for your pet!
Pro Tip:
When selecting a heating pad, look for one with an automatic shut-off feature for added safety. Always check the warmth level before letting your dog onto the bed, and remember, too much heat can be uncomfortable. Comfort is key, after all—no one likes a bed that’s hotter than a sauna!
Extra Tips & Ideas
When it comes to making DIY cat beds, you might think you’ve covered all your bases, but there are always a few extra tips and ideas that can elevate your creation.
First off, don’t skimp on comfort—soft, cozy blankets are a must. If you’re feeling crafty, consider adding a removable cover for easy washing; cat hairs are relentless.
Get creative with colors, too. Cats mightn’t care, but you’ll love it!
Think about adding some fun elements like pom-poms or tassels. And here’s a fun tip: a sprinkle of catnip can turn a good bed into a great one.
Frequently Asked Questions
What Materials Are Safe for DIY Cat Beds?
Safe materials for DIY cat beds include soft fabrics like cotton, fleece, and canvas, non-toxic fillers like polyester fiberfill, and sturdy bases made from wood or sturdy cardboard. Avoid any materials that can fray or splinter.
How Do I Get My Cat to Use the Bed?
To entice your cat to use the bed, sprinkle it with their favorite treats or toys. It’s like laying out a welcome mat—create a cozy, inviting space, and your feline will happily settle in.
Can I Wash Homemade Cat Beds?
Yes, you can wash homemade cat beds! Most materials are machine washable, but check the care instructions. Regular cleaning helps keep it fresh and inviting, encouraging your cat to use it more often.
How Long Will My DIY Cat Bed Last?
Your DIY cat bed can last several years if you use durable materials, reinforce seams, and clean it regularly. With good care, it’ll withstand wear and tear, providing your cat a cozy resting spot.
Where Should I Place the Cat Bed?
You should place the cat bed in a cozy, quiet spot away from heavy traffic. Cats love warmth, so near a sunbeam or radiator is ideal. Just make sure it’s safe from hazards and easily accessible.
Conclusion
So, why not transform your cat’s naptime into a cozy haven? With a bit of creativity and some crafty materials, you can create a bed that’s both stylish and snug. Picture your feline friend nestled in a fluffy faux fur pod or a rustic rattan nest. Each DIY project adds a personal touch to your home while pampering your pet. Remember, comfort and creativity go hand in hand—your cat deserves it, don’t they? Happy crafting!

Hi, I’m Ali Tarek, the founder of Animalsman. I’ve always been passionate about pets, especially dogs and cats, and I created this website to share practical tips, easy recipes, and helpful care advice for fellow pet lovers. My goal is to make pet care simple, enjoyable, and accessible for everyone. When I’m not writing or curating content, you’ll usually find me spending time with my furry friends or learning new ways to keep them happy and healthy.

