So, you want to give your furry friend the best outdoor experience without the heart-stopping drama of them trying to chase squirrels or escape into the wild, huh? You’re in luck. Creating a secure DIY cat enclosure is easier than you might think. Imagine a safe playground filled with vertical climbs, cozy hideaways, and maybe even a water fountain. Sounds fun, right? Stick around, and we’ll explore seven fantastic ideas that will have your cat purring in delight.
Outdoor Cat Playground Ideas
When you think about creating a fun outdoor playground for your cat, you’ve got to contemplate what’ll keep their curious little minds engaged and their furry bodies active. A DIY cat enclosure is a perfect start; it gives them a safe space to explore.
Imagine adding ramps, scratching posts, and cozy hidey-holes. What about those fun cat tunnels that crinkle? Your feline will think they’ve hit the jackpot!
You could even toss in some bird feeders nearby. Watching their little eyes widen at the birds will be priceless.
Just be sure to check for safe materials and sturdy construction. Oh, and don’t be surprised if your cat decides the box of new toys is way more exciting than the elaborate setup you’ve made. Trust me, I’ve been there.
Our Collection
Let’s take a look at some of the cool features you can add to your cat enclosure.
You’ve got vertical climbing structures for your feline acrobat, cozy tunnels for their stealthy escapes, and scratching posts that reach for the sky.
And hey, who wouldn’t want to watch their cat pounce on a hanging birdfeeder while they pretend that was always part of the plan?
1. Vertical Climbing Structures
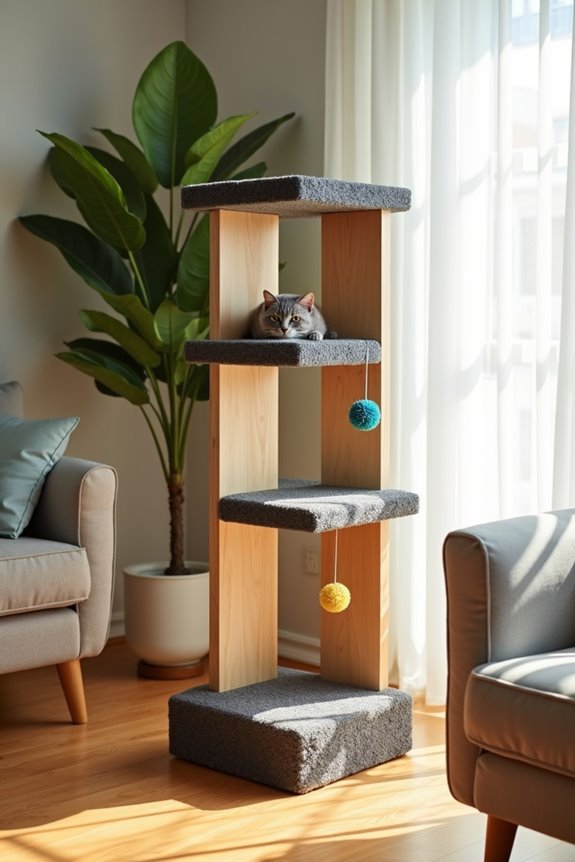
Are you ready to transform your home into a cat paradise? Creating a vertical climbing structure is an exciting DIY project that elevates your cat’s playtime while saving you a trip to the pet store. Not to mention, it adds a stylish touch to your home! Let’s get started on building a cozy jungle gym that your feline will adore.
Materials Needed:
- Wood boards (1”x6” for platforms and 1”x4” for posts)
- Wood screws
- Sandpaper
- Wood glue
- Carpet squares or faux fur fabric
- Drill with drill bits
- Saw (hand saw or power saw)
- Level
- Measuring tape
- Stud finder or wall anchors (if mounting)
- Paint or stain (optional for finishing)
- Cat toys (optional for extra fun)
Step-by-Step Instructions:
1. Plan Your Design:
Sketch out your structure on paper. Keep it simple—think of multiple platforms at different heights connected by ramps or even vertical posts.
2. Cut the Wood:
Using your saw, cut the wood boards to the desired lengths for platforms and vertical posts. Remember to measure twice and cut once—nobody likes a wobbly shelf.
3. Sand the Edges:
Smooth out any rough edges or surfaces with sandpaper. Your feline’s delicate paws deserve a gentle touch.
4. Assemble the Base:
Start with the base structure by attaching two vertical posts to a sturdy platform using wood screws. This is where you’ll want to use your level to verify it stands upright and doesn’t tip over.
5. Add Platforms:
Attach additional platforms at your desired heights, securing them with screws. Space them apart enough for your kitty to leap comfortably from level to level—no one wants to miss a jump and fall into the abyss!
6. Finish with Carpet or Fabric:
To make the platforms cozy, glue or staple carpet squares or fabric to each platform. This makes climbing more comfortable and gives your cat some extra grip.
7. Secure Your Structure:
If you’re mounting it to a wall, use a stud finder to locate secure points and wall anchors. Or if it’s free-standing, verify it’s stable and won’t wobble.
Optional Add-ons/Variations:
- Paint It Pretty: Customize your structure by painting it in fun colors or using patterned fabrics. Bright shades can really liven up the look.
- Add a Tunnel: Incorporate a fabric tunnel made from an old t-shirt or fabric scraps for extra fun. Cats love popping in and out like little ninjas.
Pro Tip:
When assembling your vertical climbing structure, use non-toxic glue and materials. Cats are curious creatures, and you want to keep their environment safe.
And while you’re at it, you might want to add a little catnip on the platforms to entice them—trust me, they’ll love you for it.
With this DIY project, you’re not just building a cat tree; you’re creating a roaring funhouse that will keep your feline entertained for hours.
And who knows, you might even earn a few “thank you” snuggles in return. Happy crafting!
2. Cat-Friendly Tunnels and Tubes
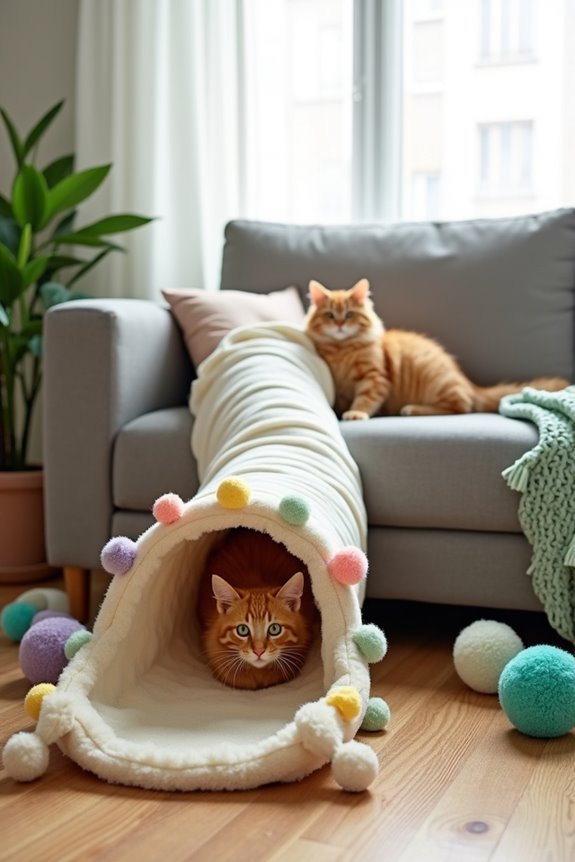
Looking to add a dash of adventure to your cat’s life? Cat-friendly tunnels and tubes are a fantastic DIY project that allows your feline friends to release their inner explorers.
Not only do these cozy hideaways provide hours of entertainment, but they also save you money compared to store-bought versions. Plus, they can easily blend in with your home decor, making your space feel even more inviting for both you and your furball.
Materials Needed:
- Fabric (old t-shirts, fleece, or canvas)
- Cardboard tubes (like those from paper towels or shipping tubes)
- Sewing kit (needle, thread, scissors)
- Hot glue gun and glue sticks
- Measuring tape
- Safety pins (optional)
- Cat toys (for extra fun)
Step-by-Step Instructions:
1. Measure and Cut Your Fabric:
Decide how long you want your tunnel or tube to be. Cut a rectangular piece of fabric that’s as long as you want the tunnel, and wide enough to wrap around your tube with some overlap.
2. Prepare the Tube:
If you’re using a cardboard tube, make sure it’s clean and dry. You can cover it with a layer of fabric or leave it as is for a simpler project.
If you want some personality, go ahead and paint it an exciting color—who says tunnels can’t be stylish?
3. Wrap the Fabric:
Wrap the fabric around the tube, leaving a bit of extra fabric at one end to create a flap for your cat to enter and exit easily.
Secure the fabric using hot glue or sew it in place. Just a few stitches will do the trick—more time for cat play!
4. Secure the Ends:
At the open end, fold the extra fabric inwards to make a comfortable entrance. Use hot glue or sew along the edge to hold it in place.
For a little extra flair, consider adding some colorful pom-poms or a small piece of catnip at the entrance.
5. Test It Out:
Give your new creation a gentle shake to verify it’s sturdy.
Then, place it on the floor and encourage your cat to explore. You might need to entice your kitty with a toy to draw them in—after all, a little coaxing goes a long way.
Optional Add-ons/Variations:
– Add Windows: Cut small openings in the fabric along the sides for your cat to peek out of, creating little ‘windows’ for them to survey their domain.
This way, they can stay playful while keeping an eye on you.
– Mix Fabrics: Combine different textures like fleece and canvas for a fun touch.
You could even dig out some funky printed fabric scraps from the craft box to add personality—who doesn’t love a little pizzazz?
Pro Tip:
To make the tunnels even more enticing, sprinkle a bit of catnip inside. Trust me; this is an instant magnet for curious kitties and will keep them returning for more adventures.
Just remember to supervise your cat’s playtime, especially for younger felines who might want to munch on fabric.
3. Scratching Posts With Heights
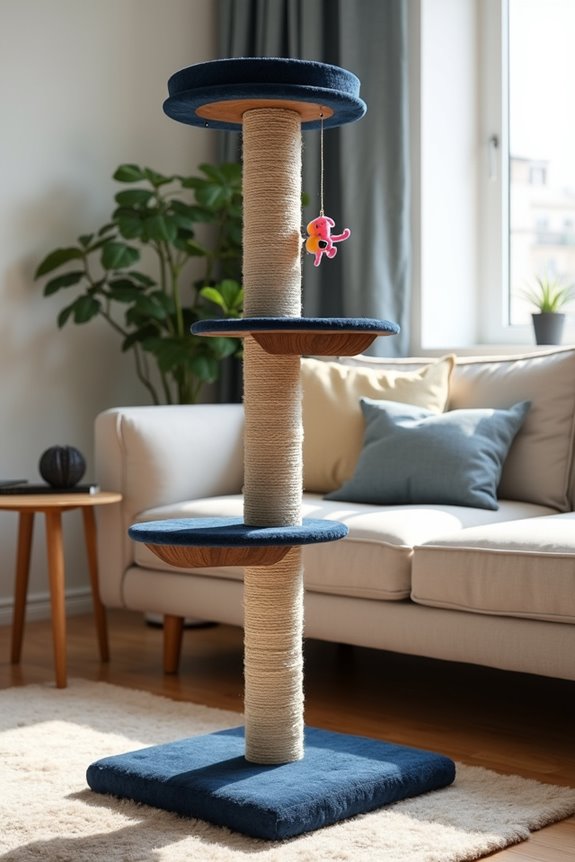
If there’s one thing every cat owner knows, it’s that a good scratching post is an absolute must. Not only does it save your furniture from those relentless claws, but it also helps keep your cat active and happy. Plus, creating your very own scratching post with heights adds a touch of personality to your home décor—and it could even save you a few bucks! Let’s jump in and learn how to craft a multi-level scratching post that your feline friend will adore.
Materials Needed:
- Wooden base (a sturdy piece of plywood or MDF)
- Wooden posts (2-3 at varying heights for multiple levels)
- Sisal rope (for wrapping the posts)
- Carpet or fabric (for covering the base)
- Wood glue (and/or screws for extra support)
- Staple gun (to attach the carpet)
- Saw (to cut the wood if not pre-cut)
- Sandpaper (for smoothing edges)
- Measuring tape
- Drill (for making holes for screws)
Step-by-Step Instructions:
1. Design Your Structure:
Decide how many levels you want your scratching post to have and the overall height. Sketch it out if you’re feeling artistic—no need for perfect lines, just a rough idea will do.
2. Cut the Wood:
Using a saw, cut your wooden base and posts to the desired lengths. Remember to sand the edges to make sure there are no sharp points. A smooth finish means fewer scratches for you and your kitty.
3. Attach the Posts:
Secure the posts to the base using wood glue. For extra stability, you can drill holes and insert screws as well. Let it sit for a few hours to guarantee everything is set and solid. If it looks a little wobbly, don’t stress—it’ll just give your feline friend a fun workout.
4. Wrap the Posts:
Starting at the bottom of each post, tightly wrap sisal rope around the entire length, securing it with a dab of hot glue every few inches. When you reach the top, trim the rope and secure it again.
Seriously, your cat will love scratching this stuff way more than your couch.
5. Cover the Base:
Take your carpet or fabric and cut it to fit the wooden base. Use a staple gun to attach it securely, pulling it taut as you go. This not only looks great but also gives your kitty a comfy spot to perch on.
6. Final Touches:
If you’re feeling extra creative, consider adding some fun elements like a hanging toy or a little bed on top! Just make sure everything is securely attached so there’s no unintended cat chaos.
7. Let It Dry:
Allow your scratching post to dry completely before introducing it to your cat. You want it to be sturdy and safe for their enthusiastic scratching sessions.
Optional Add-ons/Variations:
- Paint or Stain: Feel free to paint or stain your wood to match your home decor. A pop of color can make this scratching post a real statement piece.
- Multiple Textures: Instead of just sisal rope, why not use a mix of materials? Some carpet on the lower parts and sisal at the top can offer variety and keep your kitty guessing.
Pro Tip:
Make sure the base is heavy enough to prevent tipping. If you’re worried about stability, you can attach some weights to the bottom, or simply use a larger piece of wood for the base. Trust me, you don’t want a surprise cat avalanche during their enthusiastic zoomies.
Creating a scratching post with heights doesn’t have to be an intimidating task. With a little creativity and some simple materials, you’ll provide your feline friend with a fabulous scratching oasis that keeps both them and your home happy. Why not give it a whirl? Your cat’s ultimate playground awaits!
4. Litter Box Sheltered Space
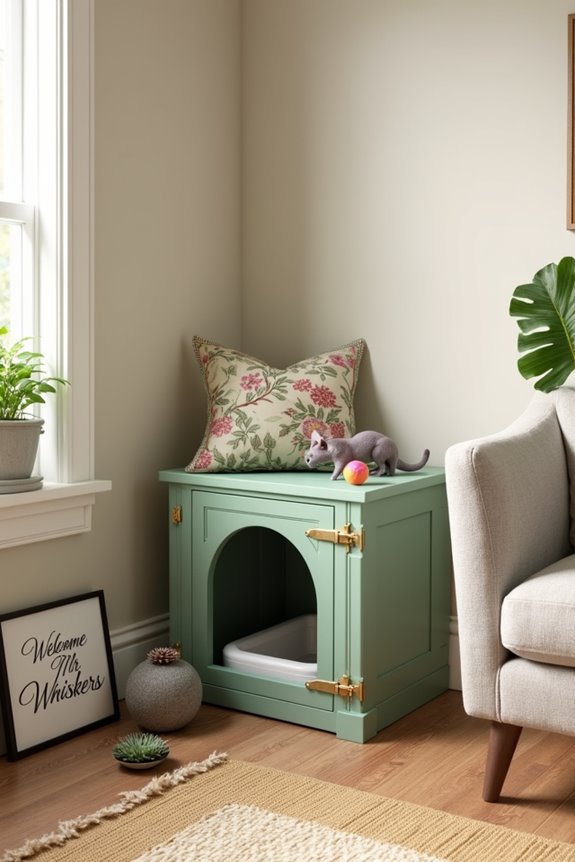
Let’s face it: litter boxes can be an eyesore in even the most beautifully decorated homes. But fear not! We’re here to make that messy necessity a little more bearable with a DIY Litter Box Sheltered Space. This cozy nook not only keeps your cat’s bathroom private, but it also adds a touch of chic organization to your living area—saving you from a cluttered look.
Plus, it’s budget-friendly and will probably make your furry friend feel like royalty. So, let’s get to work!
Materials Needed:
- Wooden crate or large box (something sturdy)
- Sandpaper
- Paint or stain (in a color that matches your decor)
- Measuring tape
- Hinges (if you want a door)
- Drill and screws (for door assembly)
- Decorative fabric (optional—think of a curtain)
- Litter box (obviously)
- Cat toys or decor (to make it inviting)
Step-by-Step Instructions:
1. Choose Your Crate:
Select a wooden crate or box that’s big enough to fit your cat’s litter box with some extra space for them to move around. You want it cozy but not cramped.
2. Prep the Wood:
Sand down any rough edges to guarantee there are no splinters to contend with. Trust me, you’ll appreciate this step more than the dodgy furniture you’ve dealt with before.
3. Paint or Stain:
Give your crate a fresh coat of paint or stain that complements your living space. This is your chance to showcase your style! Let it dry completely.
4. Decide on a Door:
If you want a closed-off space, install some hinges on one side of the crate, using your drill and screws to attach a wooden panel as a door. Make sure it opens easily for you but is also sturdy enough to stay closed when your cat is doing their business. No one wants a surprise litter disaster.
5. Set Up the Litter Box:
Place the litter box inside the sheltered space, guaranteeing there’s enough room for your cat to comfortably get in and out. This is key. Trust me, you wouldn’t want to be crammed into a tiny bathroom yourself.
6. Add Personal Touches:
Consider hanging a small curtain over the entrance if you’re feeling fancy, or place a few cat toys around the outside to make it all look inviting. A little greenery can also help—fake plants, of course, because let’s not tempt fate with actual dirt.
7. Final Adjustments:
Check everything to verify that it’s sturdy and safe. We want a safe haven for your feline, not an amusement park ride. Give it a good shake—if it’s stable, you’re ready to go!
Optional Add-ons/Variations:
- Color Choices: Instead of painting, consider wallpapering the inside with fun designs. This adds a pop of personality that will impress both you and your kitty.
- Themed Decor: Make special decorations around the crate that reflect your cat’s personality, like a little sign with their name—hello, Mr. Whiskers.
Pro Tip:
Make sure to keep the litter box clean regularly. A freshly maintained litter box is the best promotion for your DIY project, meaning your cat will use it without hesitation.
Plus, you might as well keep those “oh no” moments at bay, right?
5. Hanging Birdfeeders for Stimulation
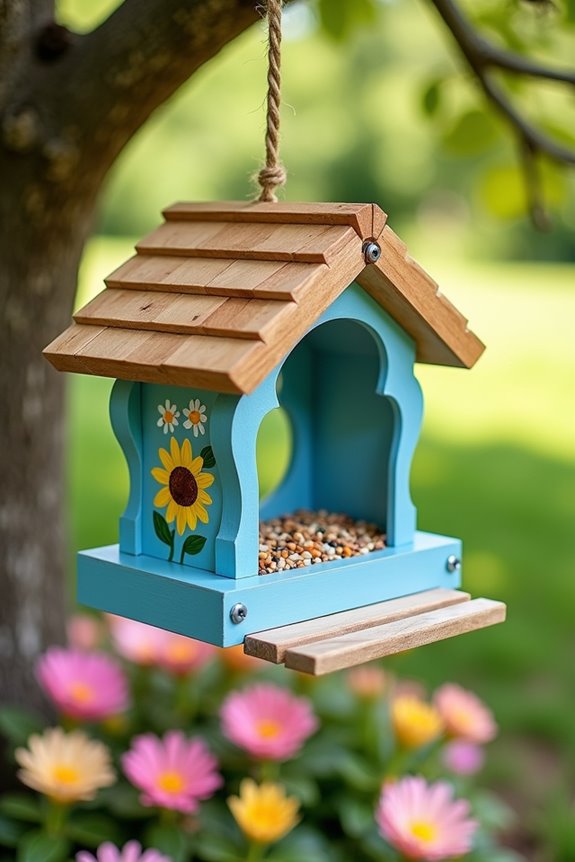
Are you looking to bring a little more life to your outdoor space? Building your very own hanging birdfeeders isn’t just a fun project; it also adds a charming touch to your garden while attracting lovely feathered friends. Not only will your backyard become a bustling hub of activity, but you’ll also enjoy the soothing presence of birds singing—who doesn’t want that? Plus, crafting your birdfeeders can save you some cash compared to store-bought options, so let’s plunge into this delightful DIY.
Materials Needed:
- Wooden board or plywood (for the feeder base)
- Paint or wood stain (non-toxic options)
- Wood screws (suitable for outdoor use)
- Drill (with bits for wood)
- Saw (if you need to cut the wood)
- Sandpaper (to smooth out rough edges)
- Plastic or metal feeding tray (to hold seeds)
- Hanging chain or rope
- Hooks or eye screws (for hanging)
- Birdseed mix (to entice the birds)
Step-by-Step Instructions:
1. Design Your Feeder:
Sketch out a simple design for your bird feeder. A basic box shape is effective and easy, but feel free to get creative. You can even make it a little roofed house for the birds. Just keep it straightforward for your first attempt.
2. Cut the Wood:
Using your saw, cut the wooden board to the sizes you need for your feeder. Typically, you’ll want a bottom piece about 8 inches by 6 inches, and side panels about 4 inches tall. Make sure you wear protective eyewear, because nobody dreams of eye injuries during a bird feeder project.
3. Sand Down the Edges:
Grab your sandpaper and smooth out all those cut edges. You want it nice and safe for the little birds. No splinters allowed—you’re not trying to send tiny birds to the hospital.
4. Assemble the Feeder:
Using the screws and drill, attach your side panels to your base. Confirm it’s stable enough for the birds, but also for wild gusts of wind that will test its might. Don’t skimp on the screws; you want this feeder to last.
5. Attach the Feeding Tray:
Secure your feeding tray to the base using extra screws if necessary. If your design is a little fancier, you might want to create a roof on top. The birds will appreciate some cover, especially during rainy days.
6. Finish with Paint:
Apply your non-toxic paint or wood stain to protect the wood and give your feeder a pop of color that complements your garden. Let it dry completely—this is an essential step. Remember, this isn’t just for aesthetics; it also helps the feeder withstand the elements.
7. Hang it Up:
Use the hooks or eye screws to create a way to hang your feeder with the chain or rope. Choose a spot where you can easily see it from your window, making your morning coffee a little more entertaining.
Optional Add-ons/Variations:
To personalize your bird feeder, consider using fun color patterns or even stencils to add designs on the sides. You might choose vibrant hues to attract the attention of inquisitive birds or opt for a more rustic, natural look by simply staining the wood.
If you’re feeling extra creative, add a small perch so your feathered visitors can comfortably rest while nibbling away.
Pro Tip:
To keep your bird feeder in great shape, consider using a clear coat to seal it after painting. This will help prevent moisture damage and keep it looking new, even through rain and shine.
Plus, consistently clean out any old seeds to avoid attracting unwanted pests and keep your feathered friends happy and healthy.
6. Water Fountain for Cats
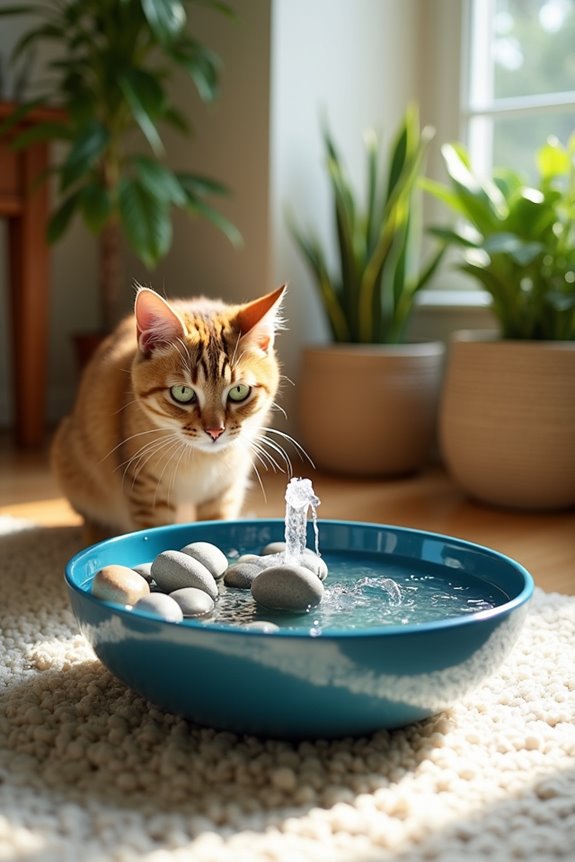
Are your furry friends in need of something fun and new? A DIY water fountain is just the thing to keep your cats hydrated while adding an attractive centerpiece to your home. Not only does it encourage them to drink more (hello, healthy kitties!), but it can also be a stylish addition to your decor.
Plus, making it yourself can save a few bucks compared to store-bought fountains. So, roll up your sleeves and let’s plunge into this rejuvenating project.
Materials Needed:
- Plastic bowl or large planter (as the base)
- Submersible water pump (check for a pet-safe version)
- Flexible tubing (to connect the pump)
- Decorative stones or pebbles (for decoration)
- Waterproof sealant or silicone (to seal gaps)
- Drill (with a bit suitable for making holes)
- Bucket or container (to catch excess water)
Step-by-Step Instructions:
1. Choose Your Base:
Start with your plastic bowl or planter as the fountain’s base. Clean it well to confirm a safe drinking spot for your cats. If it has drainage holes, that’s great; you can use those for your pump.
2. Prepare the Pump:
Take your submersible pump and attach the flexible tubing to the outlet port. Make sure it’s secure—no one wants a mini waterworks event in their living room.
If your particular pump doesn’t have an outlet port, just follow the manufacturer’s guidelines.
3. Drill a Hole:
Using your drill, make a hole in the bottom (or side, depending on your design) of your base where the tubing will go. Make sure the hole is snug enough to keep the tubing from slipping out, but not so tight you’re wrestling it in. Aim for a hole where the tubing can easily lead to the water source.
4. Set Up the Fountain:
Space your pump in the base of the bowl, making sure it’s submerged in water when you fill it up. You may want to create a barrier with stones or pebbles to keep it in place.
Pump it up a bit; you’ll have a bubbling beauty soon.
5. Seal It Up:
Grab your waterproof sealant and cover any gaps around the hole you drilled. You want to keep the water where it belongs—inside your fountain.
Allow it to dry completely until it feels solid to the touch.
6. Water, Power, and Style:
Fill your fountain with water, plug the pump in, and watch it start to flow. Adjust the water level if necessary to get the right height.
You can add decorative stones around the top for that appealing look and to make it more enticing for your cats.
Optional Add-ons/Variations:
- For a splash of color, consider painting the base with non-toxic outdoor paint or using vinyl decals to decorate it. Go wild with styles, like floral patterns or geometric shapes.
- If you’re feeling adventurous, add a small plant (like a pet-safe herb) next to the fountain for a touch of greenery, just make sure the plant is out of reach of the water flow.
Pro Tip:
Always choose a submersible pump that’s quiet—your cats (and your ears) will thank you. Also, remember to clean the fountain regularly; no one likes a grimy water source, and fresh water encourages kitties to drink more!
And there you have it—a charming DIY water fountain that keeps your cats entertained and hydrated. So, grab those supplies and let the good times flow (but maybe not as much as the water, right?).
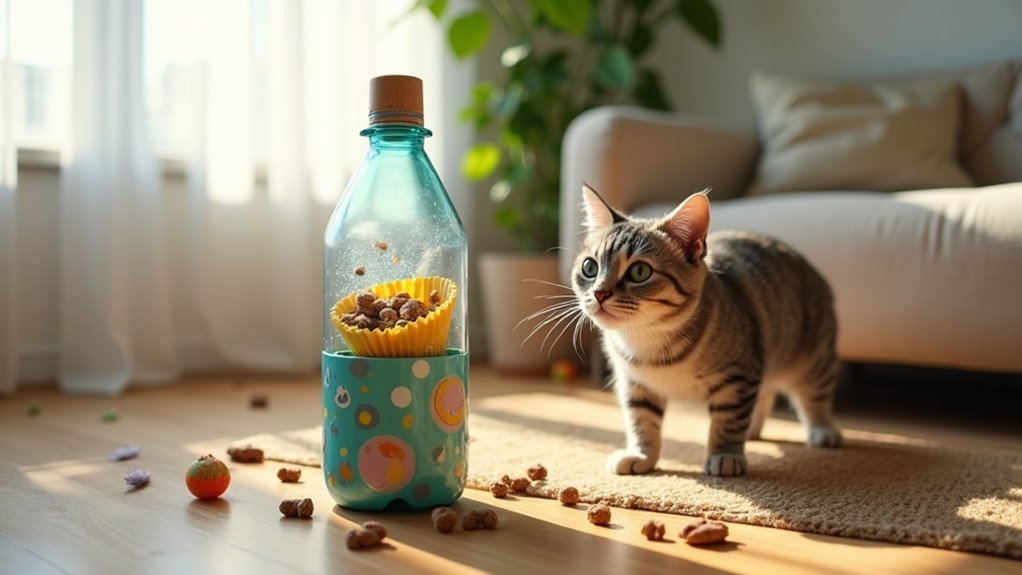
7. Interactive Feeder Toys
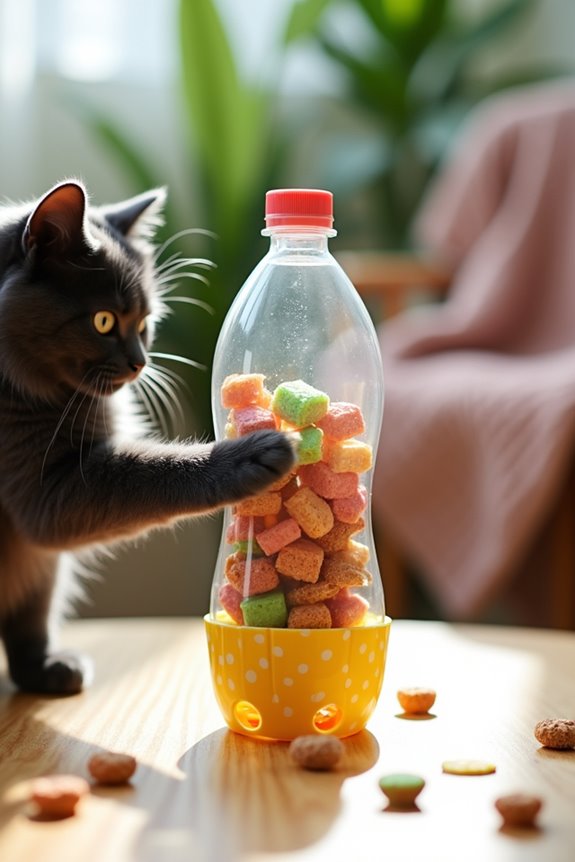
Looking for a fun way to keep your cats entertained and mentally stimulated? An interactive feeder toy is the perfect DIY project. Not only does it save you money compared to store-bought toys, but it also adds a personal touch to your kitty’s playtime. Plus, it encourages healthy eating habits by slowing down their eating pace, which is essential for preventing issues like obesity. If you have a dog at home too, consider investing in odor-free bully sticks, which can also be a rewarding treat for them.
Let’s plunge into this paws-itively engaging project.
Materials Needed:
- Plastic bottle (empty and clean)
- Cupcake liners or small tin cans (for dispensing treats)
- Craft knife or scissors (for cutting)
- Marker (to mark holes)
- Cat treats or kibble (to fill the toy)
- Sandpaper or file (for smoothing edges)
Step-by-Step Instructions:
1. Prepare the Bottle:
Start by removing any labels from your plastic bottle and rinsing it out. You want it to be sparkling clean. No cat wants to play with something yucky, right?
2. Mark the Holes:
Using your marker, draw a few small circles on the sides of the bottle. These holes should be big enough for treats to fall out when nudged but not too large that everything spills out at once. Think of it as a little challenge for your curious kitty.
3. Cut the Holes:
Grab your craft knife or scissors and carefully cut out the holes you marked. If you’re like me and a bit clumsy, take it slow. Safety first! If the edges feel sharp, some quick smoothing with sandpaper or a file can help guarantee no tiny paws get hurt during playtime.
4. Add the Cupcake Liners/Tins:
If you’re using cupcake liners, place one inside the bottle, resting it at the bottom. If you opted for small tin cans, secure them inside the bottle to catch the treats.
These will keep the goodies from just falling straight out the bottom while allowing your kitties to fish them out. Super clever, right?
5. Fill It Up:
Now, the exciting part. Fill the bottle with your cat’s favorite treats or kibble, close the cap, and watch the fun unfold. Your curious cats will love batting it around to get their snacks.
It’s like a treasure hunt with every roll and tumble.
6. Engage and Supervise:
Let your cats explore their new toy. Just a friendly reminder: always supervise them, especially if they’re new to interactive toys. You never know when they might get too curious for their own good.
Optional Add-ons/Variations:
- Paint It Up: Want to spruce it up? Consider painting the outside of the bottle with pet-safe paint. Choose bright colors or even patterns that match your home decor!
- Add a Bell: For some auditory fun, attach a small, non-toxic bell inside to jingle around as your kitty plays. The extra noise adds to the excitement.
Pro Tip:
To add a little challenge, try varying the size of the holes or the types of treats inside. This way, your kitty never gets bored, and each session feels fresh. A little variety never hurt, right?
Also, remember to regularly clean the toy to guarantee it stays safe and hygienic for your feline friend.
Extra Tips & Ideas
While you’re pondering how to create the perfect cat enclosure, don’t forget the little details that can make a big difference.
Ever thought about adding a cozy nook for sunbathing? Cats love warmth, and a simple wooden shelf covered with a soft blanket can be their favorite spot.
You might also think about incorporating a scratching post. It’ll keep your furniture safe, and your kitty will thank you.
Trust me, I once made a DIY post that turned into a cat skyscraper—what a sight!
And don’t underestimate the power of toys. A few hanging feathers or balls can keep them entertained for hours.
Frequently Asked Questions
What Materials Are Best for Building a Cat Enclosure?
You’ll want to use strong, weather-resistant materials like treated wood, galvanized wire, and metal brackets. These guarantee durability and safety. Don’t forget to include shade and climbing elements for your cat’s comfort and enjoyment.
How Can I Cat-Proof My Backyard Before Building an Enclosure?
To cat-proof your backyard, fence off the area, remove toxic plants, secure trash bins, and block gaps. Installing netting or screens can also help keep your cat safe while they explore their outdoor space.
What Are the Legal Requirements for Outdoor Cat Enclosures?
You’ll need to check local ordinances regarding structures, ascertain your enclosure meets zoning regulations, and consider building codes. Some areas might require permits, so it’s best to confirm with your local authorities before starting.
How Do I Monitor My Cat’s Safety in the Enclosure?
To monitor your cat’s safety in the enclosure, you’ll want to install cameras for a real-time viewing extravaganza! Regularly check for wear and tear, keep an eye on their behavior, and make certain food and water are plentiful.
Can I Include Plants Inside the Cat Enclosure, and Which Are Safe?
Yes, you can include plants in the cat enclosure. Choose non-toxic options like catnip, spider plants, or basil. Just make certain they’re safe, and monitor your cat’s behavior to prevent any chewing or digging.
Conclusion
Building a cat enclosure can feel like crafting a little slice of paradise for your furry friend. With climbing structures, cozy hideaways, and fun toys, you’re not just creating a space—you’re crafting an adventure! So, why not let your kitty explore the great outdoors safely? Think of it as their personal theme park, where every day can be a new thrill. Keep an eye on it, and let the fun begin; your cat is going to love you even more.

Amr Mohsen is a software engineer who traded his keyboard for a leash — at least on weekends. His love for dogs inspired him to share what he learns as a dog owner and enthusiast, bringing a detail-oriented, research-driven perspective to every article he writes. If it’s about dogs, he’s probably already looked it up twice.

