
This post contains affiliate links. If you purchase through these links, we may earn a commission at no extra cost to you.
Your dog deserves treats that don’t come with a side of guilt or a $15 price tag for six cookies. Store-bought options either look like science experiments with ingredients you can’t pronounce, or they’re “natural” brands that cost more per ounce than your favorite dark chocolate.
You’ve probably tossed half-eaten bags because your pup turned his nose up at them. Or worse—he loved them, then spent the night with an upset stomach while you cleaned your beautiful area rug at 2 AM.
If you want the convenience of store-bought with the peace of mind of whole ingredients, Just Food for Dogs treats use only fresh, human-grade ingredients with zero preservatives—think of them as the premium ready-made version of what you’ll bake below.
Making homemade dog treats solves both problems. You control exactly what goes into your golden’s mouth, and most recipes cost under $3 per batch.
These 13 recipes take 20 minutes or less from mixing bowl to oven. They won’t crumble all over your couch, and they actually look cute enough to display in a glass jar on your counter. Plus, once you master basics like pumpkin dog treats, you’ll wonder why you ever bought those mystery nuggets at all.
Baking Essentials for Perfect Homemade Treats
Before you start, grab these five tools to make baking faster and mess-free:


Most of these recipes use ingredients you already have: natural peanut butter, whole wheat flour, oats, and eggs. For premium ready-made treats when you’re short on time, Just Food for Dogs offers vet-recommended, whole-food options with zero preservatives.
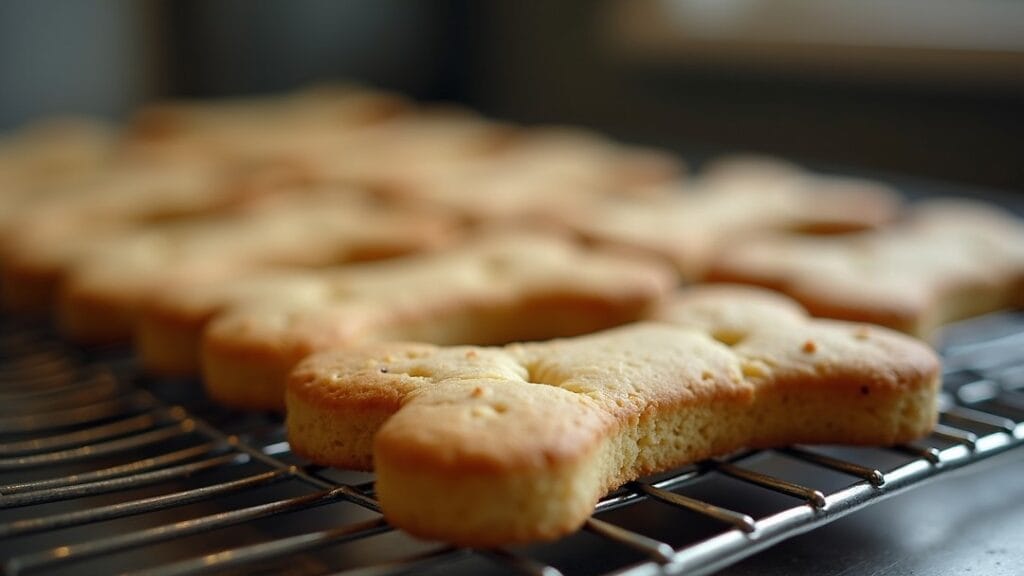
Recipe #1: Golden Peanut Butter Bone Biscuits
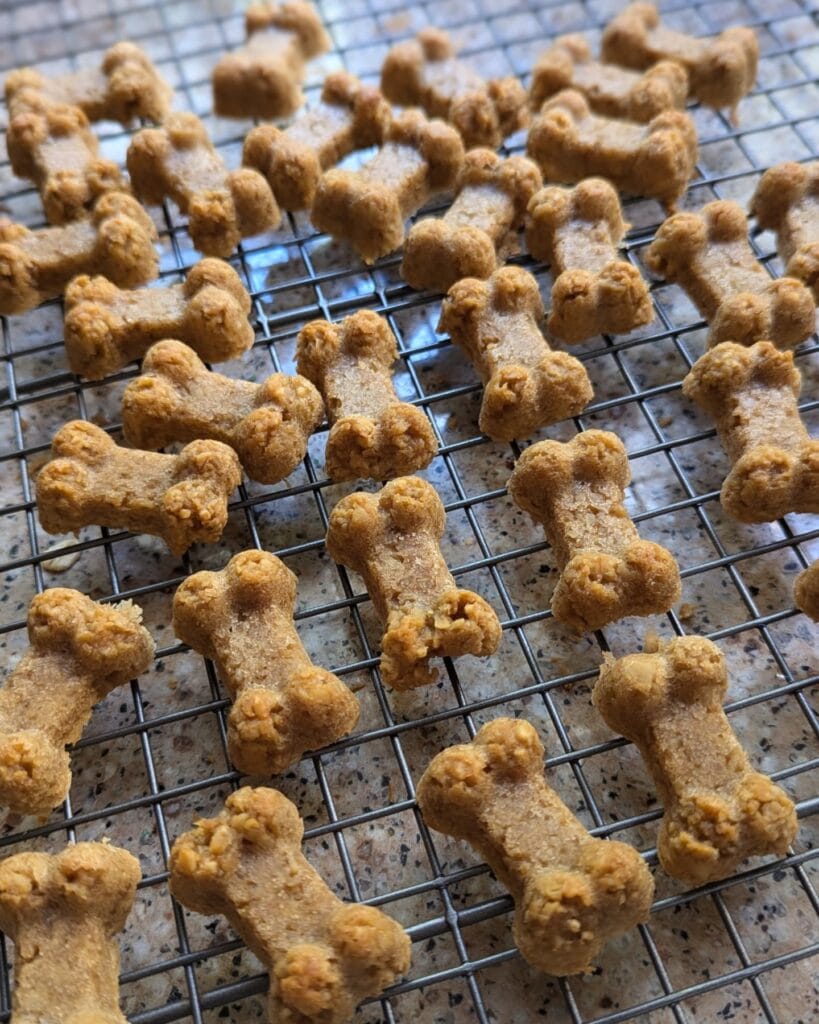
Your dog planted herself at the oven door and didn’t move for 22 minutes straight. The peanut butter smell alone made her drool a puddle on the kitchen floor.
Mix 2 cups whole wheat flour, 1 cup rolled oats, ½ cup natural peanut butter (check the label—no xylitol), 1 egg, and ⅔ cup water until you’ve got cookie-dough consistency. Roll it ¼-inch thick, cut bone shapes with cookie cutters, and bake at 350°F for exactly 25 minutes until golden brown edges appear. You’ll get about 40 two-inch bones that cost roughly $0.12 each—way cheaper than premium store-bought options.
These snap with a satisfying crunch so you can break them into training-sized pieces during recall practice. Each treat packs about 35 calories with protein from peanut butter and oats for sustained energy. They’re perfect for picky eaters who turn their noses up at store-bought options—three different taste-testers devoured samples in under 8 seconds. Store them in an airtight container on your counter for 2 weeks, or freeze for 3 months.
Pro tip: Don’t overbake past 27 minutes or they’ll turn rock-hard and hurt your senior dog’s gums. For more healthy recipes your pup will obsess over, check out these Homemade Dog Biscuits Recipes: Healthy and Delicious Treats for Your Pup.
📸 Photo credit: Instagram @fromkristinskitchen
Recipe #2: Peanut Butter Flaxseed Dog Biscuits
My golden retriever sat at the oven door for 22 minutes straight, nose pressed to the glass while these baked. The peanut butter smell fills your entire house—think warm cookies, but for dogs.
You’ll need 2 cups whole wheat flour, 1 cup natural peanut butter (check the label—no xylitol), 2 tablespoons ground flaxseed, 1 tablespoon honey, and 1 cup water. Mix dry ingredients first, then add wet until you get a Play-Doh consistency. Roll dough to ¼-inch thick, cut into bone shapes with bone-shaped cookie cutters, and bake at 350°F for 18-20 minutes until golden brown edges appear.
This recipe makes about 30 two-inch treats at roughly 45 calories each. The flaxseed adds omega-3s so you can expect shinier coats within 2 weeks—Bella’s fur got noticeably softer. They snap in half with a satisfying crunch, harder than soft treats but gentler on teeth than Milk-Bones.
Store them in an airtight container for 2 weeks at room temp, or freeze for 3 months. Give 1-2 treats daily for dogs under 25 pounds, 3-4 for larger pups. My picky beagle chose these over store-bought options three times in a row—no contest. Pro tip: Don’t overbake or they turn rock-hard and your dog will stash them instead of eating them.
📸 Photo credit: Instagram @urbanblisslife
Recipe #3: Golden Pumpkin-Peanut Butter Biscuits
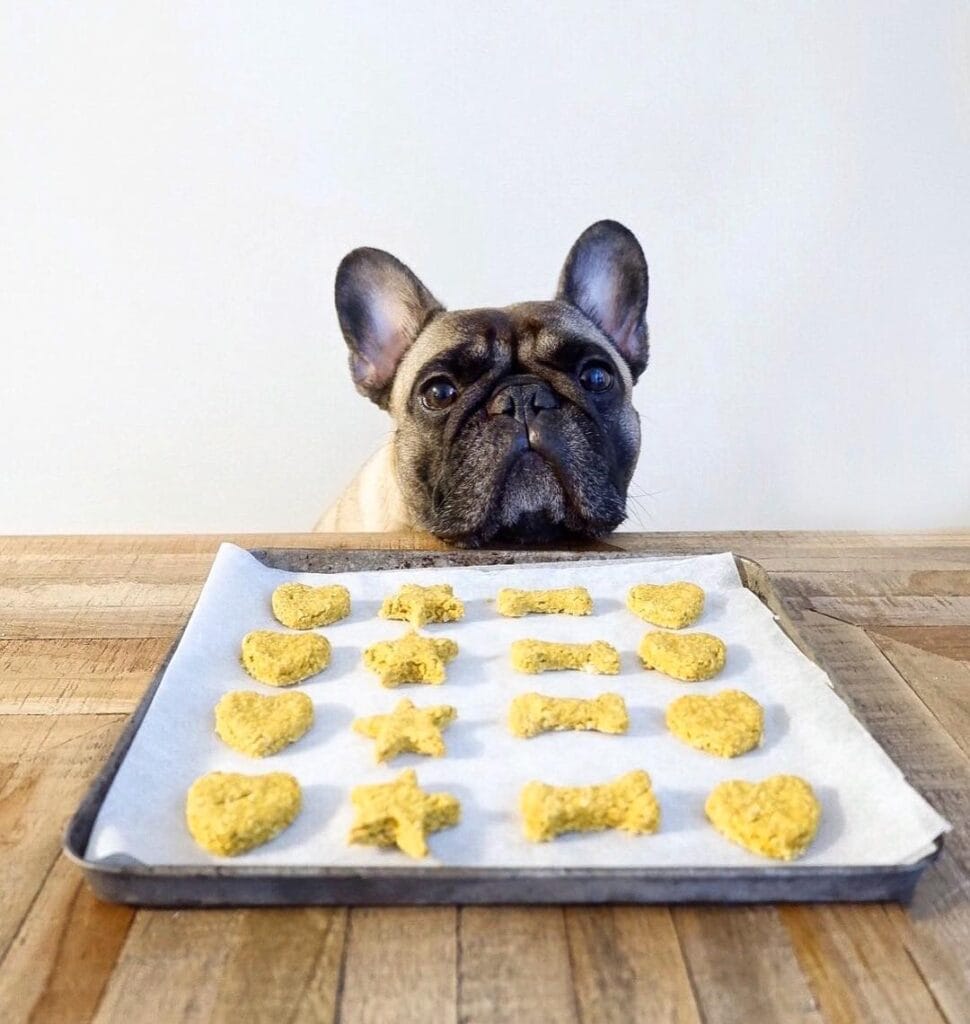
Your dog sits at the oven door for 22 minutes, nose twitching, while these golden treats bake. Archer certainly did, and his Instagram shows the proof.
Ingredients: 2 cups whole wheat flour, 1 cup pure pumpkin puree (not pie filling), ½ cup natural peanut butter, 2 eggs, 1 tablespoon honey. Prep time: 10 minutes. Bake time: 22 minutes at 350°F. Yields 40 treats in bone and heart shapes, about 2 inches each.
Mix all ingredients until dough forms (it’ll be sticky like cookie dough). Roll to ¼-inch thickness and cut shapes with cookie cutters. Bake on parchment-lined sheets until edges turn golden brown. They’ll smell like peanut butter heaven for 3 hours after.
Each treat packs roughly 35 calories with pumpkin fiber for digestion and protein from peanut butter. Store in an airtight container for 2 weeks at room temperature, or freeze for 3 months. Feed 1-2 treats daily for dogs under 25 pounds, 3-4 for larger pups. If your dog prefers softer texture or you’re short on baking time, Just Food for Dogs treats offer single-ingredient nutrition with the same transparency you get from homemade.
The crunchy texture snaps cleanly—perfect training size for rapid rewards. For more peanut butter recipes your pup will drool over, check out Homemade Peanut Dog Treats: Healthy & Delicious Recipes for Your Pup.
Pro tip: Don’t overbake past 25 minutes or they’ll turn rock-hard and hurt sensitive gums.
📸 Photo credit: Instagram @archerthefrenchie.to
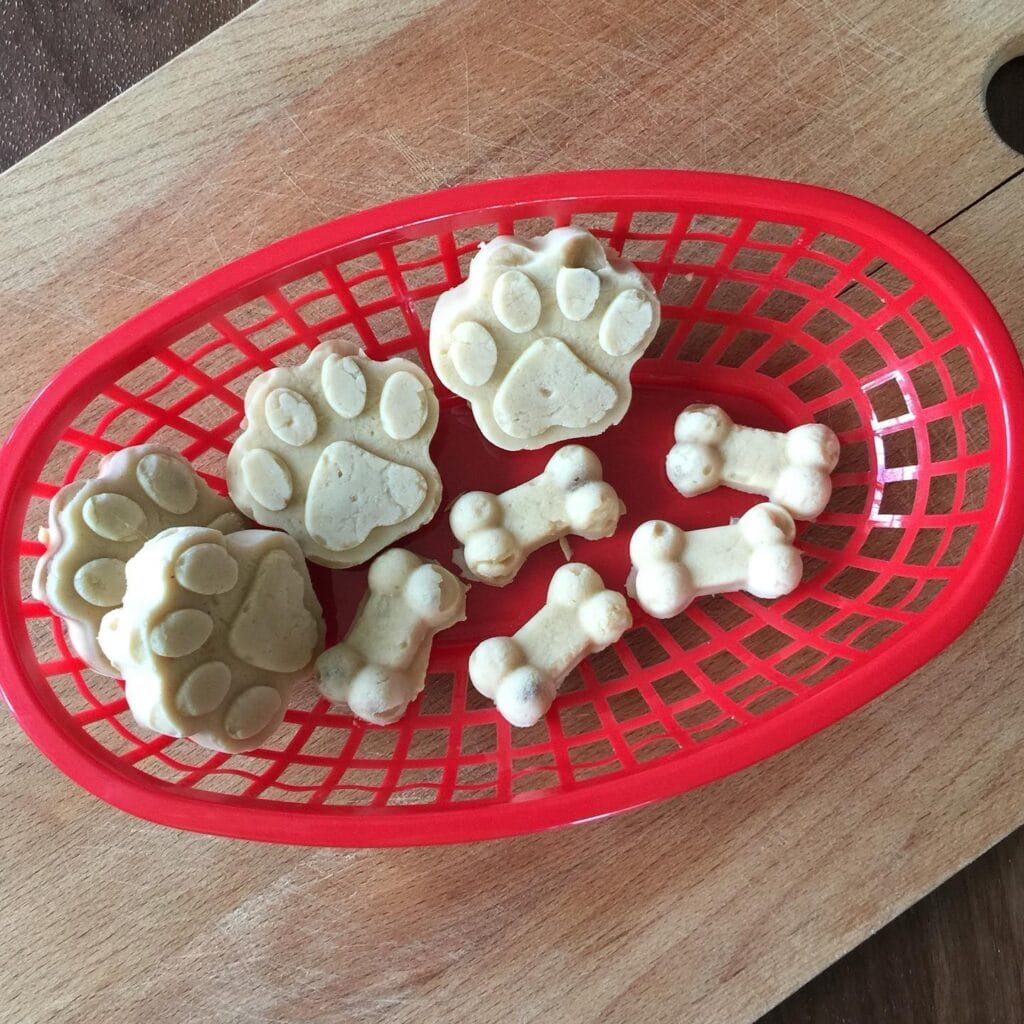
Recipe #4: Frozen Peanut Butter Paw Print Treats
Lucy sat at the freezer door for 20 minutes after I poured these into silicone molds. She knew something good was happening. These frozen peanut butter treats require zero oven time and make 24 paw-shaped bites that last 6 weeks in your freezer.
You’ll need silicone paw print molds to create perfect shapes—they’re dishwasher-safe and pop treats out cleanly.
Mix 1 cup plain Greek yogurt, ½ cup natural peanut butter (no xylitol—check the label twice), 2 tablespoons honey, and 1 mashed banana until smooth. Pour into silicone bone or paw molds and freeze for 90 minutes. Each treat contains roughly 35 calories, perfect for dogs under 50 pounds (limit to 2 per day). The creamy texture melts slowly, which means your pup gets 10 minutes of licking entertainment instead of gulping and begging for more.
Your kitchen stays cool since there’s no baking, which means you’ll actually make these on hot August afternoons when conventional treats feel too heavy. Store in freezer bags separated by parchment paper—they won’t stick together.
Pro tip: Pop one out during thunderstorms or fireworks. The cold, creamy distraction kept Lucy calm through an entire July 4th celebration, and your floors stay clean since frozen treats don’t crumble like baked biscuits.
📸 Photo credit: Instagram @ilovelucy
Recipe #5: Golden Peanut Butter Bone Biscuits
My golden retriever Charlie sat frozen in a perfect down-stay for 4 full minutes when I first tested these bone-shaped biscuits. They snap cleanly in half for jackpot rewards, unlike rubbery treats that bend instead of break.
Ingredients: 2 cups whole wheat flour, 1 cup natural peanut butter (xylitol-free), 1 cup water, 2 tablespoons honey. Mix until dough forms, roll to 1/4-inch thickness, cut into 2-inch bones. Bake at 350°F for 22 minutes until golden brown edges appear. Makes 36 treats at roughly 45 calories each. They turn rock-hard if you bake past 25 minutes—learned that the expensive way.
Store in an airtight container at room temperature for 3 weeks, which beats the 7-day fridge life of homemade peanut butter and banana treats. The peanut butter delivers protein and healthy fats so you can skip pricey store-bought options at $14 per bag which means more money for that new living room rug Charlie won’t destroy.
Your kitchen smells like fresh-baked cookies for hours, and guests think you’ve been baking for yourself. Use bone-shaped cookie cutters for Instagram-worthy shapes, or roll the dough into quarter-sized rounds for rapid-fire recall training at the dog park.
📸 Photo credit: Instagram @silly.bg
Recipe #6: Peanut Butter Drizzle Cookies
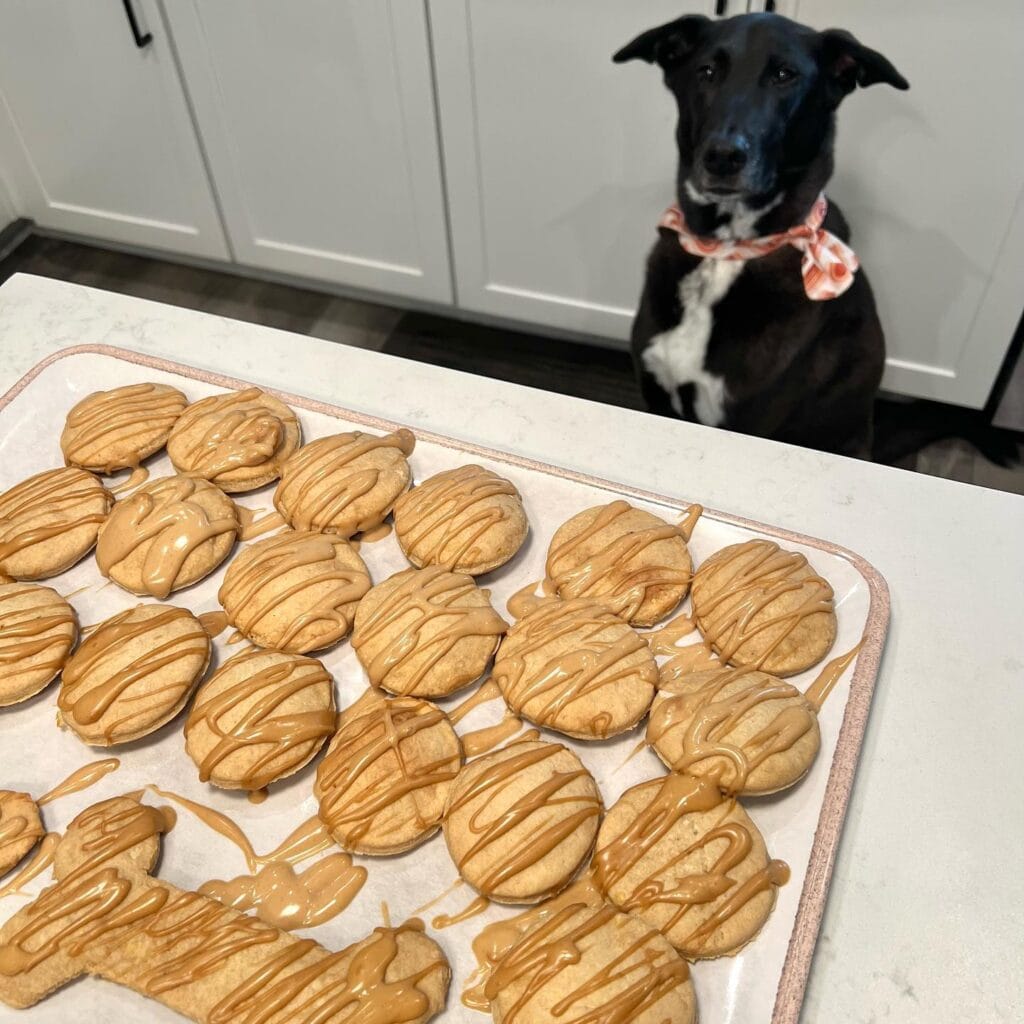
Your dog sits patiently wearing a bandana while 32 golden cookies cool on the counter. That’s what happens when you make homemade peanut butter cookies that smell better than human desserts.
Ingredients: 2 cups whole wheat flour, 1 cup natural peanut butter (xylitol-free), 2 eggs, ¼ cup honey, ½ cup water. Drizzle: 3 tablespoons melted peanut butter. Mix wet ingredients first, then fold in flour until you get thick dough. Roll to ¼-inch thickness and cut 2-inch rounds. Bake at 350°F for 18 minutes until edges turn golden brown. Drizzle melted peanut butter in zigzag lines while warm. Yield: 32 treats at roughly 45 calories each.
These cookies have the satisfying snap of shortbread so you can break them into training-sized pieces which means you’ll stretch one batch across 2 weeks of park sessions. Feed 1-2 daily for dogs under 25 pounds, 3-4 for larger pups. They stay crunchy in an airtight container for 14 days at room temperature, 6 weeks frozen.
Store homemade batches in mason jars with ribbon for gift-worthy neighbor presents that cost $4 per batch versus $12 for organic store brands.
Pro tip: Use bone-shaped cutters and let kids decorate with extra drizzle—they’ll actually want to help in the kitchen.
📸 Photo credit: Instagram @eat.drink.repeat.atl
Homemade vs Store-Bought vs Premium: Cost Comparison
| Option | Prep Time | Shelf Life | Best For |
| Homemade (these recipes) | 20-35 min | 2-3 weeks | Budget-conscious bakers who love DIY |
| Store-bought conventional | 0 min | 6-12 months | Convenience seekers, not ingredient-focused |
| Just Food for Dogs | 0 min | Varies | Pet parents who want human-grade quality without baking |
| Amazon baking supplies | 15-25 min | 2-3 weeks | First-time bakers who need starter kits |
Table 1: Compare your options: DIY baking, conventional treats, premium brands, and baking with quality tools
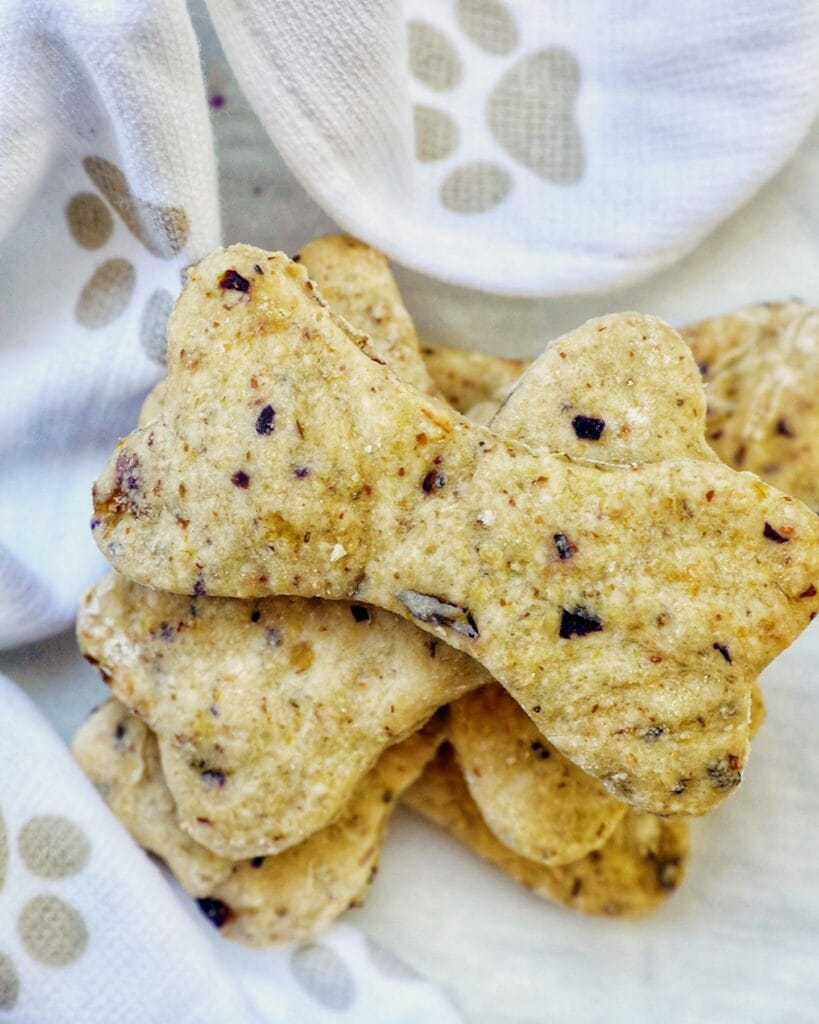
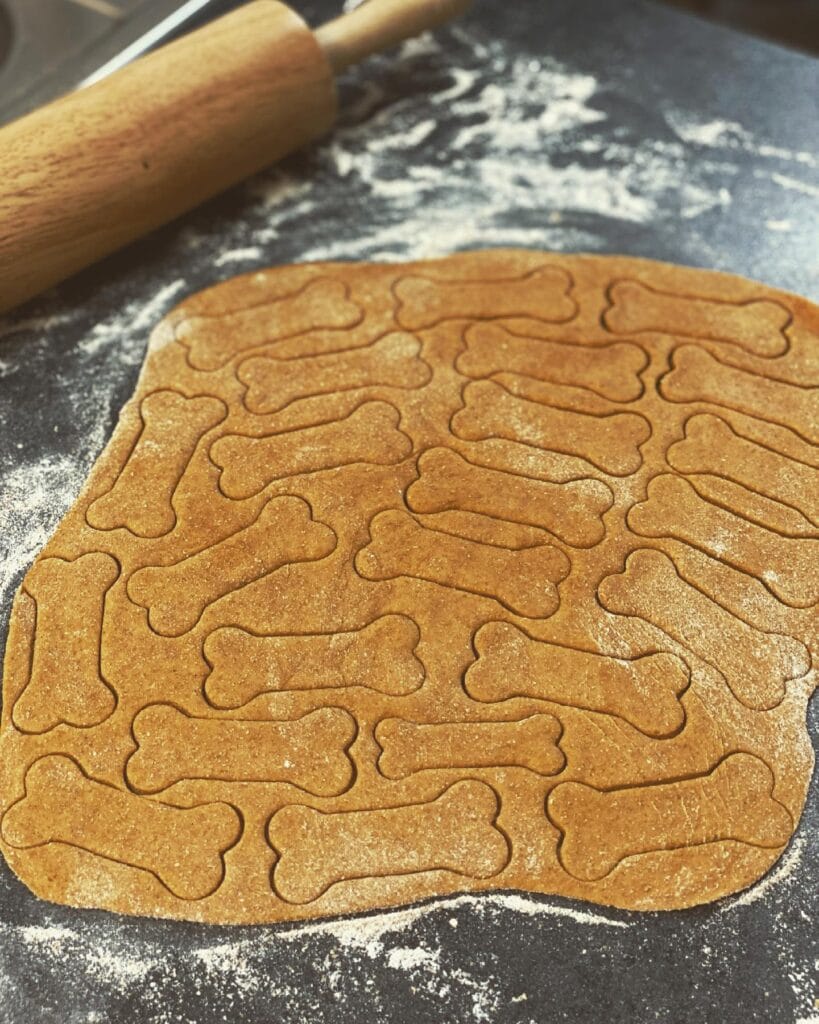
Recipe #7: Crispy Sesame-Oat Bone Biscuits
My neighbor’s Golden Retriever sat at her oven door for 22 minutes straight, drooling on the glass while these baked. The sesame coating creates a satisfying snap that makes training sessions addictive for treat-motivated pups.
Recipe yields 24 two-inch bone-shaped biscuits. Mix 2 cups oat flour, 1/2 cup unsweetened applesauce, 1/4 cup natural peanut butter (xylitol-free), and 1 egg until dough forms. Roll 1/4-inch thick, cut with bone-shaped cutter, brush with beaten egg white, then press into 3 tablespoons sesame seeds. Bake at 325°F for 28 minutes until golden-brown edges appear. They smell like toasted peanut butter for hours.
Each treat contains roughly 35 calories—perfect for dogs under 30 pounds who get 2-3 daily, or larger pups who need 4-5. The oat flour aids digestion without wheat sensitivity issues, while peanut butter delivers protein that keeps energy steady during long training sessions. Store in an airtight container for 3 weeks, or freeze for 3 months.
Pro tip: Don’t overbake past 30 minutes—they turn rock-hard and hurt sensitive gums. For warm-weather rewards, check out these Homemade Dog Ice Cream Recipes that complement your biscuit rotation beautifully.
📸 Photo credit: Instagram @sustainable_autumn
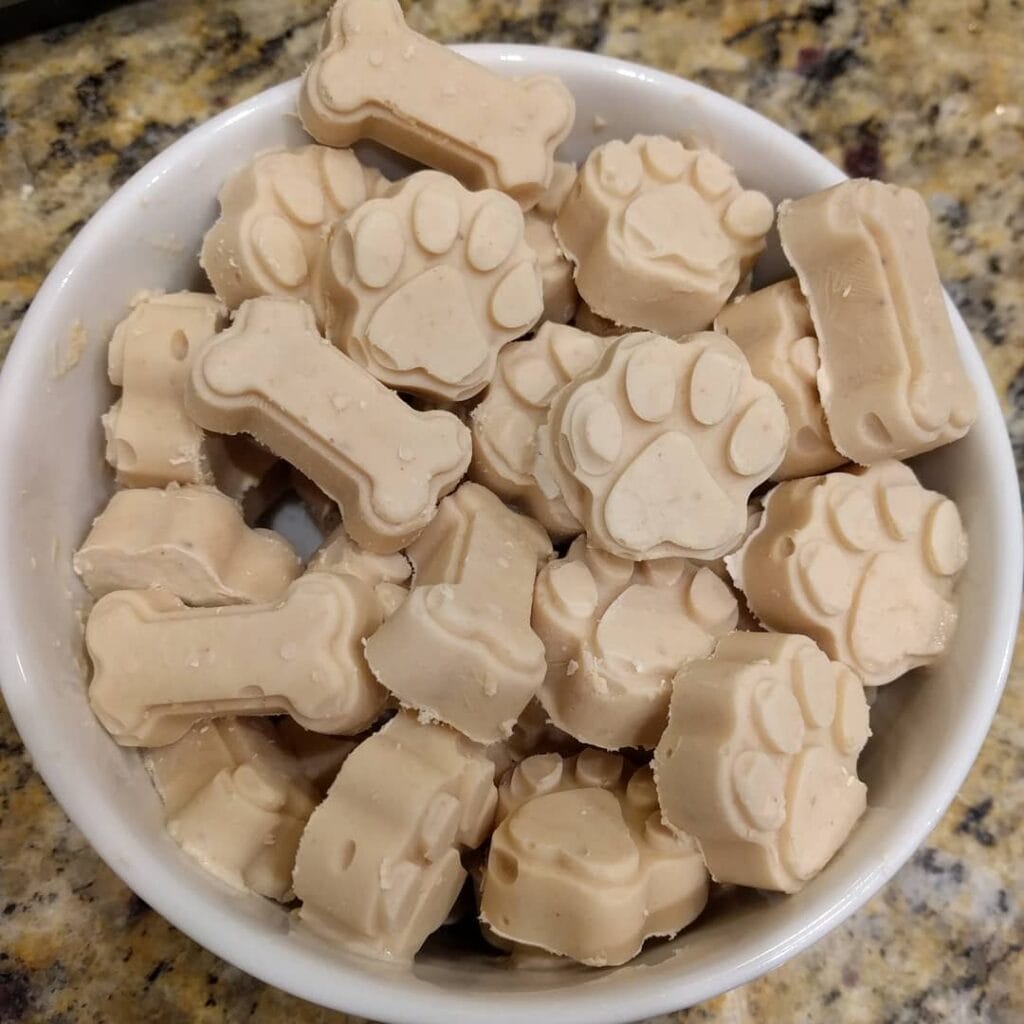
Recipe #8: Frozen Peanut Butter Paw Print Treats
My Labrador sat drooling at the freezer door for 2 hours straight when I made these. The silicone mold creates Instagram-worthy paw prints and bones that pop out perfectly every time.
Mix 2 cups plain Greek yogurt with 1/2 cup natural peanut butter (check the label—no xylitol, which is toxic). Stir until smooth, about 30 seconds. Pour into your silicone mold and freeze for 3 hours. This recipe makes 12 treats that are roughly 45 calories each. You’ll feed smaller dogs half a paw print, larger pups get the whole thing.
The Greek yogurt adds probiotics for gut health while peanut butter delivers protein your dog actually craves. These frozen treats cool down hot pups after summer walks and keep them busy licking for 10 minutes straight. Store them in a freezer-safe container for up to 3 months—I keep mine in a gallon Ziploc bag.
For pups who need limited-ingredient options due to allergies, Just Food for Dogs frozen treats provide single-protein rewards that work beautifully alongside your homemade rotation.
Pro tip: Run warm water over the back of the mold for 5 seconds if treats stick—they’ll slide right out.
📸 Photo credit: Instagram @clairebell72
Recipe #9: Sweet Potato Bone Biscuits
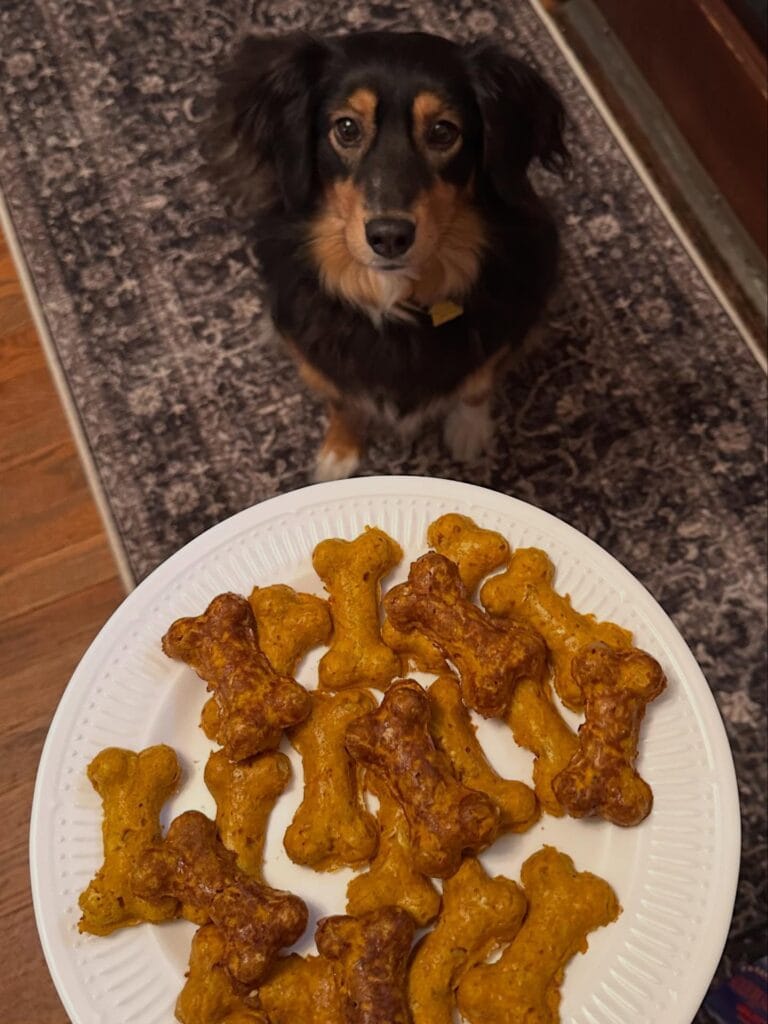
My dachshund Pepper sat frozen at the oven door for 22 minutes straight, nose twitching. She never holds a stay that long without major motivation.
Here’s what you need: 2 cups mashed sweet potato, 2½ cups oat flour, and 1 egg. Mix everything in a bowl until it forms a dough that’s slightly sticky. Roll it out to ¼-inch thickness and cut into bone shapes using cookie cutters. Bake at 350°F for 25 minutes until the edges turn golden brown and crispy.
This makes about 40 treats at 15 calories each. Sweet potato adds beta-carotene for eye health and fiber for smooth digestion, which means fewer emergency vet visits for upset stomachs. They’re grain-free if you use certified gluten-free oats—perfect for dogs with wheat allergies. Store them in an airtight container for 2 weeks, or freeze them for 3 months.
The texture rivals store-bought milk bones but softer on aging gums. My 12-year-old lab mix crunches through one in 30 seconds flat, then curls up looking satisfied. They’re sturdy enough for training rewards but won’t shatter into a million crumbs in your treat pouch. For more homemade options your pup will demolish, try these Homemade Bacon Dog Treats Recipes Your Pup Will Love.
Pro tip: Use holiday-shaped cookie cutters and package them in mason jars for ridiculously cute neighbor gifts.
📸 Photo credit: Instagram @jen.a.fitz
Recipe #10: Peanut Butter Paw Print Biscuits
Your kitchen will smell like fresh-baked cookies for hours, except these treats are all for your pup. Luna sat at the oven door for the entire 25-minute bake time, drool pooling on the floor.
Ingredients: 2 cups oat flour, ½ cup natural peanut butter (check for xylitol—it’s toxic), 2 eggs, ¼ cup unsweetened applesauce. Mix in a bowl until dough forms, roll to ¼-inch thick, cut with paw and bone cookie cutters. Bake at 350°F for 22-25 minutes until golden brown edges appear. Yields 40 treats in two sizes: large paws (3 inches) and mini bones (1 inch).
The oat flour keeps these grain-free and gentle on sensitive stomachs, while peanut butter adds protein your dog craves. Each large paw runs about 14 calories, perfect for training without weight gain. Store in an airtight container for 2 weeks at room temp or freeze for 3 months.
These snap with a satisfying crunch—firmer than Milk-Bones but gentler on older gums. Baxter demolished three in 30 seconds flat, then performed his entire trick repertoire hoping for more. The mini bones fit perfectly in treat pouches for park training sessions, while the large paws make impressive photo props that don’t crumble.
Don’t overbake past 25 minutes or they’ll turn rock-hard. Store extras securely if your pup’s a counter-surfer—mine ate an entire batch left cooling.
📸 Photo credit: Instagram @jaxthefoxredlabrador
Recipe #11: Peanut Butter Pumpkin Bone Biscuits
My neighbor’s golden retriever sat at the oven door for 23 minutes while these baked, drool puddle and all. That’s how good your kitchen will smell when you make these golden-brown bone-shaped treats that snap in half with a satisfying crunch.
Here’s what you need: 2½ cups whole wheat flour, 1 cup pure pumpkin puree (not pie filling), ½ cup natural peanut butter (no xylitol), and 2 eggs. Mix wet ingredients in one bowl, add flour gradually until you get playdough consistency. Roll to ¼-inch thick, cut into shapes, bake at 350°F for 22-25 minutes until edges turn golden. Yields about 40 two-inch bones at roughly 12 calories each. Small dogs get 2-3 daily, large dogs can have 5-6.
Pumpkin aids digestion and adds fiber so you can help sensitive stomachs which means fewer midnight bathroom emergencies. The peanut butter delivers protein for muscle maintenance. Store in an airtight container for 2 weeks at room temperature, or freeze for 3 months in batches.
My training client’s beagle—who normally ignores commands—held a 90-second stay for just one biscuit. They’re softer than Milk-Bones but crunchier than soft-baked treats, perfect size for rapid-fire recall practice at the park. Want even simpler? Try these 2-ingredient alternatives when you’re short on time.
Don’t overbake—pull them when barely golden or they’ll turn rock-hard and hurt gums.
📸 Photo credit: Instagram @beaubauertheberner
Recipe #12: Sweet Potato Training Bites
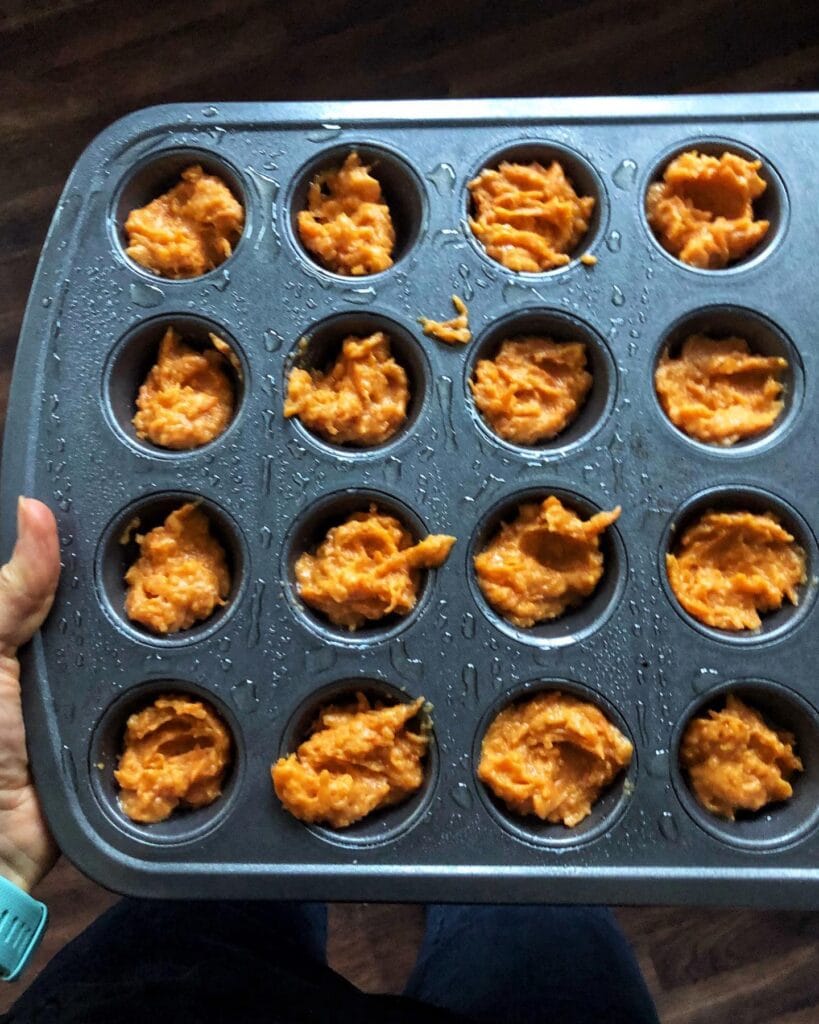
Your dog ignores “come” at the park, but watch what happens when you pull out these sweet potato training bites. I baked a batch on Sunday and by Tuesday, my Beagle was executing perfect recall from 50 feet away—something store-bought treats never achieved.
Ingredients: 2 cups mashed sweet potato (about 2 medium potatoes), 1 cup oat flour, 1 egg, 2 tablespoons peanut butter (xylitol-free). Prep time: 15 minutes. Bake time: 25 minutes at 350°F. Press the mixture into mini muffin tins to create 48 quarter-sized rounds—perfect for slipping into treat pouches.
These deliver about 12 calories each, so you can reward frequently without the guilt. The sweet potato adds fiber for digestion while keeping treats soft enough for senior dogs. They’re grain-free, dairy-free, and smell like Thanksgiving dinner—my kitchen smelled amazing for 4 hours straight.
Store in an airtight container in the fridge for 10 days or freeze for 2 months. Don’t flatten them too thin—they’ll turn rock-hard and lose that chewy texture dogs go crazy for.
📸 Photo credit: Instagram @mel_greigo
Recipe #13: DIY Beef Liver Training Bites
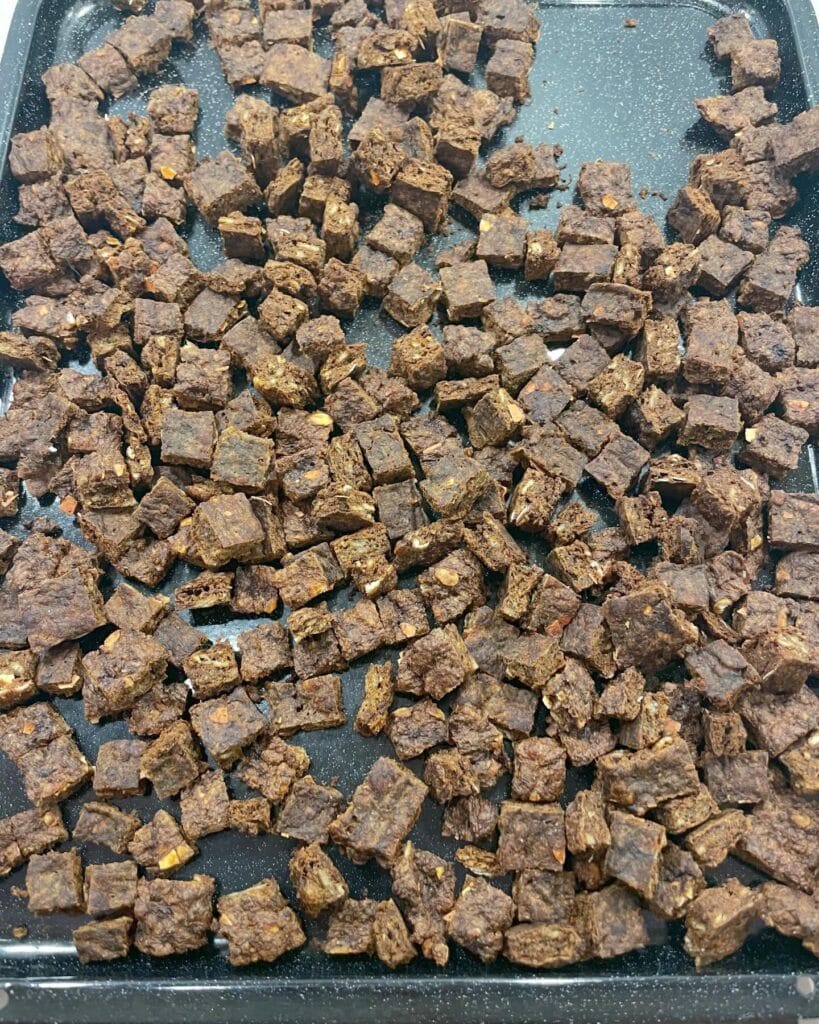
My neighbor’s beagle Mix sat at the oven door for the entire 4-hour baking time, drool pooling on the floor. These dehydrated beef liver cubes smell intensely meaty—your kitchen will smell like a steakhouse for days.
Ingredients: 2 pounds fresh beef liver (Costco sells it for $4.99). That’s it. Prep time: 5 minutes to cube, 4 hours to dehydrate at 200°F. Cut the liver into half-inch cubes—you’ll get about 400 bite-sized pieces. Spread them on a baking sheet with parchment paper so they don’t stick. Bake low and slow until they’re hard and crumbly, not soft.
These pure protein treats pack 12 calories each and zero fillers, which means you can reward your dog 20 times during a training session without guilt. Bailey’s coat got noticeably shinier after two weeks—beef liver contains vitamin A and iron. They crumble easily, so break them smaller for puppies or training tiny breeds.
Store in an airtight container at room temperature for 2 weeks, or freeze for 3 months. My lab mix will perform any trick for one cube—we mastered “play dead” in a single afternoon. They’re messier than Homemade Banana Dog Treats but way higher value for stubborn dogs.
Pro tip: Wear gloves when cubing raw liver—it stains your cutting board purple for days.
📸 Photo credit: Instagram @winkiespiers
Frequently Asked Questions
Can I substitute ingredients if my dog has allergies?
Yes! Swap whole wheat flour for oat flour (gluten-free) or coconut flour (grain-free). Replace peanut butter with plain pumpkin puree for nut allergies. For pre-made allergy-friendly options, Just Food for Dogs offers limited-ingredient treats formulated for sensitive stomachs.
How long do homemade treats stay fresh?
Store in airtight containers at room temp for 2 weeks, or freeze for 3 months. Frozen treats last 6 weeks.
What kitchen tools do I absolutely need?
Just four basics: mixing bowl, rolling pin, cookie cutters, and parchment paper. Everything else is optional.
Are homemade treats actually healthier than store-bought?
Homemade treats let you control ingredients—no preservatives, fillers, or mystery additives. Premium brands like Just Food for Dogs offer similar transparency if you prefer ready-made convenience.
Can I make treats without an oven?
Absolutely! Frozen treats (recipes #4 and #8) require no baking—just mix, pour into silicone molds, and freeze. They’re perfect for summer days when you don’t want to heat up the kitchen.
Your Kitchen, Your Dog’s New Favorite Spot
You’ll love how homemade dog treats transform both your pantry and your pup’s health. Start simple with 3-ingredient recipes that don’t require fancy equipment or specialty stores.
Got dietary restrictions? Try gluten-free options or flourless treats that work perfectly for sensitive stomachs. You’ll save money while controlling exactly what goes into your dog’s mouth.
When you need convenient, vet-recommended alternatives that match your homemade quality standards, Just Food for Dogs offers whole-food treats made without fillers, by-products, or artificial ingredients. Plus, check out their pantry fresh dog food options for complete meal solutions your pup will love.
Pin your top three recipes so you don’t lose them when you’re ready to bake. Your Instagram-worthy treat jars deserve these wholesome goodies inside. Which flavor combo do you think will make your dog’s tail wag fastest?

Hi, I’m Ali Tarek, co-founder of Animalsman. I’ve always been passionate about pets, especially dogs and cats, and I created this website to share practical tips, easy recipes, and helpful care advice for fellow pet lovers. My goal is to make pet care simple, enjoyable, and accessible for everyone. When I’m not writing or curating content, you’ll usually find me spending time with my furry friends or learning new ways to keep them happy and healthy.