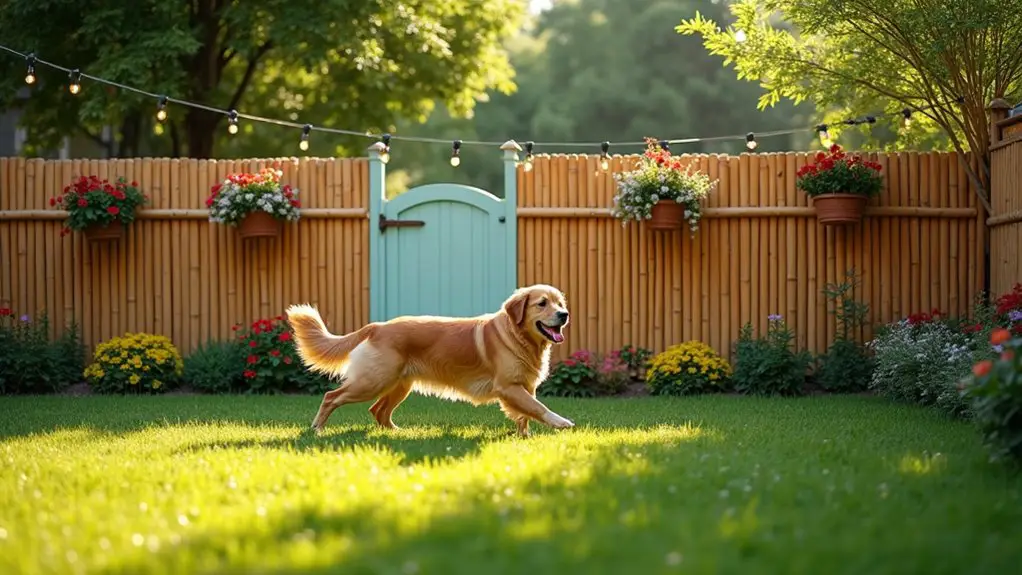
A sturdy fence keeps your dog safe, while an eyesore can ruin your yard’s vibe. So, how do you balance function and style without breaking the bank? You might think you need a fortune to create a dog-friendly space, but there are actually some clever DIY solutions out there. From rustic pallets to playful PVC pipes, you’ll be surprised at how easy and fun these projects can be. Ready to explore these inventive ideas?
Creative Pallet Fence Ideas
When it comes to creating a dog fence, using pallets can be a game-changer—seriously, who knew something so simple could be so effective?
You can build a DIY dog fence outdoor cheap and keep your pup safe without breaking the bank. Start by gathering some sturdy pallets; they’re often free or super cheap from local businesses.
Next, position them upright, creating a solid barrier. You might want to sand the edges a bit—no one wants splinters, right? Secure them together with screws or nails.
If you’re feeling fancy, paint or stain the pallets for a pop of color. Trust me, your furry friend will appreciate the space to roam, and you’ll feel like a DIY superstar.
Our Collection
Now that you’ve explored some creative pallet fence ideas, let’s check out our collection of DIY dog fence options.
You’ll find everything from repurposed wooden crates to wire mesh panels, each with its own charm and practicality.
Got a stubborn pup or a garden to protect? These ideas might just save the day.
1. Repurposed Wooden Crates Fence
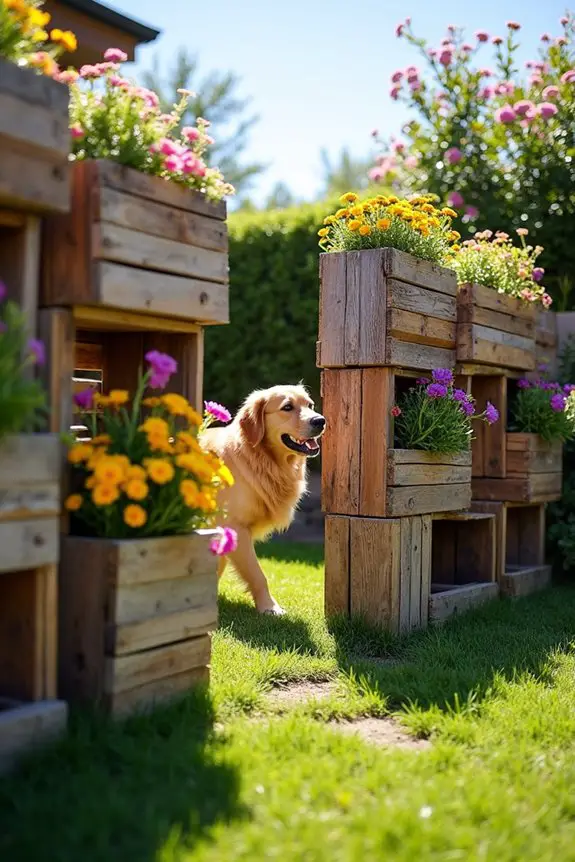
If you’re looking for a charming and budget-friendly way to keep your furry friend safe and secure, creating a fence from repurposed wooden crates is a great project to tackle. Not only does it save you money, but it also adds a rustic, cozy vibe to your yard. Plus, it’s a fantastic way to give new life to old crates that might otherwise go to waste. Who knew being green could look so good? To enhance your pup’s outdoor experience, consider complementing your fence with premium dog supplies that will elevate their playtime.
Materials Needed:
- Wooden crates (enough to cover your desired area)
- Sandpaper (medium and fine grit)
- Outdoor wood sealant or paint (optional)
- Heavy-duty outdoor screws
- Drill and drill bits
- Level
- Measuring tape
- Safety goggles
- Work gloves
Step-by-Step Instructions:
- Gather Your Crates: Start by collecting enough wooden crates to create your fence. You can find them at local thrift shops, farmers’ markets, or online marketplaces. Aim for uniform sizes for a tidy look, but a mix can add character.
- Prep the Crates: Sand down any rough edges or splinters with medium grit sandpaper, followed by fine grit for a smooth finish. Safety first, so wear those goggles and gloves!
- Seal or Paint (Optional): If you want to keep your crates looking fresh and protected from the elements, apply an outdoor wood sealant or paint. Choose a color that complements your home, or go for a fun, bright hue to show off your personality.
- Plan Your Layout: Measure the area where you want to install the fence. Use your measuring tape to determine how many crates you’ll need and how you want to arrange them. A straight line is classic, but a zigzag or staggered pattern can add a playful touch.
- Assemble the Crates: Using the drill and outdoor screws, attach the crates together in your planned layout. Make sure each connection is secure by checking with a level. If things aren’t quite right, don’t sweat it – a little wiggle can add character.
- Secure the Fence: Once assembled, anchor your crate fence to the ground, using stakes or additional screws. This will help prevent any accidental toppling if your pup decides to lean against it during a particularly exciting squirrel sighting.
- Finishing Touches: Check for any sharp edges or loose screws and make adjustments as needed. And voilà, your dog’s new favorite hangout spot is ready!
Optional Add-ons/Variations:
- Color Pop: Consider painting each crate a different color for a whimsical look or go monochrome for a more sophisticated design.
- Add Planters: Attach small planters to the sides of your crates for a splash of greenery or flowers. It’s a great way to make your fence a part of your garden.
Pro Tip:
To guarantee your fence stands the test of time, treat the wood regularly with sealant. This not only protects from rot and weather but also keeps your fence looking new for years to come.
And don’t forget – always check for any escape routes after your pup’s first few playdates. You never know what a determined dog can do when they spot a butterfly.
2. Wire Mesh Fence Panels
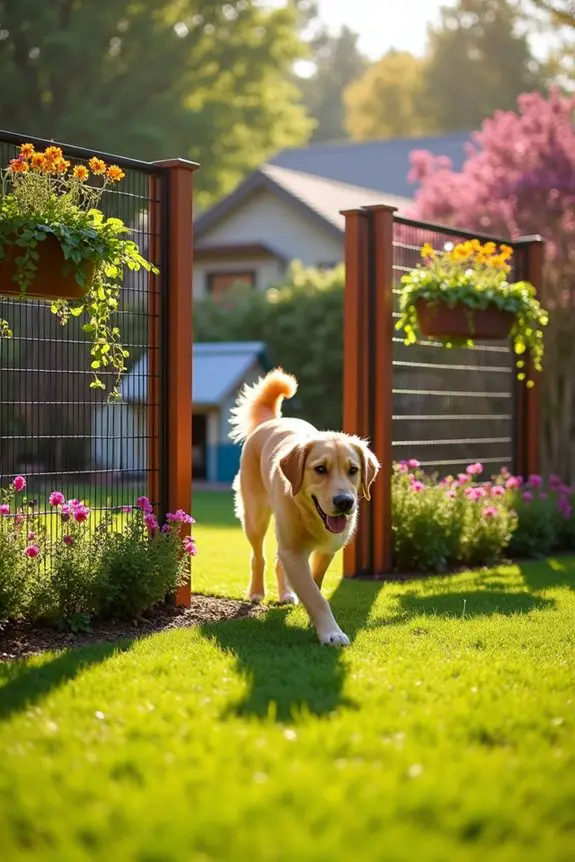
If you’re looking for a sturdy and effective way to keep your dog safe while still being budget-friendly, wire mesh fence panels may be just the ticket. They’re easy to install, incredibly durable, and can keep even the most adventurous pups contained. Plus, they offer a sleek, modern look that can enhance your yard’s aesthetic. Who doesn’t want a fence that’s both functional and stylish? Additionally, pairing your dog’s diet with premium dog food brands can contribute to their overall health and energy levels.
Materials Needed:
- Wire mesh fence panels (enough to cover your desired area)
- Fence posts (wood or metal, based on preference)
- Concrete mix (for securing posts)
- Heavy-duty outdoor screws or zip ties
- Drill and drill bits
- Level
- Measuring tape
- Safety goggles
- Work gloves
- Post hole digger or auger (optional but helpful)
Step-by-Step Instructions:
- Measure Your Space: Start by determining the area you want to fence in. Use your measuring tape to outline the perimeter. This will help you figure out how many panels and posts you’ll need.
- Select Fence Post Locations: Generally, you’ll want to place your posts every 6 to 8 feet. Mark these spots with flags or stakes, keeping in mind any corners or gates you may want.
- Dig Post Holes: Use your post hole digger (or auger if you’re feeling fancy) to create holes for your fence posts. Each hole should be about 2 feet deep to guarantee stability.
- Set the Posts: Place each post into its respective hole and fill with concrete mix according to the package instructions. Make sure to use a level to keep them straight. You may need to support them temporarily until the concrete sets.
- Attach Wire Mesh Panels: Once your posts are set and the concrete has cured, it’s time to attach the wire mesh panels. Lay the panels against the posts and secure them using screws or zip ties. For a cleaner look, consider using a staple gun or wire clips to attach the mesh directly to the posts.
- Check for Stability: After securing all the panels, give the fence a gentle shake to verify everything is sturdy. If you notice any wobbly sections, tighten them up or adjust as needed.
- Finishing Touches: Check for any sharp edges on the mesh that might be hazardous to your pup. You can use a piece of hose or tape to cover these spots. If you want, plant some bushes or flowers along the base for a little added flair.
Optional Add-ons/Variations:
- Color Coating: If you’re feeling creative, consider painting the fence posts to match your home or landscape. A pop of color can really brighten things up.
- Decorative Elements: Add some decorative elements like climbing plants or hanging planters along the fence. Your dog will love the added shade!
Pro Tip:
Before you start digging, check local regulations regarding fence height and type. You don’t want to get halfway through your project only to find out you need a permit or to make adjustments. Also, keep a tape measure handy for accurate spacing—it saves time and headaches later.
3. Recycled Garden Trellis Fence
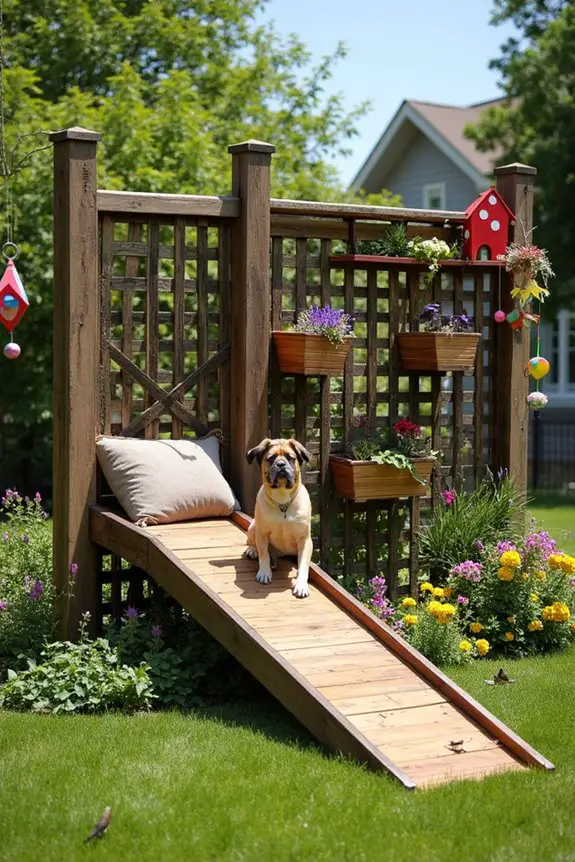
If you’re looking for a creative and eco-friendly way to keep your pup safe while adding a touch of charm to your yard, a recycled garden trellis fence might just be the perfect solution. Not only does it help contain your furry friend, but it also saves money and gives a delightful rustic vibe to your outdoor space.
Plus, it’s a fun project that lets you repurpose materials that might otherwise go to waste. Who knew creating a safe haven for your dog could also be so stylish? Moreover, pairing your fence with a dog ramp heavy duty can enhance your dog’s mobility around your yard.
Materials Needed:
- Old wooden garden trellises (or wooden pallets)
- Fence posts (wood or metal)
- Outdoor screws or nails
- Hammer or drill
- Level
- Measuring tape
- Safety goggles
- Work gloves
- Wood stain or paint (optional for a pop of color)
Step-by-Step Instructions:
- Gather Your Materials: Start by collecting your old trellises or pallets. If you’re using pallets, make sure they’re in good condition and free of any splinters.
- Plan Your Design: Decide how you want the fence to look. You can create a straight line or go for a more whimsical shape. Use your measuring tape to mark out the area you want to fence in, and verify you have enough materials.
- Set Up the Fence Posts: Place your fence posts at the corners and along the perimeter, spacing them about 6 feet apart. Use your level to make sure they’re straight. If you’re feeling extra motivated, you can even dig holes and set them in concrete for added stability.
- Attach the Trellis: Starting from one end, secure the trellis or pallet boards to the fence posts using outdoor screws or nails. If you’re using pallets, you can stand them on their side for a taller fence or lay them flat for a shorter barrier.
- Check Stability: Give the fence a gentle shake to ascertain everything is secure. If anything feels loose, tighten it up. Make sure your pup can’t wiggle their way through any gaps.
- Personalize Your Fence: Once your fence is up, consider giving it a fresh coat of wood stain or paint. This not only protects the wood but also lets you add a splash of color that matches your home or garden.
- Finishing Touches: Walk around the fence and check for sharp edges or gaps. Cover any rough spots with sandpaper or add a bit of padding. You can also plant flowers or vines along the base for a beautiful finishing touch.
Optional Add-ons/Variations:
- Vertical Garden Planters: Attach small planters to your trellis to grow herbs or flowers, giving your fence a dual purpose.
- Decorative Accents: Hang colorful birdhouses or wind chimes from your trellis for a whimsical touch that will delight both you and your pup.
Pro Tip:
Before starting your project, check with your local regulations regarding fence height and material. You don’t want to end up with a lovely fence that’s in violation of any codes.
And remember, always wear your safety goggles while working—trust me, splinters don’t care how much you love your dog!
4. Hurdle Jump Dog Fence
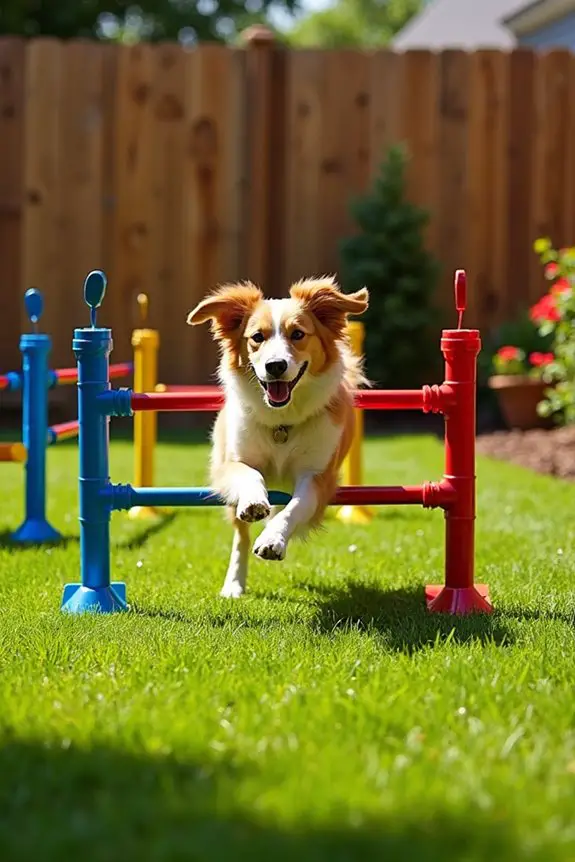
If you’ve got a high-energy pup who loves to leap and bound, a hurdle jump dog fence is a fantastic DIY project to contemplate. This fence not only keeps your furry friend contained but also provides them with an exciting way to exercise and have fun in your yard. Plus, it’s a budget-friendly solution that adds a unique touch to your outdoor space, making it look more playful and inviting. Additionally, consider incorporating a dog ramp for elderly pets to ensure all your furry friends can enjoy the yard, regardless of their mobility.
Materials Needed:
- PVC pipes (1-inch diameter recommended)
- PVC pipe connectors (elbows and T-joints)
- A saw (for cutting pipes to size)
- Measuring tape
- Zip ties or bungee cords
- Outdoor fabric (optional for a pop of color)
- Safety goggles
- Work gloves
Step-by-Step Instructions:
- Measure Your Space: Determine where you want to set up the hurdle jump fence. Use your measuring tape to decide the height and width of each jump. A good starting height is around 24 inches, but feel free to adjust based on your dog’s jumping ability.
- Cut the PVC Pipes: Using your saw, cut the PVC pipes into the lengths you need for the vertical posts and horizontal bars. You’ll need two vertical posts for each jump and one horizontal bar that connects them.
- Assemble the Jumps: Use the PVC connectors to attach the vertical posts to the horizontal bars. Create a rectangular shape for each jump. Make sure everything fits snugly, so your dog can’t knock it over with a little enthusiasm.
- Secure the Jumps: Once your jumps are assembled, use zip ties or bungee cords to attach them to the ground or to your existing fence. This will help prevent them from tipping over during playtime.
- Personalize Your Jumps: Optionally, you can wrap the horizontal bars in outdoor fabric to add a splash of color, or paint them with outdoor-safe paint for a fun design. Just make sure everything is securely fastened.
- Test for Stability: Before letting your pup loose, give each jump a gentle shake to verify everything feels sturdy. You want to make sure your dog can’t wiggle them around or knock them over.
- Let the Fun Begin: Once you’re confident in the stability of your hurdle jump fence, invite your dog to give it a try. You might want to encourage them with treats and lots of praise to show them how much fun it can be.
Optional Add-ons/Variations:
- Adjustable Heights: Contemplate using adjustable connectors to allow you to change the height of the jumps as your dog improves. This way, you can keep the challenge alive and exciting.
- Decorative Touches: For a more whimsical feel, paint the jumps in bright colors or add some fun designs with stencils—think paw prints or bones.
Pro Tip:
Make sure to check your jumps regularly for wear and tear, especially if your dog is a frequent jumper. A little maintenance goes a long way in keeping the fun safe and enjoyable.
And hey, if your pup is anything like mine, they’ll be jumping for joy in no time—hopefully not over the fence, though.
5. Chain Link Fence Sections
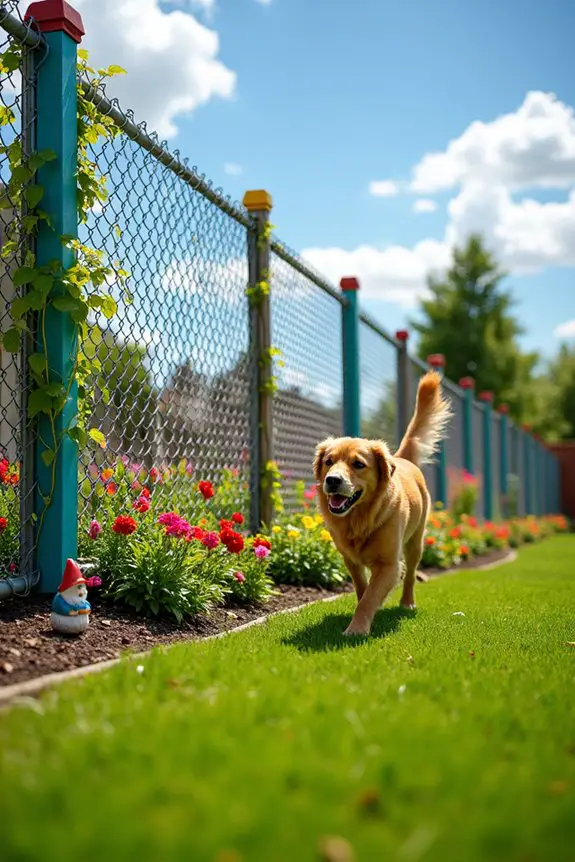
If you’re looking for a sturdy, reliable way to keep your furry friend secure while giving them plenty of space to roam, a chain link fence might just be the perfect DIY project for you. Not only does it provide a strong barrier against escapees, but it also allows for visibility and airflow, making your yard feel more open and inviting.
Plus, chain link fences are relatively affordable and can be customized to fit your unique needs, saving you money in the long run. Additionally, premium dog health supplements can support your pup’s overall wellness and happiness, ensuring they thrive in their newly enclosed space.
Materials Needed:
- Chain link fence fabric (the height and length will depend on your yard)
- Fence posts (line posts and corner posts)
- Concrete mix (for securing posts)
- Fence ties (to attach the fabric to the posts)
- A post hole digger or auger
- Level (to verify your posts are straight)
- Tape measure
- Wire cutters
- Safety goggles
- Work gloves
Step-by-Step Instructions:
- Plan Your Layout: Start by mapping out where you want the fence to go. Measure the perimeter of the area you want to enclose, making sure to take note of any trees, shrubs, or other obstacles. This will help you figure out how many fence sections you need and where to place your posts.
- Mark Post Locations: Using your tape measure, mark where each post will go. Typically, you’ll want your posts spaced about 6 to 10 feet apart, depending on the fence height and type.
- Dig Post Holes: Using your post hole digger or auger, dig holes for your posts. Make sure the holes are deep enough (about 2-3 feet) for stability, especially if you live in an area with high winds or heavy snow.
- Install the Posts: Place each post in its respective hole and use your level to verify they’re vertical. Pour concrete mix into the hole around each post and add water according to package instructions. Allow the concrete to cure for at least 24 hours.
- Attach the Chain Link Fabric: Once the concrete is set, unroll the chain link fabric and attach it to the posts using the fence ties. Start at one end, pulling the fabric taut as you go to avoid sagging. Secure it at the top and bottom of each post for added stability.
- Tension the Fabric: After attaching the fabric, you may need to adjust and tension it to verify it’s tight and secure. This prevents your curious pup from trying to squeeze through any gaps.
- Finishing Touches: Trim any excess fabric with wire cutters, and double-check that all the ties are secure. Step back and admire your work. It’s a labor of love, and your dog will appreciate the new freedom to roam!
Optional Add-ons/Variations:
- Decorative Elements: Consider adding a splash of personality by painting the posts in fun colors or wrapping them with outdoor-friendly fabric. You could even plant climbing vines near the fence to create a natural green wall.
- Height Customization: If you’ve got a bigger dog or an escape artist, think about using taller chain link fabric or adding an extension at the top with barbed wire or curved fencing to deter jumping.
Pro Tip:
Always wear your safety goggles when cutting wire or working with concrete. This little precaution can save you from a lot of headaches (and eye injuries).
And remember, if you’re feeling overwhelmed, enlist a friend. Two sets of hands make for quicker work, and who wouldn’t want to share a few laughs while building a fence?
6. PVC Pipe Dog Fence

Creating a PVC pipe dog fence is a fantastic DIY project for dog owners who want a budget-friendly and visually appealing way to keep their pets safe. Not only does it allow your pup to roam freely without the worry of them escaping, but it also adds a touch of charm to your yard.
Plus, it’s lightweight, easy to install, and can be customized to fit your style – saving you money while enhancing your outdoor space.
Materials Needed:
- PVC pipes (1-inch diameter for posts and rails)
- PVC pipe elbows and tees
- PVC cement (for securing joints)
- Fence fabric or netting (optional for added security)
- Measuring tape
- Hacksaw (or PVC pipe cutter)
- Level
- Drill (if you’re securing the fence to the ground)
- Safety goggles
- Work gloves
Step-by-Step Instructions:
- Plan Your Layout: Start by measuring the area where you want the fence. Sketch a simple outline, marking any gates or openings. This helps you visualize how much material you’ll need and where each section will go.
- Cut Your PVC Pipes: Using the hacksaw, cut your PVC pipes into the desired lengths for the posts and rails. Consider making your posts about 4-5 feet tall and your rails the length between the posts. If you’re feeling ambitious, you could even create a design that includes a gate.
- Assemble the Fence Frame: Connect the pipes using elbows and tees to form the frame. Use the level to confirm everything is straight. This is where you can let your creativity shine – consider a zigzag pattern or a more traditional rectangular shape.
- Secure the Frame: Once you’ve got the shape you want, apply PVC cement to the joints to secure them. This step is essential because it keeps your fence stable, especially if your dog has a penchant for jumping or leaning against it.
- Install the Posts: Dig holes for your posts (about 2 feet deep) and set them in place. You can either use concrete to secure them or simply pack the soil tightly around the base. Make sure they’re level and straight. If you’re feeling fancy, you can even add caps to the top of the posts for a polished look.
- Attach the Fence Fabric or Netting: If you want to add an extra layer of security, attach your fence fabric or netting to the PVC frame using zip ties or staples. Make sure it’s taut to keep your pup from trying to squeeze through.
- Finishing Touches: Take a step back and admire your work. Trim any excess fabric and confirm there are no sharp edges. You could even paint the PVC pipes in a fun color to match your home or yard décor.
Optional Add-ons/Variations:
- Colorful Paint: Consider spray painting the PVC pipes in bright colors or pastels to give your fence a playful vibe. It not only looks great but also adds personality to your yard.
- Decorative Elements: Attach some decorative elements like hanging planters or garden lights to the fence to make it a stylish feature in your outdoor space.
Pro Tip:
For added durability, consider using UV-resistant PVC pipes, especially if you live in an area with intense sunlight. This helps prevent the pipes from becoming brittle over time.
And always double-check the stability of the posts – a wobbly fence can lead to an adventurous dog escaping for a surprise neighborhood tour.
With just a little time and effort, you can create a safe and stylish haven for your furry friend. Happy fencing!
7. Bamboo Fencing for Dogs

If you’re looking for a natural and stylish way to keep your furry friend safe, a bamboo fence is the perfect DIY project. Not only does it blend beautifully with your garden, but it also provides a secure boundary for your dog to play and explore. Plus, bamboo is an eco-friendly choice that can save you money while enhancing your outdoor aesthetic. Let’s explore how you can create your own bamboo dog fence.
Materials Needed:
- Bamboo poles (at least 6 feet long)
- Wooden posts (for securing the bamboo)
- Nails or screws
- Hammer or screwdriver
- Wire or twine (for securing the bamboo to the posts)
- Measuring tape
- Hacksaw (for cutting bamboo, if necessary)
- Level
- Safety goggles
- Work gloves
Step-by-Step Instructions:
- Measure Your Area: Start by measuring the perimeter where you want the fence. Mark the spots for your posts, keeping in mind that you want them about 6 feet apart for stability.
- Prepare Your Bamboo: If your bamboo poles are longer than you need, use a hacksaw to cut them to your desired height. Aim for about 4-5 feet tall above ground, which is usually sufficient for most dogs.
- Install the Wooden Posts: Dig holes for your wooden posts, making them at least 2 feet deep for stability. Make sure to set the posts in concrete for added sturdiness, especially if you have an enthusiastic digger on your hands. Use a level to confirm they’re straight.
- Attach the Bamboo: Once your posts are secure, start attaching the bamboo poles. You can lay them vertically or horizontally, depending on your design. Use nails or screws to fix them to the posts. If you’re feeling adventurous, a crisscross pattern can add a fun touch.
- Secure with Wire or Twine: For additional security, wrap wire or twine around the bamboo and posts to hold everything in place. This will help keep the bamboo from swaying or falling over if your pup decides to lean against it.
- Check for Stability: Once everything is attached, give your fence a little shake (carefully, of course) to test its stability. If it wobbles, you might need to add more support or secure it further.
- Finishing Touches: Take a moment to admire your handiwork. Trim any excess bamboo or rough edges to give your fence a polished look. Consider adding a small gate for easy access in and out of the fenced area.
Optional Add-ons/Variations:
- Stain or Paint: Give your bamboo a different look by staining or painting it. This can help it blend in with your home or stand out as a feature.
- Decorative Elements: Add some charm by hanging flower pots or lights on your bamboo fence. It’s a great way to personalize your space and make it dog-friendly.
Pro Tip:
Before you start, check the local regulations about fencing. You might save yourself a headache later by confirming your fence meets any height or design requirements.
And remember, bamboo can be a bit flexible, so keep an eye on it over time to ensure your pup doesn’t find a way to wiggle through.
Creating a bamboo dog fence isn’t only a rewarding project but a way to make your outdoor space a safe haven for your furry friend. Happy building!
Extra Tips & Ideas
While you might think building a dog fence is all about the materials and height, there are plenty of extra tips and ideas that can make your project not just functional, but also a fun experience.
First off, consider painting your fence in bright colors. It adds personality—plus, it’s a great conversation starter. You could even add a few fun decorations, like paw print stencils.
Got a few old tires lying around? Stack them to create a mini obstacle course for your pup.
And hey, don’t forget about the plants! Adding greenery not only beautifies the space but can also provide shade. It’s like a spa day for your dog.
Frequently Asked Questions
What Materials Are Best for a DIY Dog Fence?
For a DIY dog fence, wooden panels, chain link, or welded wire works best. You’ll also need concrete for stability and tools like a post driver and wire cutters to guarantee a secure installation.
How High Should a Dog Fence Be?
A dog fence should be at least four to six feet high, like a sturdy wall protecting your furry friend’s freedom. This height prevents jumping and keeps them safe from wandering off or escaping.
Can I Use Chain Link for a DIY Fence?
Yes, you can use chain link for a DIY fence. It’s durable and provides good visibility. Just make certain you’re following local regulations and installing it properly to keep your dog safe and secure.
Are There Zoning Regulations for Dog Fences?
Yes, there are zoning regulations for dog fences. You should check your local ordinances and homeowners association guidelines to verify your fence complies with height, materials, and placement requirements before starting your project.
How Long Does It Take to Build a DIY Dog Fence?
Building a DIY dog fence typically takes a weekend, depending on your experience and the materials used. You’ll need time for planning, gathering supplies, and installation, so set aside at least a couple of days.
Conclusion
So, there you have it—seven budget-friendly ways to keep your pup safe without breaking the bank. Who knew building a fence could be as easy as pie, right? Just think, while you’re out there hammering away, your dog could be plotting his escape like a cartoon villain. But with these ideas, you’ll create a cozy space for him to frolic, and maybe, just maybe, keep your sanity intact. Now, go on, get building, and release your inner DIY genius.

Hi, I’m Ali Tarek, the founder of Animalsman. I’ve always been passionate about pets, especially dogs and cats, and I created this website to share practical tips, easy recipes, and helpful care advice for fellow pet lovers. My goal is to make pet care simple, enjoyable, and accessible for everyone. When I’m not writing or curating content, you’ll usually find me spending time with my furry friends or learning new ways to keep them happy and healthy.

