Did you know that making DIY dog treats can be as easy as pie, and way more fun? Picture your pup’s face lighting up when you present them with homemade goodies shaped like their favorite toys. But here’s the catch—choosing the right flavors and designs can be a bit tricky. So, how do you create treats that aren’t just tasty but also look tempting? Let’s plunge into ten healthy designs that will make tail-wagging a guarantee.
Tail-Wagging Flavor Combinations
When you’re whipping up dog treats, choosing flavor combinations that make your pup’s tail wag is key. Think peanut butter and pumpkin—it’s a match made in canine heaven.
Or try applesauce mixed with oats for a chewy, yet healthy treat. You know your dog loves a good sweet potato, right? Pair it with tiny chunks of chicken for a protein-packed goodness.
You could also blend yogurt with bananas for a creamy delight. Quite the gourmet chef, aren’t you?
Just remember, these diy dog treats healthy recipes are simple, and they won’t take hours to prepare. Your kitchen might get messy, but who cares? Your dog’s happy face will totally be worth it. Plus, you get to brag about your baking skills.
Our Collection
Now that you’ve explored some tasty flavor combos, let’s check out our collection of DIY dog treats.
You’ll find everything from Pumpkin Peanut Butter Bites to Sweet Potato Cheddar Chews, each one a hit for your pup.
Which one do you think they’ll beg for first?
1. Pumpkin Peanut Butter Bites
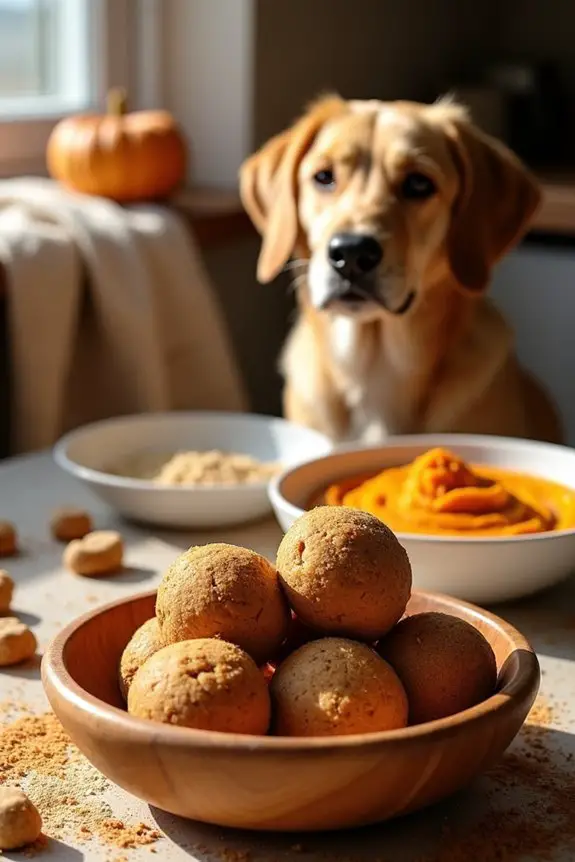
Dog owners know that keeping our furry friends happy is a full-time job. One simple and fun way to do this? Making homemade treats! These Pumpkin Peanut Butter Bites aren’t only easy to whip up but they can save you money while giving your pup something extra special. Your dog will love you even more (if that’s even possible), and you’ll feel like the superstar pet parent you are. Ready to get started? Let’s jump in!
Materials Needed:
- 1 cup pumpkin puree (make sure it’s pure pumpkin, not pumpkin pie filling)
- ½ cup peanut butter (make sure it’s xylitol-free, we want the best for our pups!)
- 2 cups whole wheat dog-friendly flour (or oat flour for a grain-free option)
- 1 egg (the binding magic)
- ½ teaspoon cinnamon (optional, but oh-so-yummy)
Step-by-Step Instructions:
- Preheat the Oven: Get that oven warmed up to 350°F (175°C). A warm oven means tasty treats!
- Mix It All Together: In a large mixing bowl, combine the pumpkin puree, peanut butter, egg, and cinnamon. Stir until it looks like a creamy dream (don’t be too shy; get in there with a spatula).
- Add the Flour: Gradually add the flour into the pumpkin-peanut butter mix. Stir it up until you have a nice, slightly sticky dough. Remember, it’s okay if it’s a little messy; that just means loving hands are at work.
- Roll It Out: On a floured surface, roll out the dough to about ½ inch thickness. You can even get creative here and use cookie cutters to make fun shapes if you’re feeling fancy.
- Cut and Place: Using your cookie cutters (or a knife for squares), cut the dough into your desired shapes. Place these cute little bites on a parchment-lined baking sheet.
- Bake Away: Pop them in the oven and let them bake for about 20-25 minutes, or until they’re golden brown. Your house will smell unbelievable at this point, and your pup might be staring at you like you’ve never fed him before.
- Cool Down and Serve: Once baked, allow the bites to cool completely. This is the hardest part—waiting while your dog gives you those puppy-dog eyes. You can store these goodies in an airtight container to keep them fresh (they should last about two weeks).
Optional Add-ons/Variations:
Feeling playful? You can add a spoonful of cinnamon or even some mashed bananas to the mix for extra flavor. Or why not sprinkle some oats on top before baking for a bit of crunch? Your pooch won’t be able to resist.
Pro Tip:
Always remember to check that the peanut butter you’re using is safe for dogs—xylitol, a common sweetener, is toxic to them. Additionally, using peanut butter dog treats can offer more convenient alternatives for busy pet owners.
And here’s a little secret: if you want to save on costs, buy flour in bulk. Your furry buddy deserves the best, and you won’t always be heading to the store for just a cup.
2. Sweet Potato Cheddar Chews
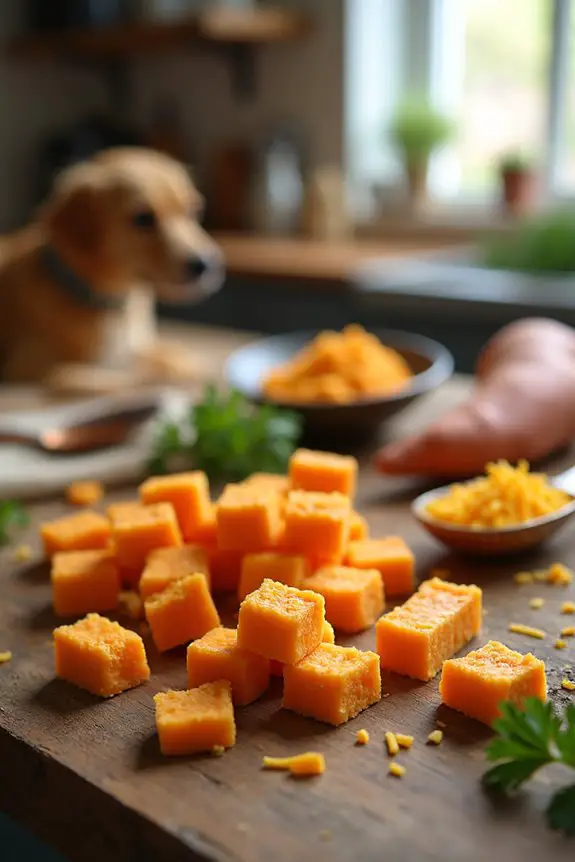
If your dog loves a cheesy snack, then these Sweet Potato Cheddar Chews might just be the perfect DIY treat for you to whip up. Not only are they delicious, but they also offer a healthy alternative to store-bought options. Plus, making these chews at home can save you money, and your pup gets fresh ingredients — a double win! Additionally, nourishing your senior pet’s joints with homemade treats like these can be a great way to support their health.
Materials Needed:
- 1 cup mashed sweet potato (cooked and cooled)
- 1 cup shredded cheddar cheese (look for low-fat options if preferred)
- 1 ½ cups oat flour (or whole wheat flour for a different flavor)
- 1 egg (the binder that makes everything stick)
- ½ teaspoon garlic powder (optional, for an extra kick)
Step-by-Step Instructions:
- Preheat Your Oven: Set your oven to 350°F (175°C). A warm oven leads to yummy chews, trust me.
- Mash That Sweet Potato: In a mixing bowl, take your cooked sweet potato and mash it until it’s nice and smooth. Think of it as a mini workout for your arms — those muscles will thank you later.
- Mix It All Up: Add the shredded cheddar cheese, oat flour, egg, and if you’re feeling adventurous, that garlic powder. Stir everything together until you have a thick and slightly sticky dough. If you’ve ever wrestled with cookie dough — you can handle this.
- Shape the Chews: Grab small portions of the dough and roll them into little logs, about the size of a finger. You can also form them into small squares if you prefer quicker bites. Your dog won’t judge your shapes — they just care about the taste.
- Arrange on a Baking Sheet: Line a baking sheet with parchment paper and place your shaped chews on there, making sure to give them a little space. A bit of room allows for some expansion while baking — kind of like your pup after a satisfying meal.
- Bake: Toss the tray into your preheated oven and let those delicious chews bake for about 20-30 minutes, or until they’re golden brown. You might find yourself enthusiastic checking the oven, anticipating that cheesy aroma wafting through the house.
- Cool and Store: Once baked, let the chews cool completely on a wire rack (or a plate if you’re like me and don’t have a fancy rack). After they cool, store them in an airtight container — they should last about a week if your pup doesn’t devour them all in one go.
Optional Add-ons/Variations:
Feeling a bit creative? You can swap out the cheddar for another dog-friendly cheese, like mozzarella, or add a tablespoon of bacon bits for a special treat. Your pooch will definitely appreciate your culinary escapades.
Pro Tip:
If you want to budget even further, make a larger batch and freeze some of the chews. Just layer them with parchment paper in an airtight container, and they’ll keep for a couple of months. When you’re ready to treat your pup, just pull out a few and let them thaw. It’s like having a dog treat bank — always ready when your furry friend deserves a little something special.
3. Apple Cinnamon Crunchies
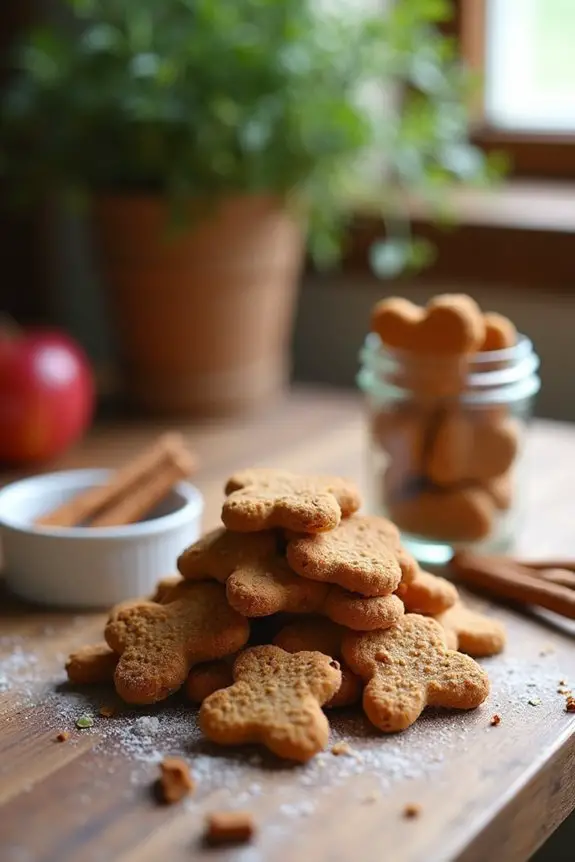
If there’s one thing your dog will love as much as those Sweet Potato Cheddar Chews, it’s these delightful Apple Cinnamon Crunchies! Packed with the natural sweetness of apples and the warming spice of cinnamon, these treats aren’t only tasty but also healthy. Additionally, using a premium dog treat maker can make the process even easier and more fun. Investing in a high end dog treat maker ensures consistent results and takes your baking game to the next level.
Making them at home means you know exactly what goes into your pup’s snacks, and they might save you a few bucks compared to those pricey store-bought treats. Plus, your house will smell divine as they bake, especially if you use a dog treat dehydrator machine to enhance the flavor and texture further.
Materials Needed:
- 1 cup unsweetened applesauce
- 2 cups whole wheat flour
- 1 teaspoon cinnamon
- 1 egg
- 1 tablespoon honey (optional, for a touch of sweetness)
- A pinch of salt
Step-by-Step Instructions:
- Preheat Your Oven: Warm up that oven to 350°F (175°C). A cozy oven is a happy oven, and trust me, it’s going to make those treats smell as good as they taste.
- Mix the Ingredients: In a large bowl, combine your applesauce, flour, cinnamon, egg, honey (if using), and a dash of salt. Give it a good stir until everything is mixed well. It’s okay if it feels a little sticky — that just means there’s good stuff in there.
- Roll Out the Dough: Lightly flour your countertop and transfer your dough onto it. Roll it out to about ¼ inch thick. If you’re like me and struggle with rolling dough evenly, don’t sweat it. Any shape will do, as long as they’re all roughly the same thickness for even baking.
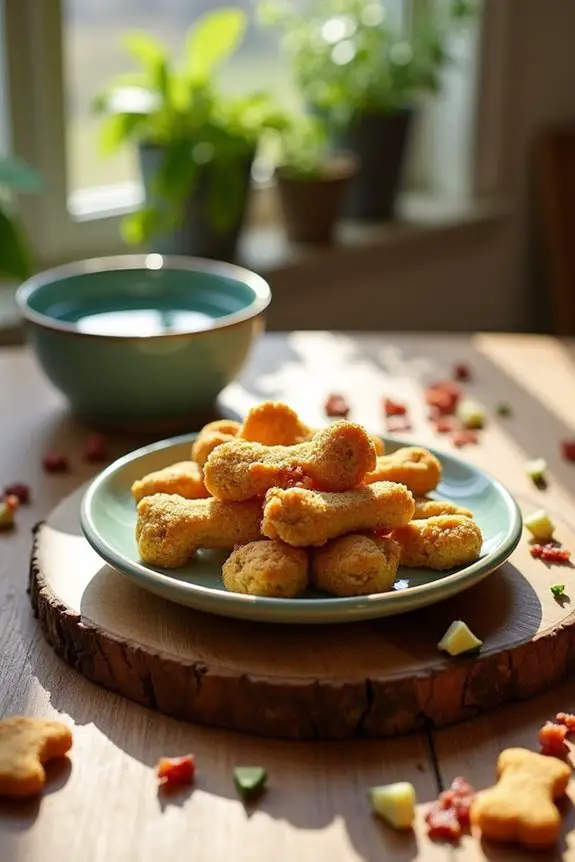
- Cut into Shapes: Grab a cookie cutter (or just a knife, no judgment here) and cut the rolled dough into fun shapes. Bones, hearts, or even classic squares work just fine. Your dog mightn’t care about shapes, but it’s fun to personalize them a bit.
- Bake: Place your treats on a lined baking sheet (parchment paper works wonders) and pop them in your preheated oven. Bake for about 25-30 minutes, until they’re golden and crispy. You might find yourself thinking, “Why did I only make a batch?” because the smell is irresistible.
- Cool Down: Once baked, let those crunchy goodies cool on a wire rack (or whatever you have handy). It’s essential to let them cool completely — you don’t want to serve your dog a hot surprise.
- Store: After they’ve cooled down, you can store your Apple Cinnamon Crunchies in an airtight container. They should keep fresh for about a week unless you have a furry vacuum enthusiastic to clean them up.
Optional Add-ons/Variations:
Want to jazz them up a bit? Try adding a tablespoon of peanut butter for an extra flavor twist, or use pumpkin puree instead of applesauce for a different take. Your pup won’t mind the change, I promise.
Pro Tip:
When baking for dogs, always check to confirm that your ingredients are safe for canine consumption.
If your pet has any specific dietary needs or allergies, tweak the recipe accordingly.
And if you’re trying to save a few bucks, consider buying your whole wheat flour in bulk — it’s usually cheaper that way, just like the treats will be compared to store-bought options. Happy baking!
4. Carrot Oatmeal Biscuit Bites
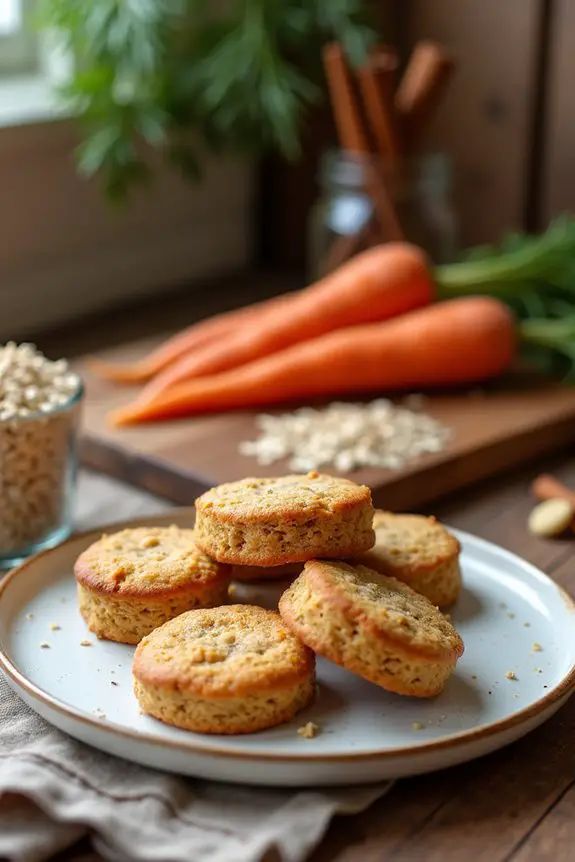
Are you ready to treat your dog to something scrumptious? These Carrot Oatmeal Biscuit Bites aren’t only delicious but incredibly healthy, too! Packed with the goodness of carrots and oats, these homemade treats offer a fantastic way to bond with your furry friend while keeping a few extra bucks in your pocket.
Plus, they’re easy to whip up so you can feel like a superstar dog chef in no time!
Materials Needed:
- 1 cup finely grated carrot (about 1 medium carrot)
- 1 ½ cups rolled oats
- ½ cup whole wheat flour
- 1 egg
- ¼ cup vegetable or chicken broth (low sodium)
- A pinch of cinnamon (optional, for a hint of warmth)
Step-by-Step Instructions:
1. Preheat Your Oven: Get that oven fired up to 350°F (175°C). The aroma of baking goodies will soon fill your kitchen—something that even the best dog treats from the store can’t compete with.
2. Mix the Ingredients: In a large mixing bowl, combine the grated carrots, rolled oats, whole wheat flour, egg, and broth. If scenting your kitchen with cinnamon puts a smile on your face, go ahead and sprinkle it in.
Stir everything together until it’s nice and blended. The mixture should feel slightly sticky but manageable.
3. Shape the Treats: To make things fun, use your hands to form small balls or use a tablespoon to scoop out portions. Place them onto a lined baking sheet.
You can flatten them slightly for that classic biscuit look, or keep them rounded for a little variation. Your dog won’t care as long as they taste great!
4. Bake: Slide your baking sheet into the oven and let your biscuits Bake for about 20-25 minutes, or until they’re golden brown and firm to the touch.
You might find yourself pacing in anticipation, but doggy patience is key for ultimate treat satisfaction.
5. Cool Down: Once baked, remove them from the oven and let those delightful bites cool on a wire rack.
It’s hard to resist stealing a sample for yourself, but trust me, you want to let them cool completely before serving.
6. Store: After cooling, pop your treats into an airtight container. They’ll stay fresh for up to a week—though I can’t promise they’ll last that long, especially if your dog is a treat connoisseur like mine!
Optional Add-ons/Variations:
Feeling a little wild? Try adding a ¼ cup of mashed sweet potato for some extra flavor and nutrition, or go for a mix-in of 1/4 cup of unsweetened peanut butter.
You might even consider using different flour like oat or rice flour if your dog has dietary restrictions—get creative!
Pro Tip:
If you want to amp up the health factor, consider substituting half the oil or broth with pureed pumpkin.
Not only does it add a unique flavor twist, but it also ups the fiber content; your dog may love you even more for it.
Now, roll up those sleeves and get baking! You won’t just be making treats; you’ll be creating happy tail wags and puppy smiles.
5. Peanut Butter Banana Biscuits

If you’re seeking a tempting treat that will have your furry friend wagging their tail with joy, search no more than these Peanut Butter Banana Biscuits. Not only are these biscuits delicious and packed with flavor, but they’re also incredibly easy to make. Plus, whipping these up at home is budget-friendly and allows you to control the ingredients—so you know exactly what your dog is munching on. Let’s get that tail wagging!
Materials Needed:
- 1 ripe banana, mashed
- ½ cup natural peanut butter (make sure it’s xylitol-free)
- 1 cup whole wheat flour
- 1 cup rolled oats
- 1 egg
- ¼ cup water (as needed for consistency)
Step-by-Step Instructions:
1. Preheat Your Oven: First things first, let’s get that oven preheating to 350°F (175°C). Your kitchen is about to smell glorious—trust us, your dog will agree.
2. Mix It Up: In a large mixing bowl, combine the mashed banana and peanut butter. Stir until it’s all blended together, forming a creamy duo that could rival any smoothie.
Then, add the whole wheat flour and rolled oats. If the mixture feels too dry, don’t hesitate to incorporate a little water, just a tablespoon at a time, until it holds together nicely.
3. Add the Egg: Crack that egg right into your mixture. This is what’ll help bind everything together. Stir it in well—don’t be afraid to get your hands dirty!
4. Shape Your Treats: Here comes the fun part! Dust your countertop with a bit of flour (to prevent sticking), and roll out the dough to about ½ inch thick.
Use cookie cutters (dog-shaped if you’re feeling fancy) to cut out treats, and place them on a lined baking sheet. If cookie cutting feels too fancy, just roll small balls and flatten them slightly.
5. Bake Away: Slide that cookie sheet into your preheated oven and let the biscuits bake for about 15-20 minutes, or until they’re firm to the touch and slightly golden.
You might find yourself dancing to the smell wafting through your kitchen!
6. Cool and Serve: Once baked, remove them from the oven and let the biscuits cool on a wire rack. Your dog might be hovering close by, keenly waiting to sneak a taste.
It’s tempting to offer them a treat right out of the oven, but patience is key—let them cool first.
7. Storage: After they’ve cooled completely, store those tasty biscuits in an airtight container. They’ll stay fresh for about a week—though you may need to make another batch sooner if your pup has a healthy appetite!
Optional Add-ons/Variations:
Feeling adventurous in your kitchen? Try swapping the banana for pumpkin puree for a seasonal twist.
Or, if your pup loves a little crunch, add in finely chopped carrots or oats for some fun texture! The possibilities are endless, just like the love you have for your dog.
Pro Tip:
Keep an eye on your dog’s waistline. While these biscuits are healthy and delicious, moderation is important. A couple of biscuits a day should be plenty to keep that tail wagging without turning your pup into a treat-loving couch potato.
Now, roll up those sleeves and whip up a batch of these delightful biscuits. Your dog will appreciate it, and who knows? You might just find yourself sneaking a taste.
6. Blueberry Coconut Delight Bites

If you want to spoil your pup with a treat that’s not only delicious but also nutritious, these Blueberry Coconut Delight Bites are the way to go. Packed with antioxidants and healthy fats, they’re perfect for training, rewards, or just because your dog deserves a little something special.
Plus, making dog treats at home saves you money while ensuring you know exactly what’s going into those little mouths.
Materials Needed:
- 1 cup blueberries (fresh or frozen)
- ½ cup unsweetened shredded coconut
- 1 cup whole wheat flour
- 1 egg
- ¼ cup coconut oil (melted, but not hot)
- 1-2 tablespoons honey (optional for extra sweetness)
Step-by-Step Instructions:
1. Preheat the Oven: Before you engage in mixing, preheat your oven to 350°F (175°C). This way, you won’t have to wait too long once your treats are ready.
2. Puree the Blueberries: Grab a blender or food processor and blend your blueberries until they form a smooth puree. This is where the magic begins—just a little juicy goodness leads to wagging tails.
3. Mix It Up: In a mixing bowl, combine the blueberry puree, melted coconut oil, egg, and honey (if using). Stir until it’s a vibrant blue mixture that looks as tasty as it’s for your pooch.
4. Add the Dry Ingredients: Now, sprinkle in the shredded coconut and whole wheat flour. Mix it all together until you have a cohesive dough that doesn’t stick to your hands too much.
Need a little extra moisture? Just drizzle in a bit of water.
5. Shape Your Bites: With floured hands, grab small amounts of dough and roll them into bite-sized balls—about one inch in diameter. If you want to get fancy, you can flatten them a bit or use cookie cutters for fun shapes.
6. Bake Away: Lay your bites on a lined baking sheet and pop them in the oven. Bake for 12-15 minutes or until firm and lightly golden. Just imagine your dog’s happy dance while they wait—it’s the best.
7. Cool and Store: After baking, let those bites cool on a wire rack. They’ll be vastly more enjoyable for your dog if they’re not piping hot.
Once cool, store them in an airtight container, where they’ll last for about a week—though it’s highly unlikely they’ll stick around that long.
Optional Add-ons/Variations:
Feeling adventurous? Swap out blueberries for strawberries or apples for a fun twist. Not a fan of coconut? Replace shredded coconut with pumpkin puree for a different flavor profile that dogs love.
Pro Tip:
When measuring coconut oil, try to warm it just slightly if it’s solid (but not hot). This will help it mix more easily into the dough, and your kitchen will smell divine.
Plus, the added healthy fats will keep your pup’s coat shiny and beautiful.
Your dog is going to adore these Blueberry Coconut Delight Bites. What a great way to share those “homemade with love” vibes.
Get ready for a flurry of tail wags and puppy kisses—because who wouldn’t want to be their favorite human?
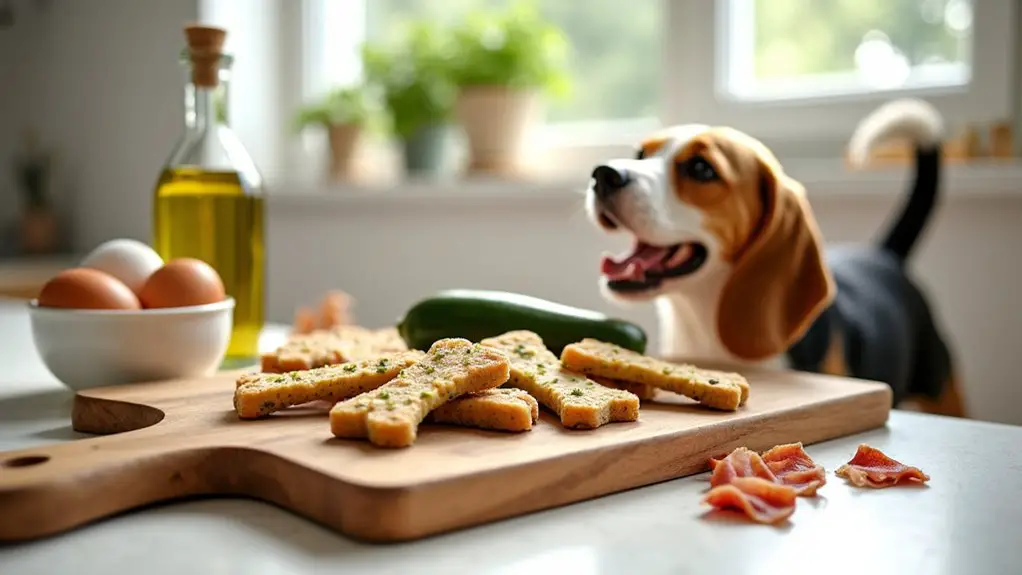
7. Zucchini Bacon Crunch Treats
If you’re ready to elevate your pup’s snacking game with some crunchy, mouthwatering goodness, then these Zucchini Bacon Crunch Treats might just be your new go-to. Not only will they keep your furry friend happy and healthy, but they’ll also put a little more money back in your pocket compared to those store-bought treats.
Plus, who can resist a treat that combines the deliciousness of bacon with the goodness of zucchini? It’s a win-win for you and your pup.
Materials Needed:
- 1 cup finely grated zucchini (make certain to squeeze out excess moisture)
- ½ cup cooked bacon, crumbled (because bacon makes everything better, right?)
- 1 cup whole wheat flour
- 1 egg
- 1 tablespoon olive oil (or your favorite cooking oil)
- ½ teaspoon garlic powder (optional for extra flavor)
Step-by-Step Instructions:
1. Preheat the Oven: Get that oven warmed up to 350°F (175°C). This will guarantee your treats bake evenly, and no pup wants to wait too long for their goodies.
2. Prepare the Zucchini: Grate your zucchini until you have about one cup. Don’t forget to squeeze it in a clean cloth or paper towel to remove excess moisture. This keeps the treats from becoming too soggy—no one likes a soggy snack, least of all your dog.
3. Mix the Ingredients: In a big mixing bowl, combine the grated zucchini, crumbled bacon, egg, olive oil, and garlic powder (if you’re using it). Stir it all together until it’s a delightful mixture that puts a smile on your face.
4. Add the Flour: Gradually add in the whole wheat flour, mixing until the dough comes together. If it’s too sticky, just sprinkle in a little more flour until it’s the right consistency. It should be soft but not sticking to your hands.
5. Shape Treats: Roll the dough into small balls about one inch in diameter, or get creative and flatten them into shapes using cookie cutters. You can even make some resembling bones—your dog might just give you a little extra tail wag for that.
6. Bake the Treats: Line a baking sheet with parchment paper (you know, so you don’t end up scrubbing burnt-on bits later). Place your shaped treats on the sheet and slide them into the oven.
Bake for 20–25 minutes until they’re golden brown and crispy—just wait for that scrumptious smell to fill your kitchen; it’s the best.
7. Cool and Serve: Let those yummy snacks cool on a wire rack. Trust me, you don’t want to burn your pup’s tongue with hot treats. Once they’re cool, offer one to your furry companion and watch those tail spins.
Optional Add-ons/Variations:
Feel free to mix it up a bit. Instead of bacon, try shredded chicken or turkey for a different flavor.
Not a fan of garlic? Just leave it out; your pup won’t mind. You can even toss in some grated carrots for added crunch and nutrition.
Pro Tip:
Always keep an eye on homemade treats as they bake; ovens can vary in temperature, and you’d want your treats perfect, not overcooked.
Oh, and if your dog has a sensitive tummy, introduce new treats gradually to avoid any surprise visits to the vet.
Extra Tips & Ideas
When you plunge into the world of DIY dog treats, you might find that a sprinkle of creativity can go a long way. Don’t be afraid to mix flavors. Got some pumpkin left over from baking? Toss it in. Your pup won’t mind!
Experiment with different shapes, too—bone-shaped cookies are classic, but hearts or stars? Why not.
And hey, if you’re feeling fancy, you can even dip your treats in yogurt or carob, just to impress your friends (and your dog).
Remember, some added herbs like parsley can help with freshening breath. As you whip up these goodies, just think: will your dog be your biggest fan? Spoiler alert: absolutely.
Happy baking!
Frequently Asked Questions
How Can I Ensure My Dog Won’t Have Allergies to Ingredients?
To guarantee your dog won’t have allergies, introduce new ingredients slowly. Monitor for adverse reactions, and consult your vet for allergy testing. Keep a diary of food changes to track any unusual symptoms effectively.
What Kitchen Tools Do I Need for Making Dog Treats?
You’ll need a mixing bowl, measuring cups, a rolling pin, cookie cutters, and a baking sheet. Having a set of dog-safe utensils will make the process smoother and more enjoyable for both of you.
How Should I Store Homemade Dog Treats?
You’ll want to store your homemade dog treats in an airtight container, like a glass jar, keeping them fresh and delicious. Avoid the sun’s rays, letting your treats stay cool and scrumptious for longer.
Can I Freeze the Dog Treats for Later Use?
Yes, you can freeze dog treats for later use! Just make sure they’re tightly sealed in an airtight container or freezer bag. When you’re ready, thaw them in the fridge before giving them to your pup.
What Can I Do With Leftover Ingredients?
You can create delicious smoothies or baked goods with leftover ingredients. While your dog enjoys treats, you craft delightful snacks for yourself. It’s a win-win situation, minimizing waste while indulging your culinary creativity.
Conclusion
So, you’ve tried your hand at creating these tasty dog treats, and your pup’s wagging tail says it all. Just like a seasoned chef who knows their spices, you’ve discovered that a little creativity goes a long way in treat-making. Remember, each delightful cookie you whip up is a moment of joy for both you and your furry friend. Why not keep experimenting? There’s an entire world of flavors waiting to be explored, one tail wag at a time.

Hi, I’m Ali Tarek, the founder of Animalsman. I’ve always been passionate about pets, especially dogs and cats, and I created this website to share practical tips, easy recipes, and helpful care advice for fellow pet lovers. My goal is to make pet care simple, enjoyable, and accessible for everyone. When I’m not writing or curating content, you’ll usually find me spending time with my furry friends or learning new ways to keep them happy and healthy.