Okay, so you know that moment when your golden just launches himself through the back door after a muddy trail walk?
Paws everywhere. Drool on the couch. That wet-dog smell soaking into your throw pillows — the ones you picked out from Pinterest, by the way.
Girl, I’ve been there. My dog Scout did that last spring and I literally stood in my kitchen holding a dish towel like it was gonna help. It didn’t.
The thing is, dragging a 70-pound dog to the bathroom every single time isn’t it. Your back hurts, your floors are wrecked, and somehow the bathroom still smells weird three days later.
That’s exactly why a diy dog washing station outdoor changed everything for me — and these 7 ideas will help you build one that actually fits your backyard and your aesthetic.
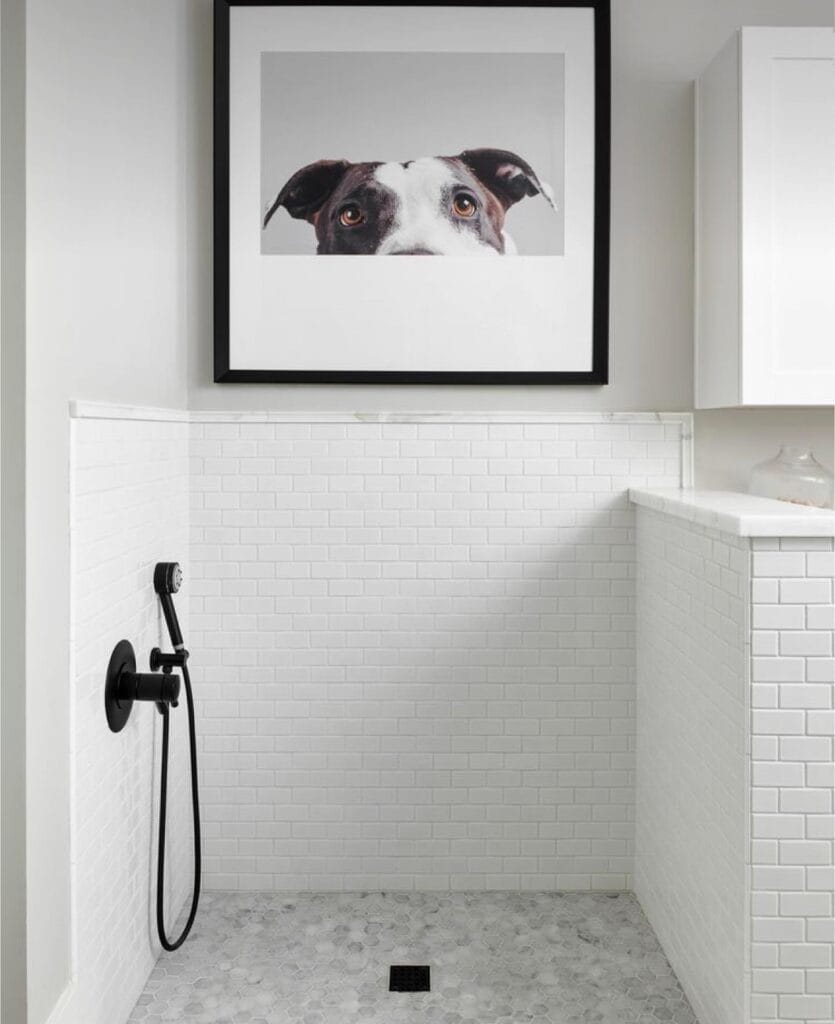
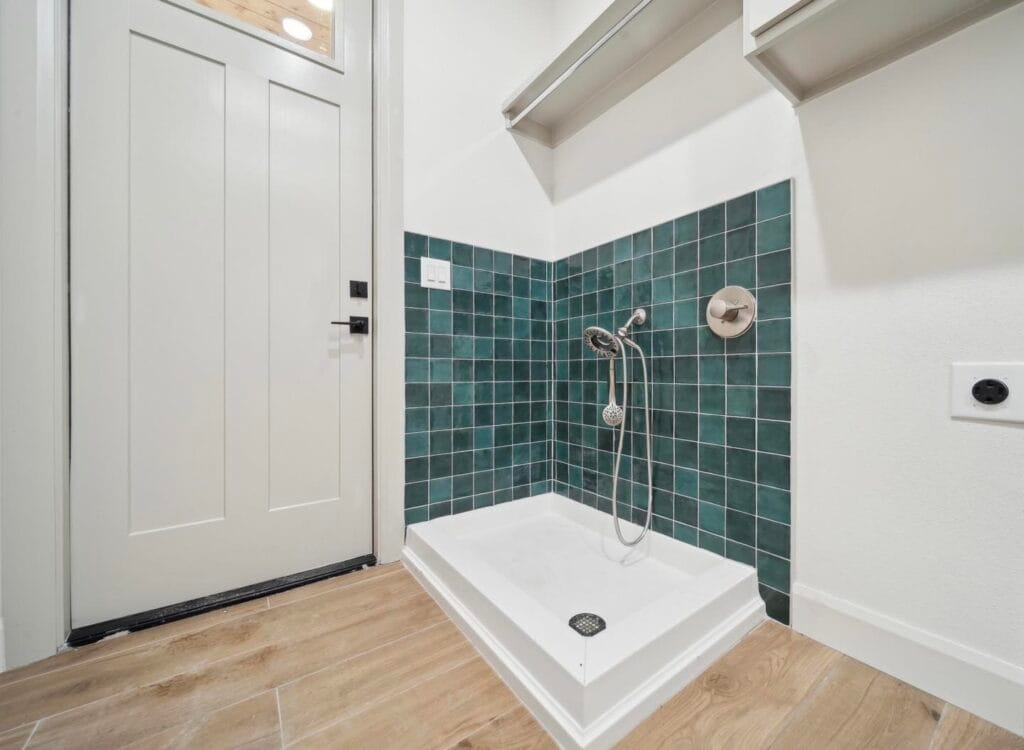
#1: Built-In Indoor Dog Wash Station With Glass Door Enclosure
Your golden just rolled in something spectacular — and now she’s standing at the back door, tail wagging, mud flying everywhere. You know that feeling. I’ve been there, grabbing old towels, chasing a wet dog around the bathroom, soaking the floor.
This built-in wash station changes everything.
Materials & Tools:
– White subway tiles (3×6 inch beveled)
– Tempered glass door panel with matte black hardware
– Low-profile shower pan (walk-in style, elevated ~6 inches)
– Handheld shower head with flexible hose
– Built-in floating shelves (painted white)
– Sage green upper cabinets
– Wicker storage baskets
– Matte black hooks and door hinges
– Cement board backing
– Waterproof grout and tile adhesive
Instructions
Frame your niche into an existing wall using cement board. Tile the interior with white subway tiles in a stacked horizontal pattern — the grout lines give dogs grip while standing. Install your elevated shower pan with a center floor drain so water clears fast. Mount the handheld shower hose on the left wall at mid-height. Attach matte black hooks along the back wall for leashes. Hang the tempered glass door on black pivot hinges — the enclosure keeps water contained, which means zero soaked floors and zero chasing a dripping dog down the hallway. Float two shelves above for treat canisters and baskets. Add sage green cabinets beside the station for towels.
Seal all grout lines with waterproof sealer before first use — it prevents staining and extends the life of your tile work by years.
Prep Time: 1 day | Active Project Time: 2–3 days | Difficulty Level: Intermediate
📸 Photo credit: Instagram @carringtonhomeskelowna
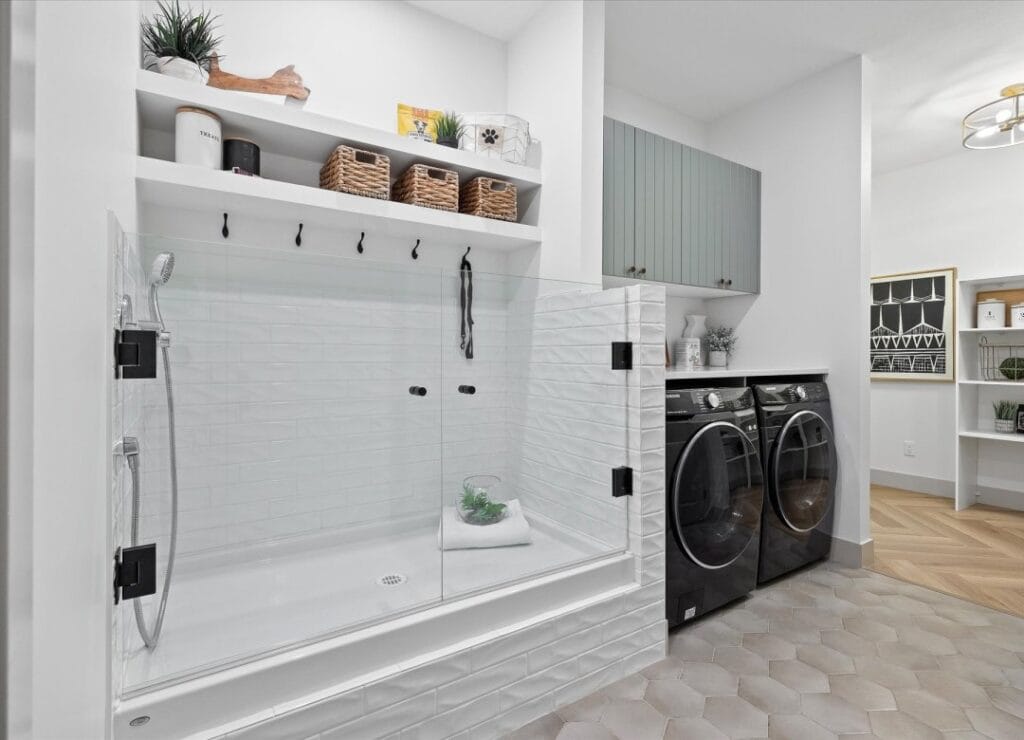
#2: Indoor-Inspired Dog Wash Station With Floor-Level Tub and Custom Cabinetry
Your golden just rolled in something unidentifiable in the backyard. Again. And now she’s standing at the door, tail wagging, completely unbothered by the chaos she’s about to bring inside.
This setup? It’s the answer to that exact moment.
Materials & Tools:
– White shaker-style cabinets (floor-to-ceiling)
– Matte black hardware (knobs + bar pulls)
– Subway tile backsplash (light gray/beige blend)
– White quartz countertop
– Frameless glass shower door with matte black frame
– Handheld black shower fixture
– Large-format porcelain floor tile
– Drill, level, tile saw, silicone caulk
Instructions
Build the floor-level wash tub first using a tiled enclosure with a built-in drain. This low entry means your dog walks right in — no lifting a 60-pound retriever over a ledge.
Frame the cabinetry in an L-shape around the tub. The quartz countertop creates a dedicated folding and grooming surface right beside the wash area, so towels and brushes stay within reach.
Install the handheld sprayer at mid-wall height. Adjustable reach means you rinse every muddy paw without fighting the angle.
Stack your washer and dryer on the opposite wall — wet towels go straight in after bath time.
Keep grout lines tight on the subway tile backsplash to prevent moisture buildup over time.
📸 Photo credit: Instagram @daniellestanleyhome
#3: Frameless Glass Shower-Style Indoor Dog Wash Station
Okay so picture this — your golden just sprinted through the backyard, soaking wet, and she’s heading straight for your white couch.
You need somewhere contained to wash her. Fast.
This setup uses a pre-sloped shower floor pan with 2×2 inch mosaic floor tiles for grip, large-format 12×24 porcelain wall tiles in a warm greige tone, and a frameless glass panel system with brushed nickel hinges.
Materials & Tools:
– Pre-sloped shower pan with center drain
– 12×24 porcelain wall tiles
– 2×2 mosaic floor tiles
– Frameless glass panels + brushed nickel hinge hardware
– Handheld shower head with flexible hose + wall bracket
– Tile adhesive, grout, waterproof membrane
Instructions
Install your waterproof membrane first — skipping this step causes water damage behind the walls. Set the shower pan, then tile the walls bottom-to-top. Mount the frameless glass panels using the four-point hinge system on both sides. The glass contains splashing while letting you actually see your dog mid-wash. Mount the handheld bracket at shoulder height so you control the rinse without wrestling her.
The center floor drain paired with mosaic tiles gives paws traction and pulls water away fast — meaning no post-bath puddle chaos for you.
Grout in a matching tone keeps the look clean.
⏱ Prep Time: 1 day | Active Project Time: 2-3 days | Difficulty Level: Intermediate
Keep grout lines on floor tiles tight — 1/8 inch joints prevent claw catches.
📸 Photo credit: Instagram @bbconstruct
#4: Self-Serve Dog Wash Station (The Pinterest-Worthy Setup You Need in Your Home)
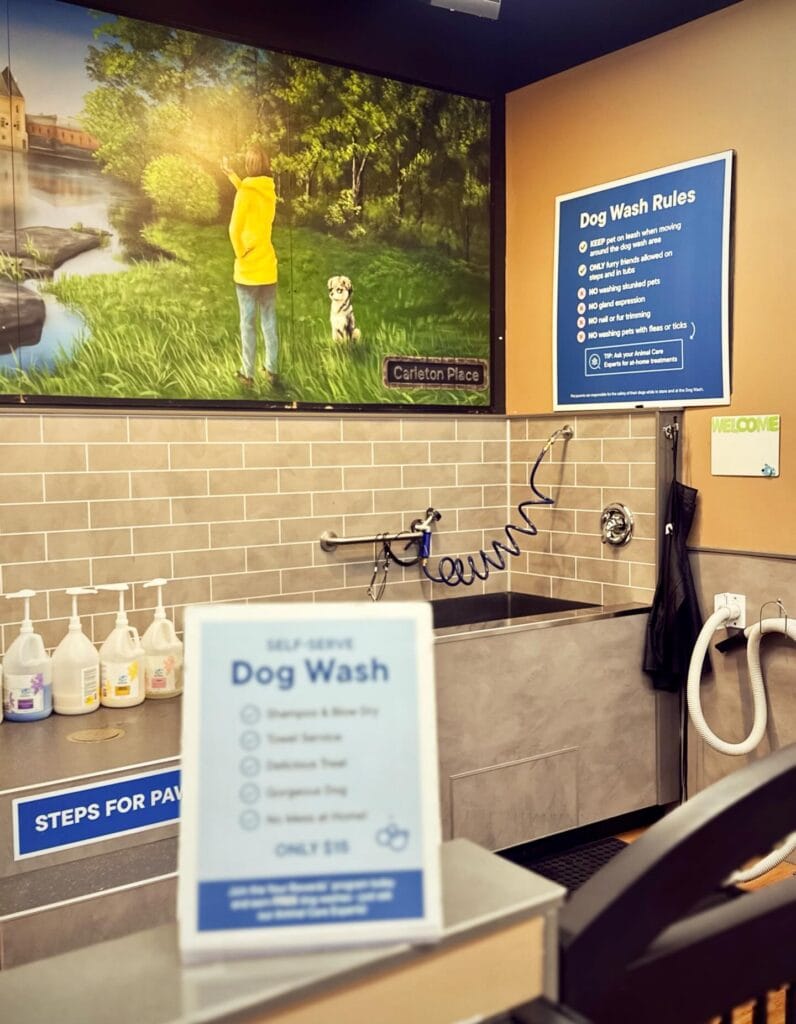
Your golden just rolled in something unidentifiable in the backyard. Again. And now you’re doing that awkward shuffle — trying to get him to the bathtub without him shaking mud across your cream-colored hallway runner.
Materials & Tools:
– Stainless steel utility tub (deep basin style)
– Gray subway tile (4×12 inches)
– Tile adhesive + grout
– Handheld sprayer hose with coiled connector
– Pump dispensers (3-4 bottles for shampoo/conditioner)
– Waterproof caulk
– Apron hooks + wall-mounted blow dryer holder
Prep Time: 2 hours | Active Project Time: 1 weekend | Difficulty Level: Intermediate
Instructions
Mount your stainless steel tub at hip height — that height means zero back strain while scrubbing. Tile the backsplash with gray subway tiles in a classic stacked pattern. Line up your pump dispensers left of the basin so everything stays within reach.
And here’s what makes this setup chef’s kiss — the coiled sprayer hose gives you full range of motion without tangles. Hang your dryer on the right side wall with a metal hook bracket so the cord stays clear of wet surfaces.
Seal every tile edge with waterproof caulk before your first wash day.
📸 Photo credit: Instagram @downtowncarletonplace
#5: The Mudroom Dog Wash Station With Green Tile That’ll Make You Ditch the Bathtub Forever
Your golden just rolled in something deeply questionable on your afternoon walk. And now she’s standing at the back door, tail wagging, mud flinging everywhere.
Yeah. We’ve been there.
Materials & Tools:
– Green zellige square tiles (approx. 4×4 inch)
– White acrylic shower base (36×48 inch pan with built-in drain)
– Brushed nickel handheld shower head with wall-mount valve
– White shelf brackets + 3/4 inch pine board
– Waterproof tile adhesive + grout
– Wood-look porcelain floor tile
Instructions
Mount your shower pan flush against the back wall corner. Tile both walls up chest height using zellige tiles in a staggered grid — the slight color variation hides water spots between washes. Install your valve at shoulder height, handheld wand on a slide bar so you control the rinse angle. Seal every grout line twice.
The low-profile pan means your dog steps right in — no lifting a 65-pound retriever over a tub edge ever again.
Keep a small shelf above for shampoo and towels so everything stays within arm’s reach mid-wash.
Prep Time: 2 hours | Active Project Time: 2 days | Difficulty Level: Intermediate
📸 Photo credit: Instagram @mathis_homes
#6: The Indoor Subway Tile Dog Wash Station That Looks Like a Spa (But Works Like a Hose)
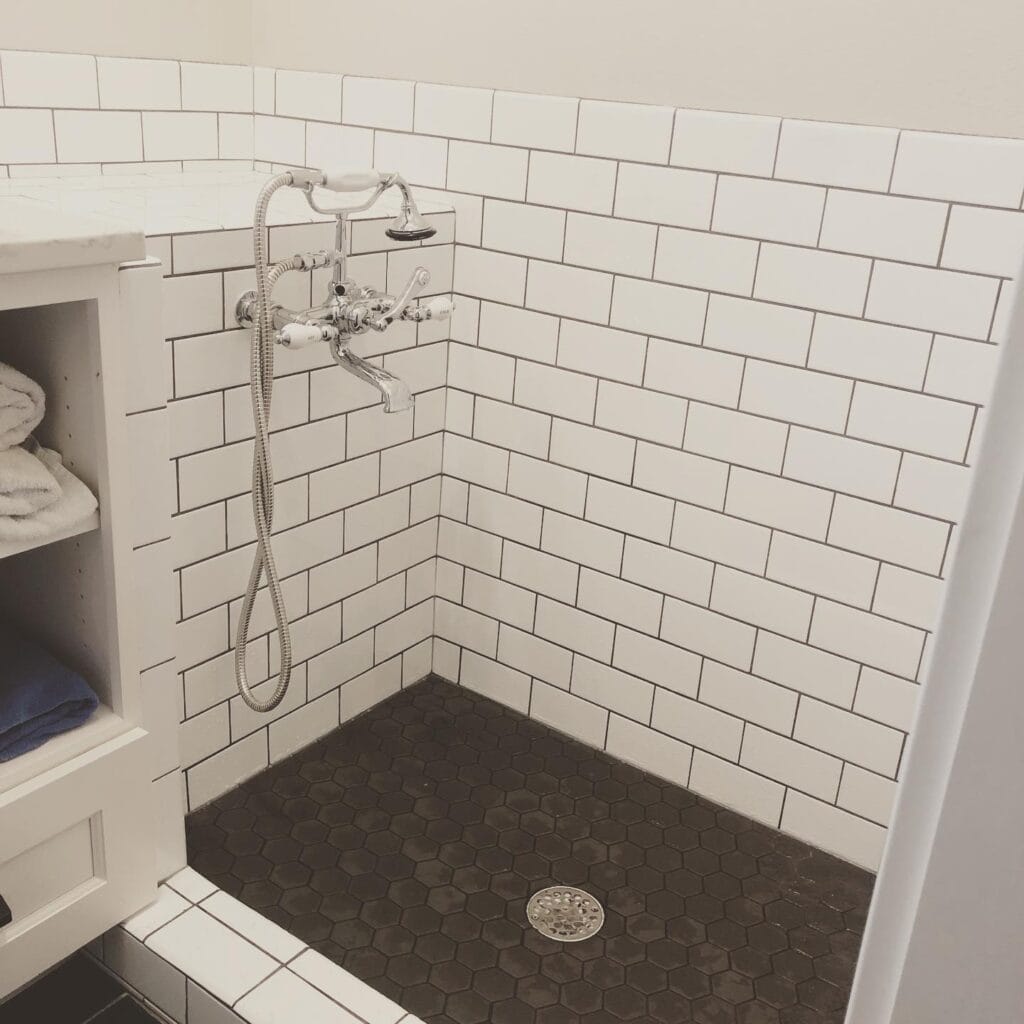
Your golden just bolted through the backyard, rolled in something unidentifiable, and now she’s sitting at the bathroom door looking at you like she owns the place.
Prep Time: 2–3 hours | Active Project Time: 2 weekends | Difficulty Level: Intermediate
Materials & Tools:
– 3×6 inch white subway tiles
– 2-inch black hexagon floor tiles
– Dark charcoal grout
– Chrome wall-mount faucet with handheld sprayer
– 4-inch chrome floor drain
– Cement board backing
– Tile adhesive + waterproof membrane
– Grout sealer
Instructions
Waterproof your cement board walls first — skip this and you’ll regret it fast. Apply the white subway tiles in a classic horizontal brick pattern, using dark grout to make the lines pop. Work corner-to-corner so both walls meet cleanly.
Lay the black hex floor tiles last, sloping them toward the center drain — water channels away, keeping your pup’s paws dry between rinses.
Mount the chrome wall-mount sprayer at mid-wall height. A handheld attachment means you control exactly where the water goes, so less soaking yourself and actually rinsing her undercoat.
Here’s the trick: seal your grout twice before first use. Dark grout stains fast with dog shampoo buildup.
The built-in shelf cubby beside the station holds towels and shampoo within arm’s reach — no dripping across the bathroom floor mid-wash.
📸 Photo credit: Instagram @miller_marriott
#7: Build a Self-Service Pet Wash Station Like This Stainless Steel Setup
Your golden just rolled in something unidentifiable in the backyard. Again. And now she’s standing at the back door, tail wagging, leaving muddy paw prints on your cream-colored tile.
Materials & Tools:
– Stainless steel wash tub (24″ x 36″)
– Blue coiled hose with spray nozzle attachment
– Black flexible vacuum/dryer hose
– Coin-operated or manual timer box
– Waterproof vinyl wrap (bubble design, sky blue)
– Mounting brackets and wall anchors
– Non-slip rubber mat
Instructions
Mount the stainless steel tub at hip height against a concrete or tile wall — this saves your back completely. Secure the coiled blue hose to the upper-left corner bracket so it retracts after each rinse. Attach the black dryer hose opposite side for airflow. Wrap the lower panel in waterproof vinyl — the blue bubble graphic keeps the space looking Pinterest-clean between uses. The raised tub height means zero bending, which your retriever actually tolerates better because she feels secure at eye level.
Keep a mounted instructions card laminated in plastic so water doesn’t destroy it.
Prep Time: 2 hours | Active Project Time: 4 hours | Difficulty Level: Intermediate
📸 Photo credit: Instagram @sunnyramzan
The One Mistake That’ll Ruin Your DIY Dog Wash Station (And How to Dodge It)
Okay, real talk: most people build their outdoor dog wash station and forget about drainage. Like, completely forget. And then bath day turns into a swampy, muddy nightmare that’s somehow worse than just hosing your pup down in the grass.
Here’s the pro secret nobody tells you — slope your floor platform at least a 2% grade away from the house. That small angle moves water fast and stops that gross pooling situation before it starts.
I learned this the hard way when my cousin built hers flat on a wood deck. Three months later, the boards were warping and smelling funky. Total gut job.
The other thing? Install a pressure-regulating valve on your water line. Most garden hoses blast at 60+ PSI — that’s way too intense for a golden retriever’s sensitive ears and eyes. A simple regulator drops it to a comfortable 40 PSI and your pup actually stays calmer through the whole wash.
Little details like these separate a station that works from one that just looks good on Pinterest.
Your Golden Deserves a Spot That Doesn’t Wreck Your Whole Vibe
Okay, so here’s the thing — you don’t have to choose between a home you love and a dog you love even more. Both can coexist. I promise.
Pick one small thing from this list and just start there. Seriously, one thing. Maybe it’s a washable throw, maybe it’s a dedicated corner just for her. If you want to go all out, building out a full outdoor dog area is such a game-changer for keeping the inside chaos manageable.
Your space should feel like you — golden fur and all.
So tell me — what’s the one spot in your home your dog has completely taken over? 🐾

Amr Mohsen is a software engineer who traded his keyboard for a leash — at least on weekends. His love for dogs inspired him to share what he learns as a dog owner and enthusiast, bringing a detail-oriented, research-driven perspective to every article he writes. If it’s about dogs, he’s probably already looked it up twice.

