Okay, so you know that stray tabby that’s been hanging around your back porch since October? The one your golden keeps staring at through the glass door?
Girl, I saw the same thing at my aunt’s place last winter — this skinny little cat curled up under a frozen lawn chair, just shaking. It wrecked me.
And here’s the thing — the cold doesn’t care. It drops fast, it hits hard, and that cat outside has nowhere warm to go.
You’re probably already pinning cozy home stuff and thinking someone should do something. You’re right. And it’s way easier than you think.
These 7 diy outdoor cat shelter winter builds will actually keep a cat alive through the cold — no fancy tools, no contractor needed. Just you, a weekend, and a good reason.
#1: Build a Cozy Outdoor Cat Shelter That Survives Winter (And Looks Good Doing It)
You know that moment when you’re refilling your golden’s water bowl in the backyard and you spot that stray cat huddled under your porch steps? Yeah. That got me bad last February.
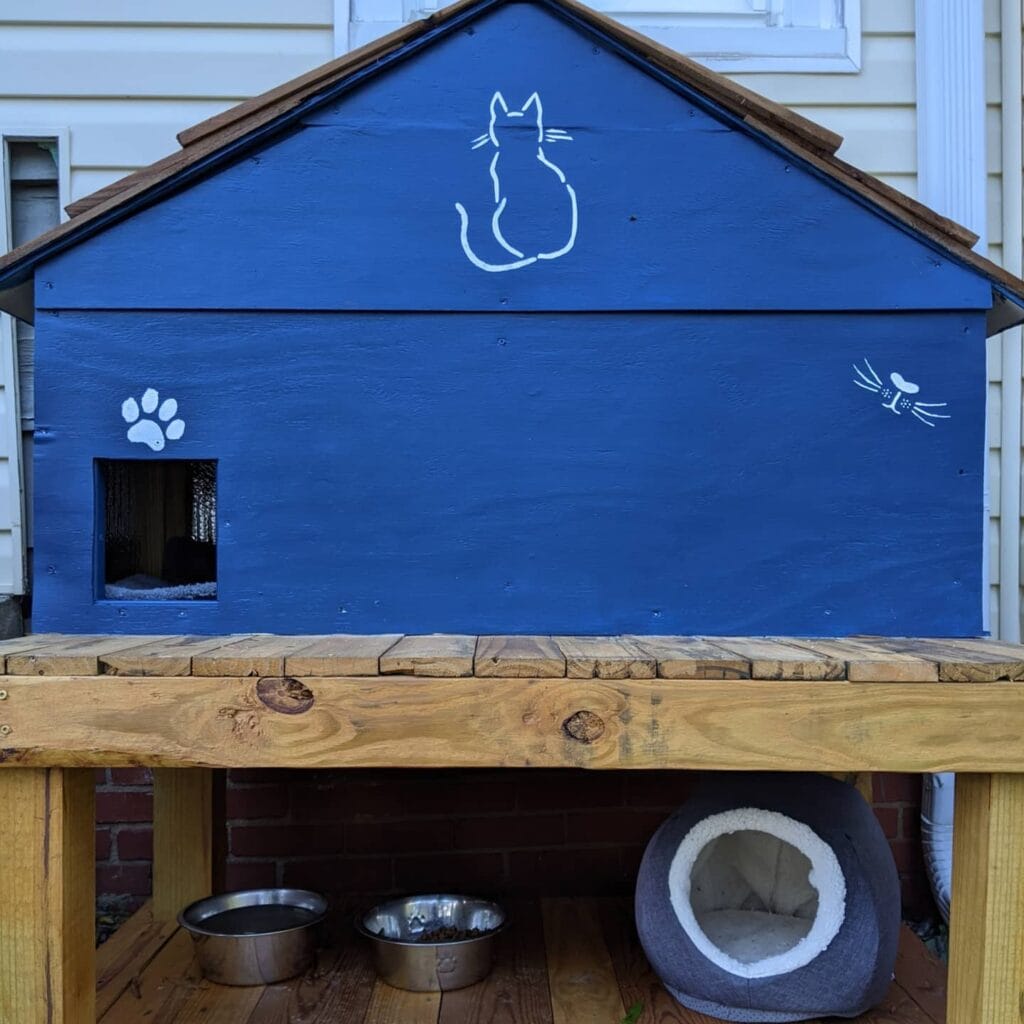
This navy blue painted plywood cat shelter mounted on a natural cedar wood platform is honestly one of my favorite DIY projects I’ve seen all year. It’s practical, it’s Pinterest-worthy, and it keeps community cats warm when temps drop.
Materials & Tools You’ll Need:
– ¾-inch plywood (for walls, floor, and roof base)
– Cedar wood planks (for the platform base and legs — roughly 2×4 inches)
– Cedar shingle roofing (for the peaked roof)
– Navy exterior-grade latex paint
– White paint or stencil kit (for cat silhouette + paw print designs)
– Mylar emergency blanket (visible inside the entry hole — reflects body heat back)
– Small cat igloo bed (the gray one tucked underneath is perfect for overflow shelter)
– 2 stainless steel pet bowls
– Drill, screws, sandpaper, paintbrush, measuring tape
Prep Time: 1 hour | Active Project Time: 4–6 hours | Difficulty Level: Intermediate
Instructions
Start by cutting your plywood panels into the four walls, floor, and two angled roof panels. The peaked roof design isn’t just cute — it sheds snow and rain so cats stay dry inside, which means fewer sick strays and more trust from neighborhood cats who’ll actually use it.
Sand every edge before assembly. Rough edges split over winter and your whole structure weakens by spring.
Screw your cedar 2×4 legs into the platform base first. Elevating the shelter off the ground about 12–16 inches keeps moisture from wicking up through the floor and gives you that bonus under-shelter storage space — which is where the gray igloo bed and food bowls live in this build.
Attach the wall panels to the platform, then add the peaked roof panels. Secure the cedar shingle strips starting from the bottom row and overlapping upward so water runs off clean.
Cut your entry hole at roughly 6×6 inches on one side, positioned low. Smaller openings trap more heat inside — that’s the feature that makes the whole thermal design work, and it’s why this shelter can realistically stay 10–15 degrees warmer than outside temps even without a heater.
Line the interior floor with that Mylar emergency blanket before sealing the roof. You can see it catching light through the entry hole in the photo. Add a layer of straw on top — not a blanket, straw doesn’t hold moisture.
Paint everything with two coats of navy exterior latex. Once dry, use a simple stencil to add your white cat silhouette on the gable and a paw print on the front panel. That little mouse near the right side? Freehand it. It adds personality.
One thing to remember: seal all exterior seams with exterior wood caulk before painting. Winter moisture sneaks into every gap and will warp your plywood by January.
Set your two stainless steel bowls underneath — one water, one food. Stainless doesn’t crack in cold temps the way plastic does.
The cats in my neighborhood started using a build almost exactly like this within three days. Three days.
📸 Photo credit: Instagram @joynerathome
#2: The Black-and-Yellow Plastic Tote Cat Shelter That Costs Less Than $20
You know that feeling when you spot your neighbor’s outdoor cat huddled under a porch step in January? That’s the moment this DIY hit me hard.
I built this for my sister’s feral colony cats, and honestly — it’s one of the easiest winter shelters I’ve ever made.
Materials & Tools:
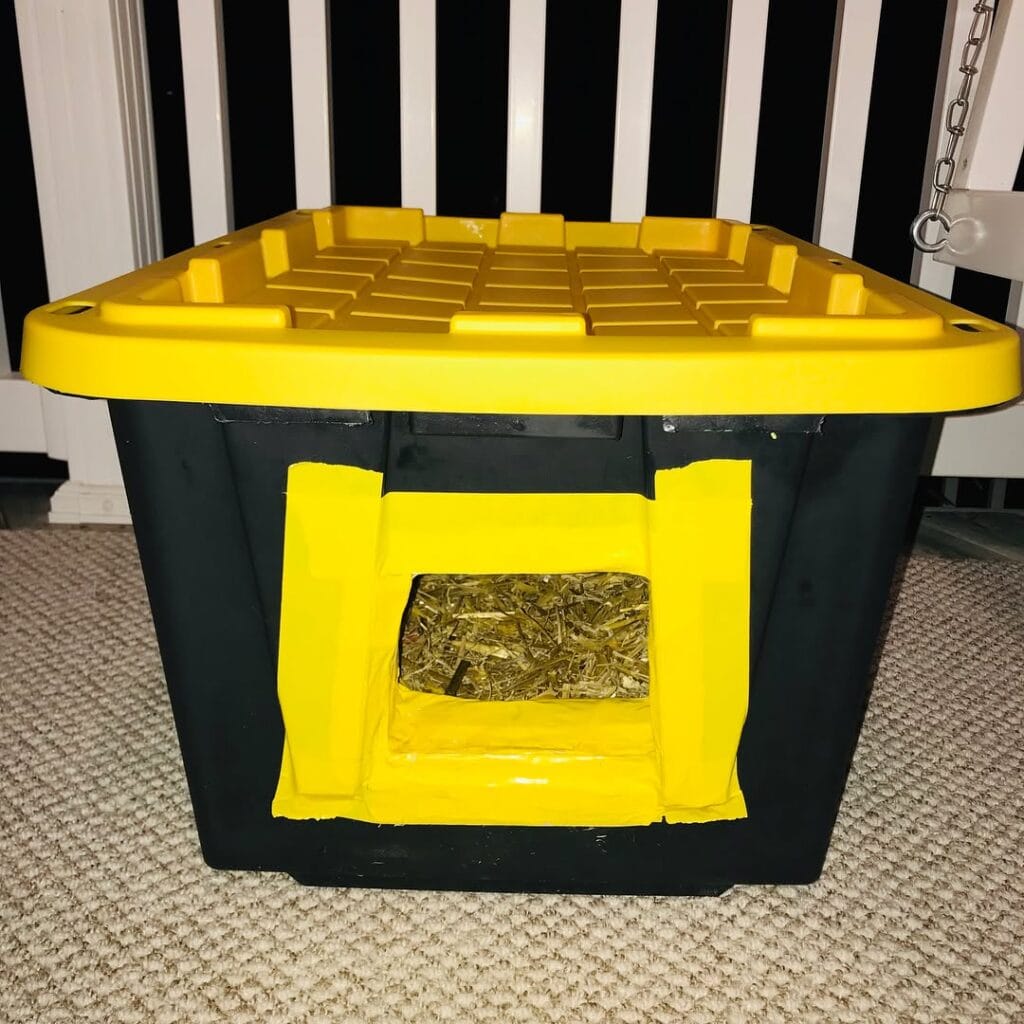
– 18-gallon black plastic storage tote with yellow lid (like the one pictured)
– Yellow duct tape (matches the lid — so Pinterest-worthy, your golden’s kennel is about to look boring by comparison)
– Box cutter or sharp utility knife
– Straw (NOT hay — straw repels moisture, hay holds it)
– Ruler or marker
Instructions
Flip the tote upside down — seriously, don’t skip this. The entrance hole gets cut on what’s normally the side wall, about 4 inches up from the floor once flipped right-side up. This raised lip keeps snow and rainwater from flooding in.
Cut a 7×7 inch square opening using your box cutter. Press yellow duct tape firmly around every raw edge. Sharp plastic edges can cut a cat’s paws, so every inch of that border needs coverage.
Pack 4-5 inches of straw inside. Straw traps body heat — that insulation feature keeps cats warmer through freeze-and-thaw nights, which means they actually use the shelter instead of abandoning it.
Snap the lid on tight.
The yellow tape border isn’t just cute — it protects little paws from jagged plastic, making this safer than most store-bought options at a fraction of the price.
For more cozy outdoor pet projects, 19 Outdoor Cat Room Ideas That Cats Will Love has some seriously good inspiration.
Place the shelter against a wall or fence to block wind. Weight the lid down with a brick if your area gets heavy gusts.
Prep Time: 5 minutes | Active Project Time: 20 minutes | Difficulty Level: Beginner
📸 Photo credit: Instagram @laurelaynnecook
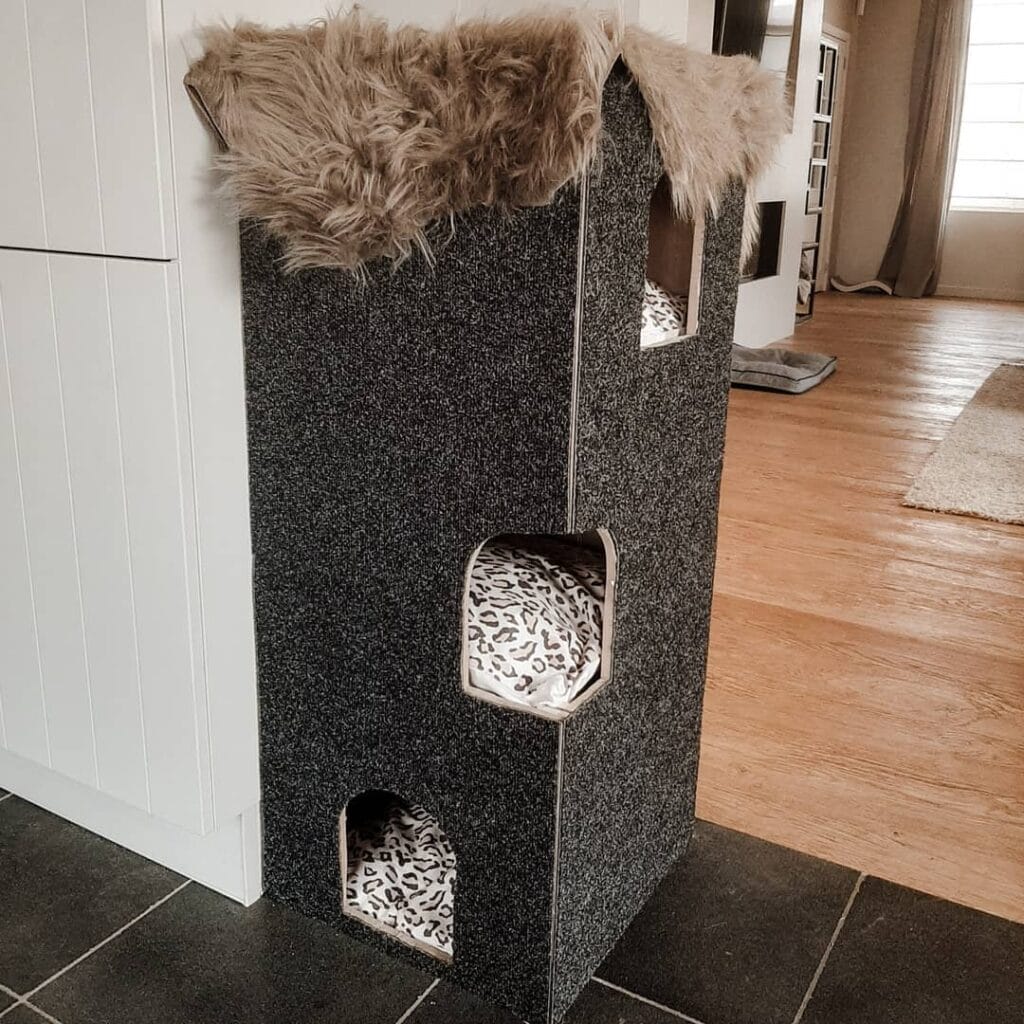
#3: Carpet-Covered Indoor Cat Tower With Leopard Print Hideaways
Okay, so you know how your golden leaves fur on everything — the couch, your throw pillows, that one white rug you refuse to give up? Cats do the same thing, except they also want vertical real estate. And if your outdoor cat has started eyeing the porch furniture as their personal hotel, this build is going to change things.
This tower is giving full castle energy, and honestly it looks so good next to a white paneled wall.
Materials & Tools:
– ¾-inch plywood (cut into side panels, floor, and roof pieces)
– Dark gray berber carpet (approximately 2-3 yards)
– Faux fur fabric in sandy beige (for roof trim, about ½ yard)
– Leopard print fleece fabric (for interior cushion lining)
– Carpet adhesive or staple gun
– Jigsaw (for arched entry cutouts)
– Wood glue + finishing nails
– Sandpaper (120-grit)
– Metal corner trim strips (silver, for entry edges)
Prep Time: 45 minutes | Active Project Time: 4-5 hours | Difficulty Level: Intermediate
Instructions
Start by cutting your plywood into two identical side panels — mine came out to roughly 18 inches wide by 48 inches tall. Then cut three horizontal shelves that slide between those panels to create your three separate levels. Sand every edge with your 120-grit sandpaper because rough edges catch carpet weird and you’ll see it after.
Use your jigsaw to cut the entry openings next. The bottom one is a simple arch, about 8 inches wide by 10 inches tall. The middle and top openings can be slightly taller since those are sleeping cubbies, not ground-level entries. Press your metal corner trim strips around each opening — this is the detail that makes the whole thing look intentional instead of DIY-messy.
Now glue your shelves in using wood glue, then reinforce with finishing nails from the outside panels. Let that dry completely before you touch it again. Seriously, rushing this step is how the whole thing wobbles.
Once it’s dry, cut your berber carpet into panels and staple-gun the entire exterior. Wrap it tight around corners like you’re gift-wrapping something. The carpet-wrapped exterior gives your cat a built-in scratch surface — which means your sofa gets left alone, and you stop finding claw marks on things you love.
Line each interior cubby with your leopard print fleece cut to fit like a little cushion sleeve. Finally, hot glue strips of faux fur along the top roof edge. This is purely aesthetic but it looks so good.
If you love how this turned out, 16 Insulated Cat House Ideas for Winter-Ready Comfort has some great variations for keeping things warm when temperatures actually drop.
For extra insulation in winter, staple a second layer of carpet to the interior walls of the bottom cubby — that dead air space between layers traps heat better than a single thick layer ever will.
📸 Photo credit: Instagram @life_of_a_foster_mom
#4: Insulated Plastic Tote Winter Cat Shelter (The $20 Fix That Actually Works)
So you know that feeling when you spot a stray curled up outside in the cold and your heart just breaks? Yeah. I had that moment last November, and I went full Pinterest mode at 11pm on a Tuesday.
Prep Time: 15 min | Active Project Time: 45 min | Difficulty Level: Easy
What You’ll Need:
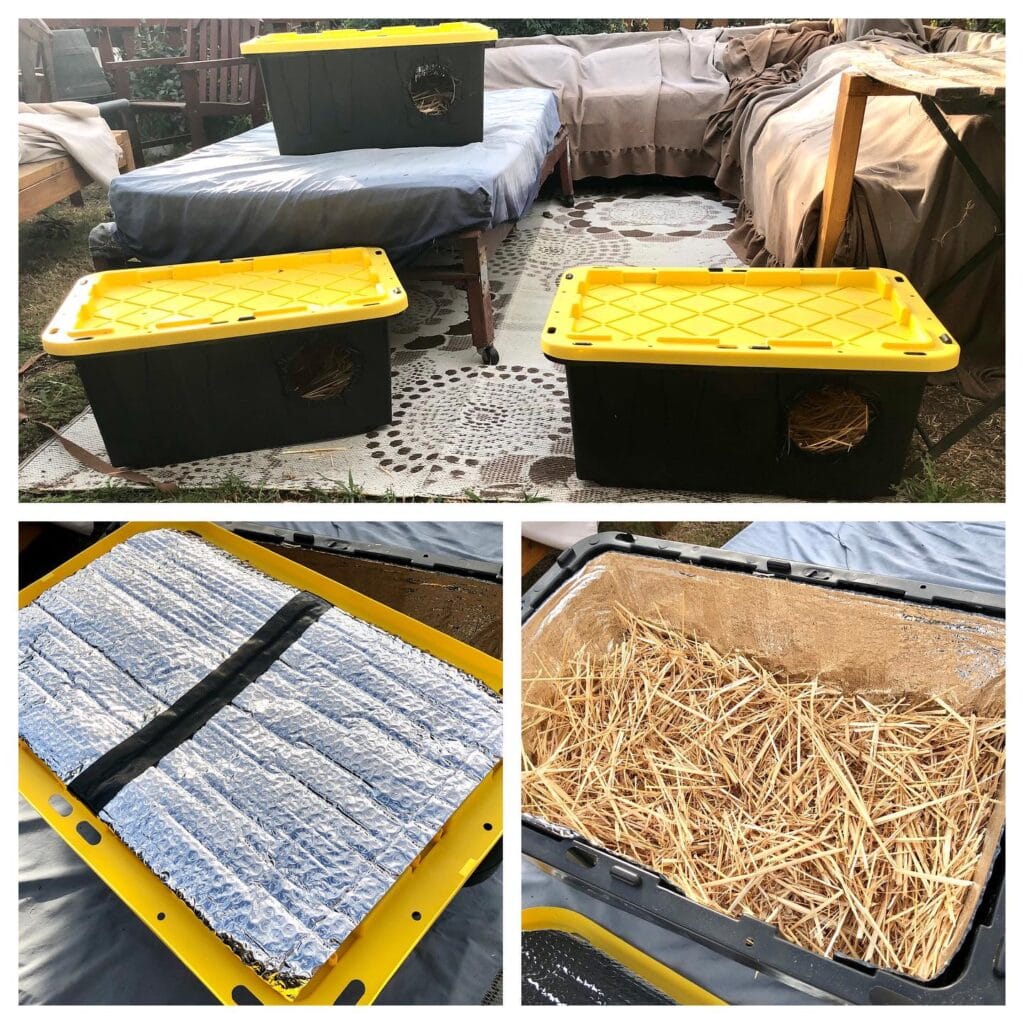
– Large black plastic storage tote with yellow lid (like a 45-gallon Husky tote)
– Reflective foil bubble insulation (cut to fit the lid interior)
– Dry straw (NOT hay — straw repels moisture, hay holds it)
– Box cutter or jigsaw
– Black duct tape
– Ruler or measuring tape
Instructions
Cut a 5-6 inch round entry hole on one of the short sides of the tote, positioned low near the base so cold air stays out. And if you want extra protection, cut a second hole on the opposite side — that gives cats an escape route if a predator shows up.
Line the entire inside bottom with foil bubble insulation, then press a matching piece against the lid’s interior and secure it with black duct tape. The reflective foil traps body heat, which means a cat sleeping inside stays warm even on a 20°F night.
Pack 4-6 inches of dry straw across the floor. Straw creates air pockets that insulate way better than blankets or towels, which just absorb cold moisture.
Real talk: I made three of these last winter and placed them under my covered patio. The neighborhood cats found them within two days.
Darker tote colors absorb daytime sun heat, giving the shelter a head start before temps drop at night. Two shelters side by side also let cats choose — some prefer company, some don’t.
📸 Photo credit: Instagram @haafu_sista
#5: The Rubbermaid Tote Cat Shelter That Costs Less Than $20 to Build

Okay so you know that moment when your golden tracks mud across your floors and you’re already on your third paper towel? That’s exactly the energy of realizing a stray cat has been sleeping on your cold porch all winter with nothing but a plastic chair for warmth.
This build is genius. A dark gray 27-gallon Rubbermaid storage tote flipped upside down on four 4×4 pressure-treated wood post legs creates a raised, insulated shelter that keeps cats off the frozen ground.
Materials & Tools:
– 27-gallon Rubbermaid storage tote with lid (gray)
– Four 4×4 pressure-treated lumber post cuts (approximately 4 inches tall)
– Gray foam pipe insulation sleeves (for door edging)
– Box cutter or jigsaw
– Drill + screws
– Measuring tape
Instructions
Cut a 5×5 inch square entry hole on one short side of the tote. Wrap the raw edges with split foam pipe insulation and secure it with screws through a small wooden frame — this protects cats from sharp plastic edges.
Attach the four lumber legs underneath by drilling through the tote bottom. Set the lid underneath as a floor base.
The raised design keeps moisture out — finally a shelter that won’t fill with rainwater and leaves.
Line the inside with straw (not hay — straw repels moisture, hay holds it).
Drill one small ventilation hole near the top to prevent condensation buildup inside.
📸 Photo credit: Instagram @freecatsheltersri
#6: Elevated Fabric Cat House with Insulated Roof — Raised Off the Ground So Cold Never Wins
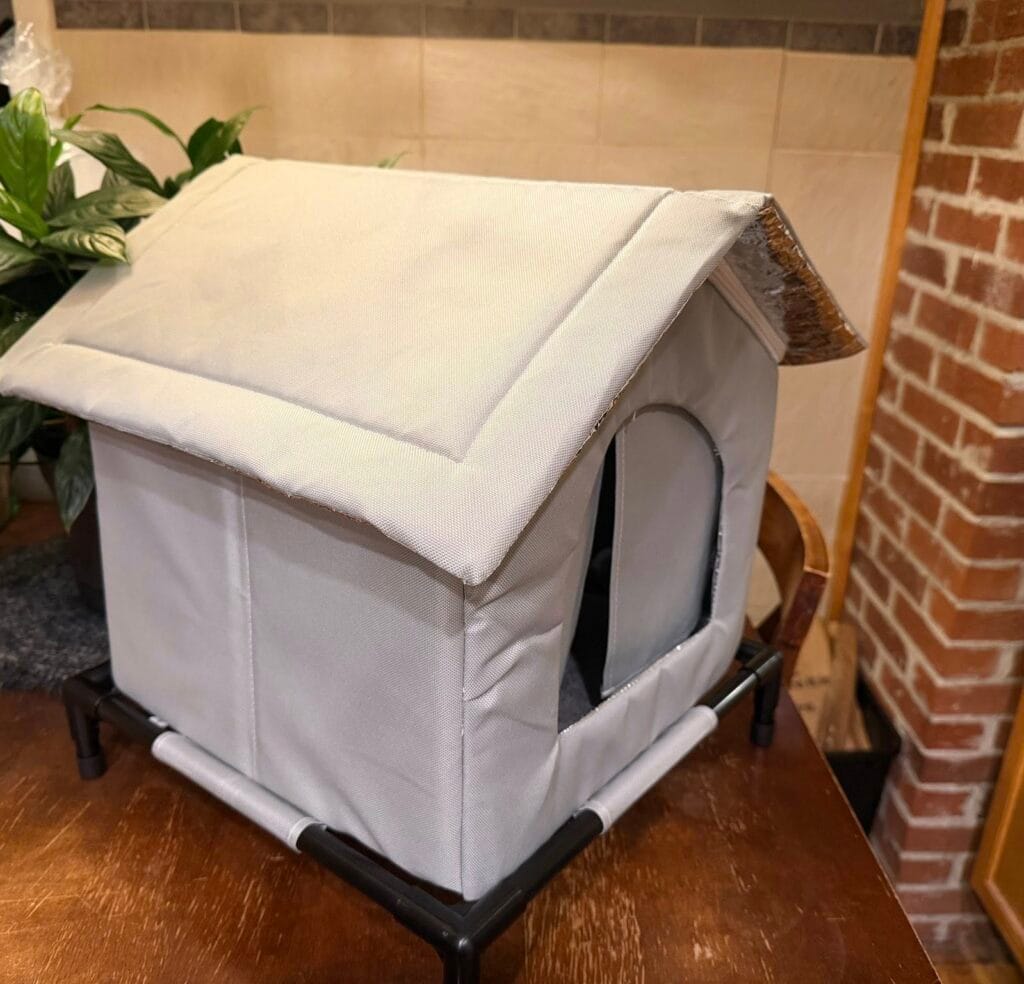
Prep Time: 30 minutes | Active Project Time: 2–3 hours | Difficulty Level: Intermediate
Okay so you know that feeling when you see your outdoor cat curled up on the bare cold porch in January? Like, that image lives in my head rent-free. My cousin had the same situation with her two barn cats, and this project honestly changed everything for them.
This one is so good — a house-shaped fabric shelter built over a raised cot-style frame using black PVC pipe corners and gray Oxford polyester canvas panels. The roof is two-panel and peaked, with what looks like a foil-bubble insulation layer sandwiched underneath the outer fabric — you can actually see it peeking out at the ridge line in the photo.
Materials & Tools:
– Gray 600D Oxford polyester fabric (water-resistant)
– Black PVC pipe joints + grey PVC pipe sections (frame base)
– Foil bubble wrap insulation sheet (roof liner)
– Heavy-duty zipper (arched front entry)
– Scissors, sewing machine or iron-on hem tape, zip ties, measuring tape
Instructions
Cut your PVC base frame first — four corner joints connect the bottom rectangle, elevating the floor about 4–5 inches off the ground. This raised floor means cold concrete never touches your cat’s body, the insulation stays dry, and your cat actually uses the shelter instead of avoiding it.
Sew your side panels and attach them to the frame using zip ties through reinforced grommets. The arched front entry — roughly 10 inches wide — gets a zipper so you can close it on brutal nights.
For the roof, cut your insulation sheet to match the peak shape, then sandwich it between two layers of fabric before sewing the ridge seam. The peaked angle sheds rain and snow without pooling.
Double-stitch every seam. Wind pulls harder than you think on a freestanding shelter.
Want an easy win? Add an old fleece blanket inside as bedding — it traps body heat fast and you probably already have one stuffed in a closet somewhere.
📸 Photo credit: Instagram @tmbrsd
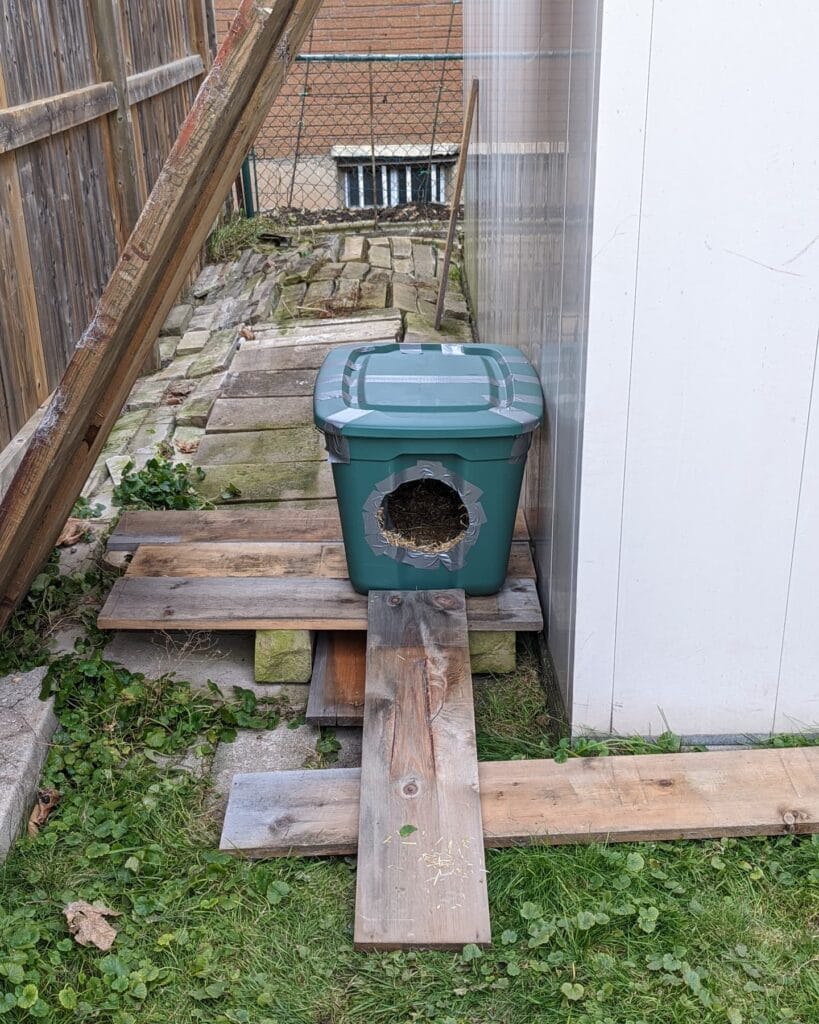
#7: The Rubbermaid Tote Feral Cat Shelter (The One That Actually Stays Dry)
Okay so you know that feeling when your golden tracks mud across your just-mopped floors and you think, why do I even try? That’s basically every feral cat in your neighborhood during a January freeze — except they don’t even have floors.
This shelter is built from a green 18-gallon Rubbermaid tote with a round entry hole cut into the front, lined with straw insulation, and sealed with duct tape around the edges. It sits on a wooden pallet platform to keep it off cold ground — which is everything in wet weather.
Materials & Tools:
– 18-gallon Rubbermaid storage tote with lid (green or any color)
– Straw (NOT hay — hay holds moisture)
– Heavy-duty duct tape
– Wooden pallet or scrap lumber boards
– Box cutter or jigsaw
– Marker
Instructions
Trace a 6-inch circle onto the lower front panel of the tote using your marker — keep it low but leave a 2-inch floor lip so straw stays put. Cut it out with your box cutter using slow, controlled strokes. And here’s where most people skip a step: tape every cut edge with duct tape so no sharp plastic catches a paw.
Pack 3-4 inches of straw loosely inside. Snap the lid shut and wrap duct tape across the seam — moisture finds every gap. Slide the whole thing onto your pallet so cold concrete never touches the base.
Tuck it against a wall or fence like you see here. That windbreak cuts drafts and the shelter stays noticeably warmer inside.
The straw-plus-elevated-platform combo traps body heat, keeps moisture out, and means a cold cat has somewhere genuinely warm — not just technically covered.
If you’re already deep into cat DIY mode, 7 Fun DIY Cat Projects Every Owner Needs has more ideas worth stealing.
Face the entry hole away from prevailing wind. Cats feel safer entering from a sheltered angle, and it cuts heat loss by a surprising amount.
Prep Time: 10 minutes | Active Project Time: 25 minutes | Difficulty Level: Beginner
📸 Photo credit: Instagram @newt.and.hudson
The One Insulation Mistake That’ll Leave Your Cat Freezing All Winter
Okay, real talk — most people grab a styrofoam cooler, cut a door hole, and call it a day. And honestly? That’s not bad. But here’s where everyone messes up: they add a fabric or fleece blanket inside.
Blankets absorb moisture. Your cat comes in wet from snow, that blanket soaks it up, and now the shelter is colder than outside. I made this exact mistake my first winter building shelters for the feral colony near my grandma’s property.
Use straw, not blankets. Loose straw repels moisture and traps body heat. It’s a game-changer.
Two more pro moves:
– Face the door away from wind. Sounds obvious until you forget and your shelter becomes a wind tunnel.
– Keep the entrance small — around 6 inches wide. Bigger openings bleed heat fast.
Also, elevation matters more than people realize. Raise the shelter off the ground on a pallet or wood blocks. Cold travels up through concrete and frozen ground way faster than through air.
Your cat will actually use it. Promise.
Your Floors Deserve Better — And So Do You
Okay, real talk — stop waiting for the “perfect time” to protect your floors. There is no perfect time. There’s just right now, before your golden tracks in another round of backyard mud.
Pick one rug, one mat, one washable cover. Start there. Your future self (the one not scrubbing grout lines on a Saturday) will genuinely thank you.
And hey — if you’re already in full-on dog-proofing mode, homemade frozen dog treats are a fun next step to keep that fur baby happy and busy.
So tell me — which room in your house is your golden’s biggest disaster zone right now?

Amr Mohsen is a software engineer who traded his keyboard for a leash — at least on weekends. His love for dogs inspired him to share what he learns as a dog owner and enthusiast, bringing a detail-oriented, research-driven perspective to every article he writes. If it’s about dogs, he’s probably already looked it up twice.

