So, you’ve got a furry friend who deserves more than just a basic feeding setup, right? Why not spice things up with some DIY dog feeding stations? Imagine this: a stylish elevated platform for your pup or personalized bowls that scream their name. It’s all about making mealtime fun and engaging, while also keeping your home looking great. Ready to transform those mealtime blues into a culinary adventure? Let’s explore these creative ideas together.
Feeding Station Design Ideas
When it comes to creating the perfect feeding station for your dog, there are a ton of design ideas to contemplate. Think about a dog feeding station DIY project that reflects your style.
You could use an old wooden crate, paint it a fun color, and add cute bowls. Or how about a wall-mounted shelf? It saves space and keeps things tidy.
Got some spare tiles? Lay them down as a mat to catch spills. For the adventurous, a raised feeding station can help your dog eat comfortably.
Don’t forget about personal touches, like their name on a sign. You might even want to add some fun dog-themed decor.
After all, it’s not just about feeding; it’s about creating a cozy corner for your furry friend.
Our Collection
Let’s take a look at our collection of dog feeding stations that’ll fit any pup’s personality and your home style.
You’ve got options like the elevated wooden platform for those fancy dogs who prefer dining in style, or the portable travel station for those on-the-go adventures.
And if your dog loves a challenge, the interactive puzzle feeding station is sure to keep them entertained while they munch away.
1. Elevated Wooden Feeding Platform
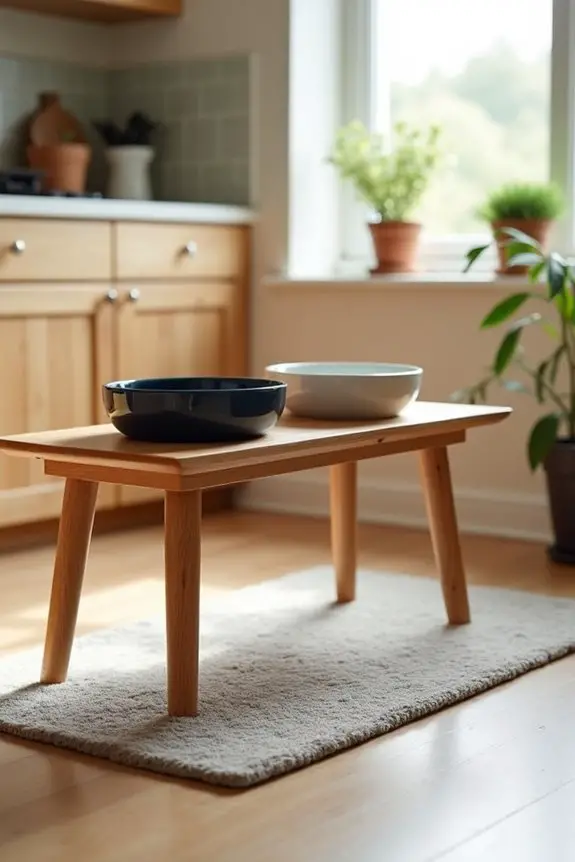
Creating an elevated wooden feeding platform for your dog is a fun and practical DIY project. Not only does it make mealtime more comfortable for your furry friend, but it also helps keep your home looking tidy and stylish. Plus, making one yourself can save you some serious cash compared to buying a fancy one from the store. Let’s explore this easy-to-follow project that your pup will love. Additionally, consider pairing this with a cozy luxury dog bed to enhance your dog’s comfort during mealtime and relaxation.
Materials Needed:
- 1 piece of plywood (about 2 feet by 3 feet)
- 4 wooden legs (you can use 2x2s or pre-made furniture legs)
- Wood screws (1.5 inches long)
- Wood glue
- Sandpaper (medium and fine grit)
- Non-toxic wood stain or paint (optional)
- Dog food and water bowls (make sure they fit snugly)
- Measuring tape
- Electric drill or screwdriver
- Paintbrush (if staining/painting)
- Safety goggles
Step-by-Step Instructions:
- Measure and Cut: Start by measuring where you want the feeding station to go. Cut your plywood to the desired size, typically around 24 inches by 18 inches is great for medium to large dogs. Don’t worry if it’s not perfect; dogs don’t care about precision.
- Sand the Edges: Take your sandpaper and smooth all the edges of the plywood. You want to avoid any splinters for your pup’s safety. Trust me, you don’t want your dog giving you that “Do you really expect me to eat off this?” look.
- Attach the Legs: Flip the plywood over. Position the wooden legs at each corner and secure them with wood screws. If you’re feeling fancy, use wood glue before you screw them in for extra stability. This is where you can really show off your skills—just make sure it’s sturdy enough for your dog to lean on.
- Stain or Paint: If you want to add a splash of color or a rustic look, now’s the time to stain or paint the platform. Use a non-toxic option, of course. Let it dry completely. Your dog’s feeding station should reflect your style, not look like a kindergarten art project.
- Add Bowls: Once everything is dry and ready, place your dog food and water bowls on top. Confirm they fit snugly, so they don’t slide around during dinner time. You don’t want Fido to be chasing his bowl around the kitchen like it’s a game of fetch.
- Final Touches: Check for any rough spots or screws sticking out. Sand those down if necessary. You don’t want anything ruining your dog’s dining experience—after all, they deserve the best.
Optional Add-ons/Variations:
- Decorative Stencils: Get creative by stenciling your dog’s name or some fun paw prints on the platform. It adds a personal touch that showcases your pup’s personality.
- Use Different Wood: Try using reclaimed wood for a rustic vibe or even colored wood for a pop of fun. Who said dog feeding stations can’t be chic?
Pro Tip:
Make sure the height of the feeding station is comfortable for your dog. A general rule of thumb is to have the platform around the same height as your dog’s chest. This helps reduce strain on their neck and back, making mealtime a lot more enjoyable.
And, if you’re feeling extra generous, consider adding a cute mat underneath to catch any spills.
2. Customizable Ceramic Bowls
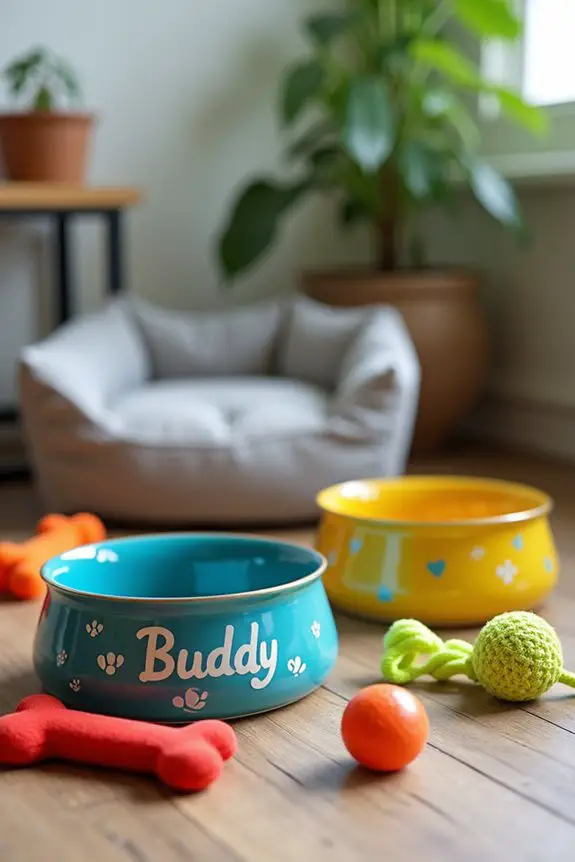
Are you tired of your pup’s boring, plain food and water bowls? This DIY project will help you create beautiful, customizable ceramic bowls that not only elevate your dog’s dining experience but also add a splash of personality to your home decor. Plus, making your own means you can save money and create a one-of-a-kind piece that reflects your style (and your dog’s taste, of course). Additionally, you can serve your dog’s meals in style with our selection of premium dog food packages.
Materials Needed:
- Plain ceramic bowls (choose sizes that fit your dog)
- Non-toxic ceramic paint or paints designed for pottery
- Paintbrushes (various sizes)
- Stencils or stickers (optional for designs)
- Clear ceramic sealer (food-safe)
- Oven (for curing the paint)
- Safety goggles (for eye protection)
- Old newspaper or drop cloth (to keep your workspace clean)
Step-by-Step Instructions:
- Prep Your Workspace: Start by laying down old newspapers or a drop cloth to protect your surface. Gather all your materials so you can easily reach them while you paint. Trust me, you don’t want to be hunting for your paintbrush halfway through this project.
- Clean the Bowls: Wash the ceramic bowls with soap and water to remove any dust or oils. Dry them completely. This step is essential; you want your paint to stick, not slide off like your dog when they hear the treat jar open.
- Plan Your Design: Before you get started with painting, sketch out your design on paper, or use stencils or stickers for added flair. Think about your dog’s personality—is it playful, regal, or a bit of a troublemaker? Your design should reflect that.
- Start Painting: Using your paintbrush, apply the ceramic paint to the bowls. You can go for solid colors, fun patterns, or even cute little paw prints. If you mess up (and who hasn’t), don’t worry. Just wipe it off with a damp cloth before it dries and try again.
- Let It Dry: Once you’re happy with your masterpiece, let the bowls dry according to the paint instructions. This might take a few hours, so use the time to catch up on your favorite show or play with your pup—just keep them away from the wet bowls.
- Cure the Paint: After the paint is dry, place the bowls in the oven (cold) and set the temperature according to the paint instructions, usually around 350°F. Bake them for 30 minutes to cure the paint. This will help it last through all the enthusiastic eating and drinking.
- Seal It Up: Once cooled, apply a food-safe clear ceramic sealer to protect your design from scratches and wear. Let it dry completely before letting your dog use them.
Optional Add-ons/Variations:
- Color Combinations: Experiment with ombre effects by blending two colors together. You can also paint the inside of the bowls a different color for a fun surprise.
- Personalization: Add your dog’s name to the bowl with a stencil for a personal touch. You can even include little designs around their name, like hearts or bones, to make it extra special.
Pro Tip:
Always double-check the paints and sealers you use to verify they’re non-toxic and food-safe. Your pup will appreciate not only the stylish bowls but also the safety. And remember, if you feel inspired, you could make a matching set for your cat—if they’re up for it.
Creating these customizable ceramic bowls is a great way to bond with your dog while adding a personal touch to your home.
3. Portable Travel Feeding Station
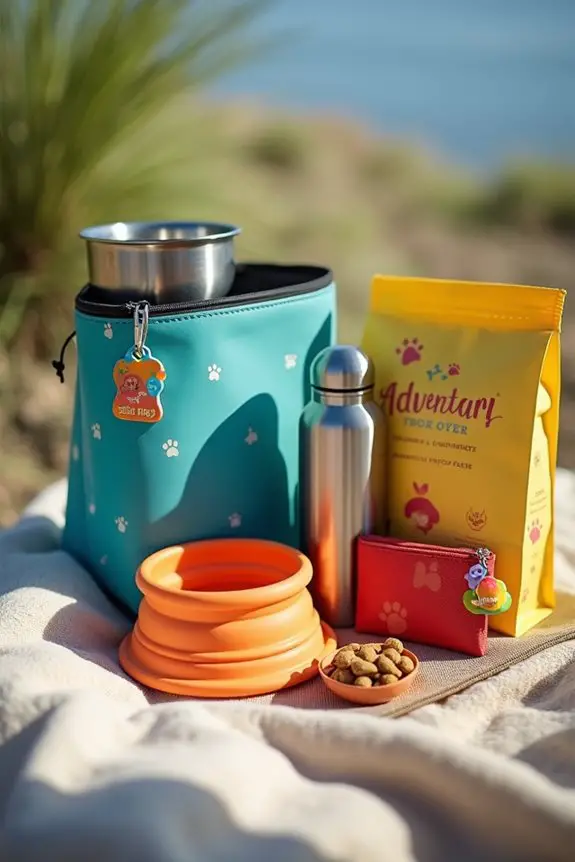
If you’re a dog owner who loves to travel, then you know how important it’s to have a convenient and organized feeding solution for your furry friend. A portable travel feeding station is the perfect DIY project that not only saves you money but also enhances your adventures by making mealtime a breeze for both you and your pup.
Imagine a compact setup that you can easily toss in the car, guaranteeing your dog always has access to their food and water, no matter where your journeys take you.
Materials Needed:
- Small, lightweight container (like a tote bag or backpack)
- Collapsible dog bowl (silicone or fabric)
- Travel water bottle with a built-in bowl
- Dog food in a resealable bag or container
- Portable pet mat (for easy cleanup)
- Optional: dog treats in a separate pouch
- Optional: a leash clip or carabiner
Step-by-Step Instructions:
- Choose Your Container: Start by selecting a small, lightweight tote bag or backpack that’s easy to carry. Look for one that has compartments to keep everything organized. If it has a cute dog design, even better.
- Add the Bowls: Find a collapsible dog bowl made of silicone or fabric. These are perfect because they take up minimal space. Place it inside your container along with a travel water bottle that has a built-in bowl. This way, you can quickly hydrate your pup on the go without fuss.
- Pack the Food: Use a resealable bag or a small container to store your dog’s food. Measure out enough for the duration of your trip, plus a little extra for those “just in case” moments. You know, like when your dog gives you those sad puppy eyes begging for more.
- Include a Cleanup Mat: A portable pet mat is a must-have for any feeding station. It protects your car or wherever you’re from spills and makes cleanup a breeze. Simply roll it out when it’s mealtime, and when your dog is done, just shake it off and fold it back up.
- Organize Treats (Optional): If your pup is a fan of treats (who isn’t?), pack them in a separate pouch within your container. This way, you can reward good behavior during your travels without digging through your bag.
- Attach Extras with a Clip: If you want to be extra organized, consider using a leash clip or carabiner to attach the travel food and water bottles to the outside of your bag. It keeps everything within reach and gives you more space inside for other essentials.
- Final Check: Before you hit the road, double-check that you have everything packed. A quick glance guarantees you won’t be frantically searching for bowls or food when your dog’s mealtime rolls around.
Optional Add-ons/Variations:
- If your dog has a favorite color, consider choosing a container and bowls that match their personality. You could even personalize the bag with your dog’s name or a cute saying.
- For added flair, decorate the feeding mat with fabric paint or patches related to your dog’s favorite things, like bones or paw prints.
Pro Tip:
Always keep a few extra plastic bags in your travel feeding station for easy cleanup after meals or potty breaks. It’s a small touch that makes a big difference, especially when you’re on the go. Plus, it helps you be a responsible pet parent, which is something everyone can appreciate.
Additionally, integrating a premium automatic dog feeder can further streamline feeding routines when you’re at home.
4. Wall-mounted Feeding Station
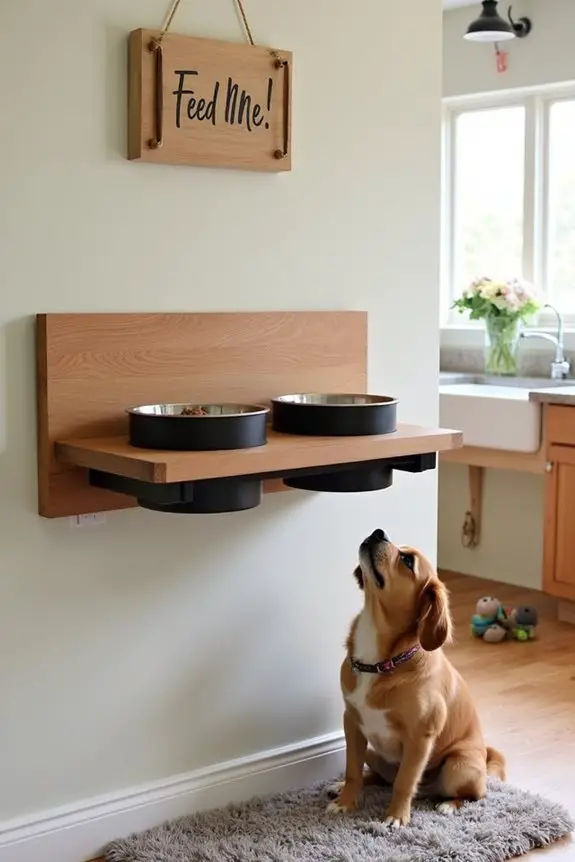
If you’re looking for a way to keep your dog’s feeding area tidy and organized, then a wall-mounted feeding station is just the project for you. Not only does it save space, but it also adds a stylish touch to your home. Plus, it keeps your pup’s food and water bowls off the floor, making clean-up a breeze and preventing any accidental spills. Let’s explore this simple DIY project. Additionally, consider using premium dog food to ensure your Goldendoodle receives the best nutrition possible.
Materials Needed:
- Wooden board (about 2’ x 1’)
- Two stainless steel pet bowls (with a diameter that fits your dog’s needs)
- Bowl holders or brackets (to secure the bowls)
- Wall brackets (for mounting the wooden board)
- Screws and wall anchors
- Paint or wood stain (optional)
- Sandpaper (if you want a smooth finish)
- Drill
- Measuring tape
- Level
- Pencil
Step-by-Step Instructions:
- Choose the Location: Start by selecting a spot on the wall that’s convenient for your dog to reach but out of the way of foot traffic. Think about where you want to place it—maybe near the kitchen or a designated pet area.
- Prepare the Wooden Board: If you want to add a personal touch, now’s the time to paint or stain your wooden board. Let it dry completely before proceeding. If you’re going for a natural look, just sand it down to smooth any rough edges.
- Mark the Bowl Positions: Using your measuring tape, decide where you want the bowls to sit on the board. Make sure they’re spaced evenly and high enough off the ground for your dog’s comfort. Use a pencil to mark the spots.
- Attach the Bowl Holders: Drill the bowl holders or brackets onto the wooden board at the marked positions. Confirm they’re securely fastened, as you don’t want any accidents during mealtime.
- Mount the Wooden Board: With a level in hand, hold the board up against the wall and mark where the wall brackets will go. Drill holes for the screws and wall anchors, then attach the wooden board to the wall securely.
- Add the Bowls: Once the board is mounted, place the stainless steel bowls into their holders. This part is satisfying—seeing everything come together.
- Final Touches: Double-check that the bowls are secure and adjust them if needed. You might want to add a small mat underneath for easy cleanup, or even a little sign that says “Feed Me!” for a personal flair.
Optional Add-ons/Variations:
- Colorful Bowls: Choose bowls in bright colors or fun patterns to match your home décor. Or, paint the wooden board in a fun color that complements your room.
- Personalization: Stencil or paint your dog’s name on the wooden board for a custom look. It’s a little detail that makes a big impact.
Pro Tip:
When mounting the feeding station, make sure to secure it at a height that’s comfortable for your dog. A good rule of thumb is to have the bottom of the bowls at your dog’s shoulder height. This promotes better posture while eating, which can help prevent digestive issues. Plus, who doesn’t want their pup to eat like royalty?
Now you’re ready to create a functional and stylish feeding station for your furry friend. Just think of all the space you’ll save and how much nicer your home will look. Happy DIYing!
5. Interactive Puzzle Feeding Station
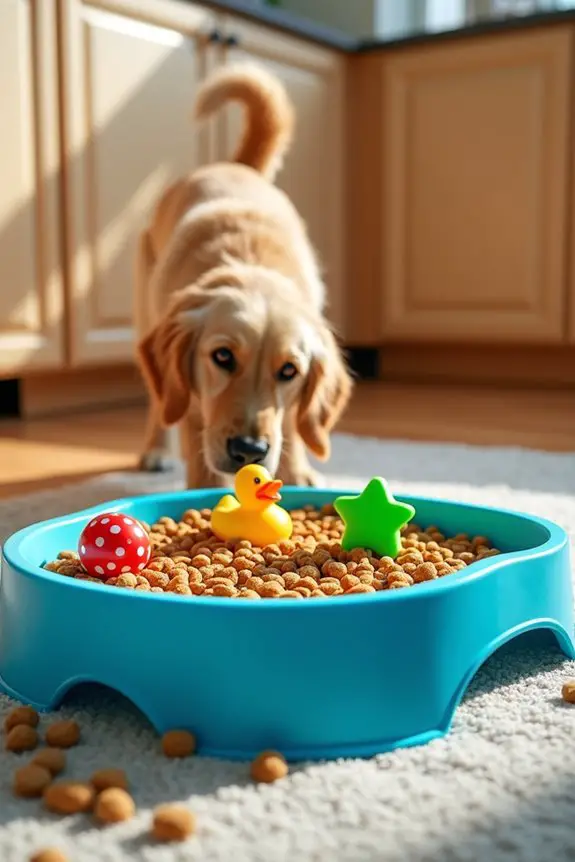
If you’re on the hunt for a fun and engaging way to keep your furry friend entertained during mealtime, why not try creating an interactive puzzle feeding station? This DIY project not only slows down your pup’s eating pace, which can help with digestion, but it also provides mental stimulation.
Think of it as a little workout for your dog’s brain while they enjoy their favorite kibble. Plus, it’s a fantastic way to repurpose items you might already have at home. Let’s explore how you can make one for your pup.
Materials Needed:
- A shallow plastic container or tray (like a cake pan or baking dish)
- Non-toxic plastic toys (such as balls or rubber ducks)
- Dog-safe treats or kibble
- Scissors (if needed for adjusting toys)
- Measuring cup
- Optional: felt or fabric for lining (to add texture)
Step-by-Step Instructions:
- Select Your Base: Choose a shallow plastic container or tray that will hold your dog’s food and toys. It should be wide enough for your pup to reach in and explore but shallow enough to prevent spills.
- Prepare the Toys: If you have non-toxic plastic toys that are dog-safe, you can use them to create obstacles. Cut or modify the toys (if necessary) so they don’t have small pieces that could come off and become choking hazards.
- Fill with Kibble: Pour a layer of dog-safe treats or kibble into the container. Make sure the layer isn’t too deep, as the goal is for your dog to use their nose and paws to search for the hidden goodies.
- Arrange the Toys: Place the plastic toys on top of the kibble. You can either scatter them around or create a fun maze-like pattern. The toys should be placed in a way that your dog has to move them around to get to the food.
- Test It Out: Before introducing the puzzle to your pup, give it a little shake to make sure everything is stable. Then, show your dog the new feeding station. It might take a minute for them to understand, but once they do, prepare for a delightful display of canine creativity.
- Supervise: When your dog is using the puzzle feeding station for the first time, keep an eye on them to confirm they’re playing safely.
Optional Add-ons/Variations:
- Customizable Designs: Paint the container in bright colors or patterns to match your home décor. You could even use stickers of your pup’s favorite characters.
- Add a Liner: If you want to add texture, consider lining the bottom with felt or fabric. This can introduce different sensations for your dog as they dig around for their food.
Pro Tip:
Consider rotating the toys you use in the feeding station regularly. This keeps your dog engaged and excited to explore new challenges.
Also, make sure the toys are large enough that your dog can’t swallow them, but small enough to fit into the container—think Goldilocks, not too big, not too small!
Creating an interactive puzzle feeding station is a fun way to combine mealtime with playtime, helping your dog stay engaged and happy. Plus, it’s a great conversation starter for when guests come over.
Just imagine them saying, “Wow, your dog is a genius!” Who wouldn’t love that? Additionally, using premium dog food brands can enhance your dog’s overall health and enjoyment during mealtime.
6. Stylish Stainless Steel Bowls
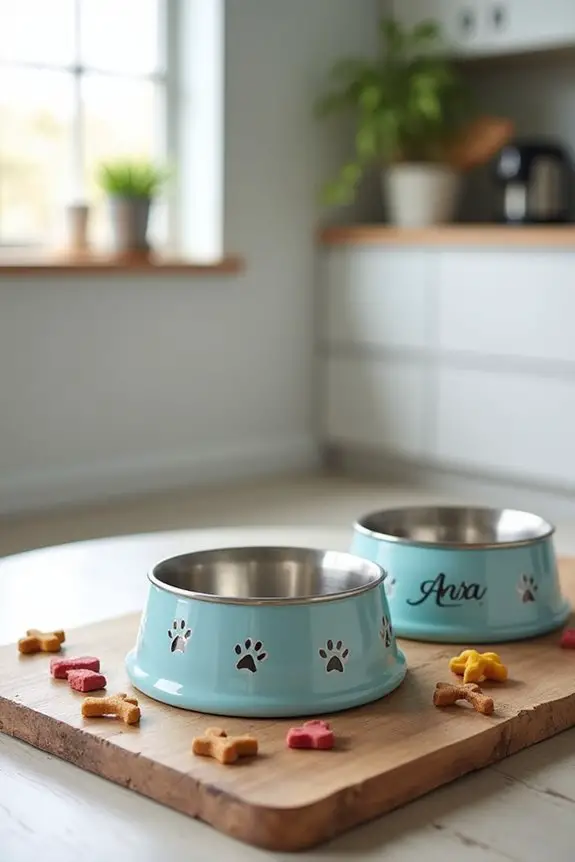
If you’re looking for a way to elevate your dog’s dining experience while keeping it practical and chic, why not create some stylish stainless steel bowls? This DIY project not only adds a touch of elegance to your home but is also a fantastic way to guarantee your furry friend has a comfortable and functional feeding station.
Plus, it’s an easy and cost-effective alternative to buying expensive designer dog bowls. Let’s plunge into how you can make your own stylish stainless steel bowls for your pup.
Materials Needed:
- Stainless steel bowls (you can find these at pet stores or online)
- Non-toxic, dishwasher-safe paint or spray paint (in your desired color)
- Painter’s tape (to protect areas you don’t want to paint)
- Paintbrush (if using regular paint)
- Clear sealant (optional, for added durability)
- Soft cloth (for cleaning and drying)
- Stencils or stickers (for added designs, optional)
Step-by-Step Instructions:
- Choose Your Bowls: Start by selecting the stainless steel bowls that fit your dog’s size and eating habits. Make sure they’re the right depth and width for your pup’s comfort.
- Clean the Surface: Give your bowls a good wash with warm, soapy water. Rinse thoroughly and dry them with a soft cloth. A clean surface will help the paint stick better.
- Tape Off Sections: If you want to add designs or keep part of the bowl stainless steel, use painter’s tape to cover those areas. This will help create clean lines and prevent paint from smudging.
- Get Creative with Paint: Using non-toxic paint or spray paint, apply a coat to the exposed areas of the bowls. If you’re using a brush, apply thin, even layers. Let it dry completely before adding a second coat if needed.
- Add Design Elements: If you want to personalize your bowls even more, consider using stencils or stickers. You can add your dog’s name or fun designs that reflect their personality. Just make sure these additions are also non-toxic.
- Seal It Up: For extra durability, especially if your dog tends to be a messy eater, you can apply a clear sealant over the paint once it’s completely dry. This helps protect your design from scratches and wear.
- Let It Dry and Use: After everything is dry, remove the painter’s tape and give the bowls a final wipe down. Place them in your dog’s feeding area, fill them with food or water, and watch your pup enjoy their stylish new dining setup.
Optional Add-ons/Variations:
- Color Combinations: Use multiple colors for a fun and vibrant look. You could even create a gradient effect for a trendy design.
- Seasonal Themes: Change up the designs based on the season or holiday. Think autumn leaves or winter snowflakes for a festive touch.
Pro Tip:
Always double-check that the paint you’re using is non-toxic and safe for pets, especially if your dog is a bit of a bowl licker.
And remember, while these bowls can be stylish, comfort is key. Verify the bowls are stable and won’t slide around while your pup is eating.
Creating your own stylish stainless steel bowls isn’t just a fun project but also a great way to personalize your pet’s feeding area. Plus, every time you see those bowls, you’ll have the satisfaction of knowing you made them yourself. Happy crafting!
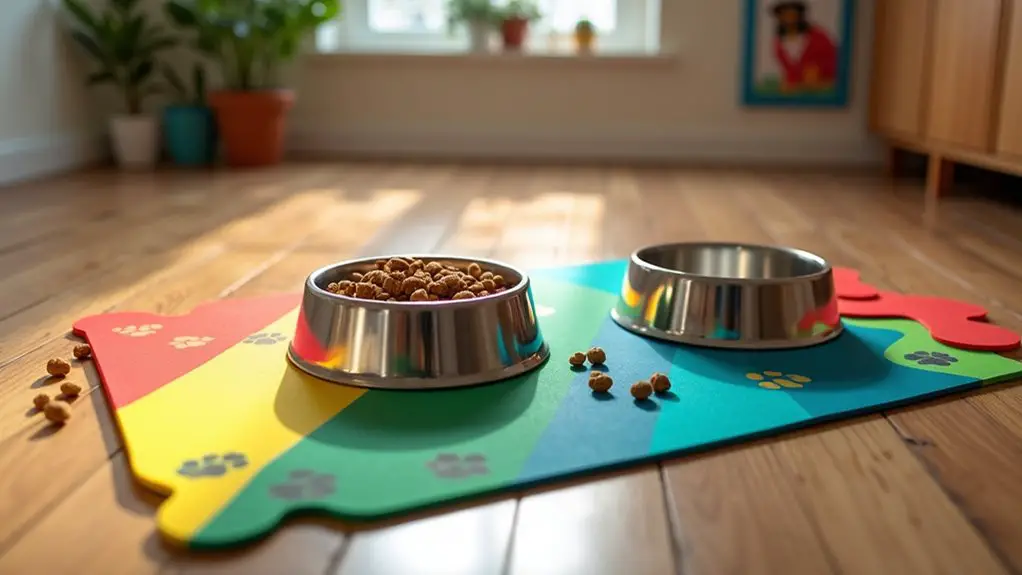
7. Colorful Silicone Mat
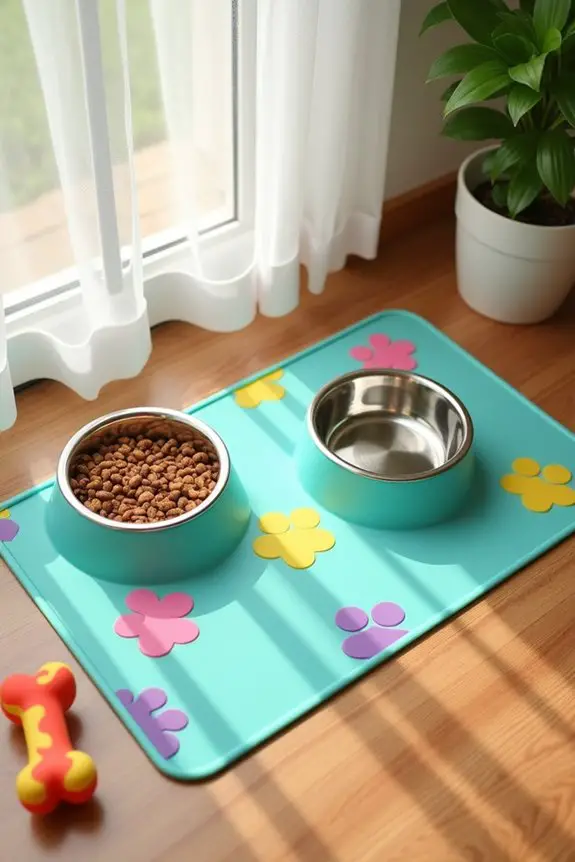
If you’re tired of cleaning up spills and messes after every meal time, a colorful silicone mat is just the solution you need. Not only does it keep your floors clean, but it also adds a splash of color and fun to your dog’s feeding area. Plus, it’s an affordable way to upgrade your pet’s dining setup without breaking the bank.
Let’s explore how you can whip up your very own silicone feeding mat.
Materials Needed:
- Silicone sheet (available at craft stores or online)
- Scissors or a utility knife
- Ruler (for measuring)
- Pencil or fabric marker
- Non-toxic paint (if you want to add designs)
- Paintbrush (for applying paint)
Step-by-Step Instructions:
- Measure the Space: Start by measuring the area where you want to place the mat. This will help you determine the size of your silicone mat. Remember, a little extra room is always nice for those enthusiastic eaters.
- Cut Your Silicone: Using your scissors or utility knife, carefully cut the silicone sheet to your desired size. If you’re feeling fancy, you can even create fun shapes like bones or paws. Just remember, sharp tools and fingers don’t mix well, so be careful.
- Design Time: If you want to jazz up your mat, now’s the time to let your creative juices flow. Use a ruler to mark out any designs or patterns you’d like, then grab your non-toxic paint and paintbrush. Apply your designs with a gentle hand, and let it dry completely.
- Final Touches: Once your design is dry, give your mat a quick wipe down to remove any dust or residue. This will guarantee that it sticks well to the floor and stays put during meal times.
- Place and Test: Set your colorful silicone mat down in your dog’s feeding area and place the bowls on top. Fill them up and watch as your pup enjoys their meal without sending food flying everywhere.
Optional Add-ons/Variations:
- Mix and Match Colors: Why stick to one color? Use multiple colors of silicone sheets to create a patchwork mat. Your dog’s dining area will pop with personality.
- Personalize It: Add your dog’s name or a fun quote using stencils and paint. It’s a great way to make the mat uniquely theirs.
Pro Tip:
To keep your mat in tip-top shape, regularly clean it with warm soapy water and let it air dry. This will help maintain its color and keep it free from odors.
Also, if your pup is a bit of a messy eater, consider adding a lip around the edge of the mat to contain spills better.
Creating a colorful silicone mat not only saves you money but also makes mealtimes a little more fun for both you and your furry friend. Plus, who doesn’t love a splash of color in their home?
Happy crafting!
Extra Tips & Ideas
Sure, while you’re crafting the perfect feeding station for your pup, don’t forget to sprinkle in some extra touches that can make mealtime even better.
How about personalizing their space? You could paint their name on the station. It’s like saying, “This is your kingdom.” If you’re feeling crafty, try adding a small shelf for treats—because who doesn’t love a surprise snack?
Consider using your pup’s favorite colors for decor. It’ll brighten up the area, and trust me, it’ll look cute in photos.
And hey, don’t forget to keep it clean. A quick wipe-down after meals keeps things fresh, and you won’t have to battle that smelly bowl monster. Your pup deserves the best, right?
Frequently Asked Questions
What Materials Are Best for a Durable Dog Feeding Station?
For a durable dog feeding station, you’ll want materials like stainless steel for bowls, waterproof wood for the base, and non-slip rubber for stability. These choices guarantee longevity and easy maintenance for your furry friend’s dining area.
How Can I Customize a Feeding Station for My Dog’s Size?
To customize a feeding station for your dog’s size, measure their height and adjust the platform accordingly. Use adjustable bowls or raised stands to guarantee comfort and accessibility, making mealtime enjoyable for your furry friend.
Are There Any Safety Concerns With DIY Feeding Stations?
Yes, there are safety concerns with DIY feeding stations. You need to guarantee stability to prevent tipping, use non-toxic materials, and avoid sharp edges. Regularly check for wear and tear to keep your dog safe.
How Often Should I Clean the Feeding Station?
Think of your dog’s feeding station like a garden; it thrives with regular care. You should clean it daily to prevent bacteria buildup, ensuring your furry friend enjoys every meal in a safe, hygienic space.
Can I Use Recycled Materials for My Dog Feeding Station?
Yes, you can definitely use recycled materials for your dog feeding station! Just make sure they’re safe and easy to clean. Get creative, and you’ll not only save money but help the environment too!
Conclusion
So, there you have it—seven fun DIY ideas to turn mealtime into a tail-wagging event for your furry friend. Did you know that 60% of dogs are overweight? That’s a big deal! A clever feeding station can help slow down their eating and keep them healthy. Whether you go for a rustic crate or a puzzle feeder, just remember to keep it light and enjoyable. After all, your dog deserves the best, don’t they?

