
Living with a dog brings endless joy, but it can also bring a few challenges when it comes to managing spaces inside the home. Whether you want to keep a curious puppy away from the stairs or create a quiet zone for training and rest, indoor dog gates can make daily life far easier and safer.
Many store-bought gates work well, but they often lack style or the perfect fit for unique spaces like stairways and hallways. That’s why homeowners are turning to dog gates indoor diy solutions that blend functionality with home design. With a little creativity and a few tools, you can build a gate that looks great while keeping your dog safe.
The following ideas show different DIY indoor dog gate styles that work beautifully in staircases, hallways, and open living spaces.
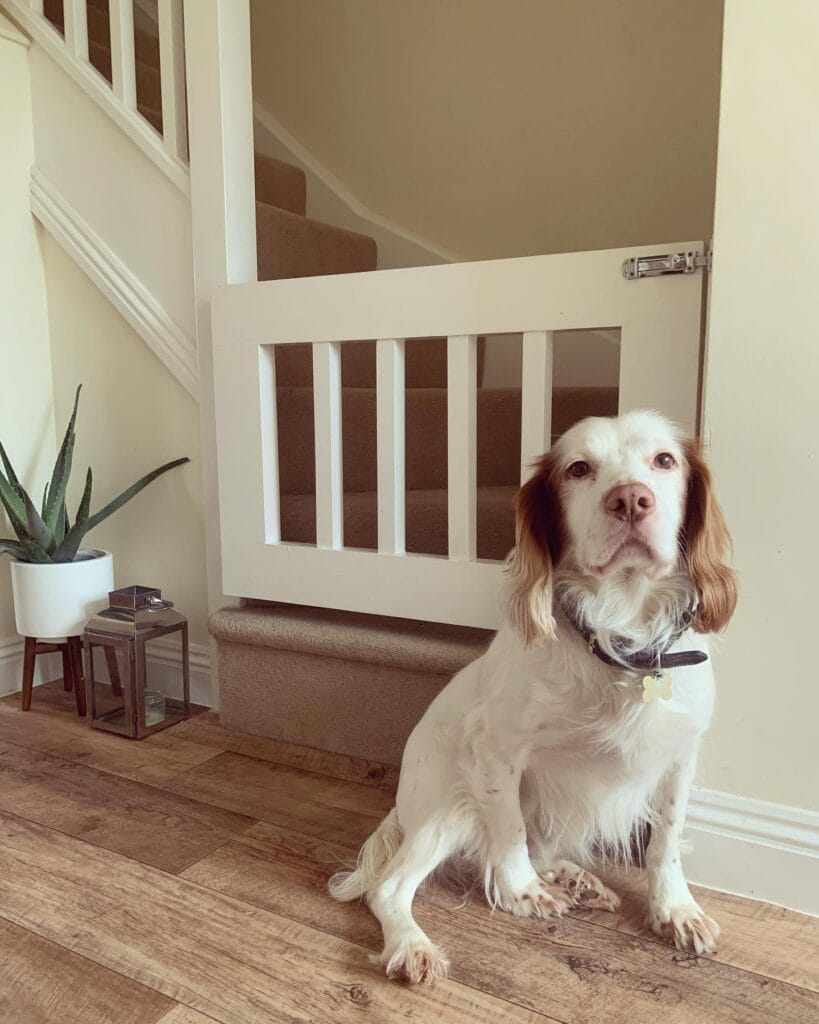
#1: Minimalist Slat Stair Dog Gate

A staircase is one of the most common areas where a dog gate is needed. The image shows a sleek white slatted gate installed at the base of the stairs, blending smoothly with the surrounding walls and railings.
Materials & Tools You’ll Need:
- Wooden slats or dowels
- Two vertical wooden posts
- Wood screws
- Drill
- Measuring tape
- White paint or wood stain
- Sandpaper
Prep Time: 20 minutes | Active Project Time: 2–3 hours | Difficulty Level: Intermediate
Instructions
Begin by measuring the width of the staircase opening where the gate will be installed. This measurement determines the overall frame size and ensures the gate fits securely between the walls or posts.
Cut two vertical posts that will serve as the sides of the gate. Then cut multiple wooden slats to create evenly spaced horizontal bars. Sand each piece of wood thoroughly to remove splinters and ensure a smooth finish.
Lay the two vertical posts on a flat surface and begin attaching the horizontal slats between them. Use a measuring tape to maintain equal spacing so the gate looks balanced and prevents your dog from squeezing through.
Secure each slat using wood screws and a drill. Once the frame is assembled, apply paint or wood stain to match your home’s interior. Allow the finish to dry completely before installing the gate.
Mount the finished gate using hinges or sliding brackets depending on your preferred opening style. This type of gate prevents dogs from climbing stairs while maintaining a modern, clean aesthetic.
Tip: Keep the spacing between slats small enough to prevent smaller dogs from slipping through.
📸 Photo credit: Instagram @bbybatandbarbell
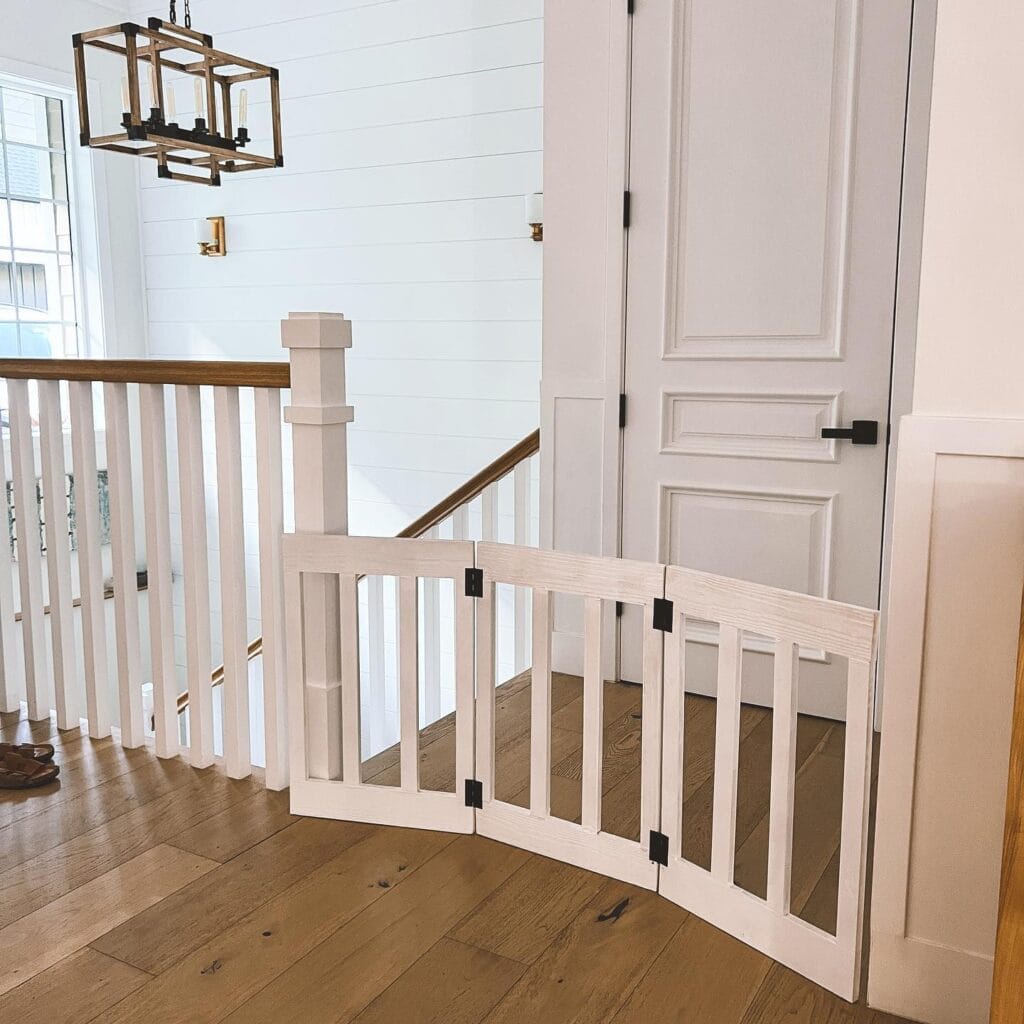
#2: Classic Vertical Railing Dog Gate

Sometimes the best designs are simple and timeless. The image shows a gate built with vertical wooden rails that mirror the design of the staircase banister.
Materials & Tools You’ll Need:
- Wooden railing spindles
- Frame boards for top and bottom
- Wood screws
- Drill
- Hinges
- Paint or stain
- Measuring tape
Prep Time: 15 minutes | Active Project Time: 2 hours | Difficulty Level: Beginner
Instructions
Start by measuring the staircase opening where the gate will be installed. Cut two horizontal boards for the top and bottom of the gate frame.
Next, cut several vertical railing spindles to the desired height. These will form the central barrier of the gate.
Attach the vertical spindles evenly along the bottom board using wood screws. Once all spindles are secured, attach the top board to complete the frame structure.
Sand the entire gate to remove rough edges and apply paint or stain to match your stair railing.
Install hinges on one side of the gate and mount it to the wall or stair post. Add a simple latch on the opposite side for easy opening and closing.
This style works beautifully in traditional homes because it mirrors existing stair designs while keeping dogs safely contained.
Tip: Use pre-made railing spindles from hardware stores to save cutting time.
📸 Photo credit: Instagram @dagwood_designs
#3: Decorative Diagonal Pattern Gate
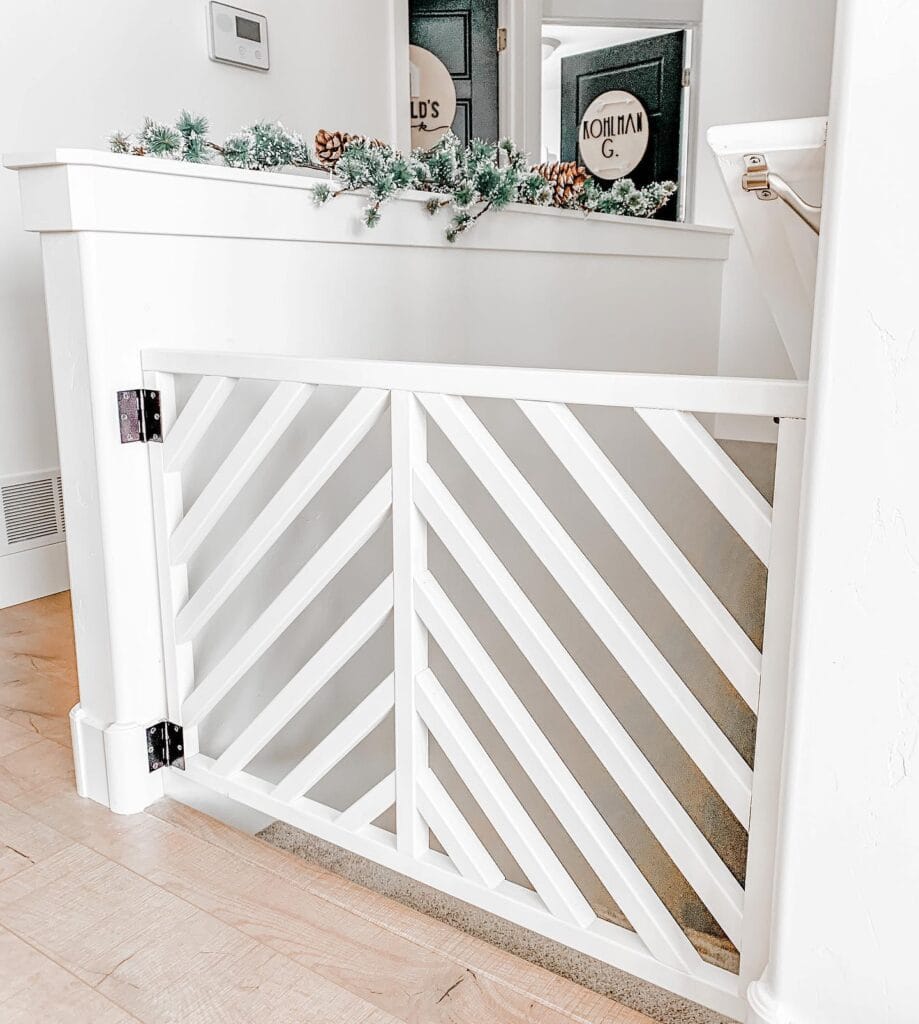
If you want a gate that doubles as décor, a diagonal wood pattern can add visual interest while remaining functional.
Materials & Tools You’ll Need:
- Wooden boards for frame
- Thin wooden slats
- Wood glue
- Drill and screws
- Sandpaper
- White paint
Prep Time: 25 minutes | Active Project Time: 3 hours | Difficulty Level: Intermediate
Instructions
Begin by constructing a rectangular frame using sturdy wooden boards. Secure the corners using screws to ensure the gate remains strong.
Cut thin wooden slats to fit diagonally across the frame. Arrange the slats so they form a repeating angled pattern across the gate surface.
Attach each slat using wood glue and reinforce with screws where needed. Continue filling the frame with slats until the pattern covers the entire gate.
Once assembled, sand the wood and apply paint or stain to match your interior design.
Install hinges along one side of the frame and secure the gate to a wall post or stair column.
This decorative gate provides a stylish solution while still creating a strong barrier for your dog.
Tip: Pre-measure each slat carefully so the pattern stays symmetrical.
📸 Photo credit: Instagram @just_courtney_slight
#4: Compact Corner Stair Gate
Some staircases have tight angles that require custom solutions. The image shows a gate fitted into a corner opening, maximizing space without blocking the walkway.
Materials & Tools You’ll Need:
- Wooden frame boards
- Vertical or diagonal slats
- Hinges
- Latch lock
- Drill
- Measuring tape
Prep Time: 20 minutes | Active Project Time: 2 hours | Difficulty Level: Intermediate
Instructions
Measure the exact corner opening where the gate will sit. Because angled stair entrances are common, double-check measurements to ensure accuracy.
Build a wooden frame that matches the exact shape of the stair opening. Attach slats vertically or diagonally depending on the design you prefer.
Secure the slats to the frame using screws. Sand the gate thoroughly and apply paint or sealant.
Mount the gate using hinges attached to the wall or stair railing post. Install a latch on the opposite side so the gate can be opened easily by adults.
This style works well in smaller homes where stair entrances may not have symmetrical openings.
Tip: Test the swing direction of the gate before installing hinges to avoid blocking pathways.
📸 Photo credit: Instagram @agirlmakingit
#5: Durable Plastic Indoor Gate Solution
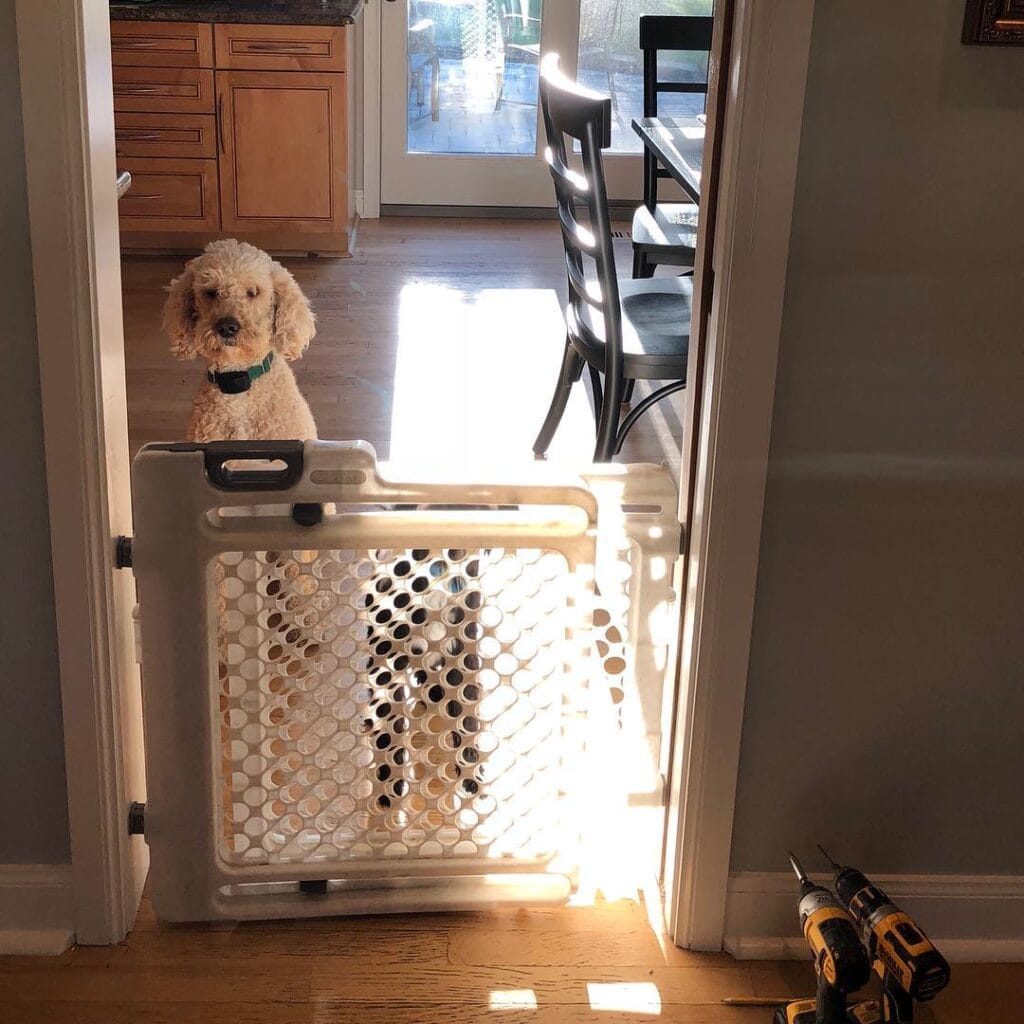
Not every DIY project requires woodworking. The image shows a durable plastic safety gate installed in a doorway to create a simple dog barrier.
Materials & Tools You’ll Need:
- Plastic baby gate
- Wall mounting brackets
- Screws
- Drill
- Measuring tape
Prep Time: 10 minutes | Active Project Time: 30 minutes | Difficulty Level: Beginner
Instructions
Start by measuring the doorway or hallway opening where the gate will be installed. Position the mounting brackets on each side of the doorway.
Use a drill to secure the brackets firmly into the wall studs. Attach the plastic gate to the brackets according to the manufacturer’s instructions.
Adjust the gate width until it fits tightly within the doorway. Lock it into place using the built-in latch system.
This type of gate works well for temporary boundaries or training zones and is ideal for renters who want minimal construction.
Tip: Choose gates with auto-close features for added convenience.
📸 Photo credit: Instagram @metrodetroitcraftsman
#6: Half-Wall Stair Landing Gate
Some homes have half walls near staircases, which require custom-sized gates. The image shows a gate mounted below a half wall at the stair landing.
Materials & Tools You’ll Need:
- Wooden frame boards
- Diagonal slats
- Hinges
- Screws
- Wood stain or paint
Prep Time: 20 minutes | Active Project Time: 2 hours | Difficulty Level: Intermediate
Instructions
Measure the opening beneath the half wall where the gate will be installed. Build a frame that fits snugly into the space.
Attach diagonal slats across the frame to create a strong and visually appealing barrier. Secure each slat with screws.
Sand the gate surface and apply paint or stain that complements the surrounding trim and walls.
Install hinges along the side connected to the wall post and attach a latch on the opposite side.
This design blends naturally with modern interiors while safely blocking stair access for dogs.
Tip: Use diagonal slats to strengthen the gate structure without adding extra weight.
📸 Photo credit: Instagram @_hunter_home_
#7: Rustic Wooden Barn-Style Dog Gate
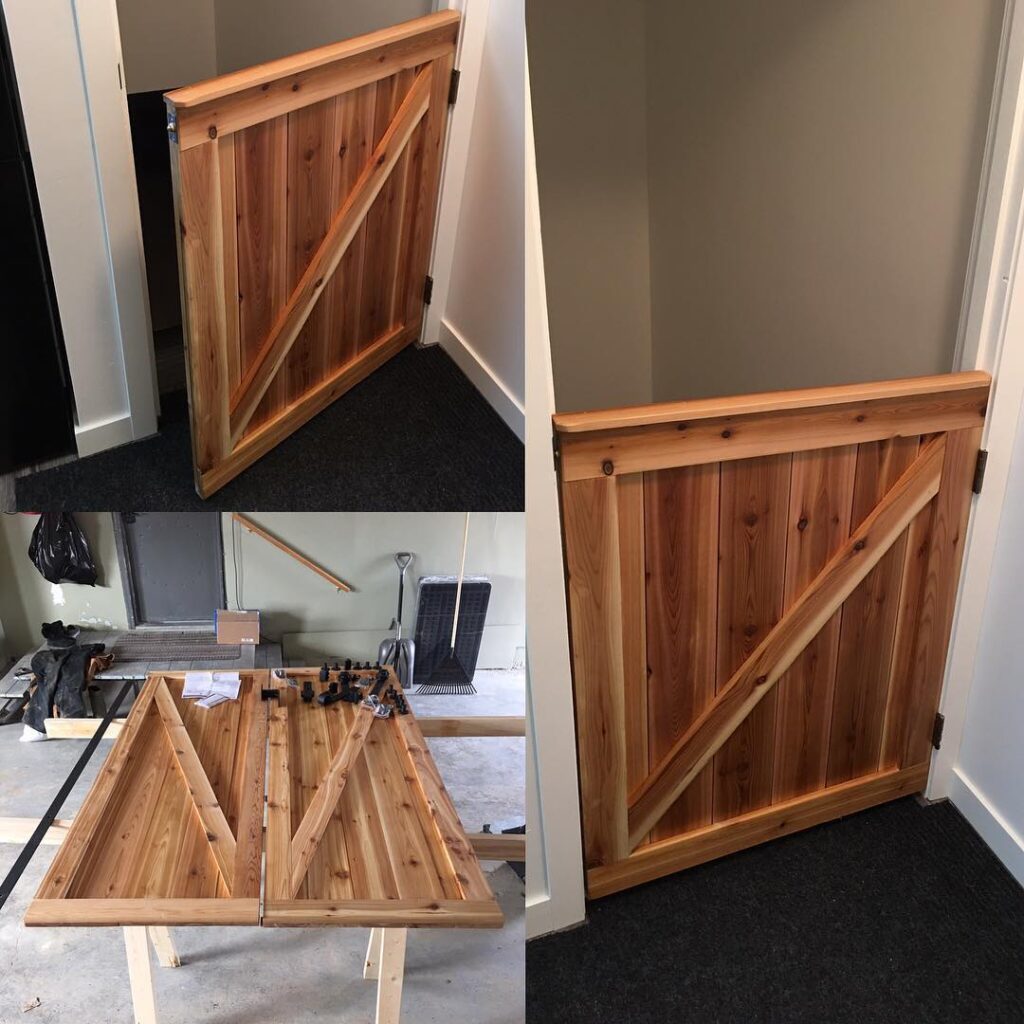
For a rustic or farmhouse interior, a barn-style gate adds character while keeping pets contained.
Materials & Tools You’ll Need:
- Cedar or pine boards
- Wood glue
- Screws
- Hinges
- Wood stain
- Sandpaper
Prep Time: 30 minutes | Active Project Time: 3 hours | Difficulty Level: Intermediate
Instructions
Cut several vertical boards to form the face of the gate. Lay them side by side and attach two horizontal support boards across the back.
Add a diagonal support beam across the frame to create the classic barn door style. Secure all boards using screws and wood glue.
Sand the wood thoroughly to highlight the natural grain. Apply a protective stain to enhance the rustic look.
Mount the gate using sturdy hinges attached to the wall or stair post. Install a latch to keep the gate closed securely.
A barn-style gate is both decorative and durable, making it ideal for larger dogs.
Tip: Cedar wood is naturally resistant to moisture and lasts longer indoors.
📸 Photo credit: Instagram @_the__turning__point_
Conclusion
Creating your own dog gates indoor diy solution allows you to match your home’s design while keeping your dog safe and comfortable. From sleek modern slats to rustic barn-style gates, these DIY options offer both functionality and visual appeal.
With the right tools and a little planning, you can build a gate that protects your dog, organizes your home, and looks like it was always meant to be part of your space.

Amr Mohsen is a software engineer who traded his keyboard for a leash — at least on weekends. His love for dogs inspired him to share what he learns as a dog owner and enthusiast, bringing a detail-oriented, research-driven perspective to every article he writes. If it’s about dogs, he’s probably already looked it up twice.


