Okay so your golden retriever is adorable — but that big metal crate sitting in your living room? Not so much.
Mine used to stick out like a sore thumb in my space. Every time I’d spend a weekend putting together a Pinterest board full of warm, cozy rooms, I’d look over and there it was. That cold, cage-looking thing absolutely wrecking the vibe.
And the guilt of hiding it in another room? Girl, we don’t do that to our babies.
Here’s the thing — your dog’s space doesn’t have to fight your decor. Dog kennel furniture DIY projects are having a serious moment right now, and honestly, some of these designs look better than actual furniture.
Want an easy win? These 10 designs give your pup a cozy home base and give your living room the Pinterest moment it deserves.
#1: DIY Dog Harness Organizer Wall Rack (The “Never Walk Alone” Station)
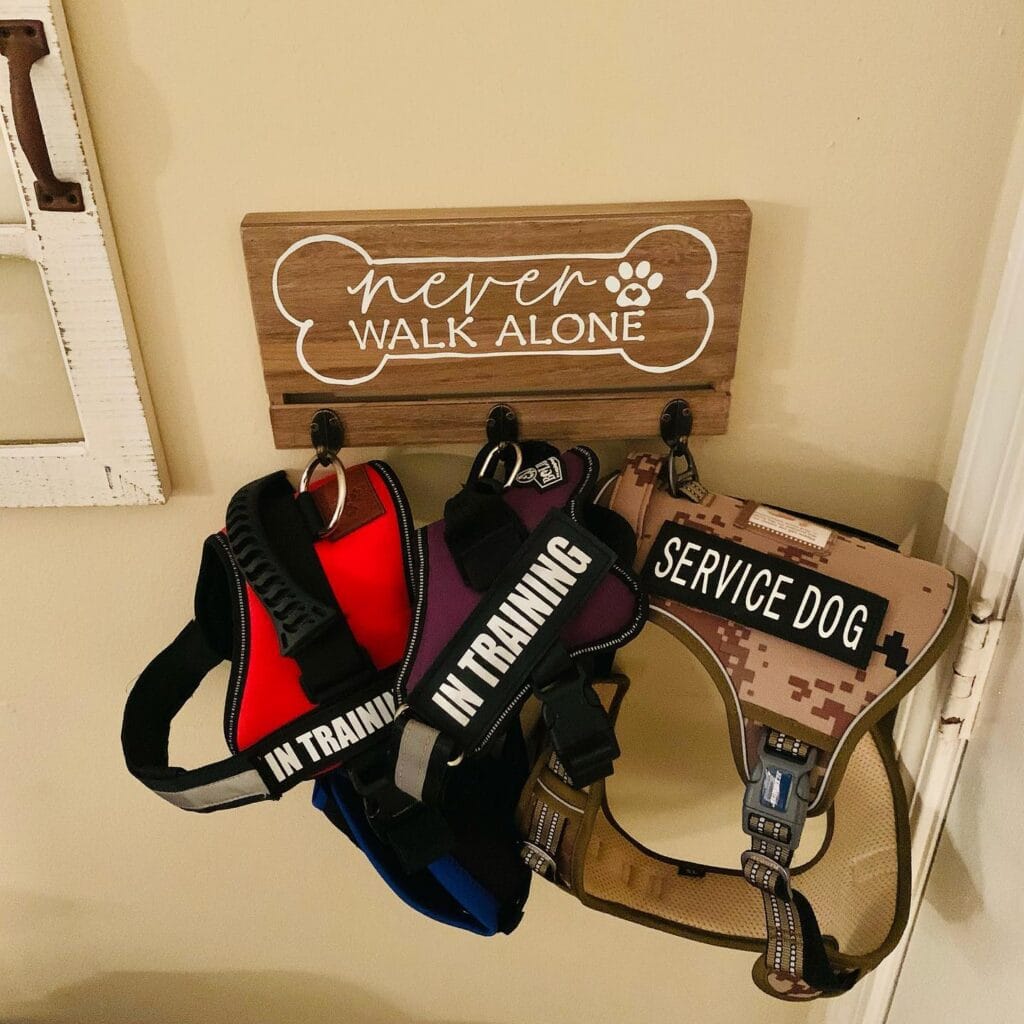
You know that moment — you’re grabbing your golden’s leash, and it’s tangled with her harness, buried under a pile of other stuff by the door. Every single time.
This wall rack fixes that chaos completely.
Materials & Tools You’ll Need:
– 1 wooden plank (approximately 12″ x 6″, stained walnut finish)
– 3 black metal double-prong hooks
– White acrylic paint or vinyl decal for lettering
– Dog bone stencil (printable free online)
– Wood stain in medium brown
– Sandpaper (120-grit), drill, screws, level
Instructions
Sand your plank until smooth. Apply two coats of walnut stain, letting each coat dry 30 minutes before touching it again.
Once dry, center your bone stencil and trace the outline. Fill it with white acrylic paint using a flat brush — thin layers look cleaner than one thick glob. Add your text inside the bone shape.
Flip the board over and mark three evenly-spaced hook positions. Pre-drill your holes so the wood doesn’t split. Mount the black metal hooks with screws, then attach the whole rack to your wall studs.
Three hooks means three harnesses organized — that’s zero morning scramble, just grab and go.
If your girl is a service dog in training like the setup here, labeling harnesses by type (“In Training” vs. “Service Dog”) helps you grab the right one fast.
Keep the lettering simple — cursive + block caps combo reads beautifully from a distance.
Prep Time: 15 min | Active Project Time: 1.5 hours | Difficulty Level: Beginner
📸 Photo credit: Instagram @abel_el_jibaro
#2: Built-In Dog Kennel with Shiplap Accent Wall and Bookcase — A DIY That Actually Looks Like Furniture
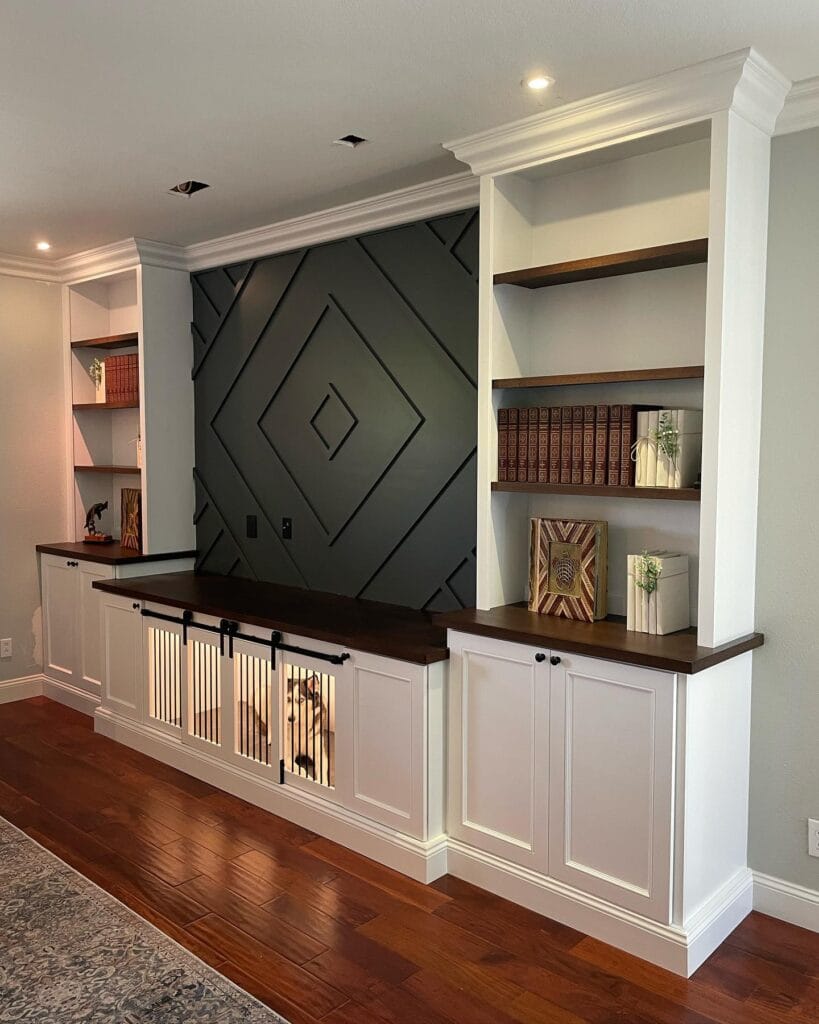
Your golden is finally chill after her morning zoomies, and you watch her do that little circle-spin thing before flopping down… right in the middle of the living room. There’s no good spot for her. The plastic crate by the couch looks like a prison cell next to your Pinterest board, and honestly? You deserve better than that.
This built-in solves exactly that.
Materials & Tools
– 3/4″ MDF or plywood for cabinet frames and shelving
– 1×4 and 1×6 pine boards for the geometric accent panel
– Dark walnut stain (Minwax Dark Walnut 2716) for shelf tops and cabinet countertops
– Benjamin Moore Wrought Iron paint for the accent wall panel
– White semi-gloss cabinet paint (Benjamin Moore Chantilly Lace works great)
– Black sliding barn door hardware kit (center kennel doors)
– Vertical slat bars or metal spindles for kennel door panels
– Crown molding and decorative pilasters
– Recessed LED strip lighting (inside kennel)
– Pocket hole jig, miter saw, brad nailer, drill, level, sandpaper
Prep Time: 2–3 hours | Active Project Time: 2–3 weekends | Difficulty Level: Intermediate–Advanced
—
Instructions
Start by building two base cabinet boxes using 3/4″ plywood, each roughly 36″ tall x 18″ deep. Cut your pieces, use pocket hole screws to join the sides, top, and bottom, then secure the whole unit to the wall studs. This is where most people rush — don’t. A level base here saves you so much headache later.
The center kennel section sits between the two cabinets. Build it as its own box, leaving the front open for the sliding barn door hardware. Mount your black barn door rail across the full front opening, then hang two slatted panels — the vertical bars keep it airy so your dog sees the room instead of staring at a wall. That open sightline means she stays calm instead of anxious, which means zero stress whining while you’re watching TV.
Common mistake: skipping the recessed LED strip inside the kennel. A warm light strip along the back interior makes the space feel cozy, not punishing.
Build your center accent panel next. Cut 1×4 pine boards at 45-degree angles and layer them in a diamond-on-diamond geometric pattern directly over a painted MDF backer board. Glue and pin-nail each piece, then paint the whole panel in Benjamin Moore Wrought Iron. The dark color and layered geometry create depth — it draws the eye up and away from the kennel door, so guests see art, not a dog crate.
Cap every cabinet top with a 1.5″ thick walnut-stained hardwood slab. Sand to 220 grit, apply two coats of polyurethane, and let it cure fully before use. Add open shelving on both flanking bookcase towers — stagger the shelf heights to break up the symmetry and give you flexible decorating space.
Finish with crown molding across the top of the full unit, painted white to match the cabinets. This ties the whole piece to the ceiling and makes it look like it was always there.
Paint your surrounding wall in a soft gray (the image uses something close to Sherwin-Williams Repose Gray) so the dark accent panel pops without feeling heavy.
If you’re sealing wood surfaces around your dog’s space, always cure the polyurethane for at least 72 hours before letting her sleep inside — fresh fumes irritate their nose something fierce. And if she’s the type who chews corners when she’s bored, a light application of bitter apple spray on the bottom cabinet edges early on saves the paint job.
📸 Photo credit: Instagram @alteredgraindesign
#3: The Double-Door Dog Kennel Coffee Table (That Looks Like Real Furniture)
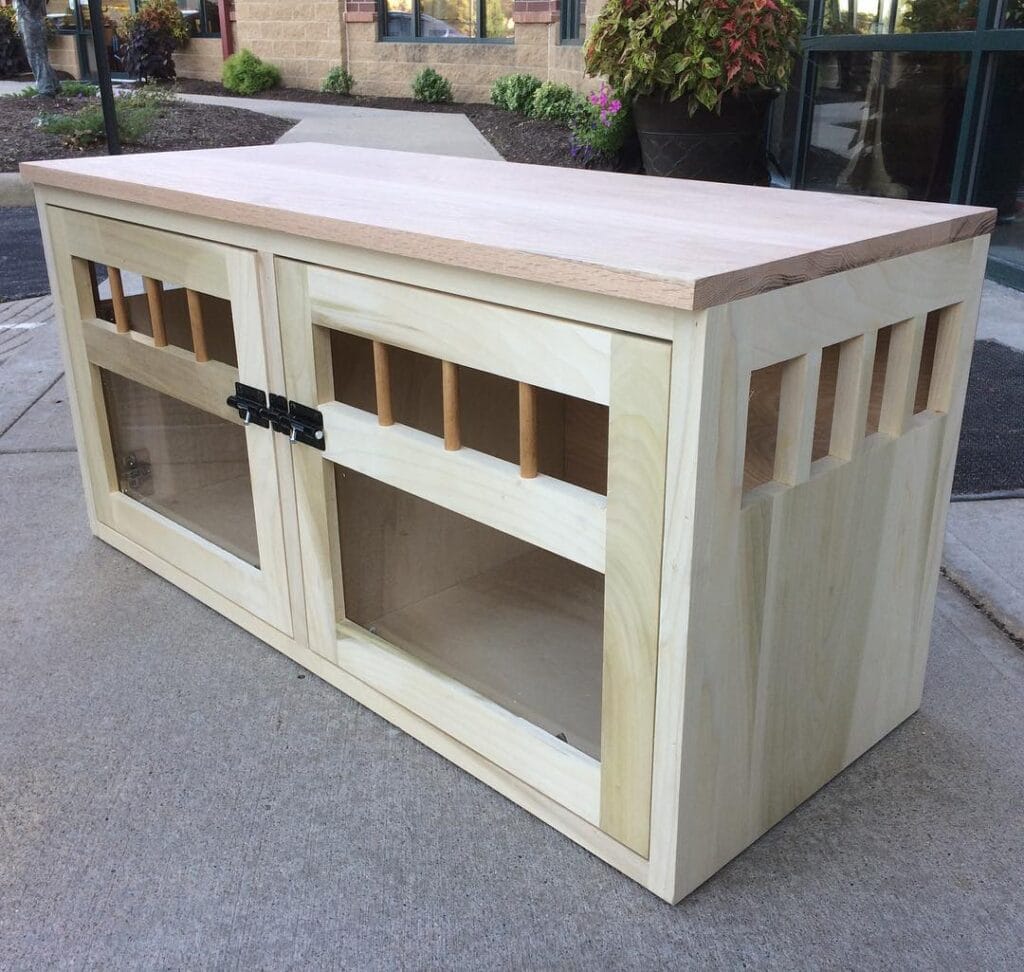
You know that moment when your golden retriever decides the living room floor is not good enough and she’s wedging herself under your coffee table again? Yeah. That chaos ends here.
This build is solid poplar wood with a butcher block top in natural maple, and honestly it looks like something straight off a Pinterest board — not a pet store shelf.
Materials & Tools You’ll Need:
– ¾” poplar plywood (for the main frame)
– Natural maple butcher block (for the top surface)
– Wooden dowel rods (for the upper ventilation bars)
– Two glass-panel cabinet doors with black metal latch hardware
– Wood glue, sandpaper (120 + 220 grit), brad nailer, circular saw, drill
Instructions
Cut your poplar into two side panels, a back panel, a floor base, and a center divider. The center divider is what gives this kennel its double-bay design — one side locks with the glass doors, one side stays open like a den your dog can slip into whenever she wants.
Attach the base first, then nail the side panels flush. Sand everything before assembly because poplar is forgiving but only when you prep it right.
Install the dowel rods horizontally across the upper section — they give your dog airflow, which means she stays cooler and calmer inside. That ventilation feature reduces anxiety during rest, which means fewer scratched doors and a dog who actually uses her kennel.
The butcher block top overhangs about 1 inch on all sides, giving it that furniture-store finish. Seal it with food-safe mineral oil.
For more outdoor-inspired enclosure ideas, 12 Creative Outdoor Dog Kennel Ideas for Your Furry Friend has some serious inspiration.
Prep Time: 30 min | Active Project Time: 6–8 hours | Difficulty Level: Intermediate
Sand the dowel rods separately before installing them — it saves you 20 minutes of awkward hand-sanding in tight corners later.
📸 Photo credit: Instagram @maplestreetwoodworking
#4: Build a Built-In Dog Kennel Under Your RV Daybed
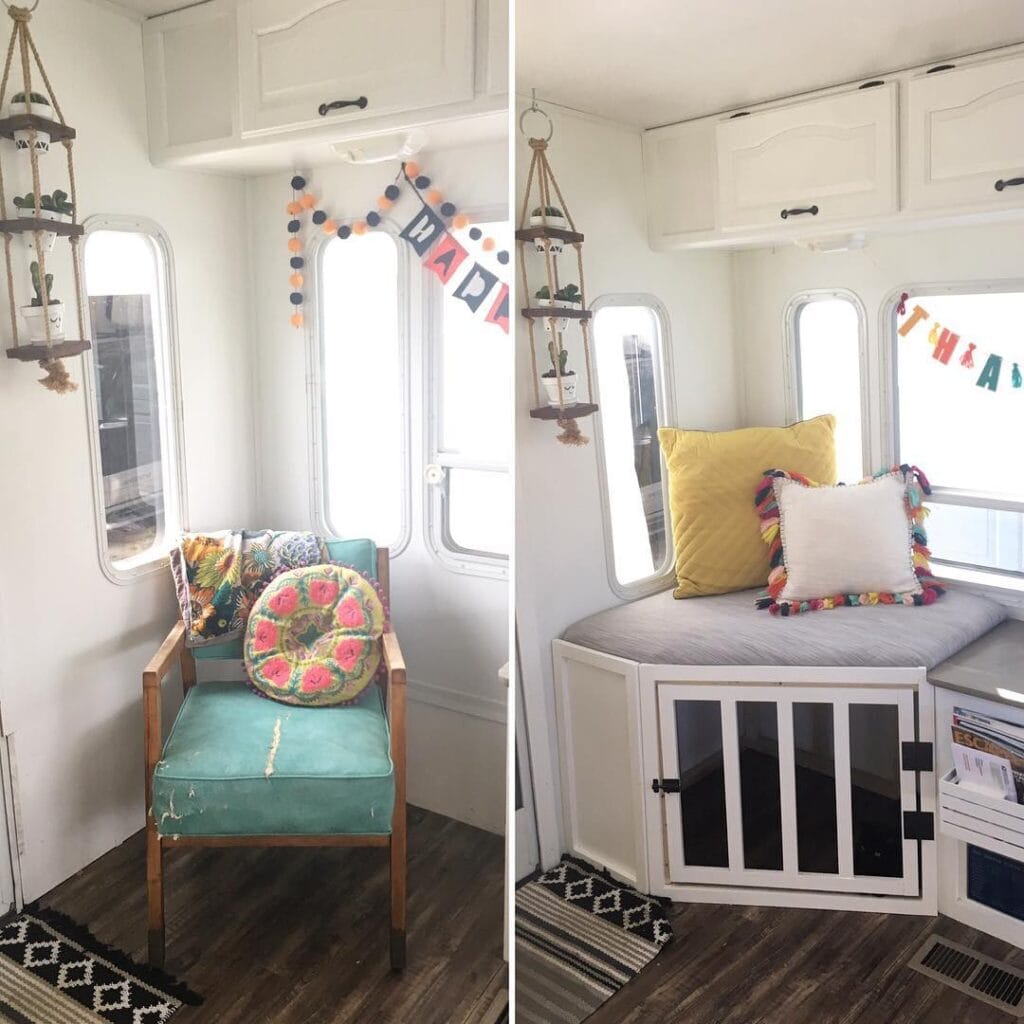
You know that moment when your golden is flopped across the entire back seat of the RV, and you’re basically sitting on two inches of cushion trying to pretend that’s fine? Yeah. I’ve been there with my dog too, and it’s not fine.
This build turns dead space under a daybed into a wood-framed dog kennel with white-painted vertical slats and a black hardware latch door — basically furniture that happens to have a dog inside it.
Materials & Tools
– 2×4 pine lumber (frame)
– 1×2 poplar or pine strips (vertical slats)
– Cabinet-grade plywood (base and top panel)
– White semi-gloss paint
– Black iron latch hardware
– Miter saw, drill, wood screws, sandpaper (120-grit)
Instructions
Cut your 2x4s into a rectangular base frame first — this anchors everything and gives your dog a solid floor. Sand every edge before assembly because splinters in a kennel are a real problem.
Attach the 1×2 slat strips vertically along the front face, spacing them 3 inches apart — wide enough for airflow, narrow enough so your pup feels secure and contained. The enclosed sides and top use plywood panels, which makes the whole structure feel like furniture, not a cage.
Paint everything two coats of white semi-gloss. Mount the black iron latch on the door panel. The built-in design means your dog gets a den-like space, which reduces anxiety on long travel days, and you get back your entire seating area.
That’s the feature-benefit-payoff right there — one weekend build gives your dog a calm retreat and gives you a Pinterest-worthy daybed setup.
A gray fitted cushion on top ties the whole thing together. Honestly, if you love projects like this, 13 Genius DIY Dog Stuff Every Pet Parent Needs to Try Today! has more ideas worth bookmarking.
Measure your space before cutting anything — RV walls angle in weird ways and a quarter inch off can throw your whole frame.
Prep Time: 30 min | Active Project Time: 6-8 hours | Difficulty Level: Intermediate
📸 Photo credit: Instagram @musing_mandy
#5: Build a Designer Dog Crate End Table (The Two-Dog Hideaway)
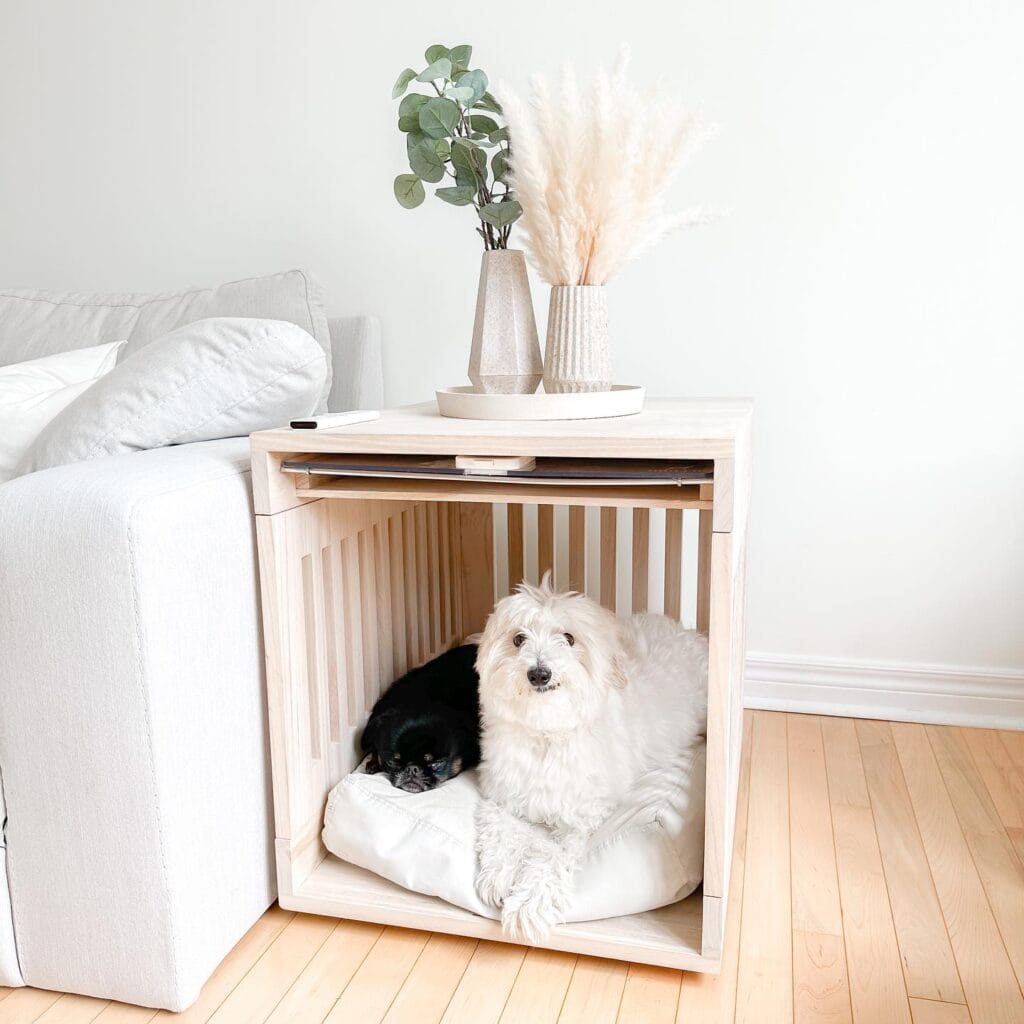
Your golden plops down right in the middle of the living room, and suddenly your Pinterest mood board is a distant memory. Mine used to do the same thing — until I stopped fighting it and built her a spot that actually belonged in the room.
This wooden crate end table is the move.
Prep Time: 30 min | Active Project Time: 4–6 hours | Difficulty Level: Intermediate
Materials & Tools:
– 3/4″ maple plywood (two 24″x24″ side panels, one 24″x28″ top panel)
– 1″ x 1.5″ maple dowels (cut to 18″ lengths, approximately 12–14 pieces)
– Two 14″ drawer slides (metal, silver finish)
– One shallow pull-out shelf board (22″x14″ maple plywood)
– Wood glue + 1.5″ brad nails
– 220-grit sandpaper
– Natural wood stain (light ash finish)
– Drill, miter saw, tape measure
Instructions
Start by cutting your maple plywood into the top, bottom, and two side panels. Sand every edge with 220-grit before assembly — rough edges inside the crate will snag your dog’s coat, and your golden will notice.
Drill evenly spaced holes along both side panels for your dowels, spacing them 2″ apart. This slatted wall design gives airflow and visibility, which means your dog feels part of the room instead of locked away. And that matters — dogs settle faster when they can see you.
Attach the dowels using wood glue, then reinforce with brad nails from outside the panel. Let it cure fully before moving on.
Mount your 14″ drawer slides at mid-height on both interior side walls. This is the key: that pull-out shelf becomes a charging station or laptop tray — hidden storage built right into the furniture means your end table actually functions like one.
Attach the top panel flush with a 3/4″ overhang on the front edge. Finish everything with your light ash stain. Drop in a cushion bed, style the top with a round tray and two vases, and you’re done.
Seal the interior with a water-resistant topcoat — golden retrievers drool, splash, and track mud, and unsealed maple will absorb all of it.
📸 Photo credit: Instagram @parkerandcodogs
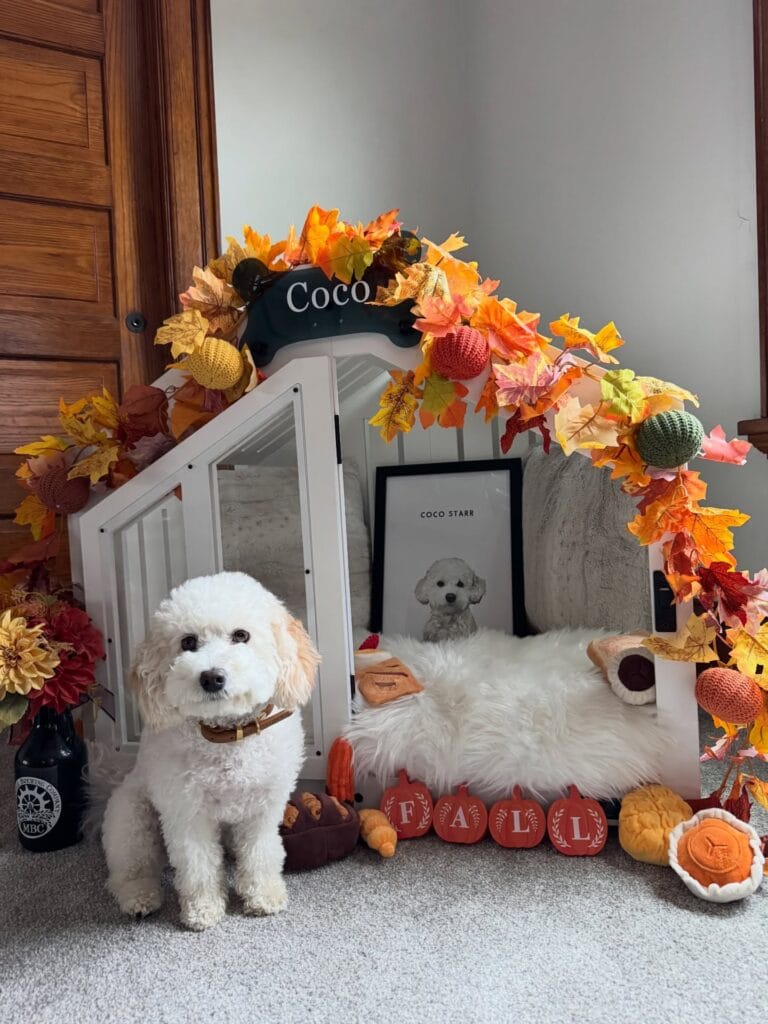
#6: DIY Seasonal Dog Kennel With Fall Décor (The “Coco Starr” Setup)
Prep Time: 1 hour | Active Project Time: 3–4 hours | Difficulty Level: Intermediate
Okay, you know that moment when your golden retriever drags her muddy paws across your living room rug right after you’ve styled a cute corner? Yeah. That’s exactly why this project hit me so hard when I saw it.
This setup is giving everything. A white wood-frame indoor dog kennel, styled with a faux autumn leaf garland, crocheted pumpkins in rust, green, and coral, and a custom black bone-shaped name sign on top. Inside sits a white faux-fur rug, a framed dog portrait, and a mini “FALL” pumpkin banner along the front edge. Chef’s kiss.
Materials & Tools:
– White-painted MDF or pine wood panels (pre-cut to your dog’s size)
– Black acrylic paint + fine brush for the name sign
– Faux autumn leaf garland (6–8 feet)
– Crocheted or foam mini pumpkins (mix of 3–4 sizes)
– White faux-fur throw (approx. 24″ x 36″)
– A 4×6 black frame for a custom pet portrait print
– Small “FALL” wood banner
– Wood screws, drill, sandpaper (120-grit)
– Hot glue gun
Instructions
Cut your MDF panels into two side triangles, a back rectangle, and a front frame piece with an open doorway. Sand every edge smooth — rough edges are a real problem for curious sniffers and ears. Assemble the frame using 1.5-inch wood screws, pre-drilling each hole so the wood doesn’t split.
Paint the entire frame two coats of white and let it dry between each coat. While that dries, paint your bone-shaped sign piece black and hand-letter your dog’s name in white. I did this with a basic foam brush and honestly it looked cleaner than I expected.
Once dry, attach the name sign to the roofline using small L-brackets. Wrap your leaf garland from one side, loop it over the top, and secure it with hot glue at three anchor points. Tuck crocheted pumpkins into the garland — the weight difference between foam and crocheted pumpkins keeps the garland from flopping. And that little detail makes the whole thing look intentional instead of thrown together.
Lay the faux-fur throw inside as the base. Place the framed portrait toward the back, and line the mini “FALL” pumpkins across the front entrance. Your dog gets a cozy, enclosed den space — the enclosed frame reduces ambient noise and gives them a genuine sense of security, which means fewer anxiety-triggered zoomies on your freshly vacuumed floors.
Small change, big win: swapping seasonal garlands (think fairy lights in winter, florals in spring) keeps the kennel fresh without rebuilding anything.
One thing to remember: if your golden is a chewer, hot glue every décor piece from underneath so she can’t pick at the edges.
📸 Photo credit: Instagram @lil_coco_starr
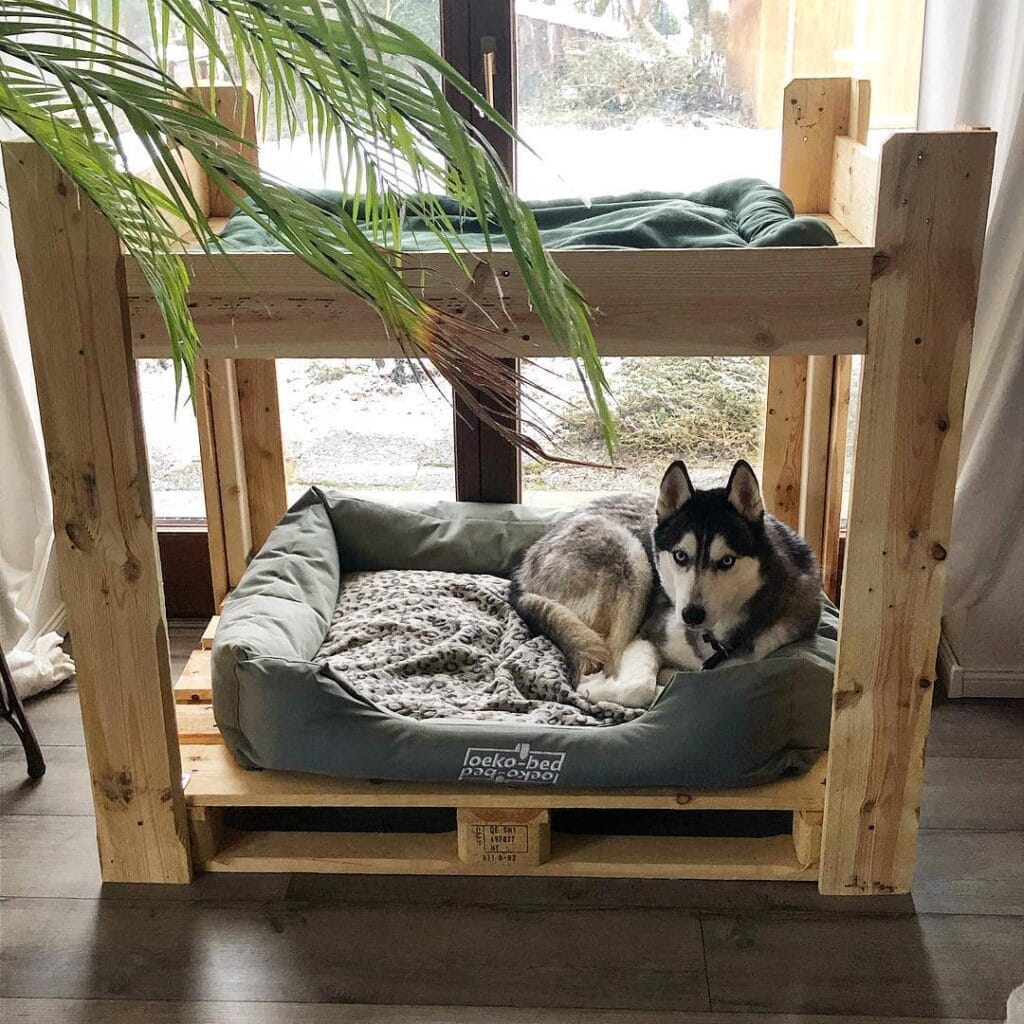
#7: DIY Striped Pet Bed With Cozy Blanket Nook (The One Your Golden Will Refuse to Leave)
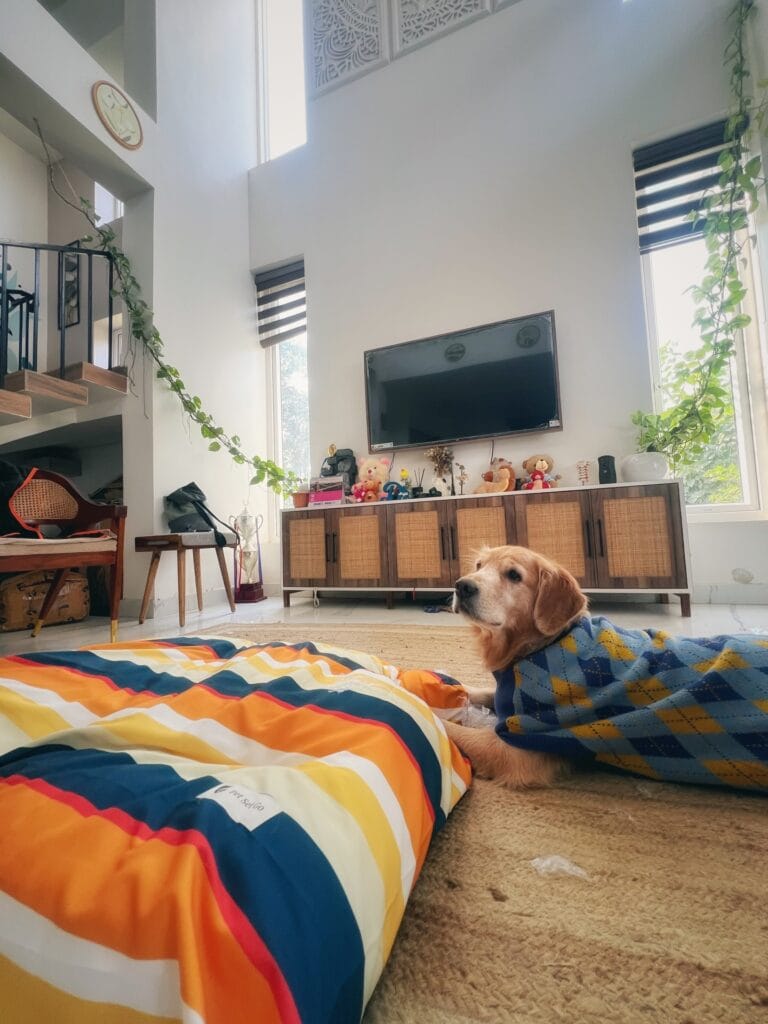
You know that moment when your golden just melts into a pile on the living room floor, dragging their blanket into a messy nest? Mine used to do that every single afternoon, and honestly the floor situation was giving me anxiety every time someone came over.
This DIY is exactly what you need.
Prep Time: 30 min | Active Project Time: 2–3 hours | Difficulty Level: Beginner-Friendly
Materials & Tools:
– 3 yards of outdoor canvas fabric (navy, orange, white, yellow stripes)
– 2 lbs of polyester fiberfill or memory foam offcuts
– 1 argyle knit blanket (blue and yellow — thrifted works perfectly)
– Sewing machine or heavy-duty fabric glue
– Size 16 upholstery needle + matching thread
– Fabric scissors and pins
Instructions
Cut your canvas into two 28″ x 36″ rectangles. Pin them right sides together and sew three edges with a ½-inch seam allowance, leaving one short end open. Flip it right side out — this is when the stripes really pop.
Stuff it firmly with your fiberfill. A packed bed keeps its shape even after your golden circles it seventeen times before lying down. Hand-stitch the open end shut using a ladder stitch so no seams catch their nails.
Tuck the argyle blanket loosely over one corner. The layered texture gives your dog a “burrow” feeling, which actually reduces restless settling behavior.
The cotton canvas wipes clean in seconds, the foam holds its loft through months of use, and your living room finally looks like those Pinterest boards you’ve been saving since forever. For more cozy floor-level inspo, 7 Cozy DIY Dog Beds for Large Dogs has some seriously good ideas too.
Wash the blanket layer weekly and spot-clean the canvas shell. And if your golden starts hogging it before you’re even done sewing — same, honestly. Same.
📸 Photo credit: Instagram @arijitmandal_
#8: DIY Laser-Cut Leaf Pattern Dog Kennel Console — The Statement Piece Your Living Room’s Been Missing
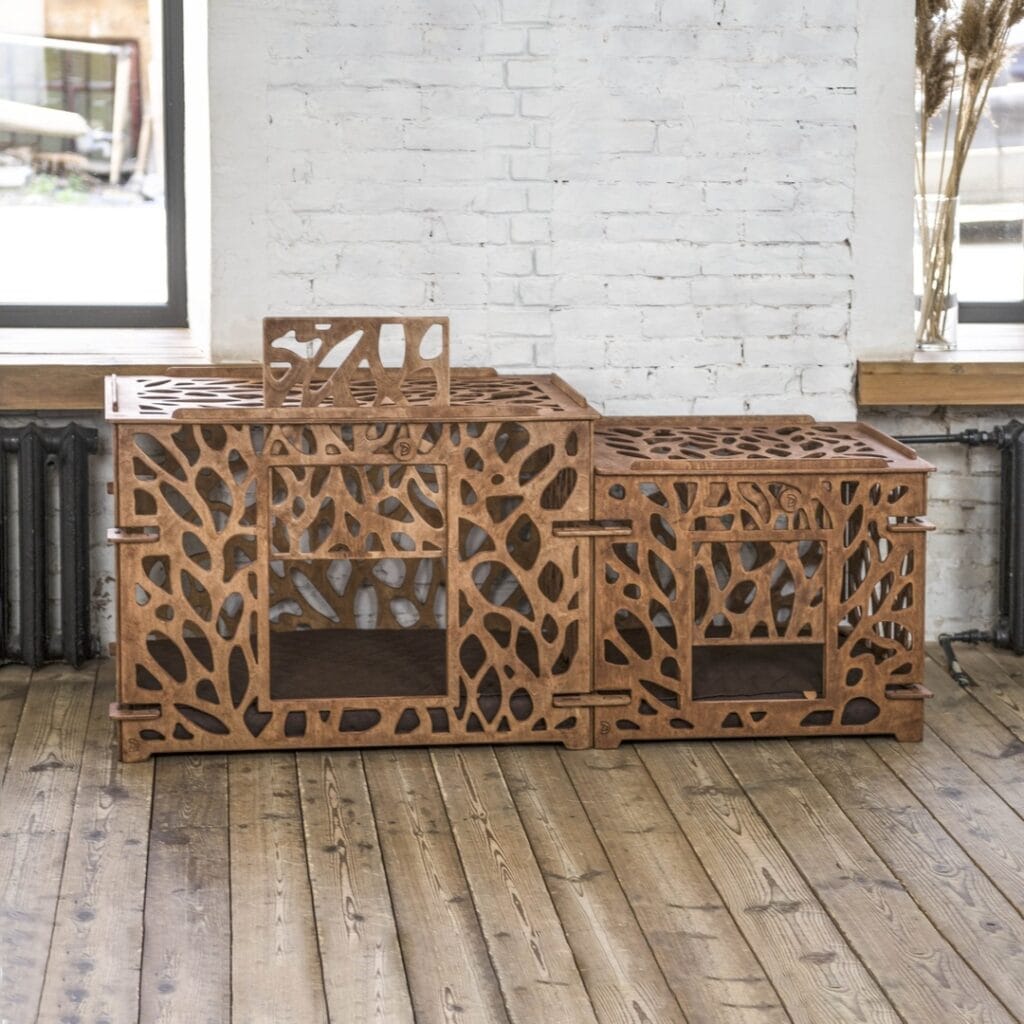
Your golden is finally napping, but the giant plastic crate in your living room is still screaming at you. Every guest’s eyes go straight to it. You’ve pinned a hundred “hidden dog kennel” ideas but nothing ever felt quite right.
This one’s different.
Materials & Tools You’ll Need:
– ¾-inch MDF board (brown-stained or walnut-toned)
– Laser cutter or CNC router (most local makerspaces rent these by the hour)
– Wood stain in warm chestnut or cognac brown
– Slot-joint connectors (no screws needed)
– Sandpaper, 120-grit and 220-grit
– Wood sealant spray
Instructions
Start by designing your leaf cutout panels in a vector software like Inkscape — the organic, irregular leaf shapes you see here give the whole piece that Pinterest-worthy feel without looking stiff. Cut two side panels, two front door panels, one back panel, and a top surface from your ¾-inch MDF.
Sand every panel with 120-grit first, then finish with 220-grit so the edges feel smooth against your dog’s fur. Apply two coats of chestnut stain, letting each coat dry fully.
And here’s where the slot-joint system earns its keep — the interlocking tabs mean the whole console assembles without a single nail. This keeps the structure sturdy enough to double as an actual side console, which means your living room stays looking intentional, not improvised.
The two separate kennel bays give a larger dog like your golden their own den space, while the flat top holds your décor or a tray.
Keep the interior floor lined with a washable canvas mat — easier cleanup after muddy walks.
⏱ Prep Time: 2 hours | Active Project Time: 6–8 hours | Difficulty Level: Intermediate
📸 Photo credit: Instagram @dogplayfurniture
#9: DIY Dog Kennel End Table With a Slatted Wood Door (That Actually Looks Like Real Furniture)
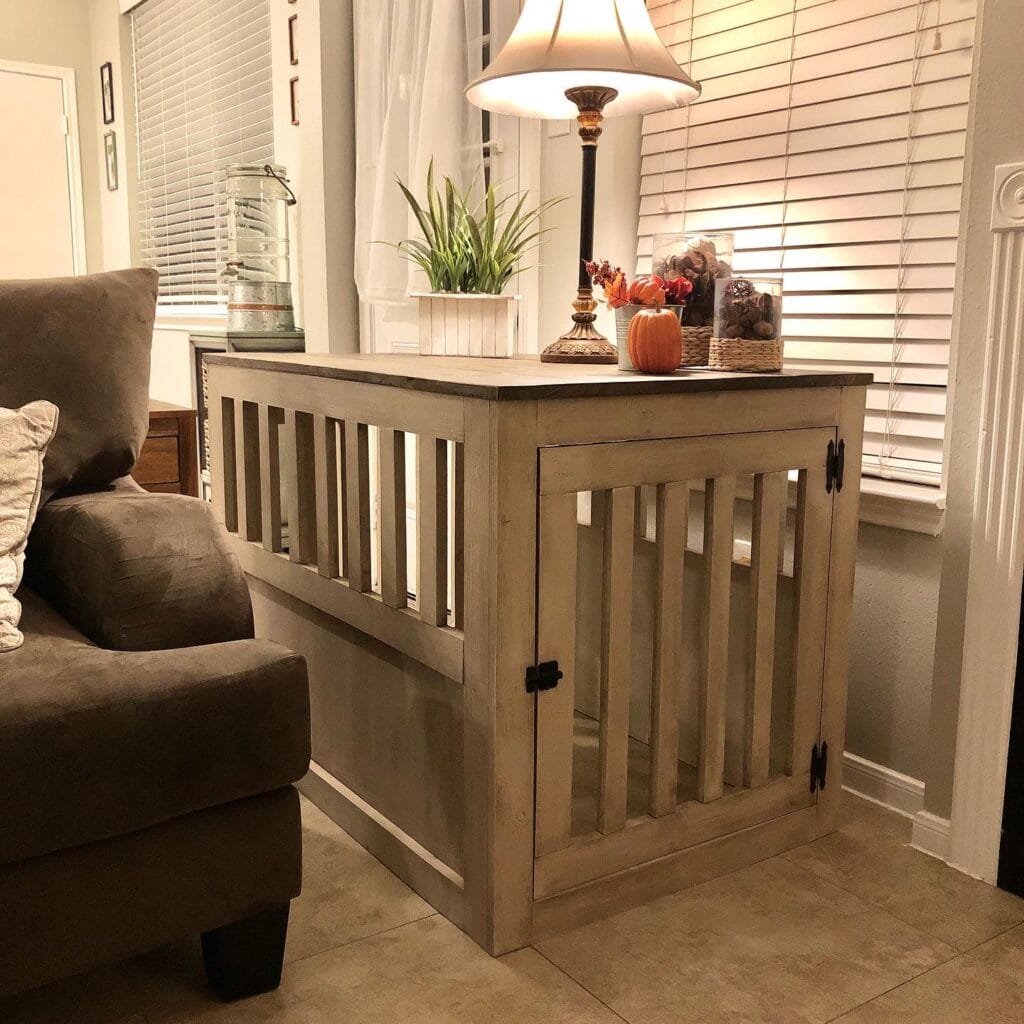
You know that moment when your golden retriever sprawls across the living room floor and you trip over her again trying to get to the couch? And her wire crate is just… sitting there, looking like a cage someone forgot to hide before company came over?
Yeah. I’ve been there with my cousin’s dog and I couldn’t stop thinking about it.
Prep Time: 1 hour | Active Project Time: 6–8 hours | Difficulty Level: Intermediate
Materials & Tools:
– 2×4 pine boards (frame structure)
– 1×3 pine boards (vertical slats)
– ¾-inch plywood sheet (top panel)
– Black iron hinges (x3 for the door)
– Black iron latch/hook (door closure)
– Sandpaper (120 and 220 grit)
– Gray chalk paint or weathered wood stain
– Dark walnut stain (for the top)
– Wood glue + 2-inch pocket screws
– Kreg Jig (pocket hole jig)
– Circular saw or miter saw
– Paint brushes + lint-free rags
### Instructions
Start by cutting your 2×4 pine boards into four corner posts at 28 inches tall. These carry the whole weight of the structure, so make sure your cuts are square — even a small angle off will throw the whole frame sideways when you go to attach the top.
Build the rectangular base frame first using 1×4 boards running along the bottom perimeter. Attach them to your corner posts using pocket screws and wood glue for a joint that won’t wiggle. This base frame gives your dog a solid, raised floor — no cold tile seeping up through a thin metal pan.
Cut your 1×3 slats to fill the side panels. Space them at 1.5 inches apart — wide enough for airflow so your golden never feels stuffy inside, but close enough that she can’t wedge a paw through. Attach each slat with two pocket screws top and bottom.
The front door is where this whole project gets its personality. Frame a rectangular door opening using 1×3 boards and add vertical slats matching the side panels. Attach your three black iron hinges along one side. The slatted door means your dog can see out and feel part of the room — which cuts down on anxious whining significantly.
For the top, cut your ¾-inch plywood to overhang the frame by about ¾ inch on each side. Apply dark walnut stain and let it dry between two coats. That two-tone finish — weathered gray body, rich dark top — is exactly what makes this look like a piece you bought, not built.
Sand everything with 220-grit before your final paint coat. Apply gray chalk paint in thin layers and dry-brush the second coat so the wood grain shows through slightly. That texture is what gives it the farmhouse finish you see in this photo.
Attach the black iron latch at the center of the door frame. It’s a small detail, but black hardware against weathered gray wood is the whole vibe.
Once assembled, tuck a washable crate mat inside and place the kennel beside your sofa. The flat ¾-inch plywood top holds a lamp, a plant, seasonal decor — whatever your current Pinterest board says — which means the kennel earns its floor space as a functional end table, not just a dog box you’re tolerating in your living room.
Keep this in mind: chalk paint scratches easier than latex, so seal the whole piece with a matte polycrylic topcoat. Two thin coats. Your golden’s nose bumping the door every morning will thank you for it.
And if you’re already on a roll building things for your pup, the 7 Creative Ideas for Your DIY Dog Washing Station pairs so well with a setup like this — especially when muddy paws are part of your daily routine.
Score the back of each slat lightly with sandpaper before gluing — it helps the wood glue grip instead of sliding. And always pre-drill your screw holes near slat ends so the wood doesn’t split.
📸 Photo credit: Instagram @thenerdybuilder
#10: The Console Table Dog Kennel That Makes Your Living Room Look Like a Pinterest Board
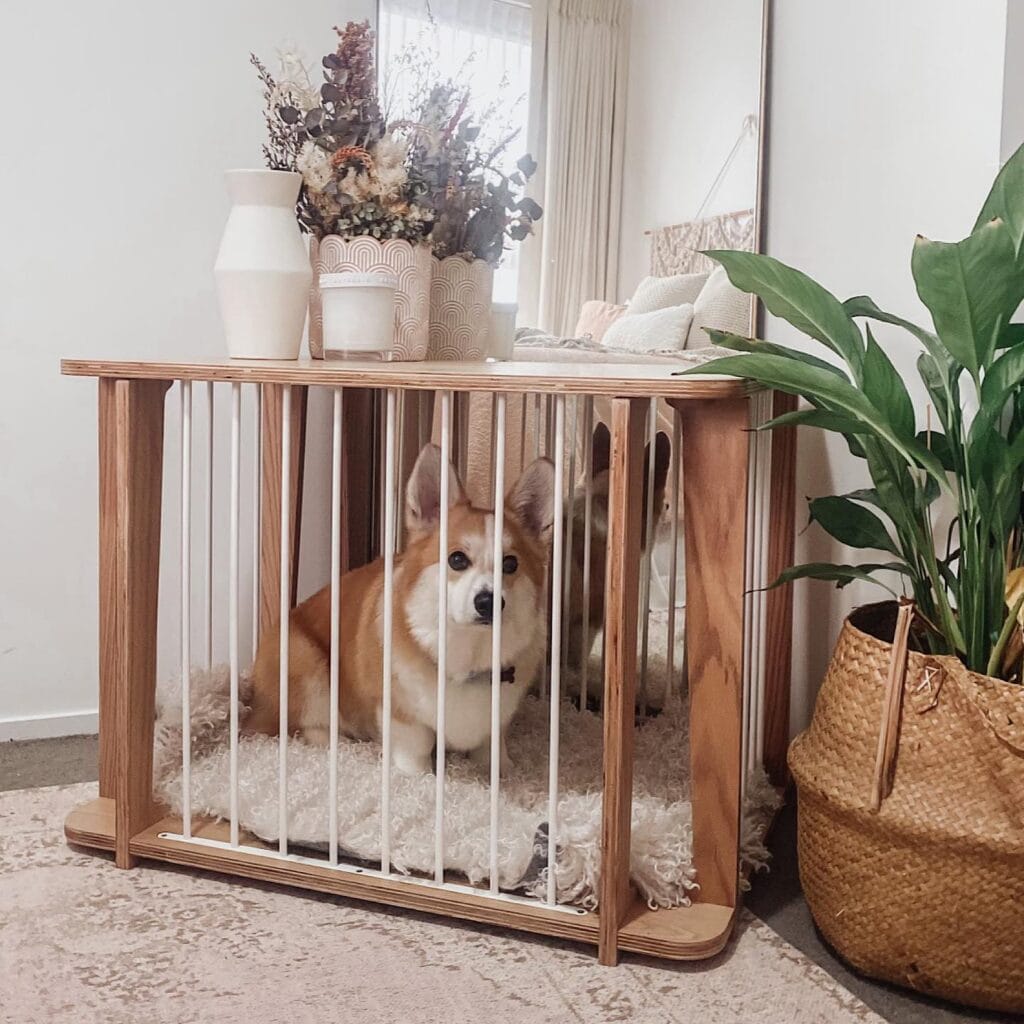
Your golden retriever just dragged her fluffy self across your freshly vacuumed rug, plopped right in the middle of the entryway, and stared at you like she owns the place. You love her. But girl, she needs her own spot — one that doesn’t make your home look like a pet store exploded.
This build is exactly that spot.
Materials & Tools You’ll Need:
– 3/4-inch birch plywood (for the top panel, base panel, and two side posts)
– Oak veneer strips for wrapping the plywood edges
– 3/4-inch diameter white metal rods (cut to 18 inches each — you’ll need about 12)
– Wood stain in a warm walnut tone
– Wood glue + 1.5-inch wood screws
– 3/4-inch drill bit for rod holes
– Sandpaper (120-grit, then 220-grit)
– Miter saw, drill press, orbital sander
Instructions
Start by cutting your plywood into two 48 x 14-inch panels for the top and bottom, and two 28 x 14-inch side posts. Sand everything with 120-grit first, then finish with 220-grit until the edges feel like butter under your fingers.
Apply your oak veneer tape along every exposed plywood edge. This is what separates a “DIY” from a “did a designer do this?” moment — sealed edges make the whole thing look intentional and clean.
Next, drill your rod holes. Mark 3-inch intervals across both the top and bottom panels, drilling 3/4-inch holes, 1/2-inch deep. Consistency here is everything. I’d suggest a drill press over a handheld drill — I made the mistake once of freehanding these holes and spent an afternoon fixing a wobbly front panel.
Apply your walnut stain to all wood pieces with a lint-free cloth, let dry 24 hours. Then add a clear polyurethane coat to protect against scratches (and let’s be real, golden retriever nose smudges).
Assemble the frame by attaching your side posts to the top and bottom panels with wood glue and 1.5-inch screws — pre-drill to avoid splitting. Then press each white metal rod into its hole with a small dab of wood glue at each end. The contrast between the white rods and walnut wood is chef’s kiss — it’s the detail that makes this look high-end instead of homemade.
Drop in a fluffy sheepskin pad and your dog gets a cozy, den-like space that actually calms her nervous system — enclosed enough to feel safe, open enough to see you. The solid top surface means you get a functional console table, she gets her sanctuary — and your entryway gets its glow-up.
Prep Time: 30 minutes | Active Project Time: 6–8 hours | Difficulty Level: Intermediate
Stain your wood a shade or two darker than you think you need — photos always make wood look lighter, and once it’s sealed, it’s sealed. Also, if your pup is a chewer, add a thin bead of clear epoxy around each rod base before it cures fully. It locks everything in place and holds up way better long-term.
📸 Photo credit: Instagram @thepawsroom_dogcratefurniture
The One Measurement Mistake That Ruins Most DIY Dog Kennels
Okay, real talk — most people measure their dog standing up and build the kennel around that. Huge mistake.
Dogs curl up to sleep. They sprawl sideways. My cousin built this gorgeous farmhouse-style kennel for her lab, and the poor thing couldn’t turn around comfortably because she sized it for “standing Biscuit,” not “doing-a-full-360 Biscuit.”
Here’s the pro tip nobody tells you: measure your golden’s diagonal body length while she’s doing her full stretch across your floor (you know the one). Add 6-8 inches to that number. That’s your interior floor dimension.
The other thing? Skip pine for the frame. It dents, it warps with moisture, and dog breath alone will warp it within a year. Go for poplar or birch — same workability, way more durable.
Quick note: if you’re building a full dog corner anyway, pairing your kennel with a 7 Creative Dog Feeding Station DIY Ideas setup makes the whole space look intentional and Pinterest-perfect.
Your golden deserves a space built around her actual body — not a best guess.
Your Golden’s Comfort Starts With One Small Change
Stop putting this off. Your dog deserves a spot that feels like theirs — not just the corner of your couch he claimed by accident.
Pick one idea from this list. Just one. Put it together this weekend while he’s napping nearby, making those little sleep-run movements. I promise it’ll feel so good watching him actually use something you made for him.
Here’s the takeaway: a happy dog and a Pinterest-worthy home aren’t mutually exclusive — you really can have both.
So tell me — what’s the first thing you’re building for your pup?

Amr Mohsen is a software engineer who traded his keyboard for a leash — at least on weekends. His love for dogs inspired him to share what he learns as a dog owner and enthusiast, bringing a detail-oriented, research-driven perspective to every article he writes. If it’s about dogs, he’s probably already looked it up twice.

