
So okay, I have to tell you about the stray cat that showed up on my porch last February. Skinny, soaked, just looking at me. I couldn’t leave her out there.
But here’s the thing — I had zero clue how to build a shelter that would actually hold up. I grabbed some cardboard, threw a blanket in a box, and honestly? That thing collapsed in two days.
Cold nights hit different when you know a cat is out there shivering.
Good news: you don’t need to be a woodworking pro to build something that actually works. These stray cat shelter DIY builds are simple, sturdy, and won’t wreck your weekend.
And if you’re already planning ahead for colder months, these warm DIY outdoor cat shelter winter designs are worth bookmarking too.
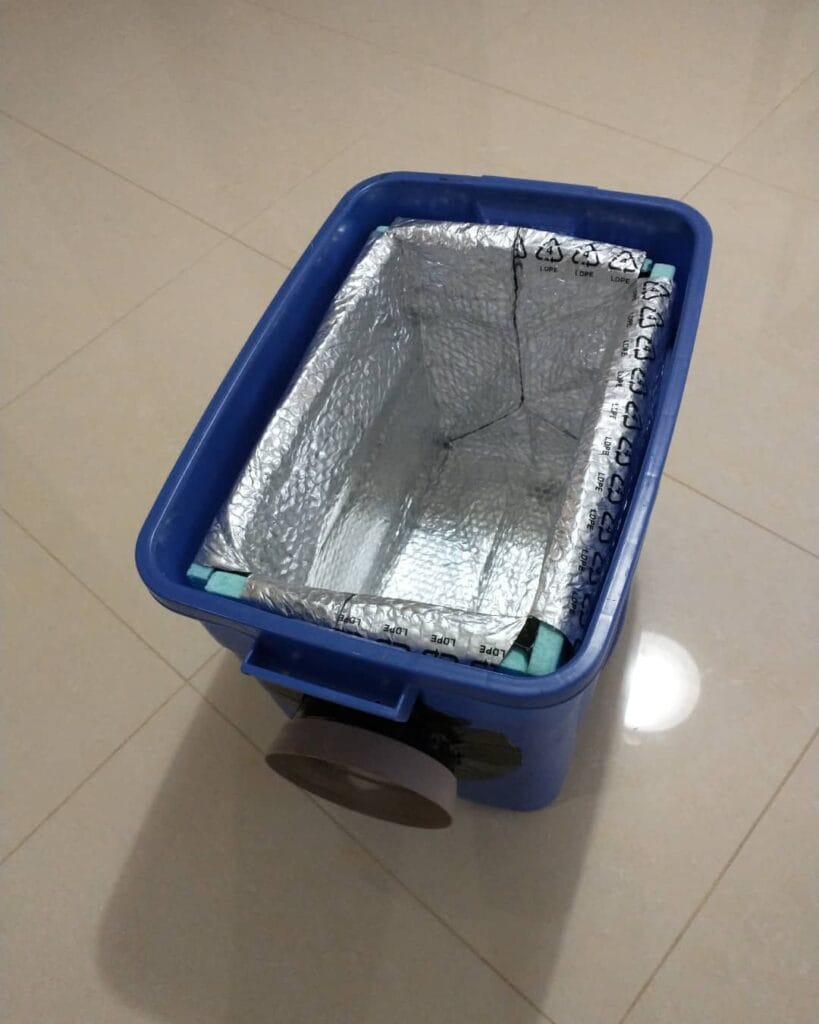
#1: The Foil-Lined Blue Bin Shelter That Actually Keeps Stray Cats Warm
Okay, so you know that feeling when you’re curled up on the couch with your golden, blanket pulled up, and you glance outside at a stray cat just sitting there in the cold? Yeah. That got me too.
This DIY shelter is exactly what I made after that moment — and it’s stupid simple.
Materials & Tools:
– Blue plastic storage bin (approx. 13″ x 18″)
– Reflective bubble foil insulation (LDPE-labeled, silver-faced)
– Teal foam weatherstripping tape
– Box cutter or scissors
– Strong adhesive tape or hot glue gun
Instructions
Cut your reflective bubble foil into panels sized to match each inner wall of your bin. Press each panel flat against the interior walls, bottom included. Run your teal foam weatherstripping along the top edges — it locks the foil in place and seals drafts where the lid sits.
The reflective surface bounces the cat’s own body heat back inward, so one small cat warms the whole space fast. That’s the feature-benefit payoff: foil insulation + body heat = a cat that actually stays warm overnight.
Flip the bin on its side if outdoor wind is an issue. Cut a small entry hole on the short end using your box cutter — around 6 inches wide works for most cats.
Keep the bin off cold concrete using two pieces of scrap wood underneath.
📸 Photo credit: Instagram @knottykatcreative
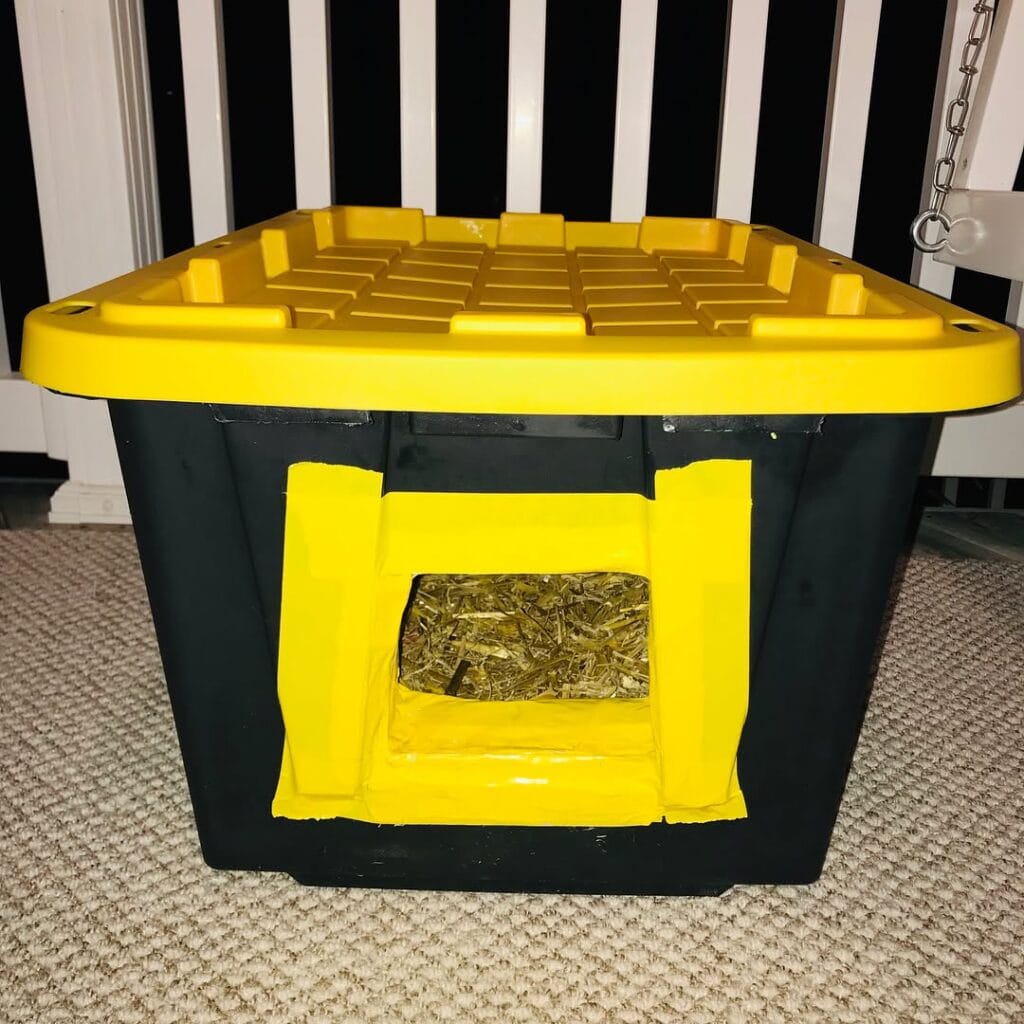
#2: The Black and Yellow Tote Bin Stray Cat Shelter (Under $20!)
Okay, so you know that moment when you’re curled up on the couch with your golden and you hear that sad little meow outside in the freezing cold? My heart just shatters every single time.
Prep Time: 15 min | Active Project Time: 45 min | Difficulty: Beginner
Materials & Tools:
– 18-gallon black plastic tote bin with yellow lid
– Yellow duct tape (approximately 2-inch wide roll)
– Box cutter or jigsaw
– Straw (NOT hay — straw repels moisture, hay holds it)
– Permanent marker for tracing
Instructions
Start by flipping the tote upside down — the lid becomes the floor, which keeps the cat off the cold ground. Grab your marker and trace a 6×6 inch square opening on the front panel, centered about 3 inches from the bottom edge. Cut along that line with your box cutter.
Here’s where the yellow duct tape earns its spot. Press it around every edge of the cutout — this covers sharp plastic edges that could nick a little paw. Run a 2-inch border of tape framing the entire opening like a little door frame. It’s both protective and genuinely cute.
Pack the inside with a 4-inch layer of dry straw. Straw traps body heat, keeps moisture out, and gives cats a warm nest to curl into — that combo means a stray actually stays through the night instead of wandering back into the cold.
The sealed lid locks in warmth while the cut entry keeps wind from blasting straight through. And because the bin is opaque black, it absorbs a tiny bit of solar heat during the day.
Cut the opening just big enough for a cat but small enough to block larger predators.
📸 Photo credit: Instagram @laurelaynnecook
#3: The Insulated Tote Bin Shelter — Warm, Waterproof, and Done in an Hour
You know that feeling when you’re watching the rain hit your window and you just know there’s a cat outside somewhere shivering? Yeah. That hit me hard last winter when I found a little gray tabby huddled against my garage door. I had nothing ready. Never again.
This build uses a navy blue Rubbermaid storage tote (the big one — 18-gallon minimum) nested inside a slightly larger tote, with pink rigid foam insulation board sandwiched between them. That foam layer is the magic. It traps heat the cat generates and keeps wind and cold out. The white towel you see inside? A folded terry cloth hand towel that holds warmth without getting waterlogged like blankets do.
Materials & Tools
– 18-gallon navy storage tote (inner)
– 20-gallon storage tote (outer)
– Pink rigid foam insulation board (cut to fit between totes)
– White terry cloth hand towel
– Box cutter or utility knife
– Measuring tape
Instructions
Cut your foam board into flat panels using a box cutter, sizing each piece to slide snugly between the inner and outer tote walls. Press the foam panels along all four sides and the bottom gap. Drop the inner tote inside — it should sit flush. Place your folded towel flat on the bottom. That’s it.
Here’s the trick: cutting a 5-inch entry hole on one short side, roughly 3 inches above the floor, keeps cold drafts from sweeping straight in while letting cats slip through easily.
The insulated wall construction keeps interior temps 15-20°F warmer than outside — which means a shivering stray finds actual relief, not just shelter.
Prep Time: 10 min | Active Project Time: 45 min | Difficulty: Easy
The towel works great short-term, but swap it for self-warming mylar pet pads in deep winter — they reflect the cat’s own body heat back without needing electricity.
📸 Photo credit: Instagram @jakdanielz2
#4: Flip a Cooler Upside Down for a Genius Stray Cat Shelter
You know that moment when you come inside after walking your golden and you spot a stray cat curled up under your porch in the freezing cold? My heart just shatters every single time.
This one hit me hard last winter. I had an old red and gray Coleman cooler sitting in my garage doing absolutely nothing. Flipped upside down, it became the coziest little cat hideout on my street.
Materials & Tools:
– 1 large hard-sided plastic cooler (red body, gray lid — like the one shown)
– 4 gray plastic legs (repurposed from a folding stool or purchased at a hardware store)
– 4 screws + screwdriver
– Straw or dry hay for bedding (NOT blankets — they hold moisture)
– Optional: zip ties for extra leg stability
Instructions
Flip your cooler completely upside down so the lid faces the ground and becomes your floor. The cooler’s flat bottom now acts as your roof — perfect for rain and wind protection.
Attach the four legs to the corners of what is now the top surface (original bottom). Screw each leg in tight. This raises the shelter off the cold, wet ground, which keeps body heat trapped inside — the raised design insulates better, so cats stay warmer with zero extra effort.
Stuff the interior with dry straw, not blankets. Leave the lid slightly ajar as the entrance opening.
Face the entrance away from prevailing wind.
And honestly? Tuck it under a bush or near your fence line so the cat feels safe going in.
The cooler’s thick insulated walls trap body heat like a dream — built-in insulation means no extra liner needed, which saves you time and money on materials.
If you love crafting for neighborhood cats, 7 Creative DIY Cat Crafts for Pet Lovers has some really sweet project ideas too.
Keep the shelter in a quiet corner away from high foot traffic. Cats won’t use it if it feels exposed. And swap the straw out every few weeks — wet bedding is worse than no bedding at all.
Prep Time: 5 minutes | Active Project Time: 20 minutes | Difficulty Level: Beginner
📸 Photo credit: Instagram @thezenzoo
#5: The Illustrated Outdoor Cat Shelter (That Looks Like Actual Art)
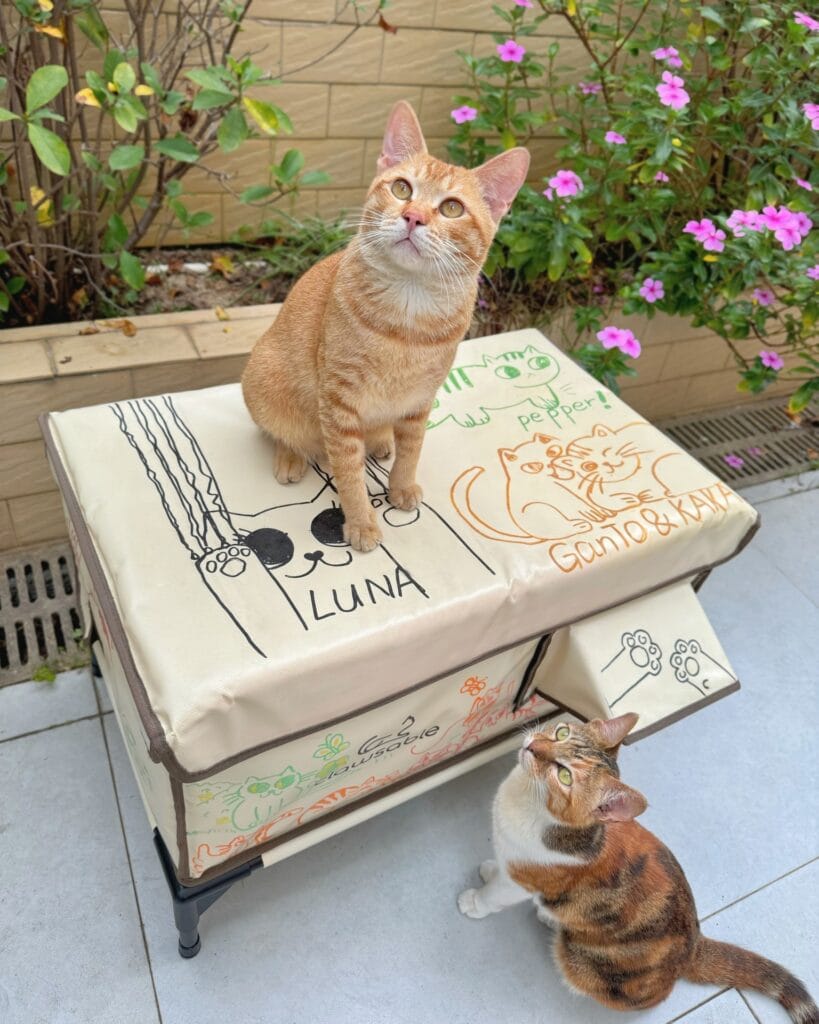
Okay so you know how your golden leaves muddy paw prints on literally every surface? Stray cats have zero shelter from rain, heat, or cold — and this build fixes that in a weekend.
This shelter is based on a canvas-wrapped, foldable storage cube frame — think metal legs + rigid fabric panels in a warm cream/ivory tone. The outside is hand-drawn with cat illustrations using fabric markers (black, orange, and green), making it look like a Pinterest board came to life outdoors.
Materials & Tools:
– Foldable fabric storage ottoman (approx. 14″ x 14″ x 14″ base cube)
– Metal riser legs (lifts shelter off cold ground — huge for wet patios)
– Permanent fabric markers (black, orange, green)
– Waterproof fabric spray sealant
– Box cutter (for entry hole)
– Old fleece blanket (for interior lining)
Instructions
Assemble your cube frame and attach the metal legs first — this keeps moisture from wicking into the base. Cut a 4–5 inch entry hole on one side panel using your box cutter, smoothing the edges so no fabric frays.
Line the interior with folded fleece. The fleece traps warmth, so cats actually choose it over bare ground on cold nights.
Now for the easy part: grab your fabric markers and sketch cat faces, paws, names — whatever feels fun. Seal everything with two coats of waterproof spray.
The illustrated exterior means neighbors see decor, not a stray feeding station — which keeps everyone happy.
Letting the sealant cure for a full 24 hours before outdoor use dramatically extends the life of your artwork.
Prep Time: 20 min | Active Project Time: 2–3 hours | Difficulty Level: Beginner
📸 Photo credit: Instagram @clawsable_official
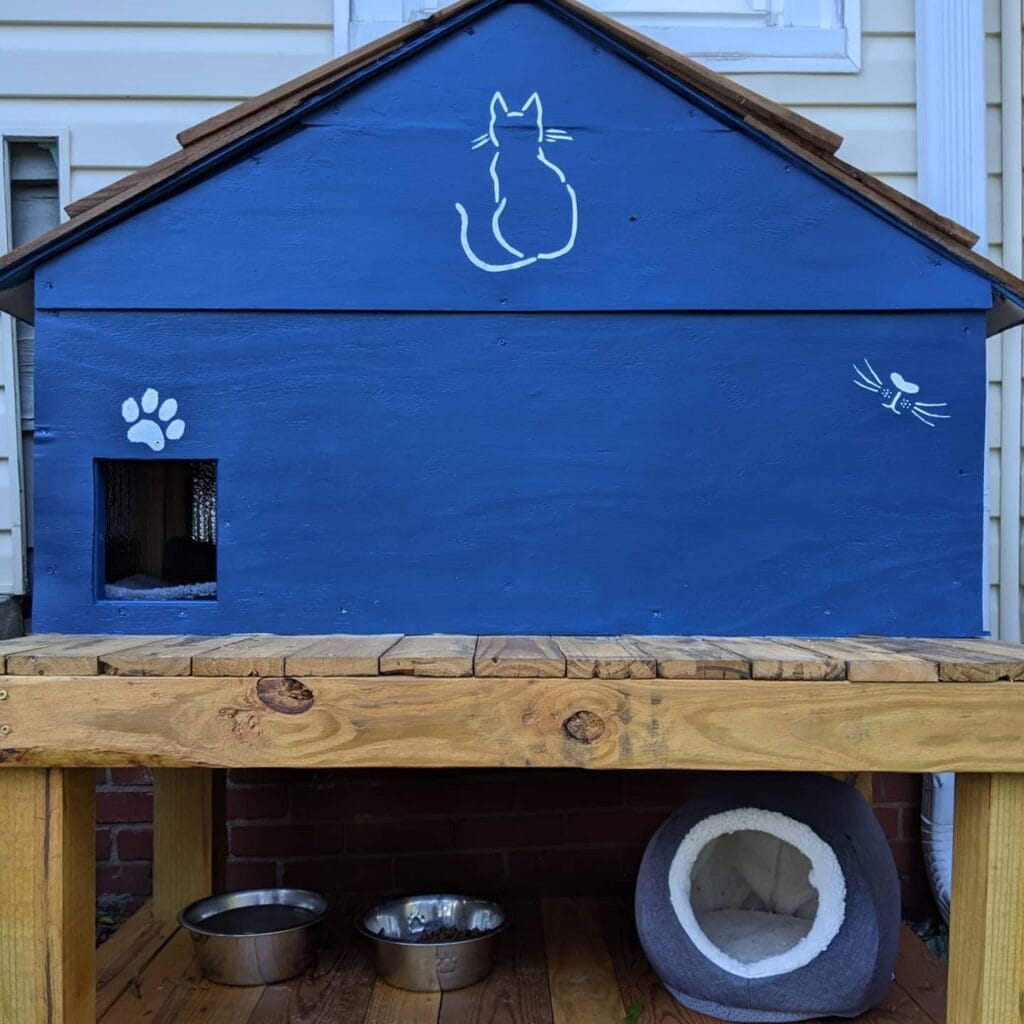
#6: Elevated Blue Colony Station — A Stray Cat Shelter That’s Actually Pinterest-Worthy
Okay, so you know how your golden probably has, like, three beds and a dedicated corner of your living room? Picture giving that same “someone actually loves you here” energy to the stray cats in your neighborhood.
This build is gorgeous — and it’s way more doable than it looks.
Materials & Tools You’ll Need:
– 3/4-inch plywood sheets (for walls, floor, roof base)
– Cedar shingles (roof covering)
– 2×4 pine lumber (for the elevated platform legs and frame)
– Reclaimed pallet wood (platform decking — gives that warm honey-toned look)
– Royal blue exterior paint (weatherproof formula)
– White paint (for the cat silhouette, paw print, and mouse stencils)
– Mylar stencils or freehand paint brushes
– Stainless steel food and water bowls (x2)
– Small round cat cave bed (gray fleece — tucks under the platform)
– Metal mesh screen (entry window covering)
– Wood screws, drill, circular saw, sandpaper
Instructions
Start by cutting your 2×4 pine into four 18-inch legs and assembling a rectangular base frame — this lifts everything off cold ground, which keeps cats warmer in winter months. A raised platform means better insulation and easier cleaning for you.
Sand every edge before assembly. Splinters are the enemy here. Lay your reclaimed pallet boards across the top frame with small gaps between them for drainage — rain runs right through instead of pooling.
For the shelter box itself, cut your 3/4-inch plywood into five panels: two side walls, a front, back, and roof base. The entry hole I’m seeing in this image sits on the left side — cut it roughly 6 inches wide by 7 inches tall. Tack your metal mesh screen loosely inside the opening so cats can push through but wind can’t blast in.
Assemble the box with wood screws, then add your cedar shingle roof in overlapping rows from bottom to top — cedar naturally repels moisture and lasts seasons without rotting.
Now the fun part. Paint everything royal blue with two coats of exterior paint. Once dry, use your stencils (or freehand it!) to paint the seated cat silhouette centered on the gable, a paw print on the left panel, and a tiny mouse with whiskers on the right. White paint, one coat, done.
Bolt the shelter box to your platform, tuck the gray cat cave bed underneath for shy cats who won’t go inside, and set out your two stainless steel bowls — one water, one food.
The raised design keeps everything off frozen or wet ground, which means cats actually use it through winter instead of avoiding it.
One thing to remember: seal all exterior wood joints with weatherproof caulk before painting. That one step adds years to this build.
Prep Time: 1 hour | Active Project Time: 4–5 hours | Difficulty Level: Intermediate
📸 Photo credit: Instagram @joynerathome
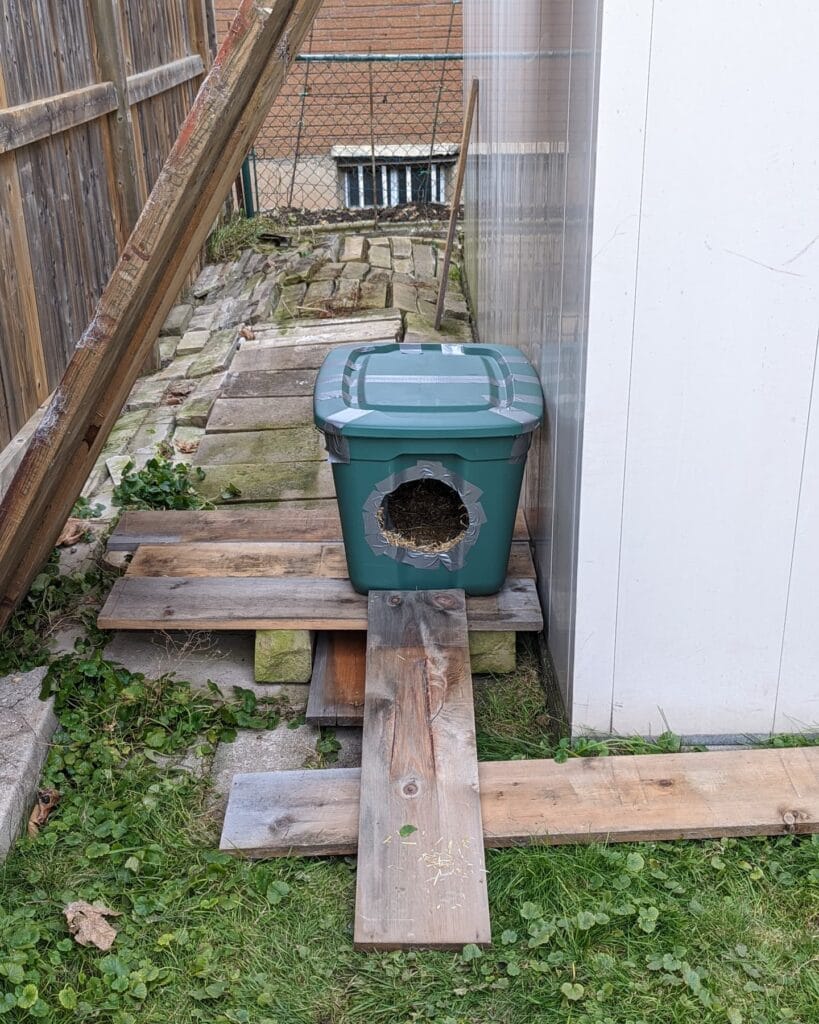
#7: The Rubbermaid Tote Stray Cat Shelter That Actually Keeps Cats Warm All Winter
You know that moment when you’re tucking your golden in with her blanket on a cold night and you suddenly think — what about the cats outside? Yeah. That hit me hard last February when I spotted a little tabby huddled against my neighbor’s wall, shaking.
This shelter is built from a dark green Rubbermaid storage tote (around 18-gallon size), a hole cut into the front face, straw stuffing inside for insulation, and duct tape wrapped around all the seams and entry edges to weatherproof everything. The whole thing sits elevated on a wooden pallet platform — that’s the part most people skip, and it makes all the difference for keeping moisture out.
Materials & Tools:
– 18-gallon green Rubbermaid storage tote with lid
– Heavy-duty duct tape (wide, silver)
– Dry straw (not hay — straw repels moisture, hay holds it)
– Wooden pallet or scrap lumber boards
– Box cutter or jigsaw
– Marker for tracing the entry hole
Instructions
Flip the tote on its side so the opening faces forward — this becomes your entry wall. Trace a circle about 6 inches in diameter centered low on that face, leaving a small floor lip to keep straw from spilling out. Cut along your traced line with a box cutter using slow, firm strokes.
Run two full wraps of duct tape around the cut edge — this prevents sharp plastic from nicking a cat’s sides and also seals against wind. Press the tape firmly into the curve. Then wrap additional tape strips across the lid seam and all four side seams of the tote. The tape locks out rain and wind — that weatherproofing feature keeps the interior dry, which means cats actually choose to use it instead of finding somewhere else.
Lay the tote on its pallet base now. Stack two or three scrap lumber boards flat, then set the tote on top — this 3-to-4-inch elevation breaks ground contact completely and stops cold from radiating up through the plastic floor.
Pack the interior with 3-4 inches of loose dry straw. Don’t compress it. Loose straw traps air pockets, and those air pockets are what actually insulate. One time I used an old towel instead of straw and the whole thing was soaked within a week. Straw is genuinely the move here.
Snap the lid shut. Done.
Position the shelter entrance facing away from your prevailing wind direction — usually facing a wall or fence, like you see in this photo. That wall acts as a natural windbreak and makes the whole setup feel more enclosed and safe for a nervous stray.
Prep Time: 10 minutes | Active Project Time: 20–30 minutes | Difficulty Level: Easy
Replacing the straw every few weeks keeps the shelter smelling fresh and mold-free. Cats avoid shelters that smell musty, so a quick straw swap every two or three weeks goes a long way toward keeping your resident strays coming back.
📸 Photo credit: Instagram @newt.and.hudson
The One Shelter Mistake That Leaves Cats Freezing All Night
Okay, so here’s the thing most DIY guides skip right over — insulation placement.
Everyone stuffs straw inside the shelter floor and calls it done. But cold air seeps in through the entrance hole, not just the ground. A shelter without a small, offset door (cut to the side, not the front center) acts like a wind tunnel straight to the cat.
Real talk: I built my first shelter dead-center entry, and by January that thing was basically a cold storage box. The cats wouldn’t touch it.
The pro fix? Cut the entrance hole offset to one corner, about 6 inches from the side wall. Cold air can’t shoot straight through. Body heat actually stays trapped inside.
Also — and this is a big one — use straw, not hay. Hay soaks up moisture and gets moldy. Straw repels it. One soggy hay shelter made a cat I was caring for genuinely worse off than before.
Get those two details right, and you’ve built something that actually works on a brutal February night.
Your Dog’s Muddy Paws Don’t Have to Win
Okay, so here’s the thing — you already know your golden is never going to stop being a chaos gremlin. That’s not changing. But how your home holds up against the muddy paws, the wet-dog smell, the fur tumbleweeds? That part’s totally in your control.
Pick one thing from this list and just start there. Seriously, one swap.
Small changes add up fast. And honestly? Your space can still look Pinterest-worthy and survive golden retriever energy. Both things are true. If you’re thinking about your pup’s setup, these stylish DIY dog crate furniture ideas are worth a look too.
So tell me — what’s the one spot in your home your dog has completely taken over?

Amr Mohsen is a software engineer who traded his keyboard for a leash — at least on weekends. His love for dogs inspired him to share what he learns as a dog owner and enthusiast, bringing a detail-oriented, research-driven perspective to every article he writes. If it’s about dogs, he’s probably already looked it up twice.

