So okay, you’re gonna think this is so random, but hear me out.
You love your golden retriever more than most people love their actual family members — no judgment, same. And every time he does that head-tilt thing, you think, I need this moment forever.
But photos aren’t always enough, right?
Last winter, I tried drawing my cousin’s dog as a Christmas gift. Total disaster. The nose looked like a potato, the ears were giving “sad triangle,” and don’t even get me started on the paws.
Real talk: learning how to draw a dog doesn’t have to be that painful spiral.
That’s exactly why I put together these 15 steps — they’re genuinely made for people who haven’t picked up a pencil since middle school art class.
Your golden deserves better than a potato portrait. Let’s fix that.
#1: How to Draw a Dog in Simple Steps (Even If You Think You Can’t Draw)
You know that moment when your golden retriever tilts her head at you and you think, “I just need to draw this face forever”? Same. I tried sketching my cousin’s dog last Thanksgiving and it looked more like a potato with ears. That was my rock bottom.
Start with a single dot. Seriously — one small dot marks your starting point for the head shape. From there, you curve a half-circle arc in pencil (a HB or 2B pencil works best here) to build the skull, then add the snout pushing forward and slightly downward.
The ear comes next — that long, floppy drop that golden retriever moms will recognize immediately. Draw it falling softly from behind the eye line.
Why this works: building the body in stages — head, neck, chest, back legs — means you’re never overwhelmed. Each step locks into the next.
Sketch the tail last, curving gently upward. Keep your lines loose until the final pass, then darken with a 0.5mm fineliner pen.
Grab smooth white cardstock instead of regular printer paper — your lines won’t drag and you’ll get cleaner curves with less frustration.
📸 Photo credit: Instagram @doityourselfies
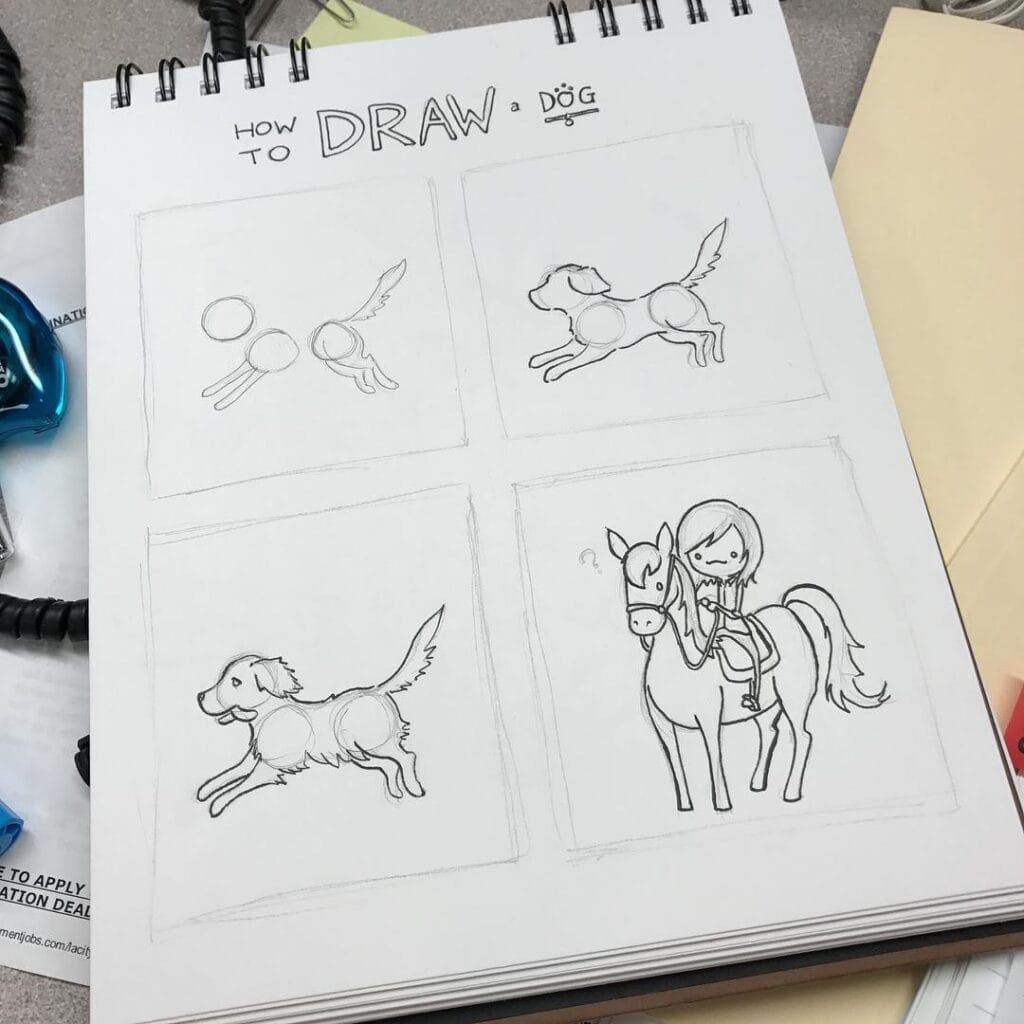
#2: How to Draw a Dog’s Head in Profile — The Tilted View That Makes Your Drawing Come Alive
You know that moment your golden gives you that side-eye look — head slightly turned, ears perked, judging you for eating the last chip? That’s exactly the angle we’re capturing here.
This four-panel sketch breaks down the profile head construction from bare bones to fur detail. Start with a soft circular base in light graphite (HB pencil) — this is your skull shape. It’s rounder than you think.
Add two triangular ears, one upright, one slightly angled forward. Then draw a second, smaller circle overlapping the front of the big one — that’s your muzzle. Keep your pencil pressure barely there at this stage.
Here’s the trick: the snout circle sits lower than center, not in the middle.
Bottom-right panel is where the magic hits. Add short, flicked pencil strokes around the cheeks and chin for fur texture. Three tiny curved lines near the eye create so much personality.
Work light before dark — building pressure last gives you control over depth without muddy lines.
📸 Photo credit: Instagram @especiallyartsy
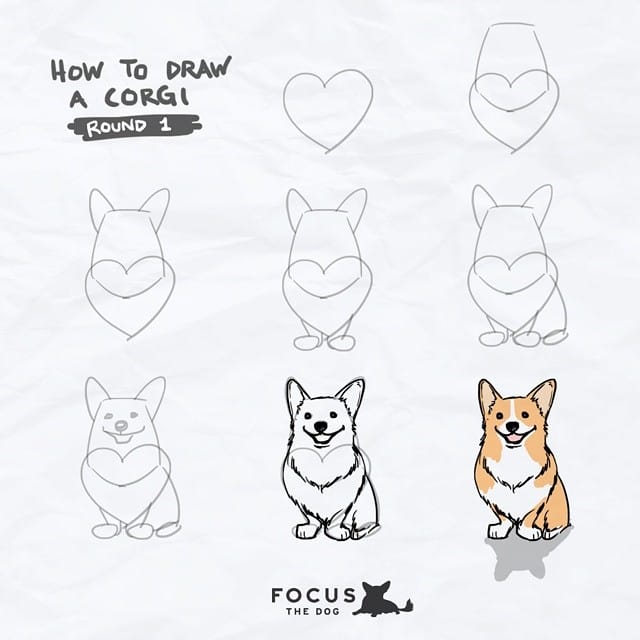
#3: How to Draw a Corgi: The Heart-Shaped Secret That Makes It So Easy
You know that moment when your golden retriever plops down and looks at you with those big eyes, and you just wish you could capture that on paper?
This corgi tutorial is about to change everything for you.
Start with a heart shape — seriously, that’s step one. Draw it in light pencil, because the whole body builds around it. The chest and belly of a corgi is literally heart-shaped, and once you see it, you can’t unsee it.
Add a rounded rectangle on top of the heart for the head. Then pop on two pointed triangular ears on each side — corgis have that signature tall-ear look. Four small rounded paw shapes sit at the bottom.
Now grab a fine-tip black ink pen and trace your final lines. Add the face details — two dot eyes, a curved smile, tiny fur texture lines on the chest.
Color with golden brown and white markers or colored pencils. The face gets brown, the chest stays white, and the paws are a mix of both.
Shade lightly under the body with cool gray to give it that grounded, dimensional feel.
The heart-as-body trick means you always nail the proportions — which means less erasing, less frustration, more actually finishing the drawing.
📸 Photo credit: Instagram @focusandcrooks
#4: How to Draw a Dog’s Face with Charcoal — Getting the Eyes and Nose Right
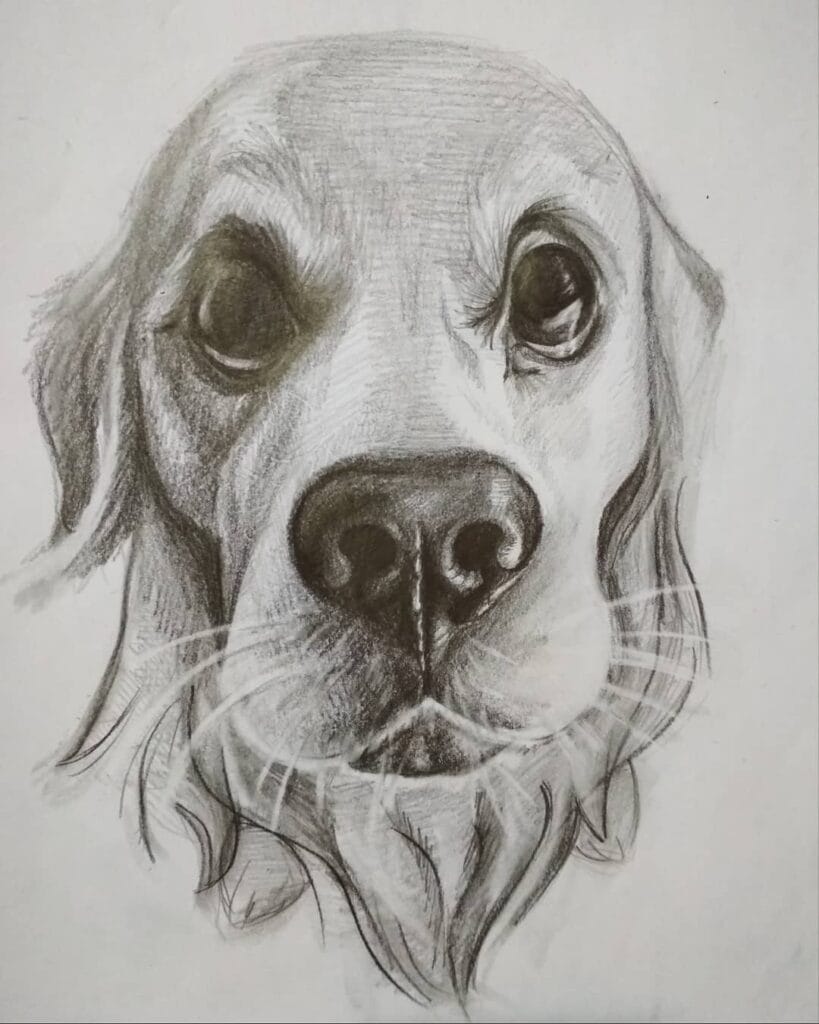
Your golden retriever just tilted her head at you, and you thought — I need to capture that look forever.
That soft, soulful expression is exactly what this charcoal sketch nails. The artist used vine charcoal and compressed charcoal on smooth white drawing paper to build those deep, dark eyes and that heavy, wet-looking nose. The face leans slightly forward, like your pup is sniffing right through the page.
Start with a light vine charcoal sketch to block the basic oval head shape. Then use compressed charcoal for the darkest areas — the pupils, the nostrils, and the shadow under the muzzle. The whiskers? Those get drawn last, using a white charcoal pencil or a kneaded eraser pulled in thin strokes across the face.
Let’s keep it simple: the magic is in contrast. Dark charcoal next to untouched white paper creates that glossy eye effect — no blending tool needed there.
Shade the ears heavy and loose. Keep the muzzle center almost white. That feature — high contrast between the nose bridge and cheeks — gives the face depth, and makes the whole drawing feel three-dimensional instead of flat.
Work from top to bottom so your hand doesn’t smear what you’ve already done.
📸 Photo credit: Instagram @mell.art
#5: How to Draw a Dog’s Face With Colored Pencils (Step-by-Step Realism)
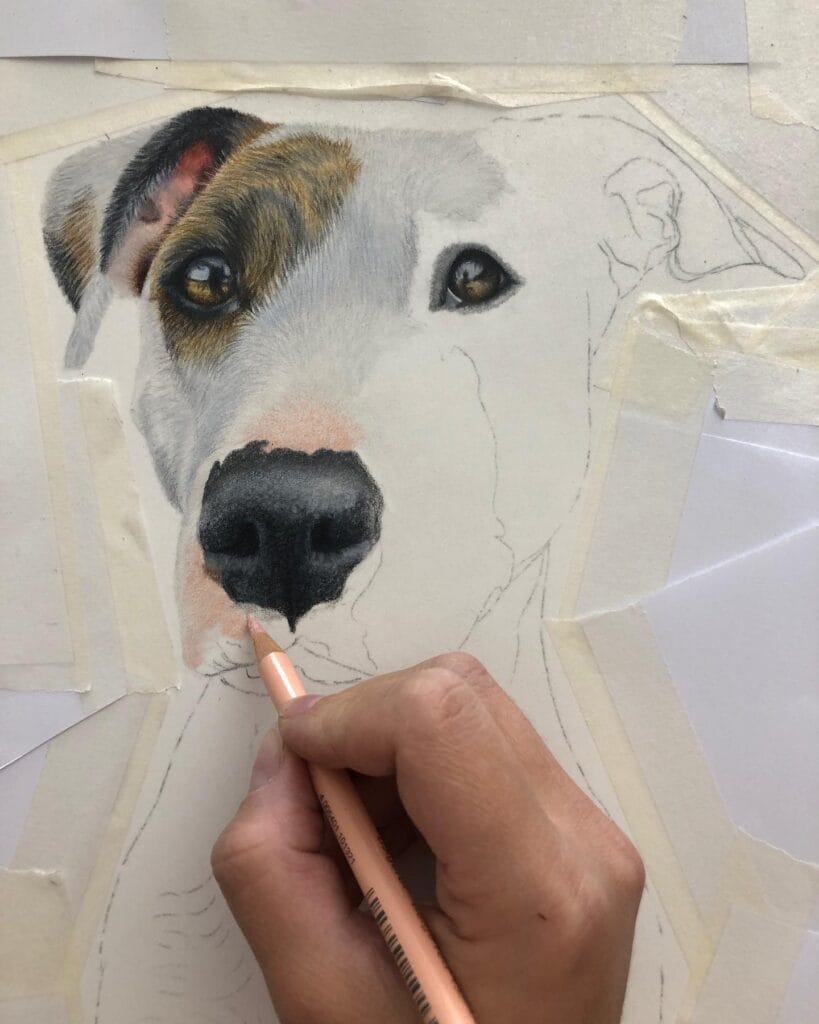
You know that moment when your golden retriever tilts her head at you and her eyes just melt you? That’s exactly what this technique captures.
This drawing shows a dog portrait mid-progress — the left side finished, the right side still in sketch form. And that split view? It’s actually the most useful thing you can study.
Start with a light pencil sketch outlining the full face before touching color. The artist here used masking tape to secure the paper flat — small detail, huge difference for clean edges.
For the fur, layer warm brown, olive green, and black colored pencils in short strokes following the fur direction. The nose uses deep black with soft gray highlights to fake that wet, glossy look.
This is the key: work the darkest areas first — the eyes and nose anchor everything. Once those feel right, the lighter fur around them falls into place naturally.
A peach/skin-tone pencil underneath the white muzzle area adds warmth instead of leaving it paper-white — that’s what makes it look real instead of flat.
Keep a reference photo taped right beside your drawing. The artist clearly did here, and look at those eyes.
📸 Photo credit: Instagram @georgieturnerartist
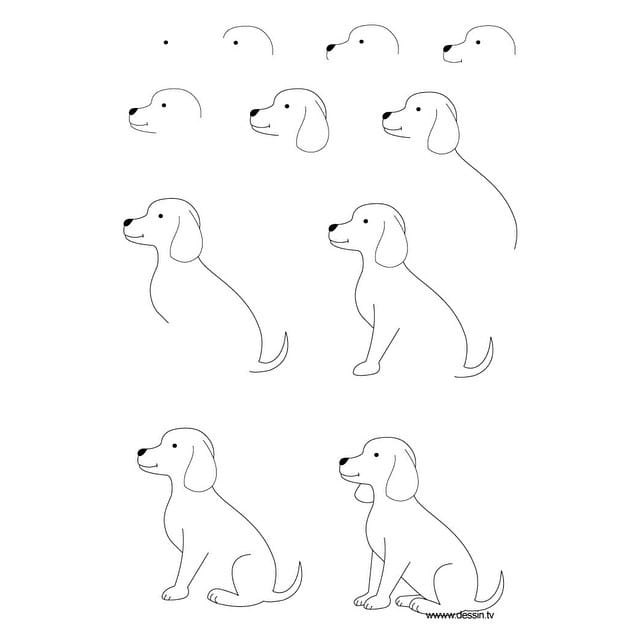
#6: How to Draw a Beagle Puppy Step by Step (Even If You’ve Never Drawn a Dog Before)
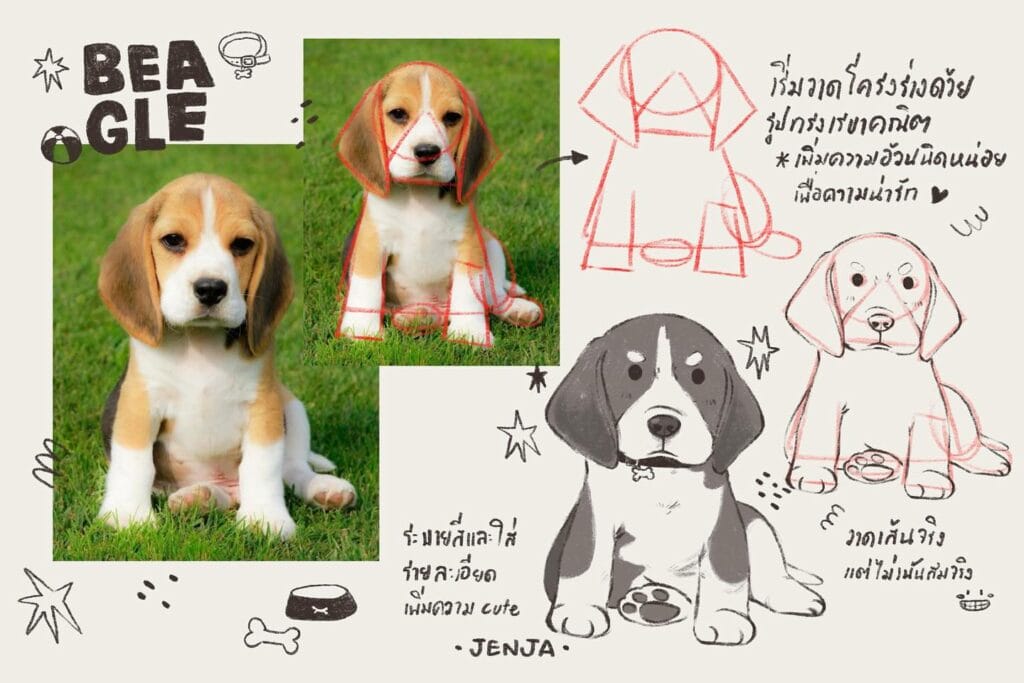
You know that moment when your golden is just sitting there, head tilted, ears flopped over, and you’re like — I need to draw this right now? Same.
Start with basic geometric shapes. A circle for the head, a rectangle for the body, and trapezoid shapes for the legs. The image shows exactly this breakdown in red overlay — and it works because it removes the overwhelm before you even pick up your pencil.
Add a little extra roundness to everything. Beagles and goldens both carry that chubby-puppy energy, so push your shapes slightly rounder than feels natural. That’s what makes the final drawing feel alive instead of stiff.
For shading, use gray marker or charcoal to block in dark zones first — ears, back, eye patches. Then pull back highlights with a white gel pen.
Draw confident strokes but keep them loose. Tight, careful lines make dogs look stiff. One fluid motion per stroke, even if it’s imperfect — especially if it’s imperfect.
📸 Photo credit: Instagram @jenja.1993
#7: How to Draw a Cute Sitting Cat (That Looks Just Like Your Golden’s Best Friend)

Okay, so my niece asked me to draw her cat one afternoon and I completely panicked — I hadn’t drawn anything since middle school. Then I found this 4-step grid method and honestly? It saved me.
Start with a vertical rectangle divided in half by a horizontal line. That midpoint is everything — it tells you where the head ends and the body begins. Draw a round head shape sitting on top, with two smaller ovals for chubby cheeks pressing outward.
Step three is where it gets fun. Add pointed ears, tiny paws hugging the center line, and a curved tail peeking out from the right side. The bell collar detail sits right at the rectangle’s midpoint — use that grid line as your guide.
For step four, thicken your outlines with a fine-tip black marker, add fur texture with short quick strokes, then erase your grid. Dot two small orange hearts on the cheeks for that signature blush.
Grab a 0.5mm mechanical pencil for the sketch and a Micron 05 pen for inking. The grid keeps proportions tight even if you’re a total beginner.
Draw the face last — eyes, nose, and mouth placement feels less scary once the body shape is locked in.
📸 Photo credit: Instagram @moccameenn
#8: How to Draw a Basset Hound Face (Those Iconic Droopy Ears!)
You know that face your golden makes when she drops her head on your lap and just stares at you? That’s exactly the energy this sketch captures.
The Basset Hound face in this image is all about exaggerated proportions — a wide, round head, a massive drooping nose, and those impossibly long ears that almost touch the ground. The artist uses simple pencil lines with light shading to give the ears weight and volume.
Start with a large oval for the head. Drop two long U-shaped curves on each side for the ears — they should be at least 1.5x the height of the head. Add a wide, bulbous nose dead center, two small circular eyes set wide apart, and a subtle jowl line curving under the chin.
Want that sad-puppy softness? Shade the ears with diagonal pencil strokes going downward — this pulls the eye down and sells the droopiness instantly.
Keep your pencil grip loose. A stiff hand gives you sharp lines, and Basset Hounds are anything but sharp.
📸 Photo credit: Instagram @kristin_roskifte
#9: How to Draw a Dog as a Snake — Yes, Really
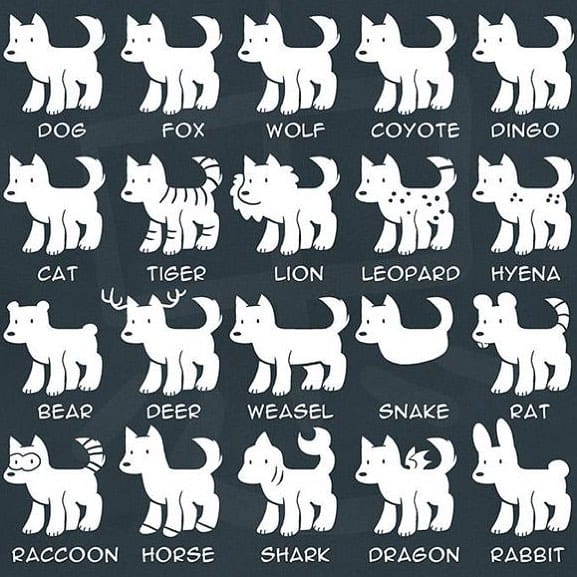
Your golden retriever probably has that one weird lounging pose — totally boneless, stretched out like he forgot he has legs. That’s the snake dog.
This style from the chart uses an elongated, low-sending body with a dramatic curved tail sweep and no visible legs underneath — just a smooth belly line. The head stays the standard dog shape: two perky ears, a simple circular snout, and two dot eyes.
Grab your HB pencil first. Sketch a long S-curve spine as your backbone guide — this is the move that makes or breaks the pose. Then build the body around it using soft, rounded lines, keeping the belly close to the ground.
And here’s the part people miss — the tail. It curls high and wide, almost taking up as much space as the body itself. That tail is doing all the storytelling.
The neck stays short and thick, connecting directly into a slightly tilted head. Ink it with a 0.5 fine liner, then erase your pencil guides.
Keep the silhouette clean. No fur texture, no extra detail — the snake dog lives or dies by its outline clarity. Simple shapes, feature-benefit-payoff: clean curves give you a readable pose, which means anyone can recognize your dog drawing at a glance.
And honestly? This one’s weirdly fun to practice.
📸 Photo credit: Instagram @nethrix
#10: How to Draw Black Fur With Pastels (Yes, You Can Actually Do This)
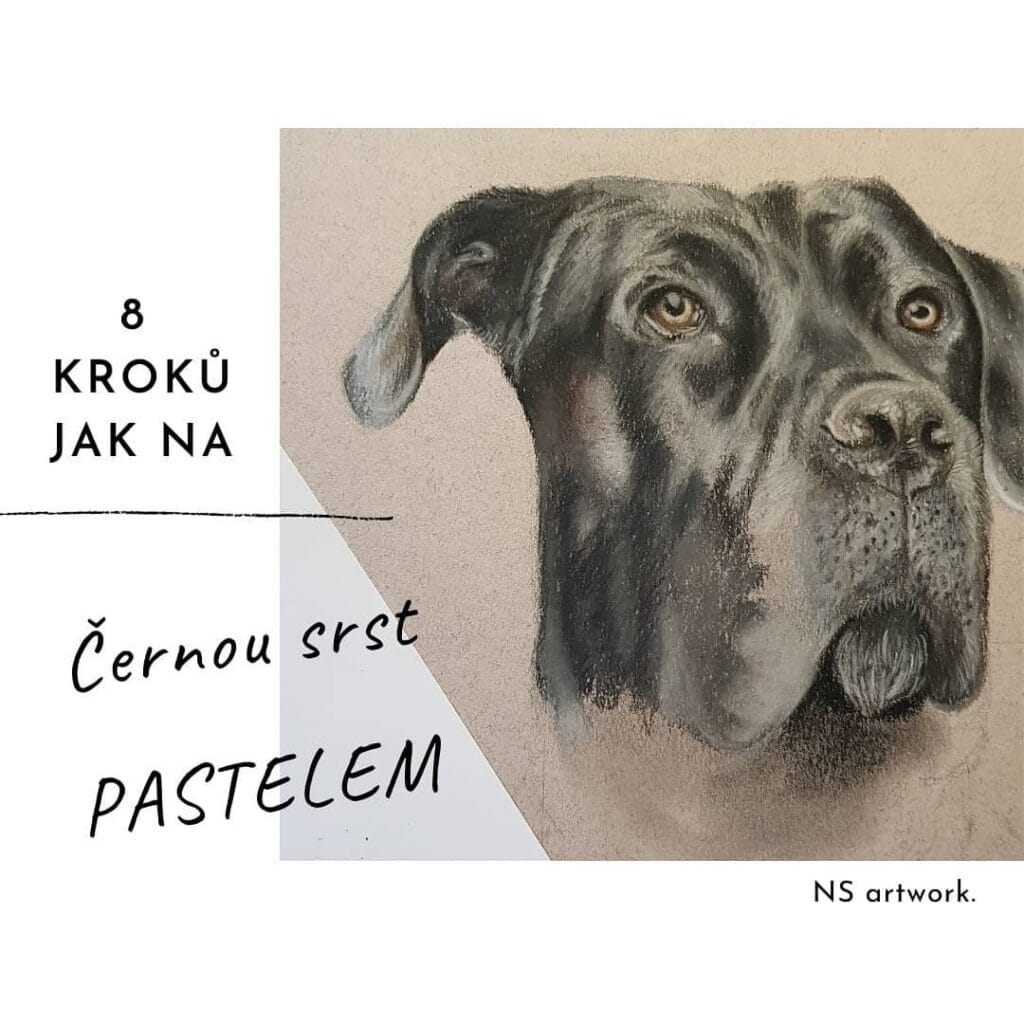
You know that feeling when your golden retriever flops down in the sunlight and his fur looks like actual honey? Now picture trying to capture that kind of depth — but in black. That’s the challenge right here, and honestly, it’s one I used to avoid completely.
This portrait uses soft pastels on toned beige paper — and that paper color is doing so much heavy lifting. It acts as your mid-tone base, so you’re not starting from scratch on white.
Start with dark charcoal gray and ivory black pastel layered in the direction the fur grows. Short, flicking strokes. Then pull in cool blue-gray along the highlights on the ears and brow — that’s what makes the fur read as shiny instead of flat.
The eyes here are painted with burnt sienna and raw umber, and they’re the anchor of the whole piece.
Keep this in mind: never blend black fur with your finger. Use a tortillon instead — it keeps the strokes crisp and prevents muddy smearing.
A kneaded eraser lifts pastel to create the whisker details around the muzzle, that little white chin tuft, and the light flecks on the nose.
Layer dark, then light, then dark again. That’s the rhythm that gives black fur its actual dimension.
📸 Photo credit: Instagram @nsartwork000
#11: How to Draw Two Dogs at Once Without Losing Your Mind (Or Your Pencil)
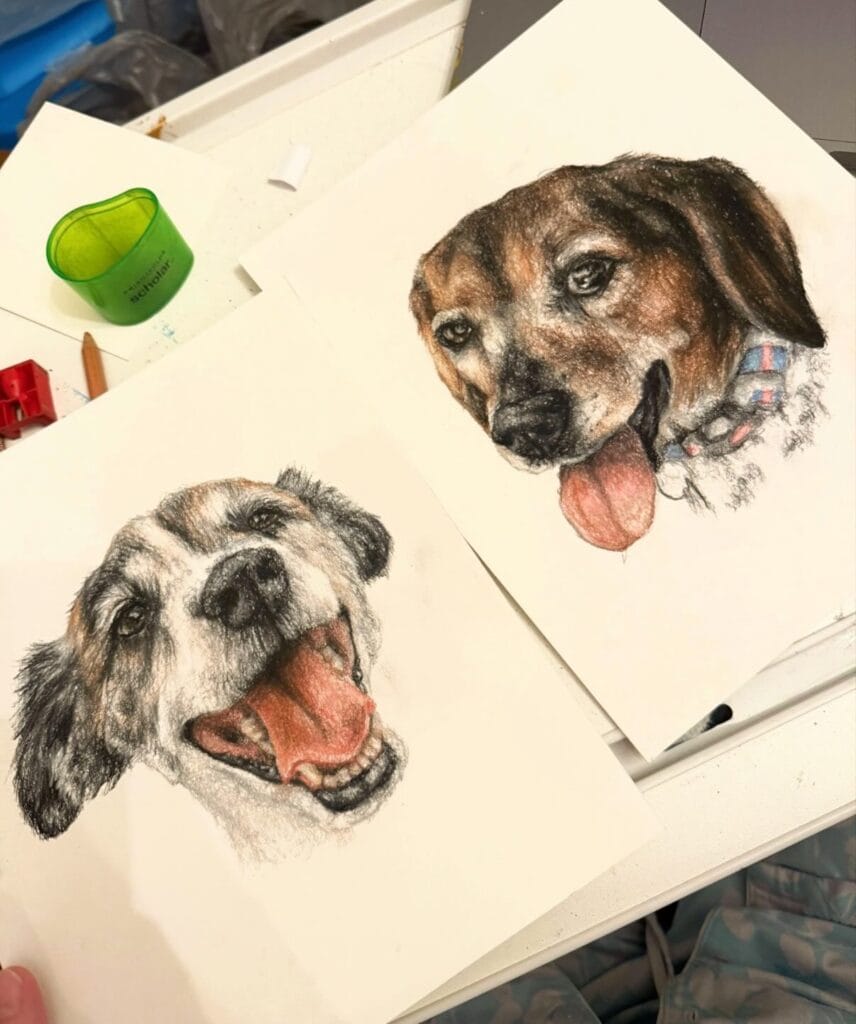
You know that feeling when your golden retriever is finally sitting still, just long enough for you to snap the perfect photo? That’s your moment. That’s the reference shot you’ve been waiting for.
These two portraits are drawn with colored pencils and charcoal on smooth white cardstock, and the combination is everything. The charcoal builds that soft, furry texture in the black-and-white dog, while the colored pencils layer warm burnt sienna, raw umber, and tan tones into the beagle mix on the right. You can literally feel the difference in their coats just by looking.
Start with the eyes. Always. Lock in the darkest darks first using a black charcoal pencil, then build outward with lighter strokes.
The tongue? Crimson red pencil, lightly layered, with a touch of salmon pink blended over it. That’s what gives it that wet, alive look.
A Prismacolor Scholar pencil sharpener (you can see the green one right there in the photo) keeps your tips sharp enough for fine fur detail around the muzzle and brows. Sharp tip, light pressure, short strokes — that trio gives you realistic fur without overworking the paper.
Work one dog at a time. Finishing one fully before starting the other keeps your color palette consistent and your brain calm.
📸 Photo credit: Instagram @rightside.of.elizas.brain
#12: How to Draw Two Dogs Playing Together (Capturing Dynamic Interaction)
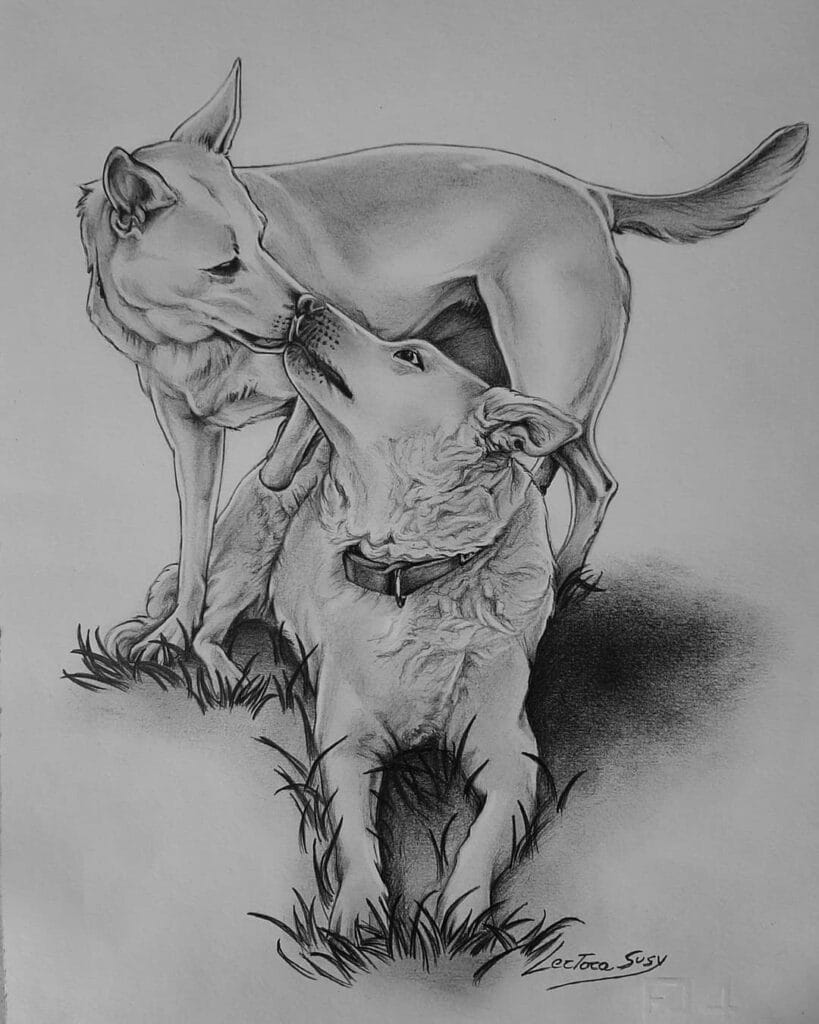
Your golden is always tangled up with the neighbor’s dog — noses bumping, paws everywhere, pure chaos. That’s exactly the energy this drawing captures.
This pencil sketch shows two short-haired dogs mid-play, one standing dominant with a raised tail, the other looking up with a loose collar around its neck. The whole composition sits on a patch of sketched grass with dramatic cast shadows underneath — that shadow work is what makes it feel three-dimensional.
Start with two HB pencils and one 4B for deep shadow. Sketch the standing dog first — its spine line flows from neck to tail in one continuous curve. Then position the second dog lower, head tilted back at roughly 45 degrees. The collar detail? Just a thin curved rectangle with a small clasp circle.
Build your shading in layers. The darkest marks go where the two bodies overlap — that contrast is what separates them visually. Lightly sketch grass blades last using quick upward flicks of your 4B.
The fur texture on the lower dog’s chest comes from short, circular strokes — feature being the directional pencil marks, benefit being realistic volume, payoff being a drawing that actually looks like your dog.
📸 Photo credit: Instagram @susy.lertora.art
#13: How to Draw a Running Dog Using Simple Circle Shapes
Okay, so you know how your golden is always mid-zoomie, ears flopping, paws flying everywhere? That energy is exactly what this tutorial captures.
Start with three overlapping ovals — a large one for the chest, a medium one for the hindquarters, and a small one for the head. These circles are your skeleton. Everything builds from them.
From there, sketch four loose leg lines angling forward and backward to nail that mid-run pose. Add a fluffy triangular tail shooting upward at roughly 45 degrees. Then layer in the ears, snout, and chest fur using short, feathery pencil strokes.
The circle framework gives you accurate body proportions — which means your dog actually looks like a dog instead of a potato with legs.
Use a light HB pencil for the base shapes so you can erase clean. Then go over the final lines with a 0.5mm fineliner pen for crisp definition.
And honestly? Once you master this running pose, you’ll want to sketch your pup from every angle.
📸 Photo credit: Instagram @theodoodles
#14: How to Capture That “Happy Dog” Expression (Mouth Open, Eyes Soft)
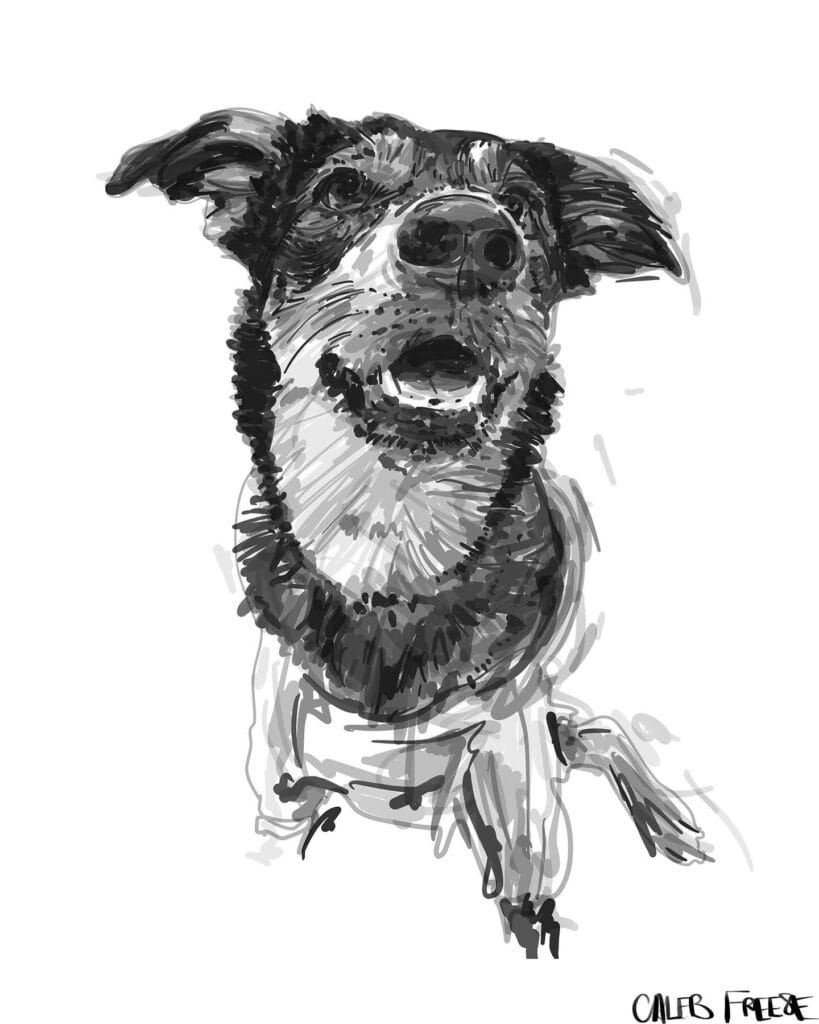
Your golden does that thing where she looks up at you mid-zoomies — mouth open, ears flopped sideways, eyes doing that soft squint. That face. That’s exactly what this sketch nails.
Start with a light gray marker or Procreate brush to rough in the snout shape first — not the outline, the middle. Caleb Freese’s technique here builds from the nose outward, which is why the muzzle feels so alive. Use hatching strokes in short, curved lines to suggest fur texture without drawing every single hair.
The dark patches around the ears? Lay down a mid-tone gray base, then go over it with dense crosshatching in black only where shadows fall deepest. Leave the chin and muzzle almost white — that contrast is what makes the expression pop.
Keep your pen pressure loose on the chest area. Fewer strokes down there actually read as fur better than tight, controlled lines.
And the collar? Sketch it as a broken circular line, not a perfect ring — dogs never sit still enough for perfect.
📸 Photo credit: Instagram @zoooooooooom
#15: How to Draw a Fluffy Black Puppy With Colored Pencils and Markers
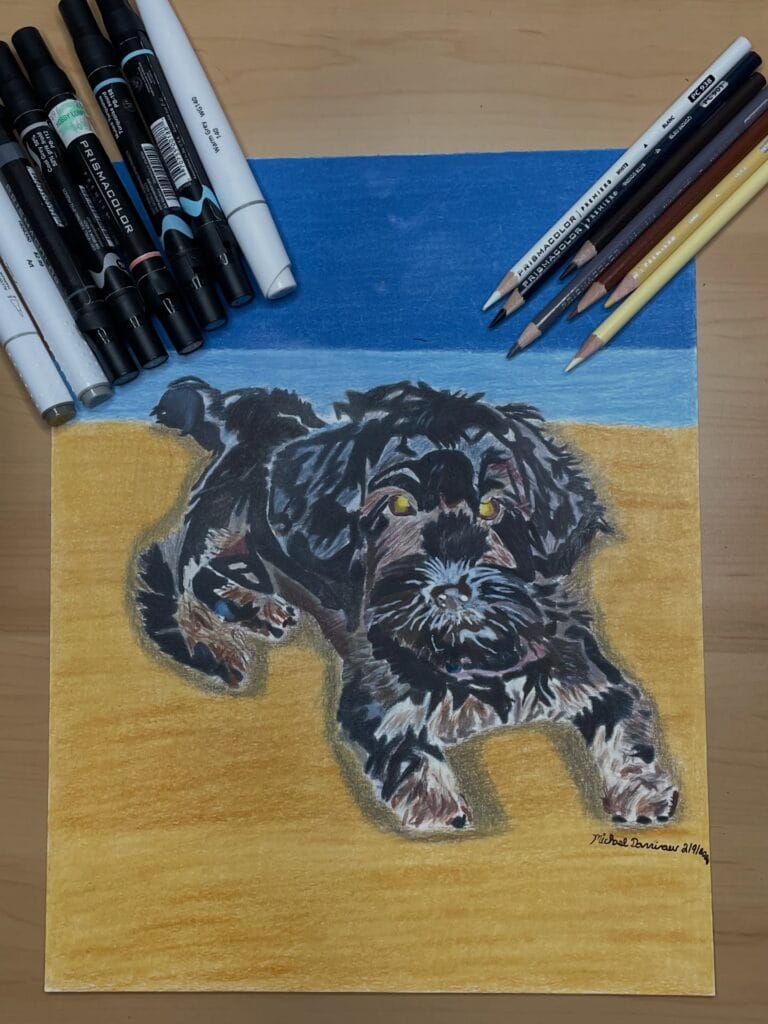
Your golden girl has that same “I’m-just-gonna-flop-here” energy — paws stretched out, eyes locked on you, totally unbothered. That’s the exact moment this drawing captures.
This piece shows a dark, fluffy puppy lying on a sandy surface with a blue sky behind it — done in Prismacolor Premier colored pencils and Prismacolor markers on tan-toned paper. The warm background does half the work for you. Picking the right paper color means your lights and shadows already have a base to play off of — no white paper fighting you.
Start with black and dark brown Prismacolor pencils to block in the fur. Then layer white and PC-938 White for the chest and paw highlights. The yellow eyes? PC-1034 Goldenrod with a black pupil on top.
Build fur in short, flicking strokes. Always follow the direction the fur grows — otherwise it reads as texture, not fur.
The blue marker for the sky goes down first, fast. Then the golden tan marker fills the sandy ground. Colored pencil layers go on top to add depth and detail.
Keep your pencils sharp. Dull tips make fur look muddy instead of fluffy — and you’ll lose all that softness the artist nailed here.
📸 Photo credit: Instagram @mikelovesdrawing
The One Sketch Mistake That Makes Every Dog Look “Off” (And How to Fix It)
Okay, real talk — most people start drawing a dog by outlining the head first. That’s the trap. I used to do this too, and my dogs always ended up looking like weird potato blobs with ears.
Here’s the pro secret: start with the rib cage and hip circle instead. Sketch two overlapping ovals — a bigger one for the chest, smaller one for the hips. Everything else hangs off those two shapes. The head, the legs, the tail. All of it.
My friend showed me this technique last summer and honestly, it clicked immediately. My golden retriever sketches went from “what is that creature” to actually recognizable.
The other big pitfall? Drawing all four legs at the same angle. Real dogs plant their weight unevenly. Shift one front leg slightly forward and watch your whole drawing feel alive.
One more thing — eyes placement trips everyone up. Dog eyes sit much lower on the skull than we instinctively place them. Move them down and your portrait stops looking cartoon-ish fast.
Your Home Deserves Better Than a Muddy Mess
Pick one mat. Try it for a week. You’ll notice the difference before you even think about it — no more side-stepping that wet, grimy spot by the door every single morning.
Your golden is not going anywhere, and honestly, neither is the mud. But you can stop fighting it and just… let the mat do the work.
Real talk — a good mat doesn’t just protect your floors. It keeps your whole entryway looking like something you’d actually pin. That’s the win here.
So which mat style caught your eye first — the aesthetic one or the heavy-duty one?

Amr Mohsen is a software engineer who traded his keyboard for a leash — at least on weekends. His love for dogs inspired him to share what he learns as a dog owner and enthusiast, bringing a detail-oriented, research-driven perspective to every article he writes. If it’s about dogs, he’s probably already looked it up twice.

