Okay so hear me out — you finally find a cat tree that doesn’t look like it belongs in a 2003 Petco catalog, and it costs how much?
That was me last spring. Standing in the pet aisle, genuinely offended by the price tag on something covered in beige carpet and plastic tubes. My whole living room has this warm, earthy vibe going on, and I was NOT about to let some ugly tower ruin it.
And I know you get it. You spend actual time making your home look good. Your throw pillows are coordinated. Your shelves are curated. Then your cat’s furniture just… sits there. Looking wrong. Clashing with everything you’ve worked for.
That’s exactly why I put together these 7 cat furniture DIY ideas — each one designed to actually belong in a stylish home, not fight against it.
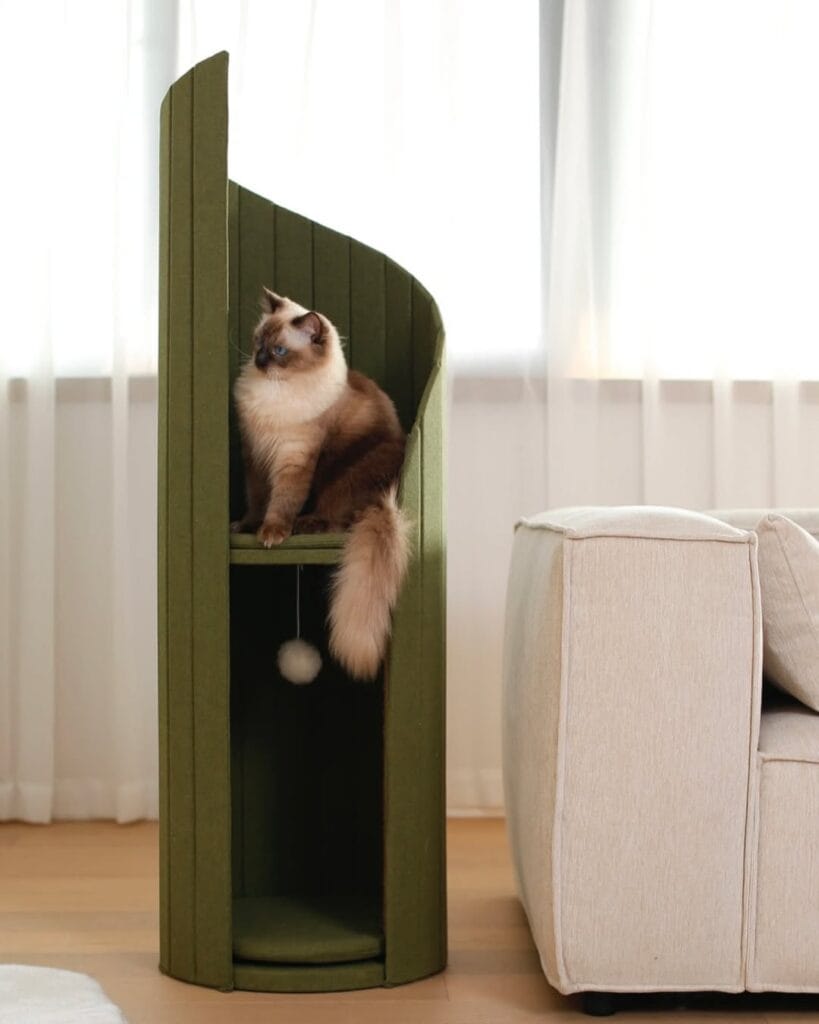
#1: DIY Felt Cat Tower with Curved Hideaway Shelter
You know that feeling when your golden retriever has claimed every single cozy corner of your house? Yeah, your cat doesn’t stand a chance. My own living room used to be a battle zone — dog toys everywhere, zero “zen zones” for anyone.
This curved felt cat tower is exactly the kind of thing that fixes that. It looks like actual furniture, not a sad carpet-covered pole shoved in the corner.
Materials & Tools:
– 6mm rigid felt board (gray or taupe — matches literally everything)
– ½-inch plywood sheet for the inner shelves
– Acoustic felt fabric in light gray — 2 yards
– Fabric adhesive + staple gun
– 1 wooden dowel rod (for hanging the toy pom-pom)
– Circular base cut from ¾-inch MDF board
– Small pompom ball + twine
– Jigsaw, sandpaper, measuring tape
Prep Time: 45 minutes | Active Project Time: 4–5 hours | Difficulty Level: Intermediate
### Instructions
Start by cutting your plywood into two shelf pieces — one upper perch at roughly 24 inches from the base, and one lower lounging platform sitting about 10 inches up. Sand every edge until there’s zero roughness, because splinters and curious paws are a terrible combination.
Cut your rigid felt board into two tall curved panels. These form the signature shell shape you see wrapping around the structure. Score the back of the felt lightly with your jigsaw to help it curve without cracking, then bend both panels gently around the plywood shelves, securing them with the staple gun along the interior edges.
Wrap the inner walls with your acoustic felt fabric using fabric adhesive, pressing firmly and smoothing out bubbles as you go. The felt backing absorbs sound, which means your cat gets a quieter hideaway — and you get a calmer house.
Attach both shelves inside the curved shell at your measured heights. Mount everything onto the MDF circular base for stability. Drill a small hole through the upper shelf, thread your twine through, and tie the pompom at the bottom — it hangs right inside the lower cubby where a curious paw can bat at it all day.
The curved open-front design gives cats clear sightlines while still feeling sheltered — that sense of security actually reduces anxious behavior in cats sharing space with dogs. Pair this build alongside 7 creative DIY cat tower plans for playing if you want to add climbing levels later.
Place the finished tower near (but not right next to) your sofa — cats prefer a slight distance so they can observe from safety. Weigh the base down with a heavy book underneath the MDF for the first 24 hours while the adhesive fully cures.
📸 Photo credit: Instagram @pewos_official
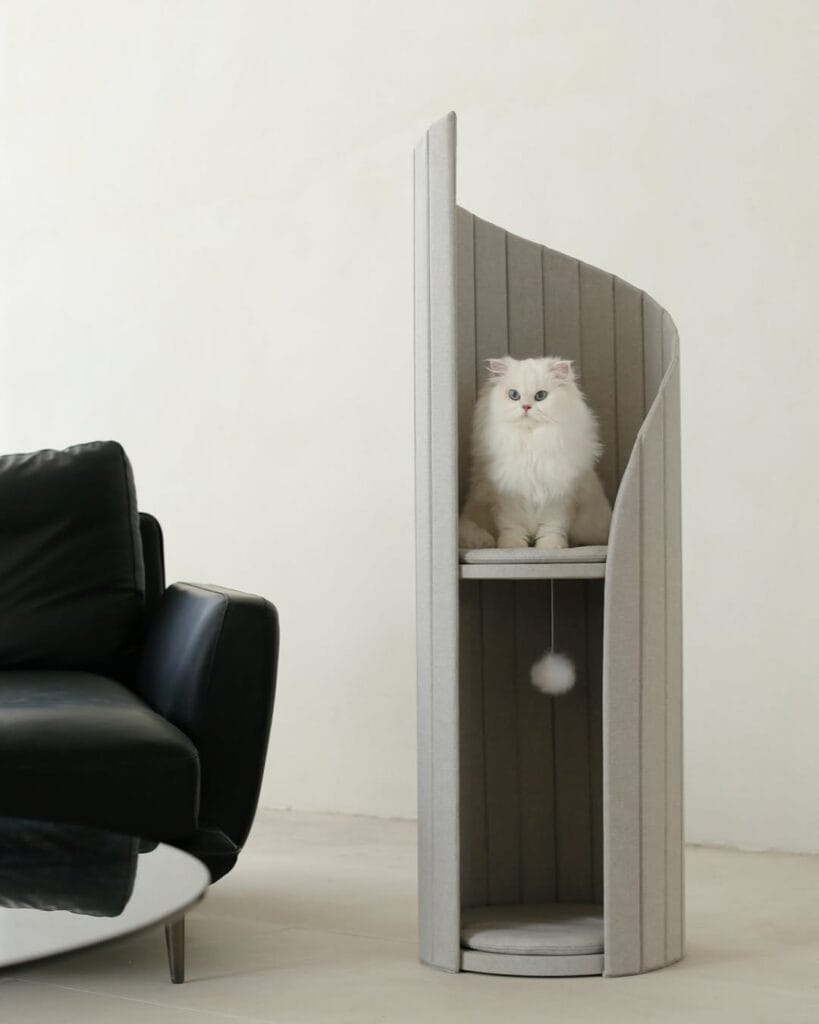
#2: DIY Tall Cat Tower with Curved Felt Walls and a Hidden Den

You know that moment when your golden plops down right in the middle of your living room and you’re like… why does this dog take up so much space? Okay, same energy with cats. My friend’s Ragdoll literally claimed her entire accent chair, and the fur situation was out of control.
Materials & Tools You’ll Need:
– Olive green felt fabric (at least 60″ x 80″ sheet, 6mm thick)
– MDF board cut to 12″ x 12″ for the interior shelf platform
– 3/4″ plywood base panel (14″ x 14″)
– Heavy-duty spray adhesive and wood glue
– Upholstery staple gun with 3/8″ staples
– Small sisal rope ball toy with hanging cord (approx. 8″ drop)
– Circular foam cushion, 10″ diameter, for the den floor
– Jigsaw, measuring tape, sandpaper (120-grit)
Instructions
Start by cutting your plywood base into a D-shaped silhouette — flat edge at the back, curved front. Sand every edge until it’s smooth. This matters more than people think because rough edges shred felt.
Cut your MDF shelf next and position it roughly halfway up the structure, around 24″ from the floor. Secure it with wood glue and let it cure fully before touching anything else.
Now wrap your olive felt around the full tower frame, pulling it taut and stapling along the back seam. The felt curves naturally if you score it lightly with a bone folder first — that’s the trick to getting that smooth, architectural curl at the top.
And here’s where it gets good. Attach the sisal ball toy directly beneath the shelf platform using a small hook screw. The dangling toy keeps cats mentally stimulated, so they actually use the tower instead of your sofa.
Tuck the foam cushion inside the bottom den space. That enclosed lower section gives cats a sheltered hideaway — that cozy, enclosed feeling means your cat retreats there instead of nesting in your clean laundry pile.
The tall silhouette means this tower fits in a corner without eating floor space, which — honestly — is the whole win for a Pinterest-worthy living room.
If your cat loves being up high AND outside, 7 Safe DIY Cat Patio Ideas for Fresh Air pairs perfectly with this build.
Prep Time: 20 min | Active Project Time: 3–4 hours | Difficulty Level: Intermediate
Scoring the felt before bending it prevents cracking along the curve. And if the felt starts lifting near the top seam after a few weeks, a thin line of fabric glue pressed flat under a book overnight fixes it permanently.
📸 Photo credit: Instagram @wildforalberta
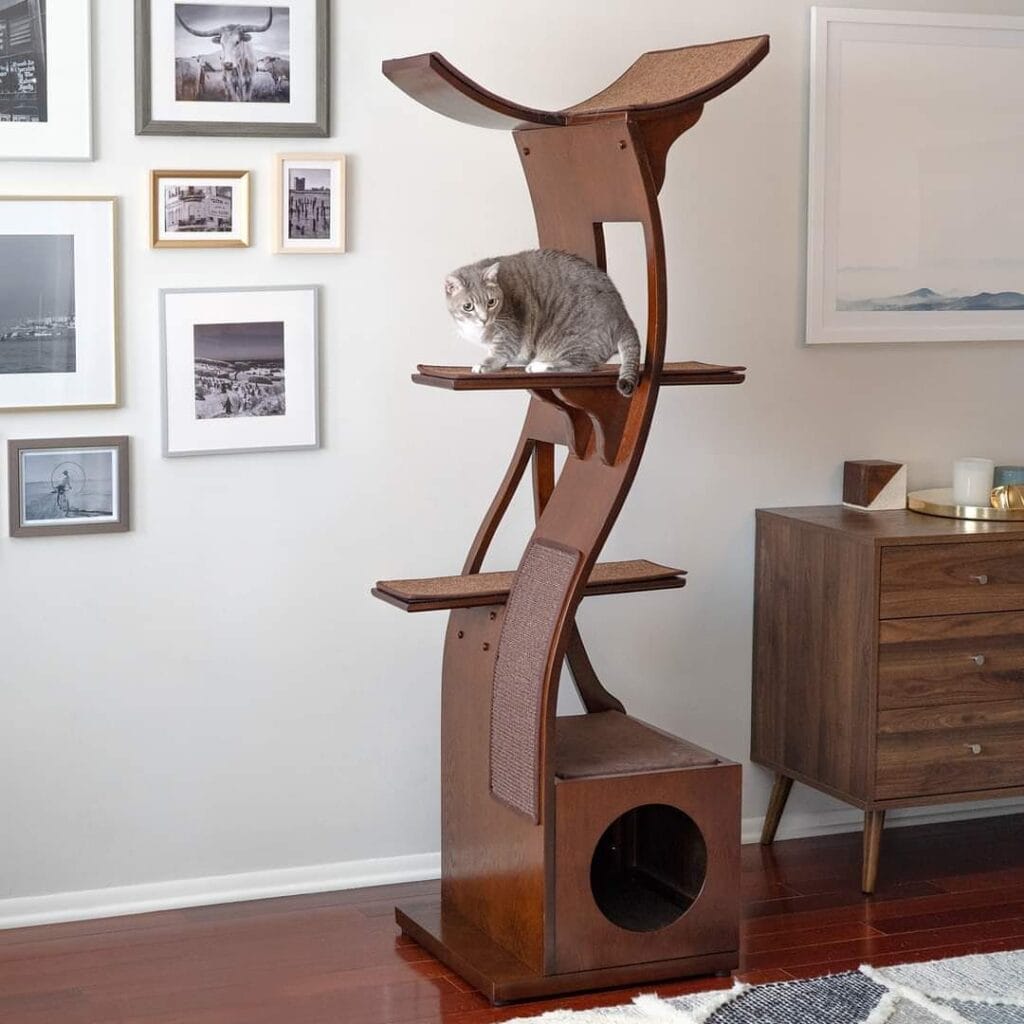
#3: Build a Mid-Century Modern Cat Tower with a Hidden Den
You know that feeling when your golden’s claimed every single piece of furniture in the house? Imagine your cat feeling that comfortable — but in their own spot that actually looks good next to your dresser.
This build is based on a walnut-stained hardwood cat tower with a sculptural S-curve silhouette, and honestly, it looks more like modern art than pet furniture.
Materials & Tools:
– ¾-inch Baltic birch plywood (walnut stain finish)
– Natural sisal rope or jute scratch panel (12″ x 24″)
– Cork or carpet squares (10″ x 14″ per platform)
– Wood glue + 1.5-inch wood screws
– Jigsaw, orbital sander, drill
– Dark walnut wood stain + polyurethane sealant
– 14-inch circular opening template for the den base
Instructions
Cut your base box first — 16″ x 16″ x 14″ cube with a 14-inch circular opening centered on the front panel. This becomes the enclosed den, and cats go wild for that enclosed feeling.
Sand every edge down to 220-grit before assembly. Rough edges catch and splinter, and nobody wants a vet visit derailing a weekend project.
Build the S-curve spine from two curved ¾-inch plywood strips, each 54 inches tall. The curves run opposite directions — one bowing forward at the top, one bowing back at the base — and that tension is what gives the tower its sculptural stability. Bolt both strips through the base box using 3-inch lag screws.
Attach three platforms at staggered heights: 18″, 36″, and 54″ from the floor. Each platform is 14″ x 10″ with cork squares glued on top. Cork grips cat paws without scratching their joints — that grip feature means better landings, which means zero wobble anxiety for older cats.
Mount the sisal panel between the two lowest platforms. Staple it tight with a heavy-duty staple gun so it doesn’t sag under scratch pressure.
Finish the whole piece with two coats of dark walnut stain, let it cure 48 hours, then seal with polyurethane for that furniture-grade look.
My cousin built one of these last spring and told me her cat refused to come down for three days straight. That tracks.
And if you love the idea of giving cats elevated spaces they actually use, 7 Fun DIY Cat Projects Every Owner Needs has more builds worth bookmarking.
Prep Time: 1 hour | Active Project Time: 6–8 hours | Difficulty Level: Intermediate
Let the stain cure in a well-ventilated space — rushing that step is what makes finished wood smell weird for weeks inside your home.
📸 Photo credit: Instagram @refinedfeline
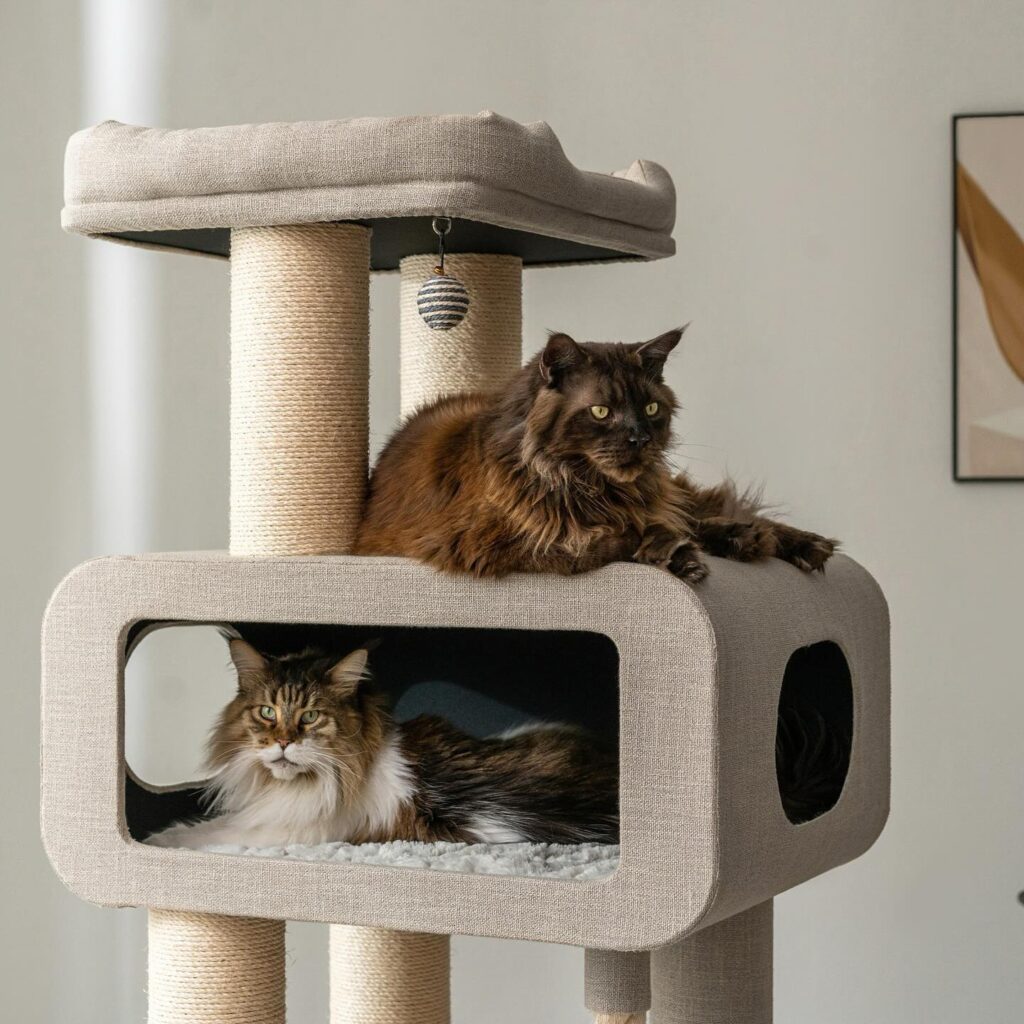
#4: Build a Two-Story Cat Condo with Sisal Posts and a Linen-Wrapped Hideaway Box
Okay so picture this — you’re trying to keep your living room looking like your Pinterest board, but your golden is already chewing the corner of your couch and the cats are wrestling on the side table. Total chaos.
Now look at this build. It’s giving cozy-modern cabin, and your cats will be obsessed.
Materials & Tools:
– ¾-inch plywood (cut to platform sizes)
– Linen fabric in warm beige/oatmeal tone
– Sisal rope (⅜-inch diameter, natural tan)
– 4-inch foam padding for perches
– Faux sherpa fabric for interior base lining
– Wood screws, wood glue, staple gun
– Jigsaw (for cutting the rounded hideaway opening)
– Sandpaper (120-grit and 220-grit)
– Hanging toy ball with striped fabric cord
My aunt built something similar last winter out of scrap plywood and leftover upholstery fabric — honestly looked better than anything at the pet store.
Instructions
Start by cutting your ¾-inch plywood into three pieces: two 18×24-inch platforms and one 24×12-inch base for the hideaway box. Sand every edge with 120-grit first, then follow with 220-grit so the linen fabric sits smooth and doesn’t snag.
For the hideaway box, use your jigsaw to cut a 10×8-inch rounded rectangle opening on the front face and a 6-inch circular hole on the side. Round corners are key — they prevent fabric pulling and look exactly like the image. Then wrap every exterior surface with your beige linen, pulling it taut and stapling it clean to the back edges.
Stack and attach the hideaway box onto the base platform using wood screws driven up from underneath. No visible hardware on the outside. Wrap your 4-inch sisal posts by applying wood glue to the post first, then winding the ⅜-inch sisal rope tight from bottom to top. The sisal scratching surface pulls double duty — it saves your furniture AND gives cats a nail workout they’ll actually use, which means zero claw marks on that sectional you love.
Line the hideaway interior with faux sherpa fabric for that soft, cozy den feel. Add your 4-inch foam pad to the top platform and wrap it in matching linen. Attach the striped hanging toy ball to the underside of the top shelf with a small S-hook.
Real talk: pre-drill all screw holes before final assembly or the plywood will split near the edges — learned that the hard way.
If your cats love elevated hideaways like this, 7 Warm DIY Outdoor Cat Shelter Winter Designs give you solid ideas for extending that same cozy energy outside.
Prep Time: 45 minutes | Active Project Time: 3–4 hours | Difficulty Level: Intermediate
Seal the linen fabric with a light upholstery protector spray once everything is assembled. It repels pet hair and keeps that clean oatmeal color looking fresh for way longer than untreated fabric.
📸 Photo credit: Instagram @petpalsgroupinc
#5: DIY Boho Cat Tree With Wicker Baskets (The One That Looks Like Actual Furniture)
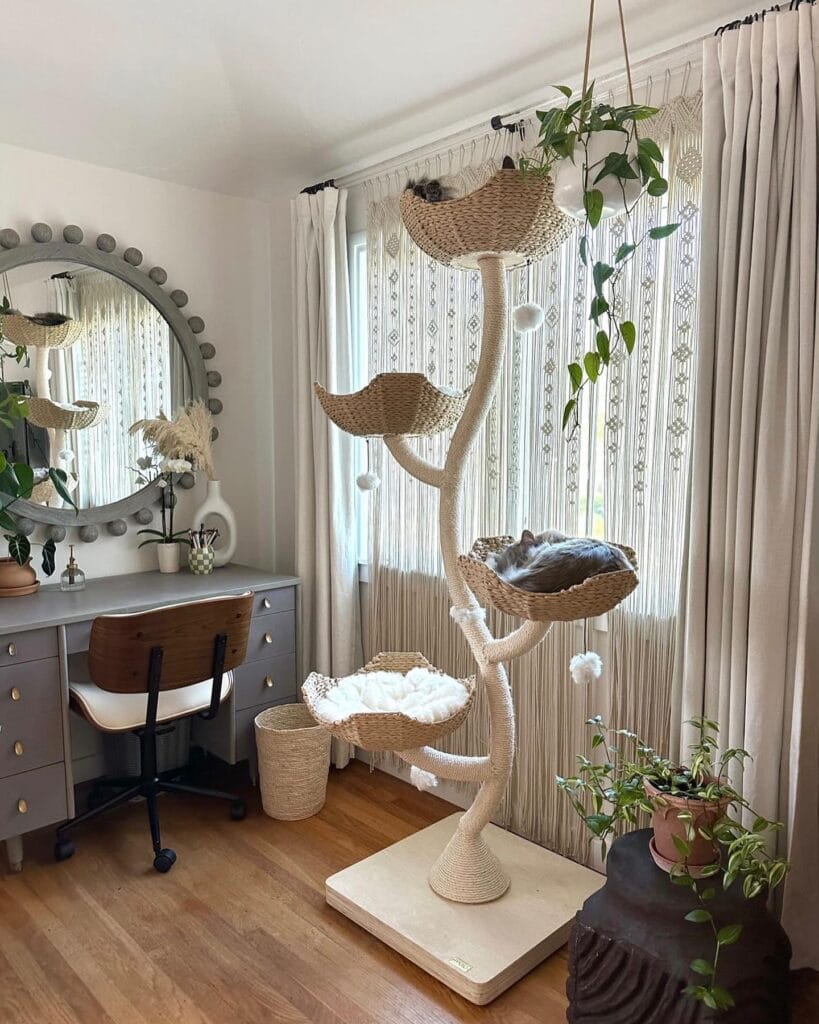
Okay, you know that moment when your golden’s toy basket is literally overflowing onto your freshly styled rug and you’re like… why does the pet stuff always ruin the vibe? Yeah, cat owners feel that too. This cat tree is the answer nobody warned us about.
This piece is stunning. And it actually belongs in a room.
Materials & Tools You’ll Need:
– 1 wooden base board (approximately 24″ x 24″, ¾” thick plywood or MDF)
– 3-4 natural sisal rope spools (⅜” diameter, at least 200 ft total)
– 1 thick PVC pipe or wooden dowel (2″ diameter, 6 ft tall) for the main trunk
– 2-3 smaller dowels (1″ diameter, 12-18″ long) for branches
– 3 wicker/seagrass baskets in graduated sizes (8″, 12″, and 16″ diameter)
– White sherpa or faux fur fabric for basket lining (½ yard per basket)
– Heavy-duty construction adhesive
– Jute twine for decorative wrapping on branches
– Drill with spade bits
– Zip ties (hidden underneath basket rims)
– Sandpaper (medium grit, 120-grit)
– Wood screws (2″ length)
– Small pom-pom balls in white (for dangling toys — grab a pack of 10-12)
Prep Time: 2 hours | Active Project Time: 6-8 hours | Difficulty Level: Intermediate
### Instructions
Start with the base. Sand your plywood smooth and drill a centered hole just wide enough for your main PVC pipe or dowel to sit snug. Apply construction adhesive around the hole, press the trunk in, and let it cure for a full hour before touching anything else. Rushing this step is how the whole thing wobbles later.
Once the trunk is set, wrap it completely in sisal rope. Start at the base and work upward in tight, overlapping coils, using adhesive every few inches to hold the rope flat. The sisal is what makes this look like a real tree trunk — and it doubles as a scratch surface, so your cat gets a claw workout built right into the structure.
Now drill angled holes into the trunk at three different heights — roughly 18″, 36″, and 54″ from the base. Insert your smaller branch dowels at slight upward angles (around 15 degrees), secure with screws from the back, and wrap those branches in jute twine for that organic, branchy texture you see in the photo.
Attach the baskets by drilling two small holes through each basket’s rim, threading zip ties through, and looping them around the branches. Hide the zip ties under a little extra jute twine wrap. The 16″ basket goes lowest, 12″ in the middle, and the 8″ basket nestles near the top.
Line each basket with your sherpa fabric, cut to fit and tucked over the rim like a little nest. The plush lining keeps the wicker from poking your cat — which means they’ll actually use the baskets instead of your couch cushions.
Hang a few white pom-poms from the branches with thin jute loops. It adds that playful detail you see in the photo and gives cats something to bat at while they’re climbing.
Common mistake: skipping weight-testing before you let your cat near it. Load each basket with something heavy (a bag of flour works) and leave it for 30 minutes. If anything shifts, re-secure before your cat discovers it.
The natural seagrass and sisal tones make this piece look like intentional decor — it genuinely blends with a boho or earthy room instead of screaming “pet furniture.” Place it near a window with a macramé panel behind it and a trailing pothos nearby, and it becomes a whole moment. For more ideas along these lines, 7 Creative DIY Cat Crafts for Pet Lovers has some really good companion projects worth pairing with this one.
Seal the wooden base with a matte wood finish to protect against scratching and spills. It’ll last so much longer, and it keeps that clean, natural look intact.
📸 Photo credit: Instagram @mau.pets
#6: Wall-Mounted Cat Shelf with Faux Fur Cushion
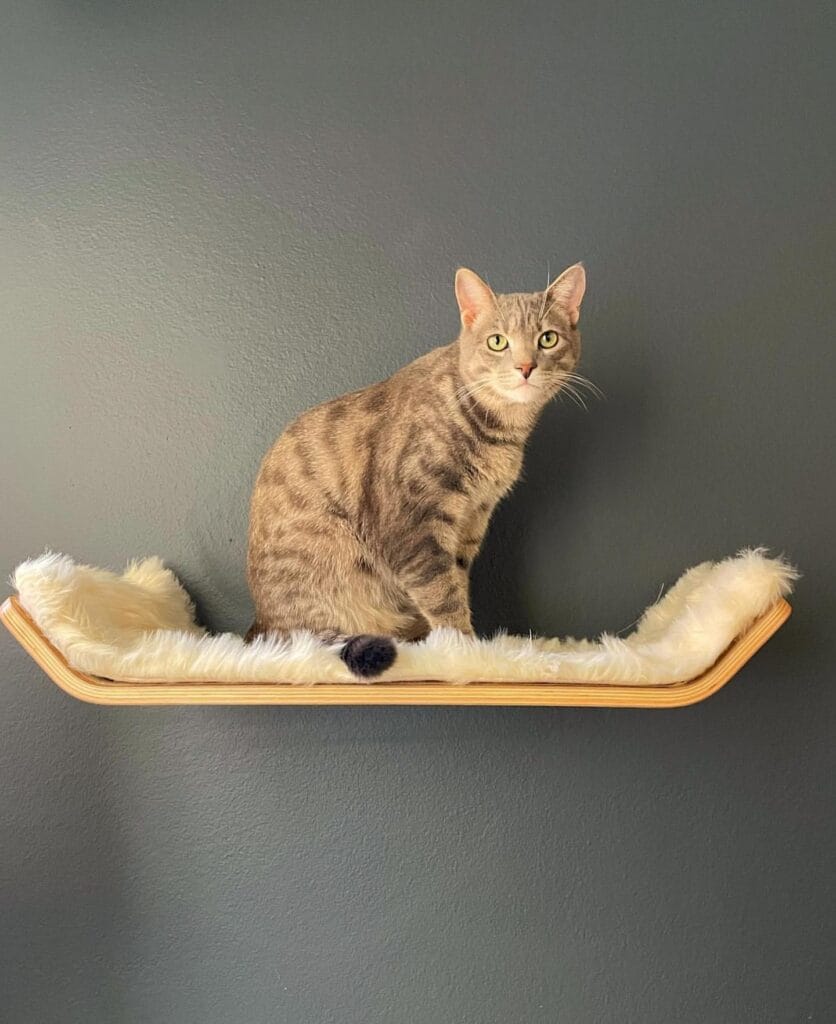
Okay so picture this — your golden is sprawled across the couch, tail wagging, taking up every single inch of space. And your cat? Nowhere near that chaos. That’s the dream, honestly.
A floating wall shelf gives your cat their own territory, up high and away from all that dog energy below.
Materials & Tools:
– 3/4-inch Baltic birch plywood (cut to 24 x 8 inches)
– Faux sheepskin fabric (cream/ivory, cut to 26 x 10 inches)
– Bent plywood edge trim (natural wood finish, 1.5 inches wide)
– Wood glue + staple gun
– 2 heavy-duty L-brackets (rated for 50+ lbs)
– Sandpaper (120 grit then 220 grit)
– Stud finder + drill
Instructions
Sand your plywood smooth, working from 120 grit down to 220 grit until the surface feels like glass. Wrap your faux sheepskin over the board, pulling it taut underneath, then staple every 2 inches along the edges — loose fabric bunches under cat weight and they hate that.
Glue your bent edge trim around the perimeter. This trim curves slightly upward on each end, which creates a cradle shape that keeps your cat from rolling off during deep naps.
Find your wall studs, then mount both L-brackets exactly 16 inches apart. Set the shelf at 4 to 5 feet high — high enough that your golden retriever can’t nose around up there.
The wall-mount design keeps the floor completely clear, which means zero obstacles for your dog and a personal sanctuary your cat will actually use.
For 7 Active Indoor DIY Cat Playground Setups, this shelf pairs perfectly as a landing platform in a bigger wall system.
Prep Time: 20 min | Active Project Time: 1.5 hours | Difficulty Level: Beginner-Intermediate
Swap ivory faux fur for charcoal if your walls run dark — the contrast photographs beautifully and cat hair blends right in.
📸 Photo credit: Instagram @tuftandpaw
#7: Build a Multi-Level Cat Tree With a Hidden Hideaway Box

Your golden is sprawled across the couch, tail wagging, zero personal space left for you — and somewhere in the chaos, your cat has claimed the armrest again. This DIY cat tree gives your feline her own kingdom, so the couch is yours again.
I built something similar last spring and honestly, my whole living room felt more pulled-together after. It stopped looking like a pet store exploded in my house.
Materials & Tools:
– ¾-inch Baltic birch plywood (for the base, platforms, and hideaway box)
– Two 4-inch diameter sisal rope posts (wrap with ⅜-inch natural sisal rope)
– Upholstery foam + neutral linen fabric (for the top cushion)
– Wood stain in warm walnut tone
– Wood glue + wood screws (1.5-inch)
– Jigsaw, drill, sandpaper (120-grit then 220-grit)
Instructions
Cut your plywood into three platforms: a 14×14-inch base-level perch, a 10-inch round mid-level step, and a 20×12-inch top platform. Sand every edge twice — rough first, then smooth.
Build the hideaway box at 12x12x12 inches. Cut the cat-face entrance opening using a jigsaw — trace a rounded head shape with two small ear cutouts at the top. That detail makes it.
Wrap your sisal posts before mounting. Start at the base, pull the rope tight, and use a dab of wood glue every few inches to lock it. Sisal scratching posts redirect claw damage away from your furniture — which means your sofa survives, and your cat stays entertained for hours.
Stack the platforms using the posts as structural columns, drilling through each platform layer from underneath. Stain everything before final assembly for cleaner coverage.
Top it with the foam cushion wrapped in linen. The neutral tone blends into a Pinterest-worthy living room without screaming “pet furniture.”
Cut a small gap in the mid-level platform edge so it hugs one post — that asymmetrical step look matches the image and adds climbing variety.
Prep Time: 30 min | Active Project Time: 4–5 hours | Difficulty Level: Intermediate
📸 Photo credit: Instagram @woodspiritpaws
The One Material Swap That Makes DIY Cat Furniture Actually Last
Okay, real talk — I learned this the hard way after spending a whole weekend building a cat tree that fell apart in three months.
Sisal rope is not all the same. Most people grab the cheapest roll at the hardware store, and that’s exactly where the project dies. You want natural sisal, not the polypropylene stuff that looks identical but smells synthetic to cats. Your golden girl probably has a sensitive nose — cats are even more particular. They’ll flat-out ignore scratching posts wrapped in fake fiber.
Here’s the pro secret nobody mentions: pre-soak your natural sisal in water before wrapping it. It tightens as it dries, which means zero unraveling at the edges six weeks later.
One thing to remember: the base weight is everything. A wobbly cat tree sends cats straight back to your linen sofa. Use solid plywood at minimum ¾ inch thick — not MDF, which crumbles the second it absorbs any moisture.
That one swap alone saves you from rebuilding the whole thing before spring.
Your Golden Deserves a Clean Home Too
Pick one mat. Just one. Set it by the door where the mud hits first, and see what happens after a week.
Honestly? That one small swap changed everything for me. No more crunchy floors, no more that wet-dog smell greeting every guest.
Your home can still look like your Pinterest board — even with a golden retriever living his best messy life in it. These mats do the dirty work so you don’t have to. And if you’re already on a roll, DIY elevated dog beds are chef’s kiss for keeping floors even cleaner.
Which mat style fits your space best — neutral tones or something bold?

Amr Mohsen is a software engineer who traded his keyboard for a leash — at least on weekends. His love for dogs inspired him to share what he learns as a dog owner and enthusiast, bringing a detail-oriented, research-driven perspective to every article he writes. If it’s about dogs, he’s probably already looked it up twice.

