Your cat is absolutely wrecking your home — and you know it.
Knocked-over plants, scratched-up furniture, that one shelf he cleared again at 3am. Girl, I’ve been there. My cat Mochi once pulled an entire curtain rod down mid-Zoom call. It was a whole thing.
And here’s what nobody tells you — a bored cat is a destructive cat. The clawing, the zoomies, the chaos? That’s him screaming “I need something to DO.”
But buying a bulky, ugly cat tower feels wrong when you’ve worked so hard on your home aesthetic.
Real talk: a cat playground indoor DIY setup can look stunning AND actually tire your cat out.
These 7 setups give him a space he’ll obsess over — and give your walls, couch, and sanity a serious break.
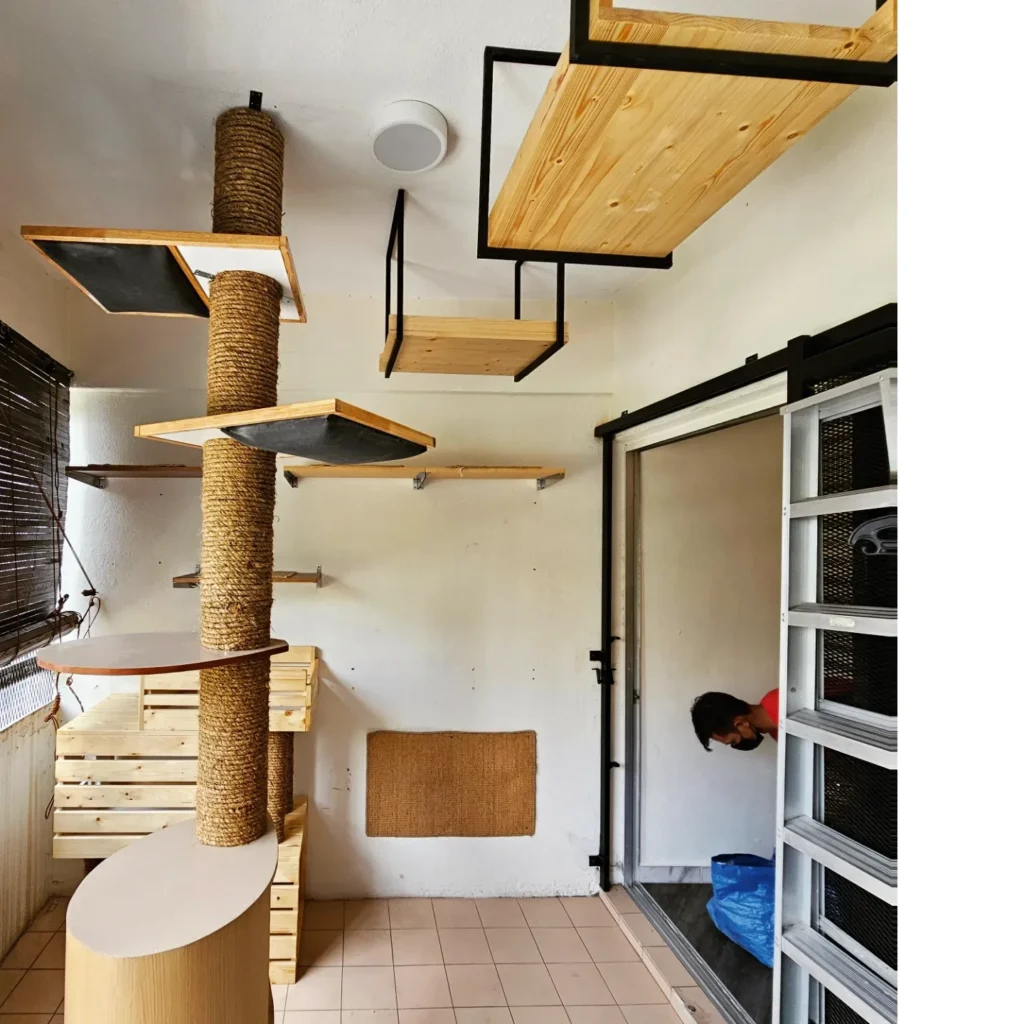
#1: Floor-to-Ceiling Rope Tower with Suspended Ceiling Platforms
You know that moment when your golden retriever finally has a space that’s just theirs — and you catch yourself thinking, “okay, this actually looks good in my house”? That’s the vibe this build gives off, but for your cat.
This setup is exactly what I built for my own cats last spring, and honestly, I couldn’t stop staring at it when it was done.
Materials & Tools:
– 4-inch diameter sisal rope post (floor-to-ceiling, 8–9 ft)
– ¾-inch pine boards cut into 16×16-inch platforms
– 1-inch black steel square tubing for ceiling-mounted frames
– Jute fabric or coir mat scraps for platform surface texture
– Wood crates (natural pine finish) for mid-level resting spots
– Circular saw, drill, M8 bolts, wood stain (natural oak tone), strong construction adhesive
– Ceiling anchors rated for 50+ lbs
Instructions
Start by locating your ceiling joists — this whole structure hangs from them, so don’t skip this step. Drill your black steel frames directly into the joists using M8 bolts, spacing the suspended platforms at 12-inch vertical intervals so cats can jump between them without strain.
Cut your pine boards to size, then wrap the edges with jute fabric using construction adhesive. That rough texture gives cats grip and a subtle scratch surface — the feature that keeps their claws off your sofa, which means your couch actually survives the year.
And the rope post? Start wrapping at the base, pulling the sisal tight with each loop. Secure every 12 inches with a hidden staple gun tack behind the rope. The tension is what makes it last.
Stack the pine crates at mid-height to create a little landing zone between the lower shelves and the ceiling platforms. It breaks up the vertical climb and gives your cat a spot to just… sit and judge you.
Sand all wood edges before assembly. Cats rub their faces on everything, and splinters are not the vibe.
📸 Photo credit: Instagram @asraf_palleture
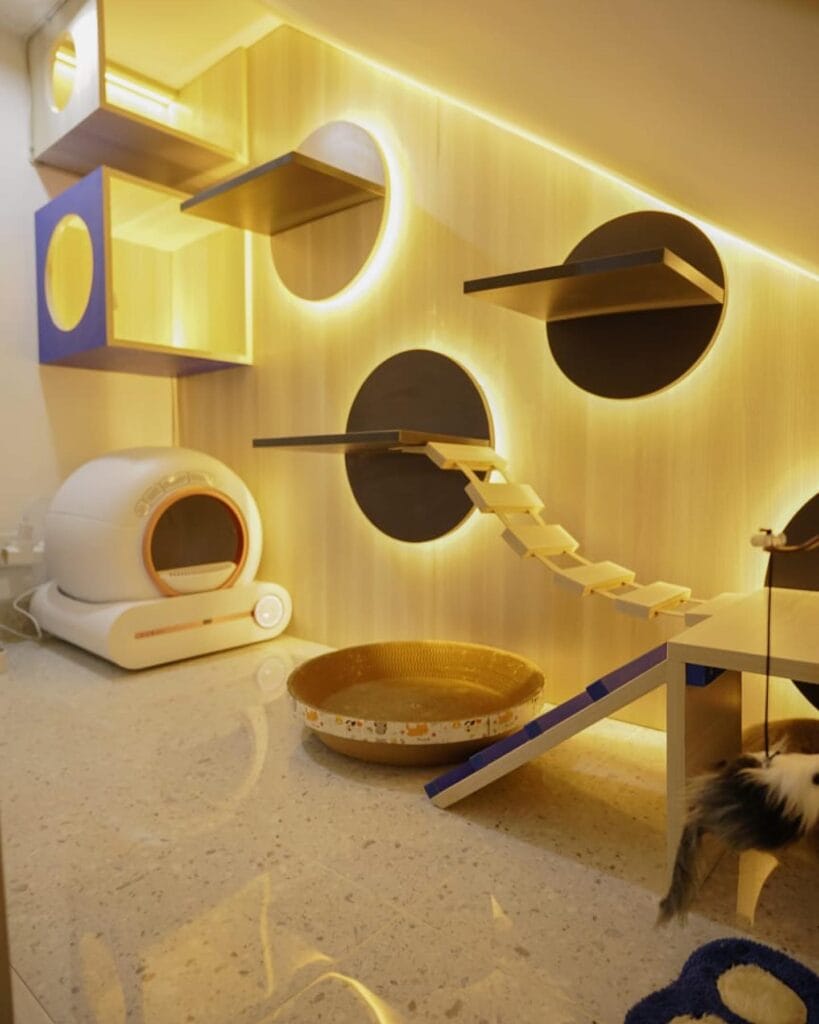
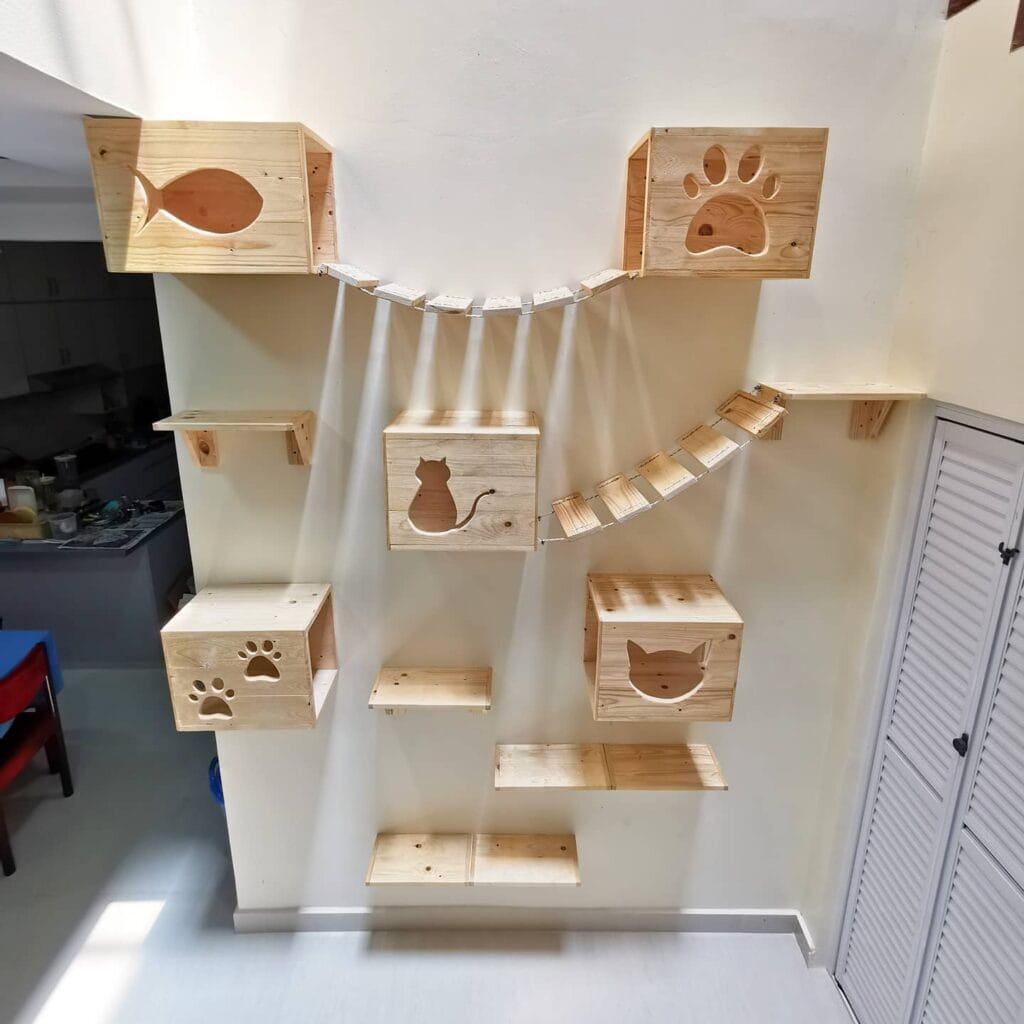
#2: Wall-Mounted Cat Playground with Bridges and Cubby Houses
You know that feeling when your golden does that full-body excitement spin and knocks over everything within a three-foot radius? That’s my dog every single time she sees a cat calmly sitting three feet above her head. Cats just own their space in a way that honestly makes me a little jealous for them.
This wall-mounted cat playground is everything. We’re talking natural pine wood box houses, rope-and-slat suspension bridges, flat climbing shelves, and laser-cut silhouette cutouts (a fish, a paw print, a full cat shape) that double as entry holes into each cubby.
Materials & Tools
– 1×6 and 1×8 pine boards (for shelves and box frames)
– Jigsaw (for cutting the silhouette entry holes)
– Heavy-duty wall anchors and L-brackets
– Metal chain or rope + wooden slats for suspension bridges
– Wood screws, sandpaper (120-grit then 220-grit)
– Drill, level, pencil for wall marking
Instructions
Start by mapping your wall layout with a pencil and level — placement matters more than anything here. Cut your pine boards into box shapes: four sides plus a top, leaving the front open. Then trace your cutout shape (cat face, fish, paw) onto the front panel and cut it with a jigsaw.
Sand every edge with 120-grit first, then finish with 220-grit so your cat’s paws never catch a splinter. Mount your L-brackets directly into wall studs — not just drywall. This keeps everything secure under a jumping cat’s full weight.
Build the suspension bridges last by drilling evenly spaced holes through wooden slats and threading metal chain or rope through each end. The bridges connect the upper box houses, which means your cat gets a route across the entire wall — the traversal path keeps their joints active and their mind engaged.
Stagger your flat shelves in a climbing zigzag pattern from floor to ceiling height so your cat has a clear step-by-step route up. And don’t skip the lower shelves — those bottom steps are how they get started.
For more wooden build inspiration, 17 Wooden Cat House Ideas for Indoors and Outdoors shows some gorgeous variations on this exact style.
Prep Time: 1 hour | Active Project Time: 6–8 hours | Difficulty Level: Intermediate
Leave a 1–2 inch gap between each wall box and the wall itself when mounting — it lets air circulate inside the cubbies so they stay fresh and your cat actually wants to sleep in there.
📸 Photo credit: Instagram @sksz311
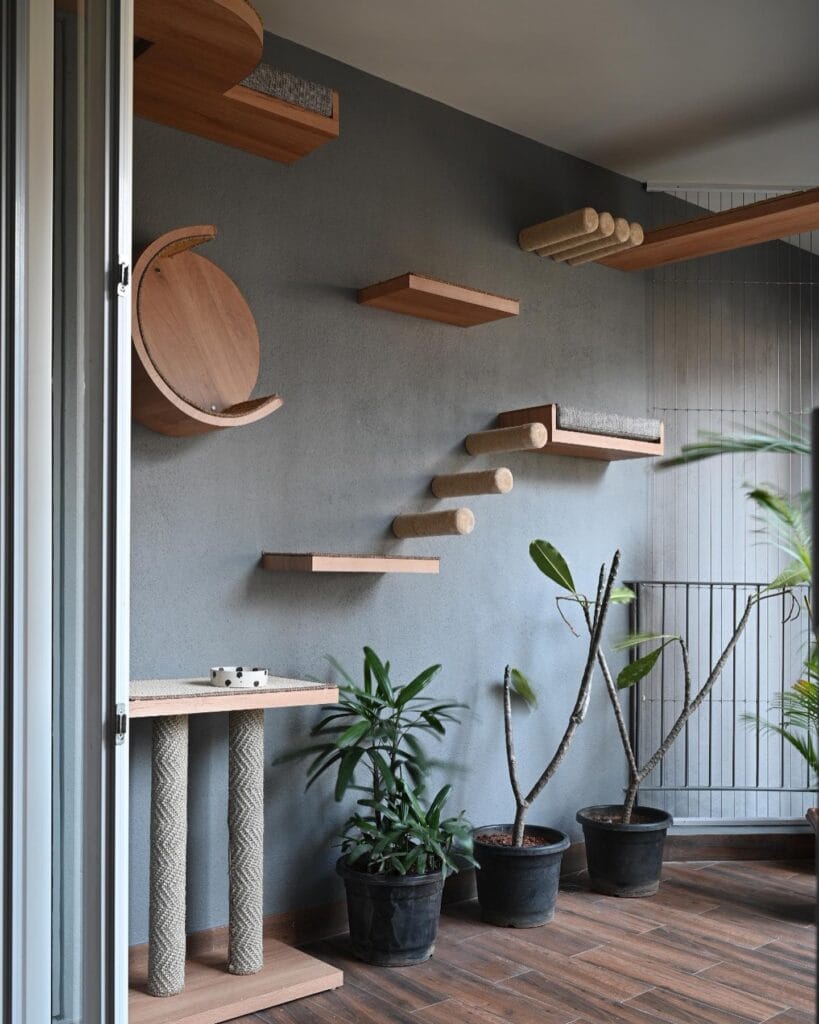
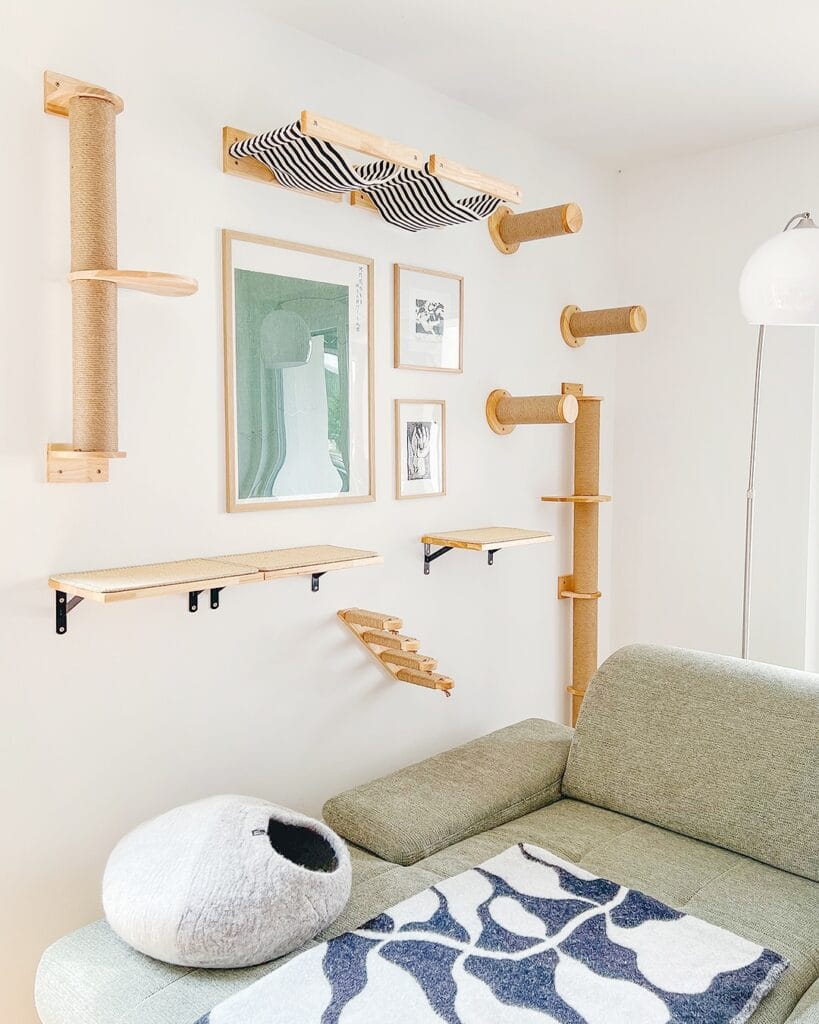
#3: Wall-Mounted Cat Playground With Hammock, Scratching Posts & Climbing Shelves
Okay so you know that moment when your golden does a full zoomie lap around the living room and knocks into literally everything? Cats have that same chaotic energy — they just take it vertical.
And that’s exactly what this wall setup solves.
Materials & Tools You’ll Need:
– Natural jute rope (at least 50 feet)
– Pine wood dowels — 1.5-inch diameter, cut to 6-inch lengths for the horizontal grips
– Pine shelves — 24 x 8 inches with black iron L-brackets
– Rattan/woven mat cut to shelf size for grip surface
– Black-and-white striped canvas fabric — 36 x 16 inches for the hammock
– Vertical scratching post base — 48-inch pine post wrapped in jute
– Drill, screws (2.5-inch wood screws), stud finder, sandpaper (120-grit)
Prep Time: 1 hour | Active Project Time: 3-4 hours | Difficulty Level: Intermediate
Instructions
Start with your stud finder — this whole system lives on your wall, so hitting studs isn’t optional. Map out your layout on paper first. I actually taped paper cutouts to my wall before drilling anything, which saved me from three bad decisions I was about to make.
Mount the 48-inch vertical jute post in the upper-left corner first. Wrap the jute tight from base to top, securing each layer with a dab of wood glue before wrapping the next. The tension is what makes it last — loose wrapping unravels in a week.
Next, install the horizontal dowel grips at staggered heights across the right side of the wall. Each 6-inch dowel gets its own circular pine disc mount, screwed flush to the wall. Sand the disc edges to 120-grit so the wood feels smooth under paw pads.
The hammock rail mounts near the ceiling. Screw two 24-inch pine rails into studs, spaced 14 inches apart, then tie your striped canvas to the rails using 1/4-inch jute cord at four points. The fabric sags naturally — that hammock shape happens on its own, which is honestly the most satisfying part.
Mount your rattan-covered shelves at three different heights to create the climbing path. The rattan surface gives cats grip without scratching the wood — rattan shelf + secure bracket mount + confident jumping means your cat actually uses it instead of avoiding it.
The staggered pine step planks near the bottom (angled slightly upward at 15 degrees) act as the entry ramp. Wrap each one in a single layer of jute for traction.
If you love this kind of vertical thinking, 7 Creative DIY Cat Tower Plans for Playing has some wild floor-to-ceiling builds worth seeing.
Leave 8-10 inches of space between each element so your cat can actually turn around mid-climb. Cats hate feeling trapped on a route — spacing is what makes them explore the whole wall instead of just the lowest shelf.
📸 Photo credit: Instagram @fukumaru_ins
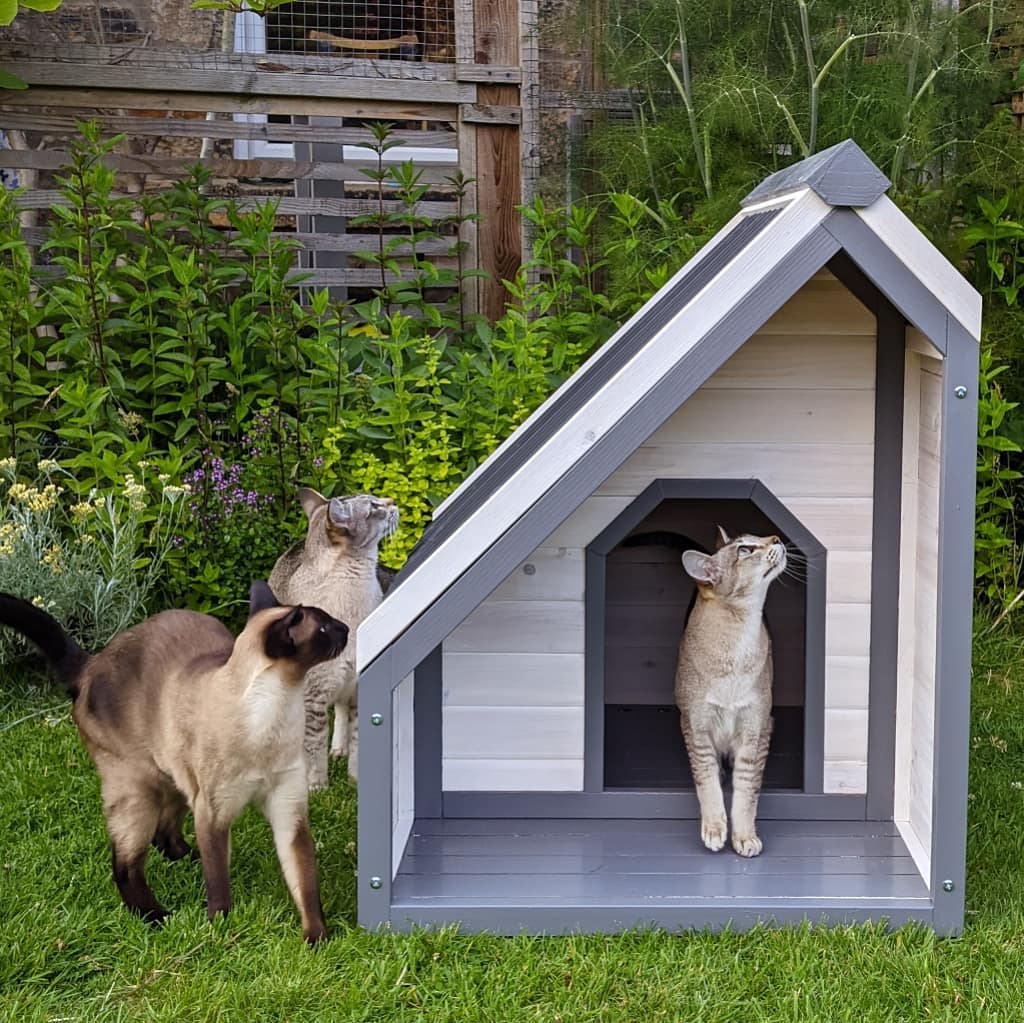
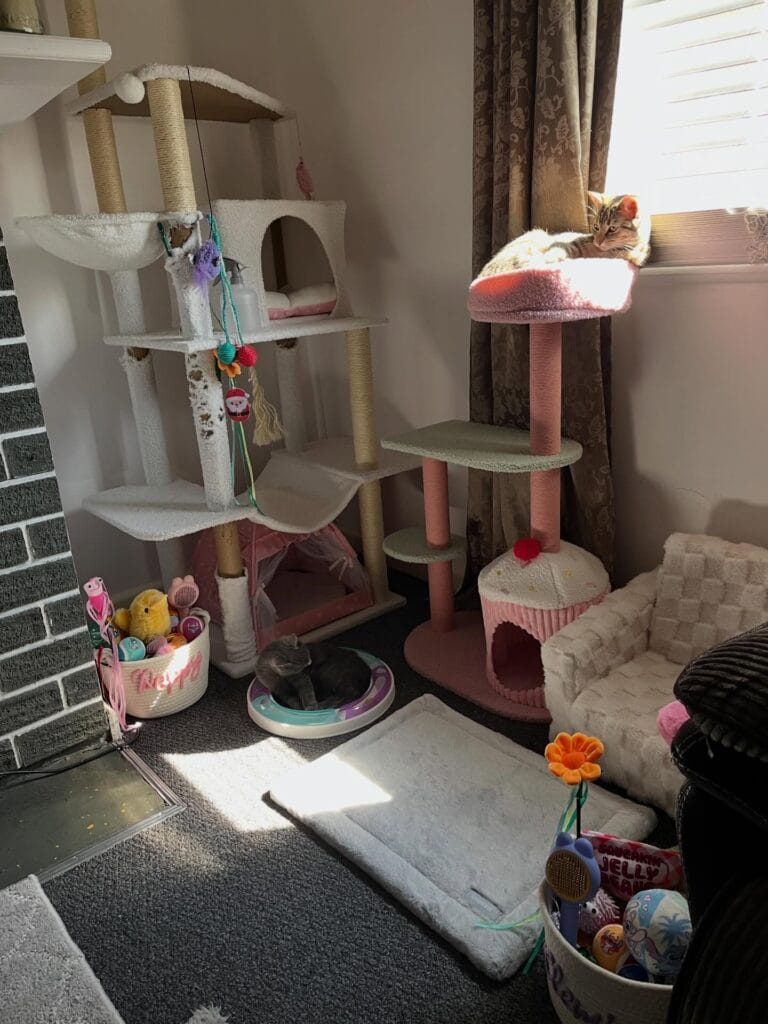
#4: Build a Multi-Tower Cat Playground Corner (Pink & White Dream Setup)
Okay, so you know that corner of your living room where your golden just claims the whole space — toys everywhere, fur on everything, zero organization? Cats do the exact same thing, except vertical.
This setup from the image is giving me all the inspiration. We’re talking two full-size cat trees (one white plush, one pink scraped-post tower), a cupcake-shaped cat condo, a pink canvas teepee bed, a flat fleece mat, a spinning track toy, and two toy baskets — all styled into one corner.
Materials & Tools
– White multi-platform cat tree (min. 60″ tall, plush-covered platforms, sisal scratching posts)
– Pink 4-tier cat tower with cupcake-shaped base condo (plush-lined)
– Small pink canvas teepee pet tent
– Round spinning ball track toy (teal/purple colorway)
– Two fabric storage baskets (personalized or plain)
– Grey fleece floor mat (approx. 24″ x 36″)
– Hanging toy attachments (pom balls, ribbons, wand toys)
– Corner wall anchors + screws (for tree stability)
– Drill, measuring tape, level
Instructions
Start by clearing your corner completely — measure the wall space so you know exactly what fits. You want at least 36 inches width per tree so cats can move between them without jumping blind.
Assemble your white plush tree first since it’s the tallest anchor piece. Follow the included instructions but hand-tighten every bolt before you fully lock them down — this prevents warping the platforms mid-build. Once it’s standing, press it snug into the corner wall and drill your anchor bracket 6 inches below the top platform into a stud. A wobbly tree will get ignored.
Next, build your pink tower with the cupcake condo base. Position it about 8–10 inches from the white tree — close enough that a cat can step between perches, far enough that the teepee tucks underneath. Anchor this one too.
Slide the pink teepee into the gap between the two trees at floor level. It fills dead space and gives shy cats a hide spot. Real talk: nervous cats use low enclosed beds way more than open perches early on.
Place the spinning track toy directly in front of the setup on the floor — not tucked away. Cats discover it mid-play session and it keeps the energy in that one corner.
Lay the grey fleece mat in front of everything as a soft landing zone, then arrange both toy baskets on either side of the white tree base. Hang the wand toys and ribbon danglers from the white tree’s top bar using the included hooks.
The best part: multi-level setups like this give cats vertical territory, which reduces anxiety and scratching on your actual furniture — that’s the real payoff.
Keep the floor mat machine washable — swap it weekly. And rotate the hanging toys monthly so cats don’t lose interest in the whole corner.
Prep Time: 20 min | Active Project Time: 2–3 hours | Difficulty Level: Moderate
📸 Photo credit: Instagram @poppyandclementine_
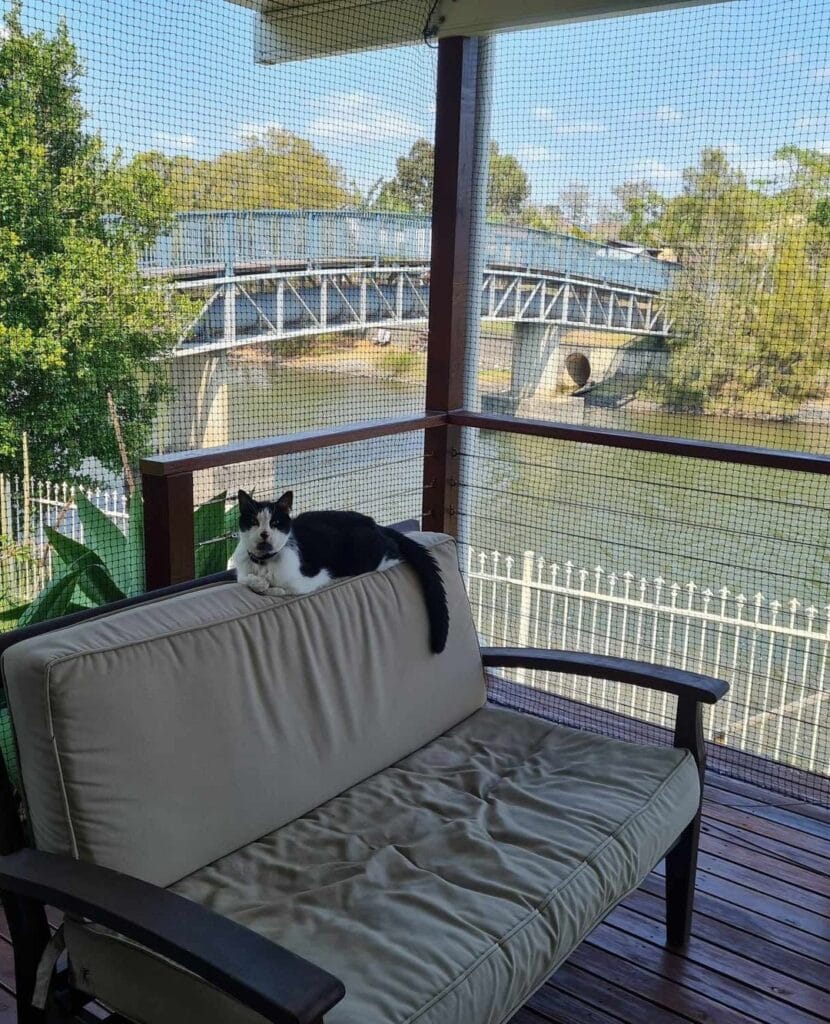
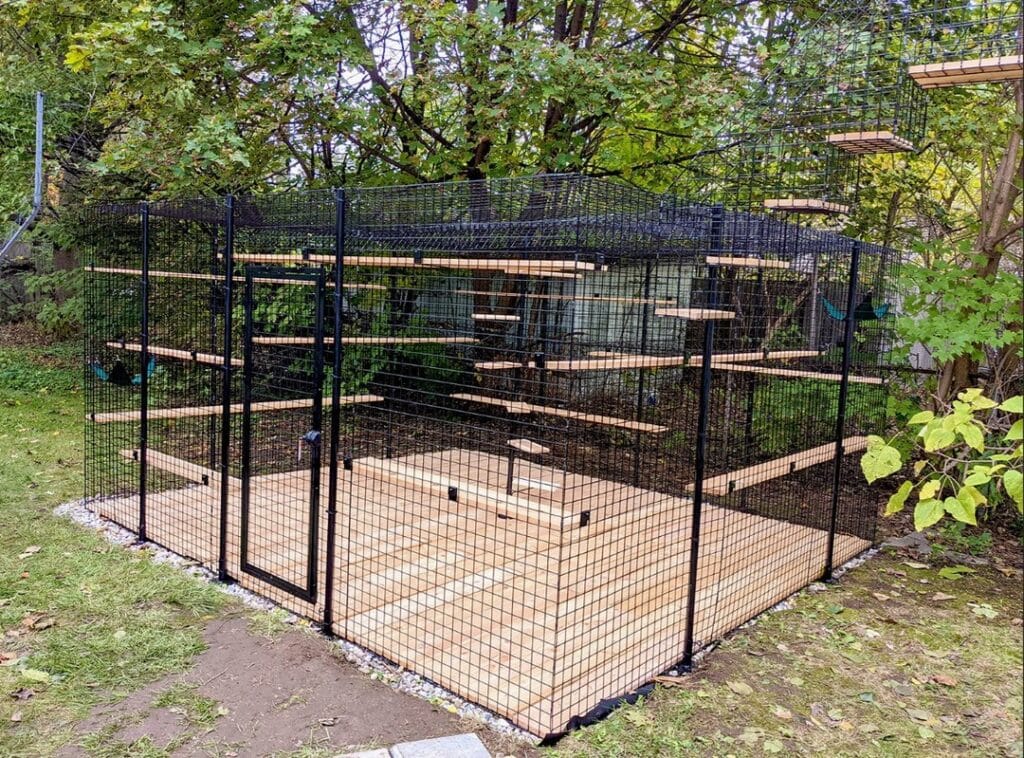
#5: Build a Backyard Catio With Multi-Level Platforms (The One Your Cat Will Actually Use)
Okay so picture this — you finally let your golden retriever, Biscuit, out into the yard, and within seconds he’s nose-deep in whatever corner of the fence your cat was just sitting in. Your cat? Nowhere to be found. Hiding under the bed again.
That’s exactly the kind of chaos this catio solves.
This outdoor enclosure uses black powder-coated steel welded wire mesh panels stretched over a steel tube frame — the same setup you see in the image. The floor is covered in natural cedar deck boards cut to fit the interior, and the whole structure sits on a gravel border perimeter to keep drainage clean.
Materials & Tools
– Welded wire mesh panels (4″x4″ grid, black powder-coated)
– 1.5″ square steel tube posts (cut to your desired height — image shows approx. 7 ft tall)
– Cedar 2×6 boards for platforms (image shows 6-8 shelves at staggered heights)
– Metal shelf brackets
– Steel gate with a latch
– Gravel (for perimeter border)
– Concrete anchors
– Drill, wire cutters, level, measuring tape
Instructions
Start by marking your corners and digging 4-inch post holes at each corner and every 4 feet along the perimeter. Pour quick-set concrete into each hole, drop your steel posts in, and let them cure for at least 24 hours before touching anything else.
Once your posts are solid, attach the mesh panels to the frame using wire ties or panel clips — work from the bottom up so the tension stays even. The floor panel goes down first, before the walls go up. This is the part people skip and then regret.
And here’s where the fun part starts. Cut your cedar planks to your platform dimensions — the image shows shelves ranging from about 12 inches to 24 inches wide, mounted at heights of roughly 2 ft, 3.5 ft, and 5.5 ft off the ground. Stagger them so your cat can hop up without needing a running start.
Bolt your metal shelf brackets directly into the steel frame posts. Cedar is lightweight enough that two brackets per shelf holds perfectly — cedar’s natural resistance to moisture means these platforms last through multiple seasons without warping.
But the top level is where this catio really shines. The image shows a full rooftop platform sitting above the mesh ceiling — essentially a catio penthouse. Use the same cedar boards, secure them to the top frame, and leave a small gap between boards for drainage.
Install your steel gate on one side with a spring latch (so it closes behind you and Biscuit can’t nudge it open — yes, that’s a real concern).
Finish by laying pea gravel around the base perimeter to lock in the posts and prevent water pooling.
The enclosed structure keeps cats protected from predators, the staggered platforms give them real vertical climbing territory, and the cedar floor means no muddy paws tracking back into your house — which, honestly, is the payoff we’re all here for.
If your cat loves lounging as much as climbing, pairing this catio with some 7 Relaxing DIY Cat Hammock Projects for Lounging inside the enclosure takes it to a whole other level.
Prep Time: 1 hour | Active Project Time: 2 full weekends | Difficulty Level: Intermediate
Use zinc-coated hardware on anything touching the cedar — regular screws will leave rust stains on the wood within one season. And if you’re in a region with cold winters, store the cedar platforms indoors during the off-season to keep them from cracking.
📸 Photo credit: Instagram @habitathavenus
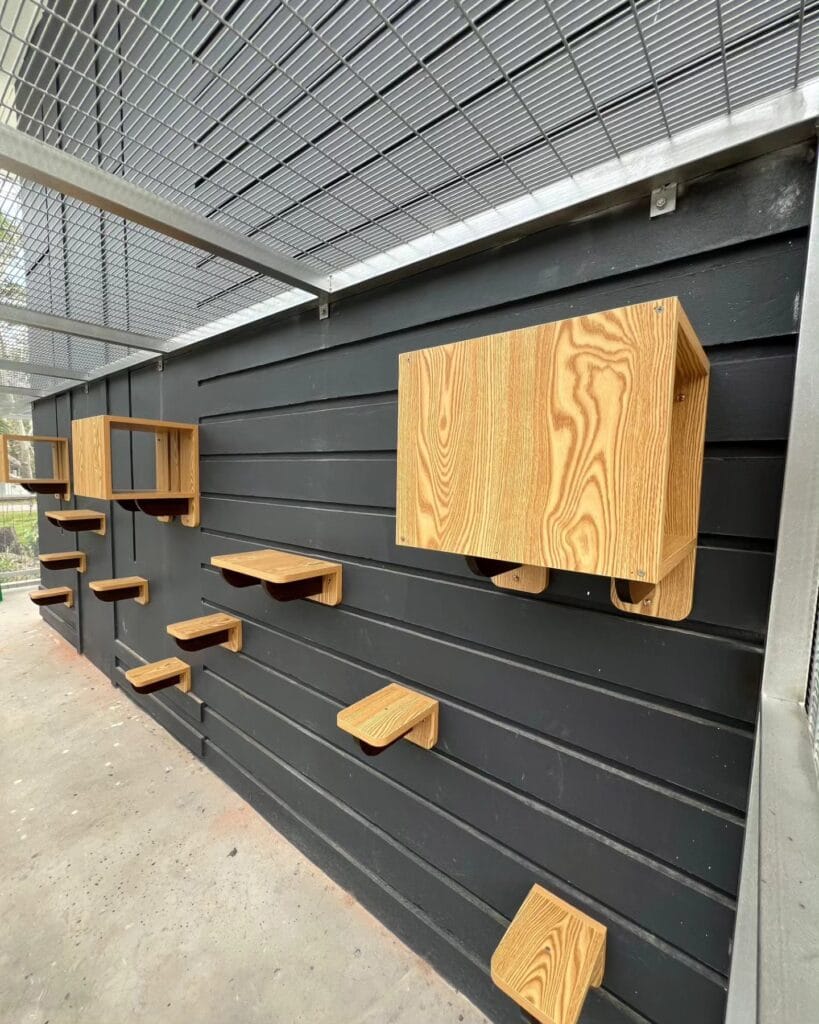
#6: Wall-Mounted Cat Shelves & Hideaway Box — The Catio Climbing Wall Your Cat Will Actually Use
So you know that moment when your golden just has to be in the middle of everything — on the couch, under your feet, on your laptop? Cats are the opposite. They want a whole vertical world to rule from above, and honestly, this setup gives them exactly that.
This is a dark-painted slatted wood catio wall with natural ash or pine wood shelves and a closed hideaway box — all wall-mounted inside a wire-ceiling enclosure. The shelves are staggered at different heights to create a climbing path, and the box gives cats a den-like retreat.
Materials & Tools:
– 1×6 pine or ash boards (for shelves and box panels)
– Dark exterior paint (charcoal/black) for the back wall
– Heavy-duty L-brackets (at least 3-inch steel brackets per shelf)
– Wood screws (1.5-inch and 2.5-inch)
– Drill, circular saw, sandpaper (120-grit)
– Wood finish or sealant (clear matte)
– Stud finder
Instructions
Sand every board before mounting — rough edges mean scratched paws. Paint your back wall two coats of charcoal first and let it cure fully before drilling anything.
Cut your shelf pieces to 10–12 inches wide and 14 inches deep. These dimensions matter because a shelf too narrow gives cats zero confidence landing on it. Wider shelf means secure footing, which means your cat actually uses it instead of ignoring it for the floor.
Mount your lowest shelf 18 inches from the ground, then stagger each shelf 12–16 inches higher and 8–10 inches to the side, alternating left and right up the wall. This zigzag pattern encourages natural climbing behavior.
For the hideaway box, build a three-sided cube — roughly 14×14×10 inches — with the open side facing out. Attach it high on the wall using two 3-inch L-brackets screwed into studs. My cousin built one of these for her rescue cats last spring and said they claimed it within an hour of installation.
And honestly? Leave the natural wood finish unsealed on the top surfaces. Cats prefer the grip of raw wood over slippery sealed surfaces — especially older cats with less confident jumps.
A second box lower on the wall creates a mid-point rest stop, which helps senior cats or kittens join the fun without needing to leap the full height in one go.
Make sure every bracket hits a wall stud. I learned this the hard way watching a shelf pop off a drywall anchor mid-project — not fun, and definitely not safe for a curious cat above it.
Prep Time: 30 min | Active Project Time: 3–4 hours | Difficulty Level: Intermediate
📸 Photo credit: Instagram @rr_catiosmith
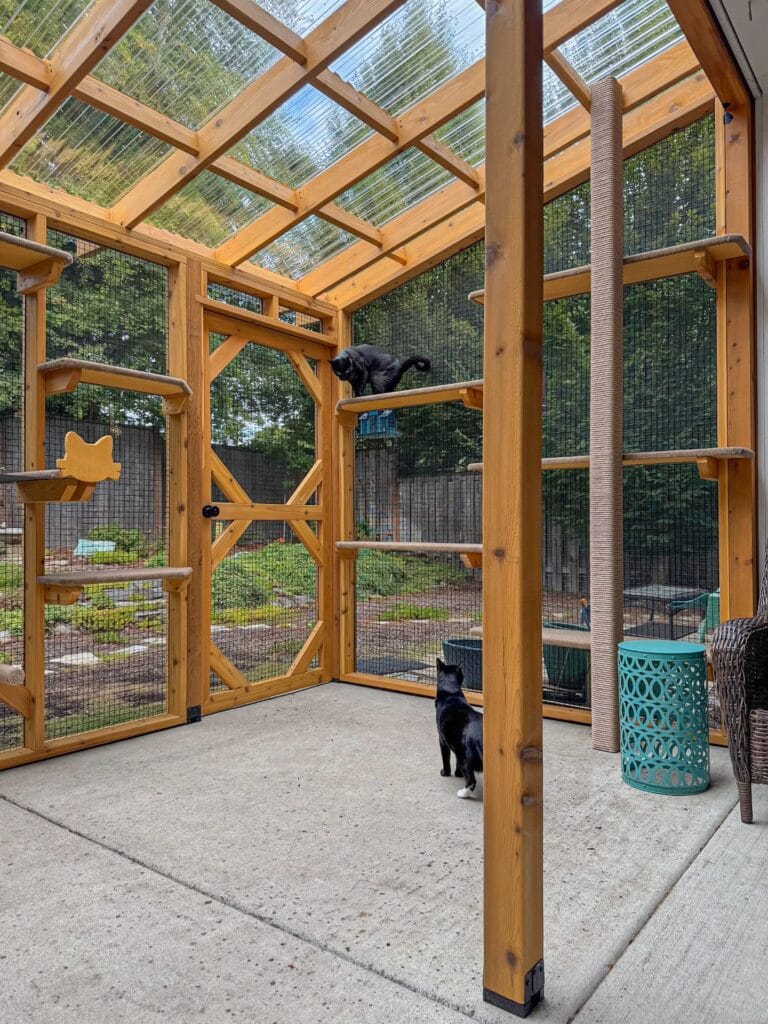
#7: Build a Full Catio Enclosure With Cat Walkways and a Clear Roof Panel
Okay so you know how your golden retriever has basically claimed every single inch of your backyard? Your cats are watching from the window, and honestly? They deserve their own space too.
This catio is the one.
Prep Time: 2–3 hours planning | Active Project Time: 2–3 weekends | Difficulty Level: Intermediate–Advanced
Materials & Tools:
– 2×4 cedar lumber (framework)
– 4×4 cedar posts for vertical supports
– Polycarbonate clear roofing panels
– 16-gauge welded wire mesh (sides and door panels)
– Sisal rope for wrapping climbing posts
– Carpet-topped shelf brackets (5–6 inch depth)
– Exterior wood stain in warm honey tone
– Hinged door frame with black hardware
– Jigsaw, drill, wire staples, wood screws
Instructions
Start by cutting your 4×4 posts to 8 feet tall and anchoring them into concrete footings. Space them 4 feet apart around your chosen perimeter — this gives the structure enough rigidity to handle a cat launching itself at full speed (and trust me, they will).
Once your frame stands, attach the 2×4 horizontal rails at 2-foot intervals up each wall. Staple the welded wire mesh tight against every panel — loose mesh sags and creates escape gaps.
Next, build your interior ladder system. Cut 1.5-inch diameter dowels into 18-inch rungs and mount them in a staggered pattern up each corner post. The staggered spacing — not straight across — means your cat uses real climbing muscles instead of just jumping.
And here’s where it gets good. Wrap each vertical post in sisal rope from base to top. Cedar underneath the sisal means the scratching post never wobbles.
Install the polycarbonate roof panels last, overlapping each sheet by 2 inches and screwing into the top frame rails. Overlapping panels — not butted together — keep rain out without blocking that warm afternoon light your cat will absolutely nap in.
Mount the carpet-topped shelves at three height levels: 18 inches, 42 inches, and 66 inches off the ground. Three levels give every cat a perching rank, which cuts down on territorial squabbles.
If you love this kind of project, 7 Secure DIY Cat Enclosure Ideas for Outdoors has even more layout options worth bookmarking.
Use a gate latch that you can open one-handed — because you’ll be carrying food, water, and a very judgmental cat every single morning.
Seal all the wood with two coats of exterior stain before assembly. Staining after building means you’ll be trying to paint around wire mesh with a tiny brush at 9pm, and nobody wants that.
📸 Photo credit: Instagram @thecatiocompany
The One DIY Cat Playground Mistake That Wastes Your Whole Weekend
Okay, real talk — the biggest mistake I see people make? Building up before testing stability first.
I watched my cousin spend an entire Saturday building this gorgeous three-tier cat tower, all wrapped in sisal rope, little hammocks, the works. Her cat sniffed it once and knocked the whole thing sideways because the base wasn’t weighted properly. Total heartbreak.
Here’s the pro secret most tutorials skip: your base needs to be at least 40% of the total structure’s footprint. So if your tower stands 4 feet tall, your base platform should be roughly 18-20 inches wide. Cats don’t ease into things — they launch themselves full-speed.
Also — and this is huge — skip the carpet remnants from hardware stores. They hold odors like crazy and your cat will stop using the whole structure within weeks.
Here’s what to do: bolt a heavy wooden base, test the wobble before adding any platforms, then build upward.
Your cat deserves a playground that doesn’t tip. And honestly? So do your floors.
Your Dog’s Paws (And Your Floors) Deserve Better
Honestly? The right dog paw cleaner is one of those things you didn’t know you needed until you have it — and then you can’t picture life without it.
Pick one option from this list and just try it for a week. Your rugs will thank you. Your sofa will thank you. You’ll stop doing that frantic grab-the-towel sprint every time your golden bolts through the door.
And hey, if you’re the type who loves a good DIY weekend project, these genius DIY dog accessories might be your next obsession.
So tell me — which one caught your eye? Drop it in the comments!

Amr Mohsen is a software engineer who traded his keyboard for a leash — at least on weekends. His love for dogs inspired him to share what he learns as a dog owner and enthusiast, bringing a detail-oriented, research-driven perspective to every article he writes. If it’s about dogs, he’s probably already looked it up twice.