Your cat is an escape artist. And you’re out here patching gaps, second-guessing every latch, and basically holding your breath every time she slips outside.
I’ve been there — my cousin’s tabby bolted three times in one week. Three. They finally built him a little outdoor setup and the whole family exhaled.
Here’s the thing: your cat deserves fresh air without you spiraling every five minutes. But cheap setups fall apart, and Pinterest looks gorgeous until you’re actually standing in your backyard with a drill.
Good news: a solid diy cat enclosure doesn’t have to be complicated or expensive. These 7 ideas are sturdy, actually doable on a weekend, and honestly? They look cute enough to fit right into your outdoor aesthetic.
No more panic. Just your cat sunbathing safely while you sip your coffee in peace.
#1: Build a Backyard Cat Enclosure With a Boho Lounge You’ll Actually Want to Sit In
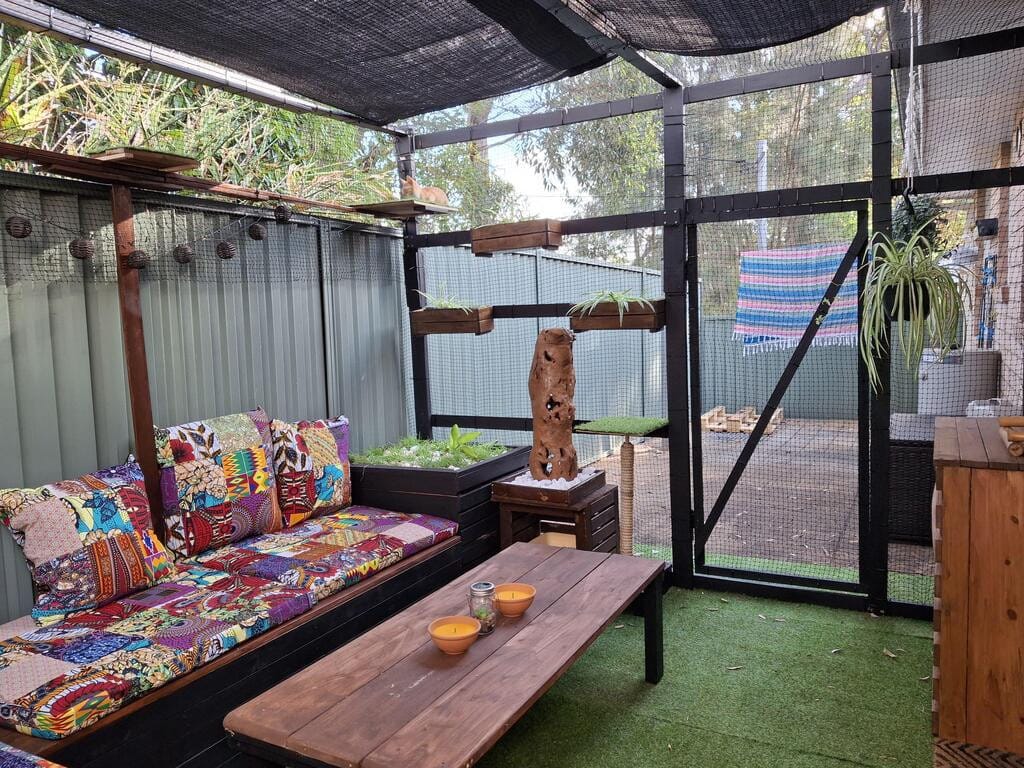
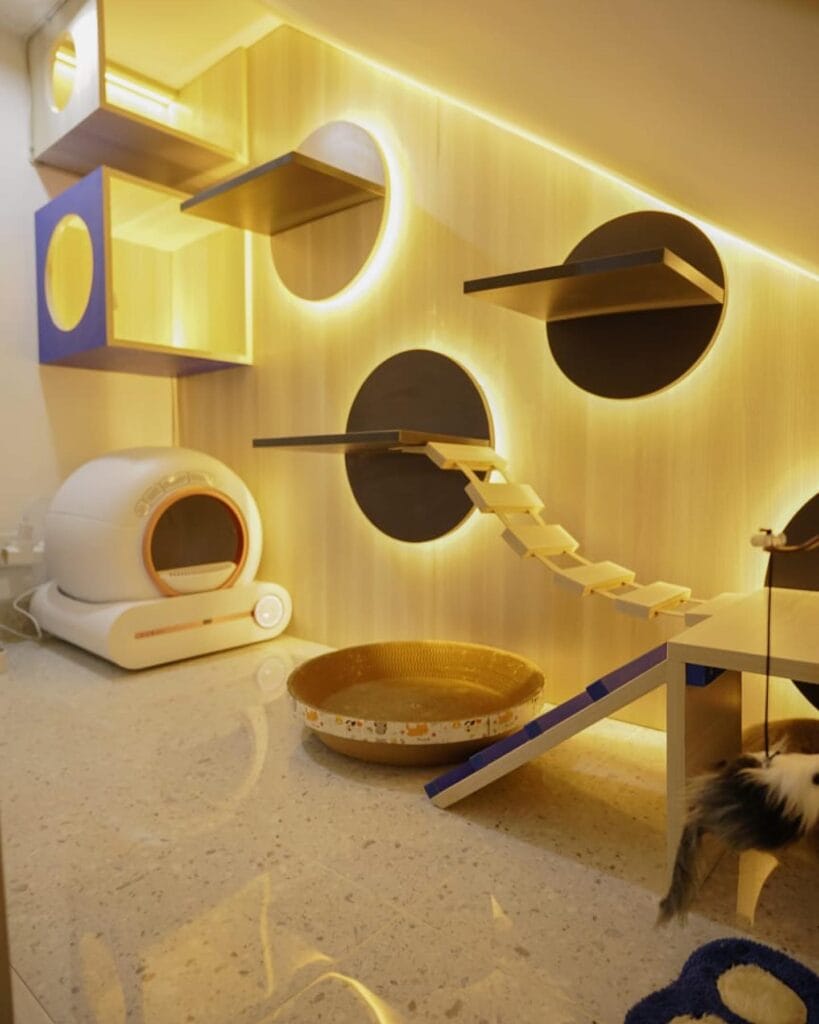
Okay, so you know that feeling when your golden has just torn through the backyard and you’re finally sitting down to breathe — but the space feels chaotic and zero percent relaxing? That’s exactly the energy this build fixes, except for your cats.
This enclosure is giving full outdoor living room. We’re talking black powder-coated steel framing, treated timber bench seating, and a patchwork cushion setup layered over the bench slats. The floor is artificial turf — no mud, no mess tracking inside. The walls and ceiling use black shade cloth on top and fine mesh cat netting on the sides, which lets air flow but keeps cats completely contained.
Materials & Tools
– Black steel square tube (for frame posts and crossbars)
– Treated pine timber (bench frame + wall shelving)
– Fine mesh cat netting (sides and door panel)
– Black shade cloth (ceiling coverage)
– Artificial turf roll
– Corrugated metal sheet (back wall privacy)
– Driftwood cat tower or scratch post
– Planter boxes with succulent and spider plant cuttings
– Boho patchwork cushions + throw pillows
– Wooden coffee table (pallet wood works great)
– Power drill, self-tapping screws, zip ties, tensioning clips
Instructions
Start by setting your four corner steel posts into the ground using concrete footings, spacing them to create a roughly 2.4m x 3m rectangle — big enough for a bench, a coffee table, and room to move.
Once posts are cured and stable, attach horizontal crossbars at 2m height to form the top frame. Lay your shade cloth across the ceiling frame and secure with zip ties pulled tight at every 30cm interval — this prevents sagging under leaf debris.
Run your cat netting down each side panel, pulling it taut before screwing timber battens over the edges to clamp it flat. This netting-plus-batten method means no loose edges cats can push through. And it looks clean, not cage-like.
Build your treated pine bench frame along the back wall, sitting at 45cm height. Screw horizontal slats across the top with small gaps for drainage if it rains. Drop your patchwork cushions right on top — this is where the whole vibe shifts from “cat cage” to actual hangout spot.
Mount two or three timber wall shelves on the interior frame at staggered heights. Fill small planter boxes with wheatgrass or succulents and set them on the shelves — cats rub past them, the greenery stays contained, and it genuinely looks like a Pinterest board.
Place your driftwood tower centered in the space as a natural scratch post. Driftwood catches scratching better than sisal alone because the texture varies — 7 durable DIY cat scratcher ideas saving furniture break down why surface variety matters so much.
Lay your turf roll across the floor, cut to fit around post bases. Roll it tight to the edges so there’s no gap for litter or debris to collect underneath.
Finish by adding a hinged door panel using the same netting-and-steel-frame method. A simple barrel bolt latch keeps it secure.
A wooden coffee table in the center — even a basic pallet wood build — makes this space somewhere you’ll actually sit with your cat in the afternoon sun. If you want to extend this concept further, 7 safe DIY cat patio ideas for fresh air show how to attach enclosures like this directly to a home’s exterior wall.
Prep Time: 1 hour | Active Project Time: 2–3 weekends | Difficulty Level: Intermediate
Seal all timber with exterior-grade wood stain before assembly — not after. Getting into corners once the frame is up is a nightmare, and bare wood warps fast in humidity.
📸 Photo credit: Instagram @catnetsnz
#2: The Curved Catio That Makes Your Backyard Look Like a Pet Resort
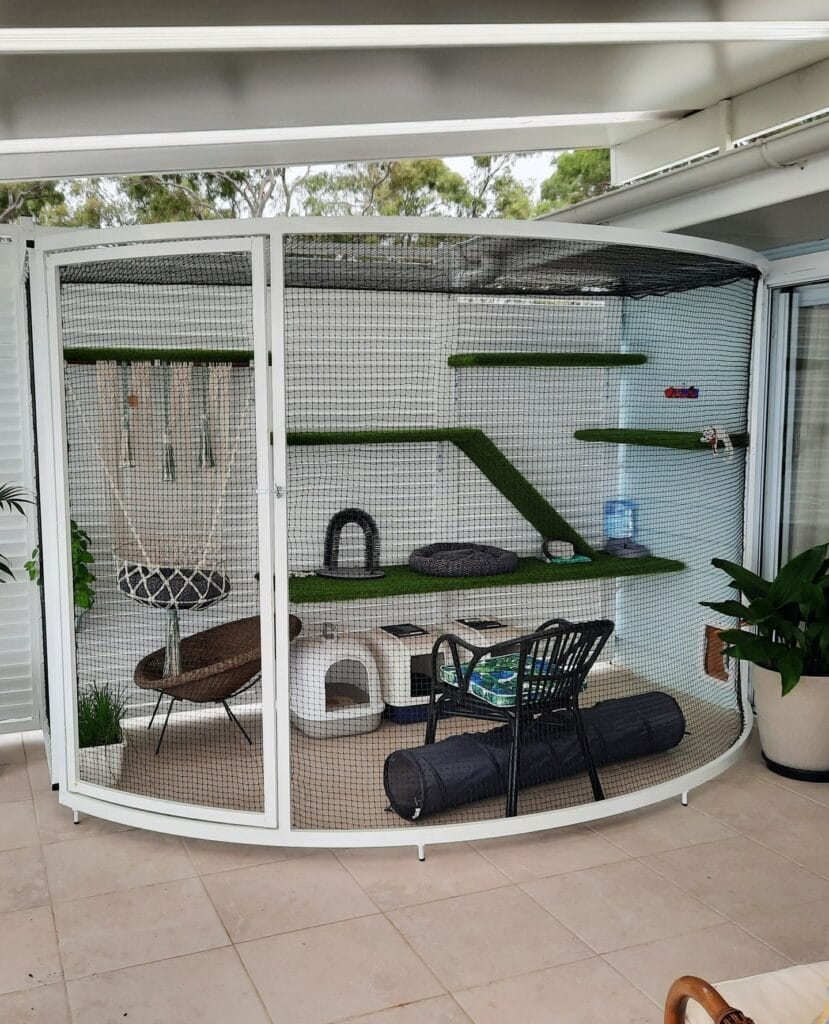
My neighbor stopped mid-conversation last week just staring at my patio setup. That’s the kind of reaction this build gets.
And honestly? If you’ve ever watched your cat claw at the screen door while your golden retriever takes over every soft surface inside, this curved freestanding catio enclosure is the answer you didn’t know you needed.
Materials & Tools You’ll Need:
– White powder-coated aluminum framing (curved, approx. 8ft wide x 7ft tall)
– Black knotted nylon mesh netting (1-inch grid, UV-resistant)
– Artificial turf panels (cut to 24″ x 48″ for shelving)
– 4-6 wall-mounted wooden shelves (wrapped in turf)
– White PVC pipe for the arched base frame
– Tempered glass door panel with latch hardware
– Macramé hanging basket (cat hammock alternative — explore 7 Relaxing DIY Cat Hammock Projects for Lounging)
– Ceramic cat house hideout (tunnel-style)
– Power drill, zip ties, mesh staples, level
Instructions
Start by building your base frame using white PVC pipe bent into a curved oval shape, roughly 8 feet in diameter. Secure the curve using heat-bending or pre-curved connectors at each joint — this gives the whole structure that sleek, intentional shape instead of looking like a random cage.
Once your base ring sits level on the patio tile, build your vertical aluminum uprights every 24 inches along the curve. These carry the mesh and the shelf weight, so don’t rush this part.
Attach your black nylon mesh starting from the top frame down, pulling it taut before stapling. Loose mesh sags fast. Work in sections around the curve, overlapping edges by 2 inches and securing with zip ties every 6 inches.
Mount your turf-covered shelves at three heights — roughly 24″, 48″, and 66″ from the floor — using L-brackets drilled into the interior uprights. The staggered diagonal placement you see here lets cats climb like a winding path, not just hop straight up.
Hang your macramé basket from the top frame on the left side using heavy-duty S-hooks. This is the feature cats actually fight over — soft, swinging, elevated — which means less furniture destruction inside your house. That’s the payoff.
Add the ceramic tunnel house and black fabric tunnel at floor level for cats who want a dark, enclosed nap spot. Drop in a water station (the blue jug style works perfectly in the corner) and tuck in some small potted grasses for enrichment.
Finish with the tempered glass door panel on the front, hinged on a standard door frame insert you pre-built into your mesh wall.
Prep Time: 2 hours | Active Project Time: 2 full days | Difficulty Level: Intermediate
The mesh top keeps everything contained without blocking airflow — your cat gets fresh air and sun without the neighborhood hawk situation.
If you’re also figuring out where to put the litter box inside the enclosure without it becoming an eyesore, 7 Clever DIY Cat Litter Box Ideas Hiding Mess has some genuinely smart solutions worth stealing.
One thing I’d change on my own build — seal every frame joint with exterior-grade silicone caulk before the mesh goes on. Water gets into untreated aluminum frames and causes rust bubbling under the paint within one season.
📸 Photo credit: Instagram @catnetsnz
#3: How to Build a Pop-Up Outdoor Cat Enclosure (With a Tunnel Your Cat Will Actually Use)
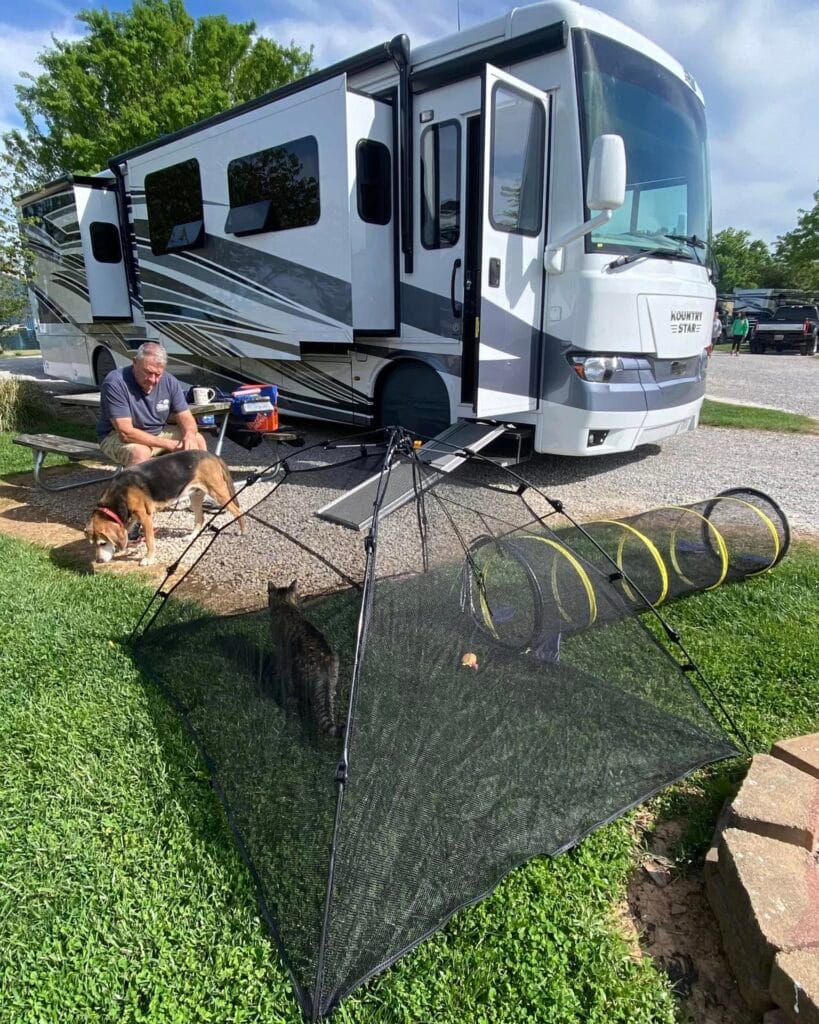
You know that moment when you’re trying to relax outside and your cat is desperately pawing at the screen door? She wants out. But you’re not about to let her roam free near your neighbor’s German Shepherd.
That’s exactly what this setup solves.
This is a collapsible mesh cat enclosure paired with a flexible tunnel connector — and honestly, it’s one of the smartest pet setups I’ve seen at a campsite or backyard. The enclosure in the photo uses a black mesh pop-up tent frame (about 4×4 feet) with metal spring-loaded legs, connected to a yellow-rimmed collapsible tunnel made from lightweight nylon mesh.
Materials & Tools You’ll Need:
– Pop-up mesh pet tent (4×4 ft, black nylon mesh)
– Collapsible cat tunnel (yellow ring reinforcement, nylon)
– Zip ties or bungee cord connectors
– Ground stakes (4-6 metal pegs)
– Optional: small fleece mat for the enclosure floor
Instructions
Lay your mesh tent flat on grass and let the spring frame snap open — it takes about 30 seconds. Stake all four corners into the ground so wind doesn’t flip it.
Attach the tunnel opening to the enclosure’s side zipper flap using zip ties at the top and bottom ring. This feature-benefit combo is real: the zip-tie lock keeps the tunnel secure, so your cat moves freely without creating an escape gap.
Run the tunnel toward your RV door or patio entrance. Stake the tunnel midpoint with an extra peg so it stays straight.
Your cat walks out, explores the tunnel, hits the enclosure — and you get zero sprinting-across-the-parking-lot panic moments. If you love building setups like this, 7 Fun DIY Cat Projects Every Owner Needs has more ideas worth bookmarking.
Prep Time: 5 min | Active Project Time: 15 min | Difficulty: Easy
Keep the tunnel under 6 feet long — longer tunnels lose their shape without a center support hoop.
📸 Photo credit: Instagram @thesunsetbandits
#4: Build a Dome-Style Catio Against Your House Wall (The Backyard Setup Your Cat Will Obsess Over)
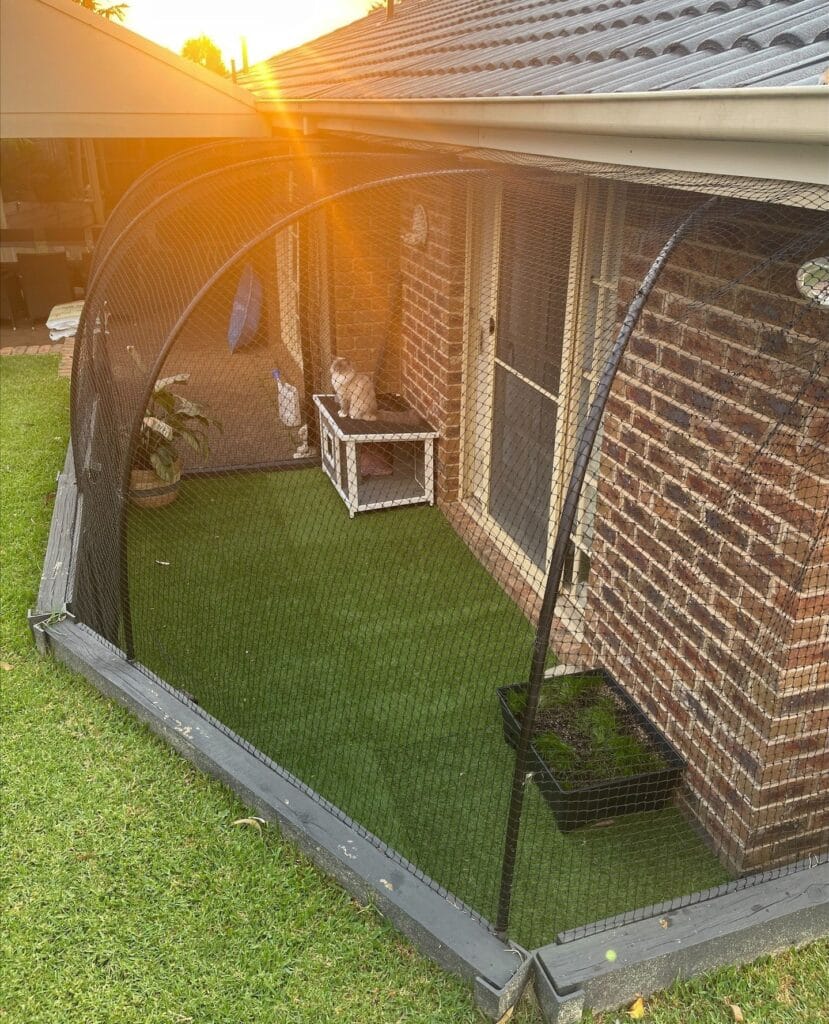
You know that panic when your golden bolts out the back door and you spend ten minutes chasing her through the neighbor’s yard? Cat owners feel that every single day — except their escape artist goes silent and disappears into traffic.
This dome catio fixes that completely.
Prep Time: 2 hours | Active Project Time: 1 full weekend | Difficulty Level: Intermediate
Materials & Tools:
– Black heavy-gauge galvanized wire mesh (fine enough to contain small paws)
– Curved steel conduit pipes (1-inch diameter) for the dome frame
– Pressure-treated timber boards (2×4 inches) for the base frame
– Artificial turf mat (cut to fit your base footprint)
– Small white wooden cat house (approximately 18×18 inches)
– Black planter box (approximately 12×12 inches) for the wall corner
– Cable ties, galvanized screws, wire cutters, drill
Instructions
Start by building your rectangular base frame from the pressure-treated timber, securing it directly against your brick wall. My neighbor did this against her garage wall last summer and said the hardest part was getting the corners square — so measure twice, seriously.
Lay your artificial turf mat inside the frame before anything goes vertical. Cut it flush against the edges.
Next, bend your steel conduit pipes into matching dome arcs. Two arcs create the tunnel shape you see here. Anchor each arc into the timber base using pipe brackets, spacing them about 3 feet apart.
Stretch your black wire mesh over the dome frame, pulling it taut. Secure with cable ties every 6 inches — this mesh being fine-gauge means zero escape gaps, which keeps your cat safe while still letting fresh air flow through. That airflow payoff means your cat actually wants to stay inside instead of scratching to leave.
Attach the mesh to the brick wall using masonry anchors along the top edge.
Position the small wooden cat house centrally inside — the cat in this photo claimed the roof immediately. Drop your planter box in the corner against the wall for some greenery.
The dome shape here isn’t just pretty — curved frames distribute wind load better than flat panels, so this structure holds up through storms without warping.
If you love outdoor builds like this, 7 Protective DIY Stray Cat Shelter Builds has some seriously smart weatherproofing techniques worth borrowing.
Seal all timber joints with exterior wood sealant before your first rain hits. And check every cable tie connection after the first windy week — they can loosen slightly as the frame settles.
📸 Photo credit: Instagram @catnets
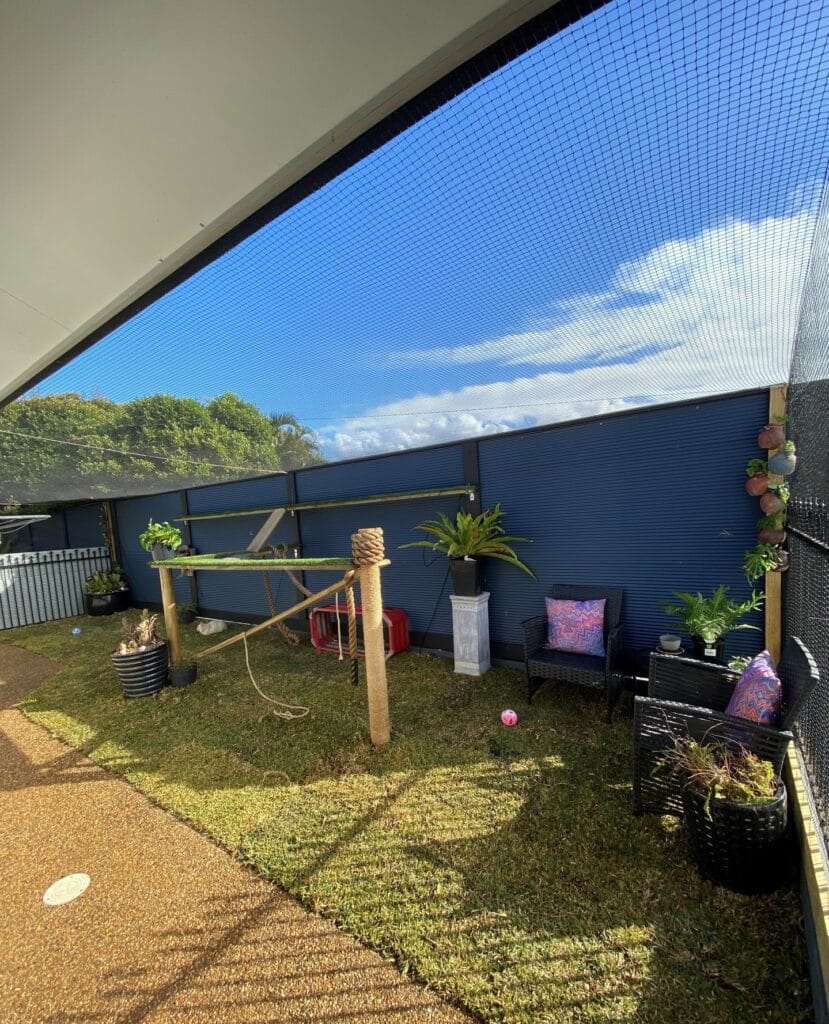
#5: The Catio With a Scratching Post So Good Your Cat Will Forget Your Couch Exists
My neighbor texted me last month like, “my cat knocked over my Anthropologie planter again.” And I thought — girl, your cat needs a space of her own. You probably get this on some level too, even with your golden. Animals just need somewhere to be.
This catio build from the image? It’s giving full outdoor living room energy — and it’s 100% DIY-able.
Materials & Tools:
– 4×4 treated timber posts (natural wood finish)
– Heavy-duty black cat containment netting (ceiling + side panels)
– Navy blue Colorbond steel fence panels for perimeter walls
– Artificial grass turf (indoor/outdoor grade)
– Jute rope (thick, 3–4 inch diameter) for wrapping the scratching post
– Bamboo poles for horizontal cat walkways
– Outdoor rattan chairs with weatherproof cushions
– Black planter pots + trailing ferns
– Vertical wall planters (terracotta wall-mounted style)
– Drill, staple gun, zip ties, exterior wood screws
Prep Time: 1 weekend | Active Project Time: 6–8 hours | Difficulty Level: Intermediate
Instructions
Start with your perimeter. Secure the Colorbond navy panels along your fence line first — these act as your solid base walls and block wind noise, which keeps the space calm for anxious cats.
Once your walls are up, sink your 4×4 timber posts into the ground at each corner and mid-span. Space them no more than 6 feet apart so your netting doesn’t sag. And trust me, sagging netting is the thing that’ll haunt you later.
Now stretch the heavy-duty containment netting from the roofline across to your perimeter posts. The image shows it attached directly under the home’s existing eave — that’s your anchor point. Pull it taut and use zip ties every 12 inches along the frame.
Lay your artificial turf over the entire ground space. Cut it flush to the edges with a utility knife. It reads like real grass but drains like a champ and survives every scratching session.
For the scratching post, wrap your center 4×4 post floor-to-ceiling in jute rope — this is the feature that keeps cats off furniture, gives them a real outlet for claw maintenance, and honestly pays off the whole build. Secure the rope with staples every few wraps so it doesn’t unravel.
The bamboo walkway runs horizontal between two posts at about 4 feet high. Attach with exterior screws and zip ties. Lay a strip of artificial grass on top for grip.
Finish with the rattan seating, your black planters, and hang those terracotta wall pockets on the right-side post for trailing greenery.
If you love the idea of going even further with vertical cat play structures, 7 Active Indoor DIY Cat Playground Setups has some seriously good inspo for adding shelves and tunnels inside.
The netting ceiling should be your last step — always work top-down so you’re not crawling under finished sections. Check every anchor point before letting your cat in. A loose edge becomes an escape route fast.
📸 Photo credit: Instagram @catnetsnz
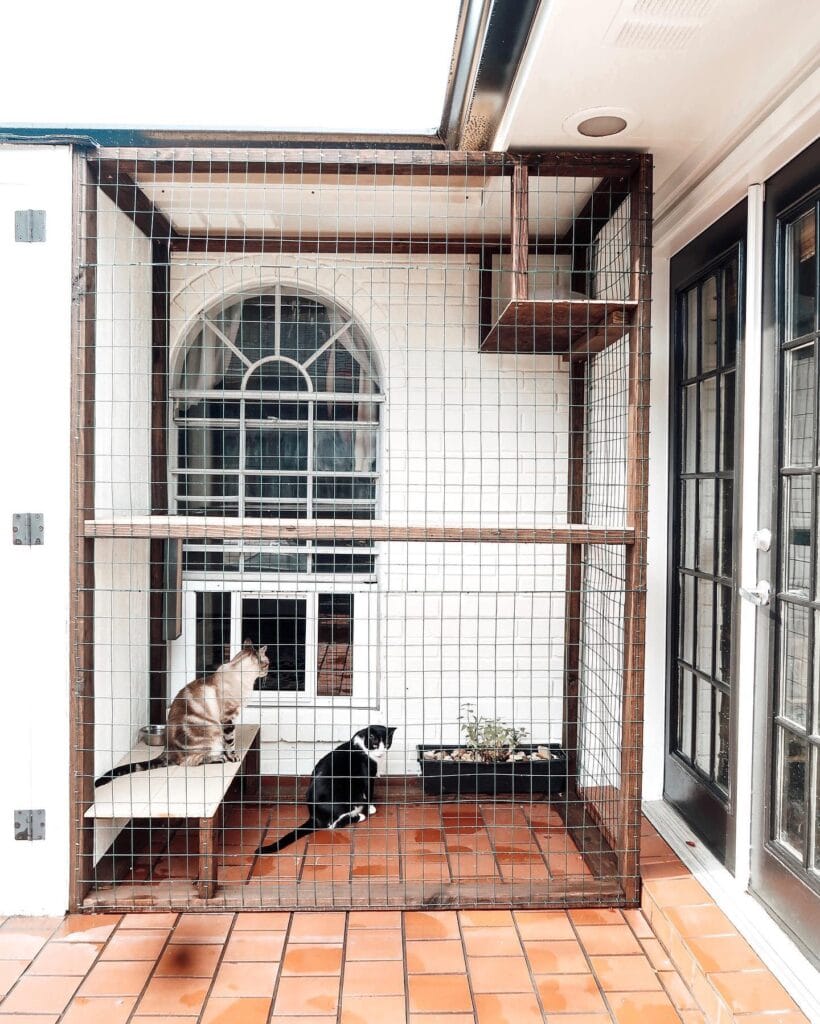
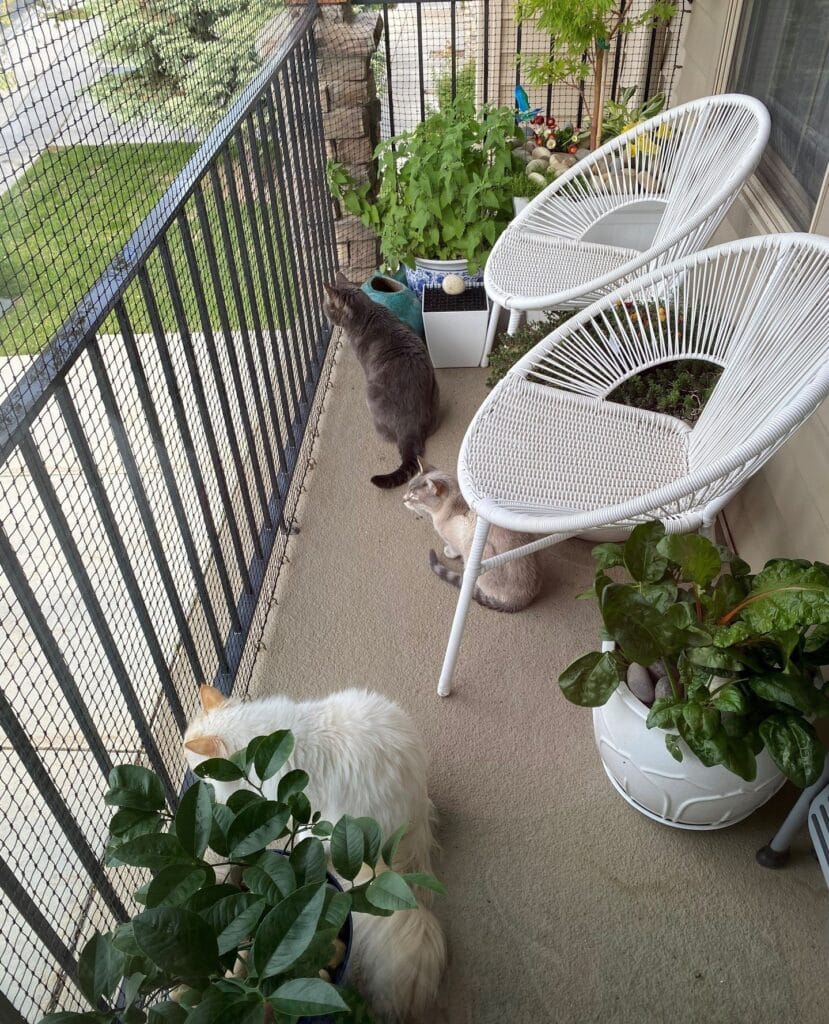
#6: How to Build a Cat-Safe Balcony Enclosure (The “Catio” Your Cats Will Never Leave)
Okay so you know that moment when your golden bolts out the back door and your heart just stops? Cats do the same panic-inducing thing on balconies — except they’re quieter about it, and that’s somehow worse.
This balcony catio setup from the photo is exactly what safe outdoor time looks like done right.
Materials & Tools You’ll Need:
– Black vinyl-coated wire mesh (the fine-grid kind shown in the photo — roughly 1/2 inch openings)
– Metal railing clips or zip ties (heavy-duty, UV-resistant)
– Tension rod system or L-bracket anchors for top netting support
– Measuring tape, wire cutters, pliers
– Optional: white wicker Acapulco-style chairs for the human side 😄
Instructions
Start by measuring your balcony railing perimeter — every inch matters here. Cut your wire mesh panels to match each railing section, then clip them from the bottom rail upward using your metal railing clips spaced about 6 inches apart.
The mesh in this photo runs from floor level all the way to the top railing bar, then connects to an overhead netting panel that closes off the sky entirely. That top closure is non-negotiable — cats jump, and they jump high.
And once the perimeter is secured, you add your potted plants along the back wall like those gorgeous green ones in the photo. The cats get stimulation, you get Pinterest content.
Real talk: skipping the overhead net is the number one mistake people make with balcony catios. A cat will find that gap in under 10 minutes.
The mesh-plus-overhead-netting combo keeps cats contained without blocking airflow — which means your cats get fresh air and sunshine without you stress-watching them every second.
Tuck a small herb garden along the back wall like in this photo. Cats love sniffing fresh mint and cat grass, and it genuinely keeps them entertained longer than any toy.
Prep Time: 30 minutes | Active Project Time: 2–3 hours | Difficulty Level: Beginner–Intermediate
📸 Photo credit: Instagram @catnets
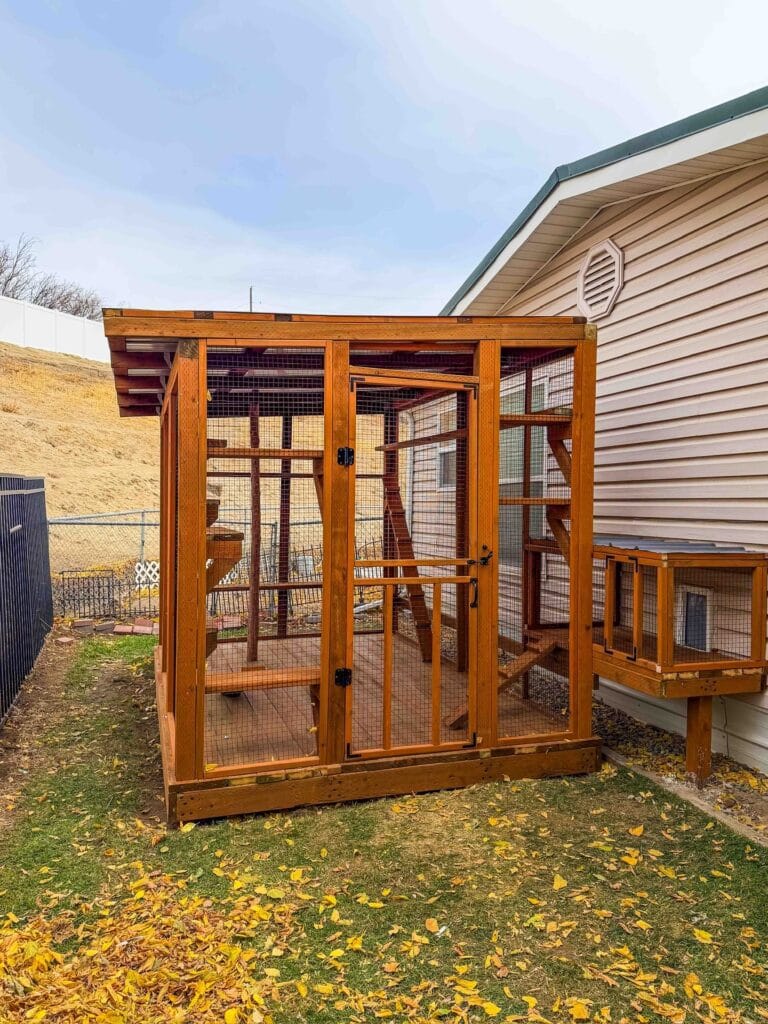
#7: Build a Walk-In Outdoor Cat Enclosure (Catio) Your Cats Will Never Want to Leave
Okay so I know this is a cat thing, but hear me out — my neighbor built one of these and even her golden retriever tried to sneak inside. That’s how good this looks.
This cedar wood catio is exactly the kind of Pinterest project that actually works in real life. We’re talking a full walk-in structure with welded wire mesh panels, pressure-treated 4×4 lumber framing, a corrugated metal roof, and built-in cat shelving at multiple heights. The warm honey-brown stain ties the whole thing to the house siding beautifully.
Materials & Tools:
– 4×4 cedar posts (qty: 8, cut to 7 feet)
– 2×4 cedar lumber for framing and shelves
– ½-inch welded wire mesh (hardware cloth)
– Corrugated metal roofing panels
– Wood stain (warm cedar tone)
– Heavy-duty hinges and barrel bolt latches (black hardware)
– Circular saw, drill, staple gun, level, measuring tape
Instructions
Cut your 4×4 posts to height first, then build two rectangular frames — front and back — using 2×4 boards screwed at corners. Stand them up, connect them with horizontal 2×4 cross members every 24 inches, and check level constantly.
Stretch your ½-inch hardware cloth tight across each panel and staple it every 3 inches along the frame edge. Don’t rush this part. Loose mesh is how cats escape and how your dog ends up confused at 6am.
Frame the door opening at 30 inches wide with a center latch and a bottom bolt — dual locks keep the enclosure secure, which means zero escape artists and zero vet panic calls.
Build the internal shelving using 2×4 brackets anchored to the side posts at staggered heights (18, 36, and 54 inches). This vertical layout gives cats a perch hierarchy — they’ll use every single level.
Attach your corrugated metal panels across the top frame with roofing screws and rubber washers to seal water out. Angle the roof slightly toward the back for drainage.
Finish with two coats of oil-based cedar stain and let it cure 48 hours before letting any animal inside.
The enclosed design keeps cats safe outdoors while giving them fresh air and sunlight — and because the structure connects directly to the house through a small cat door tunnel, they move freely without you opening a single door.
Sand all shelf edges before staining. Rough wood and cat paws don’t mix well, and splinters slow the whole project down when you’re mid-build.
Prep Time: 2 hours | Active Project Time: 2–3 days | Difficulty Level: Intermediate
📸 Photo credit: Instagram @thecattopia
The One Structural Secret That Makes or Breaks Your Cat Enclosure
Okay, real talk — most people build their catio and then immediately regret the door placement. I did this exact thing my first build. Spent a whole weekend on this gorgeous enclosure, and every single time I opened the door to clean it, my cat bolted past me like she had somewhere important to be.
Here’s the pro move: always build a double-entry airlock system — basically two doors with a small buffer zone between them. It sounds fancy but it’s literally just a small “porch” section before the main enclosure. Game changer.
The other thing nobody talks about? Wire gauge. Most beginners grab whatever’s cheap at the hardware store. Go with 14-gauge welded wire minimum. Anything thinner and a determined cat (or your neighbor’s dog) will eventually push right through it.
Worth it because: spending an extra $30 on proper gauge wire saves you a $200 rebuild three months later.
Also — think about roof slope for drainage before you cut a single board. Flat roofs pool water and rot your frame by winter. A simple 15-degree pitch fixes everything.
Your Golden Retriever Deserves This (And So Do You)
Okay, so here’s the thing — you already know your pup is worth every penny. But protecting your home doesn’t have to mean sacrificing the aesthetic you’ve worked so hard to build.
Pick one product from this list and just try it. Seriously, start small. Even one good furniture cover or a washable rug can change your whole week.
And hey, if you’re also thinking about your dog’s actual space, these stylish DIY dog crate furniture ideas are chef’s kiss for keeping things Pinterest-worthy.
So tell me — which room in your house needs the most saving right now? 🐾

Amr Mohsen is a software engineer who traded his keyboard for a leash — at least on weekends. His love for dogs inspired him to share what he learns as a dog owner and enthusiast, bringing a detail-oriented, research-driven perspective to every article he writes. If it’s about dogs, he’s probably already looked it up twice.