Isn’t it funny how the same day you decide your cat deserves a better space, you stumble upon a bunch of DIY cat room ideas? You might think a cat’s world is all about napping and chasing laser dots, but there’s so much more to it. Imagine transforming your living area into their very own playground. Curious about how to create these dreamy makeovers? Let’s explore a few purrfect ideas that will make your feline friend feel like royalty.
Purrfect Playful Spaces
When you think about crafting the ultimate cat room, why not turn it into a playful paradise for your furry friend?
Imagine a cat room DIY that transforms plain walls into climbing surfaces—yes, you can create shelves for your kitty to scale like a furry mountain goat. Don’t forget cozy nooks filled with soft cushions to catch those epic cat naps.
You could even add a puzzle feeder for some mental stimulation, so they aren’t just lounging around judging you.
Maybe you’ll want to hang some dangling toys—make sure they’re out of reach for at least a minute, so you can claim victory for a bit.
Our Collection
Let’s talk about our collection of cat-friendly goodies that’ll transform your space into a feline paradise.
Imagine an interactive climbing wall that’ll have your kitty feeling like the King of the Jungle, or a cozy bed nook where they can curl up and snooze like an expert napper.
And what about those window perches for sunbathing?
Trust me, your cat will thank you for it—and maybe even share a catnip treat or two.
1. Interactive Climbing Wall
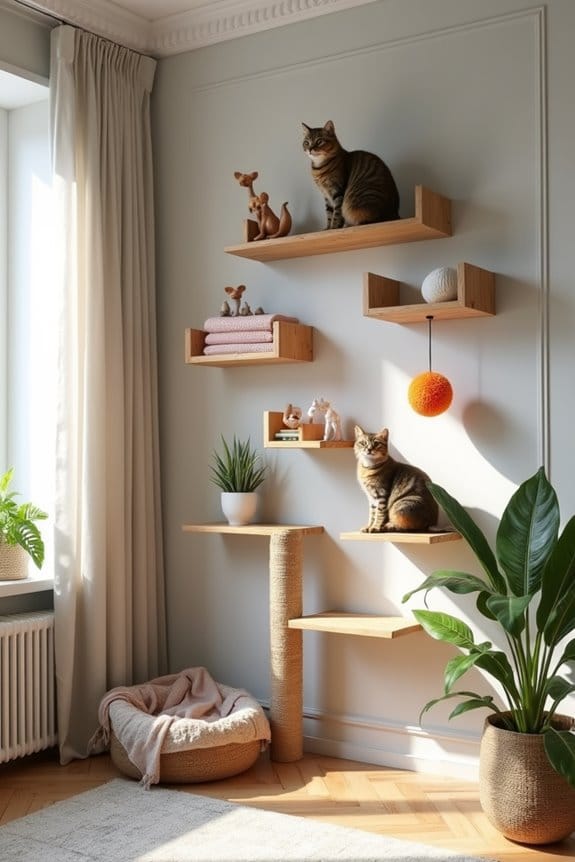
Do your cats love high places? An interactive climbing wall won’t only give them a safe space to play and explore, but it’ll also transform your home into a stylish cat haven.
Imagine your furry friends scaling their own little mountain while you save on expensive cat trees. Plus, a climbing wall adds a unique touch to your home décor, making it look like a chic pet paradise. Sounds good, right? Let’s get started!
Materials Needed:
- Wall-mounted cat shelves or wood planks (thick enough to support your cat’s weight)
- Wood screws and anchors (for securing shelves)
- Sandpaper (to smooth edges)
- Paint or wood stain (optional, for a personalized look)
- Drill (with drill bits)
- Stud finder (to locate wall studs)
- Level (for even shelving)
- Measuring tape
- Pencil (for marking locations)
- Safety goggles (for your eyes’ protection)
Step-by-Step Instructions:
- Choose Your Location: Decide where you want your climbing wall. Look for a spot that’s out of the way but allows your cats to easily access it (near a favorite window perch, perhaps?).
- Measure and Mark: Use a measuring tape to figure out how high you’d like your shelves. Mark these spots with a pencil. Think about how your cats climb and jump; they’ll need enough space to spring from one shelf to the next.
- Find the Studs: Using the stud finder, locate the wall studs behind the drywall. Trust me, drilling into a stud is much better than drifting aimlessly into the wall. Mark these spots where you’ll secure your shelves.
- Prepare Your Shelves: If you’re using wood planks, sand the edges to avoid any splinters. Want to be fancy? Add a coat of paint or stain at this stage for flair—think of those minimalist Scandinavian designs you love but on cat shelves.
- Drill Holes and Attach Shelves: Position your shelves so they’re level with your markings and secure them with wood screws into the studs. Double-check with that trusty level as you go. Your cats will appreciate the effort!
- Add Accessories: String some toys or install scratching posts alongside your climbing wall to make it even more engaging. Cats love variety as much as anyone else (sometimes, more so).
- Stand Back and Admire: Take a moment to appreciate your handiwork. Your cats are sure to inspect the new additions, probably suggesting improvements with their paws and meows.
Optional Add-ons/Variations:
- Color Pop: Customize with bright paints or funky patterns. Use stencils to add fun designs that reflect your cats’ personalities or your own home decor.
- Multi-Level Madness: Consider adding a few small platforms at varying heights to create a more dynamic climbing experience. Why have a few shelves when they can have a whole jungle gym?
Pro Tip:
Always wear your safety goggles when drilling, just in case the drill has a mind of its own.
Also, securing those shelves firmly to the wall is a must! You want your kitty to have fun, not start an unexpected game of ‘whoops, there goes the shelf’.
It’s all about creating a safe space where they can thrive, and you’ll be a proud cat-parent knowing you’ve made it happen.
2. Cozy Cat Bed Nook
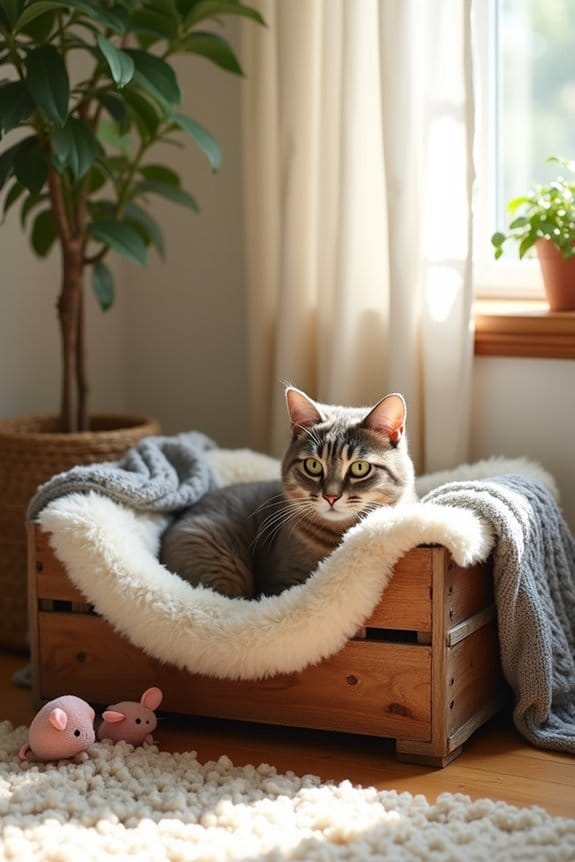
Creating a cozy cat bed nook is a fantastic DIY project that’ll give your feline friends their very own snuggly retreat. Not only does this project save you money on store-bought cat furniture, but it also adds a cute touch to your living space.
Imagine your cats curled up in their little haven, basking in comfort while making your home feel warm and inviting. Let’s explore how to whip up this delightful nook.
Materials Needed:
- Wooden crate or storage box (make certain it’s sturdy)
- Soft pillow or cat bed (to line the bottom)
- Blanket or cat-friendly fabric (for extra coziness)
- Non-toxic paint or stain (optional, for a personalized touch)
- Sandpaper (to smooth out rough edges)
- Power drill (if you’re attaching it to a wall or other furniture)
- Safety goggles (to protect those pretty eyes)
- Measuring tape (to make sure everything fits)
- Pencil (for marking any adjustments)
Step-by-Step Instructions:
1. Choose Your Crate: Start by picking the perfect wooden crate or storage box. It should be spacious enough for your cat; think of it as their personal retreat.
2. Prep the Crate: Give it a good sanding to get rid of any splinters or rough spots—no one wants a cat snagging their paw on a jagged edge. If you desire, paint or stain it to match your home decor.
Go wild with color, but maybe skip the neon if you want your house to look classy.
3. Measure and Mark Location: Use your measuring tape to find the best spot for the nook. Put it in an area where your cats love to hang out, maybe by a window or in a quiet corner. Mark this spot with a pencil.
4. Line the Crate: Place your soft pillow or cat bed inside. Maybe throw in a cozy blanket for snuggles. Cats adore soft surfaces to curl up in—who doesn’t?
5. Secure It (if needed): If you’re planning to attach it to a wall or another piece of furniture for extra stability, use your power drill to fasten it down.
Verify it’s level and double-check that it’s secure, especially if you have a big kitty who thinks they’re a mountain climber.
6. Decorate the Space: Get creative with this stage. Load it up with their favorite toys or a scratching post nearby. Introducing some catnip can also enhance the serenity of the nook; what’s a cozy spot without a little indulgence?
7. Sit Back and Observe****: Now it’s time to watch your cats explore their new space. You might just catch them eyeing you like you’ve just built the Taj Mahal for cats.
Sometimes, they may even surprise you with their “construction advice.”
Optional Add-ons/Variations:
- Personalize it by painting your cat’s name on the crate or adding fun patterns with stencils. Maybe a little paw print here and there if you’re feeling crafty.
- Mix up materials—try lining the crate with a soft, fuzzy fabric instead of a pillow for a unique look. Or, use a deep basket and fill it with blankets for a more luxurious cat lounge.
Pro Tip:
Make sure the choices you make for bedding materials are washable. Cats can be messy little creatures, and you want to keep their nook fresh and clean.
A removable cover on the pillow or using machine-washable fabrics is a lifesaver for lazy cleaning days. Plus, if a cat nap gets a bit too intense and leads to spilled treats or stray fur, you’ll be grateful.
And there you have it—your cats are ready for some serious lounging in their new cozy cat bed nook. Happy crafting!
3. Window Perches for Sunbathing
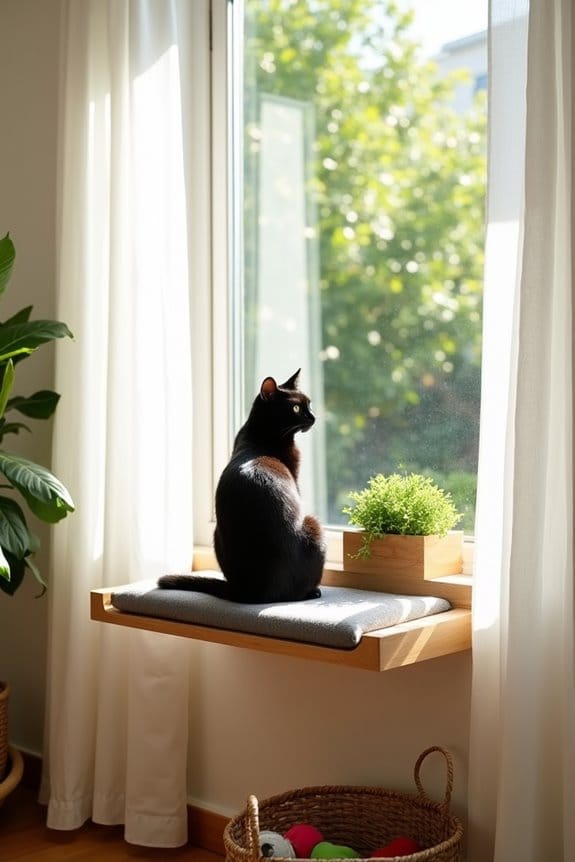
If you’ve ever found your cat draped lazily across the windowsill, soaking up the sun, then you know just how much they adore sunbathing. DIY window perches are a super simple and delightful project that transforms ordinary spaces into vibrant sun-soaking spots for your feline friend.
Not only do these perches cater to your cat’s sun-loving side, but they also save you the money you’d spend on store-bought options—and let’s be honest, they add a charming touch to your home décor too.
Materials Needed:
- Wooden boards (1×2 or 1×3 for the frame)
- Plywood (for the base)
- L-brackets (for mounting)
- Screws (to secure everything)
- Sandpaper (to smooth the edges)
- Non-toxic paint or stain (optional)
- Strong fabric (like canvas, for the perch covering)
- Measuring tape (to confirm your perch fits just right)
- Power drill (for easy assembly)
Step-by-Step Instructions:
1. Measure Your Window: Start by measuring the width of your window. This measurement will guide how long your perch will be. Make sure you factor in some extra space for stability.
2. Cut the Wood: Using your wooden boards, cut two pieces for the sides and one piece for the back. Then, cut the plywood to the desired size for the perch base. Don’t worry, nobody’s judging your sawing skills here—it’s all about the finished product.
3. Sand the Edges: Smooth out the cut edges and corners with sandpaper. This step is more important than you think—no one wants their kitty to have a splintery surprise during their sunbathing sessions.
4. Assemble the Frame: Attach the sides and back to the base plywood using screws and L-brackets to create a sturdy structure.
This is where you can either channel your inner carpenter or, you know, just screw things together and hope for the best. It might look like a jigsaw puzzle gone awry at first, but cats aren’t picky.
5. Secure It to the Wall: Decide on the best height for your perch. Confirm it’s close enough to the window for easy access.
Use your power drill to secure the perch to the wall, verifying it’s level and stable—nobody wants to witness a cat catastrophe, right?
6. Cover the Base: If you want to add a layer of comfort, stretch the strong fabric over the perch base and securely staple it in place. Your cat will thank you for the soft landing spot for sunbathing.
7. Test It Out: Finally, step back and give your kitty a tour of their new basking spot.
Watch their excitement as they jump up. It’s basically instant happiness, and you might just feel like a proud parent for creating the perfect sunbathing retreat.
Optional Add-ons/Variations:
- Different Colors & Patterns: Give your perch personality by using colored paint or fun fabric patterns. Why not glam up the perch to match your home theme? Stripes or polka dots can become a conversation starter.
- Add a Safety Barrier: If your window opens outwards, consider adding a small fence or railing for safety. Better safe than sorry, especially if your cat thinks they can fly.
Pro Tip:
Before you start your project, check and confirm that the perch will be securely fastened.
It’s always a good idea to have a secondary mounting option for larger breeds—extra stability means no kitty accidents while they’re lounging and dreaming of chasing birds. Plus, investing in some good quality materials will surely keep this perch a long-lasting fixture in your home.
There you have it! A loving, sunny escape for your feline buddy, made right from the comfort of your own home.
And if all else fails, just remember—at least your cat will still love you, even if the perch turns out a bit… unique.
4. Cat-Friendly Furniture Inserts
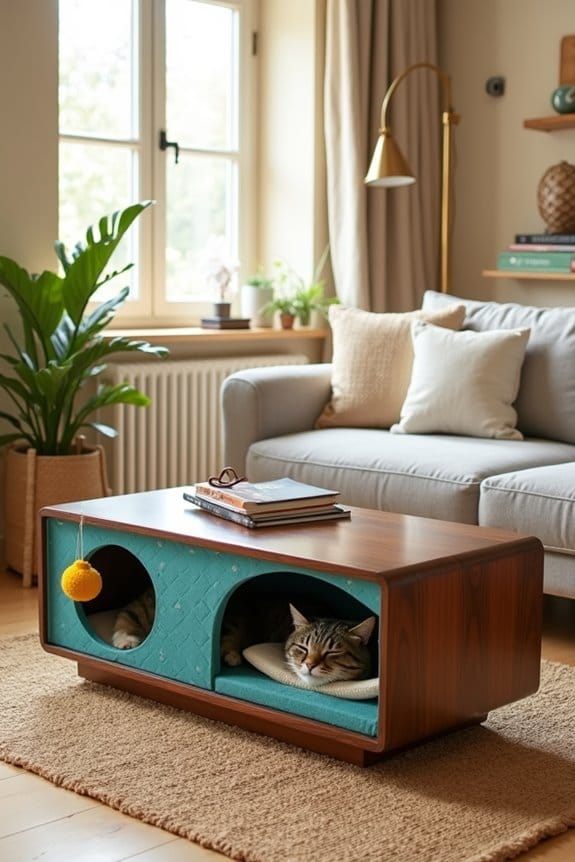
If you’re looking to give your home a cozy, stylish upgrade while keeping your furry friend’s comfort in mind, then pet-friendly furniture inserts are just the ticket. These ingenious additions allow you to transform existing furniture into cat havens, all while saving money and maintaining your home decor’s aesthetic appeal.
Imagine this: a chic coffee table that doubles as a hideaway for your cat, saving you from the dreaded battle of claws on your favorite couch. Tempted? Let’s jump in.
Materials Needed:
- Furniture insert kits (specifically designed for pet use)
- Wooden boards or plywood (depending on customization)
- Heavy-duty fabric (for covering the insert)
- Foam padding (to provide comfort)
- Measuring tape (to get everything right)
- Power drill (for assembly)
- Scissors (for cutting fabric)
- Stapler (for securing fabric to the insert)
- Optional: paint or stain (to match your decor)
Step-by-Step Instructions:
- Measure your furniture: First things first, grab that measuring tape and determine the dimensions of the space where you want to place the inserts. Being precise is key here; you don’t want to create a stressor for yourself or your kitty.
- Choose your inserts: Pick out furniture insert kits that fit your style and your furniture’s dimensions. Many kits come with easy-to-follow instructions, so you’re in good hands.
- Prepare the space: Once you’ve gathered your materials, turn your furniture upside down (preferably with a family member’s help unless you’re feeling particularly strong). This will make it way easier to work on.
- Cut the foam and fabric: If your insert requires a bit more fluff, cut the foam to size and cover it with the fabric you’ve chosen. Feel free to have fun here—wild patterns, soft hues, whatever suits your vibe!
- Assemble the inserts: Follow the kit instructions to secure the inserts in place using a power drill. You might need to put a little muscle into this part, but trust me, it’ll be worth it when you see your cat purring away in their new fortress.
- Secure the fabric: Use your stapler to make sure that the fabric is snug around the foam and insert. Pull it tight and staple it down, because no one wants a frumpy insert.
- Flip it back over: Once you’ve secured everything, carefully flip your furniture back to its rightful position. Stand back and admire your handiwork, and maybe prepare for a little introduction with your cat. They’re going to love their new digs.
Optional Add-ons/Variations:
- Get creative with colors: If you’re feeling bold, choose vibrant fabrics or even use eco-friendly paint on the insert to match your décor.
- Consider adding toys: Attach little hanging toys to the insert for extra fun. Cats love to play, and you might just have a pawsome, multi-functional piece of furniture!
Pro Tip:
Before you start, make sure to check if your furniture is sturdy enough to handle the transformation. You don’t want any accidents where your kitty endures a dramatic tumble.
If you’re really serious about comfort, add a removable cover on the inserts for easy washing—because you know, cat hair happens.
With this easy DIY project, not only do you save some cash, but you also create a custom space for your kitty that blends harmoniously with your home’s aesthetics.
Let those creative juices flow, and enjoy creating a cat-friendly oasis right under your nose!
5. Indoor Cat Garden Oasis

Is your home feeling a tad lifeless? How about turning a cozy corner into a lush indoor cat garden? This DIY project isn’t just a treat for your home aesthetics; it provides your feline friend with a delightful space to explore, perch, and play, all while bringing a refreshing change indoors. Plus, it’s a fantastic way to save money on fancy cat trees and give your kitty a customized experience they’ll adore!
Materials Needed:
- Potted plants (safe for cats, like cat grass or spider plants)
- Wooden shelving units or sturdy crates (for vertical space)
- Planters (fancy or simple, depends on your style)
- Potting soil (if you’re planting in bigger pots)
- Decorative rocks or pebbles (for a finished look)
- Coconut coir or sisal rope (if creating scratching posts)
- Measuring tape (to find the best spot)
- Watering can/spray bottle (for keeping those plants fresh)
- Drill/screwdriver (for assembly if using shelving units)
Step-by-Step Instructions:
- Choose your space: Pick a cozy corner where your cat loves to hang out. It should be bright but not too sunny, avoiding the dreaded “too many sunbeams” trap.
- Design your layout: Arrange the shelving units or crates in a way that creates levels for your cat to hop, lounge, and explore. Think about how your plants will be positioned, too. You want a good mix that makes a fun playground.
- Prepare the plants: If you’ve opted for potted plants, fill your planters with potting soil. Choose non-toxic plants, like cat grass or herbs that are safe for your feline buddy. Don’t worry—just a little digging will do.
- Plant and decorate: Place your plants into their pots, then sprinkle the decorative rocks around for that extra wow factor. Pop the pots onto shelves, even mixing in some toys or cozy spots for your cat to lay on.
- Build scratching areas: If you’re feeling extra crafty, wrap some coconut coir or sisal rope around a wooden post or piece of furniture to create an adorable scratching post. This adds functionality while providing a texture your cat will love.
- Maintain your oasis: Water regularly and make sure your kitty doesn’t decide to have a nibble on any harmful plants. Keep your indoor garden tidy since cats love to jump and play.
- Invite your cat: Once your indoor garden oasis is set up, encourage your furry friend to explore. Use treats or a toy to guide them toward their new paradise, and just watch them soak in their surroundings.
Optional Add-ons/Variations:
- Want a pop of color? Consider using planters in vibrant hues, or even paint the wood shelving to match your home decor. You could go all one color or mix and match for a playful vibe.
- Create a “cat lounge” by adding soft cushions or blankets in various spots for those lazy lounging days.
Pro Tip:
Invest in a cat-safe, self-watering planter if you’re worried about plant upkeep or your cat knocking over pots. They’ll keep your indoor jungle thriving while you sip your coffee without a worry.
Plus, the added height makes it extra fun for your kitty to explore.
6. Hiding Spots and Tunnels
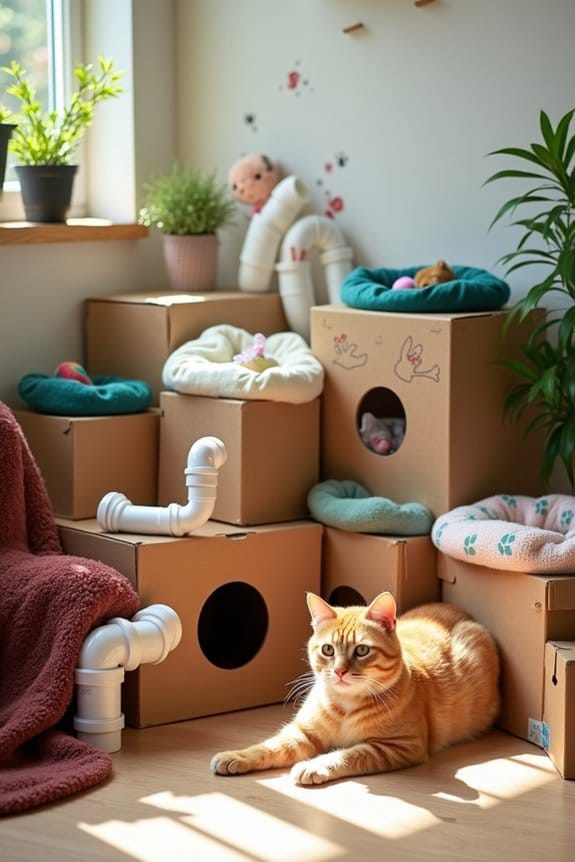
Is your kitty a stealthy little ninja or a playful explorer? Why not give them the ultimate hide-and-seek paradise with some DIY hiding spots and tunnels? Not only does this project provide hours of entertainment for your furry companion, but it also saves you a trip to the store and can help keep them off your prized furniture.
Think of it as a fun puzzle box for your cat, adding intrigue and a touch of whimsy to your living space.
Materials Needed:
- Cardboard boxes (various sizes) or PVC pipes (for tunnel arrangements)
- Fabric (old sheets, fleece, or fabric scraps for cozy spots)
- Scissors (for snipping and cutting)
- Hot glue gun and glue sticks (or tape for easy assembly)
- Cat toys or treats (to entice them into the hiding spots)
- Measuring tape (if you want precision)
- Decorative markers or paint (optional, for personal touches)
Step-by-Step Instructions:
- Gather your boxes: Start by collecting a variety of cardboard boxes. Think small, medium, and large. Cats love different sizes to explore and squeeze into!
- Design your hidey-holes: Using your scissors, cut out doorways in the boxes. Make them big enough for your cat to pop in and out but not too big they lose the snug feel. This is where they’ll find their inner explorer.
- Create tunnels with PVC pipes: If you’re feeling fancy, cut your PVC pipes into various lengths and connect them using elbow joints. Make sure there are no sharp edges. Cats love curves and twists; it adds an element of surprise!
- Add comfort: Line the insides of your boxes with fabric scraps or soft fleece. Cats love cozy spots to nuzzle into and take cat naps. You can even glue down the fabric for a more secure fit.
- Decorate your creation: Grab those decorative markers or paint and let your creativity flow. A little doodle or a fancy paint job can transform a plain box into a fabulous hideaway.
- Arrange your setup: Place your boxes and tunnels in a corner or spread them throughout the room for exploration. Make sure they’re easily accessible, encouraging your cat to plunge into their new hideouts.
- Encourage exploration: Drop a few treats or a toy inside each box and tunnel. This will coax your kitty to check them out. It’s like a treasure hunt happening right in your living room.
Optional Add-ons/Variations:
- Wrap It Up: For extra pizzazz, wrap the outside of the boxes with colorful contact paper or leftover wallpaper to match your home decor. Your cat’s playground can be a stylish part of your home.
- Create a Theme: Turn your hideouts into a fantasy world. For instance, you could design a pirate ship or a jungle with leaves and sticks, making every playtime an adventure!
Pro Tip:
Always check the safety of your materials. Avoid any sharp edges, and make sure nothing can be ingested. Keeping it safe and fun is the key to transforming your space into a delightful cat wonderland.
Creating hiding spots and tunnels isn’t just about being crafty; it’s about giving your feline friend a place where they can let their imaginations run wild, all from the comfort of home.
Trust us, watching them dart in and out of their new hideaways will bring a smile to your face.
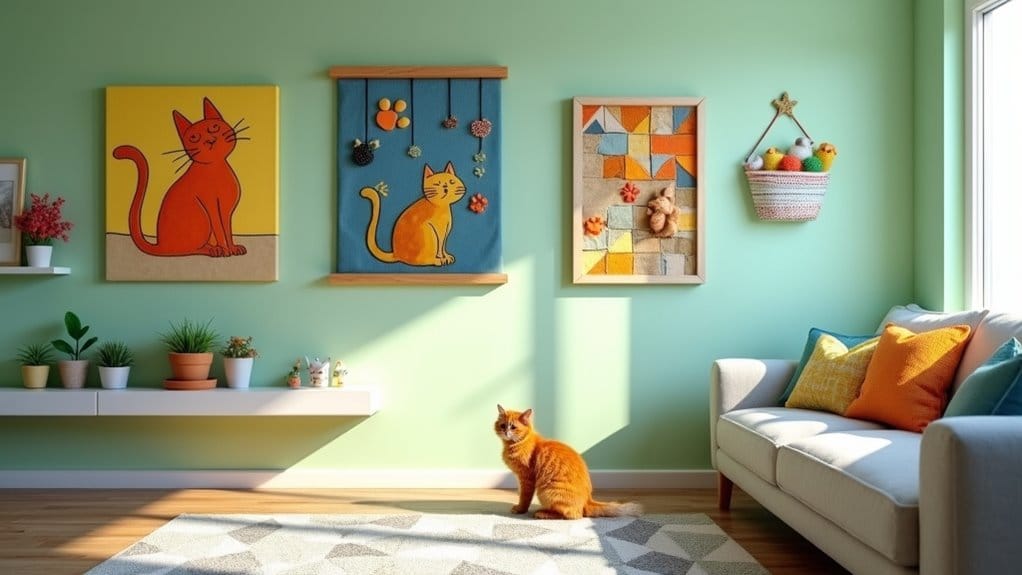
7. Cat-Themed Artwork Displays
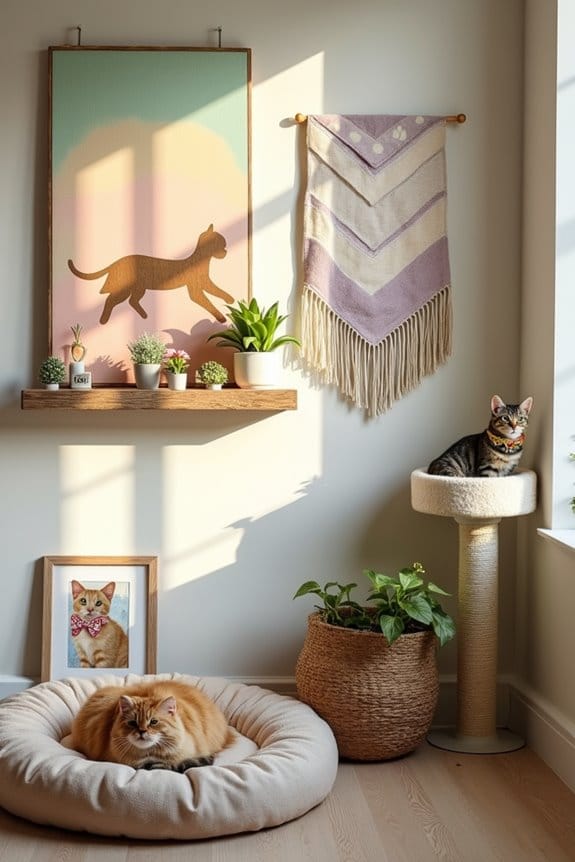
Are you tired of staring at blank walls with nothing but lonely paint staring back at you? Why not brighten up your space with some DIY cat-themed artwork that celebrates your feline friends? Not only will this project serve as a fun conversation starter, but it’s a fantastic way to add a personal touch to your home while showcasing your love for your fur baby.
Plus, creating your own art can save you a chunk of money that you’d otherwise spend at the gallery — and let’s be honest, that budget can go towards cat treats instead.
Materials Needed:
- Canvas or sturdy paper (you can also use reclaimed wood)
- Acrylic paints (pick colors that match your decor)
- Paintbrushes (various sizes for detailed work)
- Palette (a plate or piece of cardboard works too)
- Sealant spray (to protect your artwork)
Step-by-Step Instructions:
1. Choose Your Canvas: Decide whether you want to use a traditional canvas or try something quirky like wood or thick paper. If you’re feeling adventurous, grab a mix and create a gallery wall.
2. Sketch Your Design: Lightly sketch out your design with a pencil. This could be anything from your cat’s silhouette to playful paw prints. You want something that speaks to your cat’s personality but without overthinking it.
Imperfection is part of the charm, right?
3. Start Painting: Using your brushes and acrylics, Start Painting over your sketch. Feel free to layer colors for depth — the messier the strokes, the more character it has. Channel your inner cat — playful, curious, and a tad unpredictable.
4. Add Finishing Touches: Once your main design is dry, go back in with smaller brushes to add details. Maybe some whiskers or a colorful collar. Remember, this is your artwork, so let your imagination run wild!
5. Seal It Up: After the paint is completely dry, give your piece a spray of sealant. This will protect it from any curious cat paws and keep it looking fresh for years to come.
6. Display Your Masterpiece: Find a spot on the wall or on a shelf where the art can easily catch the eye. If your kitty is anything like mine, they’ll likely see it as an invitation for exploration, so pick a place that can withstand a curious nudge.
Optional Add-ons/Variations:
- Use Fabric: Instead of painting on canvas, try using fabric and create a wall hanging. You could get really creative with patterns and textures. A fabric design can add warmth and charm to your space.
- Incorporate Cat Photos: Make it a mixed-media collage by adding cute photos of your cat. You could even include small keepsakes like ribbons from cat shows or a tiny collar charm. It’s like a scrapbook, but way more stylish.
Pro Tip:
When using acrylic paints, remember to clean your brushes immediately after use. Otherwise, you might end up with a paint brush that looks like it’s gone through a catastrophic art disaster—clumpy, crusty, and sad.
Trust me, no one wants that headache when inspiration strikes again. And who knows? Your adorable décor might just inspire you to foster your own art gallery at home; just make sure it’s cat-proof.
Extra Tips & Ideas
Wondering how to add a little more flair to your cat’s new digs? Consider some cozy nooks. Cats love to hide, so why not craft a little cave from an old cardboard box? Toss in a soft blanket, and voilà—instant cat happiness.
You could also use removable wall stickers for an easy pop of color. I tried this, and my cat, Mittens, couldn’t stop playing with them.
Think about creating a play zone with dangling toys, but be prepared for some serious acrobatics. Trust me, you’ll find yourself laughing when your cat suddenly attempts a backflip.
Don’t forget scratching posts or towers; they’ll keep those nails in check. Embrace your creativity. Your cat will thank you, and you just might enjoy it too.
Frequently Asked Questions
What Are the Best Colors for a Cat Room?
Soft pastels like light blue or pale green create a calming atmosphere for your cat room. Add some bright accents for playfulness. Avoid overly vibrant colors; they might overstimulate your feline friends and disrupt their tranquility.
How Can I Make a Small Space Cat-Friendly?
To make a small space cat-friendly, think cozy! Utilize vertical shelves for climbing, add cushy napping spots, and create fun hiding places. Your feline’ll appreciate the adventure and comforts of their tiny kingdom!
What Types of Furniture Are Safe for Cats?
For a cat-friendly home, choose sturdy, non-toxic furniture. Opt for couches with tight weaves, metal or hardwood structures, and low shelves. Avoid delicate fabrics and glass pieces; they can break or get scratched easily.
How Can I Reduce Odors in the Cat Room?
To keep odors at bay, you’ve gotta regularly clean litter boxes and use odor-absorbing substrates. Incorporating air purifiers and fresh herbs like lavender can also help, turning your cat room into a fragrant oasis.
How Do I Introduce My Cat to a New Space?
Start by allowing your cat to explore the new space at their own pace. Set up familiar items, like their bed and toys, and give them plenty of time to adjust without pressure.
Conclusion
Creating a dreamy cat room isn’t just fun—it’s also beneficial for your feline buddy. Did you know that cats spend about 70% of their lives sleeping? So why not give them an amazing space to snooze and play? From climbing walls to cozy nooks, your home can be a true cat paradise. Just imagine your furball lounging in their sunlit perch or zooming through their very own tunnel. It’s all about their happiness, and let’s be honest, a little style for us too.

Hi, I’m Ali Tarek, the founder of Animalsman. I’ve always been passionate about pets, especially dogs and cats, and I created this website to share practical tips, easy recipes, and helpful care advice for fellow pet lovers. My goal is to make pet care simple, enjoyable, and accessible for everyone. When I’m not writing or curating content, you’ll usually find me spending time with my furry friends or learning new ways to keep them happy and healthy.

