Okay, so you know that feeling when you walk into your living room and your cat has destroyed the armchair — again?
Like, scratches on the fabric, stuffing pulled out, and your whole Pinterest aesthetic just… gone.
It stings. Especially when you’ve put real effort into making your space feel cozy and put-together.
Here’s the thing — my cat Lena did this to my favorite chair last winter, and I almost lost my mind. I’d just redecorated the whole corner and it looked so good for about three days.
Your cat isn’t being a menace on purpose. She just needs somewhere to climb, scratch, and own.
That’s exactly why I put together these 7 cat tower DIY plans — so your furniture survives and your cat gets a space she’ll actually use.
#1: DIY Wall-Mounted Cat Tree with Sisal Scratching Posts and Floating Shelves
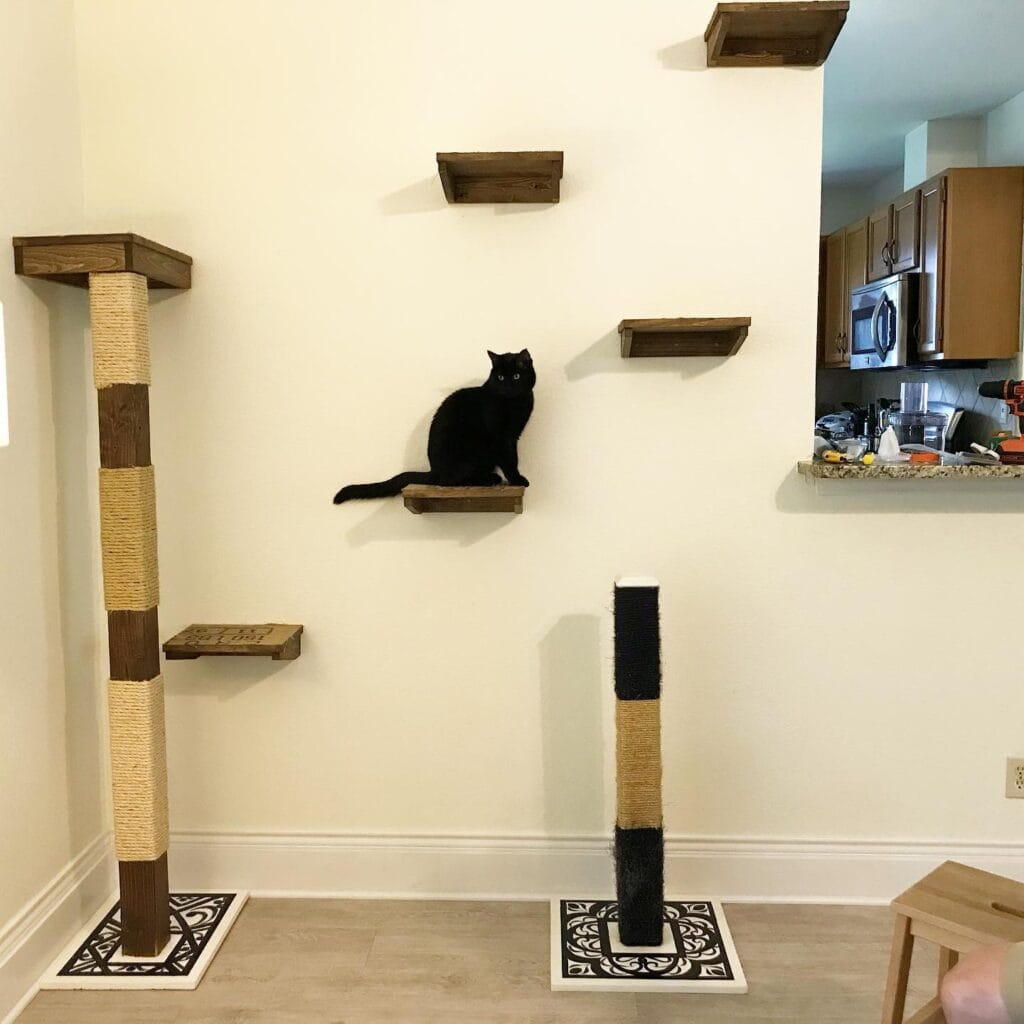
You know that feeling when your golden is sprawled across your perfectly styled living room floor and you’re just like… okay, the aesthetic is completely gone? Yeah. Cat owners get that same panic when their bulky plastic cat tower takes up half the room and clashes with every single thing they’ve carefully picked out on Pinterest.
This build? It’s the one that fixes all of that.
Materials & Tools You’ll Need:
– 2×6 pine or oak boards (for floating shelves — cut to 12″ x 18″ per shelf)
– 4×4 wooden post (6 feet tall for the floor-to-ceiling scratching column)
– Natural sisal rope (at least 200 feet for full wrapping coverage)
– Black jute rope (for contrast banding — 50 feet)
– Dark walnut wood stain (Minwax or similar)
– Heavy-duty wall anchors rated for 50+ lbs per shelf
– L-brackets (4″ steel, hidden underneath each shelf)
– Decorative base mat (24″x24″ — the black-and-white ornate style shown here adds a clean finished look)
– Black carpet or sisal piece for base post wrapping
– Drill, level, sandpaper (120 and 220 grit), wood screws, staple gun, hot glue gun
Prep Time: 45 minutes | Active Project Time: 6–8 hours | Difficulty Level: Intermediate
### Instructions
Start by cutting your oak boards to size and sanding them down — hit them first with 120 grit then finish with 220 grit so the stain absorbs without blotching. Apply two coats of dark walnut stain, letting each coat dry fully between rounds. That rich espresso color is exactly what gives this build its upscale look instead of that sad beige cat-furniture vibe.
For the floor post, take your 4×4 lumber and wrap it in alternating bands of natural sisal rope and dark-stained wood sections. Use a staple gun at the start and end of each rope section, then secure the middle with hot glue so nothing shifts when your cat goes full chaos mode during a midnight zoomie session. The sisal-wrapped post means your cat has a scratch surface they’ll actually use — durable texture pulls them away from your sofa, which saves your furniture and keeps the whole room looking intentional.
Mount your shelves using the hidden L-brackets drilled into wall studs. Pull out your level for every single shelf — even one degree off and the whole staircase pattern looks wrong. Stagger them diagonally up the wall, spacing each shelf about 14–16 inches apart vertically so there’s a comfortable jump distance for any size cat.
The second smaller post on the floor uses the same rope-wrapping technique but incorporates black carpet material at the base and top for contrast banding. Anchor both posts to their decorative base mats with wood screws from underneath so they sit flush and stable.
Place the lowest shelf within 18 inches of the floor so even older or less agile cats can access the full climb. And if you’ve been thinking about ways to give your cat more enrichment, 7 Safe DIY Cat Patio Ideas for Fresh Air pairs beautifully with a wall system like this one.
Hidden L-brackets keep the shelves looking clean and floating — that visual lightness means the whole installation reads as decor first, cat furniture second, which is the entire payoff of putting in the extra work here.
When wrapping rope around your posts, keep tension consistent the whole time. Loose wrapping bunches and gaps within a few weeks of use. Wrap tight, glue every 10–12 inches on the underside, and your post stays clean for years.
📸 Photo credit: Instagram @akiyo_ogura
#2: Porch-Side Cat Climbing Tower (The One That Actually Matches Your Deck)
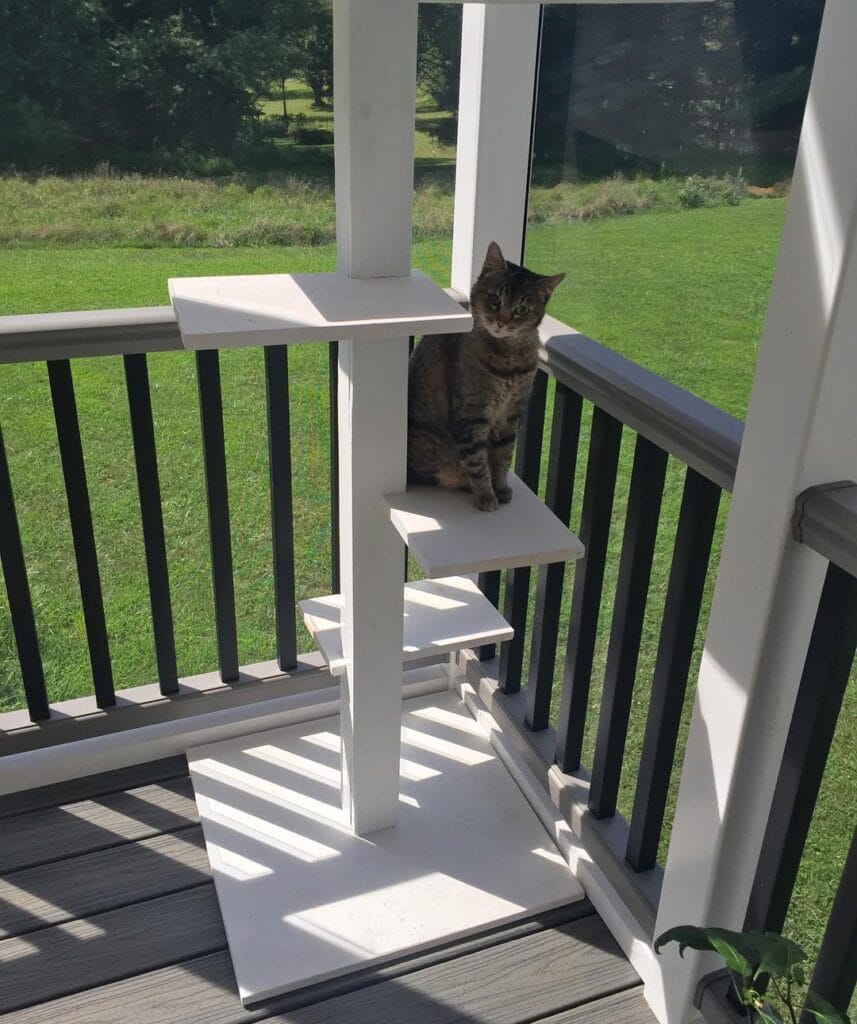
Okay, so you know how your golden probably has, like, three different beds, a designated couch cushion, and a spot by the back door? Your cat deserves that same energy outside.
This white-painted wood cat tower in the photo is exactly the kind of porch project I’d spend a Saturday building. It’s three staggered platform steps built around a 4×4 central post, painted in crisp white to match the deck railing. The platforms are cut from 3/4-inch plywood and sized roughly 12×14 inches each, spaced about 8-10 inches apart vertically so your cat can hop up without straining.
Materials & Tools:
– One 4x4x6 ft pressure-treated post
– Three pieces of 3/4-inch plywood (cut to 12×14 inches)
– Wood screws (2.5-inch)
– Exterior wood glue
– White exterior paint + primer
– Circular saw, drill, sandpaper (120-grit)
– L-brackets (4 per platform)
Instructions
Sand your plywood pieces first — rough edges mean splinters, and nobody wants that. Cut your post to 48 inches total height. Mark your platform positions at 8 inches, 20 inches, and 34 inches up the post.
Pre-drill your holes before attaching each platform with L-brackets and 2.5-inch screws. Apply exterior wood glue along each bracket contact point for extra hold. The staggered alternating-side layout — like in the photo — gives your cat a natural zigzag climbing path, which keeps joints healthier over time.
Prime the whole structure before your top coat. Two coats of exterior white paint gives you that clean, porch-furniture look that actually belongs outdoors instead of looking like a scratching post escaped from the living room.
A better way: bolt the base plate directly to your deck boards using two 3-inch lag screws so the tower doesn’t tip during an ambitious leap.
The elevated platforms give your cat a perch to watch the yard — same sightlines your golden uses from the window, but actually outside. That visual stimulation cuts boredom and reduces indoor destructive scratching by keeping cats mentally engaged in their outdoor environment.
If you love building things for your cat, 7 Fun DIY Cat Projects Every Owner Needs has more weekend builds worth bookmarking.
Finish the top platform with a small patch of outdoor carpet or sisal mat cut to size — it gives grip on rainy days and adds texture cats genuinely prefer for stretching.
Prep Time: 20 minutes | Active Project Time: 3-4 hours | Difficulty Level: Beginner-Intermediate
📸 Photo credit: Instagram @for_all_animals
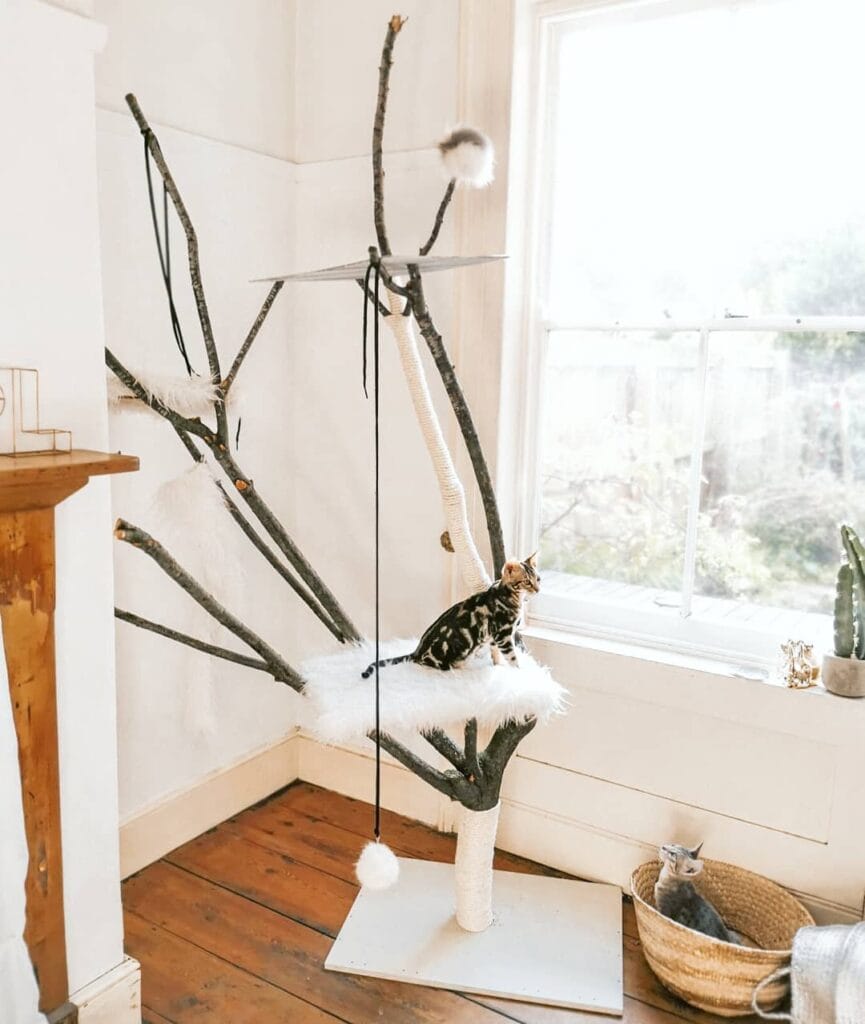
#3: Fluffy White Cat Tree With Natural Wood Branches (No-Sew, Boho Chic)
Okay so picture this — you finally get your living room exactly how you want it. Pinterest-worthy, cozy, that warm neutral palette you’ve been curating for months. And then your cat decides the corner cardboard scratcher is their new throne. Right next to your linen couch.
Yeah. We’re not doing that anymore.
This DIY cat tower is the one. White faux fur fabric, natural bamboo or driftwood branches, jute rope, and a circular plywood base — it blends into a boho living room like it was always supposed to be there.
Materials & Tools
– 2–3 natural bamboo or driftwood branches (varying heights, roughly 3–5 ft)
– 1 sheet of ¾-inch plywood (cut into 3 circular platforms: 18″, 14″, and 10″ diameter)
– White faux fur fabric (at least 2 yards)
– Natural jute rope (100 ft roll)
– 1 square plywood box (12″x12″x12″) for the hideaway base
– Staple gun + staples
– Wood glue + heavy-duty screws
– Drill with hole saw attachment
– Sandpaper (120-grit)
– White pom-pom trim (optional but so worth it)
– Hanging toy balls (jute or faux fur)
—
Instructions
Start with your hideaway cube. Cut your 12″x12″ plywood panels into four sides and a top, then drill a 6-inch circular opening on the front panel using your hole saw. Sand every edge — your cat’s face will be pushing through that hole daily, so no splinters allowed.
Assemble the cube with wood glue first, then reinforce every joint with screws. Let it cure for a full hour.
Now wrap the whole cube in white faux fur. Pull the fabric tight, fold the edges like you’re wrapping a gift, and staple directly into the plywood. The faux fur hides everything, so don’t stress about perfect cuts here.
Next, mount your branches. I drilled pilot holes into the top of the cube and used 3-inch screws with wood glue to anchor two main branches — one straight up through the center, one angling slightly outward like a real tree fork. This is the part that makes the whole build look organic and wild instead of like furniture store flat-pack.
Wrap the lower sections of each branch with jute rope, overlapping tightly and securing both ends with a drop of wood glue. This is the scratching zone — jute is tough enough to handle serious claw sessions, which saves your couch arm and keeps your cat engaged.
Attach your three circular platforms at staggered heights. Pre-drill into the branch at each level, screw a small wooden dowel as a ledge support, then mount the platform on top. Cover each platform with white faux fur before attaching — way easier than doing it after.
The top platform sits at roughly 4.5 feet when built this way. And that height matters — cats feel safest surveying a room from above, so giving them that high perch actually reduces anxious behavior. Good news: one sturdy build replaces every ugly scratcher you’ve been shoving behind the couch.
Hang small faux fur pom-pom balls from jute loops at the middle platform level. Your cat will bat them for hours.
Hot-glue pom-pom trim around the edge of each platform for that extra fluffy cloud effect you see in the image. It’s a small detail that makes the whole thing look intentional.
Prep Time: 30 min | Active Project Time: 3–4 hours | Difficulty Level: Intermediate
If your branches feel wobbly after assembly, add a wooden cross brace hidden inside the cube top — screwed into both branches and the plywood. Nobody sees it, but the whole structure locks solid. Also, source branches from a landscape supply store rather than pulling them from outside. Dried, cured wood won’t crack or warp after a few months indoors.
For more cozy DIY builds your cats will actually use year-round, 7 Warm DIY Outdoor Cat Shelter Winter Designs has some really solid ideas worth bookmarking.
📸 Photo credit: Instagram @thepetsay
#4: Floor-to-Ceiling Tension Cat Tower (No Drilling Required)
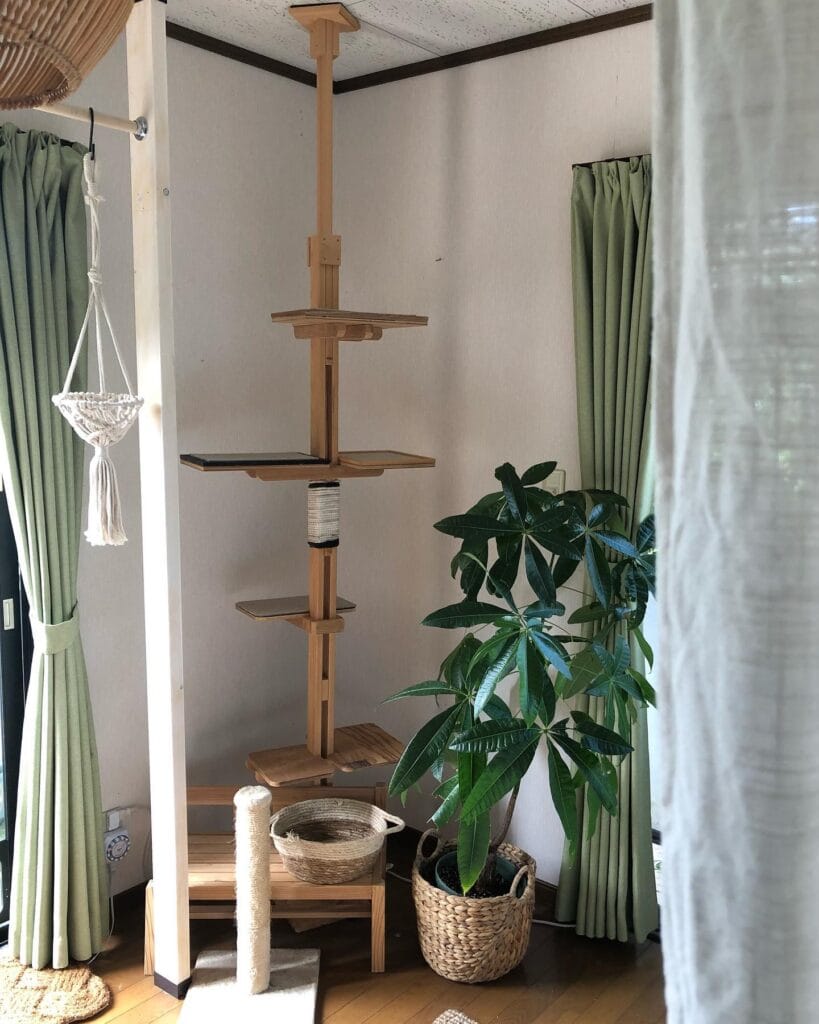
Okay, so you know how your golden retriever has that one corner of the living room she’s completely claimed? My aunt’s cat is the same way — except cats want to go up, not sprawl out. And if your cat’s been eyeing your bookshelves like a jungle gym, this build is going to save your sanity.
Prep Time: 30 minutes | Active Project Time: 3–4 hours | Difficulty Level: Intermediate
Materials & Tools:
– 1 wooden tension pole (floor-to-ceiling adjustable, 67″–114″ range)
– 4–5 solid wood platforms (12″x12″ or 14″x14″, ¾” thick birch plywood)
– Sisal rope (½” diameter) for wrapping one mid-section
– Jute rope mat scraps for platform padding
– Wood screws (1.5″ length), drill, sandpaper (120-grit)
– Wicker basket for base storage
– Wood stain or natural beeswax finish
### Instructions
Start by sanding every platform edge until there are zero rough spots — cats drag their paws across these ledges constantly, and splinters are a disaster waiting to happen.
Mount the tension pole in your chosen corner first. The pole’s adjustable spring mechanism locks it between floor and ceiling without a single hole in your wall, which — honestly? Is a game changer when you’re renting.
Attach platforms at staggered heights using L-bracket hardware bolted directly into the pole’s pre-drilled slots. Space them roughly 12″–16″ apart so your cat can actually leap between levels without straining. Staggered placement means cats build muscle control, which pays off in fewer knocked-over lamps.
Wrap the mid-section with sisal rope in tight, overlapping coils using a hot glue gun to anchor the starting and ending points. This section becomes the scratching post — cats scratch here instead of your sofa arm.
Real talk: the wicker basket at the base isn’t just decorative. Tuck extra toys or grooming tools in there and the whole tower reads like intentional home decor instead of pet furniture.
Finish every wood surface with natural beeswax to seal the grain. It dries matte, smells neutral to cats, and keeps the wood from absorbing claw oils over time.
The hanging macramé basket on the side rod adds a second resting spot for smaller cats who prefer a swinging perch over a flat platform.
Sand your platforms a second time after the first beeswax coat dries. The grain raises slightly when sealed and a quick 220-grit pass makes the surface buttery smooth — cats actually prefer a slightly textured landing over slick wood.
📸 Photo credit: Instagram @cozygarden_28
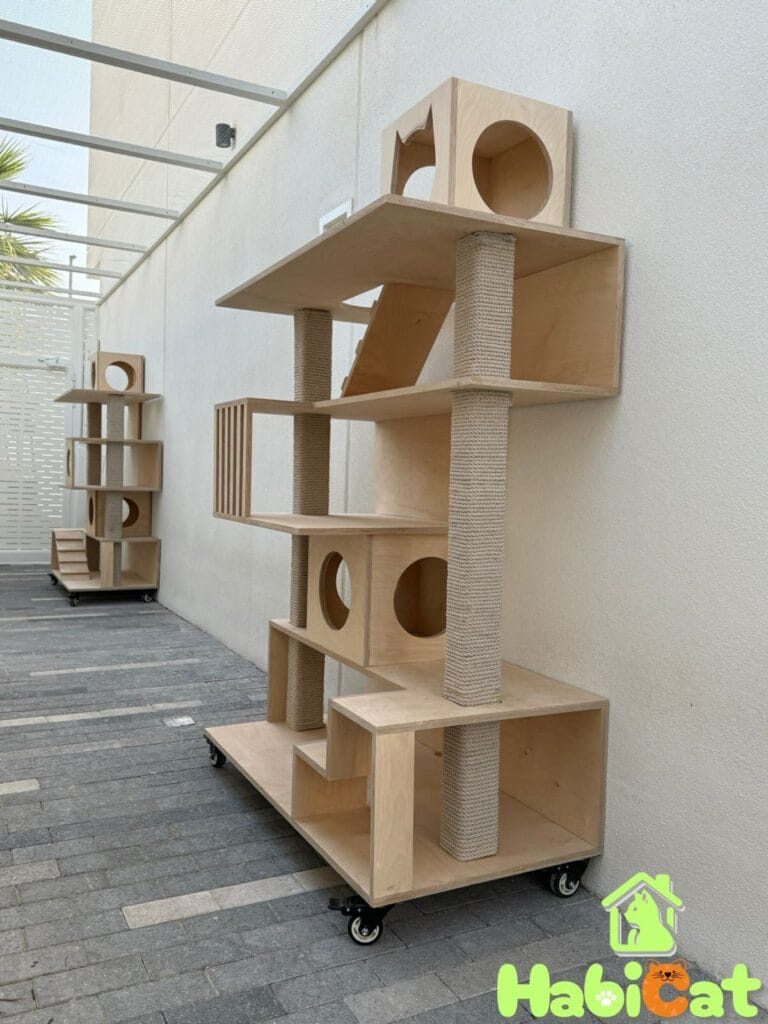
#5: The Rolling Wooden Cat Tower That Looks Like Actual Furniture (And Your Cat Will Lose Their Mind Over It)
Okay so you know that moment when your golden decides to zoom through the living room and crash into that ugly carpet cat tower — the one that’s shedding sisal everywhere and lowkey clashing with your entire aesthetic? Yeah. We’ve been there.
This build fixes all of that.
Prep Time: 2–3 hours | Active Project Time: 6–8 hours | Difficulty Level: Intermediate
Materials & Tools You’ll Need:
– 18mm Baltic birch plywood (natural, unfinished)
– 4 heavy-duty swivel caster wheels (at least 2-inch diameter with locking mechanism)
– Natural sisal rope (6mm thickness, approximately 50 meters)
– Wood screws (3.5cm and 5cm lengths)
– Wood glue (waterproof formula)
– Sandpaper (120-grit and 220-grit)
– Circular saw or table saw
– Drill + drill bits
– Jigsaw (for the round tunnel cutouts)
– Clamps (at least 6)
– Non-toxic wood finish or matte clear coat
– Hot glue gun (for sisal finishing ends)
– Measuring tape + pencil
– Safety goggles + dust mask
What you’re building here is a multi-level modular cat tower mounted on a rolling base, made from Baltic birch plywood with wrapped sisal scratch posts. It sits against your wall like a piece of actual furniture — not like a pet store impulse buy.
The whole structure in the image has six distinct levels including two enclosed cube hideouts with circular tunnel openings (approximately 20cm diameter), a slatted cube den, two wide open platforms, a small staircase ramp, and a wide rectangular base unit that houses everything on those four caster wheels.
### Instructions
Start by cutting your 18mm Baltic birch plywood into all your panels before you do anything else. The base unit measures roughly 100cm wide × 40cm deep × 30cm tall — this is your foundation, so cut it clean and sand every edge with your 120-grit paper first, then finish with 220-grit. Rough edges are your enemy on this build.
Assemble the base box first using wood glue on every joint, then reinforce with 3.5cm screws countersunk flush into the surface. Let it cure for a full hour with clamps on. Don’t rush this — the whole tower sits on top of it.
Attach your caster wheels to the underside corners while the glue sets. Drill pilot holes first so the wood doesn’t split, then drive in the mounting screws. Lock two of the wheels on one side permanently and leave the other two swiveling — this gives you control when you roll it room to room.
Now build upward. Each level platform uses the same box construction method — sides, top, bottom, glue, screw, clamp. The two enclosed hideout cubes get their circular tunnel openings cut with the jigsaw. Trace the circle with a compass, drill a starter hole inside your traced line, then cut slow and steady. The cat-ear notch cutouts at the top of the upper cube? Use the jigsaw for those too and sand the curves until they’re smooth enough to run your palm across without catching.
The slatted cube den (the one on the left side in the image) uses vertical slat strips spaced 2–3cm apart, glued and pinned into a top and bottom rail. Cut your strips uniform — inconsistent spacing looks messy and it’ll bother you every time you walk past it.
Stack your levels asymmetrically like you see in the image. The platforms stagger left and right rather than sitting centered, which gives cats multiple jumping routes. Secure each level to the one below using 5cm screws driven at angles through the interior walls — this is called toe-screwing and it holds better than you’d think.
The small staircase ramp connecting two mid-levels gets individual step pieces glued and screwed with equal spacing. Measure twice, really — uneven steps and cats don’t mix.
For the two sisal scratch posts, cut your PVC pipe or square wood post to match your height gaps, then wrap tightly with 6mm sisal rope starting from the bottom. Keep tension consistent as you wrap. A dab of hot glue on the starting end and finishing end locks the rope so it doesn’t unravel after week one.
Sisal wrapping tightly over a solid post means the scratching surface stays firm under pressure — which actually protects your plywood structure from claw damage over time, and saves whatever couch is nearby from becoming the backup option.
Once fully assembled, apply your non-toxic matte clear coat to all exposed plywood surfaces. Two thin coats beat one thick coat. Let it cure 24 hours before your cat gets anywhere near it.
The natural birch finish in this build is doing a lot of heavy lifting aesthetically. It photographs like a Scandinavian furniture piece, sits flush against a white or neutral wall, and genuinely blends into a curated home without screaming “pet stuff lives here.”
If you want more modular inspiration, 7 Active Indoor DIY Cat Playground Setups has some seriously clever configurations worth checking before you finalize your layout.
Sand the inside walls of your hideout cubes too — cats spend time in there and rough surfaces catch fur and feel uncomfortable. A five-minute step that most people skip, and your cat will notice the difference.
📸 Photo credit: Instagram @habicat_ae
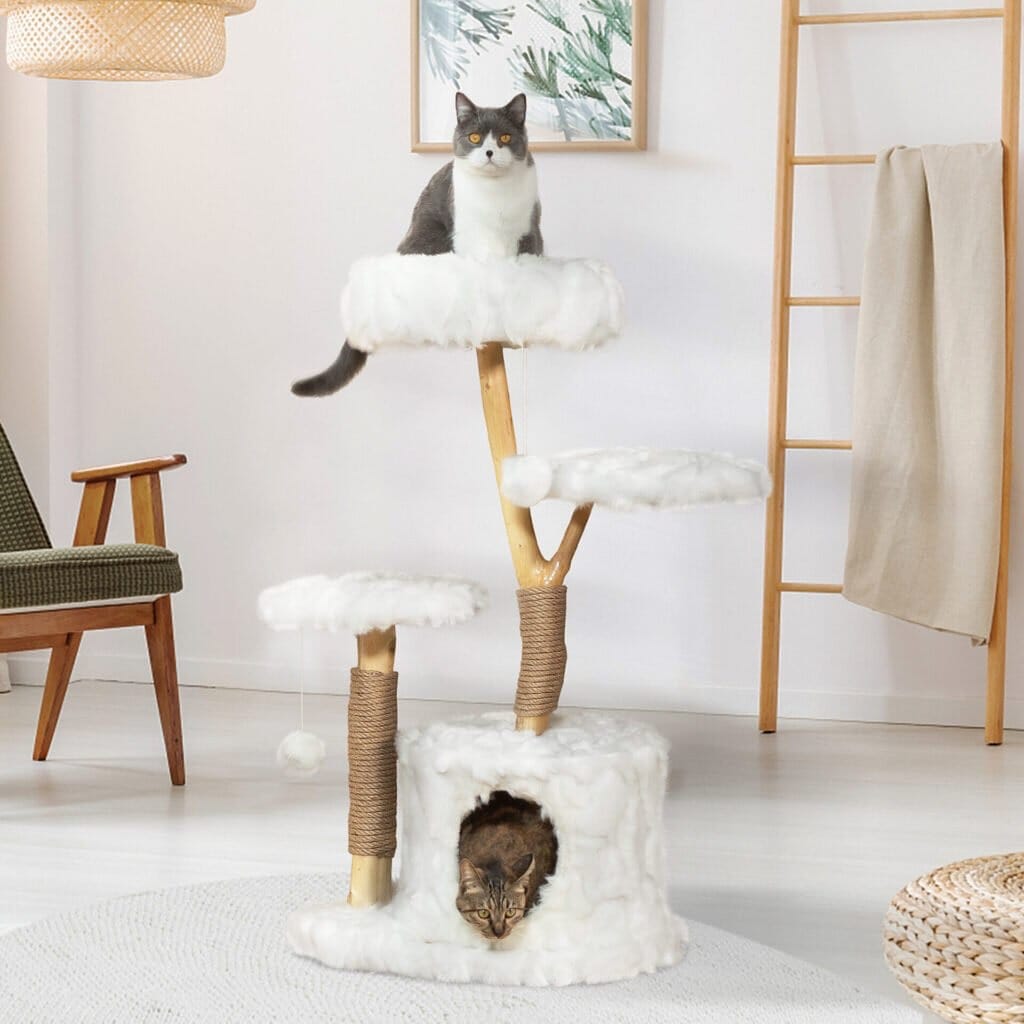
#6: Cloud Cat Tower DIY (The Fluffy Dream Perch Your Cat Will Never Leave)

Okay so you know how your golden retriever has completely claimed your living room couch? Like, there’s not one cushion that doesn’t have fur on it? Cats do the exact same thing — except they want height. My cousin’s tabby literally knocked a whole bookshelf arrangement apart just to get to the top shelf. That’s when she built this cloud tower, and girl, I haven’t stopped thinking about it since.
Materials & Tools You’ll Need:
– Natural driftwood branch (approximately 36–40 inches tall)
– 12-inch round MDF boards (x3) for platforms
– White faux fur fabric (at least 2 yards)
– Jute rope (50 feet) for the scratching post
– Cardboard tube (8-inch diameter, 12 inches tall) for the base hideaway
– Round wooden base (14-inch diameter)
– White fluffy pom-poms (x3) for hanging toys
– Strong wood adhesive + screws
– Hot glue gun + extra glue sticks
– Staple gun
– Drill with bits
– Scissors + measuring tape
Prep Time: 45 minutes | Active Project Time: 3–4 hours | Difficulty Level: Intermediate
—
### Instructions
Start by securing your driftwood branch to the wooden base using wood adhesive and two screws drilled up from the bottom. This branch is the backbone of everything, so don’t rush this step — let it cure for at least 30 minutes before moving on.
While that sets, wrap your 8-inch cardboard tube in white faux fur using the staple gun, pulling the fabric tight so there are no wrinkles. This becomes the cozy hideaway at the base. Cut a 4-inch circular opening on one side for the entrance — your cat will disappear in there for hours.
Next, attach the cardboard tube to the wooden base right beside the driftwood branch using strong adhesive. Place the first MDF platform on top of the tube and secure it with a screw through the branch. Wrap the entire platform edge in faux fur, hotgluing as you go and fluffing the edges up so it looks like a little cloud.
And here’s where the jute rope comes in. Tightly wrap a 12-inch section of the branch (between the base and first platform) in jute rope, securing both ends with hot glue. Jute wrapping gives your cat a dedicated scratching surface, which protects the rest of your tower from getting shredded — and honestly saves your furniture too.
For the second platform, drill it into the branch about 14 inches above the first one. Same faux fur treatment — wrap it, fluff it, make it cloud-like. Hang one white pom-pom from the branch between the two platforms using clear string.
The top platform is the showstopper. Attach the third MDF board at the very top of the branch and cover it generously with faux fur. Keep this in mind: pile the fur thicker on the top platform because that’s where your cat will actually lounge — this is where the feature of plush faux fur means your cat gets joint-cushioning comfort, which pays off as they age.
Hang the remaining two pom-poms down from the top platform at different lengths. Position the whole tower right at a window corner — that natural light situation in the photo is everything.
Tuck the base in a corner for stability, and press down all hot glue edges one final time once everything’s cooled. Give the whole tower a gentle shake — if anything wobbles, add a screw. Cats test structures like little engineers.
The faux fur sheds a little the first week, so a quick lint roll keeps things looking Pinterest-perfect. Placing the tower in a corner also adds natural wall support, which your cat will appreciate when they leap up at full speed.
📸 Photo credit: Instagram @thepetsay
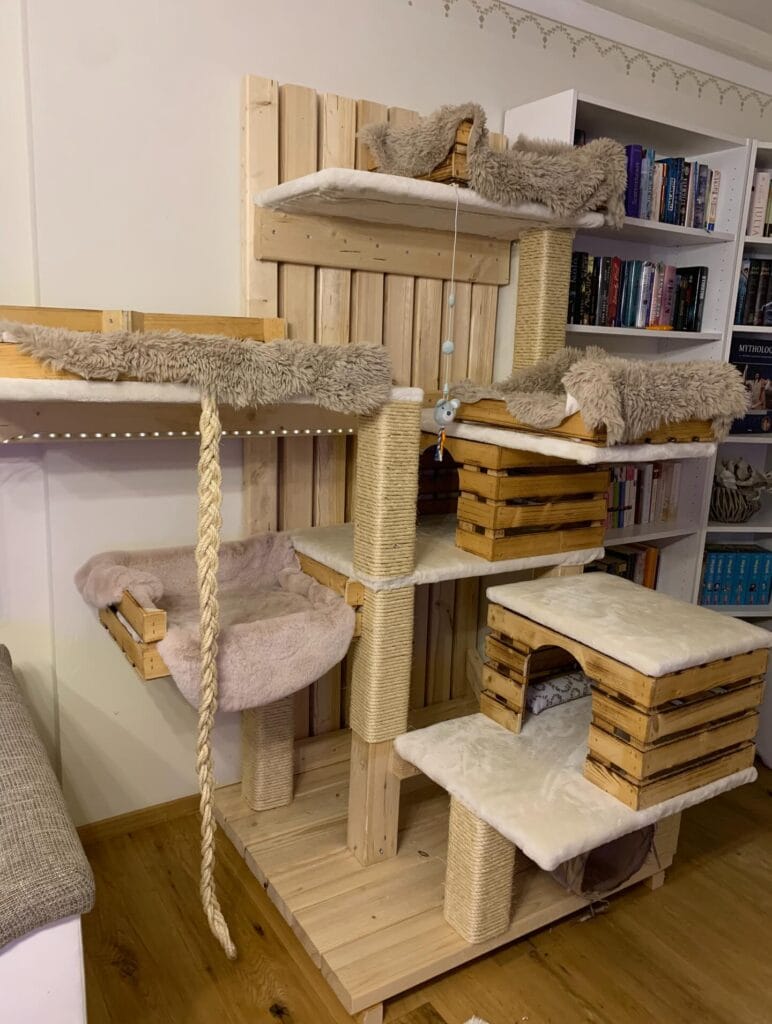
#7: Build This Multi-Level Crate Cat Tower With Sisal Scratching Posts and Cozy Fur Platforms
Okay, so hear me out — you know how your golden leaves fur on literally every surface, and you’ve started buying throw blankets just to cover the couch? Yeah. Cat owners have the same exhausting battle with scratched furniture and knocked-over decor. My neighbor’s cats destroyed her IKEA shelf within a month. This build? Solves all of that.
Materials & Tools:
– 4-6 wooden fruit crates (stained honey-oak finish)
– Natural pine lumber planks (for the main vertical frame and platforms)
– Sisal rope (3/4 inch diameter, for scratching posts and hanging rope)
– Faux fur fabric (cream and taupe, cut to platform size)
– White faux-fleece for platform padding
– Wood screws (2.5 inch and 1.5 inch)
– Wood glue
– Jute twine for decorative wrapping
– Hanging toy (mouse or ball on elastic cord)
– LED strip lights (optional, warm white)
– Drill, saw, staple gun, measuring tape
– Sandpaper (120-grit)
– Stain or wood oil for the crates
Prep Time: 2 hours | Active Project Time: 6-8 hours | Difficulty Level: Intermediate
### Instructions
Start by sanding every pine plank and crate edge until smooth — rough edges snag fur and honestly just look sloppy. Once everything’s sanded, stain your fruit crates in a warm honey tone so they contrast against the raw pine. That two-tone wood combo is exactly what makes this look so Pinterest-worthy.
Build your base first. Cut a 24 x 24 inch pine platform and attach four 3-inch pine feet underneath using wood glue and 2.5-inch screws. This elevated base gives the whole structure stability and creates room for a hammock or toy basket underneath.
Now cut your vertical sisal post. Use a 4 x 4 inch pine post, cut to 48 inches tall. Wrap the entire length tightly with 3/4-inch sisal rope, securing the start and end with hot glue. The dense sisal wrap gives cats a satisfying scratch surface, protects the post from damage, and keeps your furniture completely out of the equation — that’s the payoff.
Attach the post to the base using a metal post bracket and 1.5-inch screws from underneath. Then stack your platform levels. Cut three platforms at varying sizes — 20 x 16 inches, 18 x 14 inches, and 16 x 12 inches. Attach each one to the post at staggered heights using L-brackets. Space them 14 inches apart so cats can actually jump between them.
Stack two or three fruit crates on the right side of the base to create a staircase effect. Secure them together with wood screws through the side slats. Top each crate cluster with a platform padded with white fleece and edged in taupe faux fur. Staple the fabric to the underside of each board so edges stay clean.
The swing bed on the left side is a simple crate cut in half lengthwise, lined with blush pink faux fur, and mounted to the wall or a side arm using two rope loops. It swings slightly — cats obsess over it.
For the wall extension, mount a long pine arm horizontally using a heavy-duty wall bracket and wrap the top rail in taupe faux fur. Run your LED strip underneath for that warm ambient glow at night.
Hang your mouse toy from the middle platform on an elastic cord. Done.
Cut your fur fabric a half inch bigger than each platform, fold the edges under, and staple from the center outward — this keeps the fabric from bunching at the corners. And if your crates feel wobbly after stacking, add a small corner brace bracket inside each joint before screwing through the slats.
📸 Photo credit: Instagram @auri_and_makani
The One Structural Mistake That’ll Make Your Cat Tower Wobble (And How to Fix It)
Here’s what most DIY tutorials skip completely — the base-to-height ratio.
A tower taller than 4 feet needs a base at least 24 inches wide. I learned this the hard way when my first build toppled over during a Sunday afternoon zoomie session. Scared me half to death.
The pro secret nobody talks about? Bolt your sisal rope before assembling the full structure. Wrapping rope around a fully built tower is a nightmare — your hands cramp, the tension goes uneven, and you end up with loose sections cats will shred in a week.
This is the key: use wood screws to anchor your rope ends instead of just gluing them. Glue fails fast under constant scratching pressure. Screws hold for years.
Also — weight your base with a hidden platform layer of solid wood, not plywood. Plywood flexes. Solid pine doesn’t.
If your cat is as wild as a golden retriever in a mud puddle (you know the chaos), your tower needs that extra stability to survive.
Your Golden Deserves a Bed That Doesn’t Ruin Your Room
Okay, so here’s the thing — your home can look good and survive dog ownership. You don’t have to choose.
Pick one of these beds this week. Seriously, just one. Your back will thank you for not bending over to wrestle her off the couch anymore, and your living room will finally look like you again.
And hey, if you’re already on a roll making things cozy for her, these DIY dog crate furniture ideas might be your next weekend project.
So tell me — is your girl a “curl up in a corner” type or a “sprawl across everything she owns” type? 🐾

Amr Mohsen is a software engineer who traded his keyboard for a leash — at least on weekends. His love for dogs inspired him to share what he learns as a dog owner and enthusiast, bringing a detail-oriented, research-driven perspective to every article he writes. If it’s about dogs, he’s probably already looked it up twice.

