Okay so hear me out — your cat has claimed every single cushion in your living room.
Your throw pillows? Gone. That corner of the couch you actually like sitting on? Basically his now. And you’ve just… accepted it.
But here’s the thing. Your home looks so good otherwise. You’ve got the aesthetic, the warm tones, the little styled vignettes. A cat sprawled across your carefully arranged couch does NOT fit the Pinterest board you’ve built in your head.
I had the same problem with my sister’s cat when she visited for two weeks. That fluffy little chaos agent destroyed the vibe of my whole living room.
So I went deep into DIY mode.
These 7 diy cat hammock projects give your cat a dedicated, cozy spot — and give you your couch back. Win-win, honestly.
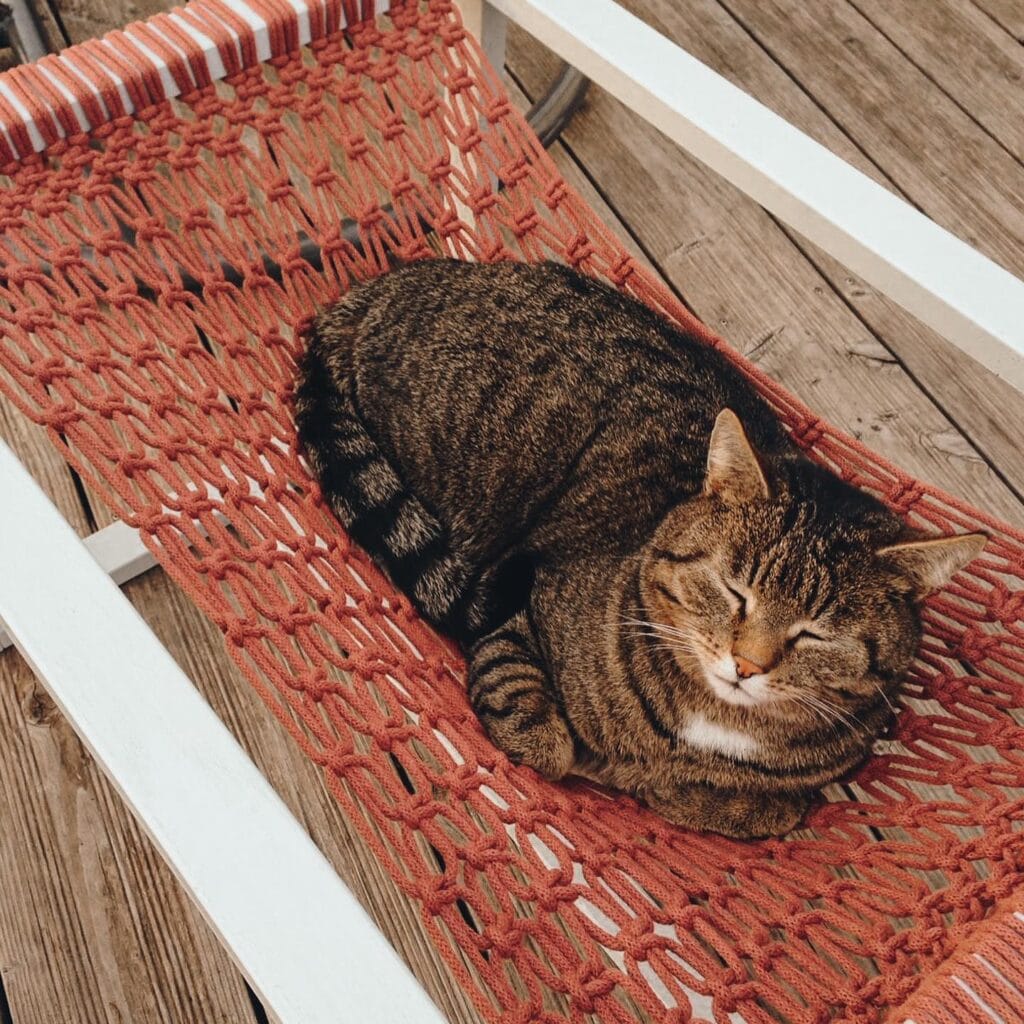
#1: Wall-Mounted Leopard Print Cat Hammock (The One That Actually Stays Put)
Okay, so you know that feeling when your golden has claimed every single couch cushion and you’re basically sitting on the armrest like a guest in your own house? That’s exactly where this idea started for me.
I wanted my cats off the furniture — but I still wanted the space to look good. Pinterest-board good.
Materials & Tools You’ll Need:
– Two natural tree branches (roughly 18-24 inches each)
– Leopard print fabric — the kind with a fleece or sherpa backing for warmth
– Four S-hooks or carabiners
– Two wall-mounted rail brackets (like the ones from IKEA’s ANTONIUS system)
– Heavy-duty wall anchors and screws
– A drill, measuring tape, and a staple gun
Instructions
Mount your two rail brackets into wall studs, spaced about 16 inches apart. Attach your branches horizontally across them using the S-hooks. Cut your fabric into a hammock sling shape — wider in the middle, narrowed at each end — and knot or staple it firmly around each branch.
The fabric sling carries the cat’s weight evenly, which protects their spine and keeps them coming back to this spot instead of your sofa.
Pull the fabric taut but with a natural 2-3 inch sag in the center. That gentle dip is what makes it irresistible.
Pair this with 7 Durable DIY Cat Scratcher Ideas Saving Furniture to fully redirect your cat away from your good furniture.
Test the whole thing by pressing down firmly before your cat ever touches it. And anchor into studs — not just drywall.
Prep Time: 20 min | Active Project Time: 45 min | Difficulty Level: Beginner-Intermediate
📸 Photo credit: Instagram @life_of_a_foster_mom
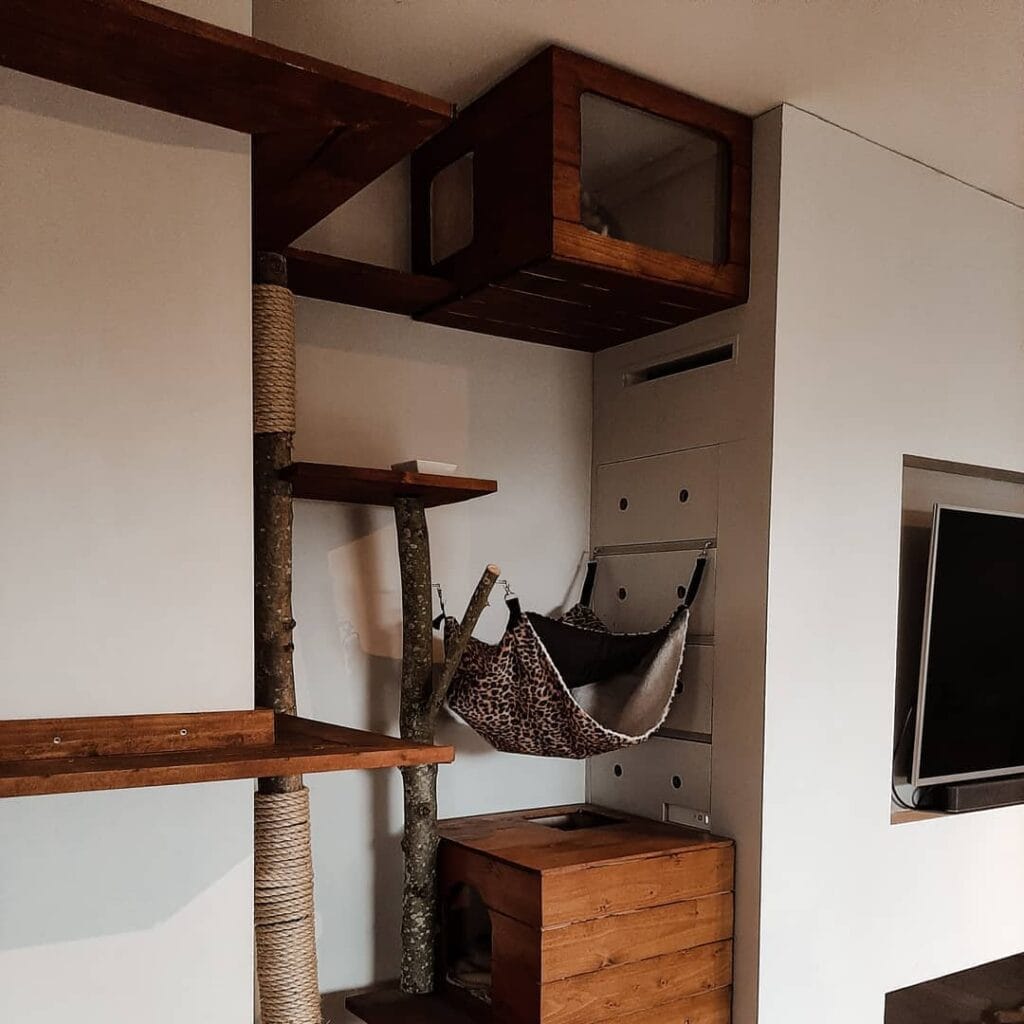
#2: Macramé Cat Hammock With a Driftwood Branch

Okay so you know how your golden just claims every soft surface in the house? Yeah, cats do the same thing — and honestly, this macramé hammock gives them their own spot so they stop eyeing your throw pillows.
I made one of these last spring after my cousin showed me hers, and I couldn’t stop staring at it. It looks like something straight off Pinterest but it’s actually doable on a weekend afternoon.
Materials & Tools:
– 200 feet of 3mm natural cotton macramé cord (cream/natural tone)
– One driftwood branch, roughly 24–30 inches wide
– Faux sheepskin or shaggy fur fabric circle, about 12 inches in diameter
– Scissors and a measuring tape
– A clothing rack or dowel to hang while you work
– 2 thin hanging cords for mounting to the ceiling
Instructions
Cut 24 cords at 8 feet each and fold them in half over the branch using lark’s head knots. Work the top section in alternating square knots to build that diamond lattice pattern you see in the photo — this is where the macramé cord’s natural texture creates structure without stiffness, so the hammock holds shape and stays cozy.
Group cords into sets of 4 as you move down to form the cradle shape. Pull them inward and knot a gathered base ring to hold the fur cushion. The cord cradles the cushion weight — cats up to 12 pounds sit comfortably — so no sagging over time.
Add tassel bundles at the center and bottom by bundling 8–10 cord ends, wrapping tightly, and trimming.
Mount your branch to the ceiling using two hooks spaced 20 inches apart.
Swap in a plush dog bandana fabric for the cushion base and your golden might also claim this one. Fair warning.
Keep the tassel lengths uneven on purpose — it gives the whole thing that organic, handmade feel that no store-bought piece pulls off.
Prep Time: 20 min | Active Project Time: 3–4 hours | Difficulty Level: Intermediate
For more creative DIY pet ideas, 7 Fun DIY Cat Projects Every Owner Needs has some seriously good inspiration.
📸 Photo credit: Instagram @lamaisonde.juliette
#3: The Mini Wooden Hammock Your Cat Will Actually Use (And You’ll Want to Show Off)
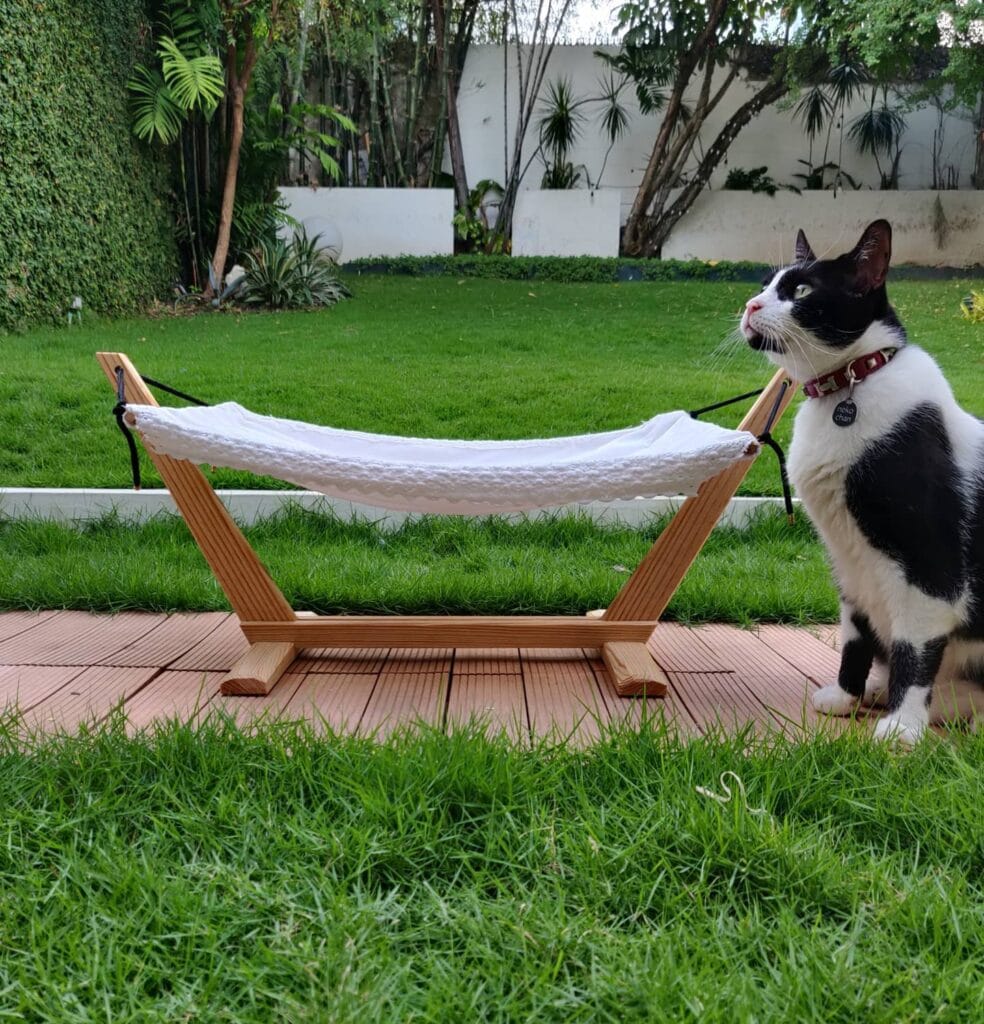
Okay, you know that feeling when your golden retriever hops on the couch and your cat immediately abandons her nap spot? Yeah. My cat Lune did this for weeks — just wandering, restless, knocking things over at 2am because she had nowhere that felt hers.
This cedar wood cat hammock is the fix. And honestly? It looks so good on the patio I almost left it out as decor.
Materials & Tools
– 8–10 cedar wood slats (approx. 12″ x 1″ x ½” each)
– 2 wooden base crossbars (14″ long)
– White textured fabric (like a waffle-knit or bouclé — 18″ x 12″ works well)
– 4 black metal S-hooks
– Black paracord or rope (3mm thickness)
– Wood glue + screws
– Sandpaper (120-grit)
– Drill
Instructions
Sand every slat before assembly — splinters are not the vibe. Fan the slats out in a V-shape on each side and secure them at the top with a crossbar, drilling screws through each slat at the meeting point.
Repeat for the second side. Connect both V-frames with a flat bottom base so the structure stands steady. The paracord threads through four corner holes in the fabric, then clips to each frame top with an S-hook — this lets you adjust the hammock tension so it sags just right.
The waffle-knit fabric grips without scratching, stays breathable in summer heat, and wipes clean in seconds — which means your cat actually uses it, and you stop finding fur on your patio cushions.
The whole thing sits low to the ground, which cats genuinely prefer for outdoor spots. If your cat spends time outside, pairing this with a covered option like one of these 7 warm DIY outdoor cat shelter winter designs gives her a full outdoor setup.
Seal the wood with an outdoor-safe matte finish before assembly — it protects against moisture and keeps that warm honey tone looking fresh all season.
Prep Time: 20 min | Active Project Time: 1.5–2 hours | Difficulty Level: Beginner-Intermediate
📸 Photo credit: Instagram @ateliermartinon
#4: DIY Cat Hammock with a Bamboo Frame and a Cozy Fabric Sling
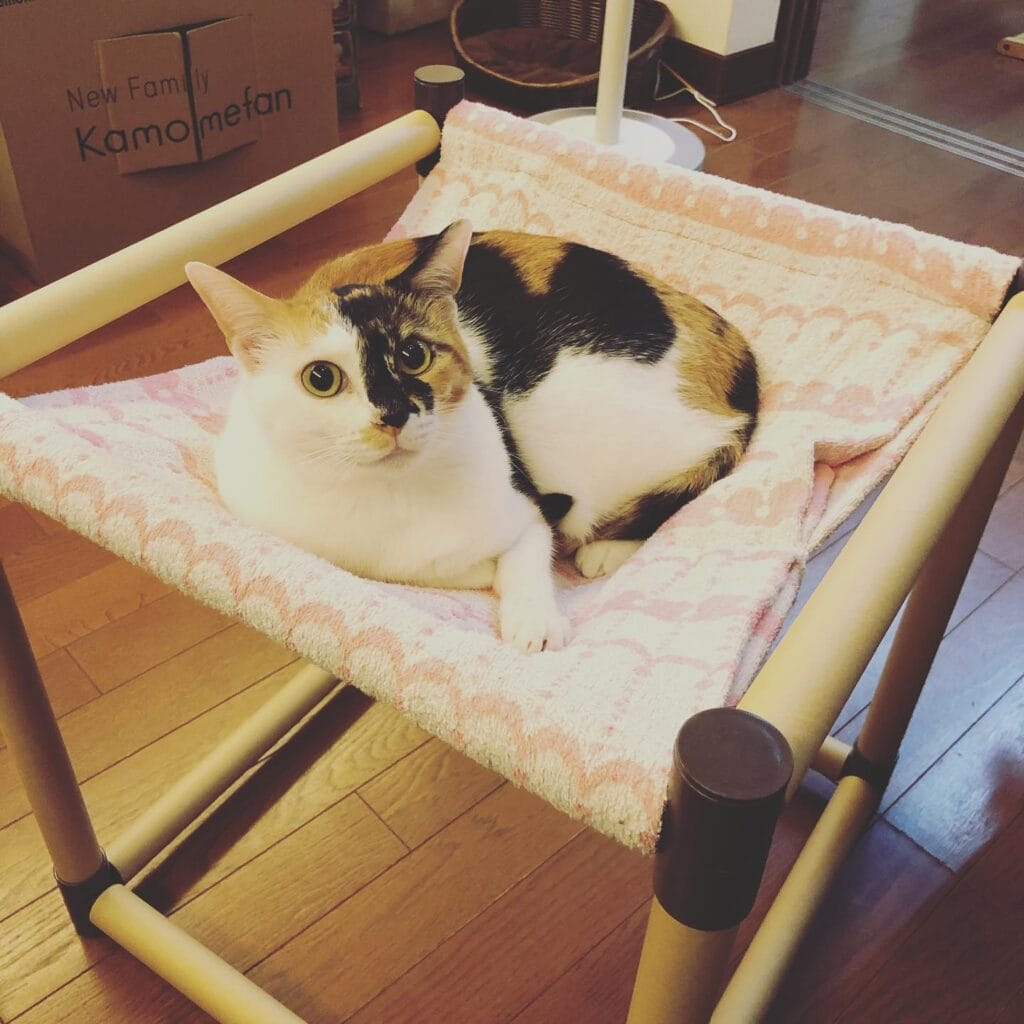
Okay, so you know how your golden retriever has like three beds and still ends up on your couch? Cats are the same way — except they want something elevated, snug, and honestly a little chic. This bamboo-frame cat hammock from the image is giving me full Pinterest-board energy, and the best part? It’s way easier to build than it looks.
Materials & Tools:
– 4 bamboo poles (approximately 12–14 inches each for the legs)
– 4 shorter bamboo poles (approximately 10–12 inches for the frame crossbars)
– Black rubber end caps (fits 1-inch diameter poles)
– Soft pink patterned fleece or sherpa fabric (approximately 14×14 inches)
– Strong twine or zip ties for lashing joints
– Scissors and a hot glue gun
– Sandpaper (medium grit) to smooth rough bamboo ends
Prep Time: 20 minutes | Active Project Time: 45–60 minutes | Difficulty Level: Beginner
### Instructions
Start by sanding every bamboo pole end — trust me, splinters are not the vibe and your cat will thank you later. Once everything feels smooth, lay out your four leg poles and four crossbar poles into a basic rectangular cot shape on the floor so you can visualize the structure before committing.
Lash the crossbars to the leg tops using strong twine, wrapping tightly in an X-pattern at each joint. I did this exact project last spring and the X-wrap made the whole frame surprisingly rigid. Add a tiny dot of hot glue under the twine wrap to lock it — that joint isn’t going anywhere.
Press the black rubber end caps onto every leg bottom. These protect your hardwood floors and keep the whole frame from sliding when your cat inevitably launches herself onto it.
And here’s where it gets satisfying. Cut your pink sherpa fabric to match the interior frame dimensions, then fold about half an inch of fabric over each crossbar and hot glue it flat underneath. The fabric sling — lightweight bamboo frame plus soft sherpa — means it flexes slightly under your cat’s weight, giving that hammock-cradle feeling they go absolutely feral for. That gentle give keeps them coming back instead of jumping off after two minutes.
The payoff? A cat who actually uses her bed and stops stealing yours.
You can find more inspiration for builds like this in 7 Creative DIY Cat Crafts for Pet Lovers if you want to keep the momentum going after this one.
Let the glue cure for a full hour before you introduce your cat to it. Place it near a window or fan base like in the image — cats pick spots with a view every single time, and positioning it there makes adoption almost instant.
📸 Photo credit: Instagram @mira_the_calicocat
#5: Macramé Hanging Cat Basket (The Boho Perch Your Cat Will Actually Use)
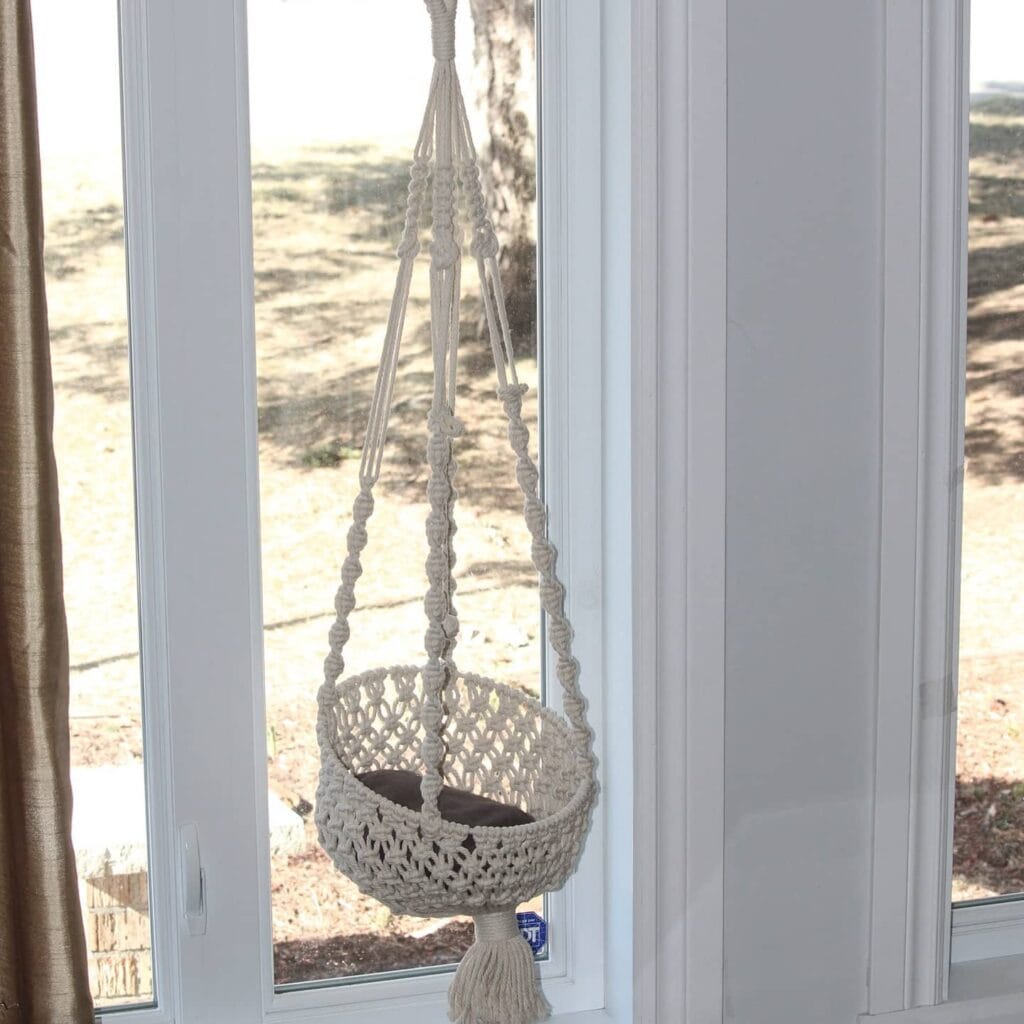
Okay, so you know how your golden is always claiming the cozy spots by the window? Your cat doesn’t even get a chance. This macramé hanging basket gives your cat their own elevated, window-view perch — totally out of paw’s reach.
Prep Time: 30 min | Active Project Time: 3–4 hours | Difficulty Level: Intermediate
Materials & Tools:
– 5mm natural cotton macramé cord (approximately 200 feet)
– 12-inch wooden or metal ring (for the basket base structure)
– S-hook or ceiling hook (load-bearing, minimum 50 lb capacity)
– Round cushion insert, 10–11 inches, in a dark neutral (charcoal works great)
– Scissors and a measuring tape
– Masking tape (to prevent cord fraying)
Instructions
Cut 16 cords at 12 feet each. Fold them in half and attach all 16 to your ceiling hook using lark’s head knots — this gives you 32 working strands total.
Divide the strands into groups of 4. Work square knots down each group for about 8 inches. This knotted length becomes the hanging arms of your basket, and keeping them even is everything. I messed this up my first try and one side drooped like a sad hammock — measure twice, seriously.
At the 8-inch mark, start connecting adjacent strand groups using gathering knots, pulling them into a circular shape around your ring. Think of it like building a little nest — each connecting knot pulls the basket walls inward naturally.
Once your basket bowl takes shape, weave the remaining cord ends underneath and secure them with tight double half-hitch knots. Trim the excess and unravel the bottom ends into a tassel. Slide your cushion inside.
The cotton cord cradles your cat’s weight while staying breathable — so even on warm afternoons by the window, they won’t overheat. And honestly, cats are obsessed with elevated spots, so this perch basically pays for itself in scratched-furniture prevention.
Keep this in mind: ceiling hooks in drywall need a proper anchor or stud — skip this step and the whole thing comes down, cushion and cat included.
My cat Juniper claimed this basket within ten minutes of me hanging it. Didn’t even wait for me to step back and admire it.
If you’re building out a full cat zone, 7 Active Indoor DIY Cat Playground Setups has some great ideas to pair with this.
Soak your finished macramé in a light mist of water and let it dry hanging — this relaxes the knots and gives the basket a rounder, fuller shape that holds up way better long-term.
📸 Photo credit: Instagram @rustic_home_handmade
#6: DIY Cat Hammock Side Table (That’s Also Pinterest-Worthy Decor)
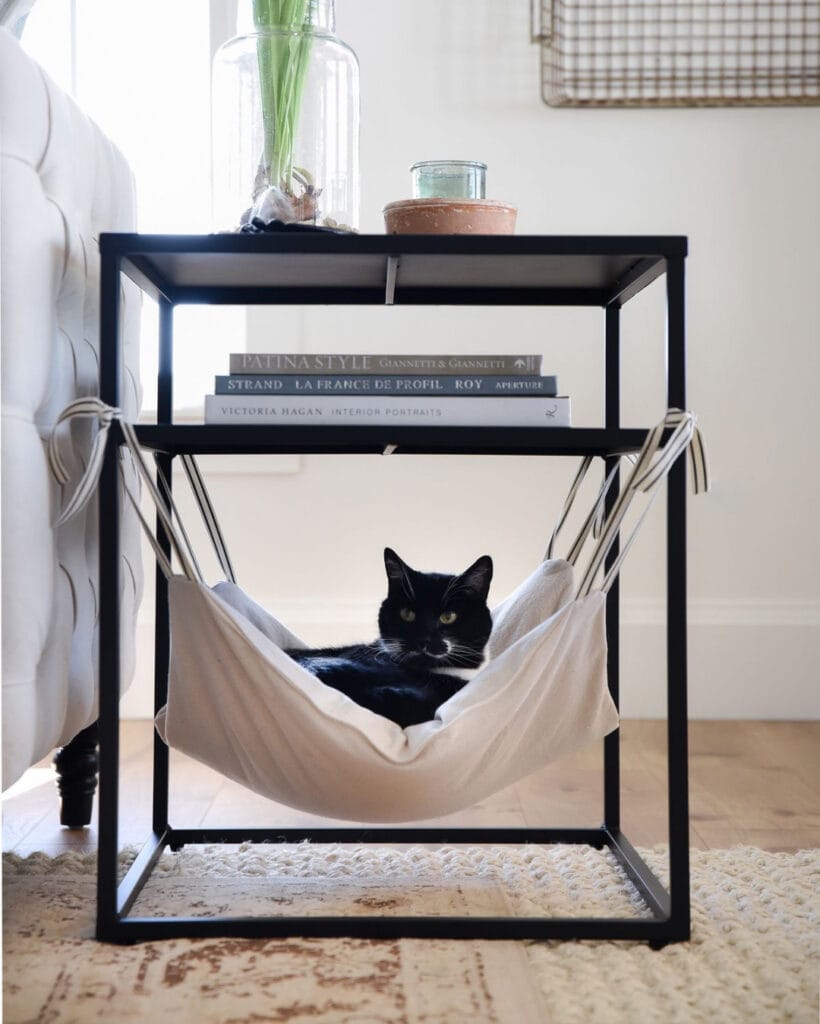
Okay, so you know how your golden retriever has basically claimed every soft surface in your house? Your cat’s done with sharing. She wants her own spot — and honestly, she deserves one that doesn’t clash with your aesthetic.
This build is giving me everything. A black powder-coated steel frame doubles as a side table, with a lower hammock sling sewn from natural canvas fabric in cream/off-white. The hammock ties to the frame using striped cotton ribbon — those little bow ties are chef’s kiss.
Materials & Tools:
– Black steel square tube frame (approx. 18″ x 18″ x 24″) — welded or bolt-together
– 1/2 yard natural canvas fabric (medium weight)
– 4 strips striped cotton ribbon, each 12″ long
– Sewing machine + thread
– Metal D-rings or grommets (4 total)
– Basic sewing pins
Instructions
Cut your canvas into a 16″ x 20″ rectangle. Fold and sew a 1-inch hem around all four edges — this stops fraying and adds structure so the hammock holds weight without sagging weird. Attach one D-ring grommet at each corner using reinforced stitching (go around twice, trust me).
Thread each striped ribbon through a grommet, then tie directly onto the steel frame bar at your preferred height — aim for the lower third of the frame. The canvas sling feature supports up to 15 lbs, keeps your cat off your sofa, and finally gives her a dedicated spot that actually looks intentional in your room.
Stack a few coffee table books on the middle shelf — the image shows Patina Style and La France de Profil — and add a glass terrarium on top. Real talk: this thing looks like you bought it from a boutique shop, not built it on a Saturday afternoon.
Pull the ribbons slightly uneven on one side before tying — it creates a deeper hammock pocket cats prefer for that curled-up sleeping position.
📸 Photo credit: Instagram @crasy_about_diy
#7: Build a Catio With Mesh Hammocks Your Cat Will Never Want to Leave
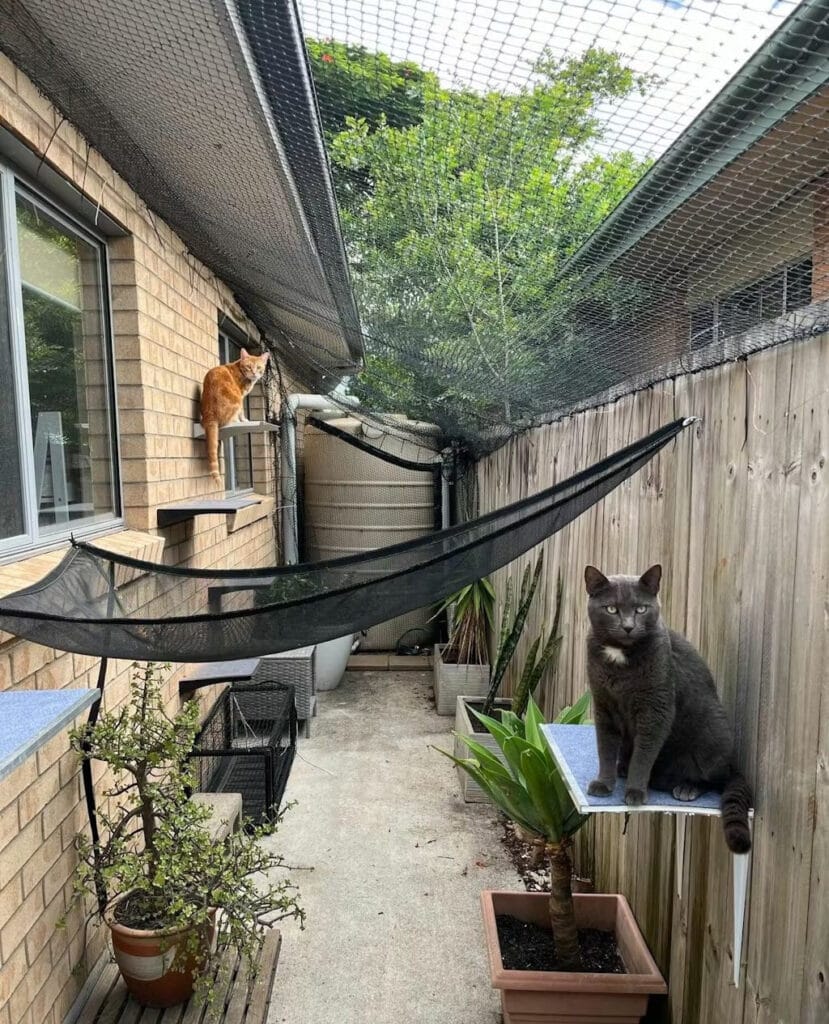
Okay, I know this is a cat project — but hear me out, because you could absolutely build something like this for your dog’s outdoor zone too. My neighbor did a version of this for her dachshunds and I think about it constantly.
What you’re looking at in this photo is a full catio enclosure — a screened outdoor corridor running along the side of a brick house, covered with black polyethylene mesh netting stretched between the roofline and a cedar wood fence. The cats have wall-mounted shelf perches and two slung mesh hammocks made from the same netting material, angled like little hammock bridges between the house wall and fence posts. There are potted plants on the ground — a yucca, some small shrubs — making it feel like an actual garden room.
Materials & Tools
– Black polyethylene cat-proof mesh netting (heavy-duty, 1-inch grid)
– Galvanized steel cable or tensioning wire for hammock support lines
– L-bracket wall mounts (powder-coated black, 4-inch)
– Cedar fence panels (already existing in this build)
– Stainless steel zip ties (at least 100)
– Wooden wall-mounted cat shelves with carpet or felt surface
– Eye bolt screws for anchor points
– Drill, wire cutters, measuring tape, ladder
Prep Time: 1 hour | Active Project Time: 6–8 hours | Difficulty Level: Intermediate
Instructions
Start by mapping your space. Measure the full length of the corridor between your house wall and fence — in this build it looks like roughly 12–15 feet long by 4 feet wide. Mark your anchor points on the wall and fence top with a pencil before you drill anything.
Drill your eye bolt screws into the house wall studs and the top fence rail at matching heights — these become your primary tension anchors. Run your galvanized cable between the eye bolts along both sides of the corridor, pulling it taut and securing with wire crimps. This cable line is what your mesh roof and hammocks will hang from.
Cut your polyethylene mesh netting to fit the full roof span, then attach it to the cable lines using stainless steel zip ties every 6 inches. Pull the mesh snug so it doesn’t sag too much — some natural drape is fine and actually gives it that catio character.
For the hammocks, cut a rectangular panel of mesh roughly 3 feet by 2 feet. Attach eye bolts on the wall at one end and on the fence at a lower point on the other end — that slight downward angle creates the hammock curve you see in the photo. Secure all four corners of your mesh panel to the eye bolts using doubled zip ties or small carabiners rated for at least 20 lbs.
Mount your wooden cat shelves directly onto the brick or siding using L-brackets — stagger them at different heights so your cat can hop up and down. The shelf-to-hammock connection means your cat gets a landing zone, a lounging zone, and an elevated perch — that trio of options keeps them engaged outside for hours instead of scratching at the door in ten minutes.
Finish by tucking the bottom edge of your mesh netting behind the fence rail and zip-tying it down so there are zero escape gaps at ground level.
The netting color here — charcoal black — is a smart choice because it nearly disappears visually from inside the yard, so your garden still looks clean and Pinterest-worthy. Light colors show every bit of dirt and debris. Go dark if you want it to look polished.
📸 Photo credit: Instagram @catnetsusa
The One Mistake That’ll Make Your Cat Hammock Fail (And How to Fix It Before You Start)
Okay, real talk — the fabric you pick is everything, and most people get this wrong on their first try.
I made this mistake myself. Bought this gorgeous linen that looked so Pinterest-perfect, and within two weeks? It was sagging like a hammock at a bad campsite. My cat Mochi refused to go near it.
Here’s the pro secret nobody mentions: always pre-wash and pre-shrink your fabric before you cut a single inch. Natural fabrics shrink under your cat’s warmth and body weight. Pre-washing locks in the final dimensions, so your hammock keeps its shape for months.
The second thing — tension points. Most DIYers attach all four corners with equal slack. Don’t. The back corners need about 15% less cord length than the front. It creates a natural cradle shape that cats actually choose over a flat surface.
Why this works: cats seek that “surrounded” feeling for security, not just a flat shelf.
Also, if you love building cozy spots for your pets, these 14 creative DIY elevated dog bed ideas use the same tension principles — totally worth bookmarking.
Your Dog’s Bed Glow-Up Starts Right Now
Okay, so you’ve got the inspo, you’ve got the ideas — now it’s time to actually do the thing. Pick one bed that fits your space and your golden’s whole dramatic personality. Don’t overthink it.
My rule? Start small. Even a simple cover swap can make your living room feel like a whole different vibe.
And hey, if you’re deep in a dog decor rabbit hole right now (no judgment, same), you’d probably love these stylish DIY dog crate furniture ideas — total game changer for keeping things Pinterest-worthy.
So tell me — is your golden more of a “velvet tufted cushion” girlie or a “chunky knit cave bed” girlie? 🐾

Amr Mohsen is a software engineer who traded his keyboard for a leash — at least on weekends. His love for dogs inspired him to share what he learns as a dog owner and enthusiast, bringing a detail-oriented, research-driven perspective to every article he writes. If it’s about dogs, he’s probably already looked it up twice.

