Okay so, you know how your Pinterest board is literally goals — like, every corner of your home looks curated and cozy?
Yeah. Then your cat decides the litter box just… lives in the middle of the hallway. In plain sight. Greeting every single guest who walks through your door.
I had the same situation last year. My cat Mochi’s box was sitting right next to my entryway console table — this beautiful little vignette I’d spent weeks styling — and honestly? It was mocking me.
The smell, the scattered litter on the floor, the whole vibe it killed. You work too hard on your home for that.
Good news — these diy cat litter box ideas are genuinely clever. We’re talking solutions that hide the mess completely while actually adding something cute to your space.
Your guests won’t even know.
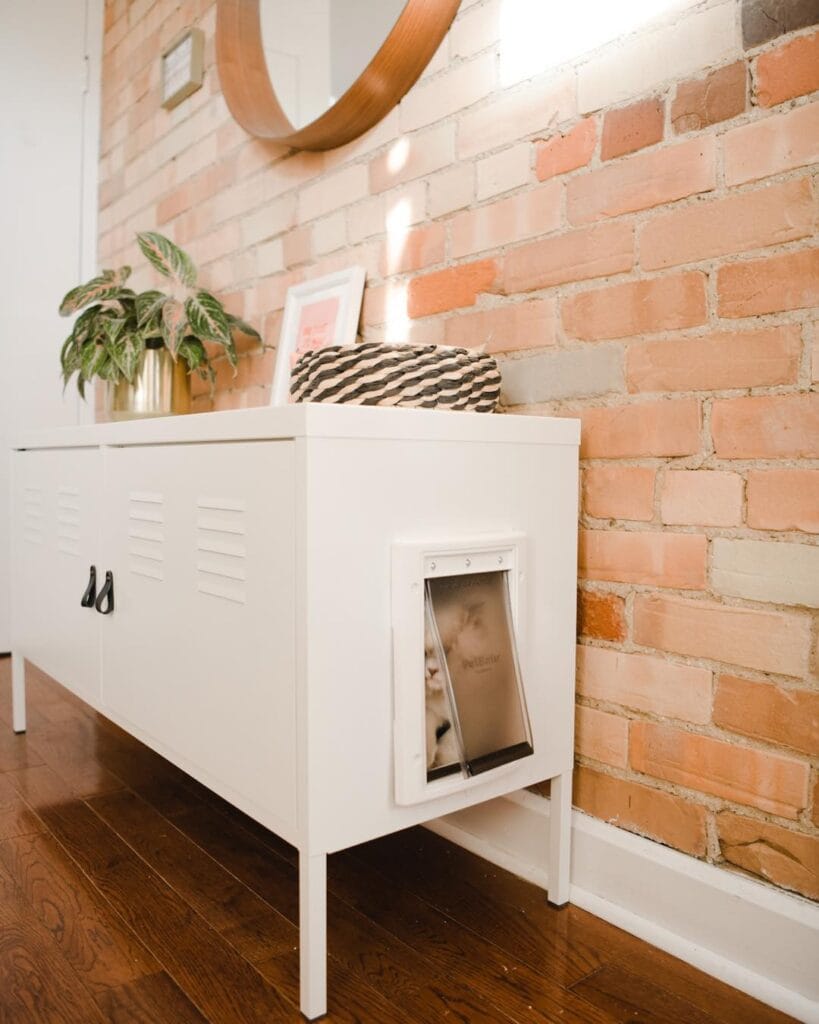
#1: Hide the Litter Box in Plain Sight With This DIY Cabinet Hack
Okay, so you know that moment when your golden retriever finally settles down for the night, and you’re just standing in your kitchen thinking… why does this space feel so chaotic? For cat moms who share a home with a dog, the litter box situation is exactly that chaos. It’s always just… out there.
This build fixes that.
Prep Time: 30 minutes | Active Project Time: 6–8 hours | Difficulty Level: Intermediate
Materials & Tools You’ll Need:
– 3/4-inch plywood (for cabinet box construction)
– Gray chalk paint (color shown: sage gray)
– Butcher block countertop (warm walnut tone)
– SureFlap or PetSafe cat flap (8.5 x 8.5 inches, white frame)
– Black bar pulls and one black knob
– Jigsaw, drill, sandpaper (120-grit), wood screws, wood glue
Instructions
Cut your plywood into five panels — top, bottom, two sides, and a back. My cousin built something similar last spring and said the key is dry-fitting everything before any glue touches wood. Trust her on that.
Assemble the box with wood glue and 1.5-inch screws, keeping corners flush. Sand all edges smooth.
Cut the cabinet door separately, then use your jigsaw to cut the cat flap opening — centered low on the door, about 4 inches from the bottom edge. Install the white cat flap frame and snap it in.
Apply two coats of gray chalk paint, letting each dry fully. Attach the butcher block top with corner brackets from underneath — this surface stays completely tool-free and doubles as prep space.
Hang the door with two standard hinges, attach your black bar pull, and add a small upper drawer with a matching pull for litter supplies.
The enclosed design traps litter scatter inside the cabinet, meaning zero litter trails across your hardwood floors — and your dog can’t nose his way in for a snack.
Ventilation matters more than people think. Drill three to four small holes along the cabinet back panel, hidden from view, so air circulates and odor doesn’t build up inside.
📸 Photo credit: Instagram @beatrice.the.bus
#2: Hidden Litter Box Cabinet — The IKEA Hack That Looks Like a Side Table
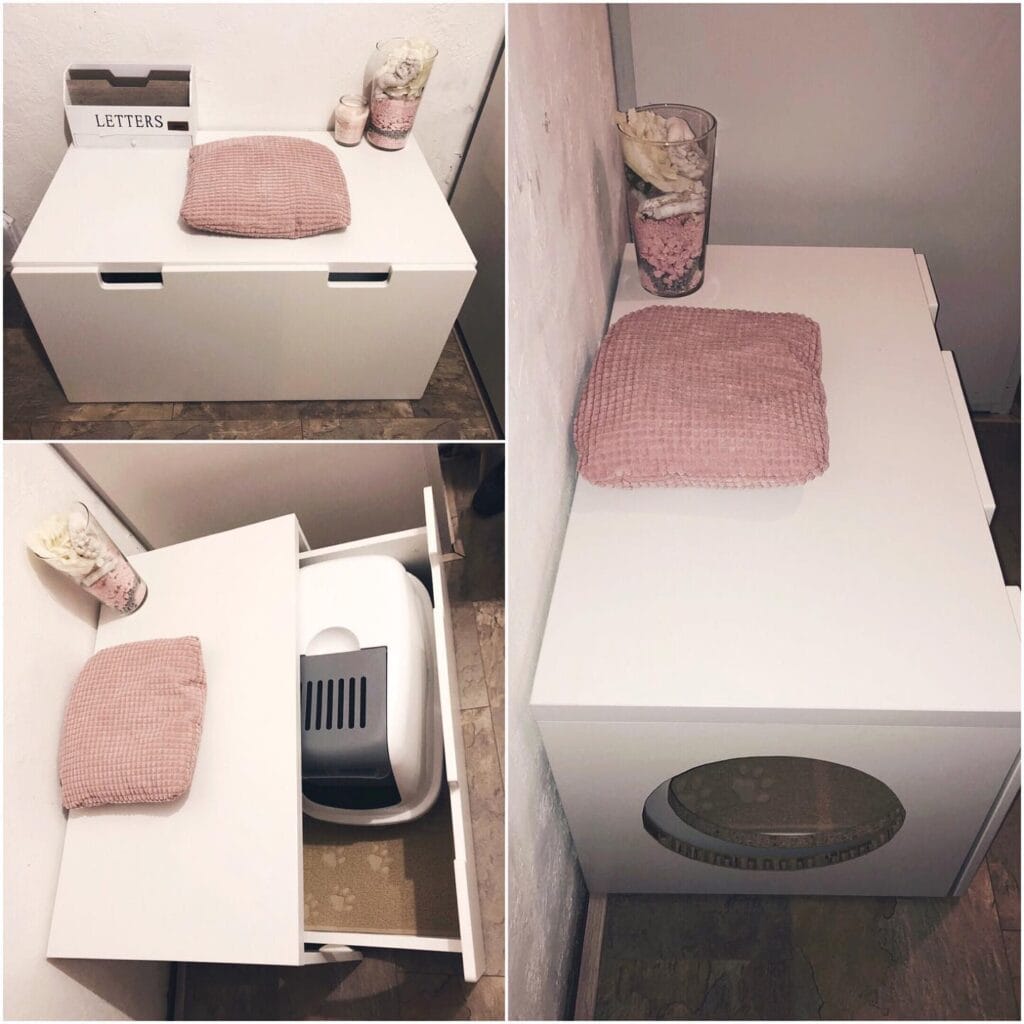
Okay, you know that moment when you’re showing your friend around your house and you cringe the second you turn the corner to that corner? The one where the litter box just… sits there. Sand dust on the floor, plastic hood peeking out, zero attempt at blending in. Yeah. That used to be my reality too.
This IKEA Stuva storage bench hack flips that whole situation on its head.
Materials & Tools You’ll Need:
– IKEA Stuva bench (white, 80x45x50cm)
– Circular jigsaw for cutting the entry hole
– Sandpaper (120-grit)
– White spray paint or touch-up paint
– A hooded cat litter box (the white-and-gray one in the image fits perfectly)
– Pink waffle-knit cushion (40x40cm) for the top
– Decorative glass vase with filler stones and dried florals
Instructions
Start by assembling your Stuva bench fully before cutting anything. Once it’s built, measure a 20cm circular opening on the front panel — centered and low enough for your cat to step through without jumping. Cut it with your jigsaw in slow, controlled passes so the MDF edge stays clean. Sand the cut edge until it’s smooth to the touch, then apply two coats of touch-up paint so moisture doesn’t warp the raw edge over time.
Slide your hooded litter box inside — the bench drawer mechanism means you can pull the whole interior out when it’s cleaning time. That pull-out access is what makes this build worth the effort. No more getting on your knees, no more awkward scooping angles.
The top stays styled like a side table — cushion, vase, candle. Guests genuinely don’t know.
The pull-out drawer base (feature) means cleaning takes under three minutes (benefit), so you actually do it regularly instead of avoiding the corner entirely (payoff).
Cutting that entry hole slightly angled inward helps contain litter scatter without blocking your cat’s path.
📸 Photo credit: Instagram @cattery_loveoffaith
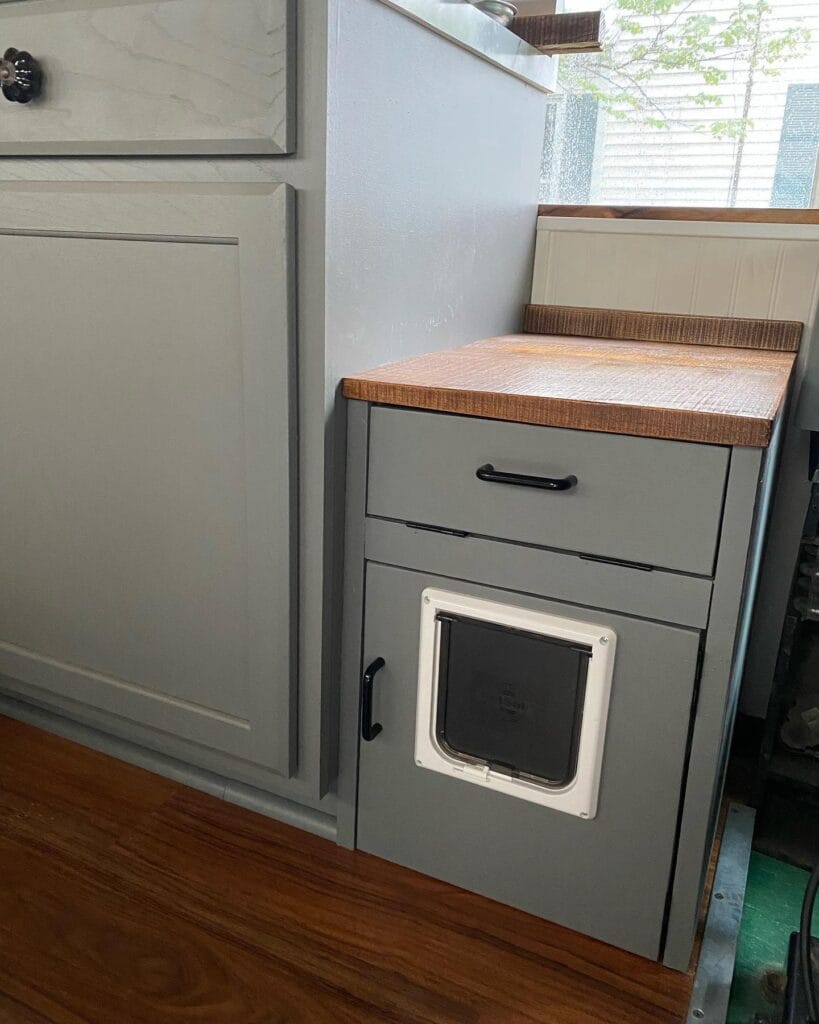
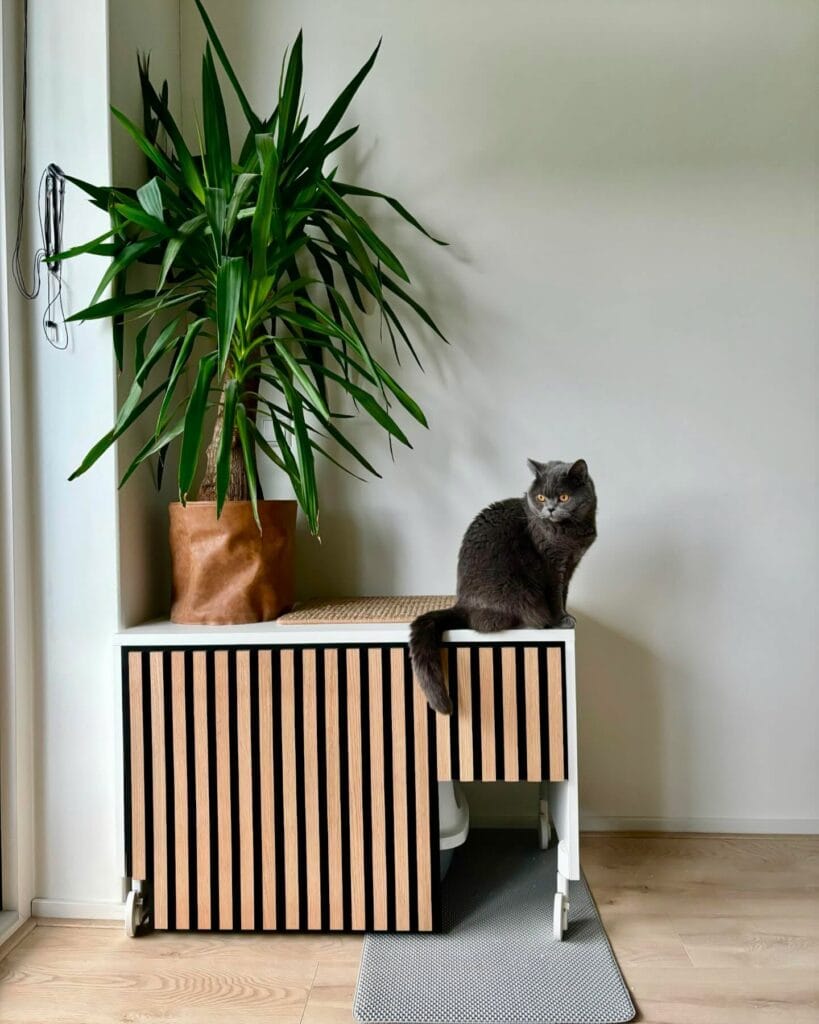
#3: The Slatted Wood Litter Box Cabinet That Looks Like Real Furniture
You know that moment when your friend comes over and you’re low-key embarrassed because the litter box is just… sitting there? Yeah. That feeling is real.
This DIY cabinet hides the whole situation behind natural oak wood slats set against a matte black frame — and honestly it looks like something straight off a Pinterest board.
Materials & Tools:
– White IKEA KALLAX unit (or similar 27.5″ x 27.5″ cube cabinet)
– Oak wood strips (0.75″ wide, pre-cut to cabinet height)
– Matte black spray paint
– Heavy-duty adhesive or brad nail gun
– Caster wheels (x4, locking)
– Sisal mat for the top surface
– Gray rubber anti-tracking mat (20″ x 14″)
– Sandpaper (120-grit), measuring tape, level
Instructions
Sand your cabinet surface first so the paint grips it. Spray the entire exterior matte black — two coats minimum. Let it cure for 24 hours.
Space your oak slats evenly across each panel, leaving 0.5″ gaps between each strip. That gap-to-slat rhythm is what gives it that high-end acoustic panel look. Press each slat firm and let the adhesive set overnight.
Attach your four locking casters to the bottom corners. This feature means you can roll the whole unit out for cleaning — no more wrestling with a stuck box in a corner.
Set your sisal mat on top, tuck the litter box inside, and lay the rubber mat at the entry.
Store a small leather bag planter beside it for that warm, lived-in finish like you see here.
📸 Photo credit: Instagram @geralt_en_nida
#4: Hidden Litter Box Station with Storage Bins on Top
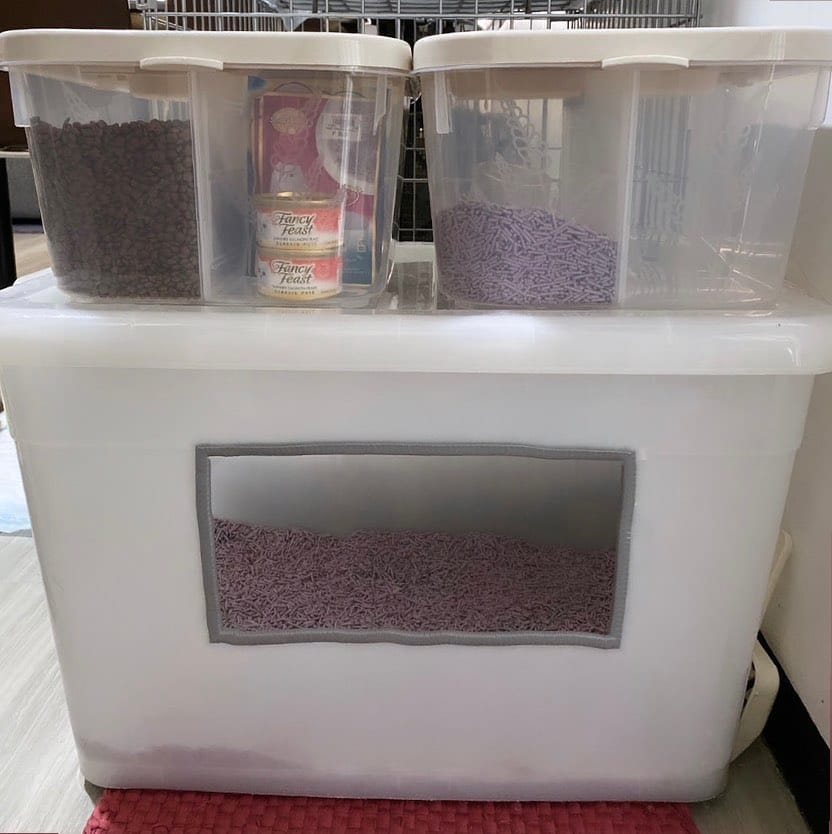
You know that moment when your golden sniffs out the litter box from across the room before you even notice it? Yeah. That’s the exact chaos this setup eliminates.
This DIY uses a large white storage tote (think 66-quart or bigger) as the litter box enclosure. The front panel has a gray fabric-trimmed window cutout — it’s basically a little cat door with a finished edge so it doesn’t look janky. Inside, you can see pink/lavender cat litter peeking through, which honestly looks way more Pinterest than a bare plastic box ever could.
On top sit two clear plastic storage containers with white lids — one holds dry kibble, the other stores extra litter. Between them? A stash of Fancy Feast cans and a treat bag. Everything in one spot. That’s the whole point.
Instructions
Grab your 66-quart white Sterilite tote and flip it upright. Trace a rectangle cutout (roughly 6″ x 10″) on one of the short sides, about 3 inches from the bottom. Cut it with a utility knife, then hot-glue gray grosgrain ribbon around the entire edge to finish it cleanly and protect little paws from sharp plastic.
Fill the inside with lavender-scented clumping litter — the color reads as decor, not function. Stack your matching clear bins on top and fill each one. And because everything is contained, the smell stays inside instead of greeting your guests at the door.
The enclosed design traps odors, the matching bins give you visible storage, and the whole thing looks like furniture instead of a litter situation.
Keep a lint roller inside one of those top bins — cats track litter and your golden will absolutely investigate the box the second you turn around.
📸 Photo credit: Instagram @mr.lullah
#5: The Vase-Style Hidden Litter Box That Looks Like a Decor Piece
Okay, you know that moment when your golden’s nose goes straight to the litter box the second you turn your back? Mine used to knock the whole thing over. And don’t even get me started on the litter trail across the carpet.
This one stopped me mid-scroll. It looks like a white ribbed ceramic vase sitting next to a couch — not a litter box. The cats walk into a rounded arch opening cut into the base, do their thing, and come back out. Your dog sees a decor piece. That’s the whole win.
Materials & Tools You’ll Need:
– Large plastic laundry hamper (hourglass or vase shape, min. 12″ wide opening)
– White spray paint (plastic-bonding formula)
– Jigsaw or rotary cutting tool
– Sandpaper (220-grit)
– Painter’s tape
– Measuring tape + pencil
– Standard litter tray insert (fits inside the base)
Instructions
Flip your hamper upside down and trace a 5″ x 6″ arch near the base with your pencil. Cut slow — a jigsaw gives you the cleanest curve here. Sand every edge until it’s smooth, because rough plastic edges scratch little paws.
Tape off anything you don’t want painted, then apply two thin coats of white spray paint. Let each coat dry 30 minutes before the next. Drop your litter tray inside the base opening, and you’re done.
The enclosed design traps odors inside the shell, which means your living room smells clean — and your dog stops investigating. Finally a box that works with your decor instead of against it.
I actually styled mine exactly like this photo — added a faux eucalyptus stem on top and my guests thought it was a planter.
Keep the arch opening facing the wall at a slight angle so curious noses can’t peek straight in. It blocks the sightline without blocking your cat’s access at all.
Prep Time: 15 min | Active Project Time: 1 hour | Difficulty Level: Beginner
📸 Photo credit: Instagram @lottacutecats
#6: Mid-Century Modern Cat Litter Box Cabinet (Dark Walnut Slatted Wood)
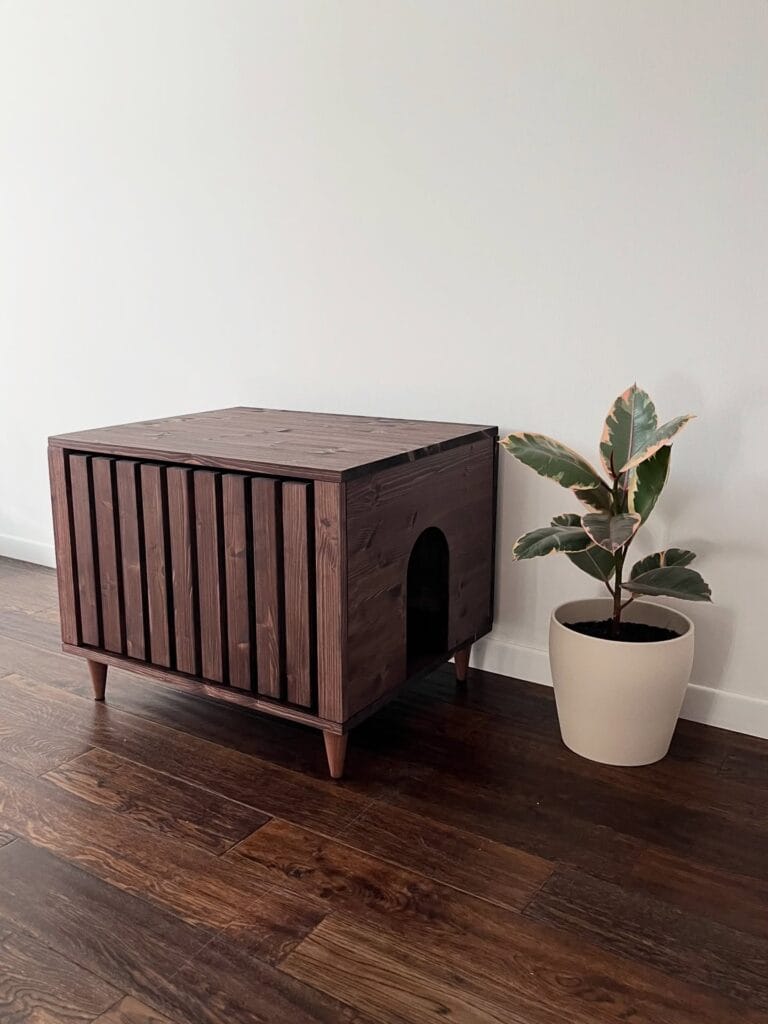
You know that moment when your golden girl trots past the litter box corner and your guest’s eyes land on it before you can redirect anyone’s attention? Yeah. That moment.
This piece is the fix.
Prep Time: 30 min | Active Project Time: 4–6 hours | Difficulty Level: Intermediate
Materials & Tools:
– 1×4 pine boards (for slat front panel — approx. 12–14 slats)
– ¾-inch plywood (for top, bottom, and side panels)
– Dark walnut stain (Minwax Dark Walnut 2716 works perfectly)
– 4 tapered mid-century legs in natural wood tone, threaded mount
– Jigsaw (for the arched entry cutout)
– Wood glue, clamps, sander (120-grit then 220-grit)
– Drill + screws
Instructions
Cut your plywood into one top panel (24″×20″), two side panels (20″×18″), and one bottom panel (24″×20″). Sand every piece before assembly — rough edges on a box this pretty? Not acceptable.
Attach the sides to the bottom using wood glue and screws, then set the top on last. On your front-facing slat panel, space each 1×4 pine slat about ½ inch apart and glue them onto a thin backing board before attaching the whole panel to the frame.
Cut your arched entry hole — roughly 8″×10″ — centered at the bottom of the front panel using your jigsaw. Sand the arch smooth so it looks intentional, not rough.
Apply two coats of Dark Walnut stain, letting it dry 4 hours between coats. The deep brown finish hides paw prints and blends with hardwood floors — that’s the feature-benefit-payoff that makes this worth every hour you put in.
Screw in your tapered legs and you’re done.
The slats give enough airflow to cut down on odor without exposing the box. And the flat top becomes a natural little shelf — perfect for a small trailing plant or a framed photo.
Small change, big win: position the arch opening facing the wall slightly (not fully) — it keeps the box discreet while still giving your cat a clear entry path.
📸 Photo credit: Instagram @pinkbau
#7: Wicker Basket Hidden Litter Box (The Pinterest Hack That Actually Works)

Okay so you know that moment when a guest walks into your bathroom and you’re just praying they don’t notice the litter box sitting out in the open? Yeah. We’ve all been there — it’s awkward, it smells, and it looks terrible next to your carefully chosen hex tile floor.
This one fixes all of that.
Prep Time: 15 minutes | Active Project Time: 45 minutes | Difficulty Level: Beginner
Materials & Tools:
– Large wicker/seagrass storage basket (minimum 18″W x 14″H x 16″D with open bottom or removable base)
– Standard plastic litter tray (16″ x 12″ fits most baskets)
– Jigsaw or craft knife for entry hole cutting
– Sandpaper (120-grit) to smooth cut edges
– Hot glue gun for reinforcing wicker edges
– Standard clumping litter (unscented works best in enclosed spaces)
### Instructions
Start by flipping your wicker basket upside down and tracing a 6″ x 6″ entry opening along one of the lower side panels — low enough for your cat to step through without jumping.
Cut along your traced line using the jigsaw. Run the 120-grit sandpaper along every cut edge so no sharp wicker strands stick out. Run a thin hot glue bead along the interior edge of that opening to lock the weave and prevent unraveling over time.
Slide your plastic litter tray inside before flipping the basket right-side up. The tray sits directly on the floor underneath the basket, fully hidden. The basket acts as a cover — no attachment needed.
And here’s the part that makes this whole thing worth it: the wicker weave naturally filters airflow, which means odors stay contained without blocking ventilation. Contained odor, no exposed litter, no awkward guest moments — that’s the payoff.
Top the basket with a glass vase of white roses and stack a couple of books on top. Your bathroom goes from functional to intentional in under an hour.
One thing to remember: avoid baskets with tight, fully sealed bottoms — your cat needs airflow and a flat surface for the tray. Open-bottom or removable-base styles work best.
Tuck a small charcoal odor pack inside the basket near the back corner and swap it monthly. It disappears completely inside the weave and pulls double duty on smell control.
📸 Photo credit: Instagram @thestorybookhome
The One Mistake That Ruins Every DIY Litter Box (And How to Skip It)
Here’s the thing nobody tells you — ventilation makes or breaks your whole build.
Most people spend hours making their litter box cabinet look gorgeous, Pinterest-perfect wood grain and all. Then it smells like a gas station bathroom within a week. The box is basically sealed, and ammonia just… sits there.
Cut a vent hole in the back panel. Seriously, that’s it. A small 3-inch hole with a dollar-store mesh screen stops odor from building up inside the cabinet. My aunt built this beautiful little bench seat for her cat and almost tore the whole thing apart before we figured this out together.
Also — line the inside with peel-and-stick vinyl flooring before you assemble anything. Litter dust gets into unfinished wood and creates bacteria pockets no amount of cleaning touches. The vinyl wipes clean in seconds.
One more thing: size your entry hole for your cat’s adult size, not the kitten they are right now. So many people rebuild this twice because they forgot that part.
Your Dog-Proof Home Is One Good Product Away
Honestly? You don’t need a Pinterest-perfect house and a golden retriever to feel like you’re constantly losing the battle. You just need the right stuff in the right spots.
Start with one room. The one that hurts the most when it’s muddy and chaotic. Grab the product that fits your space and see how fast your whole vibe shifts.
And hey — if you’re already deep in the DIY rabbit hole, these dog couch builds are chef’s kiss for golden owners who want stylish and sturdy.
So tell me — which room in your house does your dog absolutely destroy first?

Amr Mohsen is a software engineer who traded his keyboard for a leash — at least on weekends. His love for dogs inspired him to share what he learns as a dog owner and enthusiast, bringing a detail-oriented, research-driven perspective to every article he writes. If it’s about dogs, he’s probably already looked it up twice.

