Are you tired of your pup making your couch their personal throne? Creating cozy DIY dog beds might just be the solution. Imagine your furry friend curled up in a plush spot that’s both stylish and comfy. You don’t need to be an expert crafter, just a little creativity and some basic supplies. From snuggly fleece options to fancy memory foam beds, there’s something for every canine personality. So, what’s the first design that catches your eye?
Soft Fleece and Comfy Cushions
When it comes to creating the perfect cozy spot for your furry friend, nothing beats a soft fleece base paired with comfy cushions.
Imagine your pup nestling into a plush, warm spot that practically hugs them. It’s easy to make these DIY dog beds with just a few materials. Start with a large piece of fleece, cut it to your desired size, and add extra layers for that ultimate softness.
Then, grab some cushions—think old throw pillows or foam pieces—and stack them up. Your dog will be in heaven, guaranteed. An elevated dog bed is also an option to consider for added comfort! You might even catch them drooling.
Trust me, your friends will wonder how you became a DIY dog bed master. Just don’t spill the beans on how long it took!
Our Collection
When it comes to our collection, you won’t believe how comfy your pup can be.
Picture your furry friend sinking into a memory foam luxury bed, or cozying up on a stylish canvas pet sofa. From heated orthopedic beds to a woven straw mat, there’s a perfect fit for every dog—and you’ll love how good it looks in your living room too. Additionally, our range complements the best dog beds that cater to your pup’s individual needs.
1. Memory Foam Luxury Bed
If your furry friend has been sleeping on an old, flat dog bed that wouldn’t support a five-pound Chihuahua, it’s time for an upgrade. This DIY memory foam luxury bed isn’t just a cozy place for your pup to snooze; it’s a wallet-friendly solution that gives your canine companion a taste of comfort they deserve. Plus, let’s be honest, it’ll likely look a whole lot better than that tired old cushion from the pet store. Investing in luxury dog beds furniture can elevate both your home’s decor and your dog’s comfort.
Materials Needed:
- Memory foam mattress or foam layers (the thicker, the better)
- Fabric for the cover (like canvas, fleece, or your favorite old blanket)
- Scissors
- Sewing machine or needle and thread
- Measuring tape
- Pins or fabric clips
- Zipper or Velcro (if you want an easy clean option)
- Optional: Non-slip fabric for the bottom
Step-by-Step Instructions:
- Measure Your Dog: Start by measuring your furry friend while they’re stretched out on the floor. Add a few extra inches for comfort. Don’t worry, they won’t care about precision; mine didn’t even notice I was measuring them with a tape measure instead of a treat.
- Cut the Foam: Use your scissors to cut the memory foam to the size you just measured. Make sure your foam is at least 3 inches thick for ideal support. You might feel like a sculptor here, chiseling out the perfect shape for your masterpiece—go for it!
- Cut the Fabric: Now, lay out your fabric. Cut a piece that’s about 1.5 times larger than the foam on all sides. This will give you enough fabric to create a nice, snug cover without holding your dog’s limbs hostage.
- Sew the Edges: With the fabric inside out, pin or clip the edges together, making sure the “good” side is tucked in. Stitch along the edges, leaving one side open if you’re adding a zipper or Velcro later. If you’re feeling bold, just wing it without a guide—what could go wrong?
- Insert the Foam: Turn the fabric right-side out and slide the memory foam inside. If you’ve added a zipper or Velcro, close it up now. Congratulations, you’ve just created a cuddly cocoon for your pooch!
- Add Non-Slip Bottom (Optional): For extra sturdiness, you can sew or glue non-slip fabric to the bottom of the dog bed. This step can really save your dog from an embarrassing slide across the floor mid-dream chase.
- Fluff and Present: Give your newly created luxury bed a fluff, plop it in your pup’s favorite spot, and watch as they sink into their new sleeping paradise. Don’t forget to snap a pic—every dog deserves a social media debut in their new bed.
Optional Add-ons/Variations:
For a little personalization, why not try using different fabrics? A cute patterned fabric might just make your living room pop, or maybe a chic leather look will have your dogbed blending in with your home decor. You could also incorporate a fun design, like embroidering your dog’s name right on the corner, giving their space a touch of flair.
Pro Tip:
When selecting your foam, it can be tempting to go for the cheapest option, but remember: durability makes all the difference. Investing in quality memory foam means your bed will withstand the inevitable “doggy dug-into” moments, and your pup will think you’ve become a canine comfort guru.
Plus, if your pooch is anything like mine, they’ll appreciate a softer landing for those plopping-down shenanigans.
Now that you’ve crafted a delightful sleep space for your furry friend, sit back, relax, and enjoy a moment of peace while they drift into dreamland. Just don’t let them steal your favorite blanket to snuggle with—furry little thieves, aren’t they?
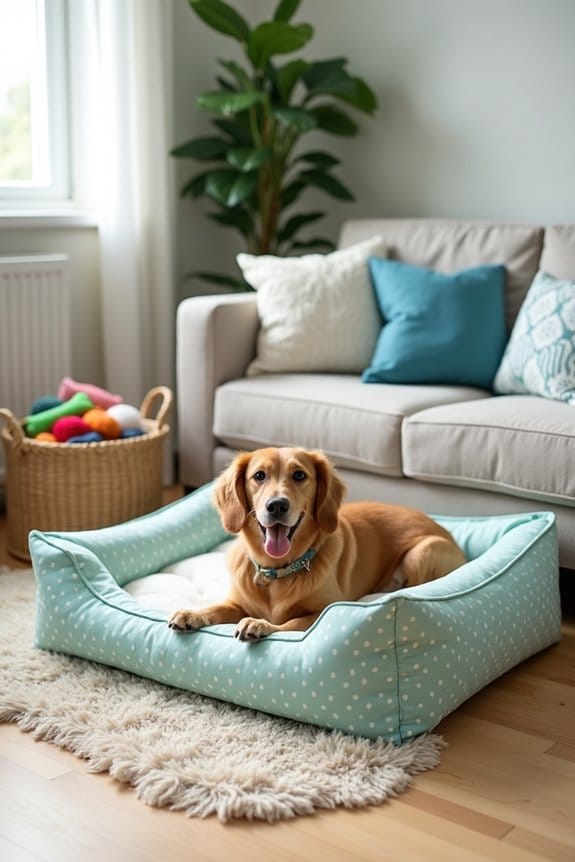
2. Cozy Nesting Dog Crate Pad
If you’ve ever seen your pup curled up in their crate, you know how much they love having a comfy, cozy spot to call their own. This DIY Cozy Nesting Dog Crate Pad isn’t only a delightful upgrade to their crate but also an easy, affordable way to provide your furry friend with the comfort they crave. Plus, it’ll make their crate feel more inviting and stylish—goodbye boring, flat bedding.
Materials Needed:
- Foam or soft padding (like cotton batting or an old pillow)
- Fabric for the cover (consider using an old blanket, fleece, or any durable fabric)
- Scissors
- Sewing machine or needle and thread
- Measuring tape
- Pins or fabric clips
- Elastic or Velcro (for a snug fit)
- Optional: Water-resistant liner (to protect against spills or accidents)
Step-by-Step Instructions:
- Grab Your Measuring Tape: Measure the inside of your dog’s crate, but don’t forget to account for the thickness of the pad you’ll be making. Add a few inches for wiggle room—your pup will appreciate the extra space.
- Cut the Foam or Padding: Take your foam or soft padding and cut it to fit the measurements you just took. Aim for about 2-4 inches thick to guarantee your dog has a cushy cushion for snuggles. Cutting foam can be a bit like wrangling a wiggly toddler—stay patient and steady!
- Pick Your Fabric: Lay out your fabric and cut it to be about 1.5 times larger than the foam pad on all sides. This excess is your ticket to a snug fit. If you want to add a fun print or color, now’s your moment to shine—choose something that reflects your pup’s personality.
- Sew the Cover: With the fabric turned inside out, pin or clip the edges together. Stitch along the sides, leaving one side open to insert the padding later. If sewing isn’t your forte, don’t fret; just keep a steady hand and take it slow. It’s like untangling a bunch of Christmas lights—patience is key.
- Put the Foam Inside: Once you’re done sewing, flip the fabric right-side out and tuck that foam or padding inside. If you’re adding elastic or Velcro for a snug fit, now is the time to attach it. Your pup will have a cozy nest that fits their crate perfectly.
- Personalize and Fluff: Give the pad a good fluff, and maybe add a few extra blankets or dog toys on top for added flair. You might even find your dog claiming it as their favorite hangout spot, begging you to join them for a good snuggle session.
Optional Add-ons/Variations:
- Color Combos: Mix and match fabric colors or patterns for a pop of personality. Who says dog beds can’t be stylish?
- Patchwork Style: For a fun twist, use several fabric patches to create a patchwork look. It’s a great way to upcycle old clothes or fabric scraps.
Pro Tip:
For added durability, consider using a water-resistant liner under the cover. It’ll save you some headache during clean-up—because we all know that accidents happen. Your pup might’ve a little too much fun at times, and that’s okay.
With this DIY Cozy Nesting Dog Crate Pad, not only are you creating a comfy retreat for your canine companion, but you’re also flexing those crafty skills. Who knew your pup’s crate could turn into such a cozy paradise? Happy crafting!
3. Heated Orthopedic Dog Bed
Give your furry friend the gift of warmth and support with this DIY Heated Orthopedic Dog Bed. This cozy haven isn’t just a comfy spot for your dog to relax; it helps alleviate joint pain and discomfort, particularly for older dogs or those with special needs. Plus, it’s a budget-friendly alternative to store-bought heated beds, especially if your pup is the type who loves to chew on their goodies. Why not provide your beloved pet with a spot that caters to their comfort and well-being? Additionally, investing in a luxury orthopedic bed ensures that your dog gets the best support for their joints and adds a touch of elegance to your home.
Materials Needed:
- Memory foam or orthopedic foam (ensures support for joints)
- Heating pad (ensure it has an automatic shut-off feature for safety)
- Durable fabric for the cover (canvas, fleece, or any pet-safe material)
- Scissors
- Sewing machine or needle and thread
- Measuring tape
- Pins or fabric clips
- Water-resistant lining (optional but great for easy cleaning)
- Velcro or zippers (for easy access to the heating pad)
Step-by-Step Instructions:
- Measure for Success: Start by measuring the size of your dog. The bed should be spacious enough for your pup to stretch out comfortably, so don’t forget to take into account their length when choosing dimensions.
- Cutting the Foam: Based on your measurements, cut your memory or orthopedic foam. You want about 3 to 4 inches thick for that soft support. Trust me, it’s like slicing a piece of cake—steady hands and a sharp knife work wonders.
- Fabric Time: Cut your cover fabric to be about 1.5 times larger than the foam on each side. Think of it as making a wrap for your bed cushion. If you’re feeling adventurous, a fun print or bold color could showcase your dog’s personality!
- Sew the Cover: With the fabric inside out, pin the edges together and sew along three sides, leaving one side open. This will be where the foam and heating pad go. Not the best at sewing? Just take your time—like a snail crossing a busy road, you’ll get there.
- Insert the Foam and Heating Pad: Flip your fabric right-side out, and slide in that foam. Nestle the heating pad right on top. Close up the open side using Velcro or a zipper, making sure your dog can’t snag the heating pad out.
- Personalize with Love: Give it a little fluffed-up shake, and think about adding doggie blankets or toys for a touch of flair. Your dog will appreciate the extra snuggles, trust me.
- Test it Out: Finally, place the bed in your pup’s favorite spot and let them discover their new cozy haven. You may find they won’t want to leave it—winter hibernation mode, activated.
Optional Add-ons/Variations:
- You can mix and match fabrics for a patchwork design. Get funky with colors that complement your home decor.
- Incorporate a removable cover with fun graphics or their name for that personal touch.
Pro Tip:
Always check the heating pad’s temperature before letting your dog use it. A too-hot pad can cause burns, so make sure it’s set to a warm, cozy level that won’t make them squirm.
And don’t forget to inspect the pad regularly for wear and tear; after all, you want their comfort to last as long as possible.
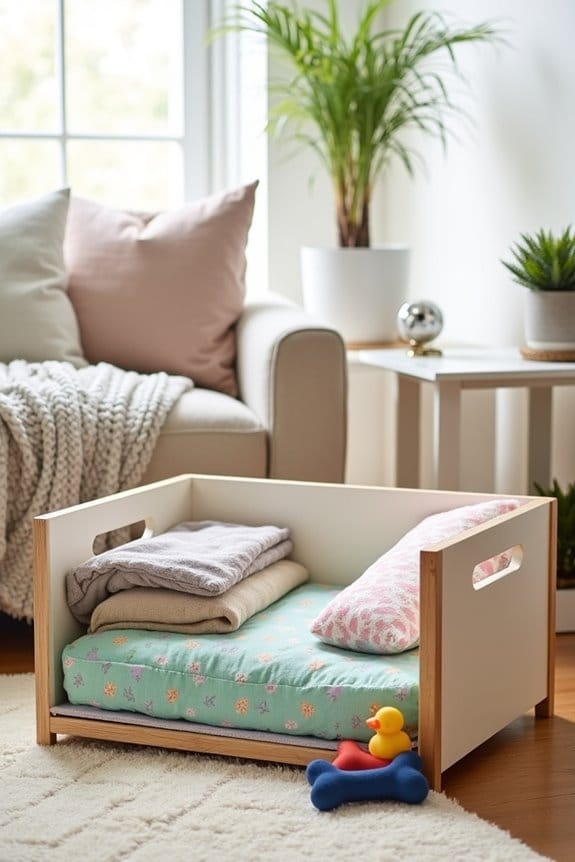
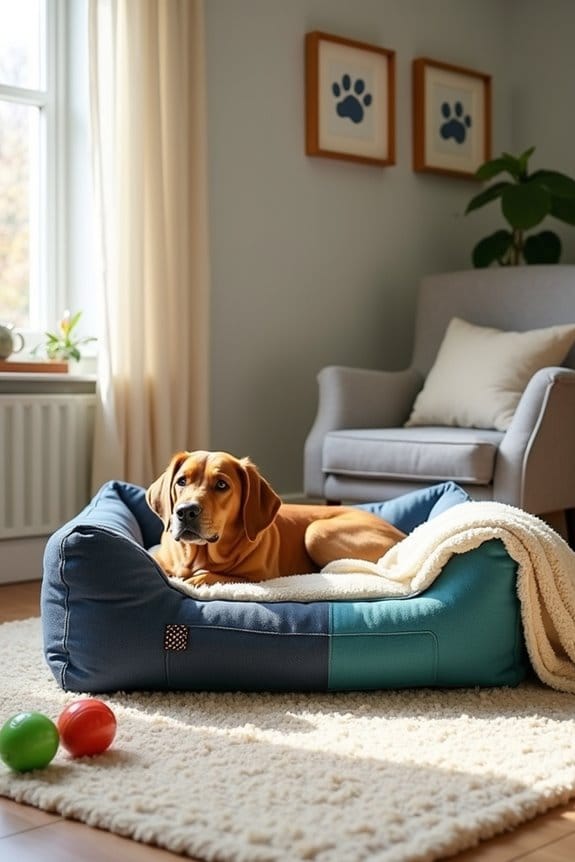
4. Stylish Canvas Pet Sofa
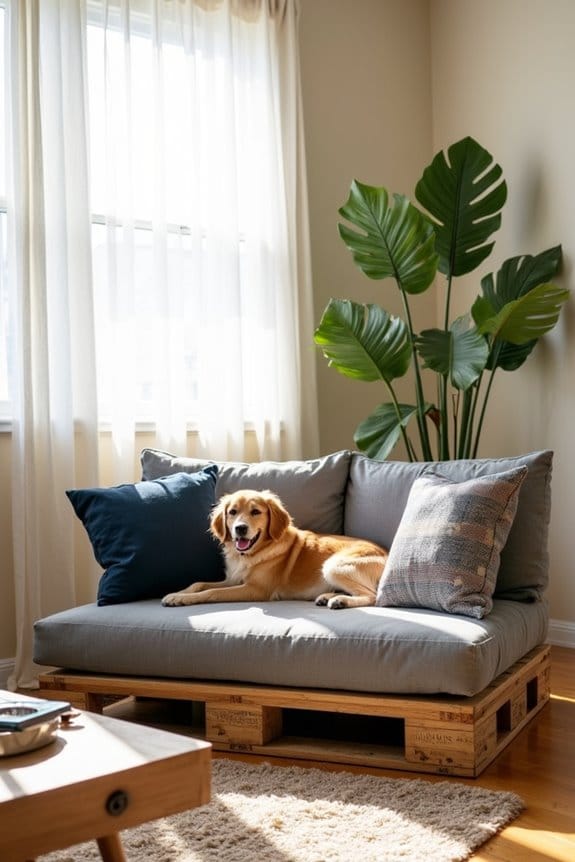
Treat your furry friend to a stylish upgrade with this DIY Canvas Pet Sofa! Not only does it provide a chic lounging spot for your dog, but it also adds a touch of elegance to your home decor. Plus, making it yourself is a budget-friendly way to guarantee your pet has a cozy place to relax while saving you some bucks over store-bought versions. Imagine your pup reclining like royalty on their very own throne — sounds delightful, right? Additionally, consider pairing your DIY effort with luxury dog beds large to offer your pet the ultimate in comfort and style.
Materials Needed:
- Wooden pallet or sturdy wooden box (for base structure)
- Canvas fabric (choose a color or pattern that matches your decor)
- Foam padding or cushion (for comfy seating)
- Staple gun and staples (to attach fabric)
- Sandpaper (to smooth rough edges)
- Measuring tape
- Scissors or fabric cutter
- Paint or wood stain (optional, for finishing touches)
- Dog-safe pillows or cushions (for extra comfort)
Step-by-Step Instructions:
- Construct the Base: If you’re using a wooden pallet, simply lay it flat. If you’re using a wooden box, guarantee it’s stable and won’t tip over. A little sanding goes a long way—smooth out any rough edges, so your pup doesn’t get splinters.
- Measure and Cut the Foam: Measure the top of your base to decide how much foam you’ll need. Cut the foam padding to size, aiming for about 2 to 3 inches thick — dogs love a cushy seat, just like us!
- Cover with Canvas: Cut your canvas fabric, allowing a few extra inches on each side to wrap around the foam and secure it beneath the base. Neatly fold the edges of the fabric over the foam and staple it onto the base using the staple gun. Pull tight, but not so tight that it tears the fabric; we’re not pulling a boat on a road trip.
- Finish the Edges: Tuck the fabric underneath and make sure everything is smooth. A smooth finish might keep your pup from thinking the sofa is an obstacle course. If you’re feeling crafty, why not paint or stain the wood to match?
- Add Pillows or Cushions: Now’s the time for comfort. Toss some dog-safe pillows or cushions on top for ultimate lounging. Your dog is going to act like they’re sitting on a cloud. It might just be the best spot in the house.
- Test it Out: Call your pup over and watch as they discover their new throne. Snap a picture for posterity, because there’s nothing cuter than a dog lounging in style.
Optional Add-ons/Variations:
Feeling extra creative? Spice things up by using a patterned canvas fabric that complements your home decor, or even sew a removable cover for easy cleaning.
Want to go the extra mile? Consider adding a personal touch by painting your dog’s name on the side of the sofa.
Pro Tip:
Before you start, check that the wood is smooth and sturdy. A wobbly base isn’t a solid foundation for dog lounging.
And hey, if you can, choose wood that’s recycled or reclaimed. You’re doing good for your dog and the planet. How cool is that?
With this project, not only does your pup get a comfy place to lounge, but you also have a beautiful conversation piece that showcases your creativity.
5. Woven Straw Pet Mat

Looking for a simple, stylish, and comfy spot for your pup to relax? A Woven Straw Pet Mat is the perfect DIY project that not only provides a cozy hangout for your dog but also elevates your home decor. Plus, it’s an excellent way to save some bucks while giving your furry friend a comfy place to lay. Don’t be surprised if your dog refuses to get up — this mat is going to be their new favorite spot. In addition, pairing it with luxury elevated dog bowls can truly elevate your pup’s dining experience.
Materials Needed:
- Natural straw mat (look for one that’s thick enough for comfort)
- Soft fabric (like cotton or fleece) (to make it more comfy)
- Hot glue gun and glue sticks (for secure bonding)
- Scissors (to cut fabric to size)
- Measuring tape (to ascertain the right fit)
- Optional fabric paint (for personalization and extra flair)
Step-by-Step Instructions:
1. Select the Straw Mat: Choose a straw mat that fits your dog’s size. It should be large enough for them to stretch out comfortably — we want a cozy lounging area, not a cramped corner.
2. Measure and Cut the Fabric: Measure the dimensions of the straw mat then cut your chosen fabric to slightly larger than the mat. This allows for a nice overhang, giving it a finished look and extra softness.
3. Glue the Fabric to the Straw Mat: Use the hot glue gun to carefully attach the fabric to one side of the straw mat. Start at one edge and work your way across, pressing the fabric down firmly to make sure it sticks well.
Just a tip: Be cautious with the hot glue, it’s sneaky hot — not like that cozy vibe we’re going for.
4. Finish the Edges: Fold the excess fabric over the edges of the straw mat and glue it down for a smooth, polished look. You don’t want any bumpy bits messing with your dog’s comfort level. It’s all about the seamless layers here.
5. Let it Dry: Allow the glue to set properly before letting your dog on it. You’ll want to avoid a sticky situation, pun intended.
6. Personalize It: If you’re feeling crafty, use fabric paint to add your dog’s name or some funky designs to the mat. It’s a great way to make it truly your own. Everyone loves a personalized touch.
7. Show it Off: Place the new mat in your dog’s favorite lounging area. Watch them flop down and settle in, and don’t forget to snap a cute pic it’s basically the law of paw-rents.
Optional Add-ons/Variations:
Want to go all out? Consider layering multiple mats for a cozy look or using bright patterns to make it pop. You could even add a border of tassels or fringe around the edges for a fun, bohemian vibe.
Your dog won’t just be resting; they’ll be lounging in style.
Pro Tip:
If you want your mat to last longer, make sure to choose a washable fabric. This will save you time and energy in cleaning up any muddy pawprints or stray fur — because let’s be honest, dogs have a knack for getting into mischief, and you’ll want to keep it looking fresh and clean without much hassle.
6. Deluxe Donut-Shaped Bed
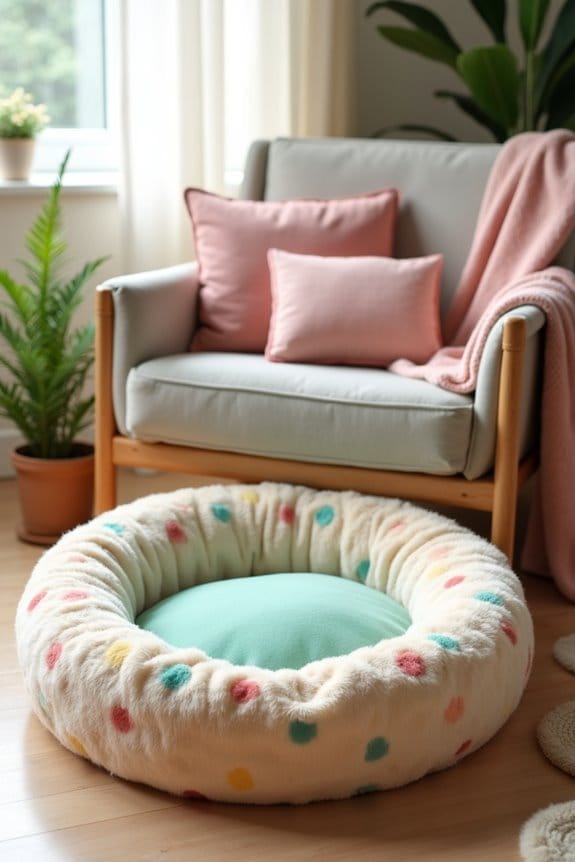
If you want to pamper your pup like royalty, why not whip up a cozy Deluxe Donut-Shaped Bed? This DIY project is the perfect blend of comfort and style, providing a snuggly spot where your furry friend can curl up like a fluffy cinnamon roll. Not to mention, it’s a cost-effective way to upgrade your pet’s sleeping arrangements while giving them a space that complements your home decor. Plus, you can ensure your Yorkie enjoys a nutritious diet with luxury dog food options that pair perfectly with their new cozy bed!
Materials Needed:
- Soft fabric (faux fur, cotton, or fleece — go wild)
- High-loft batting or foam (for cushioning)
- Sewing machine or needle and thread (you can do it by hand, but that may take a while)
- Scissors (for snipping and shaping)
- Measuring tape (to get those dimensions just right)
- Fabric pins (to hold everything in place)
- Optional fabric paint (for some personal flair)
Step-by-Step Instructions:
- Choose Your Fabric: Pick out a soft fabric that’s pleasing to the touch. Your dog deserves a bed as plush as they are. Don’t forget to choose a color or pattern that fits your vibe.
- Measure and Cut: Decide on the diameter of the donut bed. A typical size is around 24 inches for small dogs or 36 inches for larger breeds. Cut two identical circles from your fabric for the outer cover, and another slightly smaller circle for the bottom.
- Create the “Donut” Shape: For the outer ring, cut a smaller circle from the center of one of your large circles — think of it like making a donut, minus the calories. The more stuffing you add, the more luxurious it will feel.
- Pin and Sew: At this stage, pin the fabric pieces together, starting with the outer layer. Sew around the edges (don’t forget to leave a gap for stuffing). Does your sewing machine sound like a dying spaceship? It’s okay; they can be dramatic.
- Stuff It: Here comes the fun part. Stuff the donut ring and center piece with the batting or foam to create a comfy nest. Make sure it’s evenly filled; lumpy beds aren’t a vibe, trust me.
- Close It Up: Once you’ve got the plushness just right, sew up the opening. Hide any loose threads like an undercover agent; you want this bed to look sharp.
- Final Touches: Go ahead and jazz it up with some fabric paint if you’re feeling crafty. Names, paw prints, or a funky design can add that personal element.
Optional Add-ons/Variations:
Why not mix it up? Use two different fabrics for the outer ring and the center to create a playful contrast. You could also add a removable cover with a zipper so you can easily clean it after a wild night of squirrel dreams.
Pro Tip:
If your pup is a chewer, consider using a durable fabric like canvas. It may cost a bit more, but it’ll save you money in the long run. Plus, adding a little extra stuffing not only enhances comfort but may also help the bed keep its shape longer— no one wants a flat pancake bed.
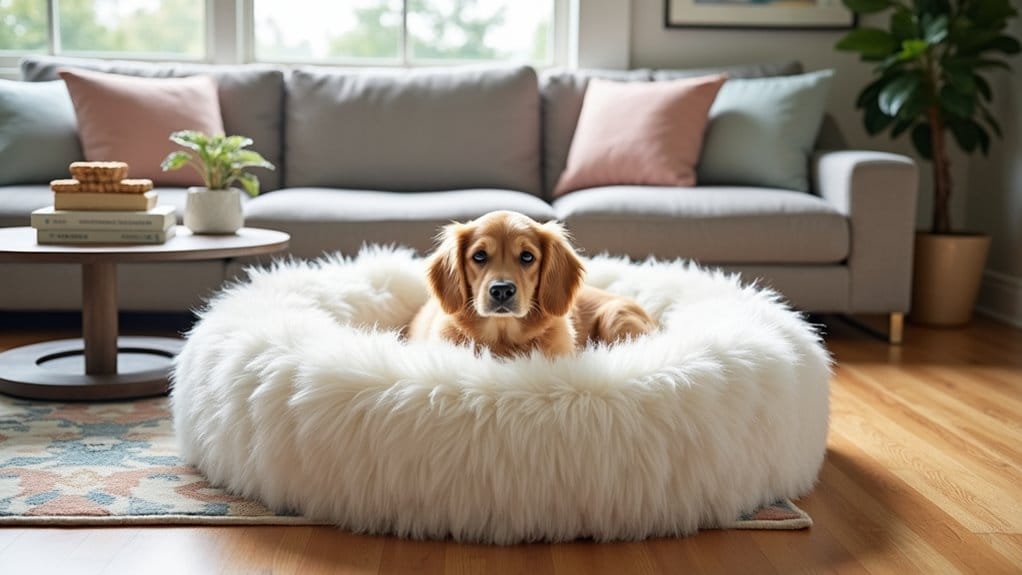
7. Plush Faux Fur Pet Bed
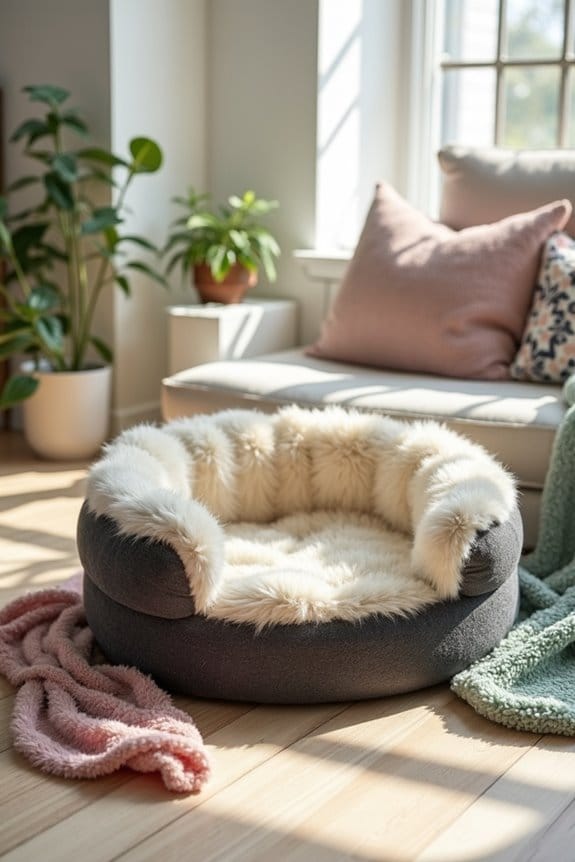
If your furry companion deserves the best, a DIY Plush Faux Fur Pet Bed is just the ticket. Not only does this project lend an air of luxury to your pup’s sleeping space, but it’s also a cost-effective way to provide maximum comfort—because let’s face it, your dog doesn’t care about your budget, they just want to relax in style. Plus, a cute pet bed can really enhance your home’s decor. Additionally, pairing this cozy bed with premium dog food packages will ensure your pup feels pampered all around.
Materials Needed:
- Plush faux fur fabric (as soft as a cloud)
- Foam or polyester batting (to soften their dreams)
- Sewing machine or needle and thread (don’t worry, it’s easier than it sounds)
- Scissors (for those stylish cuts)
- Measuring tape (because we want precision, right?)
- Fabric pins (to keep things in place)
- Optional embroidery kit (for a personal touch)
Step-by-Step Instructions:
- Select Your Faux Fur: Choose a plush faux fur fabric that makes you want to snuggle. Seriously, you should feel like you could lay down on it yourself.
- Measure and Cut: Decide on how large you want the bed to be, maybe around 30 inches for a medium-sized dog. Cut two pieces of fabric into a large circle and one smaller circle for the base—these will wrap your pet in cozy goodness.
- Sew the Edges: Pin the edges of your top and bottom circles together, fluffiness facing in. Sew around the perimeter, leaving a gap that’s big enough for stuffing but small enough to not be a total hassle (about 8 inches works well).
- Stuff the Bed: Flip the whole thing inside out, and here’s where the magic happens: stuff it with foam or batting until it feels just right. Not too plush, not too flat; think of it as Goldilocks testing the beds.
- Close It Up: After the stuffing is perfect, sew up that gap, making sure it’s lined up nicely. This is where the bed takes on its final shape, and trust me, your pup will thank you for it.
- Add Embroidery (Optional): If you’re feeling crafty, break out that embroidery kit and personalize the bed with your dog’s name or a fun design. It’s a cute way to make it special—kind of like putting frosting on a cake.
Optional Add-ons/Variations:
Want to give it a unique flair? Use contrasting fabrics for the top and bottom layers to create a fun mix of textures and colors. You could even try using a print for the outer layer while keeping the inside soft and plush.
Pro Tip:
If you want your plush pet bed to last longer, consider using a removable cover. Just create a zip closure or buttons on one side, so you can easily wash it. Because let’s be real, our furry friends can be a little… messy. Plus, a quick refresh will keep their sleep spot fresh and fluffy, just how they like it.
Extra Tips & Ideas
Transforming your DIY dog bed into a cozy haven for your pup can be a fun and rewarding project, so let’s plunge into some extra tips and ideas that’ll take your creation to the next level.
First off, think about adding a washable cover. Trust me, your future self will thank you.
Next, don’t hesitate to layer foam or old blankets for extra cushioning—let’s face it, nobody wants a sore back after napping.
Got spare fabric? Use it to create a stylish dog bed that’ll blend with your décor.
If your pup loves to chew, consider using durable materials, too.
And hey, remember, the more personal touches you add, the more your furry friend will feel the love in their cozy space. Additionally, consider exploring luxury dog beds which provide excellent support for large dogs during their restful moments.
Frequently Asked Questions
What Materials Are Best for Dog Bed Durability?
For dog bed durability, you’ll want to choose materials like heavy-duty canvas, reinforced fabrics, and water-resistant covers. Memory foam or sturdy stuffing enhance comfort while ensuring the bed withstands wear from your pup’s playful antics.
How Do I Clean Homemade Dog Beds?
Think of washing a favorite blanket; first, remove any cover and shake it out. Then, use a machine or hand wash in mild detergent, rinse thoroughly, and air dry to keep it fresh and cozy for your pup.
Can I Use Recycled Materials for Dog Beds?
Absolutely, you can use recycled materials for dog beds! Old blankets, pillows, or even crates can provide comfort and support. Just make sure everything’s clean and safe for your furry friend’s cozy spot.
What Size Bed Is Ideal for My Dog?
Did you know that 40% of dogs suffer from anxiety? For your furry friend, choose a bed that’s at least as long as they are from nose to tail, ensuring comfort and security during restless moments.
How Often Should I Replace My Dog’s Bed?
You should replace your dog’s bed every 1 to 2 years, depending on wear and tear. Regularly check for odors or damage; these signs mean it’s time for a fresh, cozy spot for your pup.
Conclusion
So, whether your pup’s dreams are of chasing squirrels or lounging like royalty, these DIY dog bed ideas are sure to pamper them in style. After all, aren’t we just their butlers in disguise? Seriously, if your dog starts expecting a spa day after this, don’t say I didn’t warn you. With a little creativity and some basic supplies, you can whip up a cozy spot that makes even the fanciest pet boutiques look like amateur hour. Happy crafting!

Hi, I’m Ali Tarek, the founder of Animalsman. I’ve always been passionate about pets, especially dogs and cats, and I created this website to share practical tips, easy recipes, and helpful care advice for fellow pet lovers. My goal is to make pet care simple, enjoyable, and accessible for everyone. When I’m not writing or curating content, you’ll usually find me spending time with my furry friends or learning new ways to keep them happy and healthy.

