Your golden retriever has a bed. You know she does. And yet somehow she ends up sprawled across your couch, your throw pillows knocked onto the floor, and that one cream-colored blanket you got from TJ Maxx? Gone. Covered in fur.
I’ve been there with my two dogs, and honestly? It drove me crazy for way too long.
The thing is, a basic dog bed just doesn’t cut it when your girl treats every soft surface like it belongs to her. And buying a second bed means more floor space eaten up, more clutter, and honestly, more mess.
Here’s what actually works: building up instead of out.
These 7 dog bunk beds DIY projects give both your pup and your space exactly what they need — a real sleeping spot that looks good enough to pin.
#1: DIY Pallet Wood Dog Bunk Bed With Personalized Name Plaque
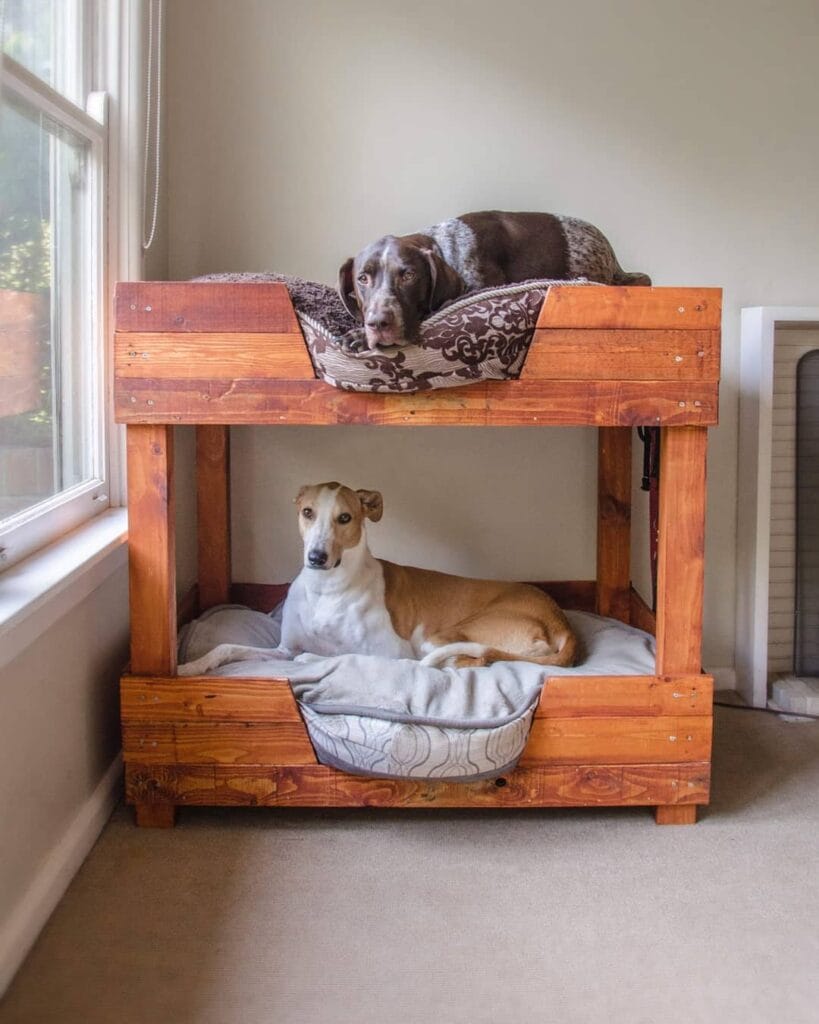
You know that moment when your golden is finally settled — and you realize she’s taken over the entire entryway, legs sprawled everywhere, blocking the door like a furry roadblock? Yeah. Same.
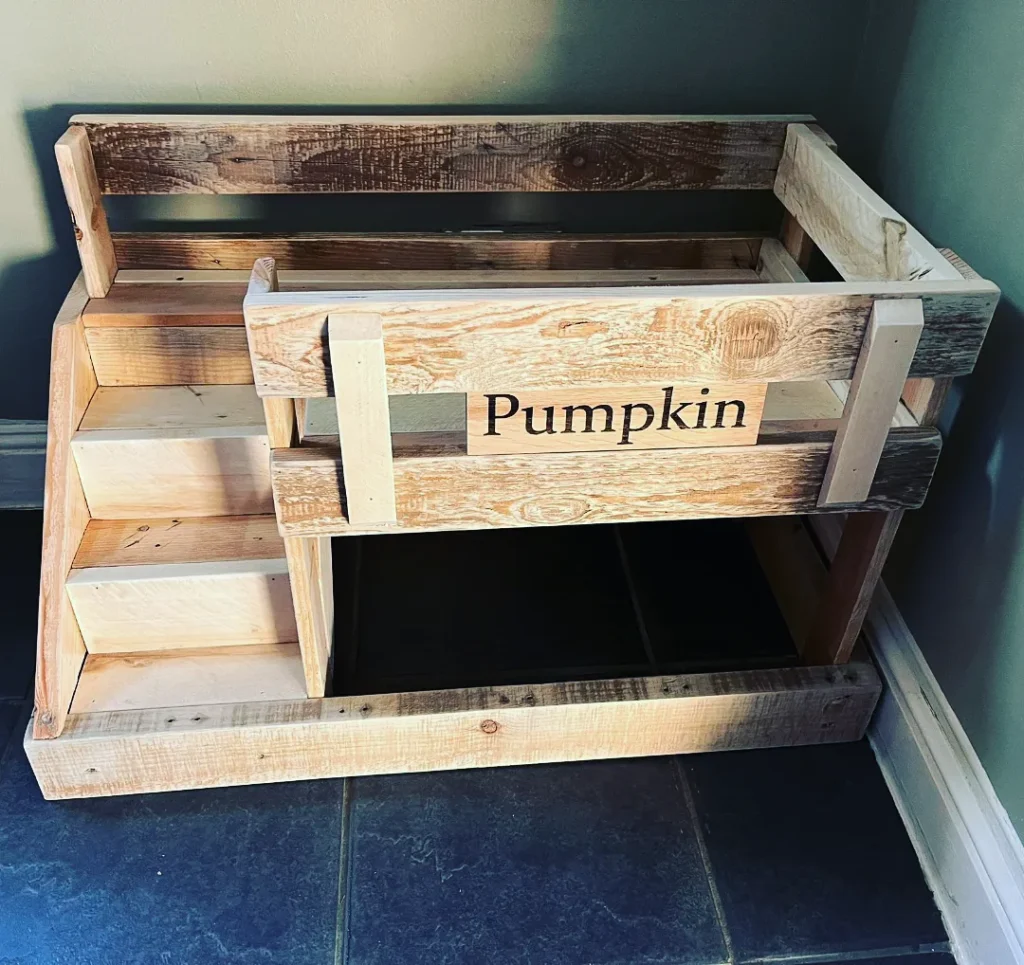
This reclaimed pallet wood dog bunk bed from @atozwoodwrk is the thing I didn’t know I needed until I saw it. It’s rustic, it’s Pinterest-ready, and it has a custom engraved name plaque right on the front — “Pumpkin,” in this case — which honestly makes it feel less like pet furniture and more like a piece your home actually wants.
Materials & Tools:
– Reclaimed pallet wood planks (mixed weathered gray and natural pine tones)
– 2×2 pine lumber for corner posts and structural supports
– Wood screws (1.5″ and 2.5″)
– Wood engraving tool or wood-burning kit for the name plaque
– Sandpaper (80-grit and 150-grit)
– Drill with drill bits
– Wood stain in a light wash finish
– Measuring tape, pencil, square
– Clamps
Prep Time: 30 minutes | Active Project Time: 3–4 hours | Difficulty Level: Intermediate
Instructions
Start by sorting your pallet wood. You want a mix of weathered gray boards for the back panel and sides, and cleaner, lighter pine pieces for the front face and name plaque — that contrast is what gives it that layered, collected look you see in the photo.
Cut your 2×2 posts to 18 inches tall for the four corner supports. These carry the whole structure, so clamp them tight before driving screws. Don’t rush this part.
Build the bottom frame first — two 24-inch side rails and two 18-inch front and back rails screwed into the base of your corner posts. This forms your lower sleeping compartment. The open front design here is intentional — it gives your dog easy entry without any awkward stepping over a ledge, which matters a lot for older goldens with stiff joints.
Attach your bottom platform boards across the lower frame, spacing them with a small gap for airflow. Then build your upper frame at the top of the corner posts, same method. The upper compartment in the photo has a full enclosed back and side boards — layer these using your weathered gray planks for that pallet aesthetic.
The stair section on the left side? Cut three small step platforms, each one about 6 inches deep and 8 inches wide, and attach them to a small side frame. Stagger them at 4-inch height intervals. A dog bunk bed with built-in stairs — sturdy steps mean your dog climbs with confidence, which keeps her joints safe and keeps you from watching her attempt a dramatic leap every morning.
Sand everything to 150-grit so there are no snag points. Apply your light wash stain and let it dry fully before assembly.
The best part: burn or engrave your dog’s name into a clean center plank and screw it right onto the front face panel. It takes five extra minutes and it’s the detail everyone notices first.
Sand any rough post edges extra smooth — goldens especially love to rub their faces along furniture edges, and you want zero splinters anywhere near that soft snoot.
📸 Photo credit: Instagram @atozwoodwrk
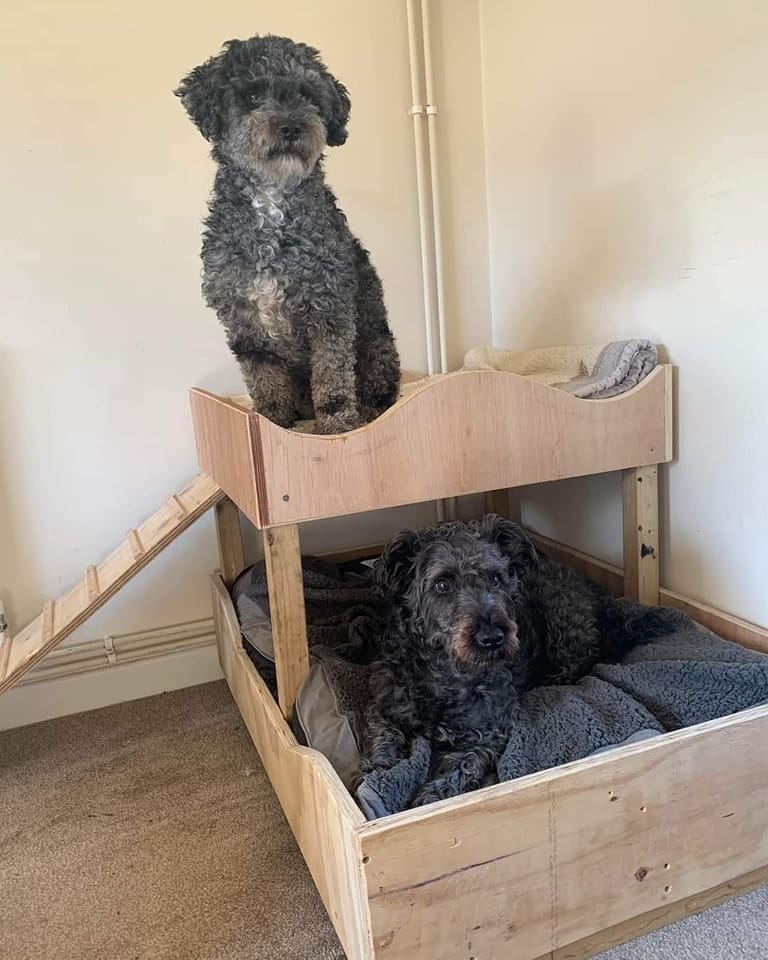
#2: DIY Dog Bunk Bed From Plywood — Two Dogs, Zero Floor Drama
Your golden is always in the way. You trip over her bed going to the kitchen, she steals the couch cushions, and somehow there’s fur on every surface you just cleaned. Now picture having a second dog. Yeah.
That’s exactly the problem this plywood dog bunk bed solves — and honestly, it’s one of the most Pinterest-worthy DIY builds I’ve ever seen.
Materials & Tools You’ll Need:
– ¾-inch birch plywood (main structure)
– 2×4 lumber for the corner legs
– Wood screws (1.5-inch and 2.5-inch)
– Sandpaper (120-grit and 220-grit)
– Wood glue
– Two bolster-style dog beds (one gray fleece, one tan)
– Jigsaw (for the scalloped front panels)
– Drill + drill bits
– Measuring tape + pencil
– A small ramp cut from leftover plywood
Prep Time: 30 minutes | Active Project Time: 4–6 hours | Difficulty Level: Intermediate
### Instructions
Cut your ¾-inch plywood into two identical bed platforms — I’d go 32 x 22 inches for a medium-to-large dog. Sand all edges with 120-grit first, then finish with 220-grit so there are zero splinters near your pup’s belly.
Cut four 2×4 corner legs at 18 inches each for the bottom tier, then four more at 16 inches for the upper tier supports. This staggered height gives the bottom dog enough breathing room — and trust me, your dog will notice that extra space.
Use your jigsaw to cut that curved scallop detail along the front panels. It’s the detail that makes this look like something you bought, not built in a garage on a Saturday. And it actually creates a cozy “lip” that keeps the bed cushion from sliding out — scalloped front panels hold the bedding in place, so your dog feels secure instead of sliding around every time she shifts.
Assemble the bottom frame first using wood glue + 2.5-inch screws at every corner joint. Attach the top platform legs to the bottom frame sides before securing the upper bed platform — this keeps everything square. Add the ramp on the left side at roughly a 30-degree angle so your older or smaller dog can reach the top bunk without jumping.
The natural birch finish pairs with literally any room. If you want it to last, seal the whole thing with a pet-safe matte polyurethane — two coats, light sanding between them.
One thing to remember: always pre-drill your screw holes in plywood. It prevents splitting and keeps your joints tight for years. And if you love the natural wood aesthetic, 11 Stylish Wooden Dog Beds Your Pup Will Love has so many gorgeous inspo builds worth bookmarking.
My cousin built this exact style for her two doodles last winter. She said the best part was that the dog who always hogs space finally had her own designated spot — and stopped stealing the couch by day three.
📸 Photo credit: Instagram @funkybunkbeds
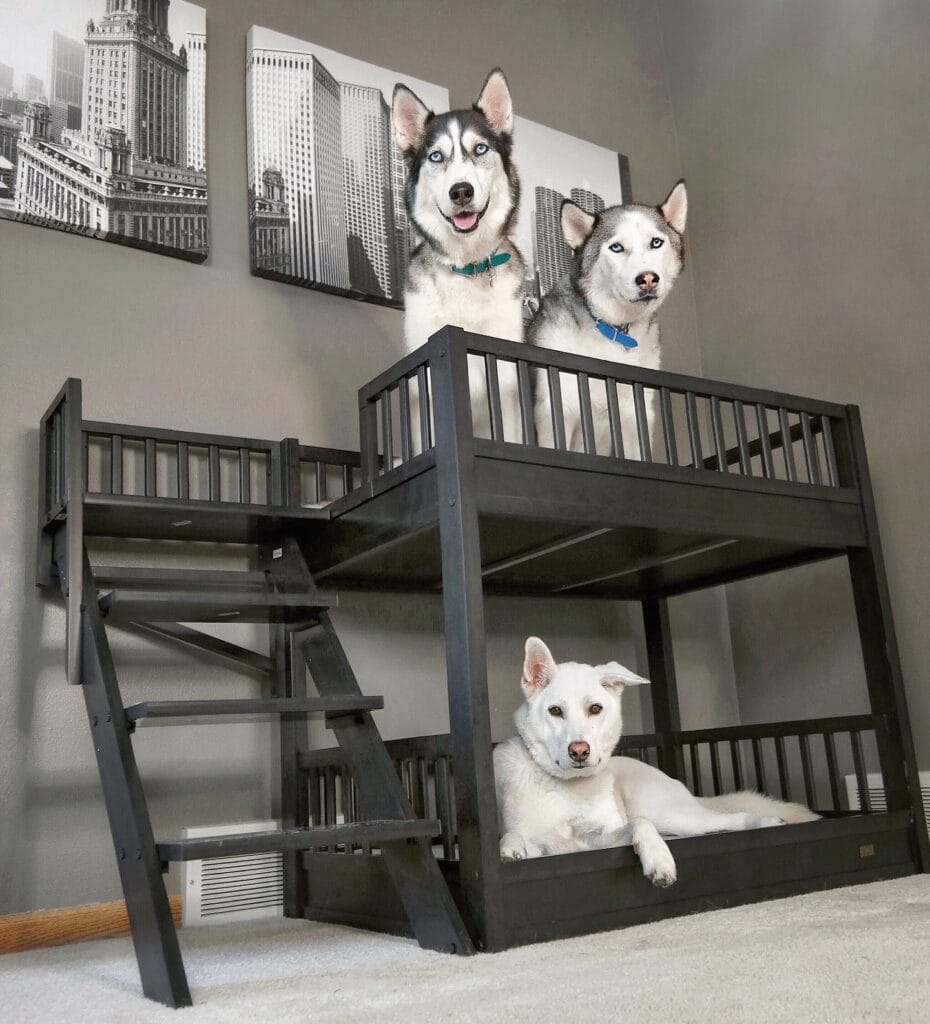
#3: DIY Dog Bunk Bed With Stairs — A Two-Story Sleep Setup Your Pups Will Actually Use
You know that moment when your golden has claimed the entire couch, the dog bed is shoved in the corner collecting dust, and you’re like… why did I even buy that thing?
Yeah. Been there.
This build is giving me all the Pinterest feels, and honestly? It solves the multi-dog chaos so well.
Materials & Tools You’ll Need:
– 2×4 pine lumber (frame and stairs)
– 1×4 pine boards (railings and slats)
– 3/4″ plywood sheets (top and bottom sleeping platforms)
– Dark espresso-toned wood stain (that charcoal finish in the photo is everything)
– Wood screws (2.5″)
– Wood glue
– Sandpaper (120-grit and 220-grit)
– Drill, circular saw, measuring tape
– Foam mattress inserts cut to platform size
Prep Time: 1 hour | Active Project Time: 6–8 hours | Difficulty Level: Intermediate
### Instructions
Start by cutting your 2x4s into four vertical legs at 36 inches each — that height gives enough clearance underneath for a larger dog like a golden to stretch out without feeling cramped.
Cut your plywood into two matching platforms at 48″ x 30″. Sand both pieces with 120-grit first, then finish with 220-grit so there are zero rough edges your dog’s paws could catch on.
Assemble the frame by attaching the legs to the platform edges using wood glue plus 2.5″ screws at every joint. The double fastening here means the structure handles a big dog jumping up without any wobble — solid frame equals confident dog, confident dog means they’ll actually sleep there.
Build the railing next using your 1×4 boards, spacing the spindles 3.5 inches apart. That gap keeps paws from slipping through while still letting air circulate. And the railing is exactly what makes the top bunk feel safe rather than scary for your dog.
The stairs attach at a 45-degree angle on the left side. Cut five stair treads from your 2x4s and space them 7 inches apart vertically. Secure them to two angled 2×4 side rails — this gentler incline is so much easier on older dog joints than a steep ramp.
Apply two coats of your dark espresso stain, letting it dry fully between coats. That rich charcoal tone ties into neutral home decor without screaming “dog furniture.”
Drop in your foam inserts and add washable covers. Done.
The stair access plus railed upper deck means even smaller or senior dogs can reach the top bunk safely, so every dog in the house gets their own claimed space — and your couch gets a break. Finally.
For more creative builds like this, 13 Genius DIY Dog Stuff Every Pet Parent Needs to Try Today! has some seriously good inspo.
Stain all cut edges twice, not once — raw wood edges absorb uneven moisture and can warp over time, especially if a dog drools on them (and they will).
📸 Photo credit: Instagram @2husketeers
#4: Build a Modular Dog Bunk Bed with Built-In Stairs (The Pinterest Dream Your Pup Deserves)
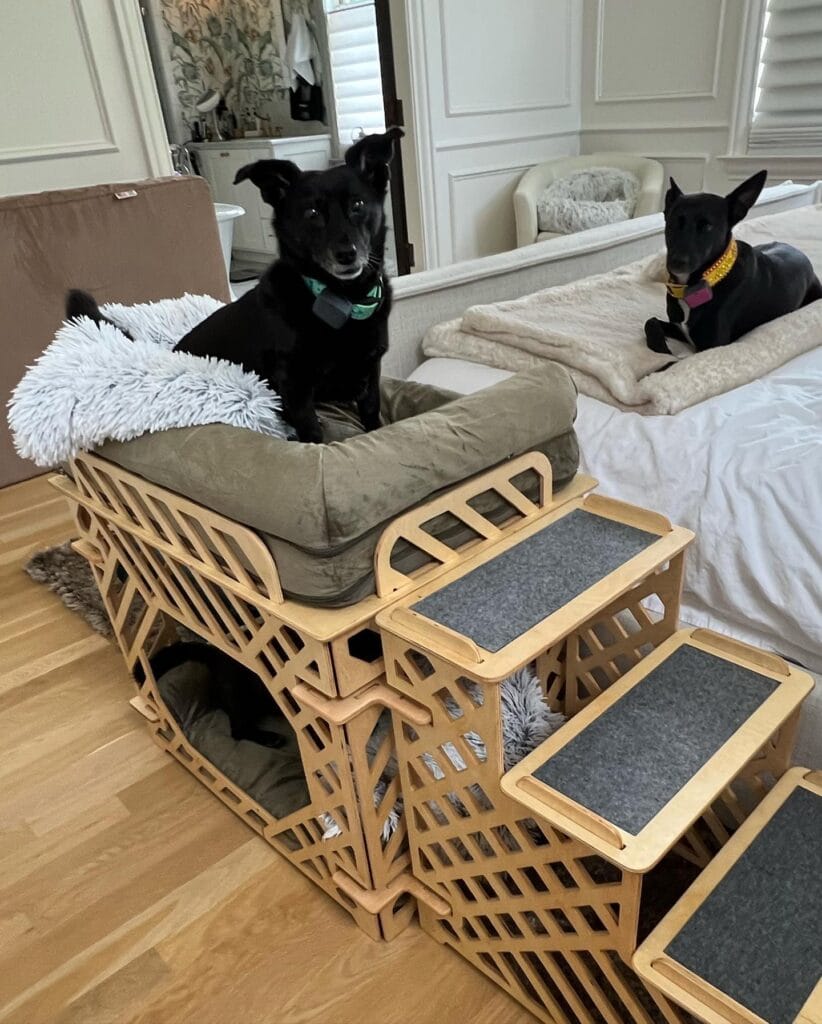
You know that moment when your golden is sprawled across your bedroom floor, taking up every inch of space, and you’re basically doing gymnastics just to get to your closet? Yeah. I lived that for two years before I found this setup — and honestly, I wish I’d done it sooner.
This build is a laser-cut Baltic birch plywood modular bunk system with a lower den/hideout and an upper sleeping platform topped with a green velvet orthopedic cushion. The stairs attach to the right side using carpet-topped treads (approximately 4 steps, each 8″ wide x 6″ rise) for solid grip — your golden’s paws won’t slip once.
Materials & Tools:
– ¾” Baltic birch plywood sheets (or pre-cut laser files ordered online)
– Jigsaw or CNC/laser cutter
– Wood sandpaper (150-grit)
– Wood glue + finishing nails
– Gray anti-slip carpet tape or carpet tiles
– Orthopedic dog cushion (approx. 24″ x 32″)
– Fluffy faux-fur throw pillow
– Wood stain or natural sealant (optional)
– Drill + screwdriver set
Instructions
Start by cutting your plywood panels using the geometric lattice pattern — those diamond cutouts aren’t just pretty, they reduce the overall weight while keeping the structure solid. Sand every edge until zero splinters remain. Your dog will rub against these constantly.
Assemble the lower den box first. Slot the side panels together using the interlocking tab-and-slot method — no screws needed if your cuts are precise, but a little wood glue at each joint adds serious stability. Let it dry fully before stacking.
The upper platform frame assembles the same way on top. Once it sits flush, place your orthopedic cushion directly onto the platform. The cushion’s raised edges act as bumpers — your dog won’t roll off mid-dream, and the firm base supports older joints without the floor’s hard pressure.
Build the stair unit separately as its own modular piece. Cut four stair-step platforms in descending heights, then apply gray carpet tape to each tread. The carpet grip means your golden builds confidence climbing up, which matters more than people realize with bigger dogs.
Tuck a second cushion inside the lower den. And suddenly you’ve got a two-dog solution or a cozy cave for one.
If you love elevated pet furniture ideas, 14 Creative DIY Elevated Dog Bed Ideas You’ll Love has incredible builds worth bookmarking alongside this one.
The lattice wall design keeps airflow moving through the lower den — your dog stays cool, sleeps longer, and actually uses their own space instead of yours.
Seal the raw wood with a water-based matte sealant before assembly. It takes an extra hour but protects against drool, spills, and the general chaos dogs bring into a bedroom.
Prep Time: 2 hours | Active Project Time: 6-8 hours | Difficulty Level: Intermediate
📸 Photo credit: Instagram @brato_the_senji
#5: The Pallet Wood Dog Bunk Bed That Keeps Two Dogs Happy (And Your Living Room Cute)
You know that moment when your golden is sprawled across the dog bed, taking up every inch, and your other pup just… stands there staring at you like “seriously?” That’s exactly the problem this build solves.
This DIY is giving full Pinterest-board energy — natural pine wood, cozy gray bedding on the bottom, mustard and blush cushions piled on top. It fits two dogs without eating your entire living room.
Materials & Tools:
– 4×2 pine lumber (structural frame)
– Wooden pallet boards (platform surfaces)
– Gray fleece mat (bottom bunk)
– Faux fur throw blanket (top bunk)
– Sandpaper (120-grit then 220-grit)
– Wood screws (3-inch and 1.5-inch)
– Drill, measuring tape, wood glue
Prep Time: 30 min | Active Project Time: 4–5 hours | Difficulty Level: Intermediate
### Instructions
Cut your pine lumber into four 24-inch vertical legs first — these carry all the weight, so don’t rush the measurements. Sand every piece before assembly, because rough edges and dog fur are a nightmare combination.
Build the bottom frame as a rectangular box structure, screwing the horizontal crossbars into the legs at floor level. Slide your bottom platform boards across, leaving half-inch gaps for airflow — your dog literally sleeps cooler because of this, which means less restless nights for both of you.
Then build the top frame the same way, positioning it about 20 inches above the bottom bunk. That gap gives a medium-large dog enough headroom to sit up comfortably underneath.
Add low side rails on the top bunk using short pallet boards — the Springer Spaniel in this build clearly feels secure up there, and that’s the whole point. Drop in your cushions, layer the throw blanket, and you’re done.
What this means for you: pine is budget-friendly, easy to cut, and holds screws without splitting — so you get a sturdy, good-looking piece without needing a full woodshop setup.
If you love functional furniture that doesn’t look like a dog took over your house, 14 Stylish DIY Dog Crate Furniture Ideas You’ll Love has more builds in this same vibe.
Seal the wood with a water-based matte finish before adding bedding — it makes wiping down muddy paw prints a five-second job instead of a whole thing.
📸 Photo credit: Instagram @jorosieh
#6: White Wooden Dog Bunk Bed With Cozy Striped Cushions

Your golden is hogging the couch again. You just bought that linen throw pillow set from Pinterest and now it’s covered in fur and drool before you even got to take a picture of it.
This build is the answer.
Prep Time: 1 hour | Active Project Time: 4–6 hours | Difficulty Level: Intermediate
Materials & Tools:
– 1×6 and 1×4 white-painted pine boards
– Wood screws (1.5″ and 2.5″)
– Sandpaper (120-grit and 220-grit)
– White chalk paint or wood primer + latex paint
– Two striped blue-and-grey cushions (roughly 18″×24″)
– Drill, measuring tape, wood glue
– Optional: teal bandana or harness for the inaugural photo shoot
### Instructions
Cut your pine boards into two matching frames — one for the bottom bunk and one for the top. Sand every edge with 120-grit first, then finish with 220-grit so there are zero splinters near your pup’s paws.
Assemble the bottom frame first by drilling 2.5″ screws through the corner posts into the horizontal boards. This two-post structure — four vertical posts holding both levels — is what gives the whole piece its solid, furniture-grade feel. And that stability means your dog isn’t rattled awake every time they shift position.
Attach the 1×4 divider board between the two levels. This is the middle shelf you see in the photo, and it’s what separates the cozy lower den from the upper sleeping space. Slide your cushions in before you close up the top level.
Apply two coats of white chalk paint, letting each coat dry fully. The matte white finish in the photo looks clean against the blue-grey striped cushions — it photographs beautifully and wipes down fast.
The enclosed bottom bunk acts like a den, which naturally lowers your dog’s anxiety. Cushioned base plus enclosed walls equals one genuinely calm dog — and that means less zoomies on your freshly styled sofa.
If you love the idea of pairing this with a full kennel setup, 7 Cozy DIY Indoor Dog Kennel Ideas has some layouts that complement this bunk perfectly.
Sand the interior edges one extra time after painting. Paint can build up and create rough patches right where your dog rests their chin — a quick once-over saves you a vet trip.
📸 Photo credit: Instagram @troops_travels
#7: Build a Two-Tier Outdoor Dog Stand (That Doubles as a Bunk Bed Base)
Okay, so you know that moment when your golden is sprawled across your patio furniture again and you’re like… girl, you have a whole yard? Yeah. That’s what pushed me to finally build her something of her own outside.
Prep Time: 30 min | Active Project Time: 3–4 hours | Difficulty Level: Intermediate
Materials & Tools:
– 2×4 pressure-treated pine lumber (for all framing)
– 1×4 cedar slats (for the slatted shelves — top and bottom)
– 3-inch exterior wood screws
– 4 corner post pieces cut to 28 inches tall
– DeWalt cordless drill (yellow and black — you can see it right there in the pic)
– Milwaukee parts organizer (for keeping screws sorted)
– Sandpaper (120-grit)
Instructions
Cut your four corner posts to 28 inches first. And this is where most people mess up — they skip squaring the frame before driving screws. Don’t.
Attach your two long side rails to the posts at the top using 3-inch screws, then mirror that structure at the 10-inch mark from the bottom for the lower shelf frame.
Lay your 1×4 cedar slats across both frames with half-inch gaps between each board. Those gaps matter — they let rain drain so the wood doesn’t rot and your pup stays on a dry surface every single time.
Sand everything with 120-grit before your dog ever touches it. Splinters in paws are the worst.
The slatted shelf design keeps air circulating underneath — that airflow feature reduces heat buildup, which pays off on those brutal summer afternoons when your golden refuses to come inside.
Seal with an exterior wood stain in a natural cedar tone to protect the pine and keep that fresh-build look for seasons.
📸 Photo credit: Instagram @venturavanbuilds
The One Measurement Most DIYers Get Wrong (And It Costs Them Everything)
Okay, real talk — most people measure their dog and build the bed to match. That’s the mistake.
Golden retrievers sprawl. Like, fully sprawl. My cousin built a bunk bed sized to her lab’s body length and the poor girl couldn’t even roll over without hitting the frame.
Here’s the pro secret: add 12 inches to your dog’s nose-to-tail measurement for each sleeping platform. That’s your actual minimum width. Not “comfortable” width — minimum.
The other thing nobody mentions? Weight distribution between levels. The bottom bunk naturally takes more stress from the frame joints. Use 2×6 lumber for bottom support beams, not 2×4. That difference saves you a collapsed bed at 3am and a very startled dog.
Also — sand every edge twice. Golden retriever fur catches on rough wood like velcro, and you’ll spend Sunday nights pulling splinters out of that fluffy tail.
Before you decide: if your girl needs to actually reach her top bunk comfortably, these DIY dog ramp ideas pair with bunk builds.
Your Golden Deserves a Clean, Happy Home Too
Okay, real talk — you’ve got the Pinterest-worthy space, the cozy throws, the whole vibe. Don’t let mud paws and fur tumbleweeds ruin what you’ve built.
Pick one thing from this list and just start there. Seriously, one product, one weekend. You’ll feel the difference before Monday.
And hey, if you’re feeling extra motivated, those DIY dog feeding station ideas are chef’s kiss for keeping things cute AND functional.
Your home can look good and work for your dog — both things are true at the same time.
So what’s the biggest mess your golden makes daily — muddy paws, drool, or the endless fur situation?

Amr Mohsen is a software engineer who traded his keyboard for a leash — at least on weekends. His love for dogs inspired him to share what he learns as a dog owner and enthusiast, bringing a detail-oriented, research-driven perspective to every article he writes. If it’s about dogs, he’s probably already looked it up twice.


