
Have you ever been standing in your living room and your dog just looks at you with these eyes…knowing he has tracked mud on your white rug. Yeah, that just happened to me last Tuesday and I just stood there holding my mop and questioned every single decision I have ever made.
All that mess, all that chewed furniture, all those toys that have taken over your living room… it’s a lot.
And to this day I still love him, but my home doesn’t need to look like a pet store exploded inside it.
That’s why I recently have been exploring the world of DIY dog stuff! And trust me, I have some really good ones!
These 13 dog project ideas are cute enough for your Pinterest board AND actually work for your real dog mom life! No hot glue disasters and trips to three different craft stores!
Just stuff that works.
#1: No-Sew Braided Dog Tug Toy (From Old T-Shirts!)
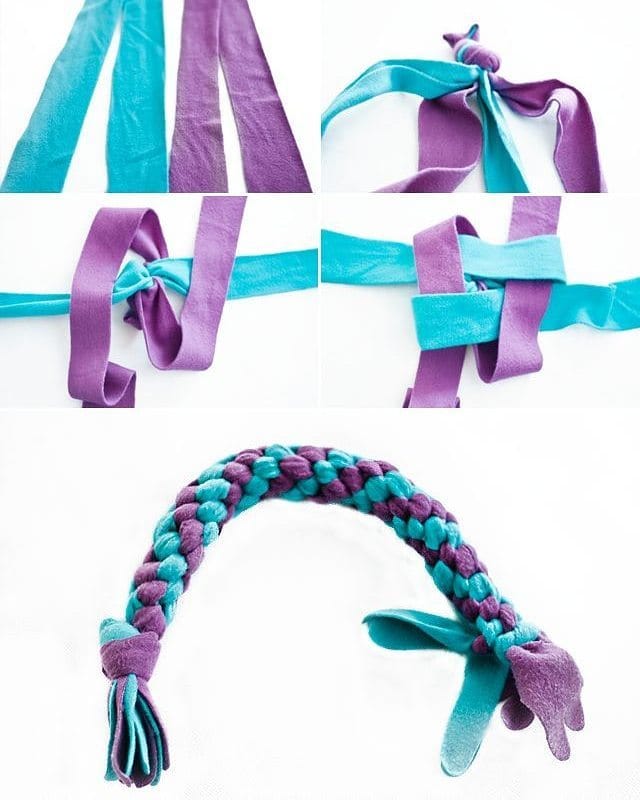
that dog is staring at you again. she’s looking at your throw pillow – again. she needs something to pull on that isn’t your couch cushions.
This braided tug toy is made from two old t-shirts. One is teal and the other is purple. Cut the t-shirts into 1.5 inch wide strips and finger-knit into a thick and satisfying rope. Tie a knot on each end.
You will need: 2 old t-shirts (the more contrasting, the better) Scissors Your hands… no tools necessary.
Instructions
Lay the strips out flat, and tie one end into a very tight knot. Pull the teal strip through the purple loop, and then wrap the purple strip back over the teal one. Repeat this pattern until you have 12-15 inches of braided strips. Tie the ends with a chunky knot, and leave a 2-3 inch tail for your dog to grab on to.
Cotton is also very pull-backable, so it keeps your dog entertained longer, thus keeping it out of trouble around the house.
Cut your strips longer than you think you need. They will shrink up quite a bit once you tighten the braid.
Prep Time: 5 min | Active Project Time: 20 min | Difficulty Level: Beginner
📸 Photo credit: Instagram @azsmalldogs
#2: Build Your Dog Their Own Bed Frame (So They Stop Stealing Yours)
There has been one of those mornings where you wake up at 2 am and your golden has taken up three quarters of your bed, haven’t you? I know I have.
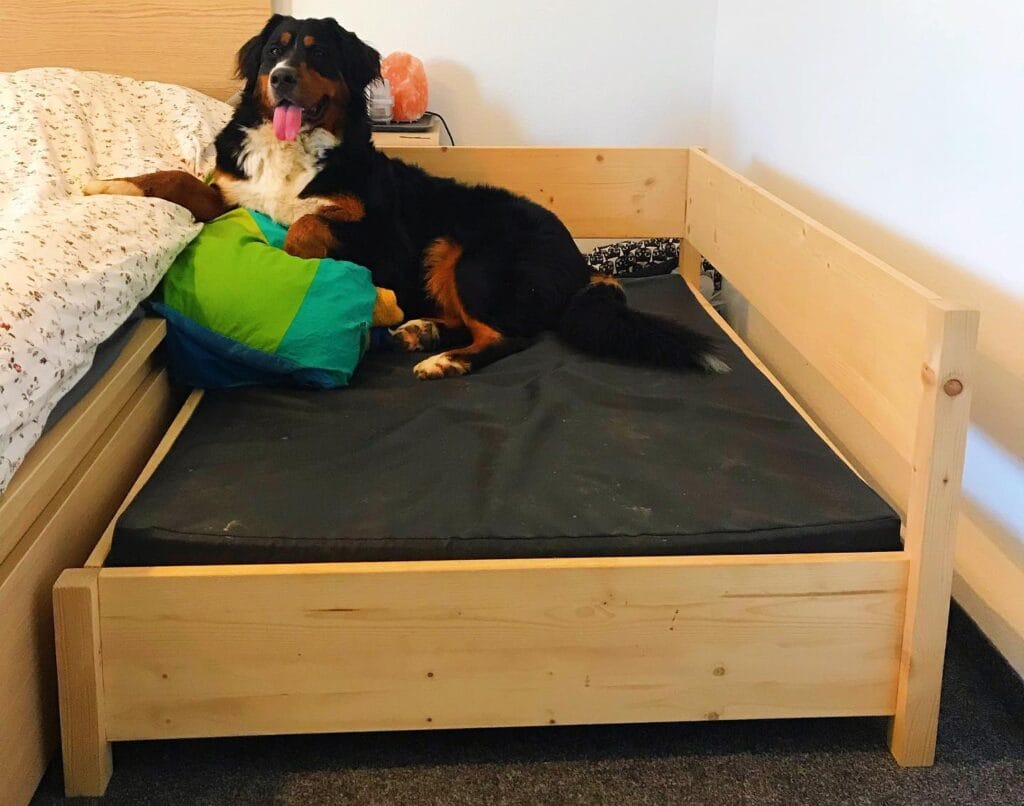
This DIY dog bed frame is giving me all the feels, because it’s like a miniature human bed, built right next to the owner’s bed. Genius!.
– Pine lumber (untreated, sanded smooth) – Black canvas dog mattress (custom cut to fit) – Wood screws and drill – Sandpaper (120-grit) – Wood glue
Instructions
Cut all the pieces of the doghouse with the pine boards into two long side rails, two short end pieces, and four corner posts. Sand all of the pieces of the doghouse, as your dog’s fur will catch on splinters.
Screw the frame together with wood glue at every joint. Attach the corner posts last so that the frame is level.
Slide your black canvas mattress inside. Done.
The raised sides keep your dog from wandering into your bed at 3am.
If your dog is older or has joint issues, adding a memory foam insert under the canvas would be very helpful. This means that they will sleep in their bed rather than yours!
These are just some of the 14 creative DIY elevated dog bed ideas for DIY Elevated Dog Bed. Be inspired before you start cutting the lumber.
⏱ Prep Time: 30 min | Active Project Time: 3–4 hrs | Difficulty Level: Intermediate
📸 Photo credit: Instagram @bernermaedchen
#3: The Tennis Ball Rope Tug Toy (Your Dog Will Lose Their Mind Over This)
You know that moment when your golden is desperately gnawing on your throw pillow because she has nothing better to do? Yeah. This fixes that.
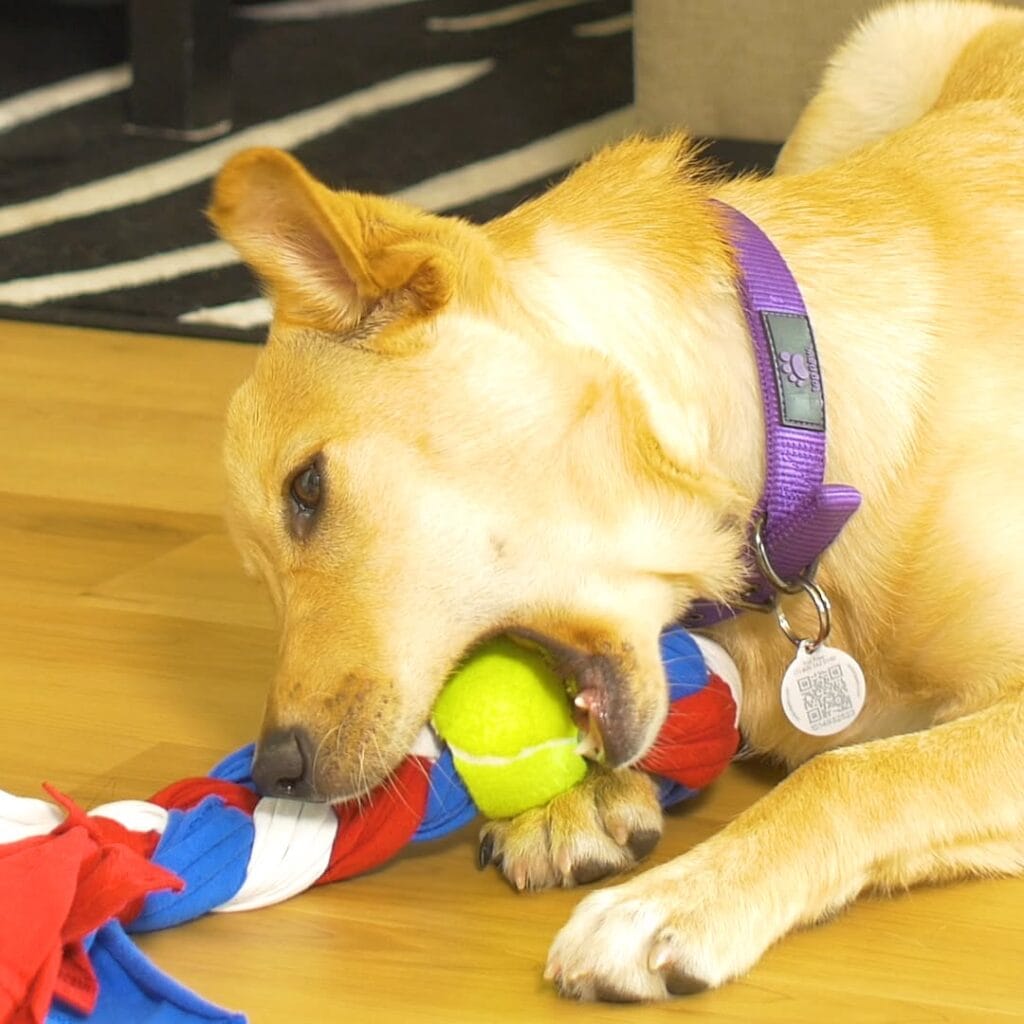
• 1 tennis ball • 3 strips of cotton fabric (red, white and blue – or whatever colors you like) • Sharp scissors or a craft knife • A skewer or pen to push the fabric through.
Instructions
Cut your fabric into three strips about 24 inches long and 2 inches wide. Pierce the two holes through the tennis ball straight through the middle using the skewer. Thread one of your fabric strips through the ball so that equal length hang on each side.
Now braid the three strips together on each side of the ball, and tie a thick knot at the ends.
That’s it.
The braided texture clings onto your dog’s teeth during tugging that helps build her jaw strength. It keeps my dog interested for longer than a plain toy too!
Keep this in mind: Every toy gets frayed. It’s normal and makes the toy more fun to chew on!
Make it with scraps of fabric from old t-shirts. It’s essentially free!
Prep Time: 2 min | Active Project Time: 10 min | Difficulty Level: Beginner
📸 Photo credit: Instagram @diplycrafty
#4: Build a Pallet Wood Dog Bed Frame (That Looks Like It Belongs on Pinterest)
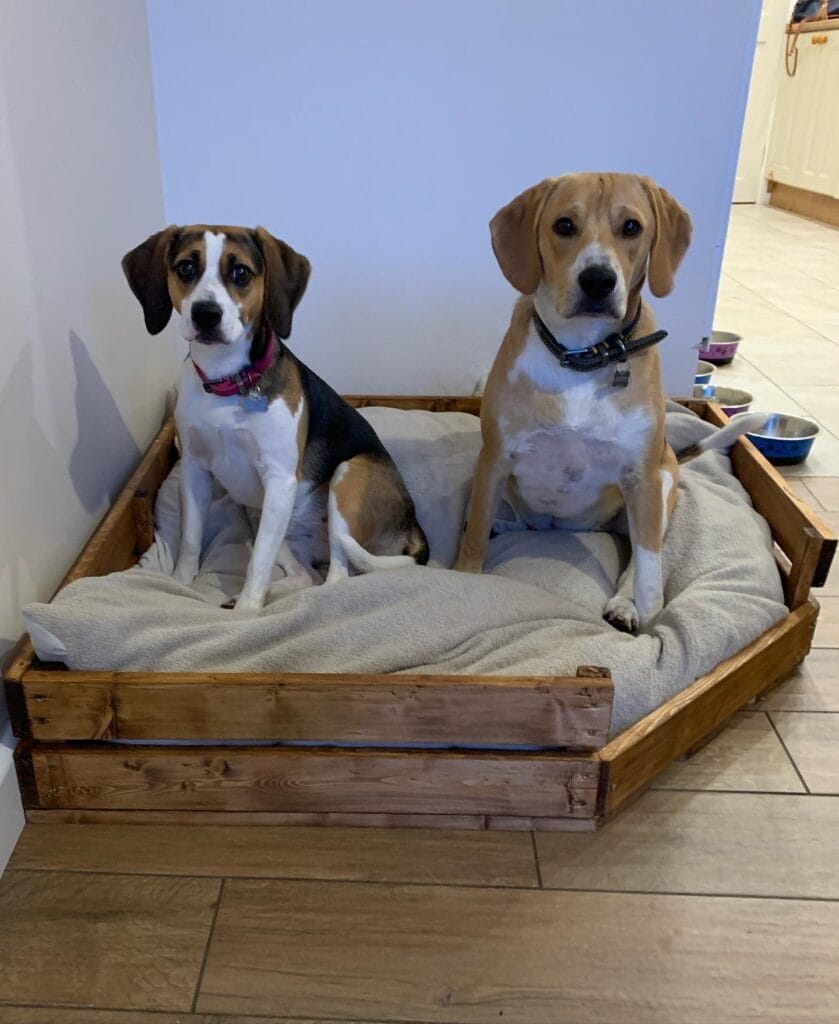
As any of us dog owners out there know, sometimes the dog bed can be just a sad, deflated cushion shoved in the corner. Now I can come to the rescue with this reclaimed pallet wood frame!
– 2-3 wooden pallets or 1″x6″ pine boards – Wood stain (medium walnut tone) – Sandpaper (80-grit then 120-grit) – Wood screws (2.5 inch) – Drill + circular saw – Gray fleece cushion (cut to fit) .
Instructions
2. Cut your boards into a rectangular frame. The one in the picture is about 40″x30″.Sand all edges so your pup doesn’t catch her fur. Stain all the pieces and let them dry. Drive some screws into the joints to lock the frame together. Add a second pallet layer on the bottom so the bed is raised off the tile and the joints are warm. Lay your cushion inside.
Good news: The raised frame keeps drafts away from the floor, which means that older dogs get deeper sleep and less stiffness in the morning.
Seal the wood with a pet-safe polyurethane coat after staining (this will help keep out moisture from the water bowl).
Prep Time: 20 min | Active Project Time: 2 hours | Difficulty Level: Beginner-Intermediate
📸 Photo credit: Instagram @buddyandbellabeagles
#5: DIY Braided Towel Rope Toy Your Golden Will Destroy (In the Best Way)
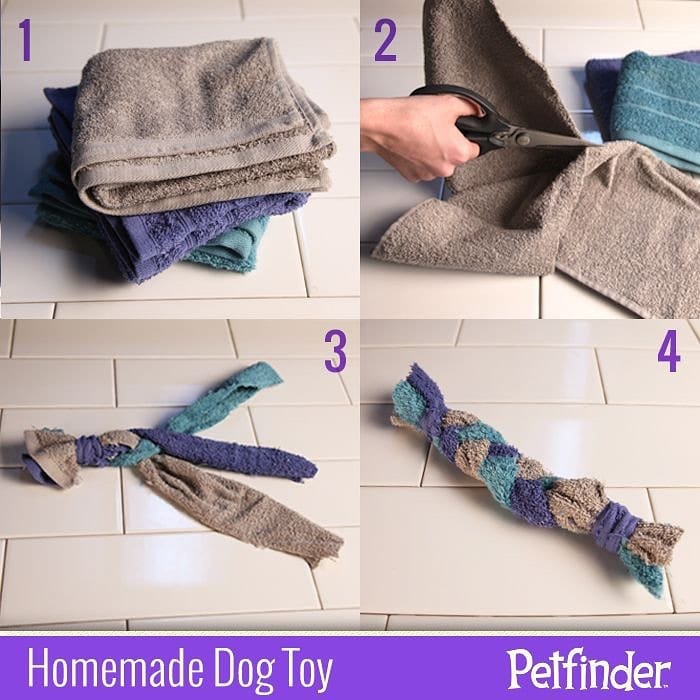
It’s been a while since I last posted, I know. I have been working on the podcast that I wanted to make with the man I am marrying, but I have been struggling to find time to do anything other than work. So, I decided to throw together a quick post. Today, Nugget threw a slobbery sock at my feet and just stared at me. She wanted to play, and I just sat down.
Prep Time: 5 min | Active Project Time: 10 min | Difficulty: Beginner
– 3 old washcloths or hand towels (I used gray, teal, and purple — use what’s in your linen closet!)- Scissors
Instructions
Cut each of your towels into three long strips that are about 2-3 inches wide. Gather all nine strips into three groups of three. Braid these groups tightly so you have three separate braided sections. Now braid these three sections together to form one long rope. Knot the ends of the rope hard — double knot them. Tuck the loose ends inside the knot so nothing unravels when you tug.
The braided texture of the rope gives her teeth something to “grip” on – she is able to grip the rope longer than a plain rope.
When you’re ready to replace your current strips, keep a second set of strips pre-cut so that you can switch them out in two minutes.
📸 Photo credit: Instagram @kay9dogtrainingbehaviour
#6: Fabric Scrap Rope Dolls (The Tug Toy Your Dog Will Actually Destroy)
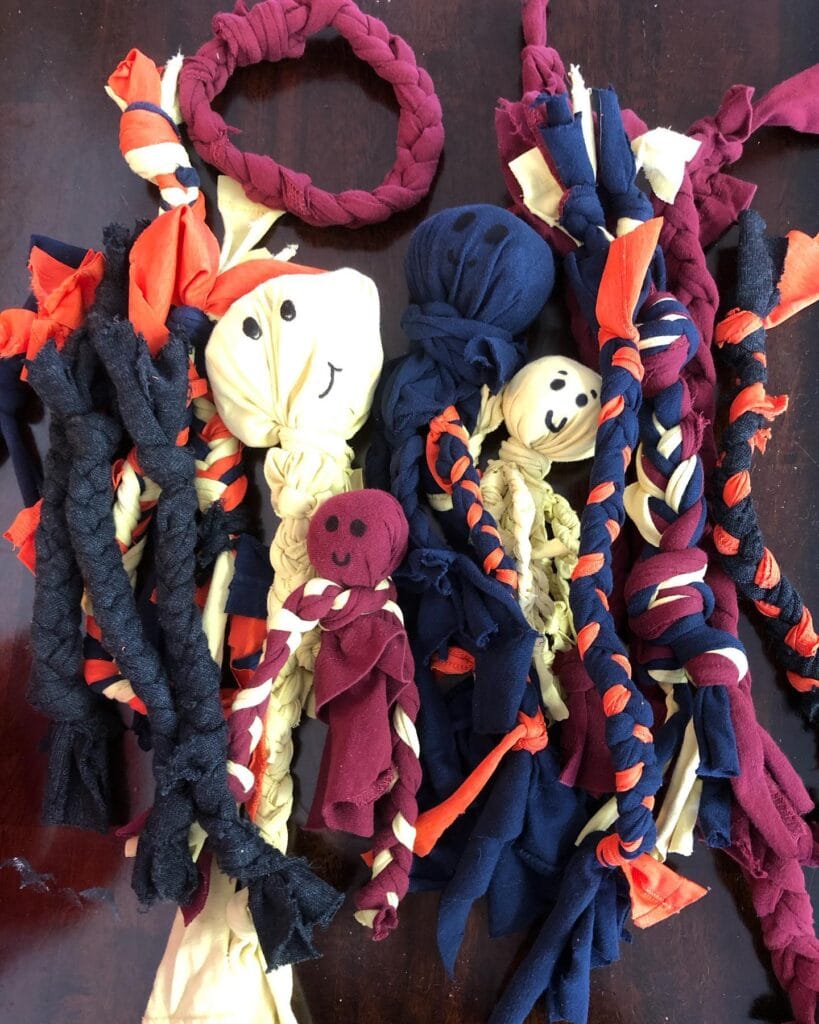
Your golden just grabbed your favorite throw pillow again. She needs something to sink her teeth into – something made for that.
Materials and tools: – old t-shirts (navy, burgundy, orange, cream etc the more colours the better!) – Fabric scissors – Permanent marker (black) – Ruler .
Cut the t-shirts into strips that are about 18-20 inches long. The number of strips will determine the thickness of the toy. Cut into strips that are 1-inch wide.
Instructions
Gather 6-8 strips and knot them at the top. Braid tightly down separating into three sections. About halfway down, pull one strip out and wrap it around the braid creating the dolls head.
Then draw two dots and a smile using your marker. Braid the rest of the length and knot the bottom.
And to further encourage that, but double knot every junction point – the braided fabric handle means no fraying even after you pull hard – she’ll get a nice grip and your floor stays clean.
For a bigger object, break 3 ropes apart and loop them into a ring, like the burgundy ring shown. This is also a great toss toy.
Prep Time: 5 min | Active Project Time: 20 min | Difficulty Level: Beginner
📸 Photo credit: Instagram @aboderespite
#7: DIY Sock Ball Tug Toy (Two-Dog Approved!)
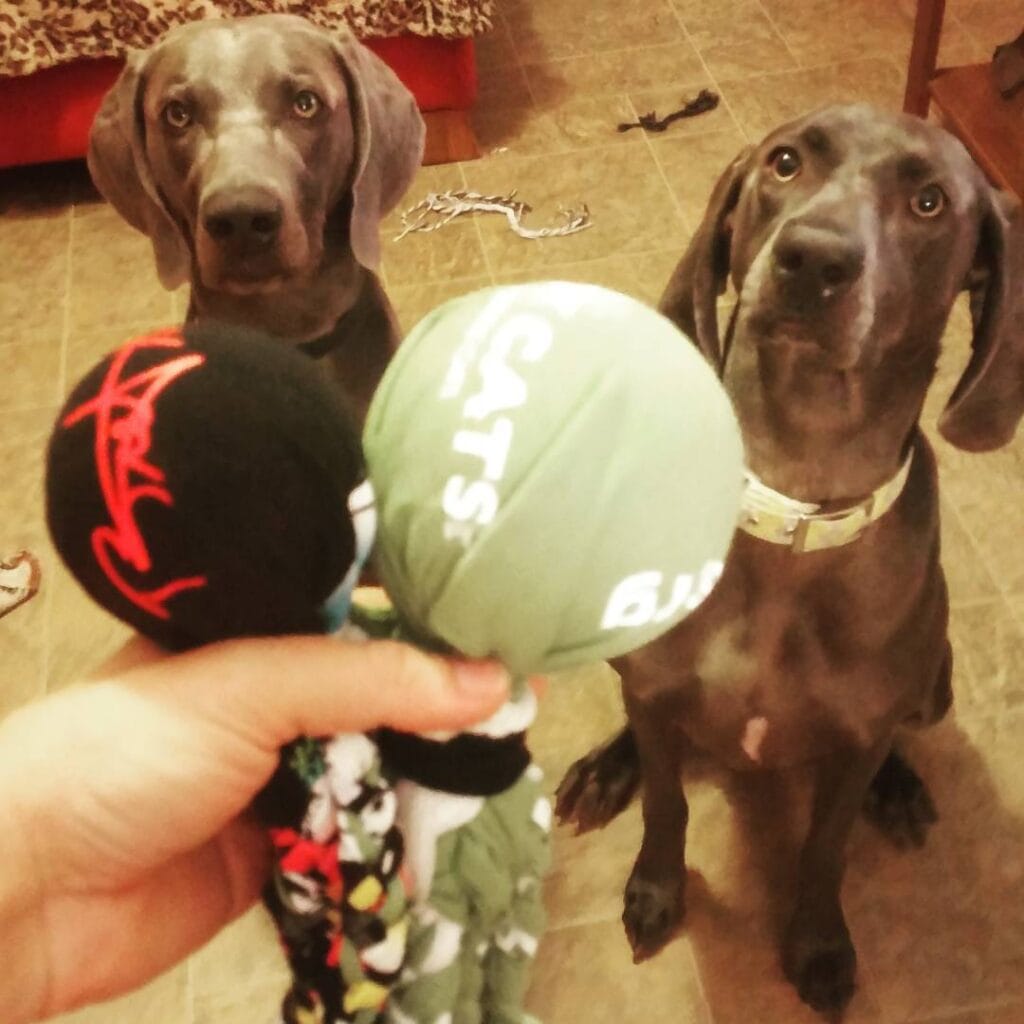
You know the moment… your golden is losing her mind because she wants to play but you have nothing nearby. Well, one afternoon I grabbed some mismatched socks off the pile of clean laundry and made something my dogs went completely crazy for.
Materials & Tools:
– 4-6 old socks (thick cotton works best)
– 1 rubber ball (tennis ball size)
– Scissors
– Strong rubber bands or zip ties
Instructions
Stuff one sock inside the rubber ball to give the dog something to grab. Wrap two more socks around the outside of the ball, alternating directions. Gather the loose ends of the socks at the base and weave the two remaining socks through the bundle, knotting them tightly. Give it a good hard tug to make sure it’s holding up; if it holds up to your pulling, it’ll hold up to hers.
I love how the yarn material for the socks is thick and layers on and gives my dogs something to sink their teeth into. It keeps them from chewing on the furniture and keeps them playing instead of competing.
Wash cold, hang dry when it gets gross.
Prep Time: 2 min | Active Project Time: 8 min | Difficulty Level: Beginner
📸 Photo credit: Instagram @ruffacademy
#8: DIY Stuffed Carrot Dog Toy (No-Sew Option!)
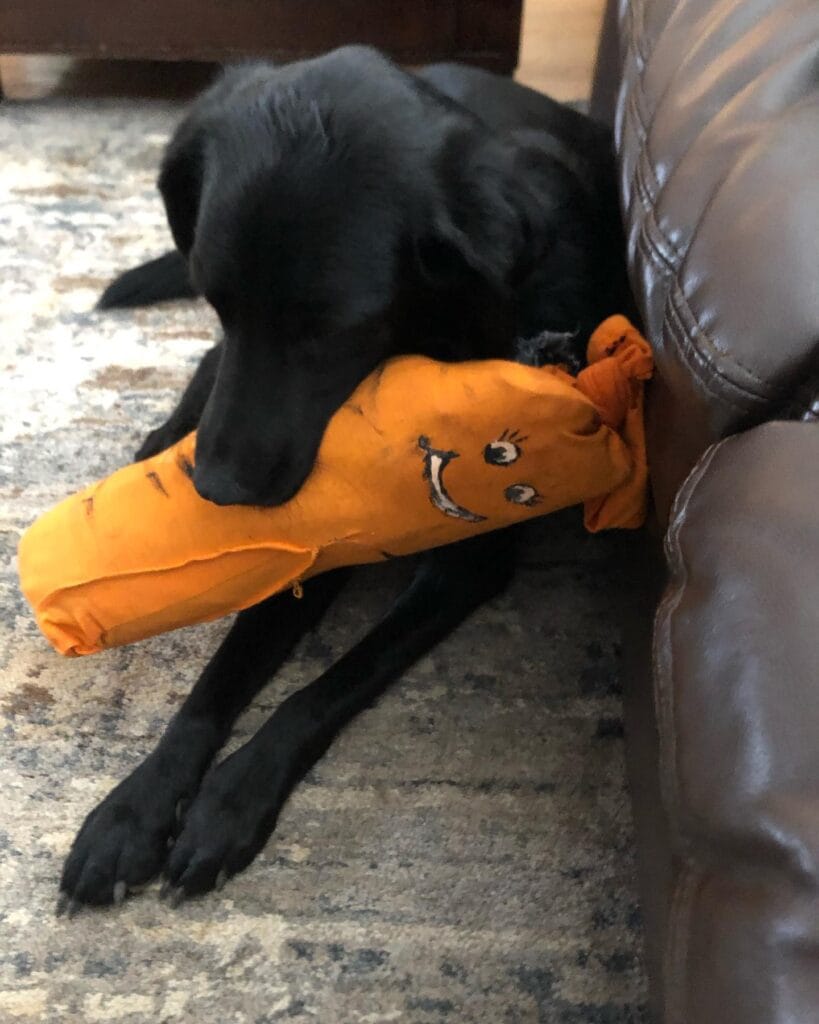
You know that feeling when your Golden is bored out of her mind and starts side-eyeing your throw pillows? It’s the same here.
This orange fleece carrot toy is one of the cutiest things you can make in an afternoon and your girl will carry it around like it’s her whole personality.
Materials & Tools: 1/2 yard orange fleece fabric Black and white fabric markers Polyester fiberfill stuffing Green felt scraps (for the carrot top) Fabric glue or needle and thread Scissors
Instructions
Cut the fleece into a cone shape about 12 inches long. Roll it tight, and seal the seam with fabric glue or a single stitch. Stuff tightly with fiberfill so that it stays round and doesn’t flatten when your dog plays with it. Twist and tie the ends of the green felt scraps at the top of the cone, and then use fabric markers to draw a face on it.
Freeze it overnight before giving it to her (it helps set the marker ink and makes it a fun surprise for her to discover).
⏱ Prep Time: 10 min | Active Project Time: 25 min | Difficulty Level: Beginner
📸 Photo credit: Instagram @liawatsn
#9: DIY Reflective Safety Vest for Your Dog
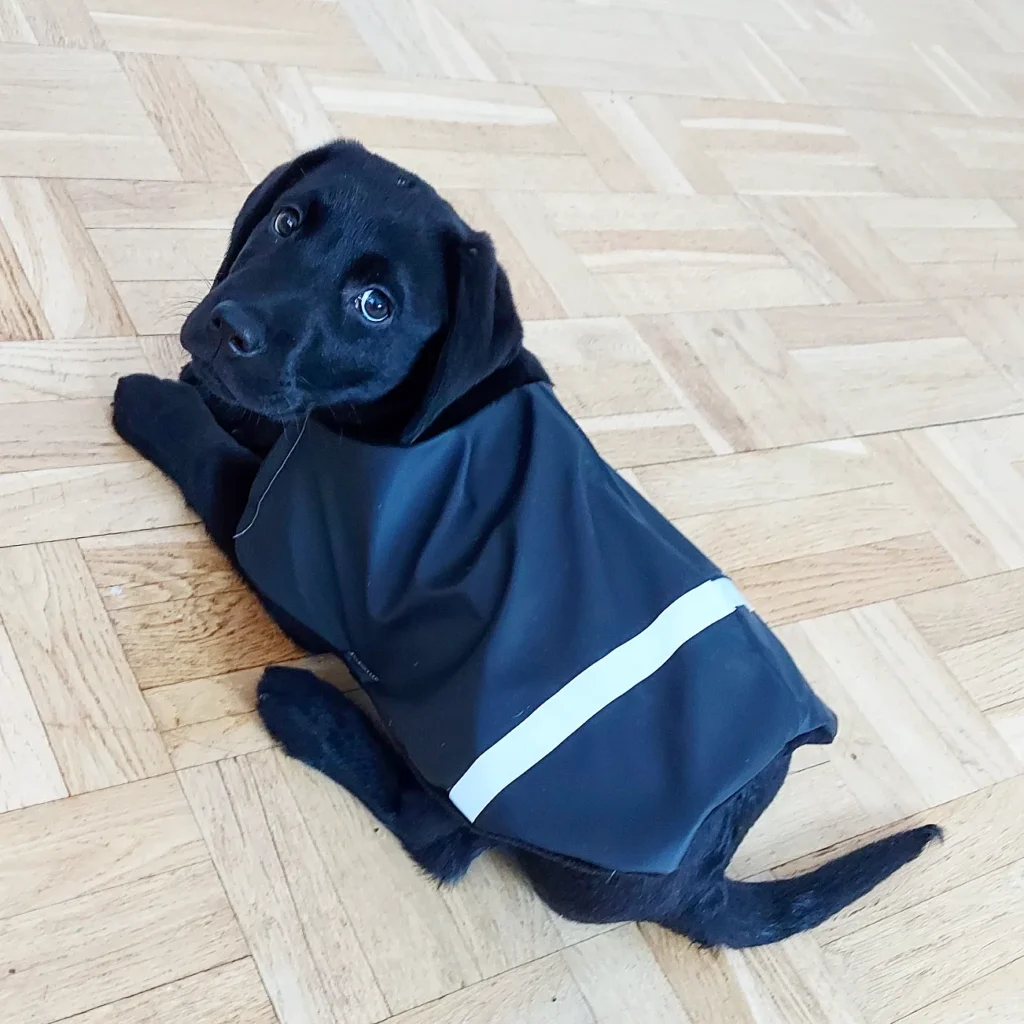
Your golden is bolting into the backyard at dusk, again, and you can barely see them in the low light. The heart drop panic you get from that? I know it well.
– Black neoprene fabric (½ yard) – Reflective tape (1-inch wide, silver) – Fabric scissors – Velcro strips (2 inches) – Fabric glue or sewing machine – Measuring tape
### Instructions
Measure your dog from the neck to the base of the tail, then cut your neoprene into the shape of a rectangular vest. Round the front edges so that it will sit flush against your dog’s chest so as not to rub.
Attach a strip of the reflective silver tape horizontally in the middle of the flag. This is at eye level for oncoming cars and is what keeps my dog visible for me, and keeps my heart rate normal on evening walks.
Then, click the Velcro strips along both sides of the item.
Cut small notches in the underarm area to ensure free movement. And neoprene doesn’t fray so there’s no finishing work at the edges.
Sew similar 7 Creative DIY Dog Halloween Costumes to Try using the same neoprene costume base, for fun seasonal looks.
Prep Time: 10 min | Active Project Time: 30 min | Difficulty: Beginner
📸 Photo credit: Instagram @pysselmorsan
#10: DIY Snuffle Mat for Dogs
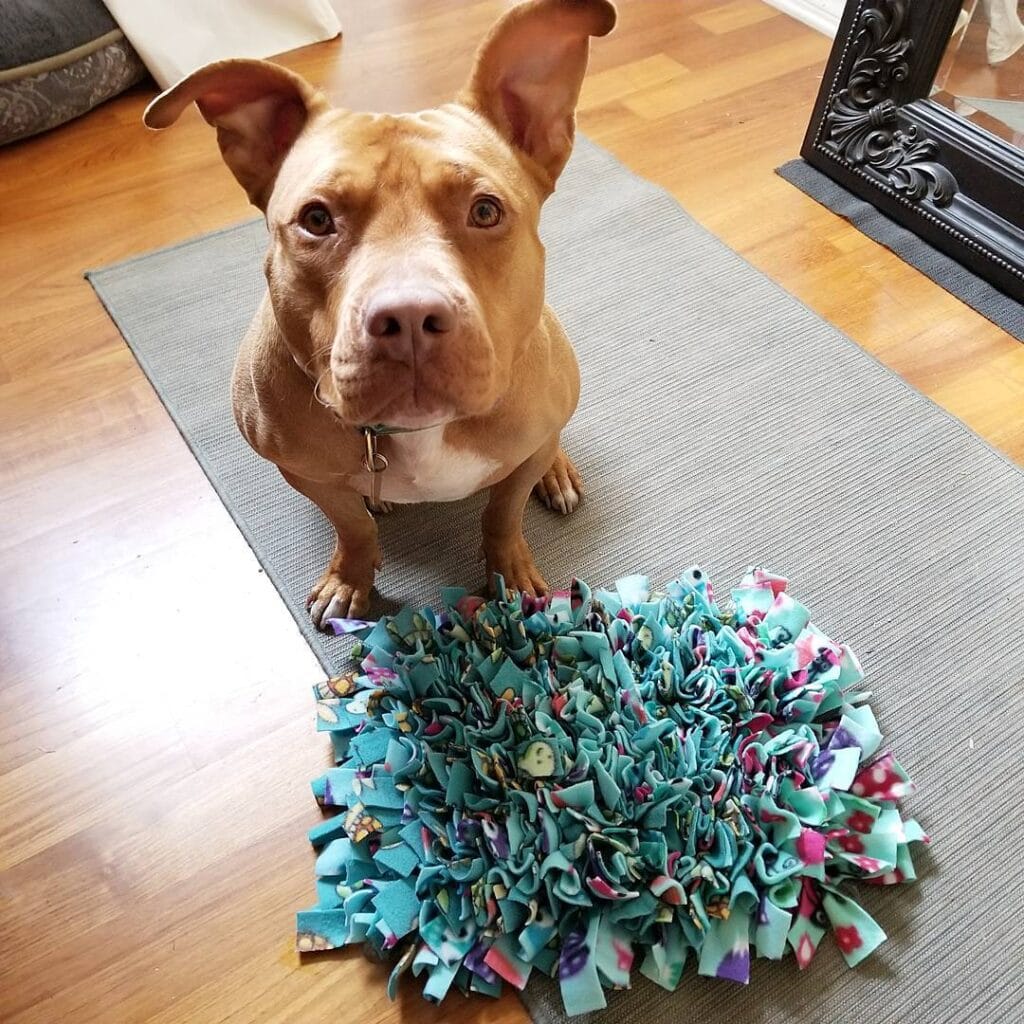
Your golden is probably looking for every crumb on your kitchen floor before you see it, your golden’s nose needs a real workout.
* Materials & Tools: * Rubber sink mat with holes (approx. 12” x 12”); * 2–3 yards of fleece fabric (teal, floral print, mixed colors like in the photo); * Scissors; * Fabric marker.
Instructions
Cut a piece of fleece into strips, about 1″ wide and 6-8″ long. Push the strip into the hole in the rubber mat and tie a knot on top, so the fabric sticks out from the hole. Continue doing this until the rubber mat is all fluffy like the one above.
Mix the patterned strips of fleece with solid strips of fleece. This makes the mat thicker so it hides the kibble better and your dog has to root around longer for the treat.
If you dog eats out of a bowl, the dense fleece loops will slow down the eating process and trigger your dog’s foraging instinct. As a result, they are calmer when they are done eating!
Tuck will often treat between the strips. Your dog will have to work for every bite of food instead of inhaling their food in 30 seconds.
Prep Time: 10 min | Active Project Time: 45–60 min | Difficulty Level: Easy
If you want to wash the finished mat, wash it on a gentle cycle in a mesh laundry bag (the knots hold up better that way).
📸 Photo credit: Instagram @malibusmama
#11: DIY Canopy Dog Bed with Floral Bedding
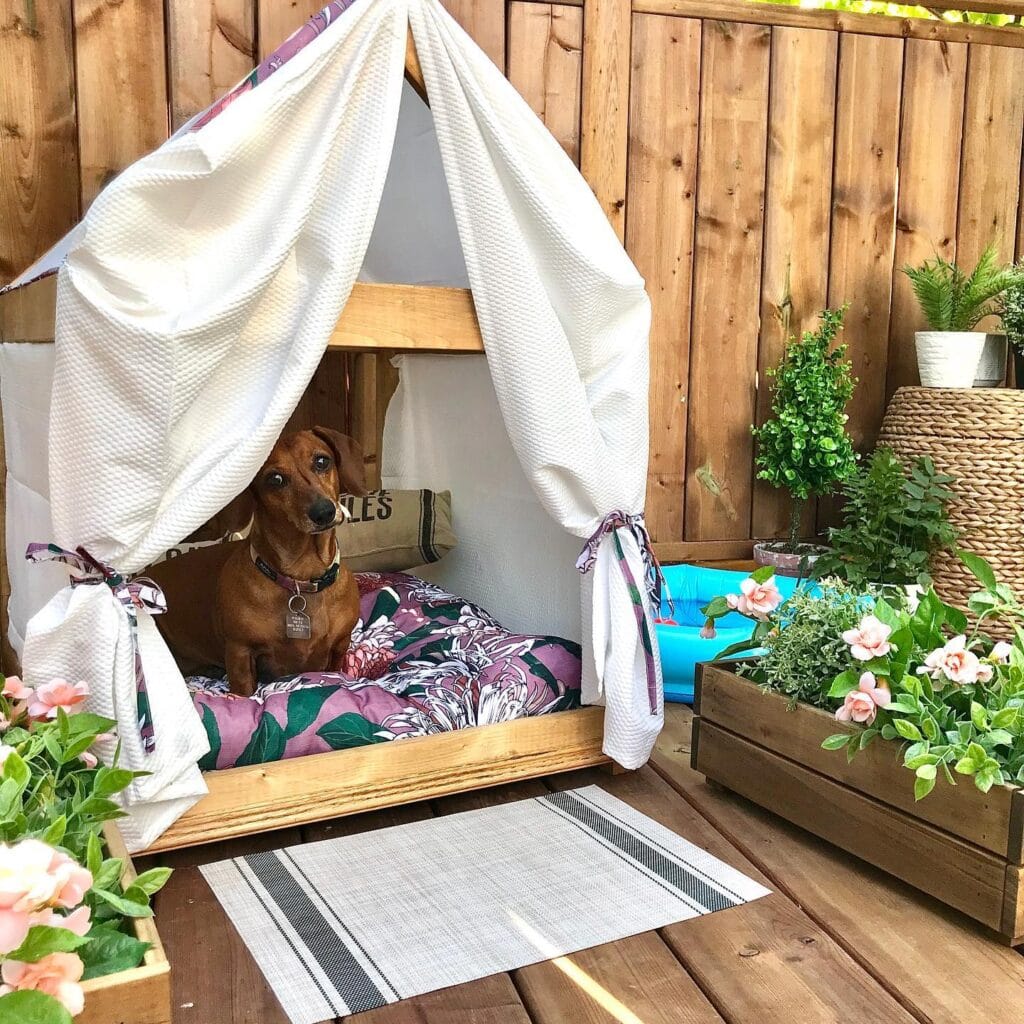
It never fails that the second my golden plops down on the deck, squinting in the sun, just waiting for me to notice, my heart breaks into a million pieces.
This cedar wood canopy bed is built from 1×4 pine boards and measures 24″ x 36″. The draped panels are made from white waffle-knit fabric, tied back with floral cotton ribbon. The cushion is purple botanical-print outdoor fabric stuffed with high-density foam.
Materials & Tools: – 1×4 pine boards – White waffle-knit fabric (2 yards) – Purple floral outdoor fabric (1.5 yards) – High-density foam insert – Drill, wood screws, staple gun
Instructions
Begin by constructing the frame of your canopy. Screw in four corner posts into the base platform. Attach a horizontal crossbar to the top of the canopy, 18 inches from the top. Lay the waffle fabric over both sides of the canopy and tie at the posts with 6-inch ribbon strips. Staple the cushion to the foam and place inside the canopy.
PS – And since it has shade inside, your dog will actually use it rather than laying on the hot deck boards! Check out 7 Creative Dog House DIY Plans for Your Pup for more outdoor inspiration.
Sand every edge smooth so that the cat does not get splinters or cut itself, or a dog, or some other curious beast.
Prep Time: 30 min | Active Project Time: 3 hours | Difficulty Level: Intermediate
📸 Photo credit: Instagram @bloomingdiyer
#12: DIY Texas Flag Beehive Dog House (That Looks Like Art)
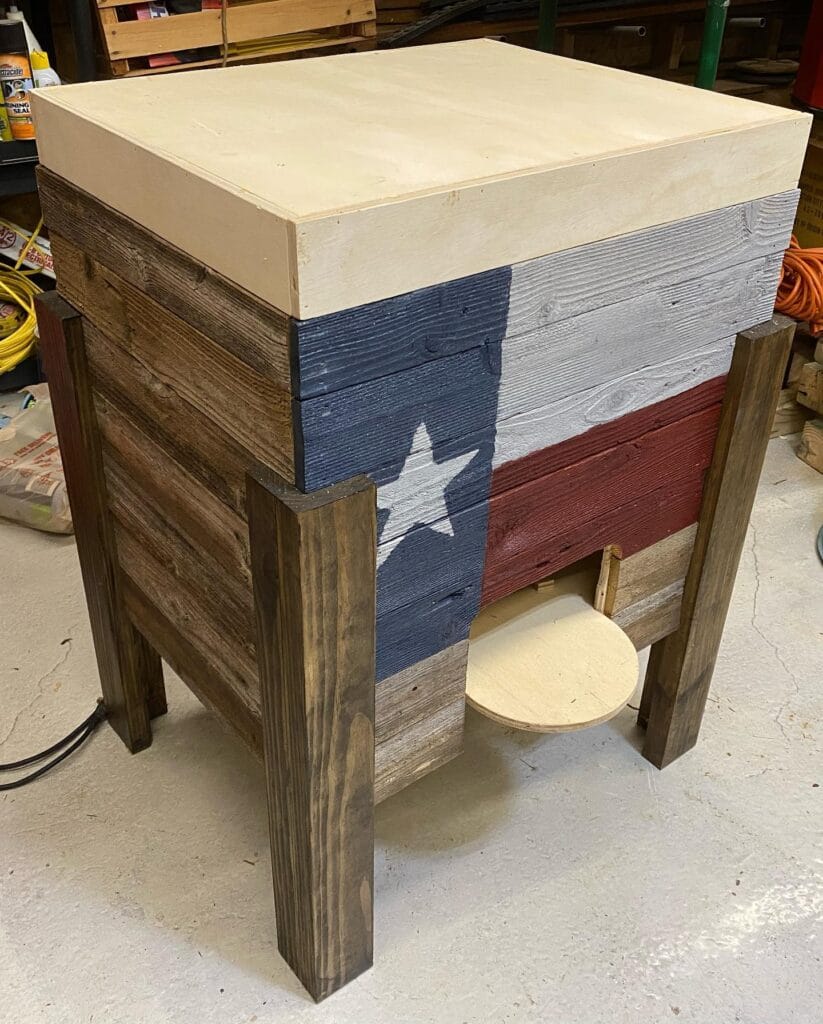
Your golden is eyeing that corner of your garage like she’s already claimed it. And honestly, she deserves something better than a plastic crate from a big box store.
Prep Time: 30 min | Active Project Time: 6–8 hours | Difficulty Level: Intermediate
-MATERIALS & TOOLS: – Reclaimed fence boards – 4×4 lumber for legs, stained a dark walnut – 3/4″ plywood for the lid and entry disk – Navy, red, white, and cream exterior paint – Wood stain, sandpaper, wood glue, brad nails – Circular saw, nail gun, paintbrush
Instructions
Make a square box frame with reclaimed boards put horizontally, this makes the box look rustic. Add four 4×4 legs to the box frame underneath the board using corner brackets and stain them a dark walnut color.
Go Texan! Paint the Texas flag on the front panel of your MP3 player, iPod or MP4. Blue vertical stripe on the left side, white star in the center, white and red horizontal stripes on the right side.
Cut a circular entry hole in your box with the same size plywood disk as a door. This raised entry will keep drafts out so your girl can stay warm.
Sand the top smooth and paint it cream. Set the lid flat on top.
you should paint the flag before you put the final assembly on it trust me it is a lot easier to do it that way
📸 Photo credit: Instagram @offdutywoodworks
#13: Make These Adorable Stuffed Dog Toys Your Pup Will Actually Play With
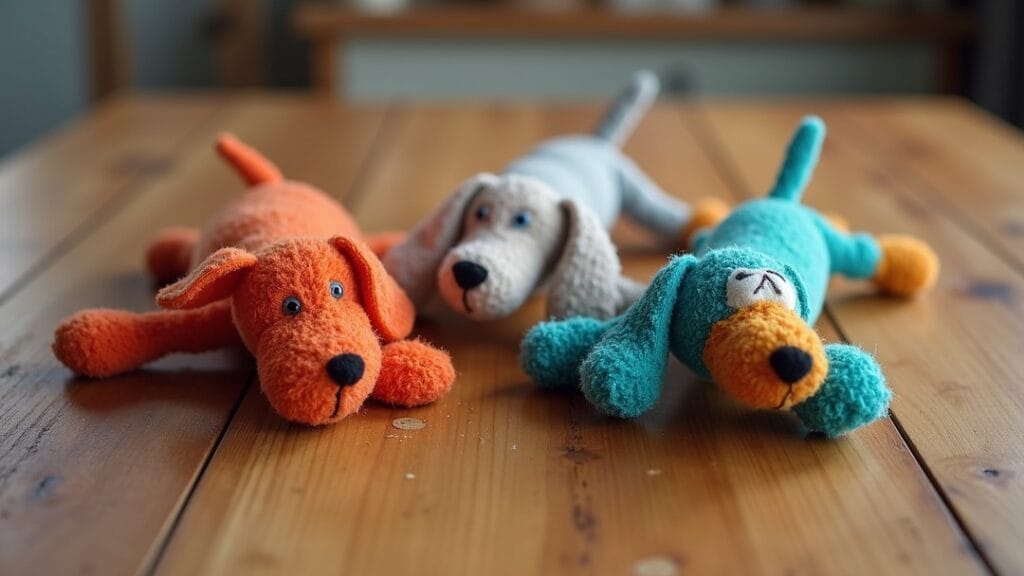
This is the one of the most fantastic toys we have ever bought for our dogs. It took them maybe two seconds to rip the squeakers out, destroy the stuffing, and it’s really too bad we have to spend $15 on something that lasts three days.
Prep Time: 20 min | Active Project Time: 1.5 hours | Difficulty Level: Beginner-Friendly
What You Need:
– Fleece or chenille fabric (orange, white, and teal work great — no sewing required with fleece!)
– Polyester fiberfill stuffing
– Black felt for nose and eye details
– Fabric glue or needle + thread
– Scissors
Instructions
Cut out two dog shaped bodies from your fabric. I learned this trick from my Aunt. Cut your ears slightly larger than the body of the dog so they will drape over.
Pin or glue the pieces together, wrong sides together, leaving a 3-inch gap at the belly. Stuff the puppet firmly with fiberfill, as full as you can. Close the gap. Attach felt circles for eyes and a rounded felt triangle for the nose with fabric glue.
The no-stuffing-mess feature means your dog gets a durable, chew resistant toy that’ll keep your floors clean for more than 24 hours.
My golden, which loves to destroy things, has had this for a couple months. I would leave the squeaker in but it was something she was always trying to get out of the toy.
📸 Photo credit: Instagram @silly.bg
The DIY Dog Mistake That Wasted Three Weekends of My Life
(What nobody tells you when you’re embarking on a DIY dog project: wood sealer is a must-have, and the type matters more than the wood.)
I built a lovely cedar dog bed for my cousin’s dog. I worked on it all Saturday afternoon. It was a beautiful bed. Two months later, it is warped and stained and smells like a wet gym bag because I used an interior-only sealer.
My pro secret is to go for food-safe, waterborne polyurethane. The drool and muddy paws will be no problem, plus it won’t off-gas anything toxic that can make your pup sick.
And, if you’re thinking about building something bigger for your backyard, such as an outdoor dog kennel, some of these 7 budget-friendly outdoor DIY dog kennel ideas will work with the same sealer logic and save you some trial and error.
I have two Golden Retrievers and they are relentless on the furniture. I spray the furniture with a sealer, then I sand it between coats. I’ve made a huge mess on my furniture with this stuff. Now my future self thanks me.
Your Golden Deserves a Clean Home Too
So you don’t have to choose between loving your dog and loving your space. Mud, fur and drool are a breeze with a few tricks up your sleeves.
Just start with one project this weekend. Make it small, so that you don’t overwhelm yourself.
I promise that once you have your first paw-cleaning station or sewn up your first couch cover, you will be wondering why you ever lived without one. You can still have a Pinterest-worthy home, even with a golden retriever (the two are not mutually exclusive).
Which one of your projects are you working on first?

Amr Mohsen is a software engineer who traded his keyboard for a leash — at least on weekends. His love for dogs inspired him to share what he learns as a dog owner and enthusiast, bringing a detail-oriented, research-driven perspective to every article he writes. If it’s about dogs, he’s probably already looked it up twice.



