
Your golden retriever is living his best life out there — and your backyard is paying the price.
Mud tracked across your patio. Scratches on the fence. That one corner of the yard that just looks… destroyed. I had the same situation with my dog Koda, and honestly? I stood there one Saturday morning with my coffee going cold, just staring at the chaos, thinking there has to be a better way.
Here’s the thing — a proper outdoor space for your dog doesn’t have to wreck your budget or clash with your whole aesthetic.
These 7 dog kennel ideas outdoor DIY cheap solutions are built for real people, real budgets, and yes — backyards that still look Pinterest-worthy. Your dog gets his own spot. Your yard gets its dignity back.
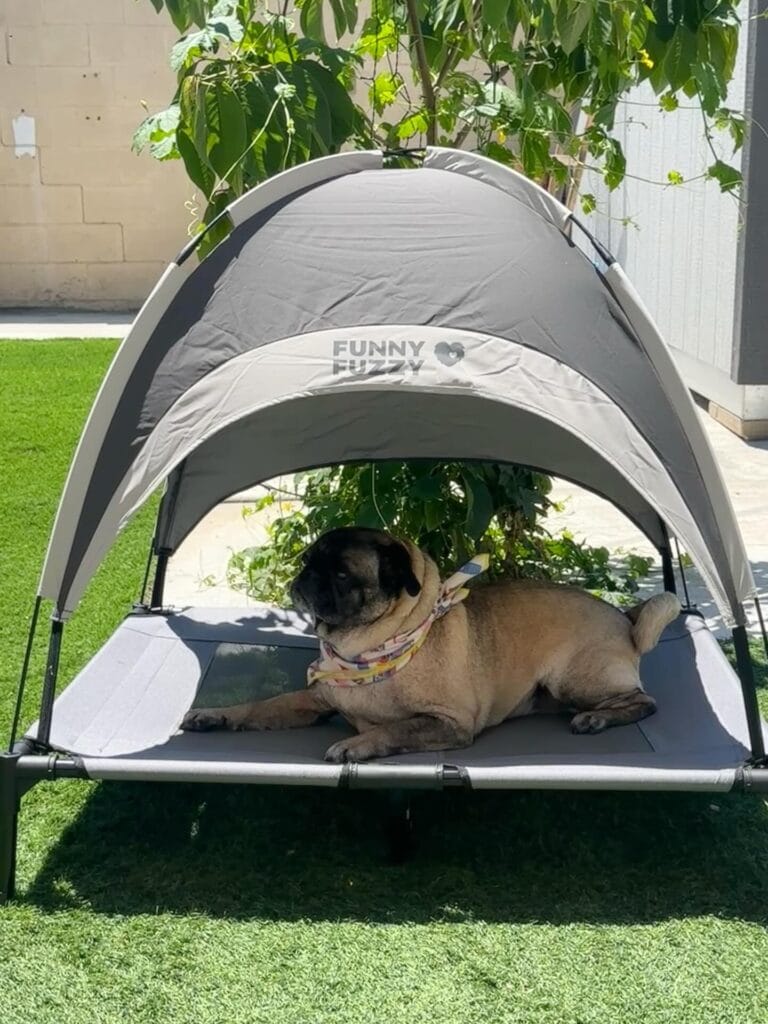
#1: The Elevated Outdoor Dog Cot With a Canopy Shade Cover (No Tools Needed)
You know that moment when your golden is panting in the backyard, flopped on the hot grass, and you feel that little pang of guilt? Like, why don’t I have something better for her out there? I had that exact feeling last summer watching my neighbor’s dog just melting in the sun. It stuck with me.
This setup is everything — and honestly, it looks so good I’d sit on it myself.
Materials & Tools You’ll Need:
– Funny Fuzzy elevated dog cot with built-in canopy (available on Amazon, approx. $45–$65)
– Gray Oxford fabric canopy top
– Steel powder-coated frame legs (usually 4 legs, pre-attached)
– A colorful pet bandana (optional but adorable)
– Artificial turf or a shaded patio spot for placement
Instructions
Lay the cot frame flat on your grass first. The four steel legs snap into the corner brackets — no screwdriver, zero hardware needed. Each leg clicks with a firm push until you hear it lock. Don’t skip checking each one.
Next, slide the two canopy arch poles through the fabric sleeve on the top panel. They’re flexible, so bow them gently and clip both ends into the side slots on the cot frame. The Oxford fabric canopy stretches taut on its own once both arches are in. And the whole thing takes maybe eight minutes from box to backyard.
Place it somewhere with partial natural shade — like near a tree or fence — so the canopy doubles the coverage. Your golden gets airflow underneath from the mesh cot surface, which pulls heat away from her body instead of trapping it like solid plastic beds do. That airflow means a cooler nap, which means she stays outside longer without overheating.
For more inspiration on building a full outdoor hangout zone for your pup, Best Dog Backyard Ideas for a Safe and Fun Outdoor Space has some genuinely fun setups worth bookmarking.
The canopy arc height sits around 22 inches, which is roomy enough for a medium to large dog to shift positions without bumping their head.
Wipe the fabric down with a damp cloth weekly — it holds up but collects pollen fast in spring.
Prep Time: 2 min | Active Project Time: 8–10 min | Difficulty Level: Beginner
📸 Photo credit: Instagram @haroldpug_life
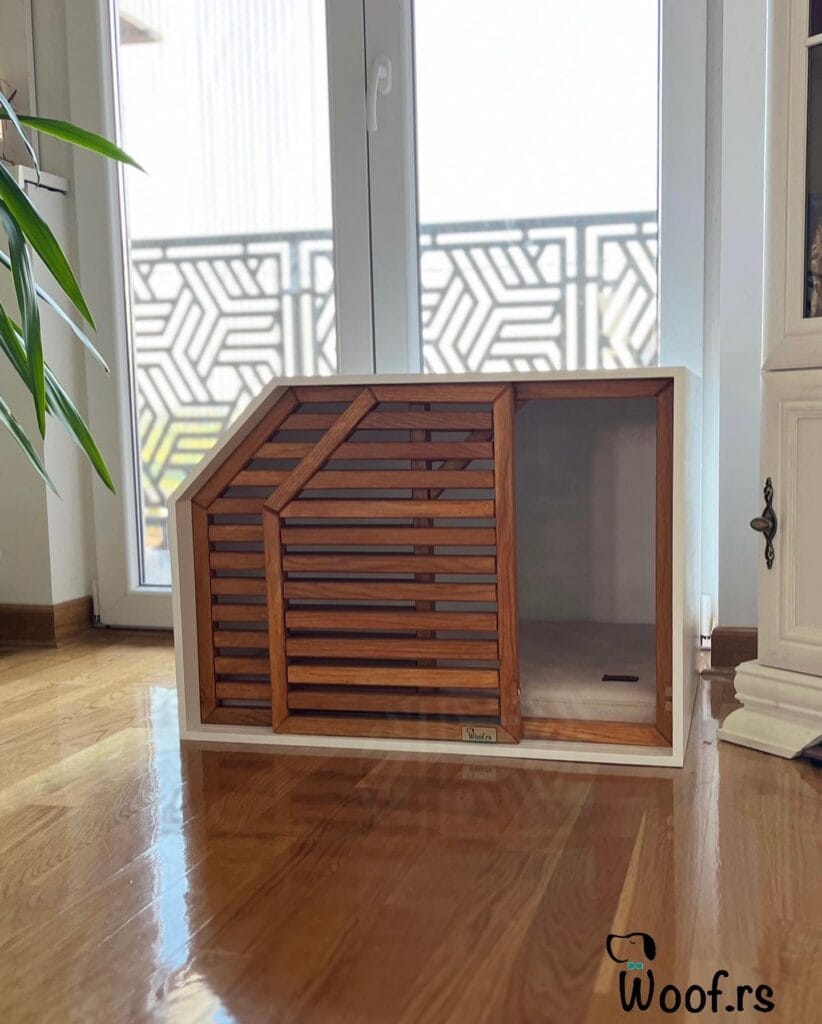
#2: Indoor-Outdoor Slatted Wood Dog House With a White Frame (Woof.rs Style)
Your golden retriever does that thing where she circles the living room three times, flops down right in the middle of the floor, and you almost trip over her again trying to get to the kitchen. She needs her own spot. A real one — not just a sad plastic crate shoved in the corner.
This build is everything.
Prep Time: 1 hour | Active Project Time: 6–8 hours | Difficulty Level: Intermediate
Materials & Tools:
– MDF or plywood panels (white-painted) for the outer frame — ¾ inch thick
– Solid oak or walnut slats — cut to 1.5 inch width, ¼ inch gaps between each
– Wood stain (warm walnut tone)
– L-brackets and wood screws (1.5 inch)
– Sandpaper (120 and 220 grit)
– Jigsaw for the angled roof cut
– Drill + drill bits
– Soft cushion insert — 2 inch foam wrapped in washable fabric
– Wood glue
– Miter saw for clean slat cuts
### Instructions
Start by cutting your white MDF panels into five pieces — two sides, a back, a bottom, and the angled roof panel. The roof sits at roughly a 30-degree angle, which is what gives this kennel that modern A-frame silhouette. Use your jigsaw for that diagonal cut on the front-facing side panel — take it slow, the angle needs to be clean.
Sand every MDF edge with 120 grit first, then finish with 220 grit. Paint all five panels matte white and let them dry completely before assembly.
Now cut your oak slats. You’ll need about 22–24 pieces depending on your dog’s size. Each slat runs horizontally across the front-facing panels, attached with wood glue and 1.5 inch screws from the inside. Leave ¼ inch gaps between each slat — this keeps airflow moving through the kennel, which means your golden won’t overheat on warm days, and you get that gorgeous architectural look as a payoff.
And here’s where most people rush — stain your slats before you attach them. Way easier. Apply two coats of walnut stain, let it cure overnight.
This is the key: frame the slatted front section with a ¾ inch oak border piece on all four edges. That border is what makes the whole thing look intentional and custom, not DIY.
Assemble the white frame using L-brackets at every interior corner. Screw the bottom panel in first, then the back, then the two side walls. Slide in your 2 inch foam cushion on the base — your girl will sink right into it.
If you love this style of structured pet space, 17 Creative DIY Dog Run Ideas for Your Furry Friend has some seriously good builds using similar materials.
Seal all the oak slats with a clear matte wood sealer — it protects against moisture from a dog’s breath and the occasional water bowl splash. Wipe-clean surfaces mean you spend less time scrubbing and more time on the couch with her.
Place it near a window like in the photo. She’ll claim it in about four minutes flat.
📸 Photo credit: Instagram @woof__rs
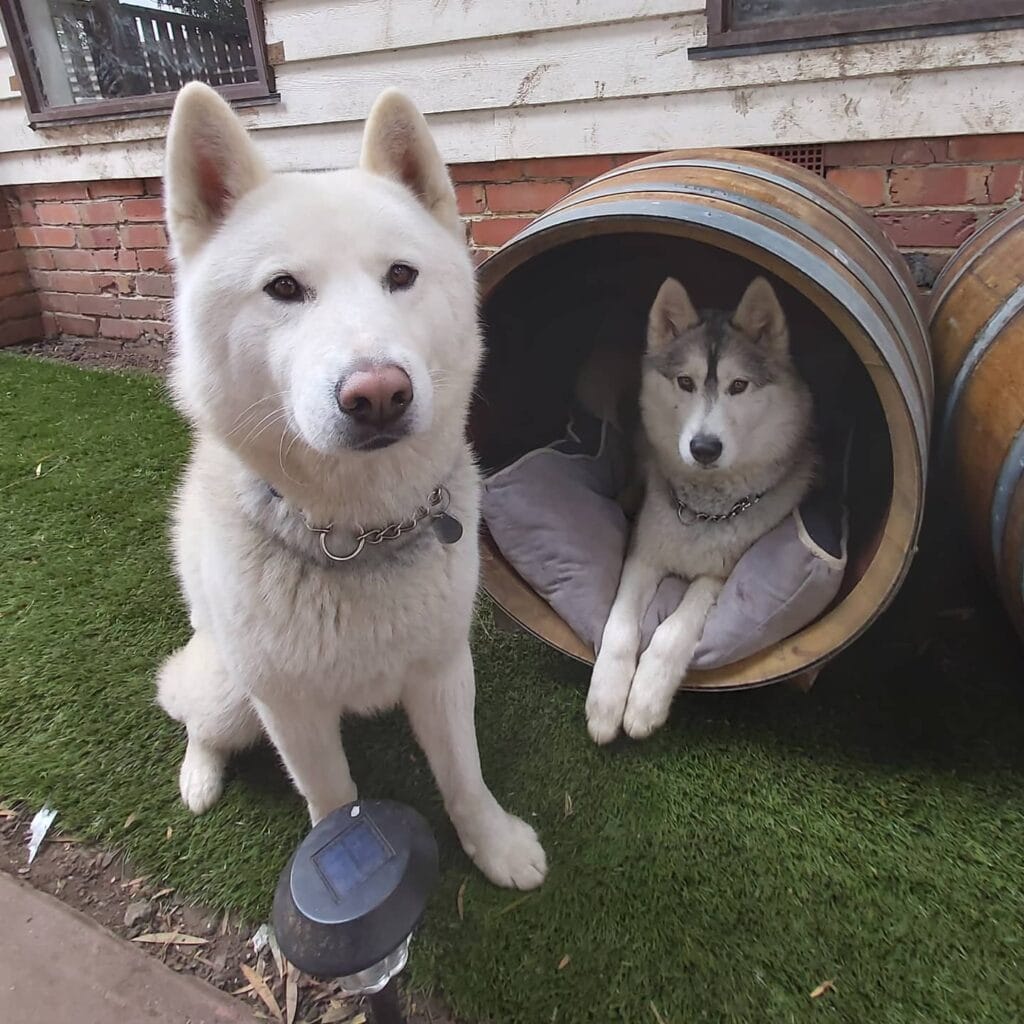
#3: Turn an Old Wine Barrel Into the Coziest Outdoor Dog Den (For Almost Nothing)
You know that moment when your golden comes in from the yard, soaking wet, and just needs a place to crash — but ends up flopping on your porch furniture instead? Yeah. That’s the moment this project was made for.
I spotted this setup on Instagram and honestly couldn’t stop staring. Two reclaimed oak wine barrels turned into the most Pinterest-worthy dog kennels I’ve ever seen. The gray cushion peeking out, the warm wood tones against the brick wall — it looks like something out of a boutique pet hotel.
And the dogs are obsessed. You can just tell.
Materials & Tools:
– 1 used wine barrel (around 23–25 inches in diameter opening) — grab one from a local winery or Facebook Marketplace for $20–$40
– Jigsaw or reciprocating saw
– Sandpaper (80-grit and 120-grit)
– Wood sealant or exterior varnish
– Round bolster dog cushion (fits a 22-inch opening)
– Metal barrel rings (usually already on the barrel)
– Optional: waterproof cushion cover in gray or neutral tones
Instructions
Start by sourcing a used wine barrel — the smell alone is incredible, that faint oak-and-wine scent actually helps mask outdoor odors inside the den. Lay the barrel on its side so the circular opening faces forward. This becomes your dog’s entrance.
Sand the entire exterior with 80-grit sandpaper first, knocking down any splinters or rough patches. Switch to 120-grit for a smooth finish your dog won’t snag their coat on. This step matters more than people think — a rough barrel edge can scratch your dog’s back every single time they enter.
Cut nothing if your barrel already has an open end. But if both ends are sealed, use a jigsaw to remove one circular end completely, cutting along the inner edge of the barrel ring for a clean, finished look.
Apply two coats of exterior wood sealant, letting each coat dry for 4 hours. This protects the wood from rain and morning dew — sealed wood means no rot, and no rot means this kennel lasts your dog years, not months.
Slide the round bolster cushion inside. The cushion hugs the curved interior walls, which creates a natural nest shape that smaller or anxious dogs love. Your golden will probably claim this within five minutes.
For stability, place the barrel against a wall or fence and press it slightly into the grass. You can also add two L-bracket anchors screwed into a wooden base board if you want it completely secure.
Before you decide: buying two barrels and stacking them side by side (like in the photo) gives each dog their own space and cuts down on territory squabbles — total game changer for multi-dog homes.
If your barrel has gaps between the wooden slats, fill them with exterior wood filler before sealing. It keeps drafts out in cooler months and makes the whole structure feel more solid. Also, flip the cushion cover inside out and wash it monthly — outdoor cushions collect more than you’d think.
Prep Time: 30 minutes | Active Project Time: 3–4 hours | Difficulty Level: Beginner–Intermediate
📸 Photo credit: Instagram @wilburrheaandfig
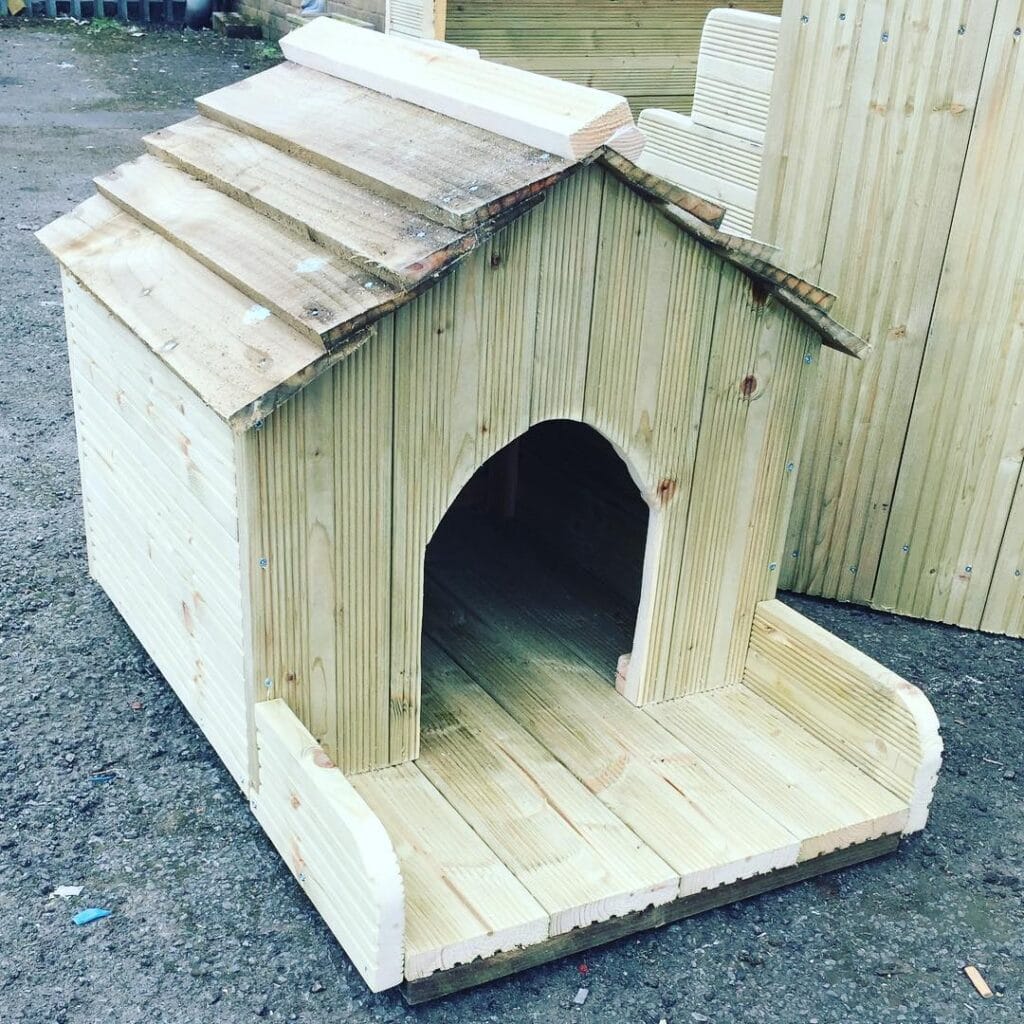
#4: Build a Cedar Porch Dog Kennel With a Covered Deck (Your Golden Will Never Want to Come Inside)
Okay so picture this — you call Rosie in for dinner, and she just stares at you from her spot on the patio. Won’t budge. That’s literally what happened to my cousin after she built her dog this exact setup. The dog claimed it immediately.
This kennel is everything. Pressure-treated pine decking boards cover the floor and walls, giving it that warm honey-wood look that would honestly fit right on a Pinterest board next to your patio furniture.
Materials & Tools You’ll Need:
– 2×6 pressure-treated pine decking boards (for walls, floor, and roof slats)
– 1×4 ridge board (roof peak)
– Jigsaw (for the arched entry cut)
– Deck screws, 2.5 inch
– Circular saw
– Sandpaper, 120-grit
– Wood glue
– Measuring tape and carpenter’s square
Instructions
Start by cutting your base platform — two 4×4 ft sheets of decking boards side by side, screwed into a 2×4 frame. This elevated base keeps moisture out and gives Rosie a dry, splinter-free surface even after rain.
Build your four walls next using vertical tongue-and-groove pine boards, which lock together without gaps so wind stays out. For the front panel, trace a 14-inch wide arched doorway centered low, then cut it with your jigsaw. Sand those edges smooth — golden retrievers rub against every surface they pass through.
The roof is two angled panels meeting at a ridge board on top. And that’s where the magic happens — the overhang extends 6 inches past the front wall, creating that covered porch deck where your dog can lounge without getting rained on. The covered deck feature keeps Rosie dry during light rain, which means she actually uses it year-round instead of scratching at your back door every drizzly afternoon.
Screw everything tight and sand the whole structure once assembled. No stain needed if you love that natural pale wood tone — but a clear weatherproof sealant protects the grain and keeps the color from going grey.
Keeping the entry lower than the interior height traps your dog’s body warmth inside during cooler nights — so sizing the arch to just fit your dog is worth measuring twice. If you love functional pet furniture that also looks good indoors, 14 Stylish DIY Dog Crate Furniture Ideas You’ll Love has some serious inspo for the inside of your home too.
Prep Time: 45 minutes | Active Project Time: 6–8 hours | Difficulty Level: Intermediate
📸 Photo credit: Instagram @welsh_wood_wizard
#5: The Gabled Roof Kennel With Wire Run — Built to Last, Easy on the Budget

You know that moment when your golden comes in from the yard absolutely soaked, tracks mud across the kitchen, and you realize you have zero control over where she hangs out outside? Yeah. That’s the moment this build was made for.
This kennel is giving me serious Pinterest board energy — natural pine wood frame, dark-stained wood plank flooring, black powder-coated wire mesh panels, and a green fish-scale asphalt shingle roof that honestly looks like a tiny cabin. It’s beautiful AND it keeps your girl safe, dry, and contained.
Materials & Tools
– 2×4 pine lumber (frame and gable ends)
– 1×6 cedar planks (floor decking)
– Black welded wire mesh panels (16-gauge)
– Green asphalt roof shingles (fish-scale style)
– OSB board (roof sheathing)
– Wood screws (2.5 inch and 1.5 inch)
– Roofing nails
– Black metal L-brackets
– Wood stain (dark walnut)
– Circular saw, drill, hammer, tape measure, staple gun
Instructions
Start by cutting your 2×4 pine into a rectangular base frame — aim for 6 feet long by 3 feet wide minimum for a golden retriever. Attach your 1×6 cedar planks across the base horizontally, leaving half-inch gaps between each board so rainwater drains through instead of pooling under your dog.
Next, build two identical gable-end frames from 2×4 pine — a simple A-frame triangle sitting on top of a rectangular wall section. The peak should sit about 5 feet high so your dog can stand and move without feeling cramped. Screw the gable frames onto the front and back of your base.
Now cut your OSB board into two matching roof panels and attach them to the gable peaks, forming the pitched roof. Lay your green fish-scale asphalt shingles starting from the bottom edge and working upward, overlapping each row. The shingles shed rain away from the wood frame — which means your pine stays dry, your dog stays dry, and you stop worrying every time clouds roll in.
Attach your black welded wire mesh panels to the front and side walls using black metal L-brackets and 1.5 inch screws. The wire mesh keeps predators out while giving your dog full airflow and visibility — she can see the yard, watch the birds, feel the breeze, and still be completely safe. That visibility feature reduces anxiety in dogs who hate feeling closed in, which means less barking and a calmer pup overall.
Finish the wood with dark walnut stain — two coats minimum. And if you want to level up the whole backyard setup, 7 Creative Ideas for Your Outdoor Dog Area has some seriously good inspiration for making the space around the kennel just as intentional.
Prep Time: 1 hour | Active Project Time: 6–8 hours | Difficulty Level: Intermediate
One thing worth doing — add a simple door latch with a carabiner clip on the wire mesh door. It takes two minutes but it’s the difference between a secure kennel and a golden retriever who figures out the door situation by Tuesday.
📸 Photo credit: Instagram @alu_bravarija_sv
#6: Chain-Link Dog Kennel Panel System (The No-Dig Concrete Solution)
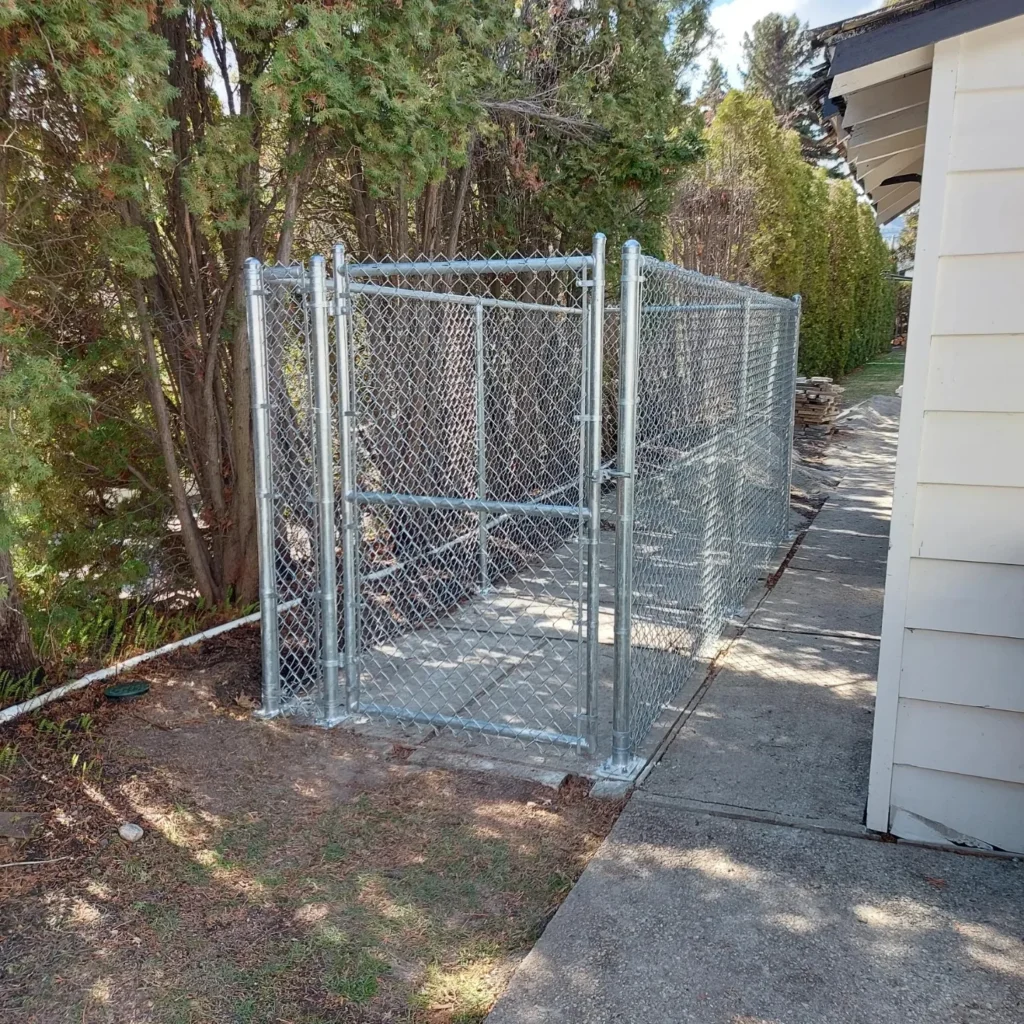
You know that panic when your golden bolts out the side yard again and you’re chasing her in your pajamas past the neighbor’s house? Yeah. This kennel fixes that.
Prep Time: 1 hour | Active Project Time: 4–6 hours | Difficulty Level: Intermediate
Materials & Tools:
– 6 galvanized steel posts (at least 1-5/8″ diameter)
– Chain-link fence panels (4 ft high, galvanized steel mesh)
– Heavy-duty base plates with anchor bolts
– Post caps (round, galvanized)
– Tension bars and brace bands
– Fence ties/hog rings
– Concrete slab or existing paved surface
– Power drill, wrench set, level, tape measure
Instructions
Start by laying out your perimeter on the existing concrete — this build uses the concrete pad as the floor, so zero digging is required. Mark your six post positions using chalk, spacing them to create roughly a 10 ft x 6 ft enclosure.
Bolt your galvanized base plates directly into the concrete using anchor bolts and a hammer drill. Slide each 1-5/8″ steel post into its plate and tighten. Check every post with a level before moving on — a crooked post will throw your whole panel alignment off later.
Once posts are plumb, attach your chain-link panels using tension bars slid through the end links, then clamp them to the posts with brace bands. Work from one corner outward. Use fence ties every 12 inches along each post to keep the mesh flat and taut.
And here’s where most people skip a step — install your horizontal mid-rail halfway up each panel. That mid-rail keeps the mesh from bowing outward if your dog leans or pushes against it, which a big golden absolutely will.
Hang your gate last. Center it in the front panel opening and attach with heavy-duty hinges and a latch that locks from both sides. The double-side locking latch means your dog can’t figure out the release with her nose (and trust me, goldens try).
Cap every post with a round galvanized post cap — this keeps rain out of the hollow post and prevents rust from starting at the top.
The galvanized steel construction resists rust through every wet season, which means this kennel stays standing for years without you repainting or patching it every spring.
For extra enrichment inside the kennel, a 7 DIY Dog Agility Course Ideas for Fun setup nearby gives her something to do between outdoor sessions.
Leave a small gap between the kennel wall and your house siding — about 3–4 inches — for airflow and so you can sweep debris out without dismantling anything. It’s a tiny detail that saves a huge headache over time.
📸 Photo credit: Instagram @beslerpresa
#7: DIY Collapsible Soft-Sided Dog Kennel for the Backyard (Under $60!)
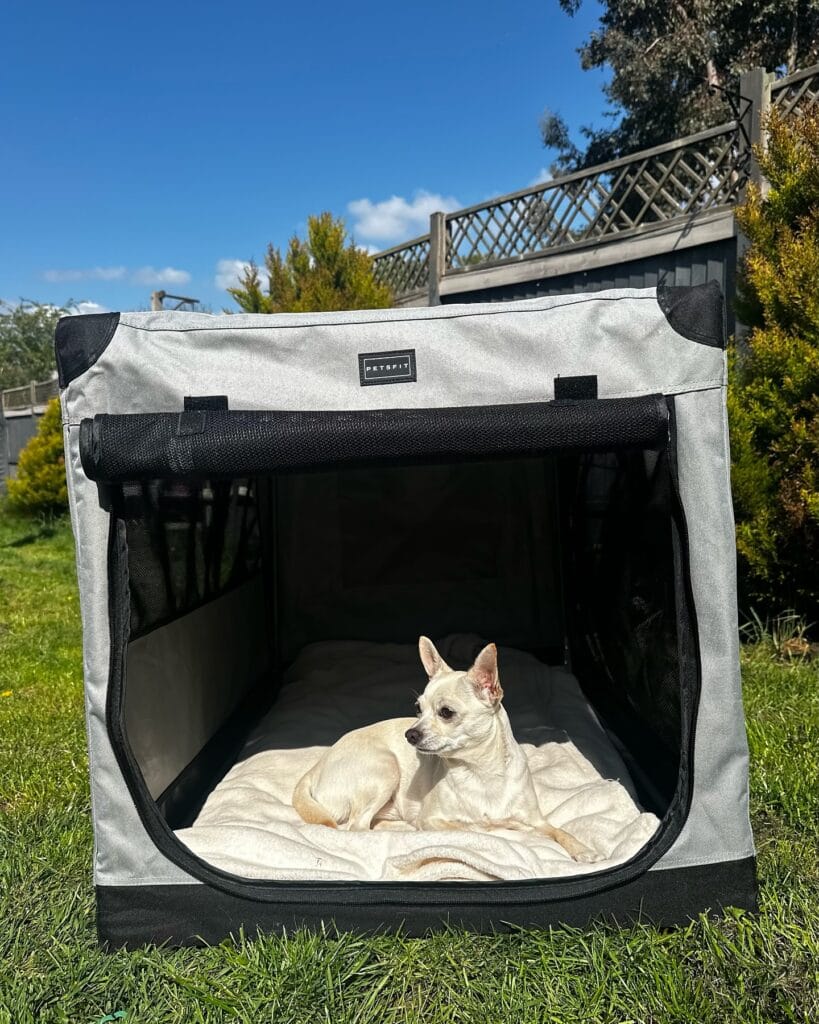
You know that moment when your golden has been outside rolling in the grass, and you’re desperately trying to keep her from dragging all of that onto your cream linen sofa? Yeah. I’ve been there with my cousin’s lab and honestly — having a dedicated outdoor space for her to chill and decompress changed everything.
This setup is exactly that.
Prep Time: 20 minutes | Active Project Time: 1.5–2 hours | Difficulty Level: Beginner
Materials & Tools:
– Heavy-duty gray canvas fabric (at least 600D polyester oxford)
– Black mesh ventilation panels (front and sides)
– Steel wire frame or collapsible PVC pipe frame (¾ inch diameter)
– Black corner reinforcement brackets (4 pieces)
– Hook-and-loop velcro strips for door roll-up closure
– Cream sherpa cushion insert (24″ x 36″ minimum)
– Fabric glue + heavy-duty thread
– Sewing machine or upholstery needle
– Scissors, measuring tape, fabric marker
Instructions
Start by cutting your 600D canvas into six panels — top, bottom, two sides, a back, and a front door panel. The front panel needs to be about 30% larger than the opening so you have enough fabric to roll it upward and secure it with your velcro strips, exactly like the image shows.
Sew the mesh ventilation strips along the upper portion of each side panel before assembling. This is the step people skip — and then their dog overheats. The mesh allows airflow, which keeps the interior 10–15 degrees cooler on a sunny afternoon.
Slide your ¾ inch steel wire frame through the sewn channels along each panel edge. This wire-through-channel construction means the structure holds its shape without any visible hardware. And it collapses flat in under two minutes, which is exactly what you want when you’re heading to a weekend farmers market with your girl.
Attach your black corner brackets at all four top corners for rigidity. These prevent the roof from sagging under light rain or morning dew.
Drop your sherpa cushion inside flat on the base. The plush surface gives your dog joint support on hard outdoor ground — cushioned base, reduced pressure, zero whining to come back inside.
I actually helped my neighbor build one of these last spring for her rescue pup, and she painted her PVC frame a matte black to match her deck railing. Looked like something straight off Pinterest.
If your golden loves post-bath outdoor hangouts, a dedicated kennel space pairs perfectly with a setup from these 7 Creative Ideas for Your DIY Dog Washing Station — rinse her off, then send her straight to her outdoor spot to dry.
Keep the cushion cover removable with a zipper or velcro backing so you can toss it in the wash weekly. Outdoor cushions hold more than you think.
📸 Photo credit: Instagram @nellitathechi
The One Mistake That’ll Cost You Your Whole Build (And How to Dodge It)
Here’s the pro secret nobody talks about — pressure-treated lumber will poison your dog.
I learned this the hard way watching my neighbor tear apart a whole kennel she’d just finished. She’d used cheap pressure-treated wood from the hardware store bargain bin, and her vet flagged it immediately. The chemicals in that wood leach into the soil and get absorbed through paws.
Go for cedar or pine instead. Yes, cedar costs a little more upfront, but it’s naturally rot-resistant and safe for your pup.
One thing to remember: elevation matters more than most DIYers realize. Raising the kennel floor even 2-3 inches off the ground stops moisture from rotting your base within one season. A rotted floor means a collapsed kennel means one very unhappy golden retriever.
Also — size the run for adult behavior, not puppy size. Dogs need room to sprint short bursts, not just stand around.
If you’re planning a full backyard setup anyway, pairing your kennel with some DIY dog playground ideas for your backyard makes the whole space work harder for your pup.
Your Couch (and Your Sanity) Deserves This
Okay, real talk — you’ve put so much love into your home. The throw pillows, the cozy textures, the whole vibe. Don’t let muddy paws undo all of that.
Pick one product from this list and just try it. Seriously, one small swap can change your whole routine with your golden.
Keep this in mind: the best pet-proof solution is the one you’ll actually use consistently. So go with whatever feels right for your space and your dog’s chaos level.
Now I’m curious — what’s the one spot in your home your golden retriever has basically claimed as their own?

Amr Mohsen is a software engineer who traded his keyboard for a leash — at least on weekends. His love for dogs inspired him to share what he learns as a dog owner and enthusiast, bringing a detail-oriented, research-driven perspective to every article he writes. If it’s about dogs, he’s probably already looked it up twice.


