
Your golden retreiver is gorgeous and a chaos machine.
The same thing happened to me, girl. Last winter, I came home and saw mud paw prints all over my cream-colored rug. And drool on my throw pillows. And my dog was somehow wedged between the couch and the wall. I just stared at her.
Your home is your own little sanctuary. You’ve spent hours, maybe even days, making it Pinterest-perfect for you and your dog. Only for it to be turned into a disaster zone by 9am.
If your dog could have their very own den, they would spend every single minute there. And not because you want them to be there, but because they want to spend every second of their day in a cozy, safe and private spot.
I put together 7 dog kennel indoor DIY ideas that are good enough to not look like eyesore when placed in your living room.
Just spaces you’ll both love.
#1: Build a Slatted Wood Dog Kennel That Looks Like Actual Furniture
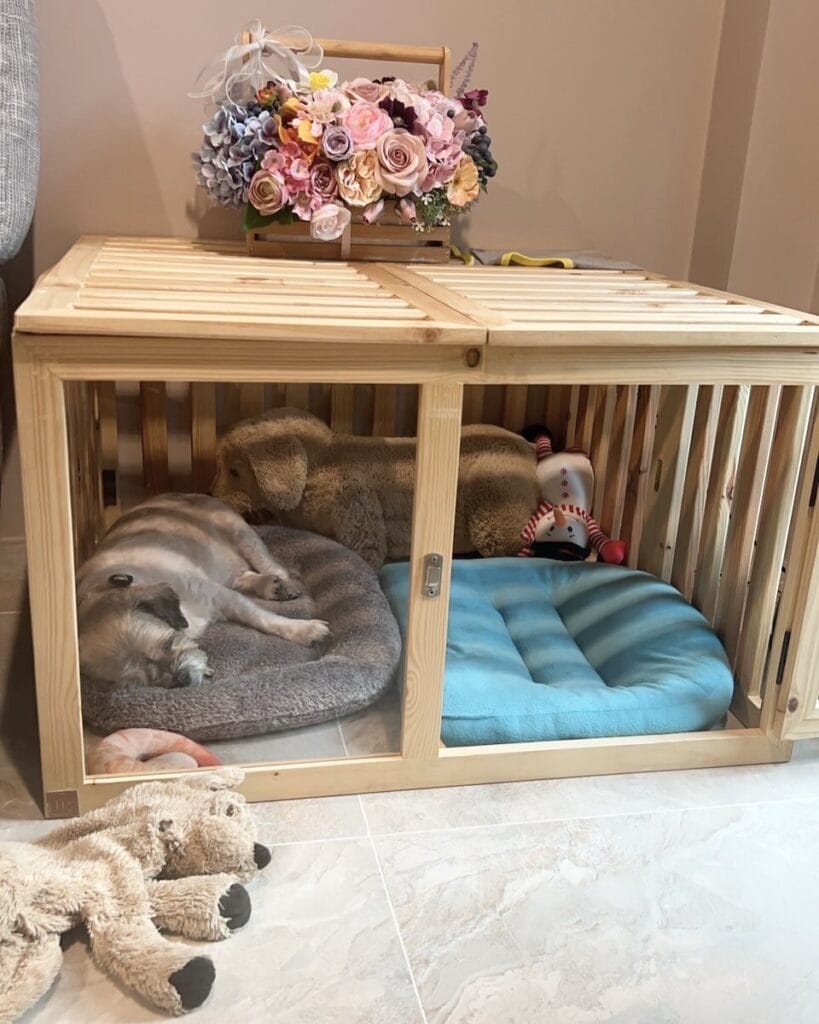
You may recognize this scenario… Your golden retriever decides the crate is the ugliest thing in the room. And you know what? You agree!
That big plastic eyesore that has been sitting in your living room, that clashes with every Pinterest board you’ve saved… I’ve been there.
This light ash wood slatted kennel cover will slide under your bed on the floor and make a perfect home for your dog when you are away. It is low to the ground like a media console and can sit right against your wall.
– 2×1 strips of ash or poplar wood (48 inches long)
– ¾ inch plywood for the top panel
– Wood glue + 1.25 inch brad nails
– Sandpaper (120-grit)
– Natural wood stain or whitewash finish
– Nail gun + miter saw
Instructions
Cut your plywood top to 60 x 16 inches. Build a simple rectangular frame from 2×2 lumber. Attach the 1×2 slats to the front and sides of the frame, leaving about 1.5 inches between each slat. Nail each slat to the frame with brad nails and apply some wood glue to hold it in place. Sand everything with 120-grit sandpaper and apply a light whitewash. This will give your dog enough space to see out of the pen without feeling like he’s being exposed and making him less anxious.
Keep this in mind: One trick I’ve learned is to stain before assembly so that I don’t have to clean up a huge mess.
Prep Time: 30 min | Active Project Time: 4–5 hours | Difficulty Level: Intermediate
📸 Photo credit: Instagram @minncenturymod
#2: Built-In Dog Kennel with Butcher Block Top and Hanging Shelf
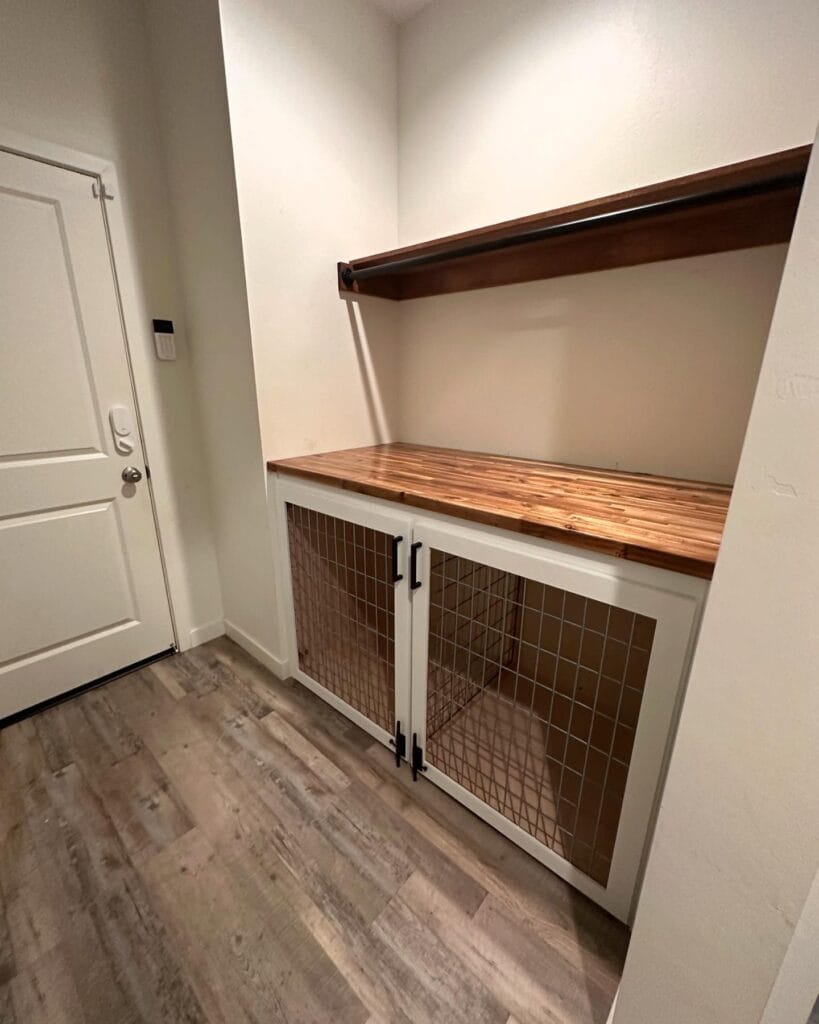
Your golden’s muddy paws just hit the entry way….again. And your only option is a plastic crate that’s awkwardly sitting in the middle of the room. Girl, I’ve been there.
I love this built in kennel in my kitchen. It has a white painted 3/4″ plywood cabinet base with wire mesh panel doors and a butcher block wood countertop and a stained wood shelf with a black metal pipe rod for hanging leashes or jackets.
Materials & Tools: 3/4″ plywood (cabinet box) Butcher block countertop Wire mesh panels Black cabinet hardware Black iron pipe (shelf rod) Wood stain, white paint, pocket screws, drill
Instructions
We put ours together first, then installed the face frame with pocket screws. That way it looks like furniture. We installed some wire mesh into the door frames for air flow and to keep the dog from feeling so isolated. We mounted our butcher block top with construction adhesive. We mounted our floating shelf into the studs, and ran a piece of iron pipe across the front for a clothing rod.
The other reason to sand them before painting is so that they aren’t rough edges, or else your pup will find the splinters with his nose.
Prep Time: 1 hour | Active Project Time: 6–8 hours | Difficulty Level: Intermediate
📸 Photo credit: Instagram @rollersnrouters
#3: White Farmhouse Dog Kennel with Chevron Door & Lift-Top Storage
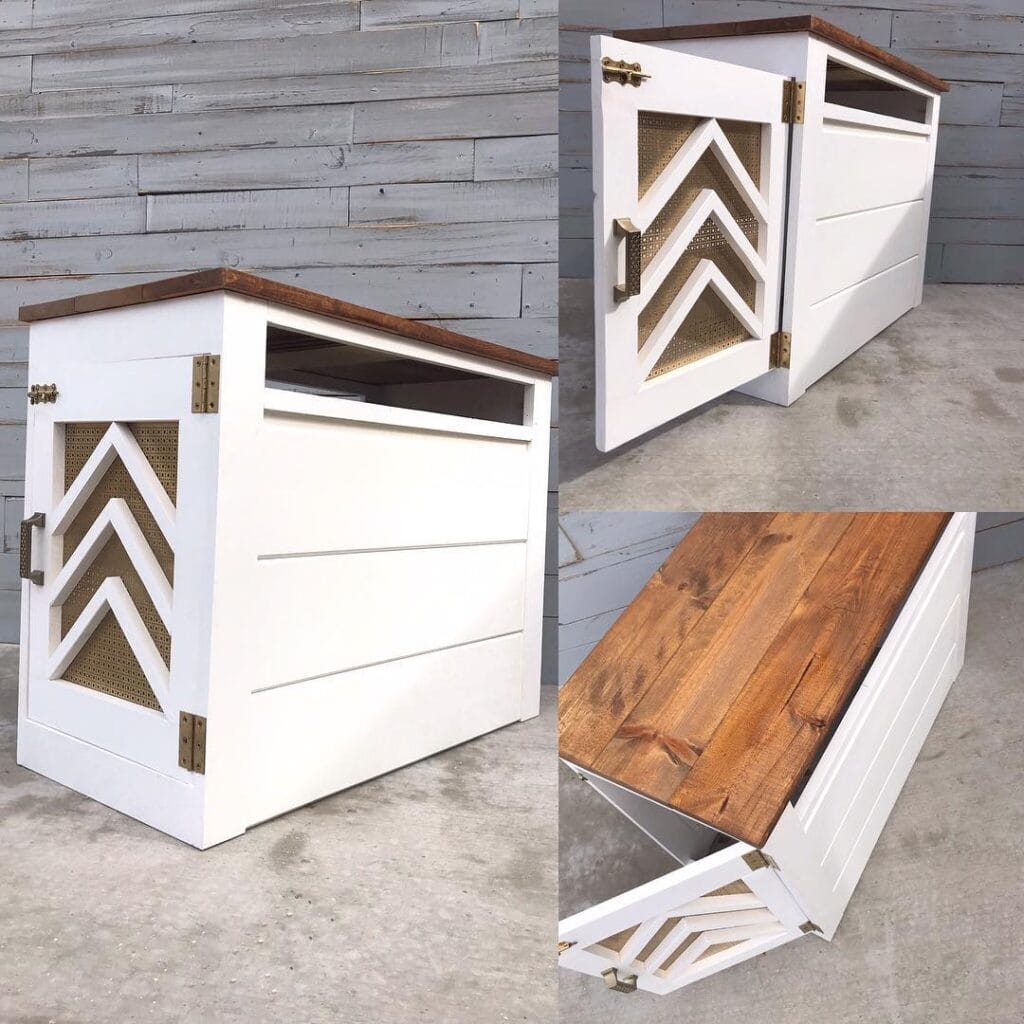
Your golden’s muddy paws just hit the couch again and that wire crate in the corner is ruining the whole vibe of your living room.
This build is the answer.
– 3/4″ plywood (white-painted MDF panels) – Reclaimed pine boards for the stained top – Brass hinges, and a vintage-style handle – Metal mesh/caning to cutout the chevron door – Pocket hole jig, brad nailer, miter saw
Instructions
Make a 24″ by 36″ box frame using plywood. Attach the panels using pocket screws. Cut three chevron arrow shapes into your door panel. Staple some metal mesh behind each cutout.
Use brass hinges to attach the door and add a narrow ventilation slot in the top front.
Stain your pine planks in a warm walnut tone and attach them to the sides as a hinged lift-top for a secret storage spot.
Paint everything crisp white.
With a lift top lid, you won’t have blankets or leashes scattered across your floor. And, the chevron mesh door allows for air flow so your pup stays comfortable (and so you don’t sacrifice your Pinterest aesthetic for a beautiful room).
Sand all the chevrons on the edges before assembly. Splinters are not fun for little noses sniffing around the door.
Prep Time: 1 hour | Active Project Time: 6-8 hours | Difficulty Level: Intermediate
📸 Photo credit: Instagram @shesthecarpenter
#4: The Double-Suite Wooden Dog Kennel That Looks Like Furniture
Your golden’s muddy paws have claimed the couch again, and you’re just done. You want something that keeps your pup cozy but doesn’t make your living room look like a pet store.
This one? Chef’s kiss.
-Materials & Tools: Pine wood slats – natural finish Acrylic/plexiglass panels for front doors Metal latch hardware – silver finish Wood screws and wood glue Circular saw, drill, sandpaper
### Instructions
Sand every pine slat before assembly to prevent splinters. Build two separate equal-width compartments, each with slatted tops (which will also serve as a surface for the flower arrangement), and frame each front panel with plexiglass so she sees out without being able to escape. Attach the silver latch between sections. Add a round donut bed to the left side of the crate and a teal cushion bed on the right side.
A number of the hotels have rooms with two beds separated by a space so the dog can rotate the beds.
Cover the floor with a few extra mats to protect those wood joints.
Prep Time: 30 min | Active Project Time: 4–5 hours | Difficulty Level: Intermediate
📸 Photo credit: Instagram @velpet.th
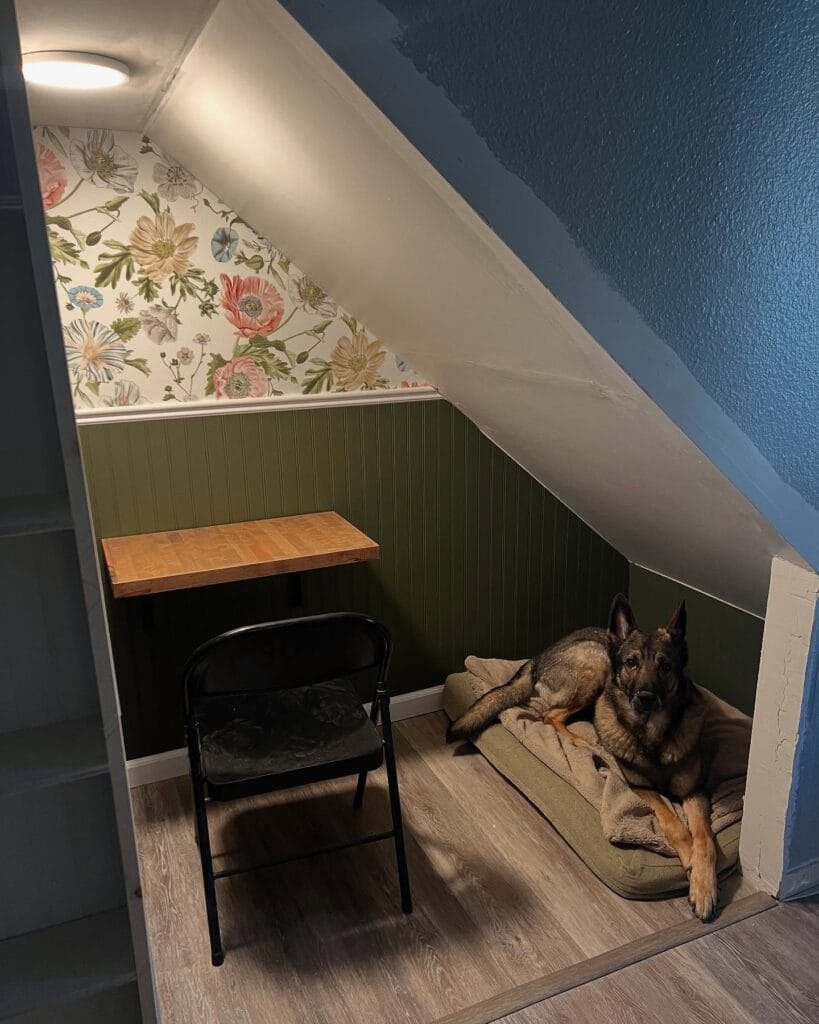
#5: The Under-Staircase Dog Nook That Looks Like It Belongs in a Magazine
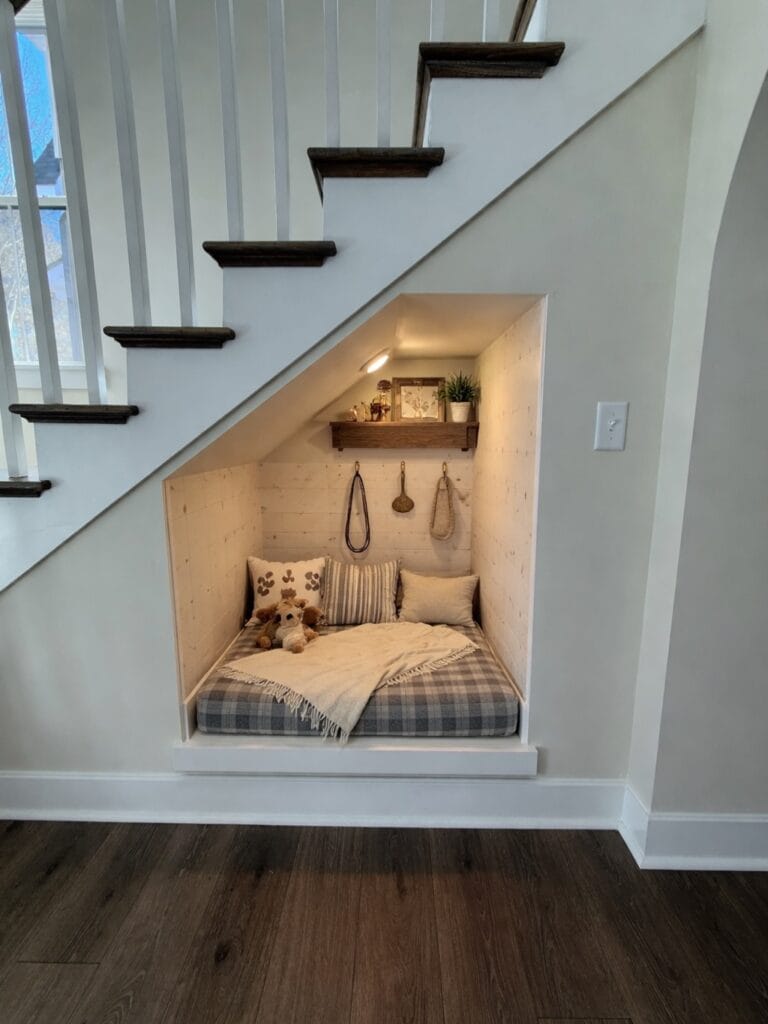
Most people have an awkward little space under their stairs that collects dust and maybe an old Amazon box. Your golden retriever could be living their best life there.
My cousin has built one of these a couple of weeks ago and I almost fell off my chair when I saw it, because it looked so much like something I had seen on Pinterest.
– Shiplap planks (whitewashed) – Plaid mattress (gray and cream buffalo check) – Floating walnut shelf – Wall hooks for leash storage – Warm-toned LED strip light – Fringe throw blanket – Jigsaw, stud finder, sandpaper, wood screws
Instructions
To fill the nook opening, I framed it out with 2×4 lumber and installed drywall flush with the 2x4s. Then I installed shiplap horizontally on all three walls. I chose shiplap because it gives the space a warm feel and hides all of the scuffs that my dog will inevitably cause. I also sanded the edges smooth so they wouldn’t scratch me.
i mounted the floating shelf 12 inches below the slope of the stairs, then i put 3 brass hooks under that so that i could put leashes on it. i added a led strip to the edge of the ceiling so that even in the dark, my dog always has a comfy spot to lay ( and it’s not the dark corner that she doesn’t like).
Put the plaid mattress on the floor, add a fringe throw, and layer it with pillows. Done.
Seal the shiplap with a water-resistant matte finish and wipe clean after mud paw situations.
Prep Time: 2 hours | Active Project Time: 6–8 hours | Difficulty Level: Intermediate
📸 Photo credit: Instagram @stacierenshaw
#6: Built-In Double Dog Kennel with Sliding Barn Doors
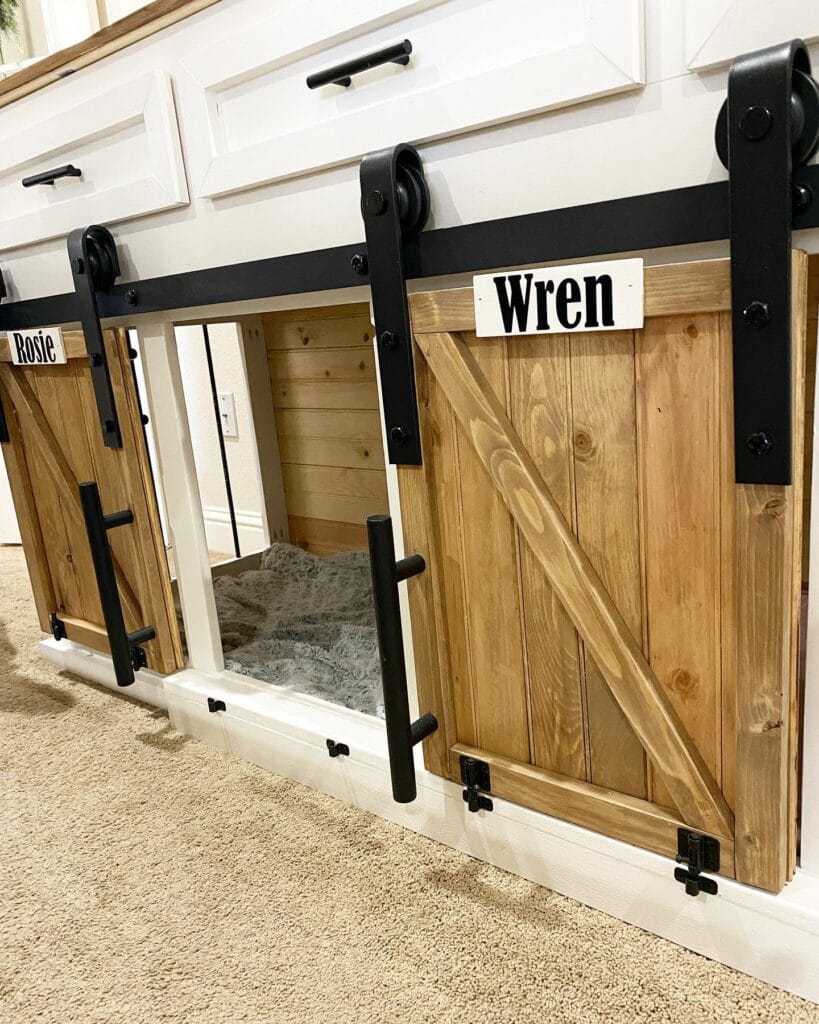
Wren just dragged her bed into the middle of the living room. And now your golden is sprawled across the carpet and we have no personal space.
This built-in double kennel fixes that completely.
Materials & Tools: – Cedar tongue-and-groove planks (shiplap interior) – White-painted MDF for the base of the frame – Black sliding barn door hardware (track + rollers) – Black metal bar handles – Wood stain (natural cedar tone) – Flush bolt latches (bottom door locks) – Gray faux fur dog bed inserts – Saw, drill, sandpaper, wood glue
Instructions
Build a white MDF box that fits under your existing cabinetry. Line the interior walls with a horizontal cedar shiplap planks so your dog is comfy. Frame two separate kennel openings side by side. Attach a black barn door sliding track to the full top. Attach Z-brace cedar doors on each side. Add bar handles and flush bolt latches. Attach a white name sign to each door.
Put a gray plush bed inside each kennel so your dog has a “den” to retreat to and relax in.
Prep Time: 1 hour | Active Project Time: 6–8 hours | Difficulty Level: Advanced
Sand doors extra smooth before staining — rough grain catches dust fast.
📸 Photo credit: Instagram @from_sawdust_to_sprinkles
#7: Built-In Loft Bed Kennel (The Under-Bed Den Your Dog Will Claim Forever)
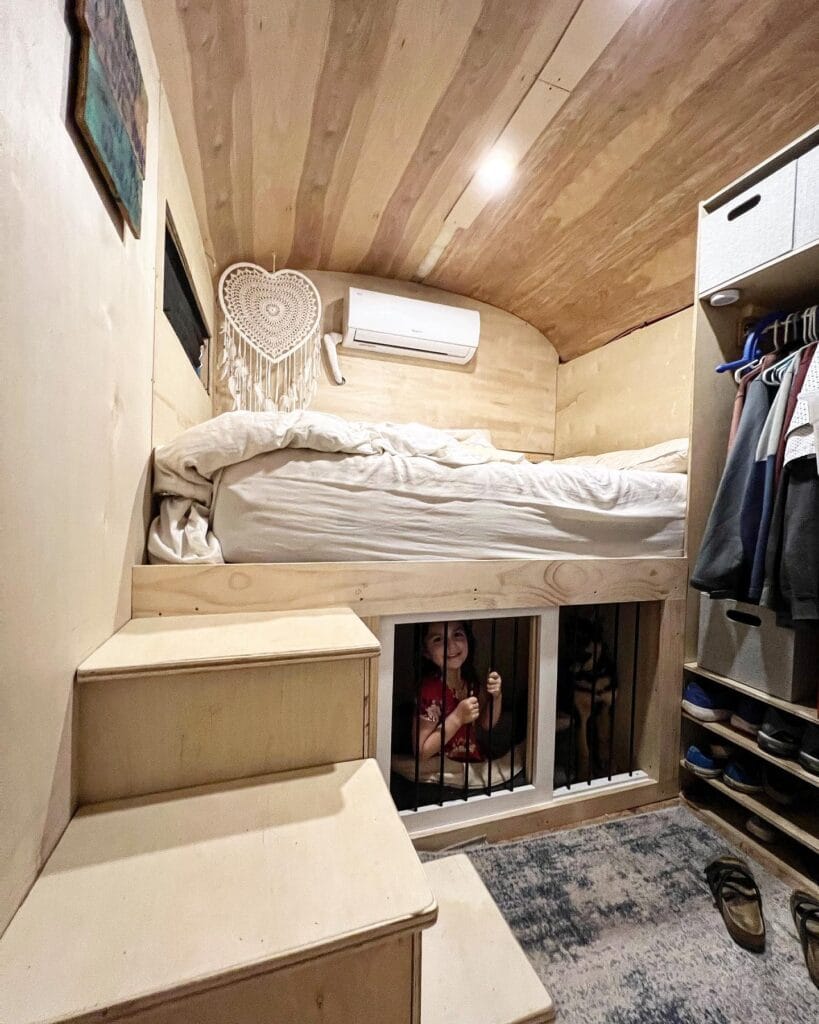
Your golden sees you grab the vacuum and immediately bolts under the bed. It’s instinct for your golden to find that cozy cave so why not build it into the furniture itself?
This is the converted school bus bedroom, but you can do this in any room. The kennel lives under the plywood loft bed platform that is framed with black metal safety bars and a small hinged gate door for access. It is exactly the type of snug den dogs crave.
Materials & Tools: ¾-inch birch plywood (platform & side panels) Black iron pipe or pre-made metal bar gate insert Wood screws, sandpaper, wood glue Drill, circular saw, measuring tape Clear polyurethane sealant
Instructions
If your dog likes to stand, build your bed platform at least 24 inches high so your dog will have plenty of headroom. Cut a 16×20-inch opening in the front panel. Then you can frame it with 1×2 pine trim. Sand every edge, because your dog’s nose will be all over this. Install your metal bar gate using the barrel bolts for easy access. Seal the wood with two coats of polyurethane so if your dog gets muddy paws, it won’t ruin your wood bed.
Because of the built-in design, this gadget takes up virtually zero additional floor space so it will not steal any space from your house.
Leave the gate open for a few days so your dog can explore on her own terms. Throw a treat inside and she’ll move in by Thursday.
Prep Time: 1 hour | Active Project Time: 6–8 hours | Difficulty Level: Intermediate
📸 Photo credit: Instagram @pepventures
The One Measurement Most DIY Kennel Builders Get Wrong (And It Costs Them Everything)
One thing that no one tells you before you begin cutting wood is most people size the kennel based on the dog’s current weight and height. This is a big mistake.
Your golden should have at least 4 inches of head room over her when she is standing. She needs enough room to turn a full circle and not hit any walls. Measure the circle and add 6 inches on each side.
That first kennel was way too tight. My dog, Juniper, refused to sleep in it for three weeks. I spent three weeks watching her stare at me like I personally wronged her.
Another idea for making this box easier to put together is to leave the side panels removable rather than nailing them permanently in place. This way, when your pup decides that she’d like a bigger bedroom, you can simply remove some panels and start with a smaller box.
And skip carpet inside. It’s a breeding ground for mildew and it smells bad after a month. Instead, you might have an elevated wooden slat floor with a washable mat on top.
Your Dog-Proof Sofa Is One Decision Away
You’ve already done the hard part. You know what your home deserves, and you know what your golden retriever does to it.
But the idea of a slipcover that could be washed like clothes appealed to me. While reading that article I thought I’d try one just to see if it would work. I picked one to buy and just washed it. I let my dog curl up on it and leave my couch clean underneath.
Quick note: If you’re already in the “my house actually looks good, and I have a dog” era, you might really like exploring 7 creative ideas for a DIY dog washing station outdoor setup – because a clean dog means a cleaner sofa too.
Which room in your house does your golden retriever currently rule? So tell me.

Amr Mohsen is a software engineer who traded his keyboard for a leash — at least on weekends. His love for dogs inspired him to share what he learns as a dog owner and enthusiast, bringing a detail-oriented, research-driven perspective to every article he writes. If it’s about dogs, he’s probably already looked it up twice.



