
A few years ago, your living room was a lot prettier. Then, you got a golden retriever.
There is a big metal box in the middle of your perfectly curated space, and every time you walk past it, it kills your vibe. It just sits there… clunky and cold… and just downright ugly. It doesn’t fit with the warm cozy feel you have spent hours pinning on Pinterest.
Real talk: This happened to me recently with my cousin. She finally got her dog, and I was so happy for her! She had spent so long on her living room and all the throw pillows and woven baskets…. but then that crate just swallowed it all up.
If you’re still struggling with a constant battle of wills between the state of your dog’s crate and the state of your decor, take a look at these 7 dog crate topper DIY ideas to turn that eyesore into a piece of furniture. Whether your dog’s crate will be the new side table or mini bar cart, these DIY ideas will certainly get the conversation started.
#1: Build a Dog Crate Console Table That Looks Like Real Furniture
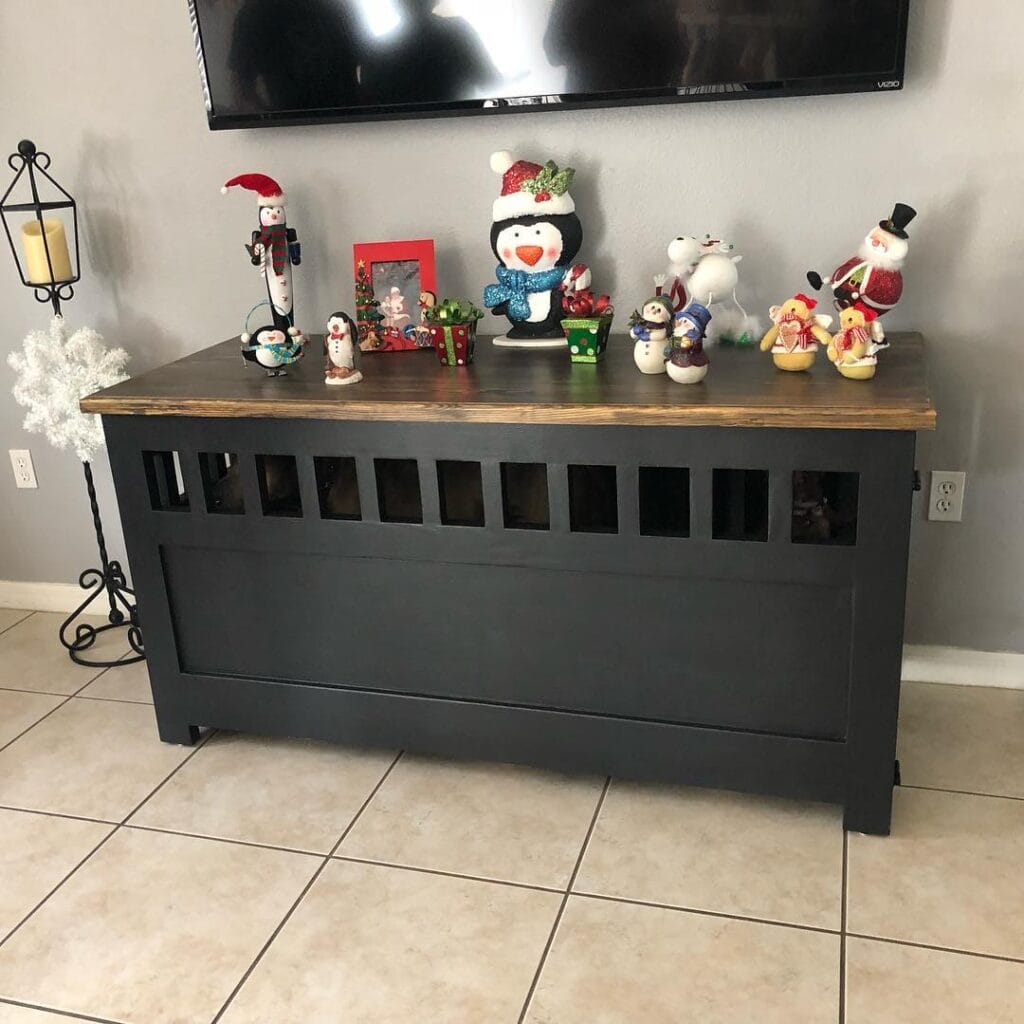
Your golden probably has that one spot that justs stares at you from the middle of the living room, that one spot that you have tried everything to get rid of and your golden still likes to sit in front of it in her crate. It’s the spot that has that huge metal eyesore sitting there. You’ve tried putting a blanket over it. You’ve tried to move it.
I bought this dark charcoal and natural wood console crate and fell in love with it immediately.
– 3/4″ plywood or pine boards – Dark charcoal gray paint (matte finish) – Stained wood top (warm walnut stain) – Wood screws, sandpaper, drill, saw – Router (for the rectangular ventilation cutouts)
Instructions
Cut the pieces of the frame first. Build a box frame with four legs, then attach the solid lower panel to the front base. Using a router, cut the rectangular window slats along the upper front panel. The slats will give your dog airflow without ruining the look of the furniture. Sand the frame, and then paint 2 coats of charcoal. Attach the stained wood top.
Keep this in mind: With a furniture-style crate like these heartfelt DIY dog crate cover designs you give your dog a calm space in which to feel safe, which in turn means less stress and better sleep for her.
Seal your wood top so you can easily wipe away holiday decor and water rings.
Prep Time: 1 hour | Active Time: 6–8 hours | Difficulty: Intermediate
📸 Photo credit: Instagram @cwoodthings
#2: The Lavender Dog Crate Topper That Doubles as a Desk (And Looks Good Doing It)
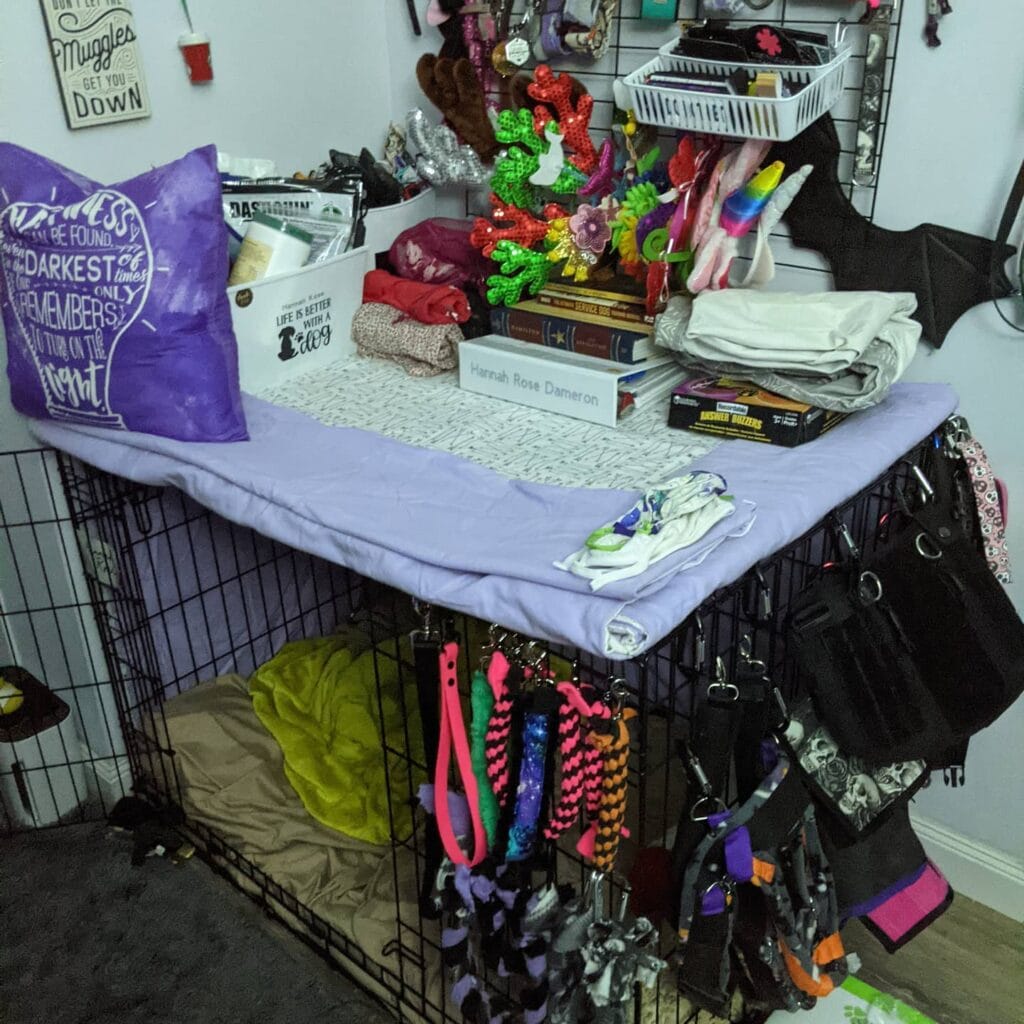
If your golden’s crate is just sitting there taking up half the room, you can throw a lavender fleece pad on top and make it into a decorative storage station.
– Purple/lavender fleece fabric (cut to the size of the top of your dog crate) – Wire dog crate (approx. 42″L x 28″W) – White decorative storage bins – Colorful leashes and clips (hung directly on the crate bars) – Bungee cords or zip ties to secure the pad
Instructions
Measure your crate top, then cut the fleece 2 inches larger on each side so that it will drape and stay on the top of the pad. Lay pad flat and fold edges under, then just press down. No sewing needed. Clip your leashes onto the front of the crate by color. Put the bins on top and fill them up by category.
The folded-edge fleece adds a grippy surface that keeps items from sliding around and gives your dog a visual “this is mine” boundary below.
Pair this with my Best DIY Dog Collars: A Comprehensive Guide so those hanging leashes actually have matches.
Do you rotate your bin contents? Well, you can also use your crate topper as a pet bin, and the top can be used as your desk space on Pinterest.
Prep Time: 5 min | Active Time: 15 min | Difficulty: Beginner
📸 Photo credit: Instagram @3furrytroublemakers
#3: Upcycled Bottle Planter Turned Glowing Crate Topper
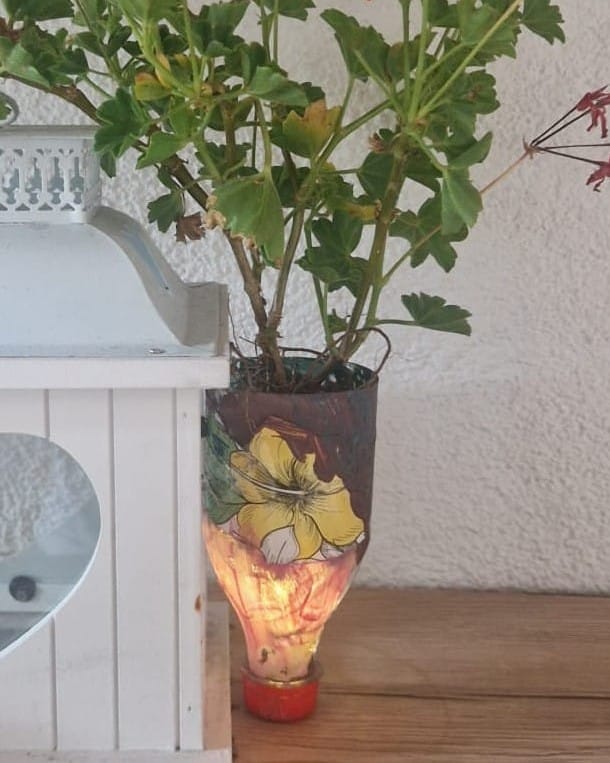
My golden retriever used to do the same thing where he flopped right next to his crate and stared at it like it personally offended him. Mine did this too until I made his crate feel less like dog jail and more like a cozy corner.
– 1 large plastic bottle (2 liter works perfectly) – Decoupage glue (Mod Podge) – Floral tissue paper or napkins – 1 small LED tea light – Brown, green, and red acrylic paint – Scissors and a foam brush.
Instructions
Have you ever tried to paint something and then wanted to paint over it? This is the perfect technique to use. Flip the bottle upside down, so the cap will be the base. Paint the entire surface with a dark brown paint. Before it dries, let it get tacky. I used a very light coat of paint for this. Then, I used a piece of floral tissue paper and Mod Podge. Layer the paper on top of the paint. Press it down so there are no air bubbles. Let it dry completely.
A set of LEDs was inside the tea light – it creates the warm amber glow in the photo. The planter is lit up at night to keep the dog’s crate area lit up without the harsh overhead lighting.
I tucked a small trailing plant into the top opening. It softens up the corner of the crate nicely.
Seal it up with two coats of Mod Podge for good measure.
I like to give the rim of the bottle a little sanding before adding my plant. It gives the soil a little better grip, so it won’t fall.
⏱ Prep Time: 10 min | Active Project Time: 45 min | Difficulty Level: Beginner
📸 Photo credit: Instagram @teag_gruppe
#4: DIY Monogrammed Dog Crate Table Topper With Dark-Stained Wood
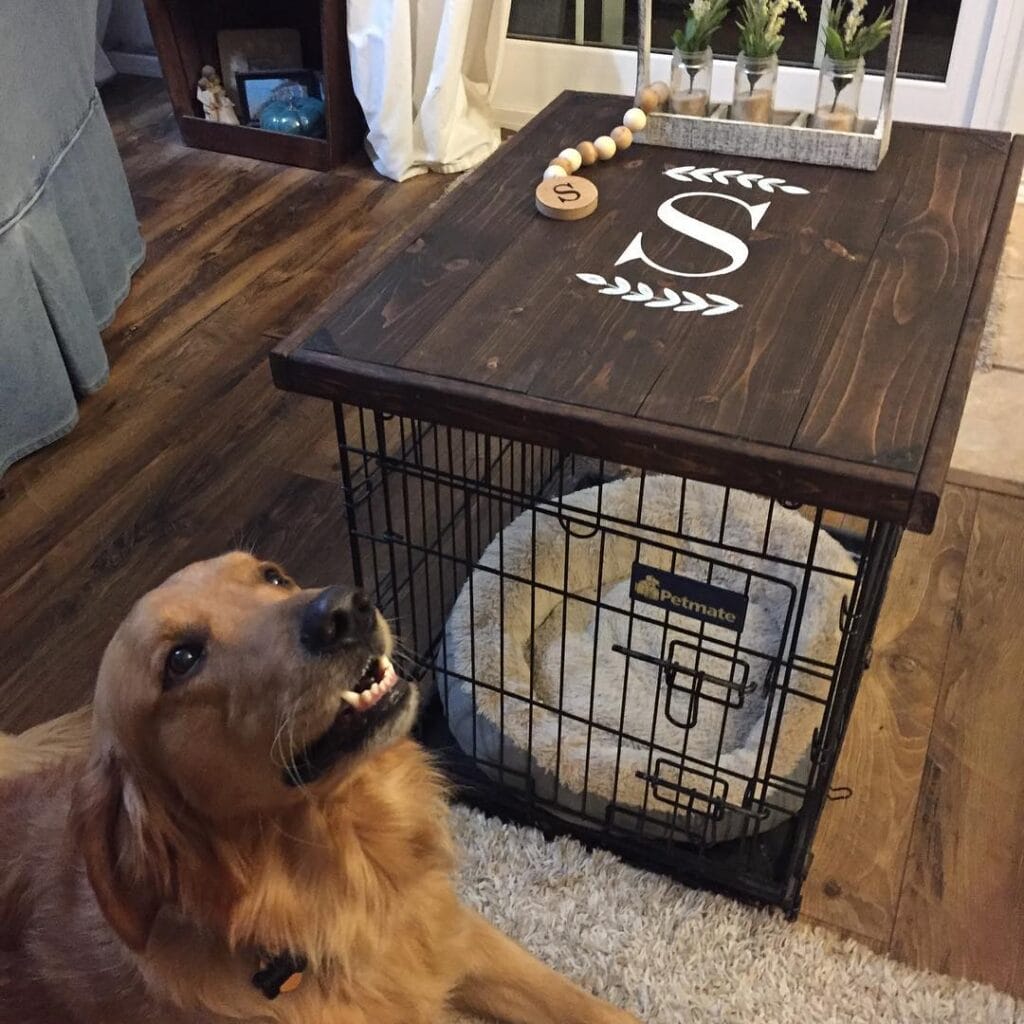
Your dog is literally sprawled out over the living room rug and that ugly black wire crate is just sitting there ruining everything.
I made one of these last spring and couldn’t believe how much it changed the whole vibe of the room.
– 3-4 pine boards (cut to the size of the crate) – Dark walnut wood stain – White chalk paint – Laurel wreath stencil – Wood glue + 1.5″ finishing nails – Sandpaper (120-grit, then 220-grit) – Paintbrush + foam roller
Instructions
I took some of the pine boards I had leftover from our project and sanded them smooth and wiped them down. I then stained them a dark walnut color and did two coats (making sure each coat was fully dry). I then took the boards and nailed and glued them together to make one large panel to fit over the top of my Petmate wire crate.
Center your stencil, apply white chalk paint in thin layers. The monogram stays crisp that way.
And that is what you get in the end. A nice finished wood surface that also can serve as a console table. Your crate does not look like a crate anymore.
I put a mason jar vase with a wooden bead garland on the table!
Prep Time: 20 min | Active Project Time: 3 hours | Difficulty: Beginner
If you’re in need of more doggie inspiration, check out this book too, 12 Heartfelt Designs for DIY Dog Accessories .
📸 Photo credit: Instagram @mycrazycraftbucketlist
#5: Salt Dough Paw Print Ornaments for Your Dog’s Crate Topper
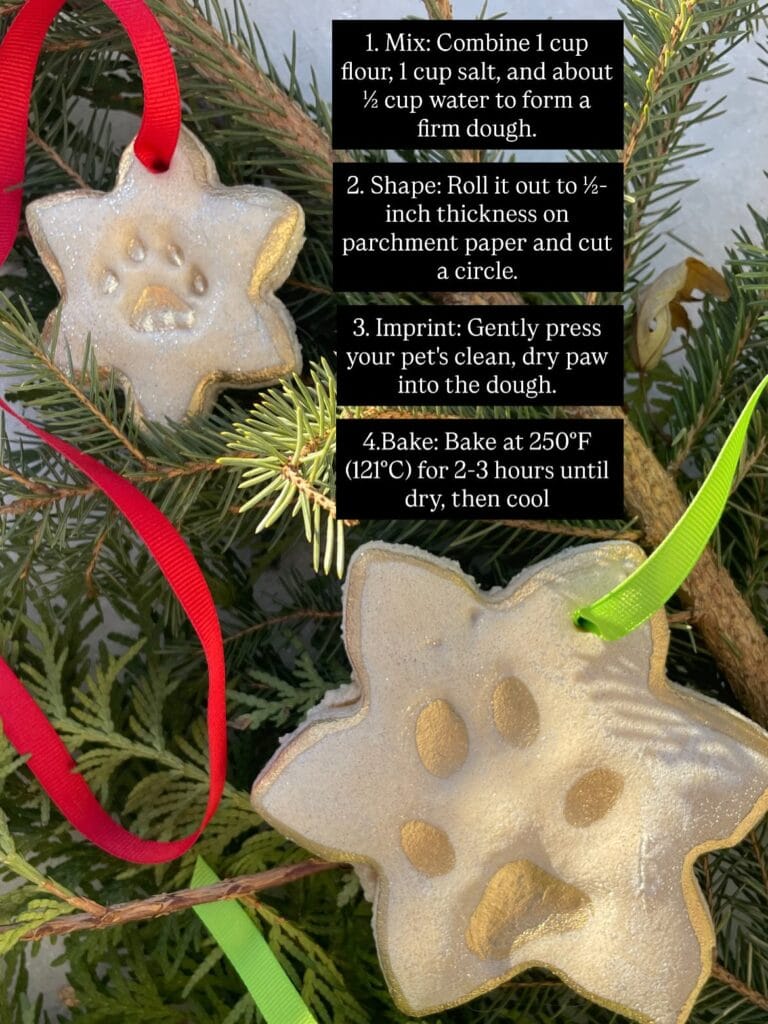
That paw is only this big once! Next year, you’ll wish you had this.
Prep Time: 10 min | Active Project Time: 3 hours | Difficulty: Easy
-Materials & Tools:- 1 cup all-purpose flour – 1 cup table salt – ½ cup water – Star-shaped cookie cutter – Parchment paper – Gold paint or shimmer glitter spray – Red or green grosgrain ribbon
Instructions
Mix the flour, salt, and water to form a firm dough – not sticky, not crumbly. Roll out the dough to ½-inch thickness on the parchment, and press the star cutter down firmly. Gently press your dog’s paw into the center. Bake in a pre-heated 250°F oven for 2 to 3 hours until the bone is dry.
One tip: punch your hole for the ribbon before you bake so that you don’t crack the hole after baking.
Once it is cooled I like to brush the edges with gold paint. The gold paint always catches the tree lights and makes it look a little more intentional.
Make two ribbons, one red and one green, to hang from the top of the crate. The ribbons might become the new favorite decor in your guest’s craft bag.
You could store it flat between the seasons between seasons so the impressions stay sharp for years.
📸 Photo credit: Instagram @birdershewrote
#6: The “Open-Run + Crate Station” Dog Play Zone Setup
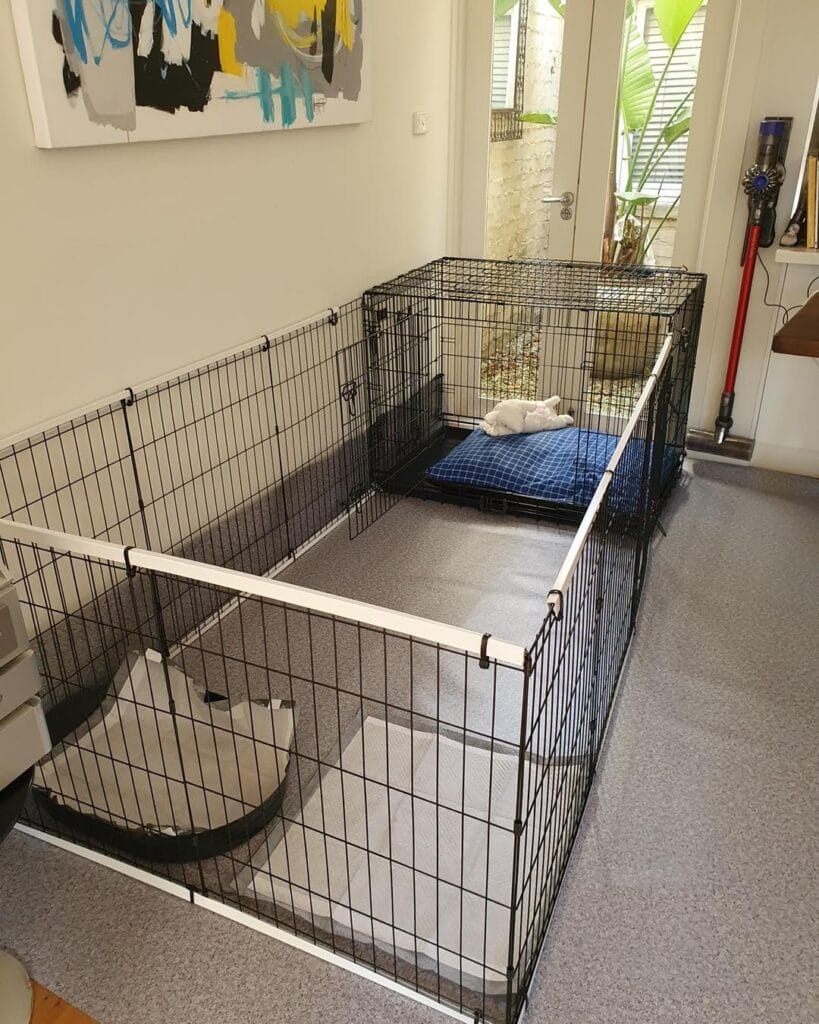
Your golden just knocked over her water bowl again and you are standing there watching it spread across your nice carpet.
Which situation from the picture? It will solve exactly that chaos.
Materials & Tools:
– Black wire modular pen panels (8-panel kit)
– Large wire dog crate (approx. 42″ L x 28″ W)
– Grey foam floor mat tiles
– Blue plaid dog cushion (approx. 36″ x 24″)
– White PVC connector rods
– Cable zip ties
Instructions
Lay your grey foam tiles down first. They will be the floor for your dog’s crate. Use white PVC rods to attach the wire pen panels around the perimeter. I want this to be an open play area where your dog can enter his crate right from the run. Put the crate at the back of the play area and put your dog’s bed or cushion inside. This gives him a little “cave” to retreat to inside the larger run. Zip-tie the joints in the corners.
The open-run design gives your dog some room to move, and the enclosed crate provides a calm place for your dog to sleep — helping to relieve anxiety and get a better night’s sleep.
Especially if your puppy is still learning to go to the toilet outside, you may need to keep a litter tray in the front of your playpen.
You will probably love these if you are looking for 7 Cozy DIY Indoor Dog Kennel Ideas.
Prep Time: 20 min | Active Project Time: 45 min | Difficulty: Easy
📸 Photo credit: Instagram @vebopet
#7: The Linen Crate Cover That Makes Your Dog’s Kennel Look Like It Belongs There
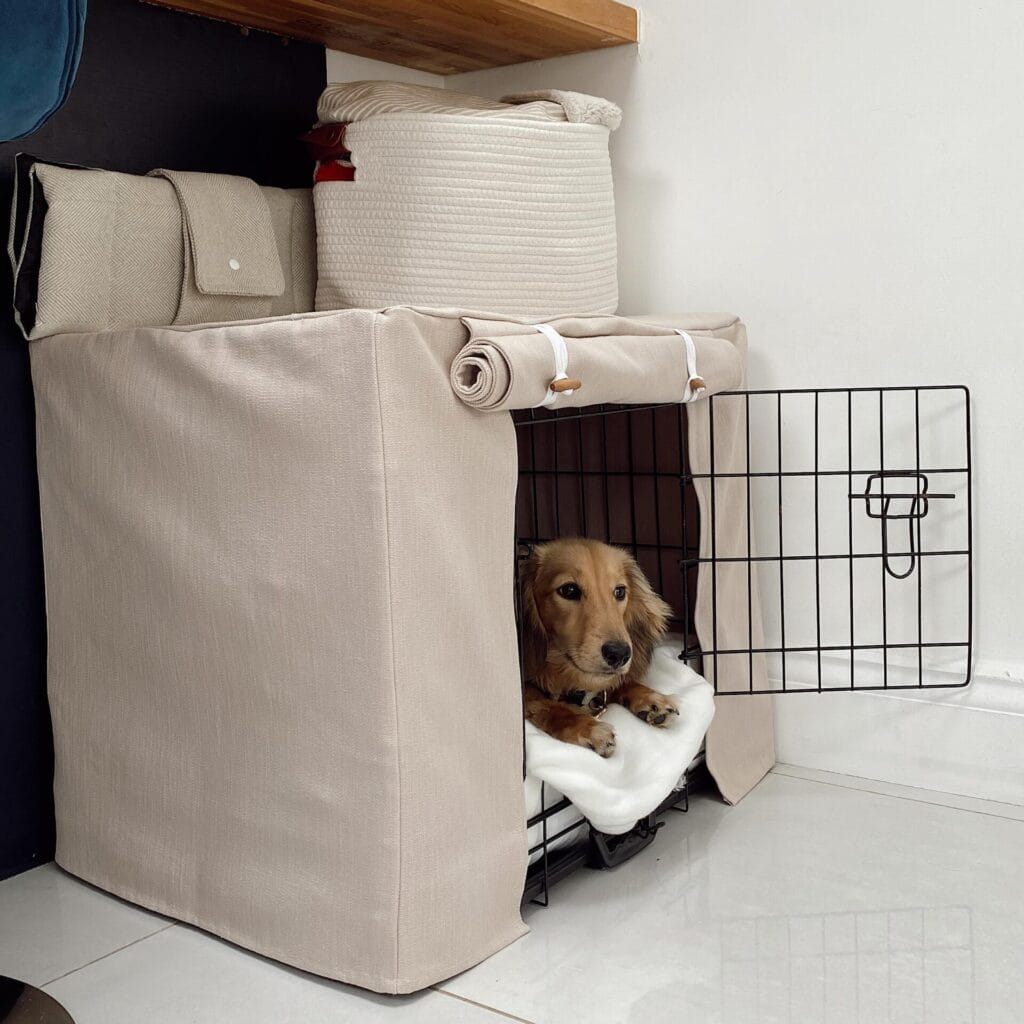
Finally, your golden is calm in her crate. But that black wire cage is just sitting there… in the middle of your living room… haunting you.
So, this linen-blend fabric cover in a warm oatmeal/cream tone is just what I needed.
What You Need:
– 1.5–2 yards of linen-blend fabric (oatmeal or natural cream)
– White elastic straps or ribbon ties
– Rolled fabric bumper (same fabric, stuffed lightly)
– Scissors, measuring tape, sewing machine or fabric glue
– Wire dog crate (small to medium size, approx. 24″–30″)
Instructions
Measure the top, sides, and back of the crate. Cut one fabric panel to fit each surface. Hem all four edges, leaving a 2-inch hem on each side. Sew the panels together to make a single connected cover that drapes over the crate. Attach white ribbon ties or elastic loops underneath to keep the cover snug. Roll a fabric tube for the front bumper and stuff it slightly. Attach leather tabs to the top edge to hold it in place.
A snug cover that fits your dog like a den will create a dark, quiet space that will reduce his anxiety during rest.
Tuck a white fleece blanket inside as bedding. It is a pretty photo, but your golden will sink right into it.
Prep Time: 20 min | Active Project Time: 1.5–2 hrs | Difficulty: Intermediate
📸 Photo credit: Instagram @spencer_thelilsausage
The One Measurement Most DIYers Get Wrong (And It Ruins Everything)
I have seen way too many crates that were built too short and too many (slightly) taller than what they should be. If you’re trying to build a crate topper with a perfectly square top, then you need to build a good reference for yourself.
When I was making my crate I realized that most tutorials don’t tell you that you need at least 3 inches of overhang on each side. The overhang is what gives you the ability to style the top of the crate as if it was a little coffee table (with books, a plant, or maybe even your candles). With the overhang you don’t have to worry about everything falling off the top the second your golden retriever goes into chaos mode.
One thing to remember: Always take into consideration the swing of the door on the crate. When I built my first one I wasn’t able to open the front door without lifting the top off. Nightmare.
Also try to get something other than MDF if you are anywhere near a water bowl. MDF swells, warps and generally dies when it gets wet. A solid pine or something will hold up better.
If you are already doing weekend project for your dog, these 7 Heartwarming DIY Dog Ramp Ideas for Your Pup are definitely worth bookmarking.
Your Golden Deserves a Yard That Keeps Up With Her
Pick just one project to work on this weekend. Maybe it’s something simple like a DIY dog feeding station to get those dirty bowls off your kitchen floor. Maybe it’s one corner of your backyard.
Small starts add up fast, I promise.
There’s a whole big world out there, but your girl is here with you every day, giving you her whole heart. She deserves a space built for her, not just tolerated around her.
What is the one spot in your home or yard that your golden has taken over and what would you get rid of first?

Amr Mohsen is a software engineer who traded his keyboard for a leash — at least on weekends. His love for dogs inspired him to share what he learns as a dog owner and enthusiast, bringing a detail-oriented, research-driven perspective to every article he writes. If it’s about dogs, he’s probably already looked it up twice.



