
Your golden retriever has basically claimed that wire crate as his throne — and honestly, it looks like a cage sitting right in your living room.
You spent weeks finding the perfect throw pillows. You have a whole Pinterest board for this space. And then there’s that metal eyesore just… vibing in the corner.
I felt this so hard last year. My cousin Sarah has a lab mix, and her crate literally sat in front of her fireplace mantle — the one she’d spent months decorating. Every photo she took for her home tour, there it was.
The good news? A DIY dog crate cover fixes this without a big budget or a single trip to a furniture store.
These 10 heartfelt designs turn that wire box into something that actually belongs in your home — cute enough to stay, sturdy enough for your pup.
#1: DIY Polka Dot Dog Crate Cover (The Cutest Den Your Pup Deserves)
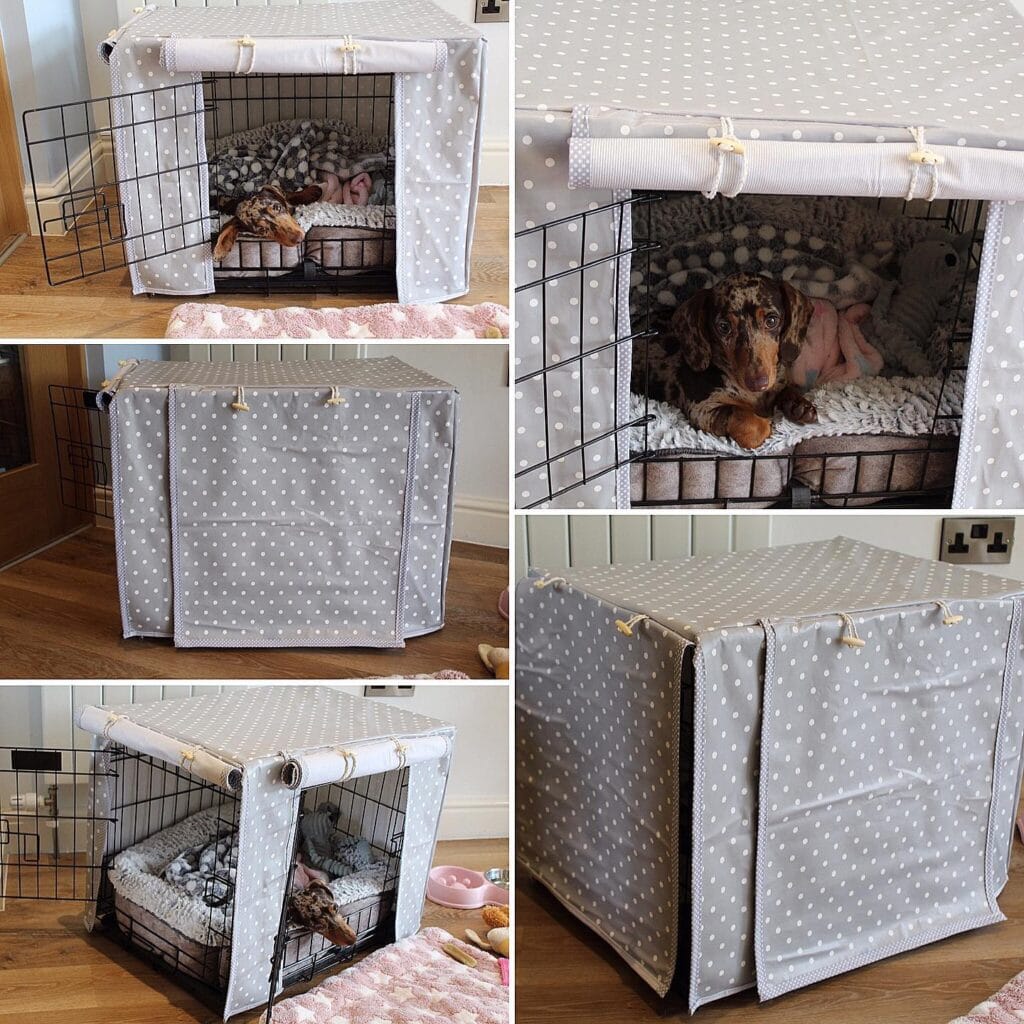
Okay so you know that moment when your golden’s crate looks like a wire cage plunked in the middle of your living room — and no amount of throw pillows nearby can make it not an eyesore? Yeah. I’ve been there. My cousin had the same situation with her dachshund, and honestly the crate was just sitting there, clashing with everything.
This gray and white polka dot crate cover is the fix.
Materials & Tools:
– 1.5–2 yards of gray cotton canvas fabric with white polka dots
– Matching gray bias tape (for clean edges)
– Natural rope or jute cord (for the roll-up tie closures)
– Sewing machine + matching gray thread
– Fabric scissors and pins
– Measuring tape
– Iron and ironing board
Instructions
Measure your crate’s top, sides, and back — add 1 inch seam allowance on every edge. Cut one large top panel first, then two side panels and one back panel. Sew bias tape along every raw edge before assembling; this prevents fraying and gives it that polished, intentional look.
Attach the panels together along shared edges, leaving the front panel open for access. Sew a fabric channel along the front top edge, then thread your natural jute cord through it to create the roll-up blind effect you see here. Knot the cord ends — these become the charming little tie-ups.
And that’s the part your dog actually benefits from: the fabric panels block light and reduce noise, which signals den time to your pup and helps them settle faster.
Pair this with a 7 Cozy DIY Indoor Dog Kennel Ideas setup and you’ve got a full cozy corner going.
Cut a small slit in the front panel exactly where the door latch sits so the door swings freely without bunching the fabric.
Prep Time: 20 min | Active Project Time: 2–3 hours | Difficulty Level: Intermediate
📸 Photo credit: Instagram @bailey_minisausage
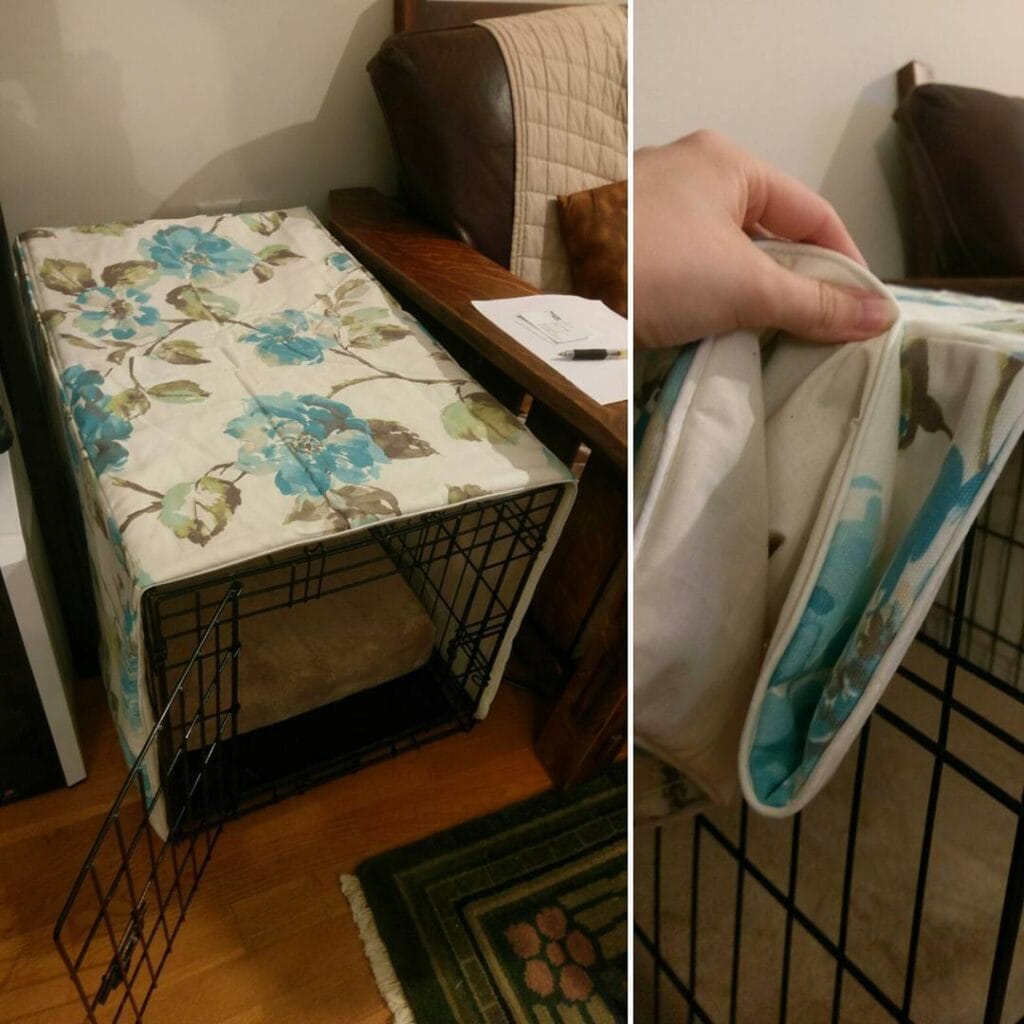
#2: Floral Crate Topper Cushion — The DIY That Makes Your Crate Look Like Actual Furniture
You know that moment when your golden flops down next to the crate and you’re just staring at that ugly wire box sitting smack in the middle of your living room? Yeah. That’s where this project comes in.
I made one of these for my cousin’s dog last spring, and honestly — it changed the whole vibe of her space. No more eyesore. Just a cozy, Pinterest-worthy crate corner.
Materials & Tools:
– Floral upholstery fabric (cream base, teal/blue blooms — similar to the one pictured)
– White zipper, roughly 18–22 inches
– Foam insert or pillow stuffing
– Muslin or cotton lining fabric
– Sewing machine + thread
– Fabric scissors + pins
– Measuring tape
Prep Time: 20 min | Active Project Time: 1.5–2 hours | Difficulty Level: Beginner-Intermediate
Instructions
Measure your crate top first — add 2 inches on every side for seam allowance. Cut your floral fabric and lining to match.
Pin your lining to your outer fabric, right sides together. Sew three sides shut, leaving one short end open for the zipper.
Attach your zipper along that open edge. A centered zipper works best here — it keeps the cover removable for washing, which means zero stress when your golden drags in muddy paws.
Flip it right-side out, insert your foam or stuffing, and zip it closed. The padded top sits flat on the crate, giving your dog a warm resting surface while keeping your room looking intentional.
One thing to remember: use an upholstery-weight fabric. Regular quilting cotton won’t hold up to a dog’s weight over time, but a heavier canvas or home décor fabric stays structured and keeps its shape wash after wash.
The floral pattern on this one does so much work — it pulls the whole room together instead of screaming “dog stuff lives here.”
Tuck the cover edges just slightly under the crate frame to keep it from sliding around.
📸 Photo credit: Instagram @ensitome
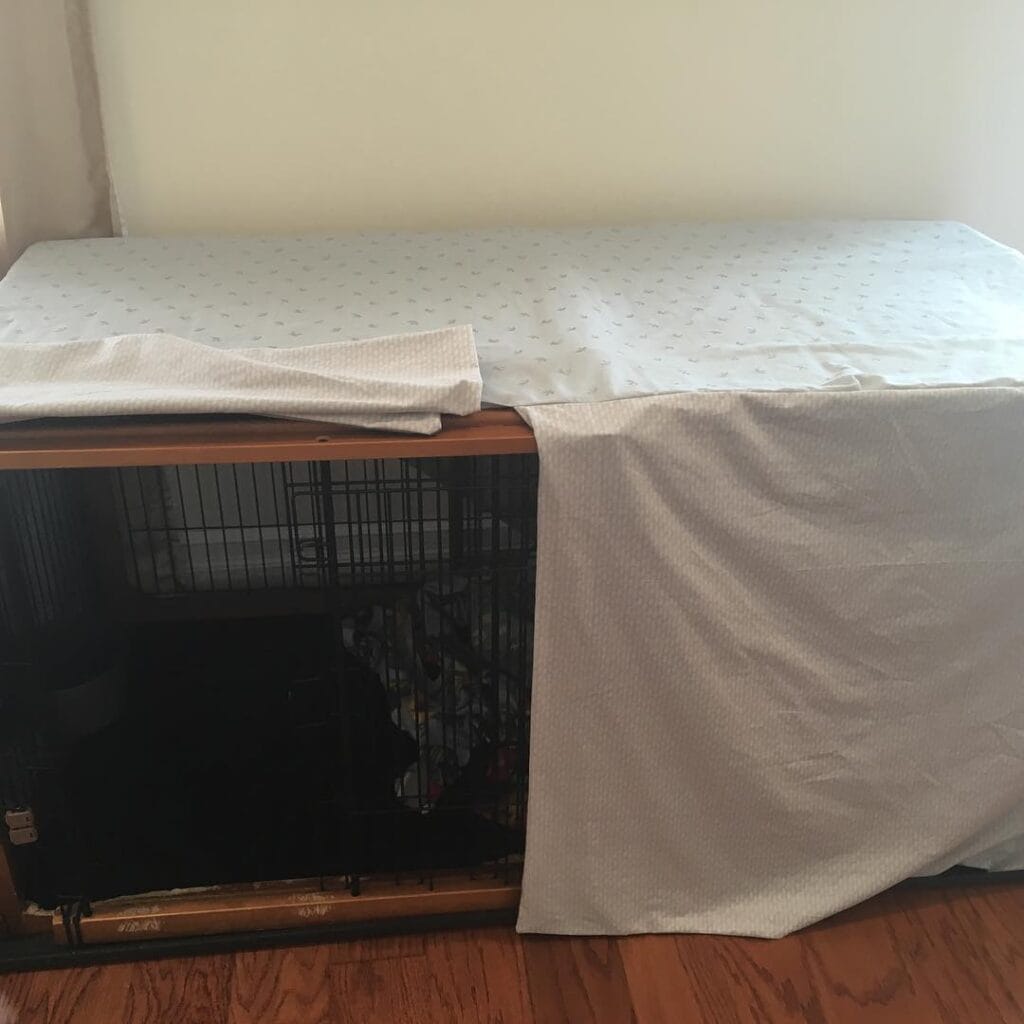
#3: The Fitted Sheet Dog Crate Cover That Actually Looks Good in Your Living Room
Your golden retriever finally settles into her crate at night — but that black wire cage sticks out like a sore thumb next to your gallery wall. Yeah. I’ve been there with my dog Koda, and I kept draping random blankets over his crate that would slide off by 2am. Total mess.
This DIY uses a fitted queen-size sheet to create a clean, structured cover that stays put.
Materials & Tools:
– 1 fitted queen sheet (light cotton, pattern of your choice — the image uses a soft white with a subtle ditsy print)
– 1 flat sheet (same set works perfectly for the side panel)
– Scissors
– Safety pins or fabric clips
Instructions
Lay your fitted sheet over the top of the crate and stretch each corner pocket over the wooden frame edges — the elastic does the gripping work for you. The snug fit means zero 3am adjustments.
Take your flat sheet and drape it down the side panel you want covered, tucking the top edge under the fitted sheet. This blocks light on one side, which helps dogs settle faster and sleep longer — a calmer dog means a calmer morning for you.
Keep the front panel open so your pup never feels trapped.
Wash both sheets together weekly. The cotton breathes well, so heat never builds up inside the crate.
Want more projects like this? 13 Genius DIY Dog Stuff Every Pet Parent Needs to Try Today! has some seriously good ideas.
Prep Time: 5 min | Active Project Time: 10 min | Difficulty Level: Beginner
📸 Photo credit: Instagram @ernie_doggie
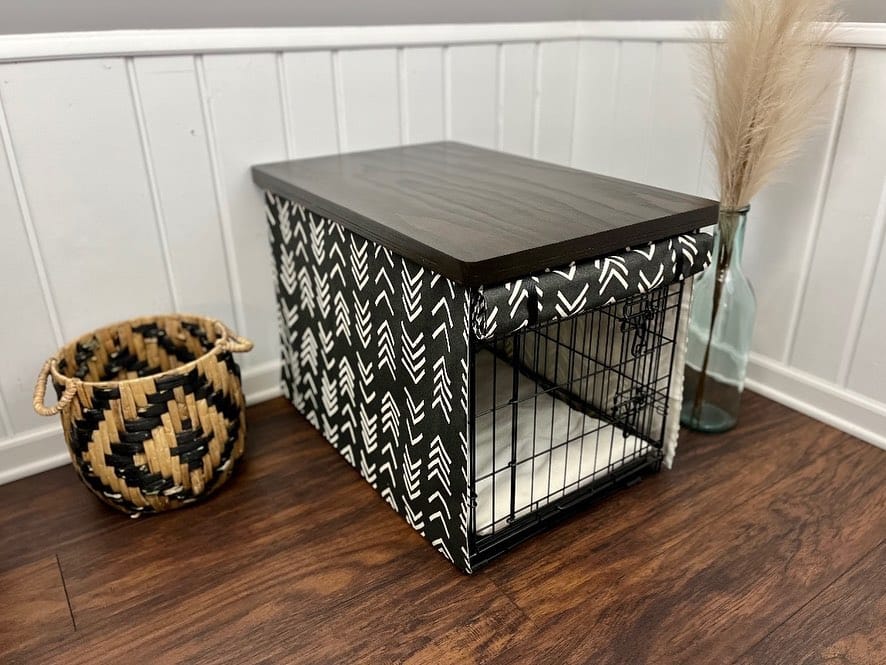
#4: DIY Dog Crate Cover with Fabric Wrap and Wood Top
Your golden retriever has claimed that wire crate in the corner, and honestly? It looks like a cage plopped in the middle of your living room. Every time you walk past it, you cringe a little.
I had that exact moment at my cousin’s house last year — her pup’s crate stuck out like a sore thumb against her otherwise gorgeous boho setup. Then she showed me this fabric-and-wood combo and I was hooked.
Materials & Tools:
– 42-inch wire dog crate (black metal frame)
– 1 piece of pine or poplar wood board cut to 42″ x 28″ for the top
– Dark walnut stain + foam brush
– Black and white arrow-print canvas fabric (approximately 3-4 yards)
– Staple gun + 3/8-inch staples
– Scissors, measuring tape, iron
– Sandpaper (120-grit then 220-grit)
– Wood sealant (matte finish)
Instructions
Sand your wood board smooth, starting with 120-grit then finishing with 220-grit. Wipe it clean before applying two coats of dark walnut stain, letting each coat dry fully. Seal it with matte sealant so it handles drinks and daily life without warping.
For the fabric panels, cut three separate pieces — one for each side and one for the back. Iron each piece flat before wrapping. Pull the fabric taut around the crate bars and staple directly to a thin MDF backing board per panel so removal stays easy on laundry day.
And here’s the genius part — the fabric panels slip off when your retriever tracks mud everywhere. Washable cover plus a solid wood surface means you get a Pinterest-worthy end table and a cozy den your dog won’t want to leave.
The arrow-print canvas is thick enough that it blocks light from three sides, which helps anxious dogs settle faster. If you want more DIY dog accessories that pull double duty like this one, that roundup has some gems worth bookmarking.
Pair a small basket and a dried pampas stem beside it like the photo shows — it reads as intentional decor, not an afterthought.
Prep Time: 30 min | Active Project Time: 3–4 hours | Difficulty Level: Beginner-Intermediate
📸 Photo credit: Instagram @jjshandcrafteddecor
#5: DIY Striped Dog Crate Cover (The One That Makes Your Crate Look Like Furniture)
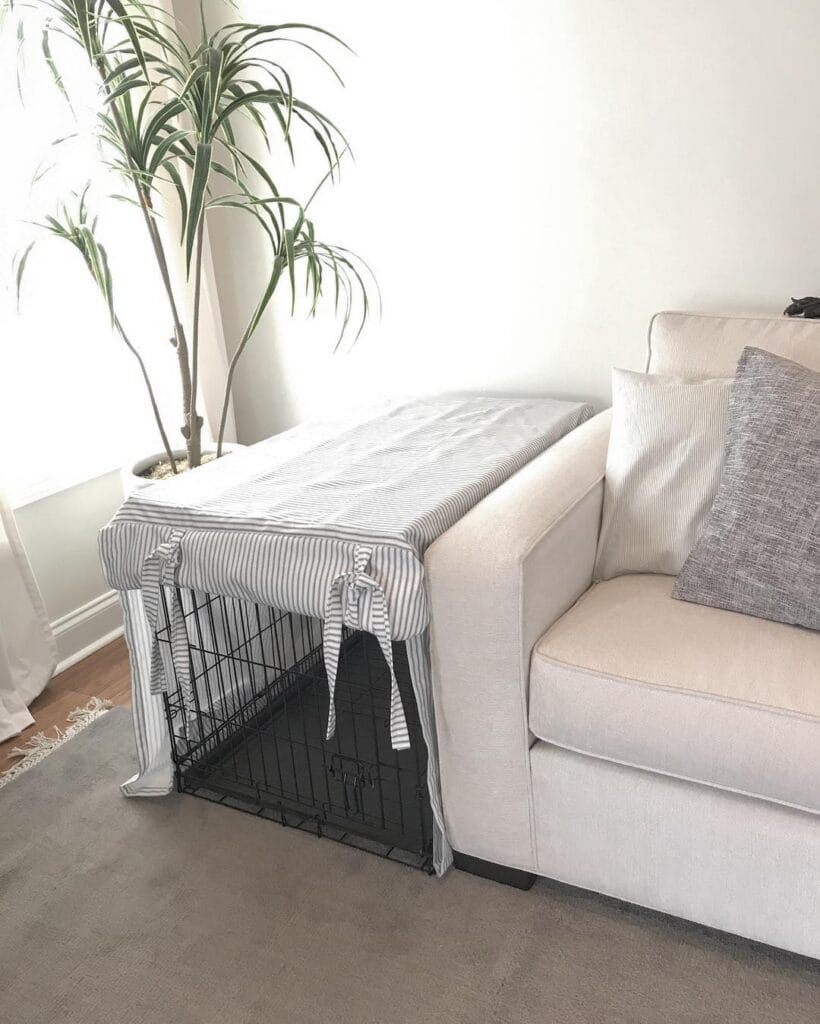
You know that moment when someone comes over and their eyes go straight to the giant black wire cage sitting in your living room? Yeah. I’ve been there. My cousin visited last spring and literally said “oh, you have a crate” like it was a confession. That was the day I decided something had to change.
This cover from @plushpupinc uses gray and white ticking stripe cotton fabric draped over a standard 36-inch wire crate — and it looks like it belongs next to that cream sofa, not against it.
Materials & Tools You’ll Need:
– 2-3 yards of ticking stripe cotton (gray/white)
– Sewing machine or fabric glue for no-sew option
– Fabric scissors
– Measuring tape
– Cotton ribbon or fabric ties (cut into 12-inch strips)
– Iron and ironing board
Instructions
Measure your crate’s top, front, and both sides — add 2 extra inches on every edge for a clean hem. Cut your fabric into three panels: one large top piece and two side panels. Fold and press each hem before sewing so your edges stay sharp. Attach the ribbon ties at the front opening — the fabric ties — rather than buttons — mean your golden can nudge the door open without getting snagged. The structured top panel stays flat under tension, so it doubles as a side table surface. That feature means less visual clutter, which means your living room finally looks intentional.
Keep the bottom hem long enough to brush the floor — it hides the crate legs and makes the whole thing read as furniture, not pet gear.
Prep Time: 20 min | Active Project Time: 2 hours | Difficulty Level: Beginner–Intermediate
📸 Photo credit: Instagram @plushpupinc
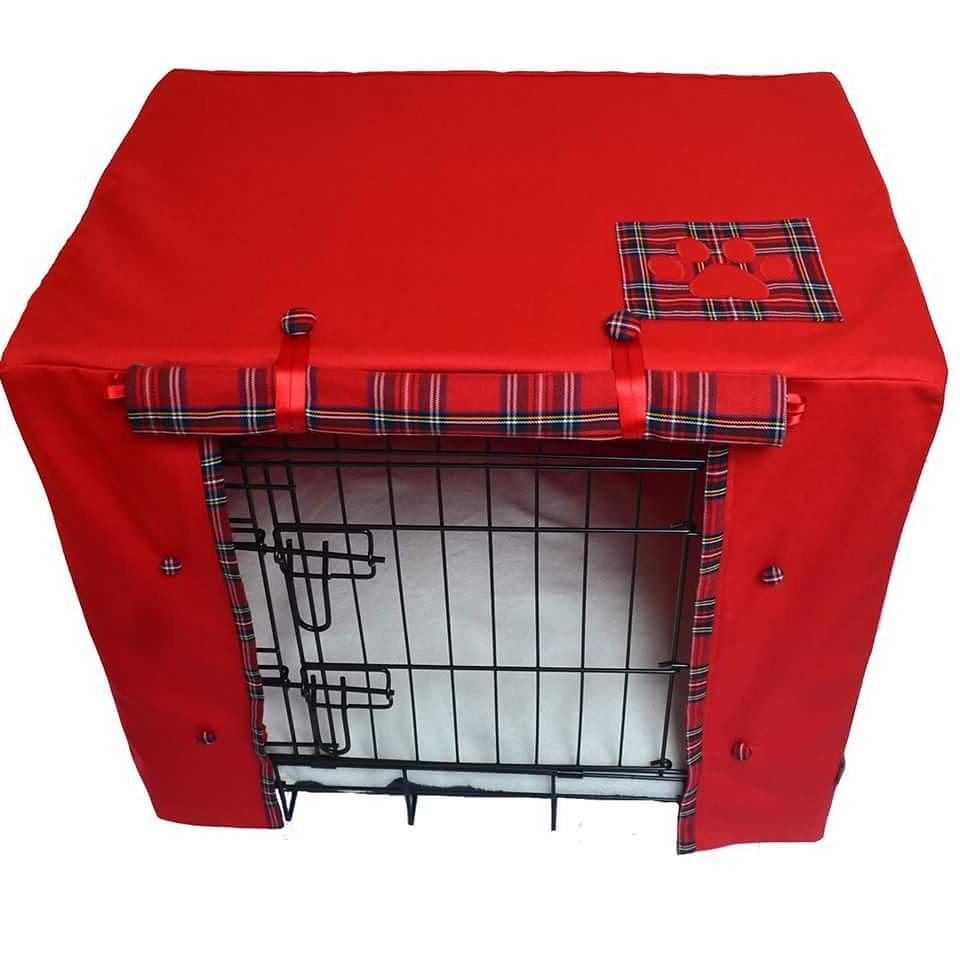
#6: How to Make a Red Tartan Dog Crate Cover (That Actually Looks Good in Your Living Room)
You know that moment when your golden retriever does a full body shake right after coming in from the rain — and somehow everything gets wet? The crate, the blanket you threw over it, the floor around it. It looks like a disaster zone. And you’ve been meaning to fix it up for ages.
This red canvas and Royal Stewart tartan crate cover is the answer.
Prep Time: 20 min | Active Project Time: 3–4 hours | Difficulty Level: Intermediate
Materials & Tools:
– Red waterproof canvas fabric (enough to cover all 5 sides of your crate + seam allowance)
– Royal Stewart tartan fabric for trim, border strips, and the paw patch panel
– Red satin ribbon (1 inch wide, for ties and loops)
– Matching red thread
– Fabric scissors, sewing pins, measuring tape
– Sewing machine
– Velcro strips or ½ inch snap buttons (for side closures)
– Iron and ironing board
– Paw print stencil or pre-cut appliqué
Instructions
Start by measuring your wire crate — top panel, both sides, the back, and the front drop panel separately. Cut your red canvas pieces with a 2-inch seam allowance on every edge.
Sew the top panel first. This is your anchor piece. Attach the side panels to the top using a flat-felled seam — it’s stronger and sits flat against the wire so it doesn’t bunch up inside.
Now cut your tartan trim strips at 3 inches wide. Press them in half with your iron and pin them along every outer edge before sewing. This creates that clean border you see running along the front opening. The tartan trim creates a structured frame — which means the cover holds its shape even after washing.
For the front panel, fold the top edge back and attach a row of red ribbon loops — about 4 loops evenly spaced — so the cover rolls up and ties when your dog needs access. This roll-up feature keeps the front fully open without the fabric drooping into the crate doorway. And your golden won’t feel trapped because the entrance stays wide and welcoming.
Sew your snap buttons or velcro strips along both side edges to secure the cover against the wire frame. Zero flapping, zero sliding off.
For the paw patch — cut a 6×6 inch square of tartan, back it with iron-on interfacing, then cut out a paw print shape from the red canvas and appliqué it onto the tartan square. Stitch the whole patch onto the top right corner of the cover. It gives the whole thing that Pinterest-worthy finishing touch.
I made one of these for my cousin’s dog last winter and the thing that surprised me most was how the tartan trim pulled the whole room together. She has plaid throw pillows and it matched almost perfectly.
The waterproof canvas outer layer repels moisture and fur — which means muddy paw shakes after walks don’t seep through to the bedding inside. That’s the real payoff — your golden’s space stays dry and warm without you doing a full bedding swap every other day.
If you love customizing crate accessories beyond just the cover, 7 Creative Dog Crate Topper DIY Ideas has some really fun add-ons worth trying.
Before you cut into your good fabric, always make a quick paper mock-up using old newspaper. It saves so much time catching fit issues before your fabric is already cut.
📸 Photo credit: Instagram @frecklesdesignsdogcoats
#7: Purple Polka Dot Dog Crate Cover (The Cozy Den Your Pup Deserves)

Okay, you know that moment when your golden’s crate just sits there looking like a metal cage in the middle of your living room? Like, you’ve got your throw pillows perfectly coordinated, your rug is giving everything — and then there’s that. The wire box. Staring at you.
This purple polka dot crate cover is the answer, and honestly it looks like something straight off your Pinterest board.
Materials & Tools:
– 1.5–2 yards of purple cotton canvas fabric with white polka dots
– 1 matching yard of coordinating solid purple for the bone toy
– Scissors, fabric chalk, measuring tape
– Sewing machine + matching thread
– 4–6 wooden toggle clips (the chunky kind — see the image!)
– Purple ribbon or twill tape (½ inch wide) for the toggle loops
– Polyester fiberfill (for the bone toy)
– Velcro strips or snap buttons
Instructions
Measure your crate first — height, width, and depth — because nothing’s worse than cutting fabric and realizing it’s two inches short. Add 2 inches on every side for hemming.
Cut three panels: one for the top, one for each side, and one for the back. Leave the front open so your dog can see out and feel safe, not trapped. That openness matters — dogs actually settle faster when they can watch the room without feeling exposed.
Hem all raw edges by folding ½ inch twice and stitching straight across. Attach the ribbon loops to the top panel’s front edge — space them evenly, about 6 inches apart. Thread your wooden toggles through each loop. This toggle system means you can roll the front panel up on warm days without unpinning anything.
The bone toy? Cut two identical bone shapes, sew them right sides together, leave a small gap, flip it, stuff it with fiberfill, and hand-stitch it closed. My cousin made one for her beagle last Christmas and it took maybe 20 minutes.
The cotton canvas fabric drapes cleanly, holds its shape through weekly washing, and gives your dog a darker, den-like space — which means deeper, longer naps. Calmer dog. Calmer you.
Wash the cover on cold and air dry to keep that purple rich and the dots crisp.
Prep Time: 15 min | Active Project Time: 2–3 hours | Difficulty Level: Beginner-Intermediate
📸 Photo credit: Instagram @smoozleandbone
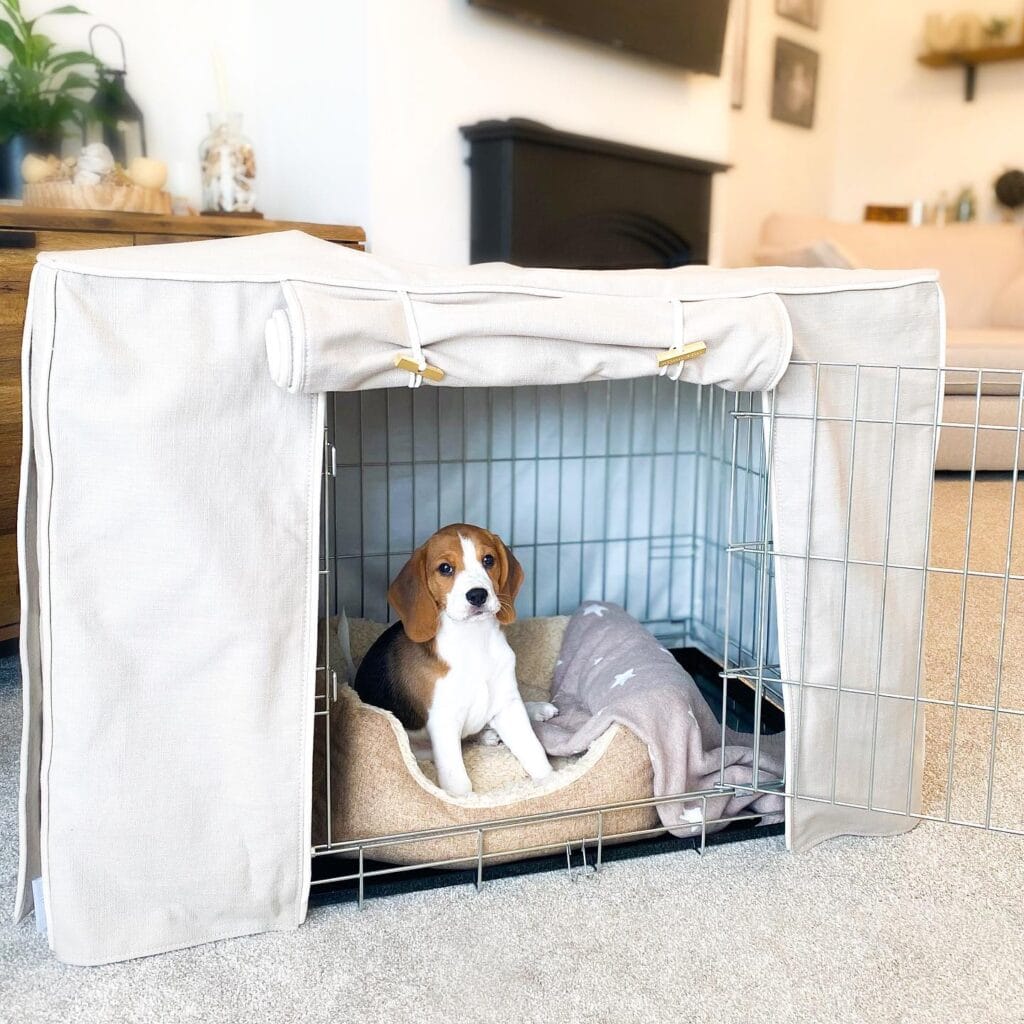
#8: DIY Linen Crate Cover with Cushion Set
Your golden retriever has that one spot on the couch he’s claimed as his own — and you’ve basically given up fighting it. But the real eyesore? That bare metal wire crate sitting in the middle of your living room like a tiny jail cell nobody asked for.
Yeah. We’ve been there.
Materials & Tools You’ll Need:
– 1.5–2 yards of natural linen fabric (cream or oat tone)
– Coordinating fabric trim or piping in the same neutral palette
– Small wooden or brass clips (4–6 pieces) for the roll-up front panel
– A soft, textured dog bed in a tan boucle or woven fabric
– A star-print fleece blanket in light grey
– Fabric scissors, sewing machine, measuring tape, pins
Prep Time: 20 minutes | Active Project Time: 2–3 hours | Difficulty Level: Intermediate
Instructions
Start by measuring your wire crate on all four sides plus the top — add 2 extra inches on each edge for seam allowance. Cut your linen into five panels: one top, two sides, one back, and one front panel.
Sew the top panel first, attaching the side panels along the edges with a clean ½-inch seam. The back panel gets sewn shut permanently, but the front panel stays separate — this is where those brass clips come in.
Fold and hem the bottom edge of each panel so it sits flush against the crate floor. Attach the front panel to the top piece with your clips, spaced evenly so it rolls up clean. This roll-up design means your dog can see out when she wants company but feels tucked in at night — cozy without being closed off.
Tuck the star-print blanket inside with the boucle bed, and you’ve got a setup that looks like it belongs in a Pinterest board and actually functions like a proper dog den.
Wash your linen before cutting — it prevents shrinkage after the first laundry cycle and keeps those seams from puckering over time.
📸 Photo credit: Instagram @ralphieboux
#9: Navy Blue Geometric Crate Cover (The One That Actually Looks Like Decor)

Your golden’s crate is sitting smack in the middle of your living room, and no matter how you angle it, it just looks like… a cage. You’ve got your throw pillows arranged just right, your rug is everything, and then — that wire box ruins the whole vibe.
This navy blue crate cover from the image is genuinely stunning. It uses navy blue geometric-print fabric with small white triangle details, finished with satin ribbon ties along the front fold. The cover drapes over a standard wire crate and tucks in clean on all sides.
Materials & Tools:
– 1.5–2 yards of navy geometric cotton-blend fabric
– 1 yard of satin ribbon (navy, cut into 4 equal ties)
– Measuring tape, fabric scissors, straight pins
– Sewing machine or heavy-duty fabric glue
– Iron and ironing board
Instructions
Measure your crate — top, two sides, and back — adding 1-inch seam allowance on every edge. Cut one large continuous panel that wraps over the top and down the back, then two separate side panels.
Hem all raw edges first. Then sew or glue the side panels to the main panel at the top corners. Attach ribbon ties at the front fold so it rolls up neatly when your dog needs airflow — that open-front design keeps her from feeling trapped while still giving her that cozy den feeling.
The fitted, hemmed construction means zero bunching, which keeps the fabric off her face and the cover looking sharp on your rug.
Wash on cold, line dry to preserve that deep navy color.
Prep Time: 15 min | Active Project Time: 1.5 hours | Difficulty Level: Beginner–Intermediate
📸 Photo credit: Instagram @justmightdiy
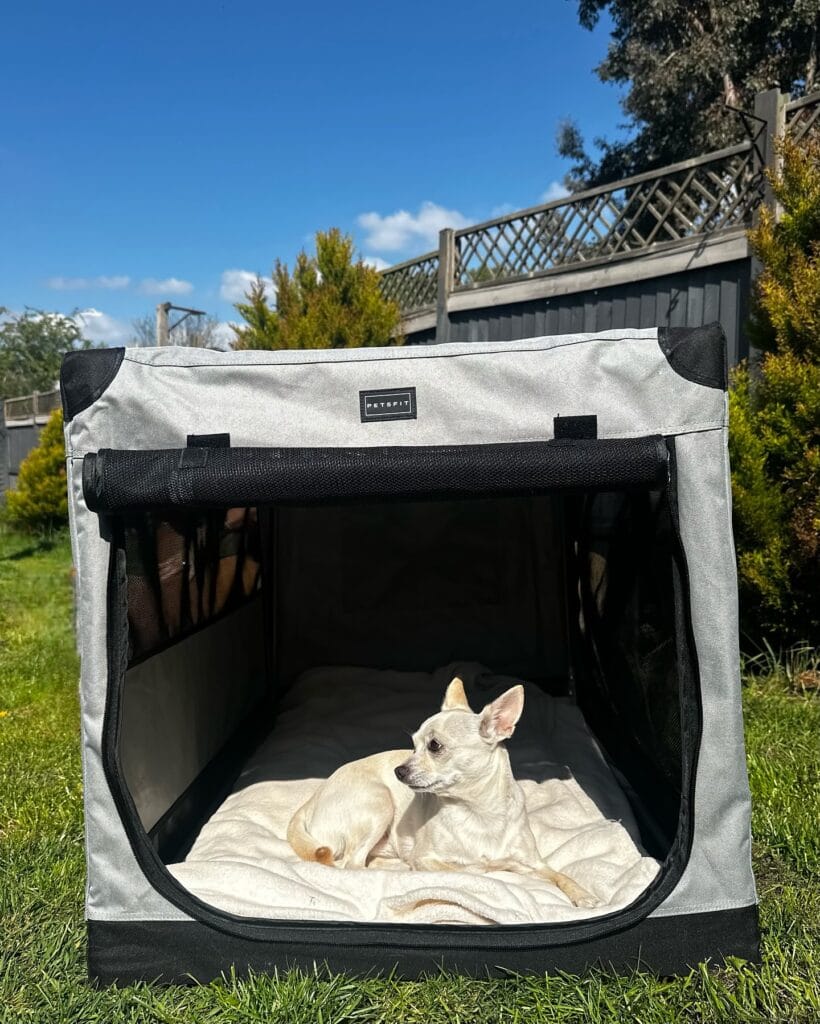
#10: How to Make a Portable Soft-Sided Crate Cover Your Dog Will Actually Want to Use
You know that moment when your golden retriever parks herself in the middle of the yard and refuses to move? Yeah. Mine does that too — except she drags her crate mat out with her like she’s setting up a whole little apartment outside.
That’s exactly what inspired this one.
Prep Time: 15 minutes | Active Project Time: 45 minutes | Difficulty Level: Beginner
Materials & Tools:
– 1.5 yards of light gray canvas fabric (outdoor/water-resistant)
– Black nylon binding tape (1-inch wide)
– 4 corner reinforcement patches (black heavy-duty nylon)
– Hook-and-loop velcro strips (3 inches each, x4)
– A soft quilted insert or repurposed crate mat in cream or neutral tones
– Basic sewing kit or fabric glue gun
– Sharp fabric scissors
– Measuring tape
– Petsfit-style collapsible wire frame (optional base structure)
Instructions
Start by measuring your dog’s crate opening — the one in this image is a front-open design, roughly 24 x 24 inches, so cut your canvas panels to match those dimensions with an extra half-inch seam allowance on each edge.
Cut four panels total: top, back, and two sides. Leave the front open — that’s your dog’s entry point, and keeping it mesh-free means airflow without the fuss.
Attach the black nylon binding tape along every raw edge using your sewing machine or a strong fabric adhesive. This is the step most people skip, and it’s the reason covers fray after two weeks outside.
Pin the corner reinforcement patches at each top corner and stitch them down in an X-pattern. This keeps the whole structure from sagging when the fabric gets heavy with morning dew.
Sew your velcro strips along the top interior edge so the cover clips onto the crate frame without sliding. And here’s the part that actually matters for your dog — snap the quilted cream mat inside before you attach the cover. That soft base layer means she has a reason to want to go in there, not just tolerate it.
Real talk: the mat is doing more work than the cover. A removable insert means you toss it in the wash after muddy backyard sessions instead of hosing down the whole crate.
The canvas exterior blocks wind and direct sun — which means your dog stays comfortable longer outside, and you stop feeling guilty every time she squints into the afternoon glare.
Roll the front panel up and secure it with the velcro tabs when you want it open. Unroll it for shade or privacy. The whole thing folds flat when you’re done.
If the canvas feels stiff at first, run it through a cool wash cycle before assembling. It softens up and drapes way better around the frame — makes the finished cover look intentional, not homemade.
📸 Photo credit: Instagram @nellitathechi
The Fabric Mistake That’ll Ruin Your Crate Cover (And What to Use Instead)
Okay, real talk — I made this mistake so you don’t have to.
Most people grab whatever cotton fabric looks cute at the craft store. Totally understandable. But cotton breathes too well, which sounds fine until your golden is panting in there and moisture builds up on the sides.
Go for a cotton-canvas blend instead. It holds its shape, handles humidity, and still looks gorgeous in your living room.
Here’s the pro secret nobody talks about — leave the front panel unattached on three sides, like a flap. Not four. Three. That one loose corner lets air circulate without making your pup feel exposed. My cousin’s dog, Maple, went from refusing her crate to sleeping in it within two days after she made this switch.
Also? Add a thin layer of batting between your fabric and the outer shell. It muffles sound without blocking airflow, and your cover will hang so much better.
The visual result is less “I made this in my garage” and more Pinterest board come to life.
Your Floors Deserve Better Than Another Muddy Paw Print
Okay, so here’s the thing — you don’t have to keep living like this. One good rug pad, one good stain-resistant rug, and your living room goes from “please don’t look at my floors” to full-on Pinterest board worthy.
I switched mine out last spring and honestly? Game changer. My cousin came over and literally asked if I’d renovated.
Start small. Pick one high-traffic spot — wherever your golden shakes off after walks — and protect it first. That’s it.
So tell me — what’s the one room your dog has basically claimed as her own? 🐾

Amr Mohsen is a software engineer who traded his keyboard for a leash — at least on weekends. His love for dogs inspired him to share what he learns as a dog owner and enthusiast, bringing a detail-oriented, research-driven perspective to every article he writes. If it’s about dogs, he’s probably already looked it up twice.


