Okay, so Halloween is literally around the corner and I still hadn’t figured out my porch situation last year. Like, I had this beautiful white pumpkin sitting there looking… plain. My neighbor’s porch had these incredible carved pumpkins glowing at night and I was lowkey embarrassed.
You know that feeling when your decor just doesn’t match the vision in your head? Yeah. That.
And honestly, cat pumpkin carving designs are having such a moment right now. The silhouettes, the arched backs, the spooky eyes — they hit different when that candle flickers inside.
Good news: I dug through literally everything online and pulled together 21 cat pumpkin carving stencils that’ll make your front porch look straight out of a Pinterest board.
We’re talking beginner-friendly to seriously impressive. Your golden boy might even sit next to it for the cutest photo op. 🎃
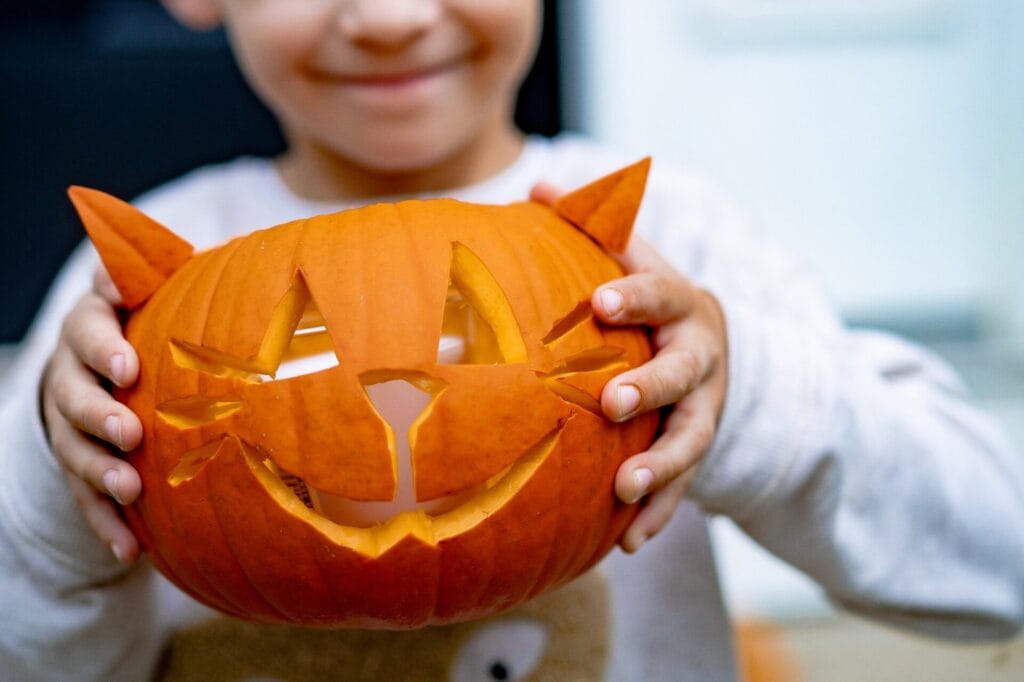
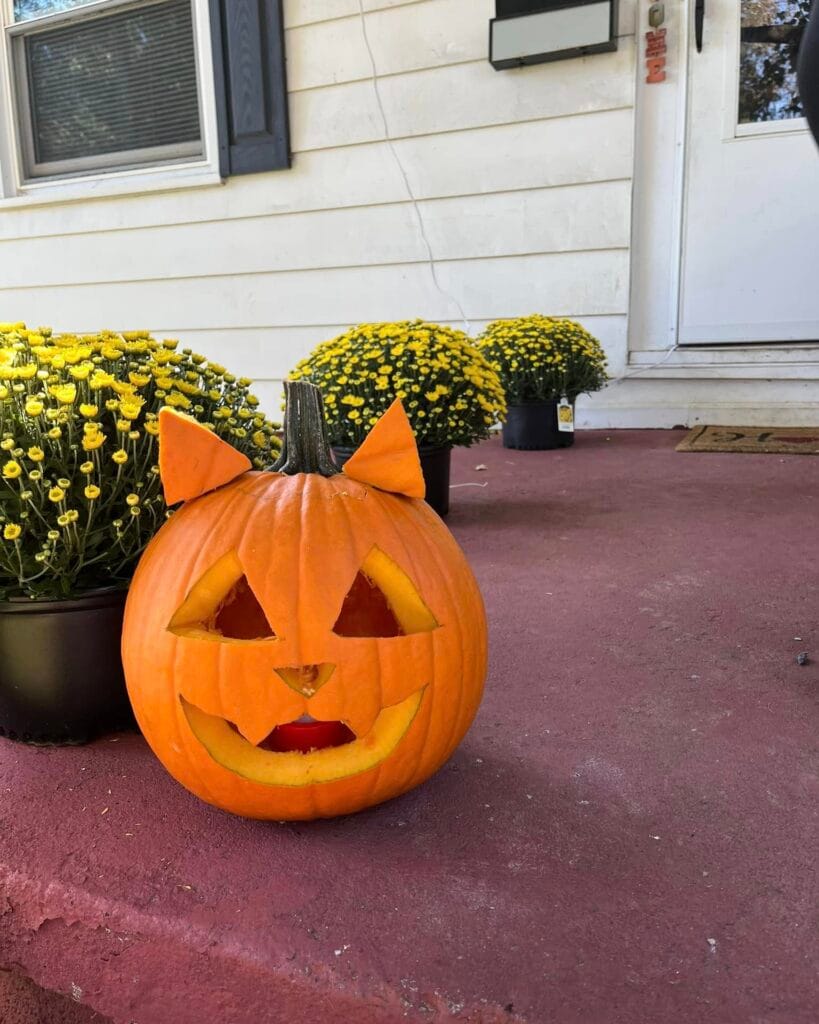
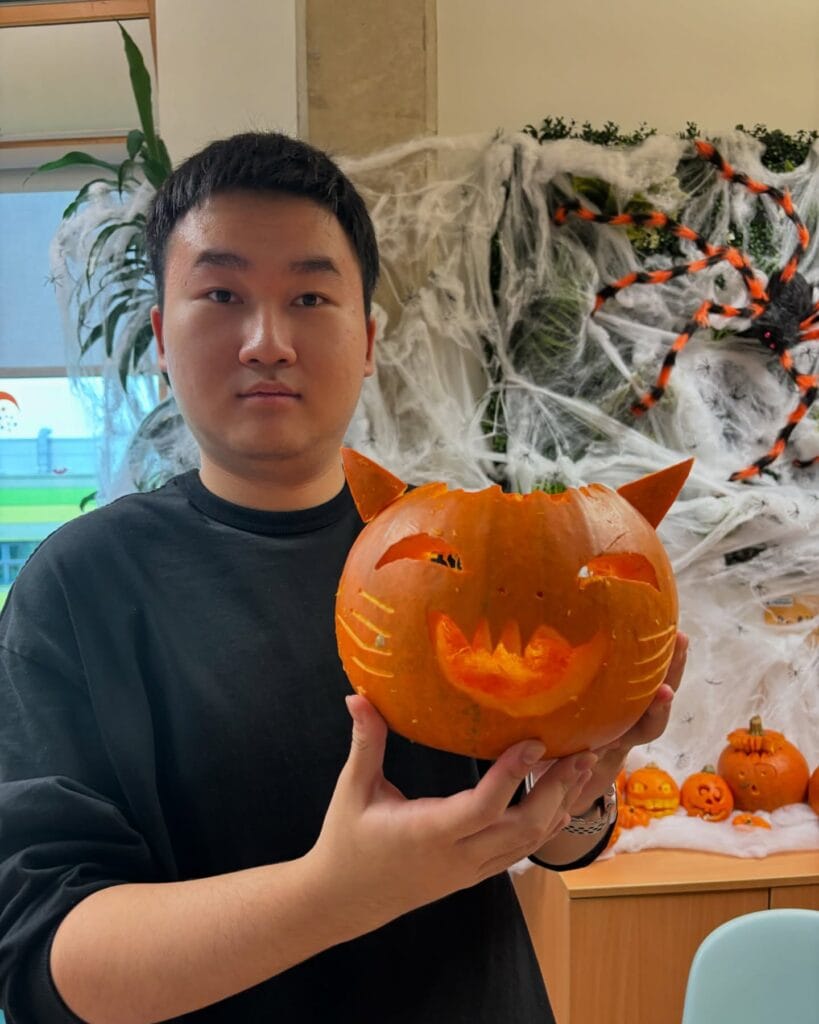
#1: Cat Face Pumpkin Carving With Ears — The Cutest Halloween Collab You Didn’t Know You Needed
Okay so I have to tell you about this one because it stopped me mid-scroll and I literally said “wait” out loud.
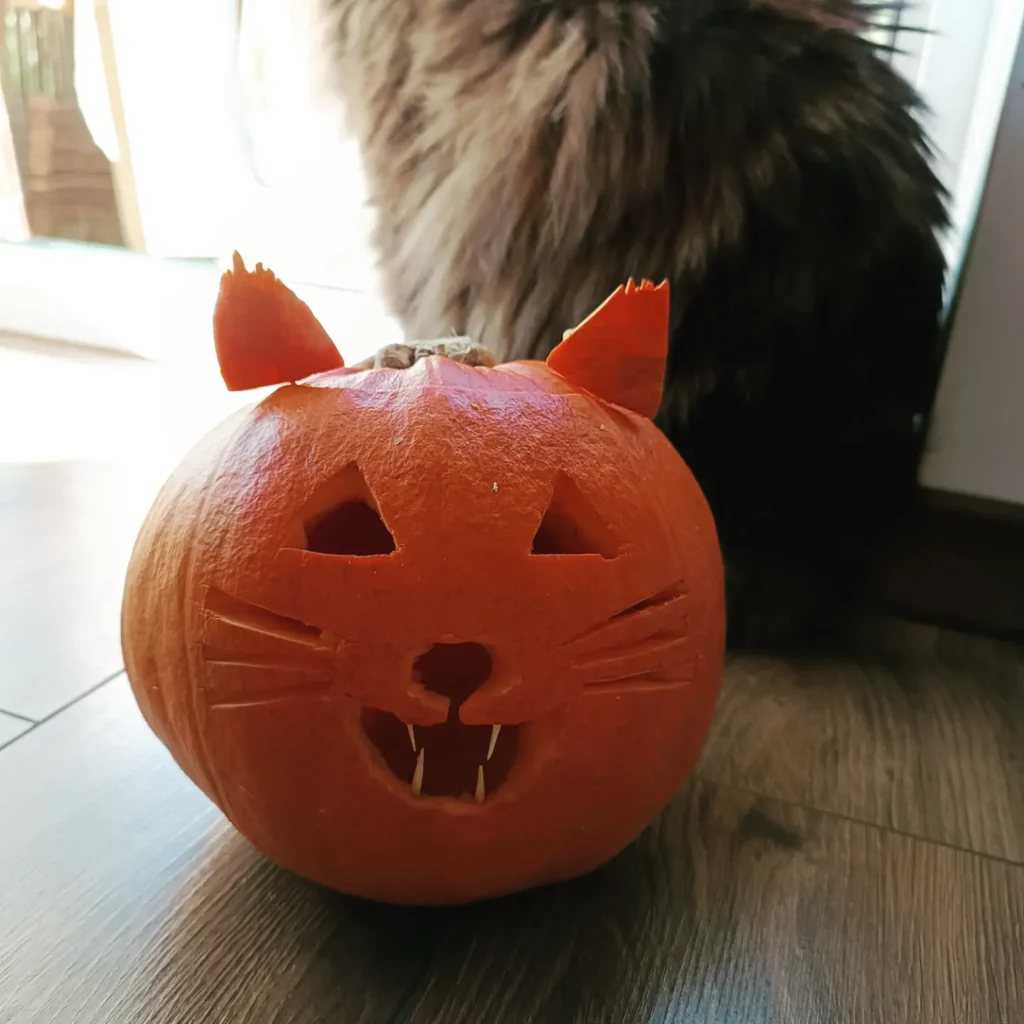
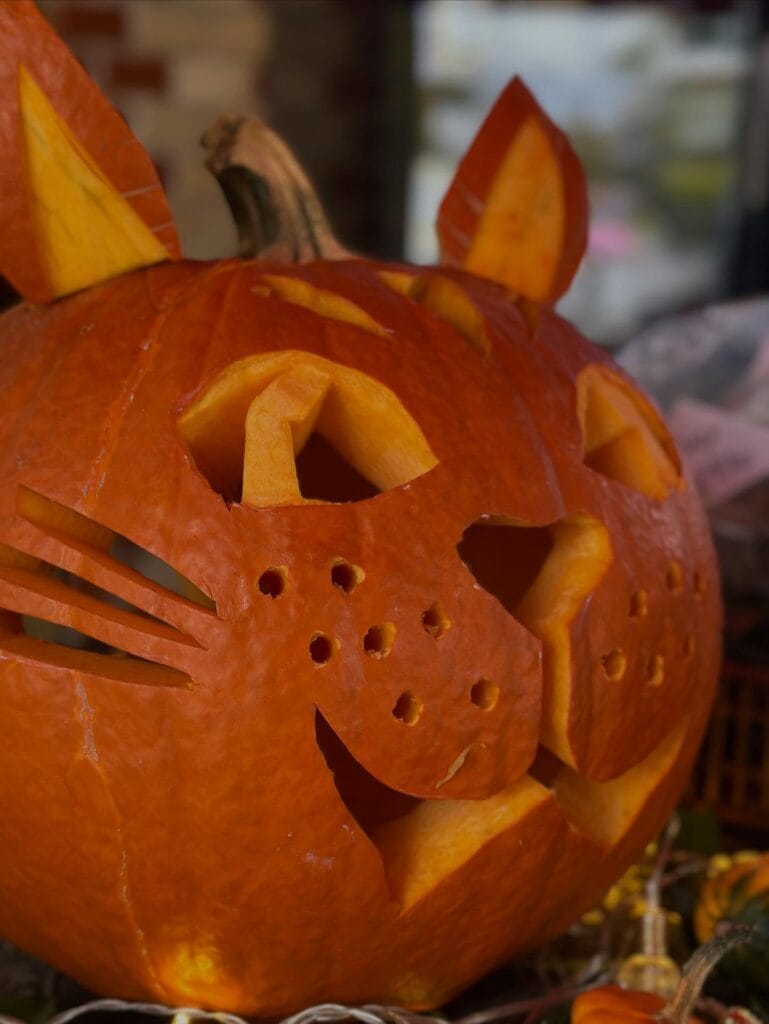
Someone carved their pumpkin to look like a cat — pointy ears cut from the pumpkin skin and propped right on top, whisker lines etched into the sides, a little triangle nose, and actual fangs in the smile. And their real fluffy cat is just… sitting behind it like they posed together. The whole thing is giving Halloween magic.
The pumpkin itself is a medium round orange pumpkin, the kind with a smooth-ish surface that gives you room to work. The carver used pointed ear cutouts made from the removed pumpkin lid pieces — so nothing goes to waste. The eyes are angular star-shaped cutouts, giving it that sly cat look instead of the usual boring triangles. Whisker lines are etched, not cut through, which means the light glows behind them. That detail alone changes everything.
Here’s the trick: use a linoleum carving tool or small paring knife for the whisker etching — you’re just scoring the surface, not cutting all the way through. This keeps the face from going floppy.
Prop the ear pieces with toothpicks pushed into the pumpkin top so they stay upright all night.
The fang details — those are what make people stop and stare. Cut two small rectangular teeth pointing down from the upper mouth edge. It looks complex but takes under five minutes.
📸 Photo credit: Instagram @bastet.sweet.kitchen
#2: The Cat Face Jack-o’-Lantern with Ears (Glowing Orange Perfection)
Picture this — it’s Halloween night, you’ve got your golden sprawled across the entryway, tail wagging every time trick-or-treaters knock. And right there on your console table? This glowing setup stops everyone at the door.
Two carved pumpkins sit on a wood-topped teal console cabinet, lit from inside with warm LED tea lights. The right pumpkin has the whole thing going on — small triangular cat ears carved directly into the sides, narrow angular eyes, and a wide jagged mouth. It’s giving exactly the moody-but-cute energy your Pinterest board has been waiting for.
Grab a standard large carving pumpkin (the rounder the better for that cat-face shape), a fine-tip dry-erase marker for sketching your design, and a thin detail carving knife for the ear cuts. The white uncarved mini pumpkin sitting between them adds contrast without any extra work — just toss it in the middle.
That right pumpkin has orange triangular ear cutouts positioned at roughly 10 o’clock and 2 o’clock on the pumpkin’s crown. Cutting ears into the side rather than the top keeps them sturdy and glowing.
Use battery-operated flickering LED candles instead of real flames — they’re safer near your dog’s wagging tail and last the whole night without babysitting.
The pumpkin fairy lights strung along the staircase rail pull the whole scene together and cost almost nothing.
📸 Photo credit: Instagram @a_kitten_called_boo
#3: The Cat Face Jack-O’-Lantern That’ll Stop Every Trick-or-Treater in Their Tracks
okay so picture this — you’ve got your golden bringing in half the backyard on her paws, you’re trying to get your front porch perfect before the kids start rolling in, and you need a pumpkin that actually looks like you tried.
This one right here? Chef’s kiss.
This carved cat face pumpkin uses a large, round orange pumpkin (think at least 10–12 inches in diameter) as the base. The carver kept the outer skin mostly intact, shaving it thin in key spots to create that warm, glowing contrast between the deep orange skin and the lighter inner flesh. That technique — called relief carving — is what gives this piece its depth without fully cutting through.
The ears are carved directly from the pumpkin wall and angled upright, which means no gluing, no toothpicks, zero extra supplies needed. The whiskers on the left side are sliced as flat, horizontal cuts through the skin layer only — keeping them attached and three-dimensional. The nose uses a cluster of small round drill holes (a 1/4 inch drill bit works perfectly here) instead of a full cutout, which adds texture and keeps the face from looking flat.
Real talk: the eyes here are the real magic. They’re carved as angular, half-moon shapes with a raised inner lid piece left intact — that tiny detail makes the cat look like it’s actually giving you attitude.
Use a linoleum carving tool set for the shaving work and a cordless rotary tool for the whisker slices.
📸 Photo credit: Instagram @bischof1887
#4: The Cat Silhouette Carving That Steals the Whole Porch
Okay so picture this — it’s Halloween morning, you’ve got your golden losing her mind over the crunchy leaves on the porch, and then she spots this pumpkin and just… freezes. Because honestly? Same.
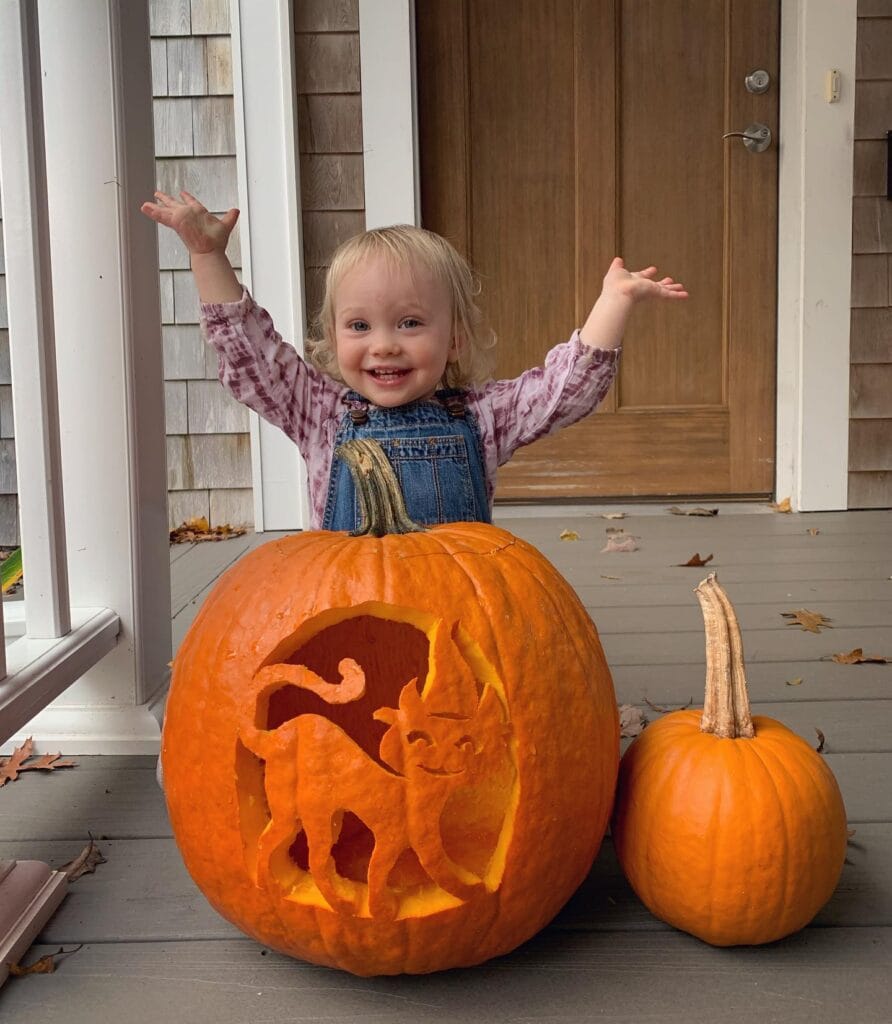
This carving features a arched-back cat silhouette mid-strut across the front of a large, round orange pumpkin — probably a 14-16 inch diameter Atlantic Giant variety. The cat design is carved in full relief, meaning the figure stays solid while everything around it gets cut away, so the glow comes from behind the cat, not through it. That backlit effect at night? Genuinely stunning.
To pull this off, grab a stencil transfer kit, a linoleum cutter or thin pumpkin saw, and a battery-powered LED tea light (it burns longer and won’t wilt your carving). The silhouette here looks traced from a black cat Halloween stencil — the arched spine, lifted tail, and tiny facial features are too clean to be freehand.
Score the outline first with a poking tool or pin tool before cutting. This keeps the cat’s thin legs and tail from snapping mid-carve.
And here’s the thing people skip — use petroleum jelly on every cut edge right after carving. It seals the moisture in and buys you at least 3-4 extra days before the pumpkin starts collapsing.
The smaller uncarved pumpkin sitting beside it? That’s a smart visual move. It adds height variation without competing with the main design.
📸 Photo credit: Instagram @bringingupbabe
#5: The Cat Face Jack-O’-Lantern That’ll Make Your Cats Do a Double-Take
Okay, so you know how your golden does that thing where she freezes and stares at something for way too long? That’s exactly what happened with my friend’s cats the first time she lit this pumpkin up.
This jack-o’-lantern has a cat face carved right into the front — whiskers, eyes, pointed ears, the whole deal. And the way the light bleeds through those cutouts? Chef’s kiss. It glows this deep amber-orange that looks unreal in a dim room.
To pull this off, grab a medium-sized pumpkin (roughly 10–12 inches wide), a fine-tip pumpkin carving knife, a detail scoop or linoleum cutter, and a battery-powered LED tea light (the flickering kind). You’ll also want a printed cat face stencil — the one in this photo has asymmetrical eyes and open whisker cuts that give it personality.
Transfer your stencil using a poking tool or push pin, then connect the dots with your carving knife. Cut the whisker lines shallow — just thin surface-etched grooves rather than full cutouts — so they catch the light without falling apart.
The etched-versus-cut technique gives you depth and shadow, which means the face looks three-dimensional instead of flat. That’s what makes people stop and stare.
Keep the lid hole cut at an angle so it doesn’t fall in, and always use LED lights near cats — no hot wax drama.
📸 Photo credit: Instagram @graydayclay
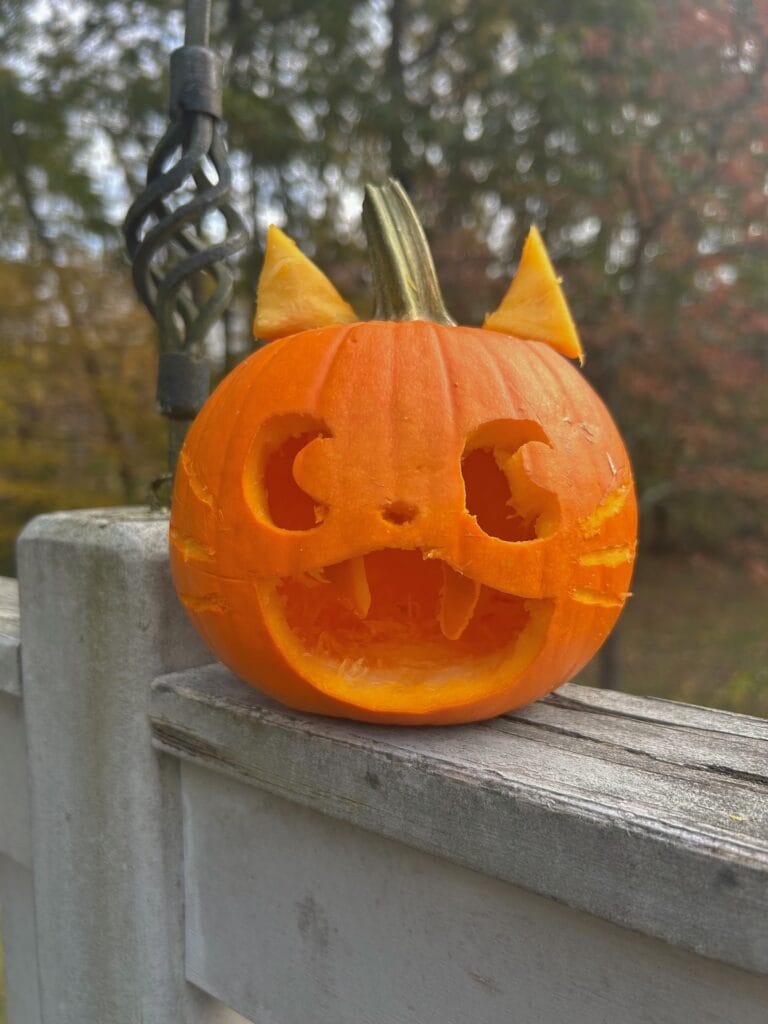
#6: The Sneaky Little Gremlin Pumpkin That’ll Make Your Neighbors Do a Double Take
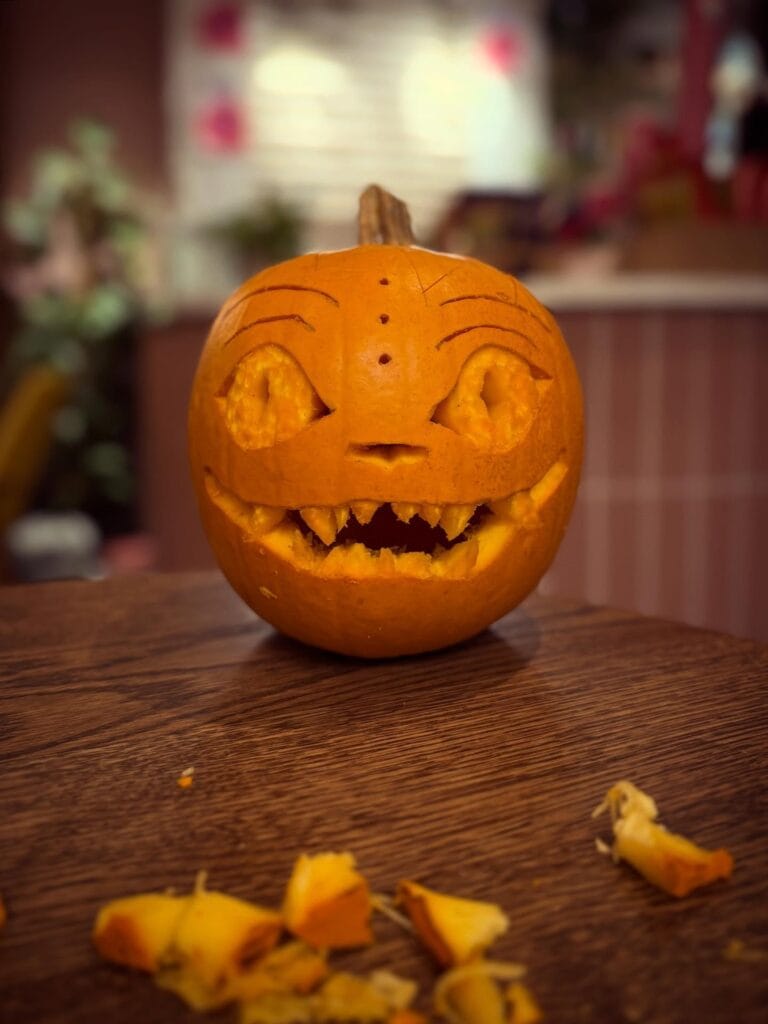
This one stopped me dead in my tracks when I first saw it. It’s got this unhinged little face — squinting eyes, a flat cartoon nose with two tiny dot nostrils, and a wide open mouth packed with jagged, uneven teeth. The whole thing has this mischievous “I know what you did” energy that somehow feels both creepy and goofy at the same time. And honestly? Your golden is going to sniff this thing for a solid five minutes trying to figure out what’s going on.
The carver used a standard medium orange pumpkin — the kind with a slightly flattened round shape, which gives the face more horizontal real estate to work with. The eyes are carved as deep oval recesses with the pumpkin flesh left intact inside, then etched with curved brow lines cut shallow into the skin above them. That layered technique — where you’re not cutting all the way through — is what gives the face that sculpted, almost 3D look instead of the flat glow-through silhouette most jack-o-lanterns have.
The nose is a small rectangular cut with two pinhole dots punched above it using a skewer or awl. Simple detail, but it adds so much character. The mouth is fully cut through with five irregular bottom teeth left standing — some wider, some narrow — which gives it that chaotic feral grin.
You’ll need a linoleum carving tool set (the kind with interchangeable U and V shaped gouges) to get those etched brow lines and eye texture without punching through. A basic pumpkin carving knife handles the mouth cutout, and a metal skewer does the nostril dots.
Scoop the pumpkin wall down to about ¾ inch thickness before you carve — thinner walls mean the etched areas catch light better when you drop a tea light inside.
Place a battery-operated flickering LED tea light inside instead of a real candle. The flicker makes those deep-set eyes almost look like they’re moving, which is exactly the unsettling vibe this little guy is going for.
📸 Photo credit: Instagram @calumdilieto
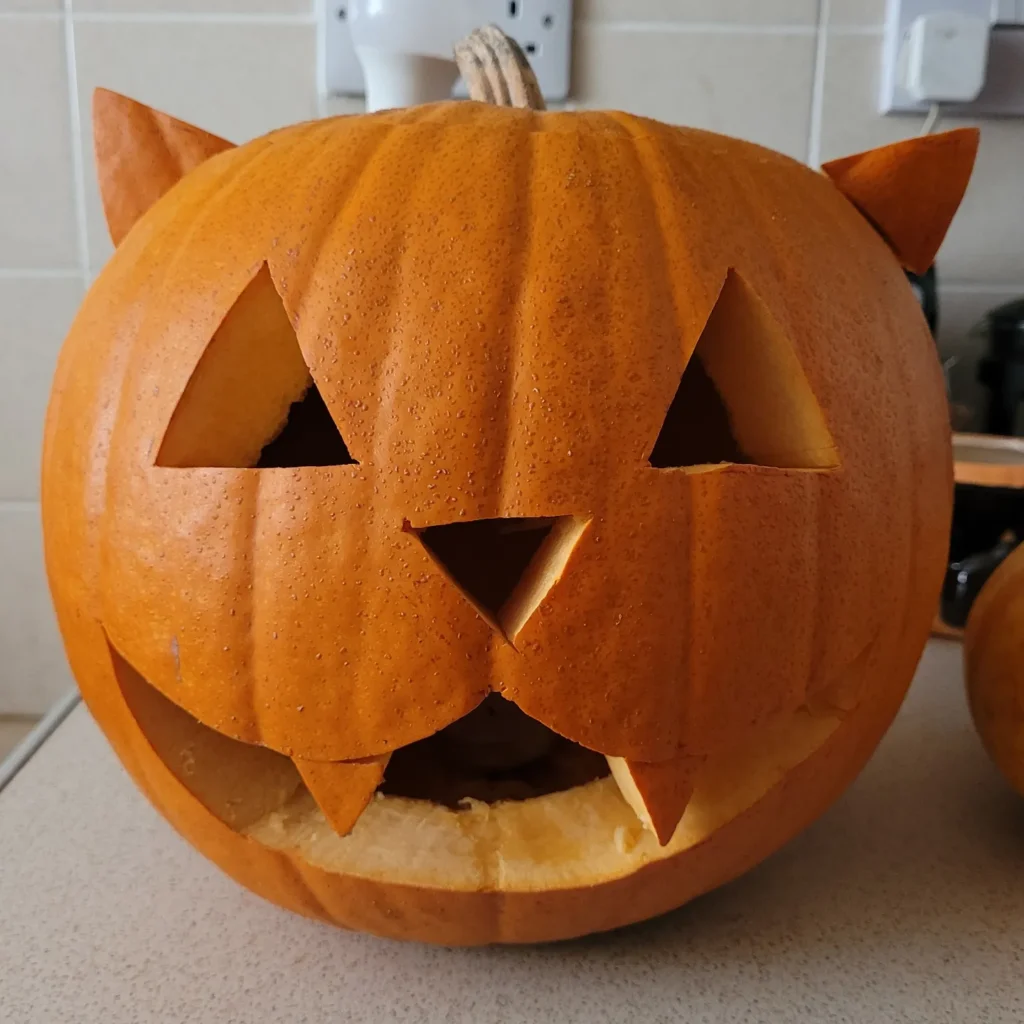
#7: The Cat Face Jack-O’-Lantern That’ll Stop Every Trick-or-Treater in Their Tracks
Okay, so this one made me literally gasp when I first saw it — a pumpkin carved to look like a full-on cat face, complete with pointy ears sticking right up from the top. It’s giving Halloween AND cat obsession in the best way. And honestly? Your golden retriever is going to sniff this thing for twenty minutes straight.
The ears are the magic here. Two triangular wedges get cut from the pumpkin’s own flesh — no extra materials needed — and repositioned upright at the top to mimic cat ears. The face itself features almond-shaped eyes with curved upper lids, a small starburst nose, and whisker-slash cuts fanning out on each cheek. The mouth is a wide, fanged grin carved with a standard pumpkin serrated knife.
For tools, grab a thin detail carving blade for the whisker lines — a chunky knife will crack the skin. Scoop the pumpkin completely hollow so a tea light or battery-operated LED can backlight every cut with that warm amber glow.
Score the ear shapes before fully cutting them. That way you can test the angle before committing. A little wood skewer poked through the base of each ear keeps them standing without toppling.
If you love cat-themed Halloween projects, 19 Unique Cat Costume Ideas For Photogenic Pets pairs perfectly with this carving for a full coordinated setup.
📸 Photo credit: Instagram @cardiffcatsprotection
#8: The Cat Face Jack-o’-Lantern That Looks Like Your Actual Cat
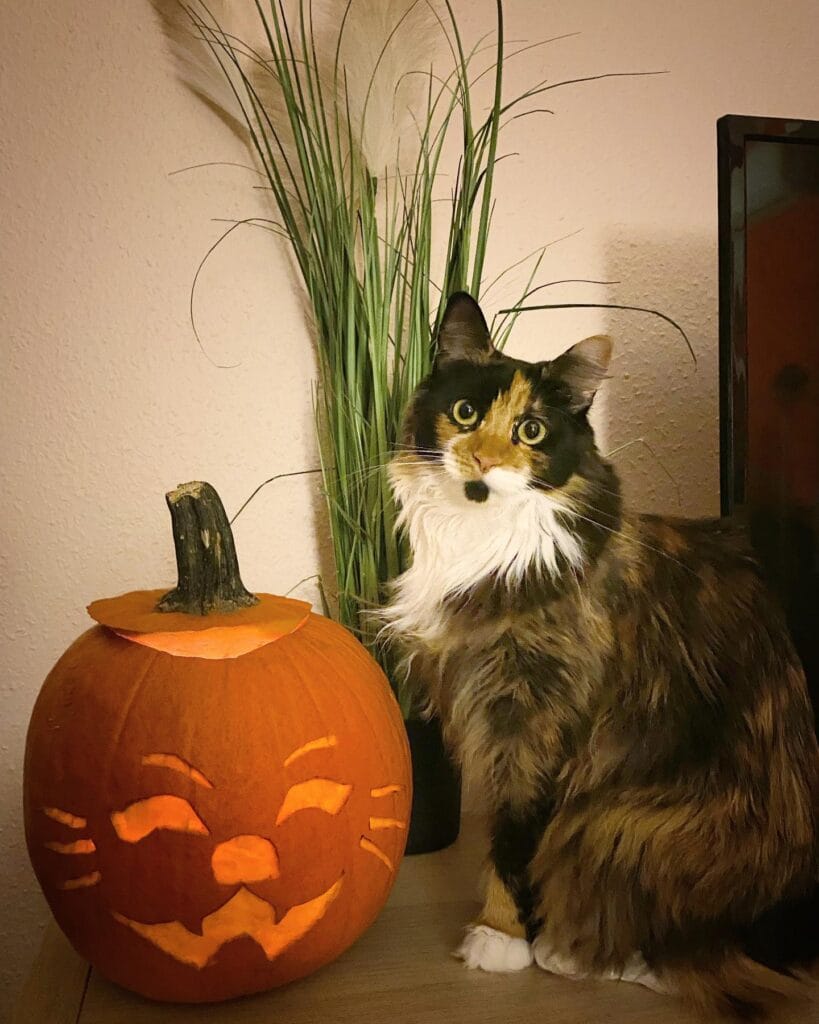
Okay, so you know that moment when you’re scrolling Pinterest at like 11pm with your golden retriever snoring next to you and you stumble across something so good you actually sit up straight? This is that carving.
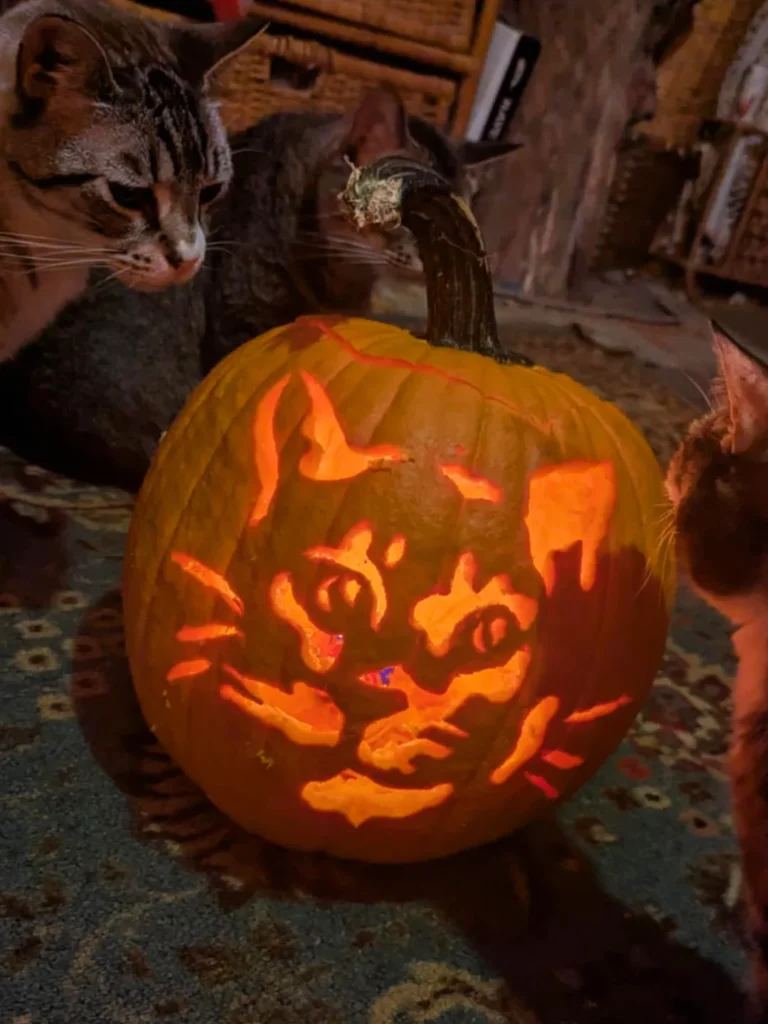
This jack-o’-lantern has cat face features carved directly into the pumpkin — whisker lines, arched brows, a little smirk — and it’s glowing from the inside with warm candlelight. And the real kicker? The tortoiseshell cat sitting right next to it looks like the literal inspiration for the design.
To recreate this, you need a medium-to-large round pumpkin (rounder is better — it mimics a cat face shape), a linoleum carving tool or fine pumpkin saw, and a battery-operated LED tea light so you’re not dealing with fire near curious paws. The face uses shallow relief cuts for the whiskers — meaning you shave the skin without cutting all the way through — which gives that soft, glowing depth instead of harsh cutouts.
Pair it on a wood console table or entryway shelf beside a tall dried grass arrangement like the one here. That neutral, earthy backdrop makes the orange pumpkin pop without competing for attention.
If your tortoiseshell or calico has a distinctive face marking, trace it. Photograph her straight-on, print it, and use it as your carving template. Feature-benefit-payoff: tracing your cat’s real markings gives the carving a personal story — guests will actually stop and ask about it.
Score the whisker lines at a 45-degree angle for cleaner edges that catch the light better.
📸 Photo credit: Instagram @harley_0702
#9: The Cat Jack-O’-Lantern With Pumpkin Chunk Ears
Okay, so this one stopped me dead in my tracks when I saw it — and I knew immediately you’d feel the same way.
Someone took a round orange pumpkin and carved it into a full-on cat face, complete with two triangular ear pieces cut from the pumpkin’s own flesh and propped right on top of the stem. That detail alone is so clever it hurts. The eyes are carved as crescent moon shapes facing inward, which gives it that classic sleepy-cat expression. A tiny circular nose hole sits centered between them, and the mouth is a jagged open grin with two fang-like teeth cut into the lower lip — very Halloween, very cat.
The ears are the real trick here. You don’t need extra materials — just carve two small right triangles from the pumpkin lid scraps and wedge them on either side of the stem. They stay up on their own because the stem acts like a natural anchor between them.
For the whiskers, score three shallow horizontal lines on each cheek using a linoleum carving tool or the tip of a detail knife — don’t cut all the way through, just enough to catch the light when a tea light candle glows inside.
And if you love this Halloween cat energy, 16 Cheshire Cat costume ideas for retro fun is basically a whole mood board for your October.
Keep the carving shallow on the whiskers — deep cuts crack the skin within two days.
📸 Photo credit: Instagram @horrorplush
#10: The Cheshire Cat Pumpkin Carving That’ll Stop Trick-or-Treaters Dead in Their Tracks
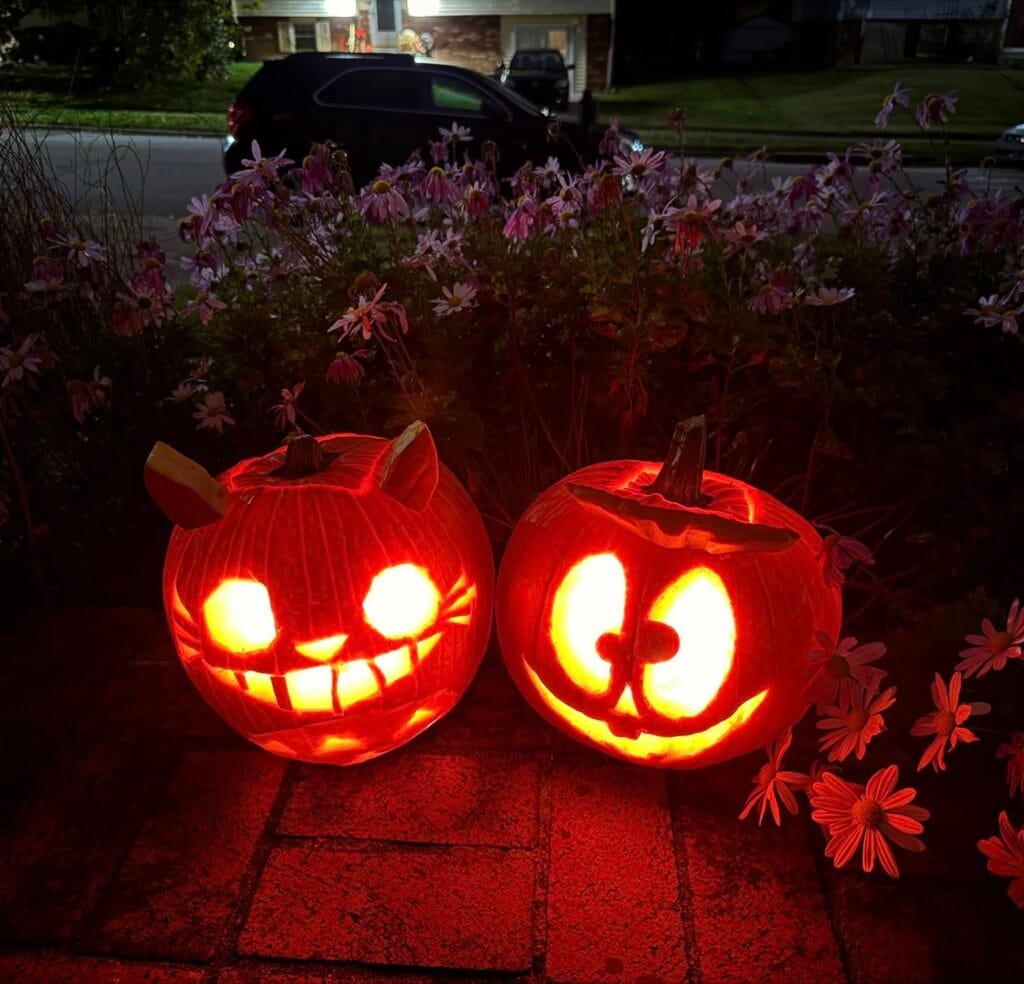
Picture this — you’re sitting on the porch with your golden, waiting for the first little ghosts and superheroes to come up the walk, and your jack-o’-lanterns are doing all the work.
These two carved pumpkins are genuinely stunning. The left one is a Cheshire Cat design with those iconic wide-set glowing eyes, petite triangle ears carved and propped at the top, and a jaw full of jagged, uneven teeth that stretch almost ear to ear. The right pumpkin pulls a Nightmare Before Christmas energy — oversized round eyes with a hollow spiral pupil, and that same stretched grin curving up the sides.
Both pumpkins sit on red brick pavers right against a bed of late-season purple mums, and that warm orange glow against the pink flowers at night? It’s everything.
To get this look, you’ll need two medium-to-large pumpkins (go for the rounder, flatter shape — it gives the face more surface area to work with). Grab a pumpkin carving kit with a fine-tipped saw blade for the teeth details and a linoleum cutter or clay loop tool for the thin etched lines you see across both pumpkins’ skin. Those etched lines aren’t cut all the way through — they’re just scraped away so the light glows through the thin skin. That’s what gives both designs that eerie, dimensional look.
For the Cheshire Cat ears, cut two small triangles separately from pumpkin scraps and wedge them into shallow cuts near the stem. They hold surprisingly well.
Small change, big win: carve your teeth slightly thicker than you think you need to. Thin teeth snap off within a day or two, and nothing ruins the vibe faster than a gap-toothed jack-o’-lantern by Halloween night.
Use battery-operated LED tea lights inside both pumpkins instead of real candles — they throw the same warm glow but won’t scorch the carved edges or go out in the wind. Bright white LED gives sharper contrast on the etched lines. And your golden won’t knock them over and start a fire if he gets curious.
📸 Photo credit: Instagram @ignagcerpa
#11: Cat Jack-O’-Lantern With Triangle Ears and a Little Nose Cutout
Okay, so picture this — you’re decorating your front porch, your golden is sniffing every single mum plant you just set out, and you want one carving that actually stops people in their tracks.
This one does it.
It’s a classic round pumpkin carved into a cat face, and the detail that makes it — two triangle ears cut from the pumpkin’s own flesh and propped right up against the stem. No extra materials. The ears sit on either side of the dark green stem, which honestly looks like a little cat tail sticking up.
Grab a medium-to-large carving pumpkin (the rounder the better — cat faces need that chubby shape). You’ll carve two wide triangle eyes, a small upside-down triangle nose, and a wide curved smile with a slight gap at the center to mimic a cat mouth. The ears are the move here — just slice two triangles from the pumpkin lid scraps and lean them against the stem. That’s it.
Score the ear bases slightly so they stay put without falling over. And that red tealight candle glowing inside? It shifts the vibe from cute to just a little eerie — which is exactly the Halloween energy we want.
Yellow mums framing it on the porch make the orange pop hard.
📸 Photo credit: Instagram @imbeingb1972
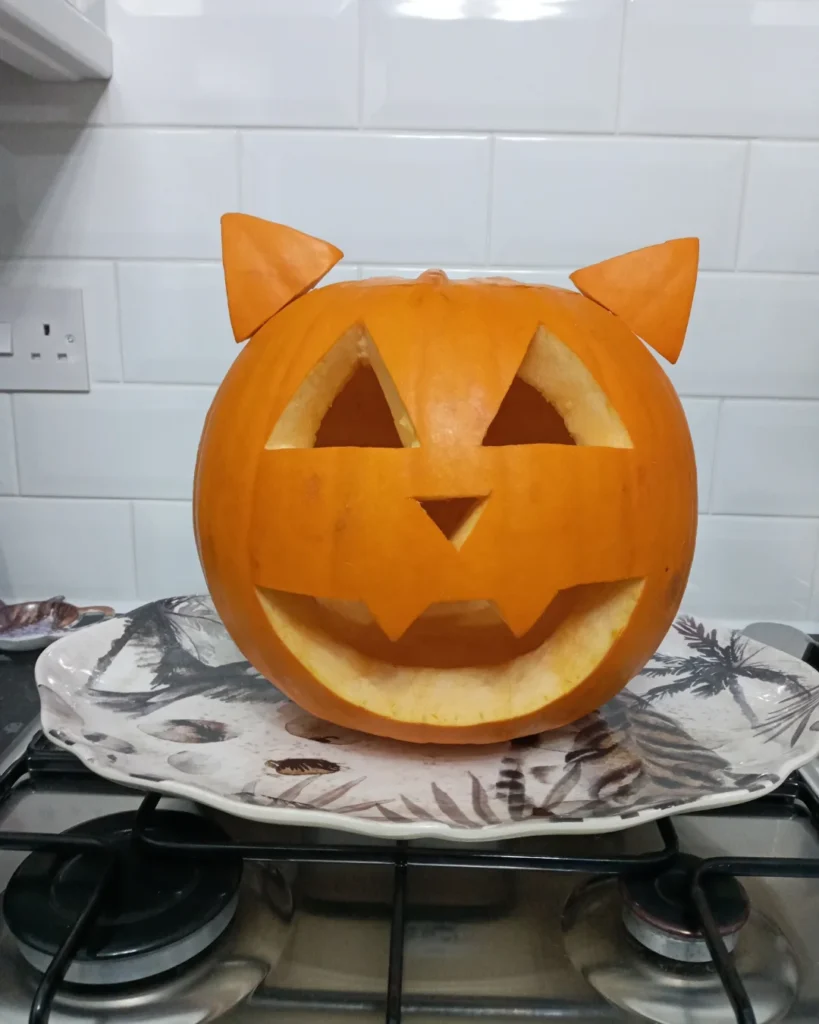
#12: Cat Jack-O’-Lantern With Ear Cutouts
Okay so picture this — you’ve got your golden retriever losing her mind over the pumpkin smell, you’re trying to carve, and you just need something that actually looks cute on the porch without taking three hours.
This one? Chef’s kiss.
The carving in this image uses a medium-to-large orange pumpkin (looks like roughly 10–12 inches in diameter) and turns it into the most adorable cat face you’ve ever seen. The secret is those two triangular ear pieces — they’re cut from the pumpkin’s own flesh and propped on top of the lid, so you don’t need any extra materials.
The face features two large triangular eyes, a small diamond-shaped nose, and a wide crescent smile with two square teeth — all carved with a basic serrated pumpkin carving knife. The whole thing sits on a decorative botanical-print ceramic platter, which honestly makes it look so Pinterest-worthy it hurts.
Start by cutting a flat-bottomed lid instead of the traditional angled cut — this keeps the ears stable when you reattach them. Score the ear triangles from the lid scraps before tossing anything.
The ears-from-lid trick means zero extra materials needed, which saves you time and keeps the orange tones consistent across the whole design.
Place a battery-operated LED tea light inside instead of a real candle — the warm glow makes the carved details pop without the fire risk near curious noses.
📸 Photo credit: Instagram @lauraleechphotography
#13: The Cat Face Jack-O’-Lantern That’ll Make Your Porch the Most Popular Stop on the Block

Okay, so you know how every year you put out your pumpkin and it’s cute but nothing that makes kids actually stop? This one stops kids. I carved something almost identical last Halloween and three separate moms asked me for the pattern. Three.
This cat face jack-o’-lantern uses a standard large carving pumpkin (think 10–12 inches wide) with two crescent-shaped eyes carved to leave an orange “pupil” island in the center — that’s the detail that makes this design look professional. The mouth is a wide half-moon cutout with a small triangular nose piece left intact between it and the eyes. Whisker lines on both cheeks are shallow surface cuts, not full piercings, so the orange pumpkin skin glows warm amber instead of full yellow. And the ears? Cut from the removed top lid piece and wedged back into slits near the stem — genius and totally free.
Grab a flameless LED tea light instead of a real candle. The glow in this photo has that consistent, warm amber tone because LED light doesn’t flicker wildly and it stays perfectly bright all night without burning the inside.
Score your whisker lines with a linoleum cutter or clay loop tool to control the depth. Thin skin = brighter glow, thick skin = that moody orange warmth — so go shallow on the cheeks for that signature cat-face effect.
📸 Photo credit: Instagram @kellemoirin
#14: The Owl Cat Pumpkin Carving That’ll Stop Every Trick-or-Treater in Their Tracks
Okay, so you know how every Halloween your porch ends up looking cute but kind of… the same? Same triangle eyes, same jagged mouth, same everything. This carving is the one that changes that.
This pumpkin features a round cat face design carved inside a crescent moon circle border, with round eyes, tiny whiskers etched into the skin, and a heart-shaped nose. The technique here is a mix of full cut-through sections (the circle border, the eyes) and shallow skin scraping to create that glowing silhouette effect. That scraped pumpkin skin lets light bleed through without fully opening — which gives it that warm, dreamy amber glow instead of harsh cutouts.
To recreate this, you’ll need a large round pumpkin (the rounder the better for this circular design), a linoleum carving tool or pumpkin etching kit, a fine-tip dry-erase marker to sketch your design first, and a battery-operated LED tea light to keep it glowing safely all night.
The small pixel-art pumpkin sitting beside it? That’s carved with a Minecraft Creeper face using a mini sugar pumpkin, and the two together make the perfect big-and-little duo display on a brick ledge or front step.
Sketch the circle border first — it anchors everything. And scrape the skin in thin layers so you don’t accidentally punch through.
📸 Photo credit: Instagram @louloubelle183
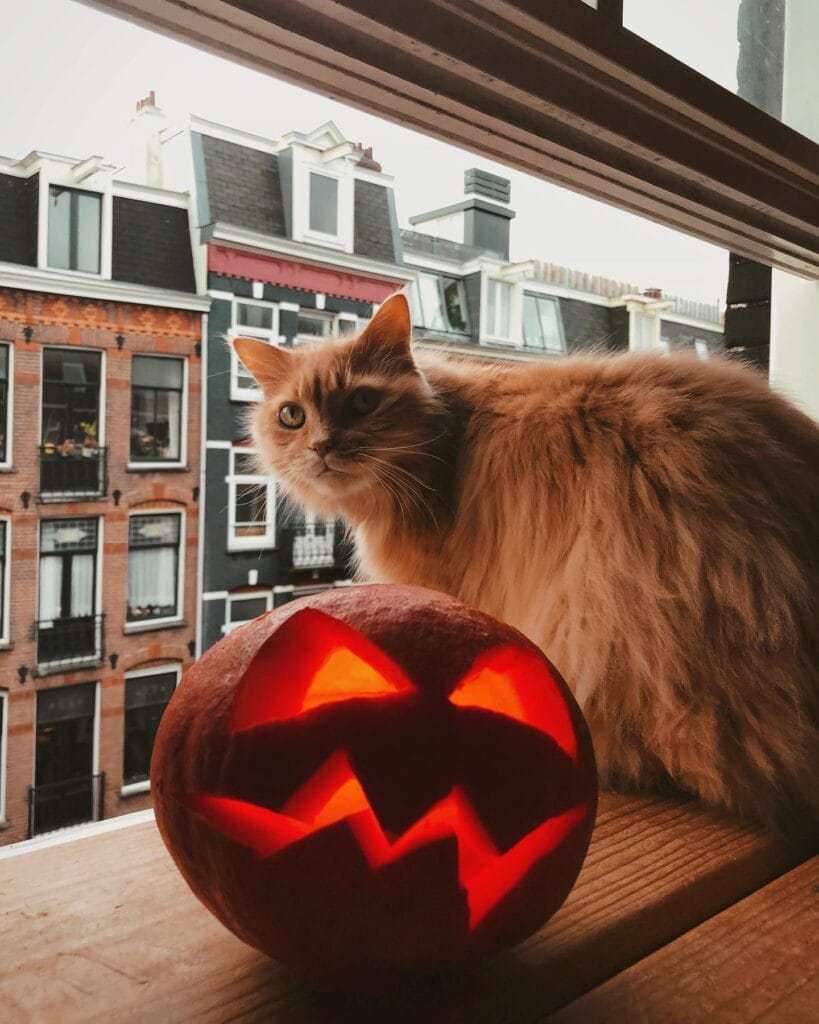
#15: The Glowing Window Perch — A Jack-o’-Lantern Your Cat Will Actually Supervise
Your golden retriever has nothing to do with this one — this is fully your cat’s territory.
Picture this: a deep red-orange pumpkin sitting right on the windowsill, lit from inside with a warm glow, while your fluffy overlord sits directly behind it like they personally commissioned the whole setup. That’s the vibe here, and honestly? It’s the most Pinterest-worthy Halloween corner I’ve ever seen.
The pumpkin itself is carved with a jagged zigzag mouth, two triangular eyes, and a sharp angled nose — all cut pretty deep so the light bleeds through strong. The inner candle (looks like a small LED tea light, which is the smart move near fur) throws that signature red-orange glow that makes the whole thing look alive.
The windowsill here does all the heavy lifting. A wide wooden ledge, roughly 8–10 inches deep, gives both the pumpkin and the cat enough room to coexist without a disaster. The backdrop — those dark Dutch canal house facades — adds serious drama, but even a plain window works.
Grab a medium sugar pumpkin (they hold color longer than carving pumpkins), sketch your face with a dry-erase marker first so you can adjust before cutting, and always swap real candles for battery-operated LED lights near pets.
The LED swap isn’t just safety — it means you can leave the display on all night without watching it like a hawk.
📸 Photo credit: Instagram @nicoladow_
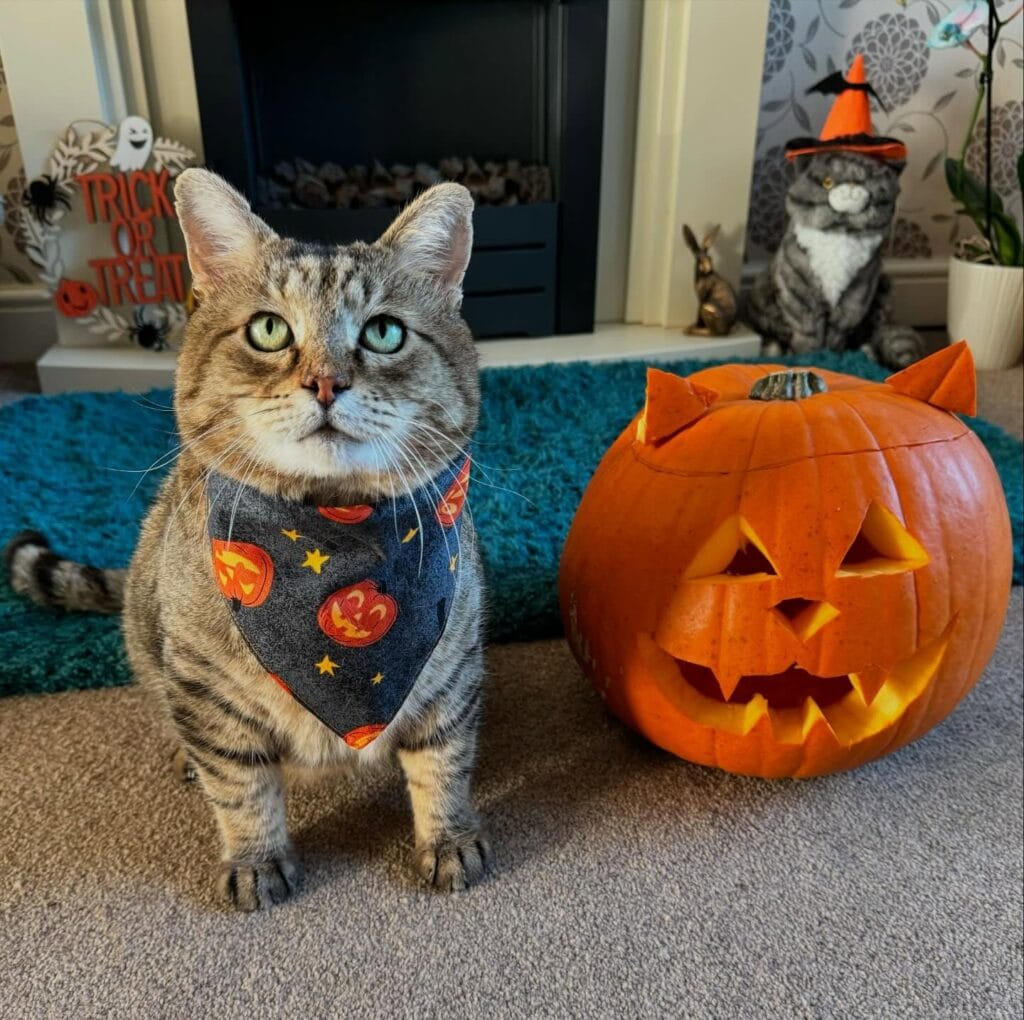
#16: The Cat-O’-Lantern: Carving a Pumpkin That Looks Just Like Your Cat
You know that moment when your golden girl trots past your Halloween decorations and knocks the whole setup sideways with her tail? Yeah. This one’s built to survive that.
This setup is everything — a tabby cat in a navy blue Halloween bandana printed with jack-o’-lanterns and gold stars, sitting next to a carved pumpkin that’s been turned into a cat face. And not just any cat face. The pumpkin has two small triangular ears cut from the lid, jagged triangle eyes, a tiny nose cutout, and a wide zigzag mouth. In the background, a second cat wears a miniature orange witch hat, sitting near a fireplace with a “Trick or Treat” sign. The whole room gives cozy Halloween living room energy your Pinterest board is going to love.
To recreate this, grab a large, round carving pumpkin (the rounder the better for that cat-face shape), a sharp serrated carving knife, and a pumpkin scoop. The ears are cut from the same piece you remove from the top — don’t toss that lid. Use a dry-erase marker to sketch the face first.
For the bandana, grab ¼ yard of Halloween-printed cotton fabric in a dark base color and cut a triangle with an 18-inch base. It ties around the neck and lays flat without bunching.
The ears take the whole carving from “basic pumpkin” to instantly recognizable cat face — which means your photos get that double-take reaction every time.
Add an LED tea light inside instead of a real candle. It keeps the pumpkin from wilting fast and is safer around curious paws.
📸 Photo credit: Instagram @ourferalfamily
#17: The Cat Face Pumpkin Family That’ll Make Your Halloween Display Unforgettable
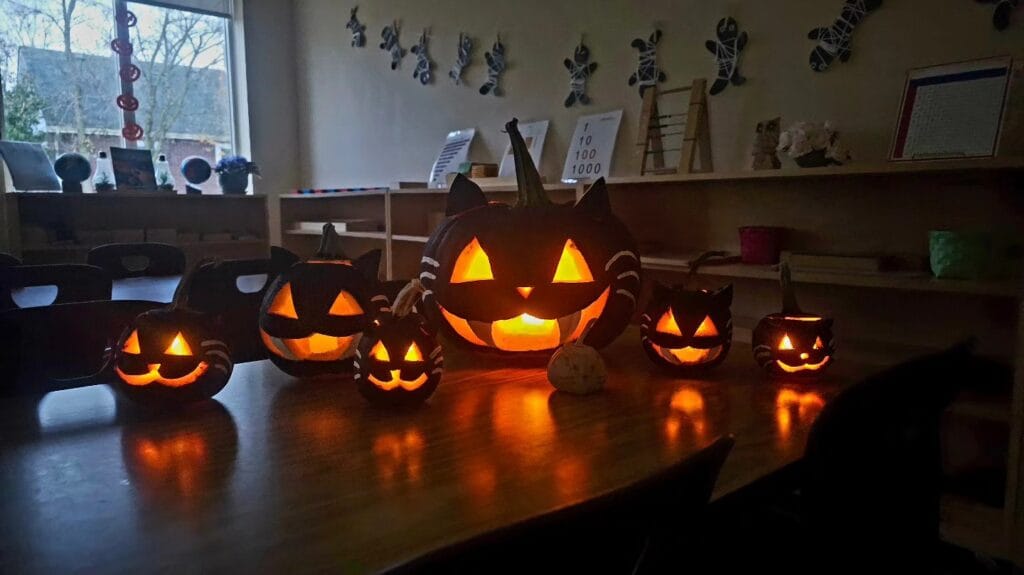
Okay, so picture this — you walk into a dimly lit classroom right before Halloween, and there’s this whole family of glowing cat-face pumpkins lined up on a long wooden table. The warm orange light bounces off the wood surface, and the mummy decorations dangling on the wall behind them just make the whole thing feel like a spooky little dream. Honestly, if your golden retriever wandered in here, she’d lose her mind sniffing every single one.
The star of this setup is one large orange pumpkin (think 10–12 inches tall with a natural stem intact) carved with triangular cat eyes, a small triangular nose, and a wide grin. The whiskers are painted or outlined using white acrylic paint directly onto the pumpkin skin — that’s the detail that makes these look intentional and polished instead of rushed. Surrounding the big one are four smaller pumpkins, ranging from 4–6 inches, each carved with the same cat face motif but with slightly varied expressions. Two of them have those adorable painted “cheek stripe” details using white paint markers — seriously, grab a Posca paint marker and thank me later.
Nestle a battery-operated LED tea light inside each pumpkin instead of real candles — they cast the same gorgeous amber glow without the fire risk, which matters a lot on a crowded table like this.
Space the pumpkins at different depths so the big one anchors the back and the small ones frame the front. That layered look is everything.
And if you love projects like this, 7 Fun DIY Cat Projects Every Owner Needs has even more ideas worth stealing.
For the whisker lines, score the pumpkin skin lightly with a linoleum carving tool instead of painting — it catches the light and adds texture that paint alone can’t fake.
📸 Photo credit: Instagram @primary.foundations123
#18: The Cat Jack-o’-Lantern That Stops Everyone at the Door
Okay, so you know how every year you see the same triangle-eyes, gap-tooth pumpkin on every porch in the neighborhood? This one is not that.
This cat-face carving is giving full Halloween personality — pointy ears made from separate pumpkin wedges pressed into the top, angular almond-shaped eyes with jagged inner cuts, a tiny inverted triangle nose, and a wide snarling mouth with fang points carved upward. The whole face reads “Halloween black cat” without needing a single drop of paint.
Those cat ears are cut from scrap pumpkin flesh and wedged into shallow slots carved at the crown — no toothpicks, no glue. The eyes are the real magic here. Each eye has a diagonal inner ridge left uncut, creating that squinting, menacing cat expression instead of the flat open look most people go for.
For the mouth, you carve a wide curved cut, then add two upward fang points in the center gap. That detail alone takes this from generic jack-o’-lantern to something worth pinning.
Rub the cut edges with petroleum jelly right after carving — it slows down the drying and keeps those crisp ear tips from shriveling by Halloween night. And if you’re doing a whole 7 Creative DIY Cat Crafts for Pet Lovers spread this season, this carving fits perfectly into that theme.
Backlight it with a warm LED tea light instead of a candle — the orange glow through those thin ear wedges looks unreal in the dark.
📸 Photo credit: Instagram @spyromaniac96
#19: Cat Face Jack-o’-Lantern With Carved Ears and Whiskers

Okay, so this one genuinely stopped me mid-scroll. Someone carved their pumpkin to look like a cat — complete with little pointed ears cut right into the top, slanted angry eyes, and scratched-in whiskers on the cheeks. It’s giving Halloween black cat energy, and honestly? It’s so much cuter than your standard triangle-eye situation.
The ears are the move here. Instead of just carving the face, the creator cut two triangular ear shapes directly into the pumpkin’s upper sides — leaving them attached so they stand up on their own. The eyes are carved at a downward slant (think grumpy cat), and the nose is a small inverted triangle with a simple curved mouth below it. Those whisker lines on the cheeks? Just shallow surface cuts — you’re not going through the whole shell, just scoring the outer layer with a paring knife or linoleum cutter.
A tea light or LED candle inside makes the whole thing glow orange, and it really brings the face to life at night.
Score the whiskers before you hollow out the pumpkin — the shell is firmer and way easier to control when it’s still full. And keep your ear cuts thick at the base so they don’t snap off.
The slanted eyes are the feature here — that downward angle gives the face a moody expression, which means your porch gets instant personality without complicated carving skills.
📸 Photo credit: Instagram @tot.life
#20: The Bat-Signal Jack-o’-Lantern Duo That’ll Make Your Halloween Mantel Look Like a Pinterest Dream
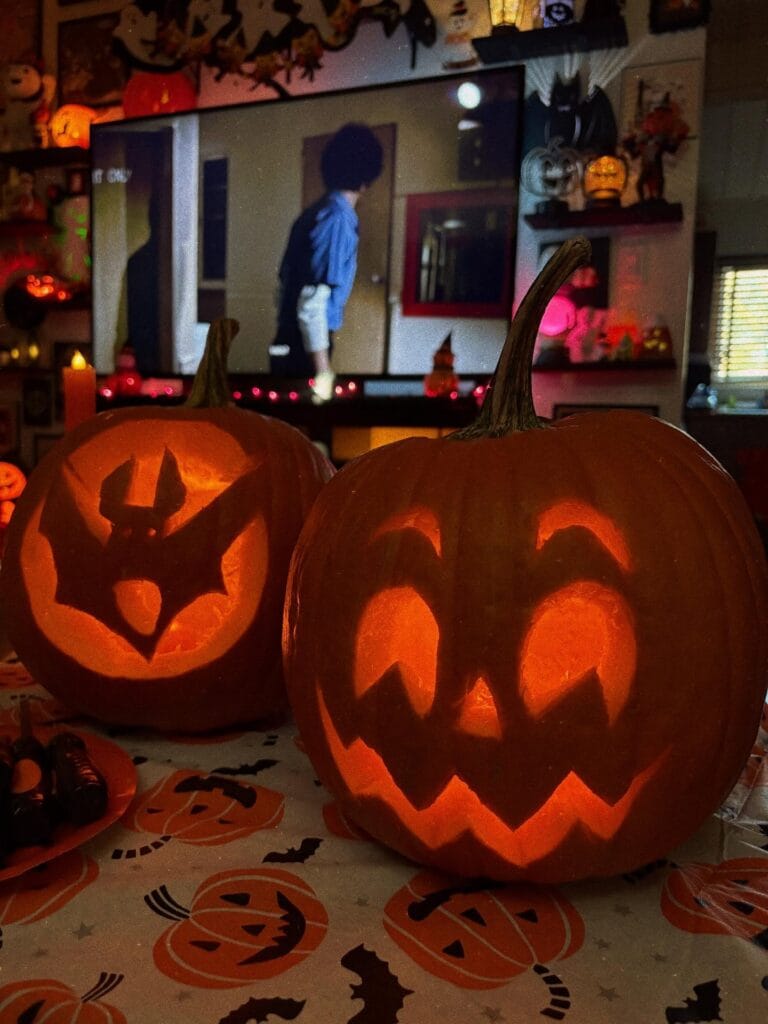
Okay, so picture this — it’s Halloween night, you’ve got a spooky movie playing on the TV, your golden retriever is curled up on the couch next to you, and these two glowing pumpkins are sitting right on your table. That warm amber light flickering through the carved faces? Chef’s kiss. This setup from @veemarhalloween is giving full cozy-Halloween-obsessed-household energy, and I’m here for every single detail.
The star of this duo is the bat-face jack-o’-lantern on the left. The carver used a negative space bat silhouette as the nose, with angular brow cuts above it that give the whole face this dramatic, almost villainous expression. It’s exactly the kind of design that looks complicated but is actually doable with a stencil printout and a thin pumpkin carving knife.
The pumpkin on the right keeps it classic — round circle eyes with thick carved lids and a wide zigzag mouth that glows the most gorgeous burnt orange when lit from inside with a LED tea light.
Both pumpkins sit on a Halloween-printed tablecloth (white base with orange jack-o’-lanterns and black bats printed on it), which honestly ties the whole scene together without feeling overdone.
Use LED candles instead of real flames — they’re safer around curious golden retriever noses AND they last all night without melting your pumpkin faster.
Carve your bat stencil before cutting the face features. It keeps the pumpkin structurally solid while you work.
📸 Photo credit: Instagram @veemarhalloween
#21: The Cat Face Pumpkin That’ll Be the Star of Your Halloween Spread
Okay, so you know how every year you pin like forty Halloween pumpkin ideas and then end up just doing the basic triangle eyes? This is the year we fix that.
This cat face pumpkin is giving full personality — carved ears cut right from the pumpkin lid itself, deep-scored whisker lines fanning out on both sides, and a jagged open mouth that looks like your golden just got caught stealing something off the counter.
To pull this off, you need a medium-to-large round pumpkin (rounder the better for that cat face shape), a thin-tipped carving knife, a linoleum cutter or V-gouge tool for those whisker grooves, and a marker to sketch your design first. The ears? You carve two triangles from the removed top piece and wedge them back into slits cut at the top. Genuinely genius.
Score the whiskers shallow — just deep enough to catch the light but not cut through. That contrast between carved-through sections and surface scoring is what gives this pumpkin its whole mood.
Rub the carved edges with petroleum jelly to slow down browning. And if your dog keeps sniffing around it, a little citrus spray on the outside keeps curious noses away without ruining the carving.
The open mouth here has uneven, chunky teeth — way more character than perfect squares.
📸 Photo credit: Instagram @uniofnottinghamic
The Carving Secret That’ll Make Your Cat Pumpkin Look Insanely Good
Okay so here’s the thing nobody tells you — cat features are ALL about the negative space, not the cuts themselves.
Most people grab their carving tool and just go for it. Big mistake. Cat eyes, especially those slit pupils, need super thin walls left behind, not full cutouts. When you light the pumpkin from inside, that thin skin glows this warm amber color. It looks like the cat’s eyes are actually alive. It’s genuinely wild.
I ruined three pumpkins before I figured this out. Three. Kept poking all the way through and wondering why my cat looked more like a melting ghost.
Here’s your game-changer: use a linoleum carving tool (grab one at any craft store) instead of those cheap orange kits. It gives you control over depth, so you can do partial cuts for fur texture and full cuts for the whiskers.
Also — and this is huge — chill your pumpkin in the fridge overnight before carving. Firm flesh carves cleaner. Your cat’s details will stay crisp for days longer.
Your Floors Deserve Better Than Another “Good Enough” Rug
You’ve spent real time making your home feel like yours. Don’t let muddy paw prints and golden retriever chaos undo all of that.
Pick one rug from this list. Just one. The one that made you stop scrolling and think “okay, that’s actually perfect.” Trust that feeling.
I did exactly that last spring and honestly? My living room finally looks like the Pinterest board I’ve been building since 2019.
So tell me — which style are you leaning toward, the washable runner or the chunky woven one? Drop it in the comments, I’m genuinely curious! 🐾

Amr Mohsen is a software engineer who traded his keyboard for a leash — at least on weekends. His love for dogs inspired him to share what he learns as a dog owner and enthusiast, bringing a detail-oriented, research-driven perspective to every article he writes. If it’s about dogs, he’s probably already looked it up twice.