Disclosure: This post contains affiliate links. If you purchase through these links, I may earn a commission at no extra cost to you. I only recommend products I believe will help create a safe, functional space for your dog.
Your golden retriever treats your side yard like a racetrack, leaving behind muddy paw prints on your patio and dead patches where grass used to grow. Those Pinterest-perfect outdoor spaces you’ve been saving? They feel impossible when you’re dealing with torn-up soil and makeshift barriers that look like an eyesore.
You’ve already spent $200 on temporary fencing that your dog knocked over in a week. The neighbors probably wonder why your beautiful home has a strip of dirt and chaos running alongside it.
Here’s the thing: a dog run side yard doesn’t have to look like a kennel. You can create a space where your pup burns energy safely while actually adding to your home’s curb appeal. These 10 dog run side yard designs blend function with style—think natural stone borders, custom gates, and landscaping that works with your dog’s energy instead of against it.
Whether you’re working with a narrow 3-foot strip or a generous 10-foot space, you’ll find inspiration for designing a dog run that fits your home’s aesthetic and your budget.
Surface Material Comparison
Before diving into specific designs, here’s what you need to know about choosing the right surface for your dog run:
| Surface | Best For | Maintenance | Drainage | Cost | Muddy Paws? |
| Artificial turf | All climates, heavy use | Hose weekly | Excellent | $$$ | No |
| Pea gravel | Hot climates, budget builds | Rake monthly | Excellent | $ | No |
| Natural grass | Large spaces, light use | Mow weekly | Moderate | $ | Yes |
| Concrete/pavers | Permanent runs, easy cleaning | Hose weekly | Good with slope | $$ | No |
Table 1: Comparison of dog run surface materials
Design #1: Narrow Artificial Turf Corridor (4-Foot-Wide Run That Doesn’t Feel Like a Cage)
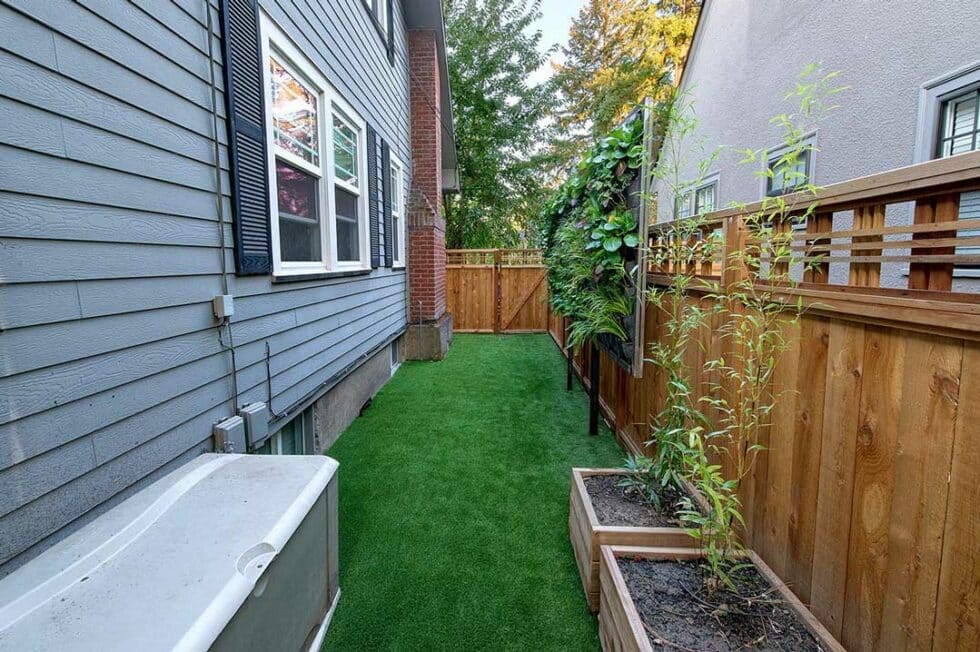
Your dog bolts out the back door, hits the emerald green turf at full speed, and races the 35-foot length in four seconds flat. This side yard setup transforms a skinny 4-foot-wide corridor into a legitimate exercise and potty zone without sacrificing your home’s curb appeal.
The artificial turf covers the entire run with built-in drainage holes every 3 inches, so your 60-pound Lab can pee freely and you’ll just hose it down in 90 seconds flat. Two raised cedar planters along the fence line hold bamboo for privacy, making it feel less like a kennel and more like intentional landscaping. The far end opens to your main yard through a self-latching gate with double locks—preventing escape artists while you grab coffee inside.
If you’re starting from bare ground, prefab outdoor dog kennel run panels give you fence sections and posts in one package—saves you 6 hours of cutting lumber and ensures uniform spacing for a professional look. It maximizes vertical space with a mounted rope toy at nose height so you can keep your dog mentally engaged, which means fewer boredom behaviors like fence-chewing or excessive barking.
Check out more 20 Dog Run Ideas for Backyard and Side Yard Spaces for inspiration. Your move: measure your narrowest point and add 6 inches—if you’ve got 48 inches minimum, this layout works perfectly.
📸 Photo credit: dfw turf
Design #2: Black Chain Link Corner Run with Artificial Turf Base (Narrow Side Yard Transformation)
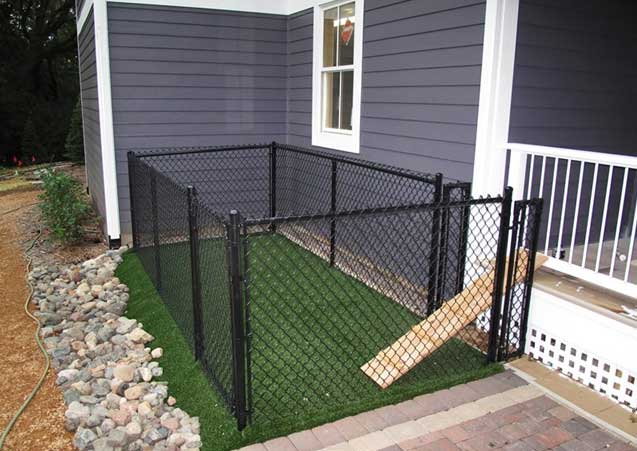
Your Lab mix rockets through the back door, hits the turf in three strides, and zooms the full 24-foot length before circling back to potty in the designated gravel zone—all while you’re still pouring your coffee. This 6-foot-tall black chain link setup turns that awkward 8-foot-wide side corridor into a functional dog bathroom and exercise strip that doesn’t look like a kennel from the street.
The base combines two surfaces: artificial turf covers the main 18-foot play section (hoses clean in 4 minutes flat), while pea gravel fills the 6-foot potty zone nearest the house door. A gentle 2% slope toward the yard edge prevents puddles during Oregon’s rainy months. The black vinyl-coated chain link blends with your gray siding instead of screaming “dog prison,” and features double-latch gates at both ends for through-access.
It handles 40 inches of rain annually without turning to mud, which means zero tracked-in paw prints through your kitchen. Neighbors see decorative rocks edging the turf and landscaping lights along the fence—not a dog toilet. The whole 192-square-foot space gets a complete poop-scoop and hose-down in under 10 minutes twice weekly.
Install a frost-free spigot at the 12-foot mark so you’re not dragging hoses from the backyard every morning.
📸 Photo credit:dfw turf
Design #3: Artificial Turf Side Corridor with Pool View (Low-Maintenance Surface, Year-Round Green Space)
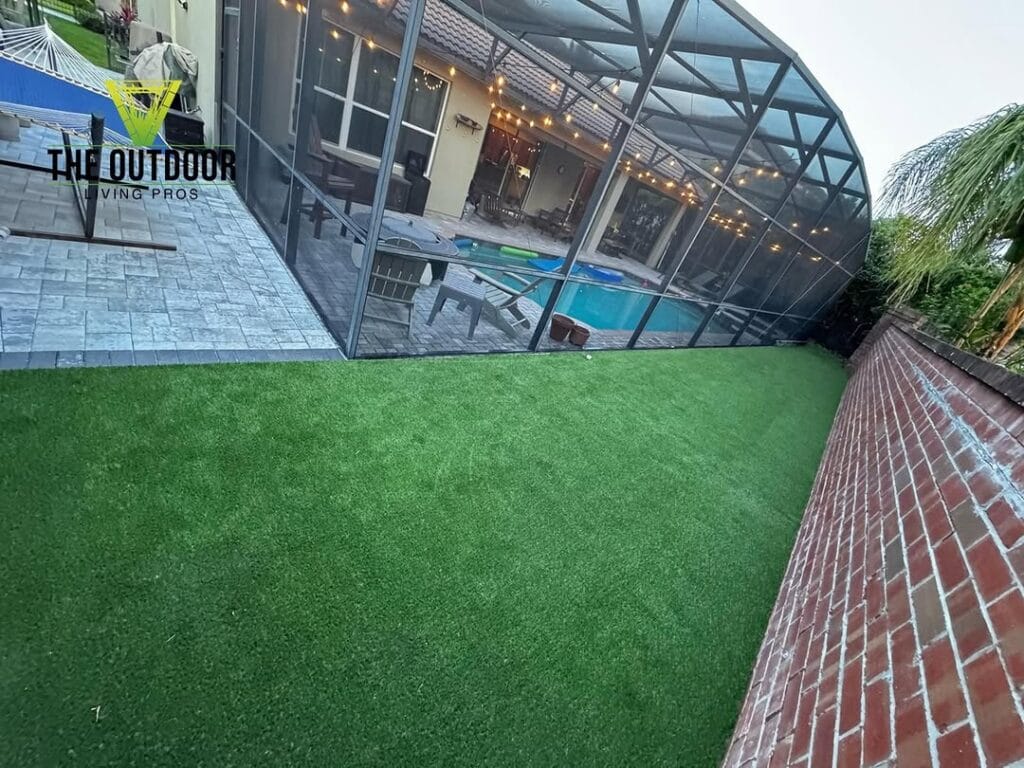
Your dog zooms out the patio door, races along 25 feet of emerald turf, and circles back in under 10 seconds—without tracking in mud. This side yard setup uses premium artificial turf installed over compacted gravel base, creating a 6-foot-wide runway between your pool enclosure and brick wall. The synthetic grass drains in minutes after rain, so you can let Bailey out at 6 AM without worrying about wet paws on your hardwood floors.
Installation takes one weekend: excavate 3 inches deep, lay weed barrier fabric, add crushed stone base, then roll out turf sections. Quality turf lasts 10-15 years and stays green through Florida summers while handling daily zoomies without developing bare patches like real grass. Hose it down weekly and hit potty spots with enzymatic cleaner—the whole 150-square-foot run cleans in 8 minutes flat.
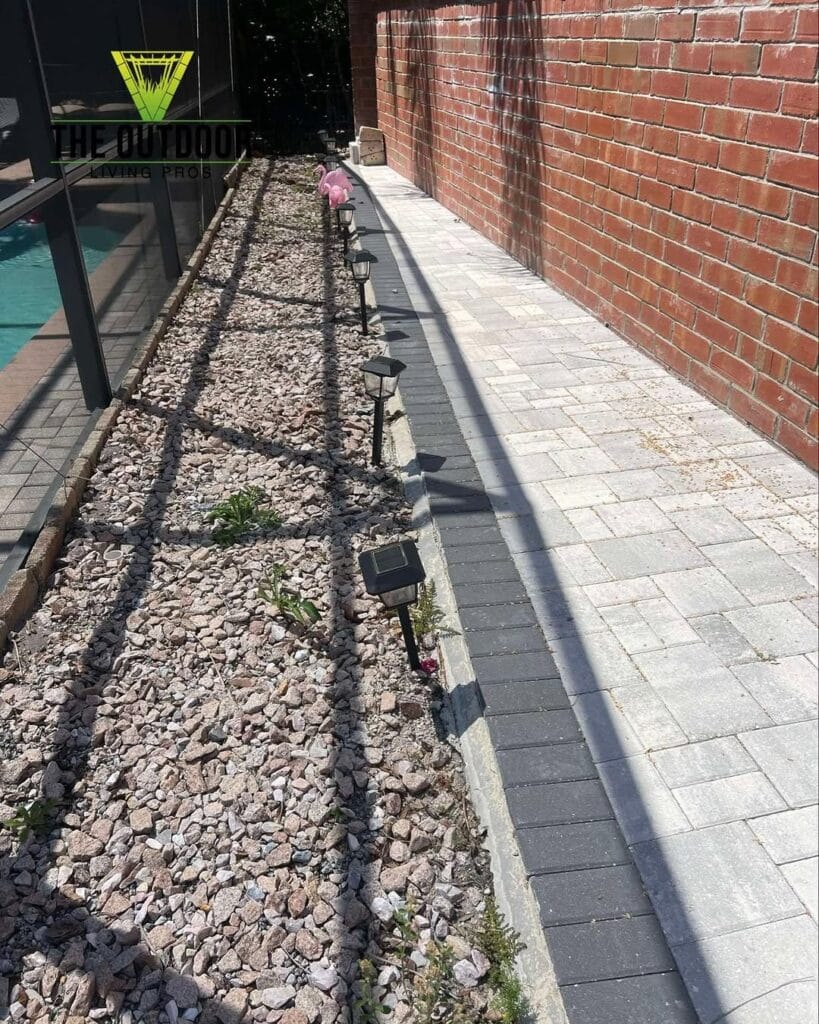
The pool enclosure provides afternoon shade while string lights add ambiance for evening potty breaks. Mount an orthopedic memory foam dog bed against the brick wall for supervised lounging sessions after playtime—the elevated foam cushioning protects aging joints while your senior dog recovers from exercise. This eliminates lawn mowing, reseeding, and muddy disasters—you get instant outdoor access that looks intentional, not like a dog kennel. Check out more creative solutions in 18 Dog Run Ideas to Upgrade Your Backyard.
Pro tip: Install a dedicated hose spigot near the turf’s center point so you can reach every corner without dragging 50 feet of slack.
📸 Photo credit: Instagram @theoutdoorlivingpros
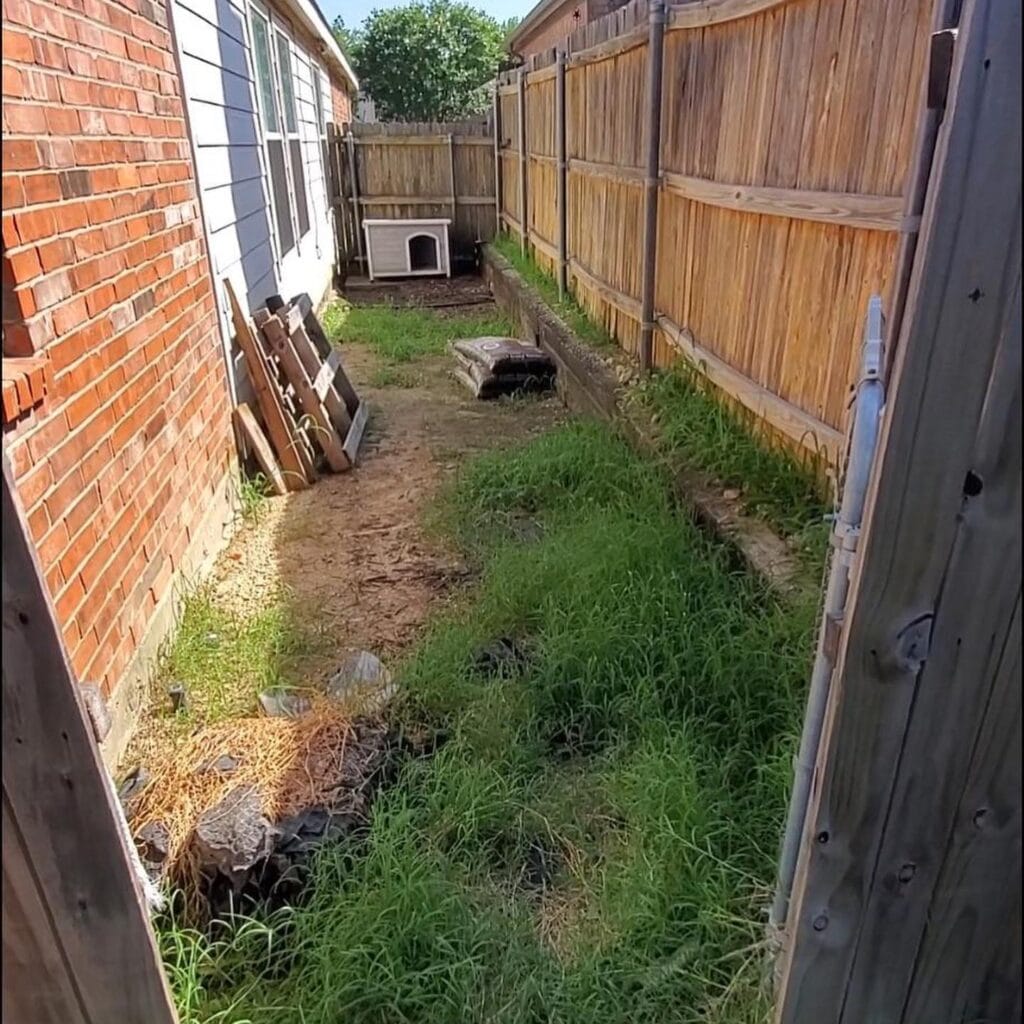
Design #4: Artificial Turf Corridor Run (Low-Maintenance Potty Zone That Stays Green Year-Round)
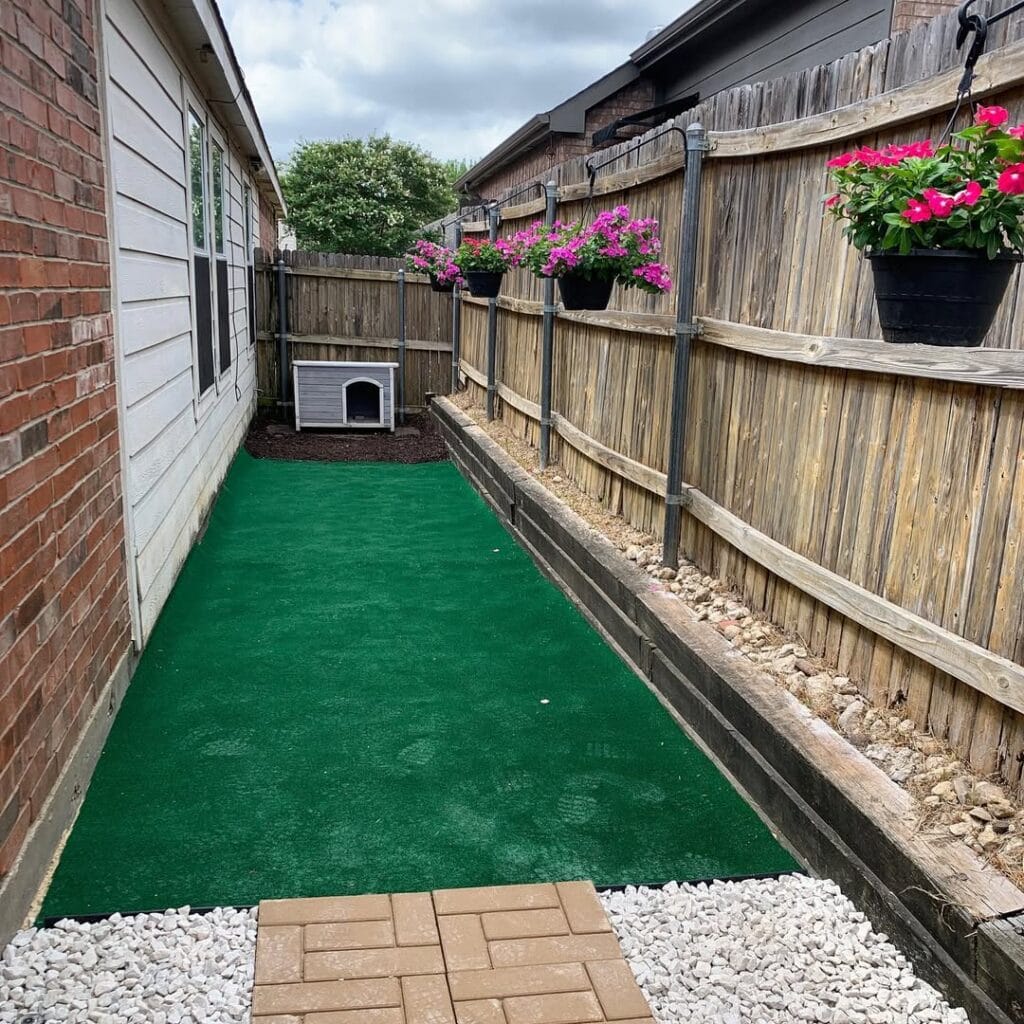
Your dog circles the back door at 6 AM, and you’ve had enough of muddy paws tracked across hardwood floors. This 25-foot by 4-foot side yard corridor transforms that narrow space into a dedicated bathroom zone with artificial turf that drains in under 90 seconds after rain.
The setup uses premium K9-grade turf with drainage holes every 3 inches, laid over a 2-inch gravel base sloped at 2% toward the back fence. A small insulated outdoor dog house anchors the far end for shade and weather protection—the weatherproof construction keeps bedding dry even during storms, giving your dog a retreat during rain or blazing summer heat. Hanging baskets add color without sacrificing floor space. The wooden privacy fence gets reinforced with hardware cloth buried 8 inches deep—no digging escapes.
Daily cleaning takes 3 minutes: scoop solid waste, spray the potty zone with your hose, done. The turf stays snow-free in winter with a quick sweep, handles 100°F summers without burning paws, and looks intentional—neighbors think it’s a landscaped pathway, not a dog run.
Action tip: Install a motion-sensor light above the door so late-night bathroom breaks don’t require fumbling for switches—your dog learns to go immediately instead of exploring in darkness.
📸 Photo credit: Instagram @tribestspecialties.jpg
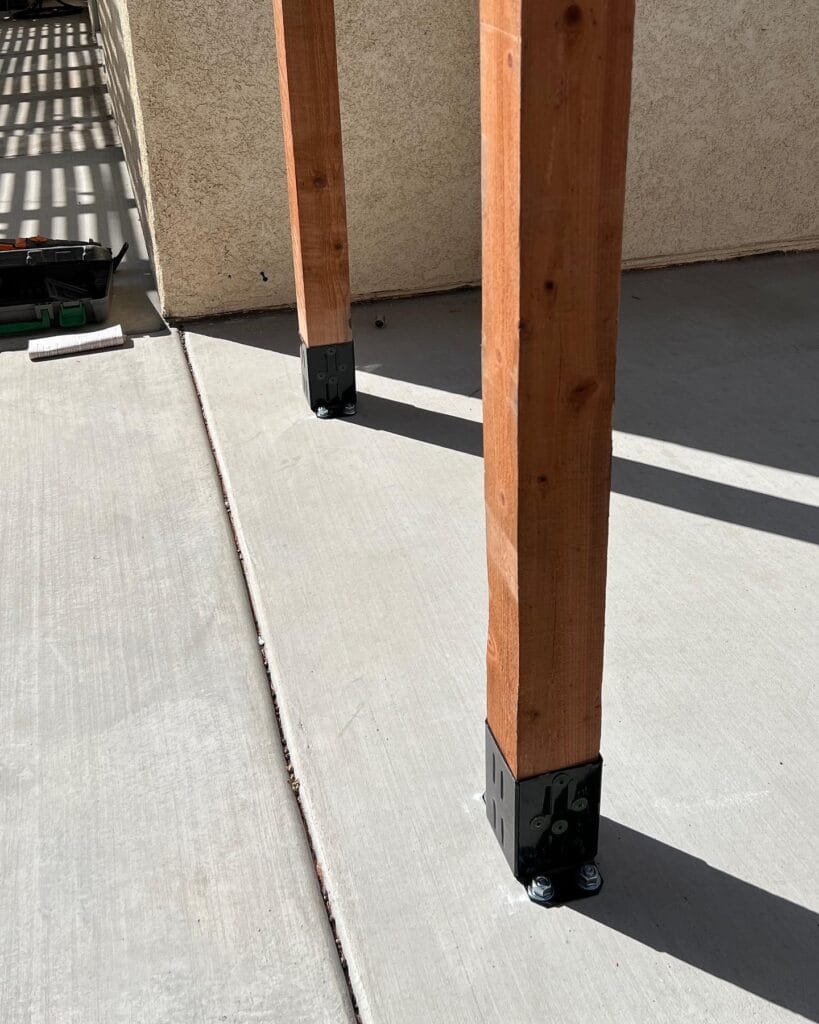
Design #5: Raised Post Foundation Run (Weather-Proof Structure, Cleaner Paws Year-Round)
Your dog exits the back door, trots across 8 feet of concrete, and settles into the 20-foot side yard run—no mud tracking through your kitchen. The posts sit on black metal brackets that lift the wood frame 2 inches off the ground, so water drains underneath instead of pooling against wood. You’ll hose down that smooth concrete in 90 seconds flat after rain.
The elevated post design prevents rot that destroys ground-contact lumber within 18 months. Those black standoff brackets extend your fence life to 15+ years and are available at most hardware stores. The concrete base slopes away from your foundation, creating a self-draining surface that stays puddle-free.
The 4-foot-wide corridor forces a natural traffic pattern: potty near the house, play toward the gate end. Mark the first 6 feet with pea gravel over landscape fabric for drainage—urine soaks through instead of creating smell zones. After switching to quality nutrition like options in Best Wet Dog Food: Top Choices and What to Consider, you’ll notice firmer stools that scoop cleanly off concrete.
Pro tip: Paint those standoff brackets to match your fence stain—they disappear visually but keep doing the critical job of protecting your investment from ground moisture.
📸 Photo credit: Instagram @huntersridgedesign
Design #6: Artificial Turf Side Yard Sprint Track (Low-Maintenance Green Carpet, Zero Muddy Paws)
Your border collie bursts through the back door at 6:47 AM, races the full 35-foot length of emerald turf in 3.2 seconds, circles twice, and squats in the designated gravel zone near the far gate. You’re still holding your coffee. No mud. No tracking. No waiting in your bathrobe while she sniffs every blade of grass.
This setup runs 4 feet wide by 35 feet long between two privacy fences. The first 6 feet near the house features pea gravel for the potty zone—waste scoops off in seconds, hosing takes 90 seconds twice weekly. The remaining 29 feet gets premium artificial turf with drainage backing that slopes 2% toward the yard. Professional-grade pet turf includes antimicrobial infill and reinforced backing that handles three rainstorms per week without puddles forming, which means your Labrador’s paws stay clean even in October.
Installation takes about one Saturday if you’re comfortable with DIY projects, and eliminates ongoing lawn service needs. Hose it down every Sunday, use an enzymatic spray on the potty transition area, and brush against the grain monthly to keep blades upright. A 6-foot cedar privacy fence on both sides blocks your neighbor’s reactive German Shepherd from view, which stopped your dog’s fence-line barking within four days.
Add a shade sail over the middle 12 feet (blocks 87% of UV rays), position a stainless steel water bowl in that shaded section, and hang a rope toy from the fence at the 20-foot mark for mid-run entertainment.
Pro tip: Spread coffee grounds on the gravel potty zone monthly—they neutralize urine smell naturally and cost you zero dollars if you brew at home.
📸 Photo credit: Instagram @shane
Design #7: Artificial Turf Side Corridor (Low-Maintenance Potty Paradise That Actually Looks Good)
Your dog hits the back door at 6 AM, and you open it to a pristine 40-foot green runway. No muddy paws, no tracking dirt through your kitchen, just synthetic grass that looks sharp year-round.
This narrow side yard runs about 40 feet long by 6 feet wide between a wood privacy fence and the house exterior. Artificial turf for dogs covers the entire surface—look for K9-grade materials with antimicrobial infill and perforated backing for superior drainage—sloped slightly (about 2%) toward the back yard so rain drains away from your foundation. The first 10 feet nearest the door becomes the designated potty zone, marked with a decorative border stone where your dog learns to go on command. A small tree breaks up the corridor visually while string lights overhead make it feel intentional, not utilitarian.
The synthetic grass handles daily hose-downs in under 5 minutes. Scoop solid waste, spray with an enzymatic cleaner bi-weekly, and it stays odor-free through summer heat. No mowing, no reseeding bare patches, no wrestling with a hose reel in tight spaces. It drains faster than you’d think—used it through winter storms and July downpours without puddles.
Guests walking past your side gate see landscaping, not a dog bathroom. Blends seamlessly with your stucco exterior and cedar trim, especially when you add pathway lighting. For year-round outdoor comfort, check out options in our guide to Best Dog Houses for Outside Dogs: The Ultimate Guide for Pet Owners.
Pro tip: Install a frost-free spigot on the house wall so you’re not dragging hoses through your home for refills.
📸 Photo credit: Instagram @synthetic_grass_solutions
Design #8: Narrow Corridor Dog Run (Wood Fence Privacy, Grass Surface)
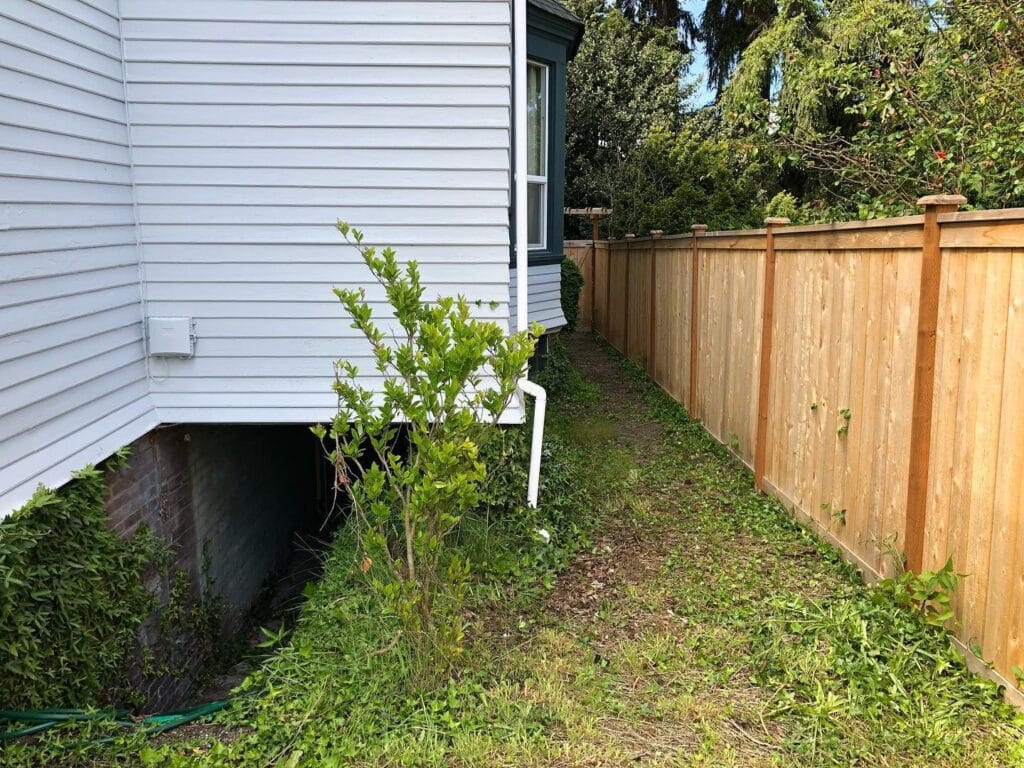
Charlie used to bark at every neighbor walking by until his owner converted this 4-foot-wide side yard into a private retreat. The cedar privacy fence blocks visual triggers while creating a calm 35-foot-long runway between the house and backyard gate.
The grass surface stays paw-friendly but requires weekly mowing and monthly reseeding in high-traffic zones near the entry door. You’ll spend 10 minutes every other day picking up poop and hosing down muddy spots after rain. Slope the ground 2% away from your foundation so water drains toward the fence line, not your basement. That narrow corridor forces traffic patterns—dogs naturally potty in the first 8 feet, then sprint the remaining stretch for exercise.
The enclosed design means you can open your door for quick morning bathroom breaks without worrying about escape attempts. No more standing in your pajamas while your dog sniffs every blade of grass in the open yard. Install a self-closing gate with double latches at both ends—enter from your kitchen door, exit to the main yard. This setup cut morning routines from 15 minutes to 3 because there’s only one job to do out here.
Pro tip: Mount a hose reel on the house wall with a quick-disconnect nozzle—you’ll clean the entire run in 5 minutes flat, and neighbors see landscaping access, not a dog kennel.
📸 Photo credit: Instagram @markowenmartin
Design #9: Gravel-Base Side Yard Run with Custom Wood-Frame Fencing (Drainage That Actually Works, Zero Muddy Paws)
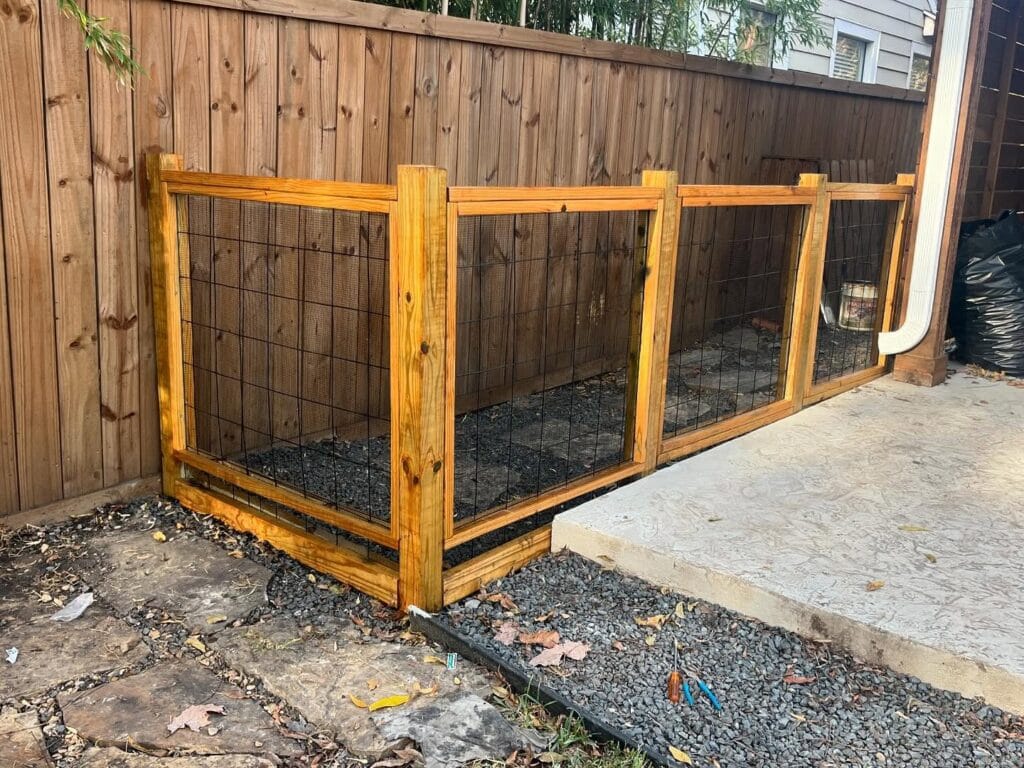
Bailey used to track mud through the kitchen every single morning. Her owner installed this 20-foot-long by 4-foot-wide side yard run with pea gravel over landscape fabric, and the muddy paw prints stopped completely. The custom cedar-framed wire mesh panels let her supervise from the kitchen window while matching the home’s natural wood siding.
The setup runs along the fence line with three distinct zones. The first 6 feet near the back door serves as the potty area with smaller pea gravel and landscape fabric that drains in under 2 minutes after rain—the crushed stone base prevents weed growth while allowing liquid waste to percolate through instead of pooling. The middle 8-foot section uses river rock for play space—she launches her ball, and the rounded stones handle her skidding stops without displacing. The far end features a shaded rest platform with an elevated cot.
The wire mesh panels (framed with 2×4 cedar stained golden oak) allow airflow and visibility while keeping her contained. A cat door insert in the third panel lets her access the run independently—no more standing at the back door waiting.
Morning potty routine dropped from 12 minutes to 3 minutes flat. The pea gravel base requires three cubic yards spread 3 inches deep over landscape fabric. Monthly maintenance takes 6 minutes: scoop twice daily, hose down weekly, rake smooth once. For more contained outdoor solutions, check out these Best Dog Backyard Ideas for a Safe and Fun Outdoor Space.
Pro tip: Slope your gravel base 2% away from the house foundation so urine drains toward the yard instead of pooling near your siding.
📸 Photo credit: Instagram @yf_landscape
Design #10: All-White Holiday Doghouse Retreat (Custom Outdoor Shelter That Doubles As Garden Art)
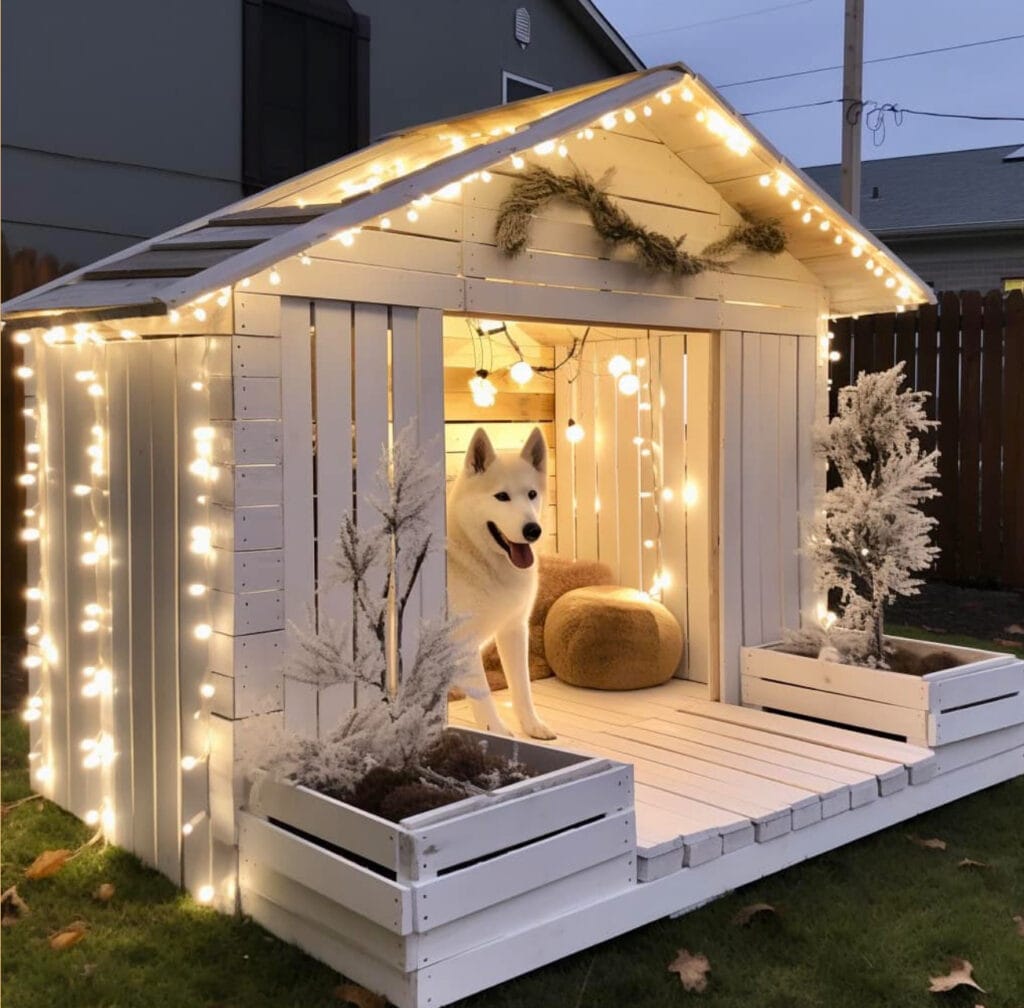
Your side yard transforms from wasted space into a destination when you build a dedicated doghouse retreat like this one. This custom 6×8-foot structure features vertical shiplap siding painted crisp white, a peaked roof with warm Edison bulb lighting, and a raised deck entry with three wide steps. The homeowner positioned it against the back fence, creating a cozy corner that looks intentional from every window.
The interior ceiling lights create a welcoming glow that draws dogs inside naturally—no coaxing needed. Position an elevated wooden dog feeder station just inside the doorway—the raised height (typically 8-12 inches for medium dogs, 16-20 inches for large breeds) reduces neck strain during meals and promotes better digestion by allowing food to travel smoothly to the stomach. The wraparound lights use 150 feet of outdoor string lights on a timer, so your dog’s space glows from 5pm to 10pm automatically.
Flanking planter boxes hold frosted faux evergreens that never need watering but add serious curb appeal. The structure sits on a gravel base with landscape fabric underneath, preventing mud and allowing drainage. Guests consistently ask if it’s a she-shed before spotting the happy husky inside. Monthly maintenance takes 10 minutes: sweep the deck, wipe down walls, check that the mustard-yellow floor cushion hasn’t migrated.
String lights on year-round timers make your dog’s space feel welcoming even on dark winter evenings when you’d rather stay inside.
📸 Photo credit: Instagram @lisapascarellstudio
Your Side Yard Transformation Starts Now
You’ve got the inspiration—now it’s time to create that perfect dog run your pup deserves. Start by measuring your space and sketching your favorite design elements from these ideas.
Check out these 17 Creative DIY Dog Run Ideas for Your Furry Friend for more layout options. Don’t forget proper fencing with 18 Creative DIY Dog Fence Ideas for Your Yard to keep your space secure and stylish. If you’re thinking bigger picture, these 14 Essential Tips for Running a Successful Dog Grooming Business might spark even more ideas.
Pin your favorite dog run side yard design so you’ll have it ready when you hit the hardware store this weekend.
Which side yard feature will make your dog’s tail wag the hardest—the artificial turf runway, gravel drainage zones, or custom doghouse retreat?

