Okay, so real talk — your golden retriever is adorable, but that soggy, flat pillow he’s been sleeping on? Girl, it’s seen better days.
Mine got to the point where I couldn’t even look at it without cringing. Stuffing falling out, the cover just… giving up on life. And it sat right in my living room, next to my carefully styled bookshelf. The audacity.
Here’s the thing though — replacing it doesn’t have to mean dropping $80 on something boring from a big box store. A diy dog bed pillow can actually look good enough to match your whole aesthetic.
Ready for a fresh idea? I rounded up 10 dog bed pillow designs that are cozy for your pup and won’t make you want to hide them before company comes over. Your space deserves both.
#1: The Pink Princess Pet Throne — A Full DIY Dog Bed Set Your Golden Will Absolutely Rule From

Your golden retriever, bless her heart, has claimed your throw pillows again. There’s drool on the couch cushion and golden fur on every surface you own. You love her to pieces, but girl… she needs her own spot.
This DIY project recreates that gorgeous hot pink velvet princess dog bed set — yes, the full set — bed, blanket, and food bowl cover, all wrapped in ruffled pink plush velvet fabric with embroidered details that honestly look like something straight off Pinterest.
I made something similar for my cousin’s chihuahua last winter and couldn’t believe how pulled together the whole corner of the room looked after.
Materials & Tools
– 1.5 yards hot pink plush velvet fabric (main bed body)
– 3 yards pink ruffle trim (for bed skirt, blanket edges, pillow edges)
– High-density foam round insert, 24″ diameter
– Fiberfill stuffing (for pillows and bone toy)
– Pink velvet fabric scraps for throw pillows
– Iron-on or sew-on embroidery patches (crown, cupcake, bow motifs)
– Rhinestone crown appliqué (hot glue or stitch-on)
– Black embroidery thread (for “Princess” lettering)
– Pink velvet fabric for cylindrical food bowl cover
– Sewing machine, fabric scissors, hot glue gun, measuring tape, pins
Instructions
Prep Time: 30 min | Active Project Time: 4–5 hours | Difficulty Level: Intermediate
Cut your 24″ diameter circle from the plush velvet for the bed base, then cut a matching backrest piece roughly 18″ tall by 48″ wide — this curves around the back like a little sofa. Sew those two pieces together along the bottom edge, leaving the top open to stuff your foam insert in later.
Attach the ruffle trim along every visible edge before you close anything up. The ruffle is what gives this that full, dramatic skirt look — don’t skimp on it. I’d double-layer the ruffle along the bed skirt specifically because the fuller it is, the more luxe it reads in photos.
Once your foam insert is in and the opening is sewn shut, stitch or hot-glue your rhinestone crown appliqué centered on the backrest. This is the showstopper detail — rhinestone crown placement right at eye level means your dog looks like royalty every time she’s lounging.
For the throw pillows, cut two 8″ square pieces for the “Sweet Baby” cupcake pillow and one heart-shaped piece roughly 7″ across. Sew right sides together, stuff with fiberfill, and slip-stitch closed. Iron on the cupcake patch and use black embroidery thread to hand-stitch “Sweet Baby” in a cursive style. The heart pillow stays plain — it’s a nice visual break.
The bone-shaped pillow is easier than it looks. Cut two identical bone shapes from velvet, sew together with a ½” seam allowance, leave a gap, stuff firmly, and close. Embroider “Princess” in bold black thread across the center. A firmly stuffed bone pillow gives your dog something to rest her chin on, which — trust me — she will immediately figure out.
For the cylindrical food bowl cover, cut a rectangle of pink velvet sized to wrap your bowl snugly, sew into a tube, add a ruffle trim at the top edge, and use a drawstring or elastic at the base to cinch it underneath. Hot glue a bow appliqué to the front.
The blanket is the easiest piece. Cut a 36″ x 36″ square, sew ruffle trim around all four edges, and iron a bow patch in the lower right corner. Done.
Worth it because: velvet pile fabric naturally traps shed fur on the surface instead of weaving it in, so you can literally lint-roll this entire set in two minutes flat — which, as a golden retriever owner, is everything.
Layer all three pieces in a corner of your bedroom or living room and it genuinely looks like a styled vignette. Your dog gets a dedicated, cushioned space she’ll actually return to. And you get your couch back.
For the lettering, practice your stitch direction on a scrap piece first. Velvet has a pile direction that can make embroidery look uneven if you’re going against it — always stitch with the nap, not against it.
📸 Photo credit: Instagram @annahappydog
#2: The “Two Cocker Spaniels Sharing One Bed” Problem — And the DIY Fix That Actually Works
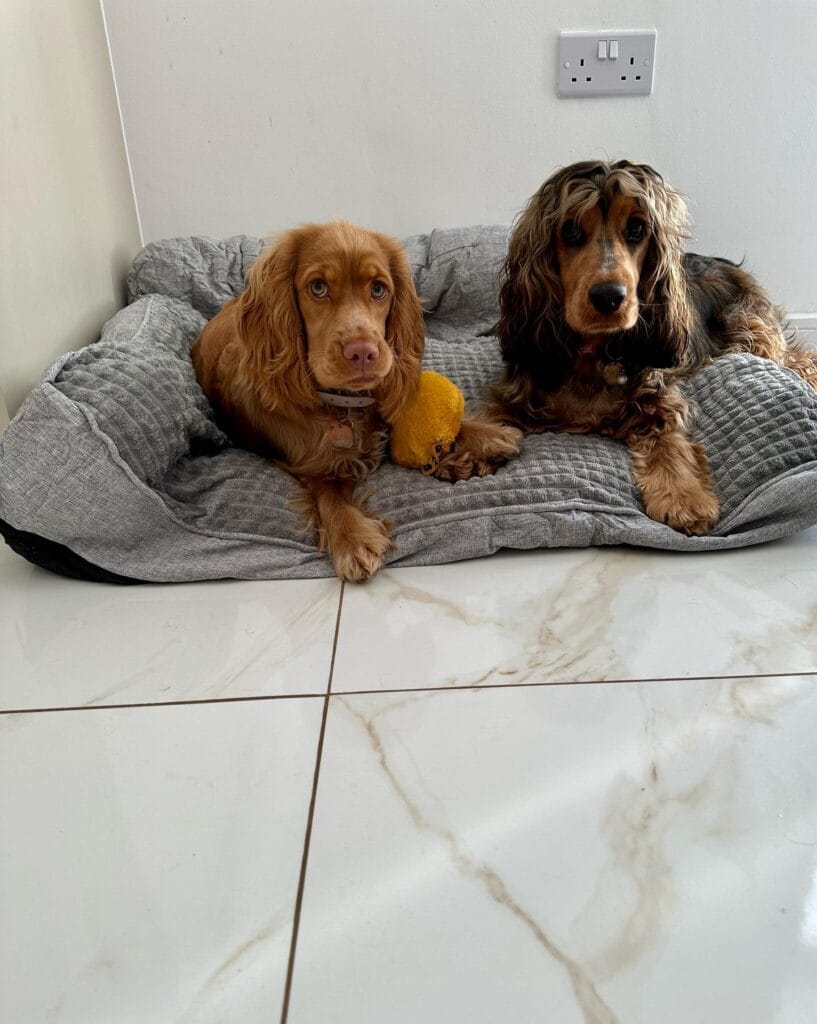
Your golden retriever has that look. The one where she’s half-hanging off her dog bed, paws on the cold tile, staring at you like you personally wronged her. I’ve been there. My cousin’s spaniel used to drag blankets off the couch every single night just to build himself something softer.
That’s exactly why this quilted bolster dog bed caught my eye the second I saw it.
The two cockers in this photo are perfectly settled into a gray quilted fabric bolster bed with raised cushion sides and a flat center sleeping panel. It looks Pinterest-ready and the dogs are genuinely relaxed. You can recreate this for your girl.
Materials & Tools:
– 1.5 yards of gray quilted cotton fabric (or textured chenille)
– 2 yards of gray linen outer fabric
– High-loft polyester fiberfill (approx. 3 lbs)
– Sewing machine + matching thread
– Fabric scissors
– Pins
– 24″ x 36″ non-slip mattress base (cut from foam or purchase pre-cut)
– Iron
Instructions
Cut your linen into one 24″ x 36″ base rectangle and four 10″ x 24″ bolster strips. These bolster strips become the raised sides your dog leans against — the feature that keeps them from rolling off mid-nap, which means zero 3am whining from the floor.
Fold each bolster strip lengthwise, sew the long edge closed, then stuff generously with fiberfill. Don’t be shy here. Firm bolsters hold their shape after washing, and your dog will actually use them as a chin rest. I watched a friend skip this step once — the sides went flat in a week.
Pin each bolster to the outer edges of your base rectangle, raw edges aligned. Sew them flush to the base on three sides, leaving the back open like a pocket. Slide your foam base inside, then hand-stitch the opening closed.
Top the flat center with a quilted cotton layer cut to 22″ x 34″ — just slightly smaller than the base — and either stitch it down at the corners or leave it removable for washing. Removable is smarter. Trust me on that one.
The quilted texture grips your dog’s fur just enough to keep them from sliding, and the bolster sides give anxious dogs something to press against while they settle.
One thing to remember: pre-wash all fabric before cutting. Quilted cotton shrinks, and you don’t want your perfectly sized bed turning into a puppy-sized cushion after the first wash.
If you’re still figuring out what size works best for your golden, 15 Best Dog Beds for Every Dog Size and Need breaks it down really well.
Prep Time: 20 min | Active Project Time: 2–3 hours | Difficulty Level: Intermediate
📸 Photo credit: Instagram @bella_and_maple_theshowcockers
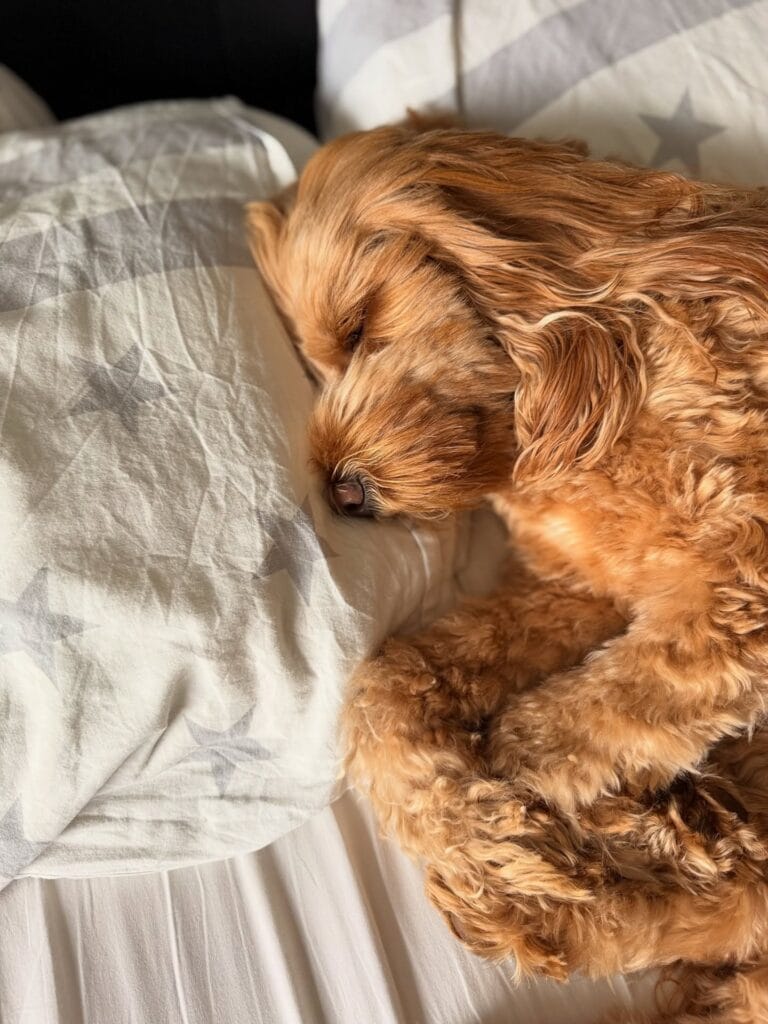
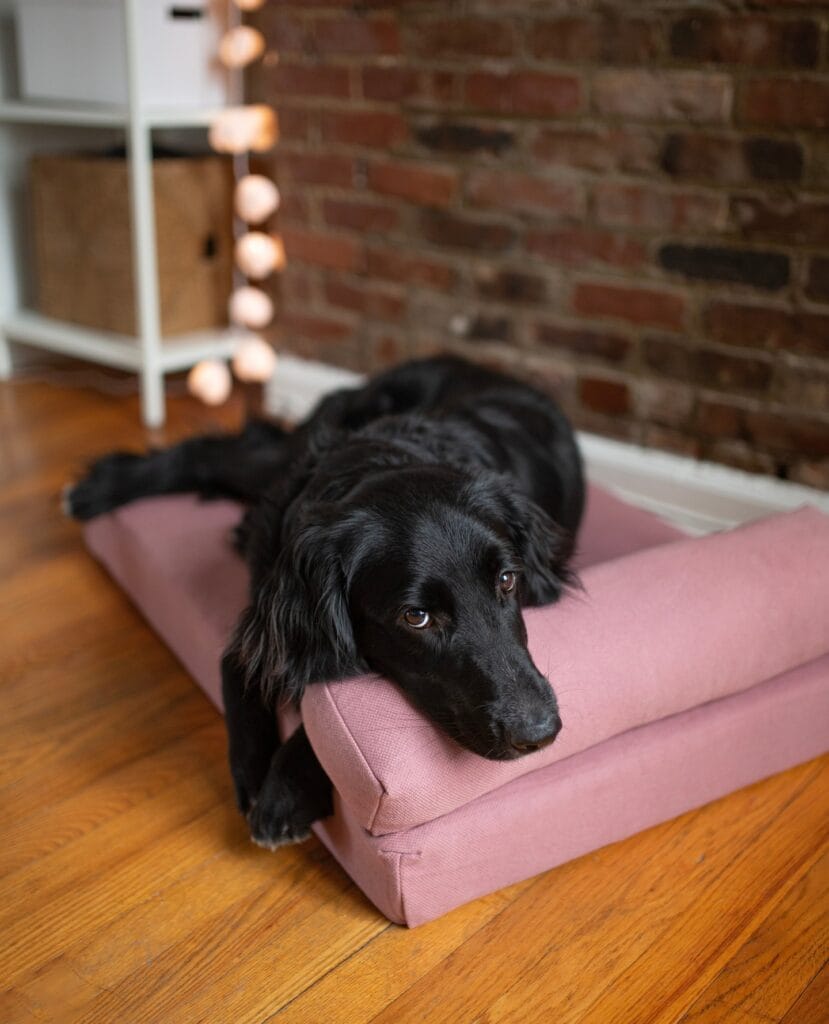
#3: The Dusty Rose Dog Bed Pillow That Looks Like It Belongs on Your Pinterest Board
Your golden is finally calm after a wild afternoon, and she picks her spot — right on the edge of your linen sofa. Again. You love her, but girl, she needs her own spot that she’ll actually want to stay on.
This dusty rose bolster bed is it.
The one in the photo? It’s got that loft-apartment, brick-wall energy — blush pink canvas fabric laid flat over a firm foam insert, with a raised bolster edge that gives dogs something to rest their chin on. My cousin made one for her spaniel last spring and she texted me like “why didn’t we do this sooner.” The dog hasn’t touched the couch since.
Materials & Tools:
– 1.5 yards of dusty rose canvas fabric (cotton-canvas blend, 12 oz weight)
– 24″ x 36″ x 4″ high-density foam insert
– 1 bolster tube pillow insert (approximately 6″ diameter x 24″ long)
– Matching thread (blush or neutral)
– Fabric scissors
– Sewing machine
– Zipper (optional — 22″ invisible zipper for washable cover)
– Measuring tape & fabric chalk
Instructions
Cut your canvas into two pieces: one 26″ x 38″ rectangle (bottom) and one 26″ x 38″ rectangle (top). These extra inches create a clean 1-inch seam allowance on all sides, so your foam sits snug without bunching.
Lay both pieces right-sides together and sew three sides shut with a ½-inch seam. If you’re adding a zipper, sew it into the shorter open end now — the washable cover pays off big when muddy paws happen (and they will).
Slide your foam insert in, then close the final seam or zip it up.
For the bolster, cut a fabric rectangle sized to wrap your tube insert with a 1-inch overlap. Sew it into a tube shape, tuck in both raw ends, and hand-stitch them closed. The raised bolster edge supports your dog’s neck and head — that joint support keeps older dogs comfortable during long naps, which means less restlessness at night for both of you.
Pin the bolster along one short edge of the base cushion and stitch it down with two parallel seam lines for strength.
Prep Time: 20 min | Active Project Time: 1.5–2 hours | Difficulty Level: Beginner-Intermediate
The canvas fabric holds its shape wash after wash, so you’re not rebuilding this every season. And if you’re already in a DIY pet groove, 10 Creative Pallet Dog Bed Ideas for Your Furry Friend pairs perfectly with this one for a full cozy corner setup.
Stitch the bolster close to the edge — not at the very corner — so it stays centered and doesn’t flip when your dog flops down hard. That small placement detail is what makes it look intentional instead of homemade.
📸 Photo credit: Instagram @avocado.green
#4: The Boucle Pillow Bed That Looks Like It Belongs on Your Pinterest Board
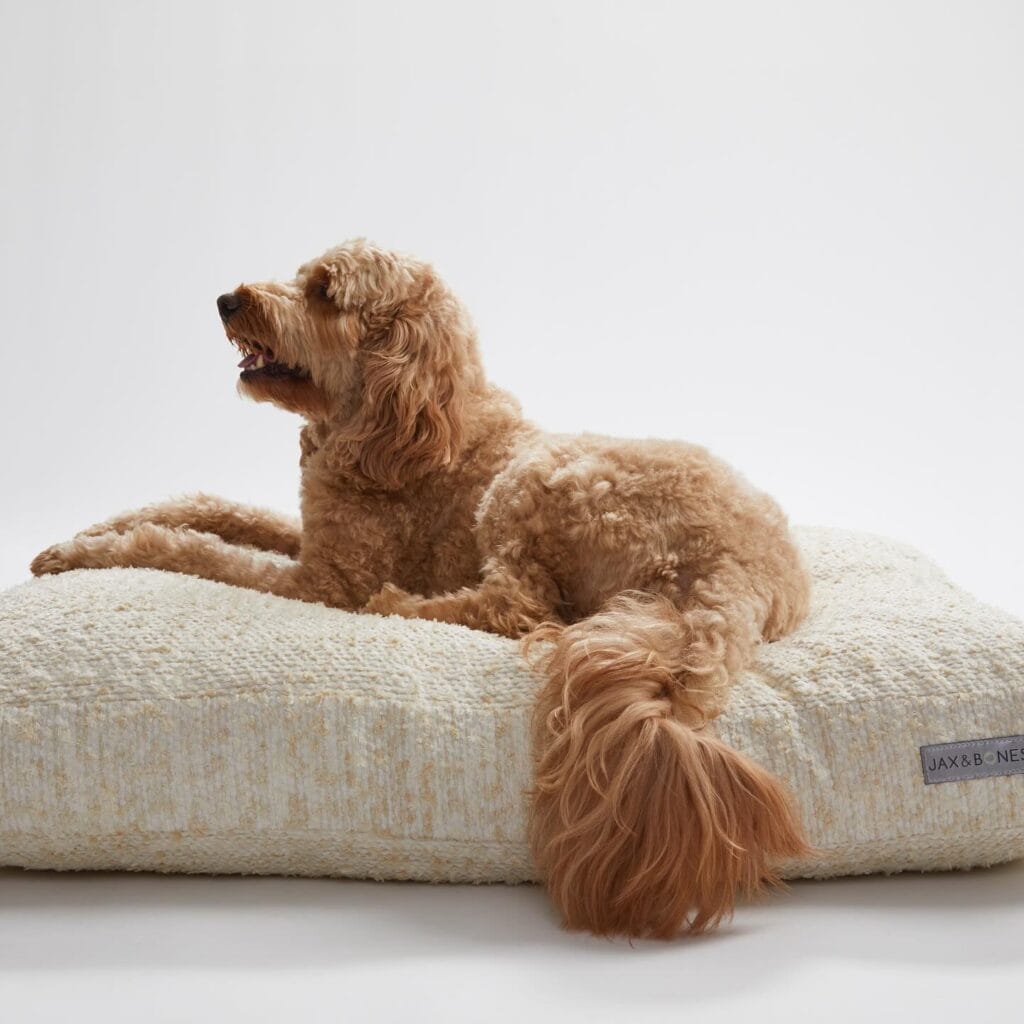
Your golden is finally calm after the park, and she goes straight for the couch — muddy paws and all. You love her, but girl, not on the linen cushions.
That’s exactly the moment I started looking for a dog bed that could handle a big fluffy dog and still look good in my living room. And then I found this style — a boucle fabric pillow bed — and I haven’t looked back.
This DIY is inspired by the Jax & Bones aesthetic: a flat, oversized rectangle cushion in cream boucle fabric with subtle gold threading. It sits low to the ground, has a 4-inch loft, and looks like something you’d see in an Anthropologie catalog.
Materials & Tools:
– 1.5 yards of cream boucle upholstery fabric
– 1 yard of coordinating cotton lining fabric
– 3 lbs of polyester fiberfill or shredded memory foam
– Invisible zipper (22 inches)
– Sewing machine + matching thread
– Fabric scissors + pins
– Iron
Instructions
Cut two 24″ x 36″ panels from your boucle fabric. Lay them face-to-face and pin all four edges, leaving a 12-inch opening along one short side for your zipper placement. Before you sew, slip your lining panels inside — this creates a hidden inner pocket that holds the stuffing and protects the boucle from snags over time.
Sew three sides with a ½-inch seam allowance. Install the invisible zipper on the remaining short edge. Turn the cover right-side out and press the seams flat with a cool iron — boucle scorches, so keep that heat low.
Stuff your cover with the fiberfill, starting at the corners and working inward. Pack it tight. Dogs compress bedding fast, so overstuffing by about 20% means your pup still sinks into something plush six months from now. That’s the feature-benefit-payoff right there: dense fill now = a bed that stays supportive instead of going flat by spring.
Zip it closed. Done.
Boucle grabs surface debris, so keep a lint roller nearby. Washing the cover every 2-3 weeks keeps it looking fresh — just zip it shut before tossing it in the machine on a gentle cycle.
And if you love this style, 14 Cozy Dog Bedrooms to Create a Perfect Space for Your Pup has some gorgeous room setups that pair well with this exact look.
Prep Time: 20 min | Active Project Time: 1.5 hours | Difficulty Level: Beginner-Intermediate
📸 Photo credit: Instagram @jaxandbones
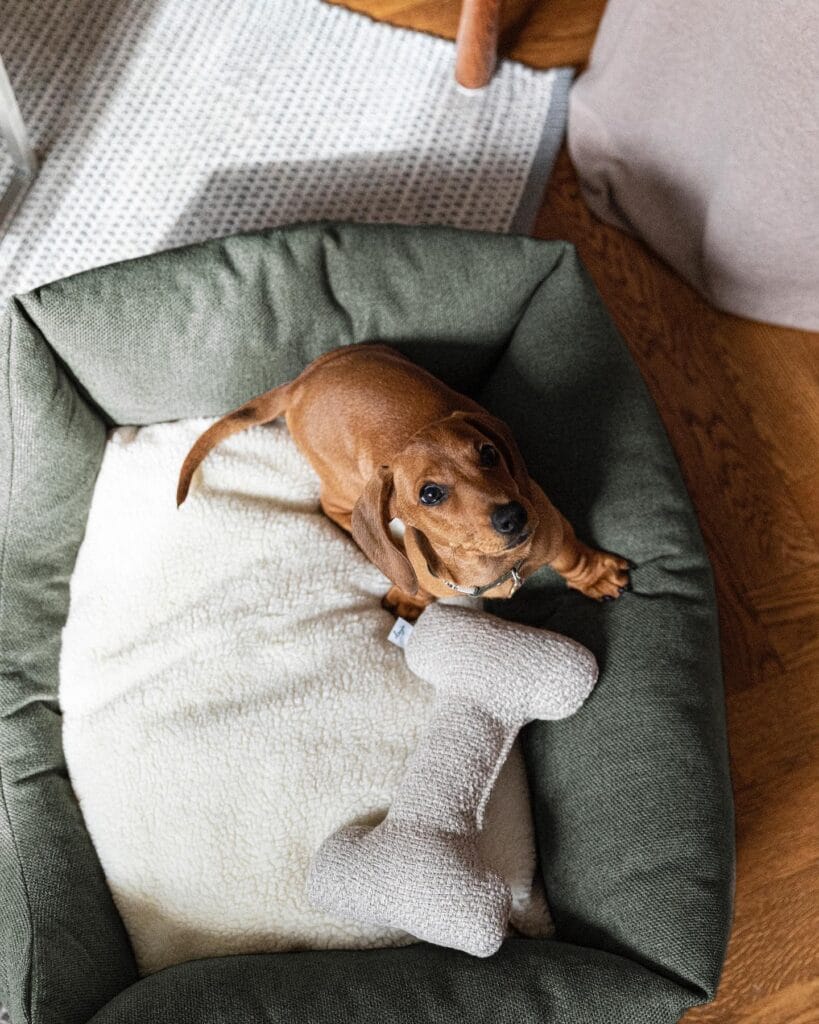
#5: DIY Sherpa Dog Bed Pillow Insert (The One That Makes Their Bed Look Like a Pinterest Dream)
Okay, you know that moment when your golden has completely claimed her bed and half your living room rug, and you’re like… can this at least look cute? Girl, same.
Prep Time: 15 min | Active Project Time: 1.5 hours | Difficulty Level: Beginner-Friendly
What You Need:
– ½ yard of cream sherpa fabric
– ½ yard of oatmeal boucle fabric
– Polyester fiberfill stuffing (about 16 oz)
– Sage green bolster dog bed base (store-bought or DIY)
– Fabric scissors, pins, and a sewing machine
– Matching thread in cream or off-white
Instructions
Cut your sherpa into a 20×26 inch rectangle for the main pillow body. Cut the boucle into a smaller bone shape — roughly 18 inches long — for the toy insert.
Pin your sherpa pieces right-sides together, then sew a ½ inch seam around the edges, leaving a 4-inch gap to stuff. Turn it right-side out. Stuffing generously means the pillow holds its shape and gives your dog that sink-in softness she’ll absolutely melt into. That’s the payoff.
For the bone, trace and cut two identical pieces, sew them together, stuff lightly, and hand-stitch the gap closed.
Both pieces sit inside the sage green bolster base — the layered textures make it look styled, not thrown together.
If your sherpa bunches while sewing, switch to a walking foot on your machine. Total game changer for thick fabrics.
📸 Photo credit: Instagram @denjodogs
#6: Cozy Ribbed Faux Fur Dog Bed Pillow (Because Your Pup Deserves the Good Stuff)
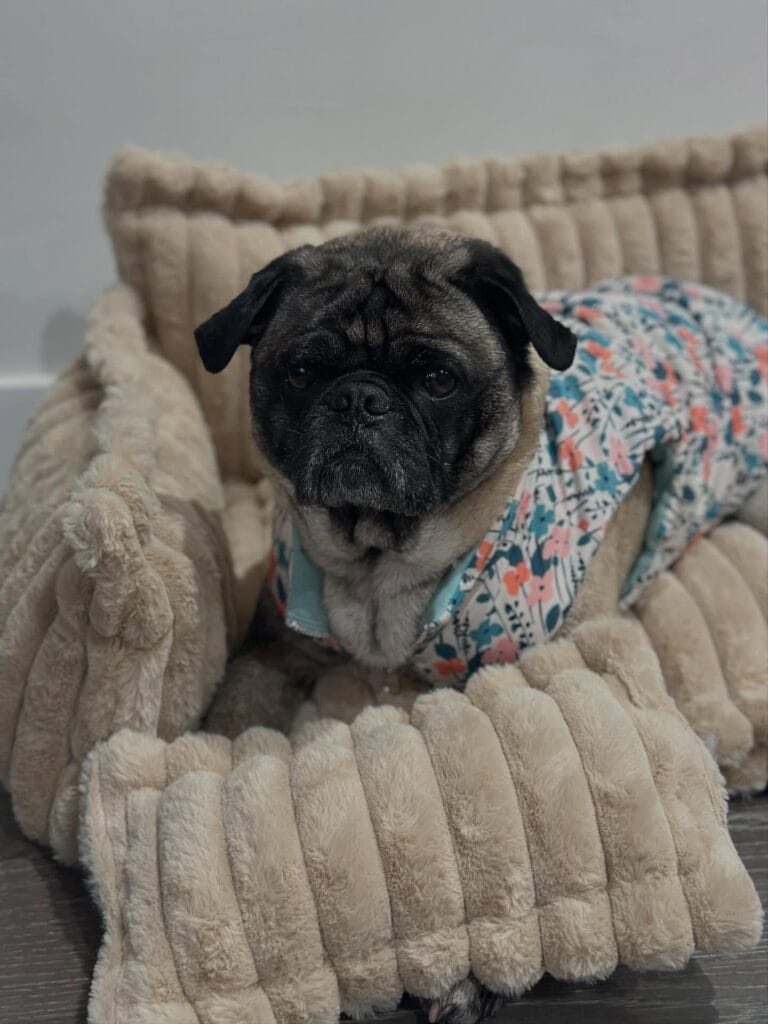
You know that moment when you catch your golden sprawled across your throw pillows again, leaving a trail of fur and drool? Yeah. This DIY is the answer.
This ridged beige faux fur fabric bed is giving full luxury pet boutique — and it costs a fraction of that price. The chunky ribbed texture comes from corduroy-style minky fabric, which is both washable and irresistibly soft against a pup’s skin.
Materials & Tools:
– 1.5 yards of ribbed minky faux fur fabric (beige/cream)
– Polyester fiberfill stuffing (about 3 lbs for a full, plush pillow)
– Sewing machine + matching thread
– Fabric scissors
– Straight pins
– Measuring tape
Instructions
Cut two 24″ x 24″ squares from your ribbed minky fabric, making sure the ridges run the same direction on both pieces. Pin them together with the fuzzy sides facing inward — this gives you those clean edges once flipped.
Sew along three sides using a ½-inch seam allowance, then flip the whole thing right-side out. The ribbed texture naturally hides any slight stitch imperfections, which, honestly, saved me the first time I made one of these.
Stuff it generously with fiberfill until it holds its shape without going flat — that firm-but-cushioned fill supports your dog’s joints, meaning less stiffness after long naps. Hand-stitch the final side closed with a ladder stitch for a seamless close.
The minky fabric traps warmth without overheating, so your dog stays comfortable through every season. And because it’s fully washable, muddy paw days are zero drama.
If you love making things for your pup, 12 Heartfelt Designs for DIY Dog Accessories has even more projects worth bookmarking.
Cut your fabric slightly larger than you think you need — minky has a gentle stretch and can shrink slightly after the first wash.
Prep Time: 15 min | Active Project Time: 45 min | Difficulty Level: Beginner
📸 Photo credit: Instagram @haroldpug_life
#7: Chunky Knit Dog Bed with Braided Border — The Coziest DIY Your Pup Will Ever Sleep On
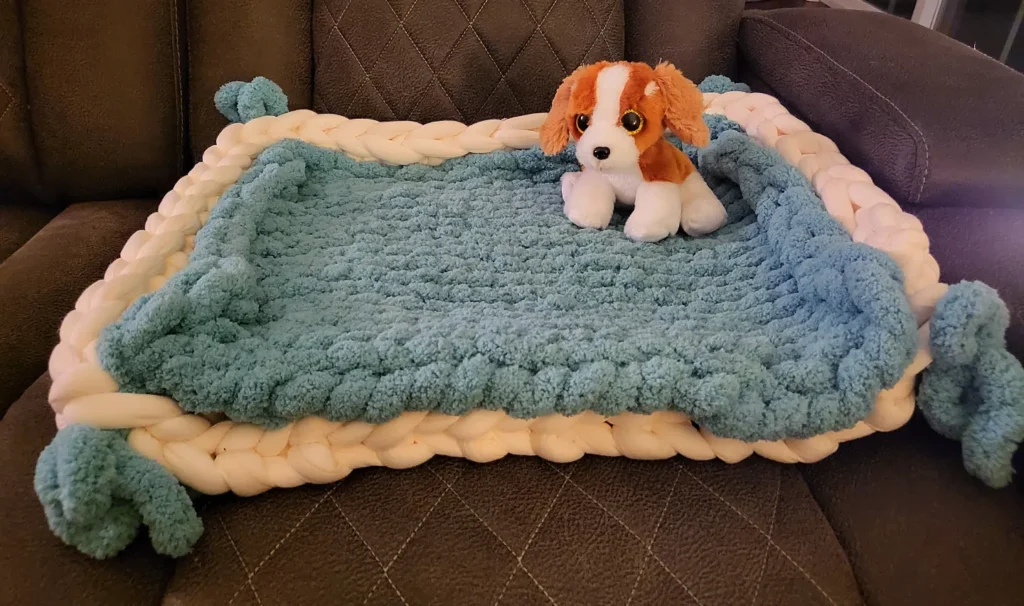
Your golden retriever has claimed the couch again. There’s drool on the cushion, fur in every crevice, and somehow she’s managed to push your throw pillow to the floor. You love her, but girl — she needs her own spot.
This DIY dog bed is honestly everything. It’s a teal/dusty blue chenille yarn center panel, hand-knitted in a chunky loop stitch, framed by a thick cream braided border made from arm-knit merino wool roving. The corners have teal pom-pom tassels that keep the whole thing looking Pinterest-perfect. My aunt made something similar for her husky last winter and I’m not joking — the dog refused to sleep anywhere else.
Materials & Tools:
– 3-4 skeins teal chenille/velvet yarn (bulky weight, size 6)
– 2 skeins cream merino wool roving (for braided border)
– Extra teal yarn for pom-pom corner tassels
– Large knitting needles (US size 50 or arm knitting)
– Scissors, tapestry needle
– Non-slip rug pad (optional but worth it)
Instructions
Cast on 20 stitches using your teal chenille yarn on size 50 needles or with your arms. Work in a basic knit stitch — every row straight across — until your panel measures roughly 24 x 30 inches. The chenille yarn creates that dense, cloud-like texture on its own, so no fancy stitch work needed.
Bind off and weave in your ends.
Now take your cream merino roving and braid three thick strands together until you have enough length to wrap all four sides of the panel. The braided border — which frames the bed and creates a raised bumper — gives your dog a natural chin rest on the edges, meaning she’ll actually use it instead of migrating back to your sofa.
Pin the braid along each edge and use your tapestry needle with a length of cream yarn to sew it securely to the chenille base. Pull firm at each corner so the braid sits flush.
For the teal pom-pom tassels, cut 20 strands of teal yarn, each about 8 inches long. Bundle them, fold in half, and tie a knot at the fold. Attach one to each corner of the braided border. They add that finished, decorative touch — the feature that makes this look like a boutique dog bed, not a craft project, which means guests won’t even clock it as DIY.
Prep Time: 20 min | Active Project Time: 2–3 hours | Difficulty Level: Beginner-Friendly
The chenille yarn is so forgiving for beginners — uneven tension basically disappears in the finished texture. And if you want to match this to your living room aesthetic, 14 Stylish DIY Dog Crate Furniture Ideas You’ll Love has some great inspo for building out a full cozy corner for her.
Wash the finished bed on a gentle cold cycle inside a mesh laundry bag. The chenille holds its shape and the roving stays intact as long as you air dry flat.
📸 Photo credit: Instagram @noors_blanktastic
#8: The Chunky Corduroy Dog Sofa Bed (Yes, Your Golden Deserves a Couch)
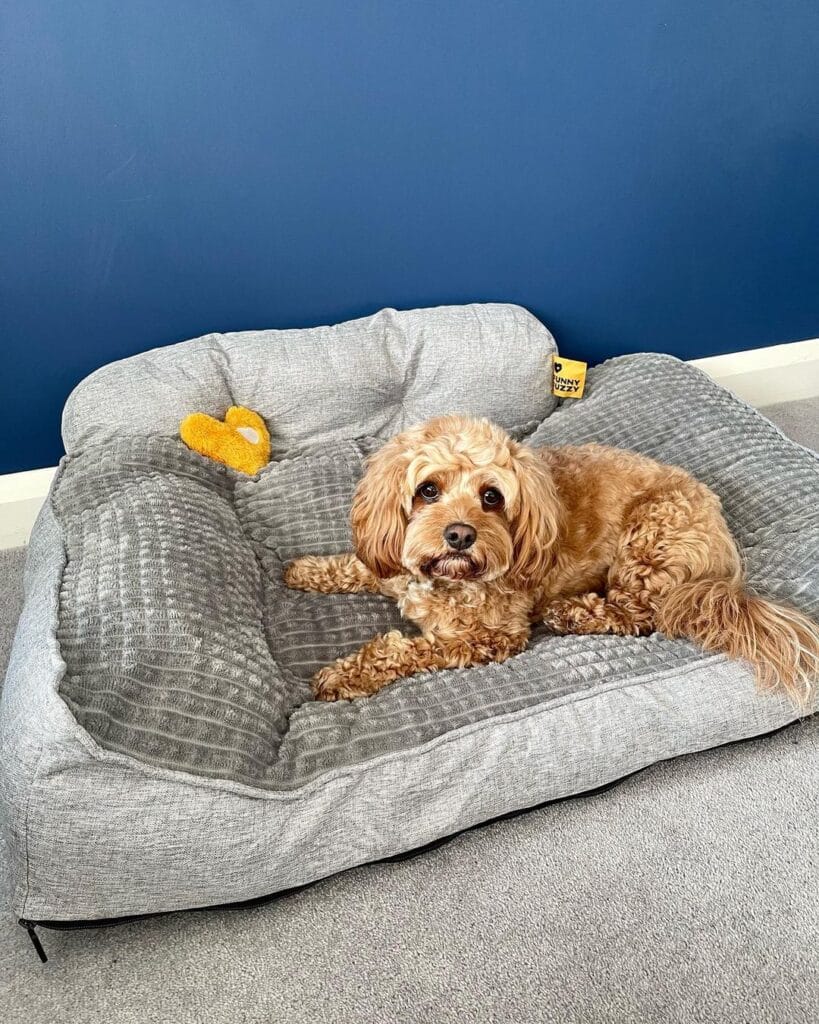
You know that moment your golden flops onto your couch, takes up three cushions, and stares at you like you’re the one sitting in the wrong spot? Yeah. That’s every Tuesday for me too.
This DIY recreates that FunnyFuzzy-style bolster sofa bed using a gray corduroy-textured fabric with a quilted ribbed interior panel — exactly what you see here. It’s structured enough to hold shape but soft enough that your dog will claim it before you finish the last stitch.
Materials & Tools
– 1.5 yards gray corduroy upholstery fabric
– 1 yard quilted gray chenille for the interior base
– High-loft polyester fiberfill (at least 3 lbs)
– 24-inch zipper (black, like the base detail in the photo)
– Sewing machine + heavy-duty needle
– Fabric scissors, pins, measuring tape
Instructions
Cut your chenille into a 28″ x 22″ rectangle for the sleeping base — this gives a medium-to-large dog enough room to fully stretch out, which supports their joints during rest. Sew a zipper along the bottom edge so you can pull the insert out for washing. That zipper closure keeps the stuffing locked in place, which means the bed holds its shape wash after wash instead of going flat by week two.
For the bolster back, cut a corduroy panel 28″ x 14″, fold it lengthwise, stuff it firm, and stitch both ends closed. Attach it along the back edge of the base with a double topstitch for durability. Do the same for the two side armrests at 10″ x 10″ each — stuff them dense so they stay upright when your dog leans in.
And here’s the thing most people skip: topstitch a quilted grid pattern across the interior base panel before assembly. Four horizontal lines, roughly 4 inches apart. It keeps the fill from shifting to the edges and gives that polished, store-bought look you see in the photo.
Tuck a small toy in the corner — the little yellow plush duck in the image is such a cute touch and gives your dog something familiar to settle with.
Chunky corduroy wipes clean with a damp cloth, so mud season doesn’t have to mean a full laundry day every time. If you love building out a full cozy corner for your pup, 7 Cozy DIY Indoor Dog Kennel Ideas pair beautifully with this bed setup.
Use upholstery-weight thread in a matching gray — regular thread will split at the bolster seams within a few weeks under a dog’s daily weight. Going heavier on thread costs almost nothing but adds months to the bed’s life.
Prep Time: 30 min | Active Project Time: 3–4 hours | Difficulty Level: Intermediate
📸 Photo credit: Instagram @funnyfuzzyuk
#9: Half-Square Triangle Patchwork Quilt Dog Bed Pillow
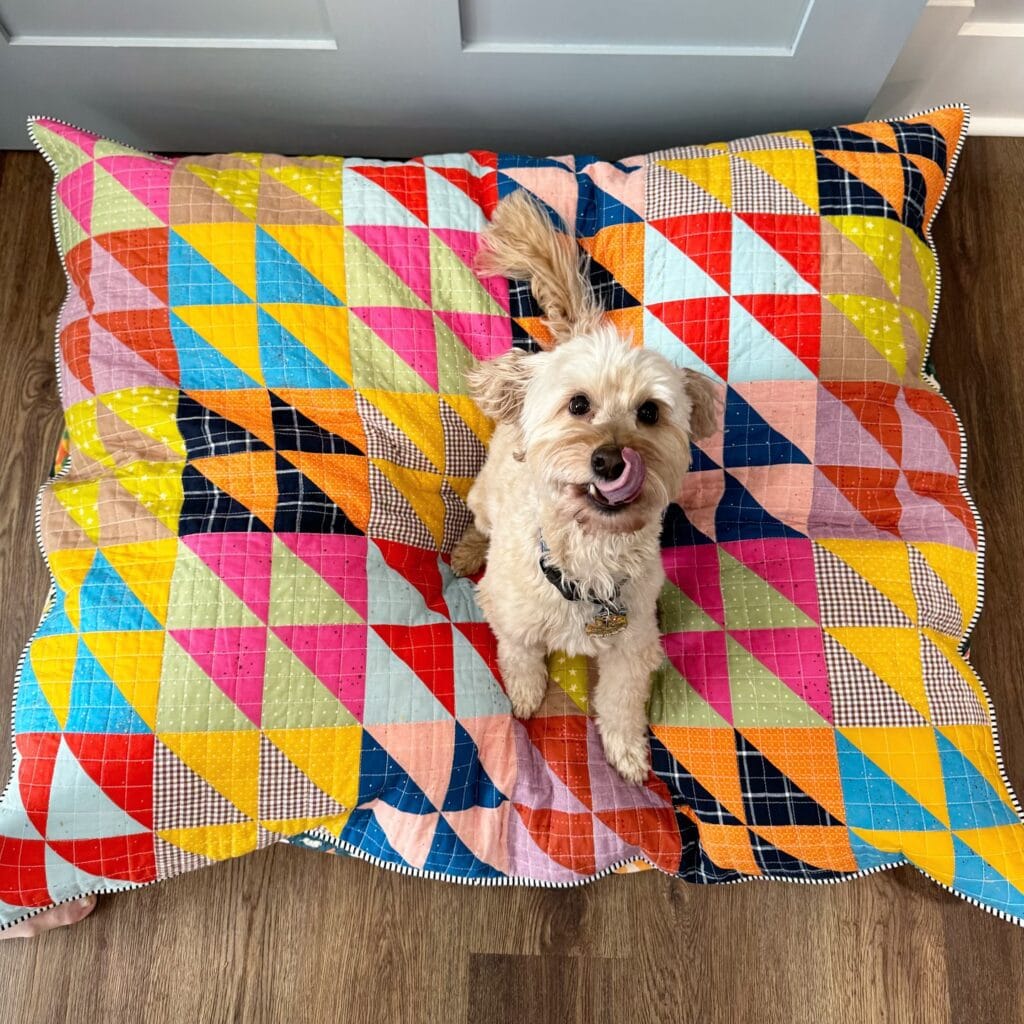
Your golden is doing that thing again — spinning three times, pawing at the couch cushion, then flopping on the cold hardwood like a dramatic little diva. Girl, I see you. My dog Mako used to do the exact same thing before I made him this ridiculously colorful quilted pillow bed, and honestly? I was more obsessed with it than he was.
This one is a showstopper. We’re talking a half-square triangle (HST) patchwork quilt layered over a thick floor pillow — the kind of thing that makes your living room look like a Pinterest board came to life. The version in this image uses a wild mix of fabrics: hot pink, turquoise, yellow, navy plaid, gingham check, orange solid, and red cotton — all cut into triangles and sewn into 6-inch square HST blocks. The border is finished with a black-and-white striped binding that pulls the whole thing together without competing with the colors.
And that scalloped edge? Chef’s kiss. It’s what takes this from “cute dog bed” to “actual home décor piece.”
Prep Time: 1 hour | Active Project Time: 6–8 hours | Difficulty Level: Intermediate
Materials & Tools:
– ⅓ yard cuts of 12–15 mixed cotton fabrics (solids, plaids, ginghams, novelty prints)
– 1 yard of black-and-white striped cotton for binding
– 1 yard of plain cotton or muslin for backing
– 1 large floor pillow insert (28″ x 36″ or custom-cut foam wrapped in batting)
– 2 yards of low-loft cotton quilt batting
– Rotary cutter, cutting mat, and quilting ruler
– Sewing machine with a ¼-inch presser foot
– Fabric marking pen or chalk
– Pins or wonder clips
– Iron and pressing mat
– Zipper (optional, 22-inch nylon coil zipper in a coordinating color)
Instructions
Start by cutting all your fabrics into 7-inch squares — you’ll need at least 60 squares total to get enough HST blocks for a 28″ x 36″ finished top. Pair each square with a contrasting fabric square, draw a diagonal line down the center of the lighter one, then sew ¼ inch on both sides of that line. Cut along the pencil line, press the seams open, and trim each block to a perfect 6.5 inches**. This gives you two HST blocks per pair, so your fabric goes a long way.
Lay out your blocks on the floor and play with the arrangement before you sew a single row. Trust me on this — I skipped this step once and ended up with three orange triangles clumped in one corner and it looked chaotic. Rotate blocks so the triangles create that classic pinwheel or zigzag illusion, then sew them into rows of 6 blocks wide by 10 rows tall. Press seams in alternating directions row by row so your intersections nest together and lie flat.
Once your quilt top is assembled, layer it over the batting and backing fabric, then baste everything together with safety pins every 4–5 inches. Quilt along the diagonal seam lines of each HST block using a walking foot — this simple diagonal quilting technique keeps the layers from shifting and gives your dog’s bed that satisfying padded, structured feel underfoot. The dense quilting also means the top holds its shape even after weekly washing, which — with a golden retriever — is basically a survival skill.
For the scalloped edge, trace a 4-inch circle template along all four sides before you bind, then cut carefully with sharp scissors. Sew your striped binding on a ¼-inch seam, clipping the inner curves every half inch so the binding curves without puckering.
Keep this in mind: if you want easy pillow insert access without re-sewing the whole thing, leave a 12-inch opening along one short edge and hand-stitch a zipper into the backing before you attach the quilt top. Your future self doing laundry will thank you.
Stuff the finished cover over your pillow insert and watch your dog claim it within approximately 45 seconds of hitting the floor. The thick batting + pillow insert combo cushions joints — huge payoff if your golden is getting into her senior years and needs that extra support on hard floors.
Color-blocking your fabrics in a loose gradient — lights on one side, darks on the other — gives the finished top a more intentional look without requiring any extra planning.
📸 Photo credit: Instagram @egmquilted
#10: DIY Black and White Striped Dog Bed Pillow with a Leather Handle
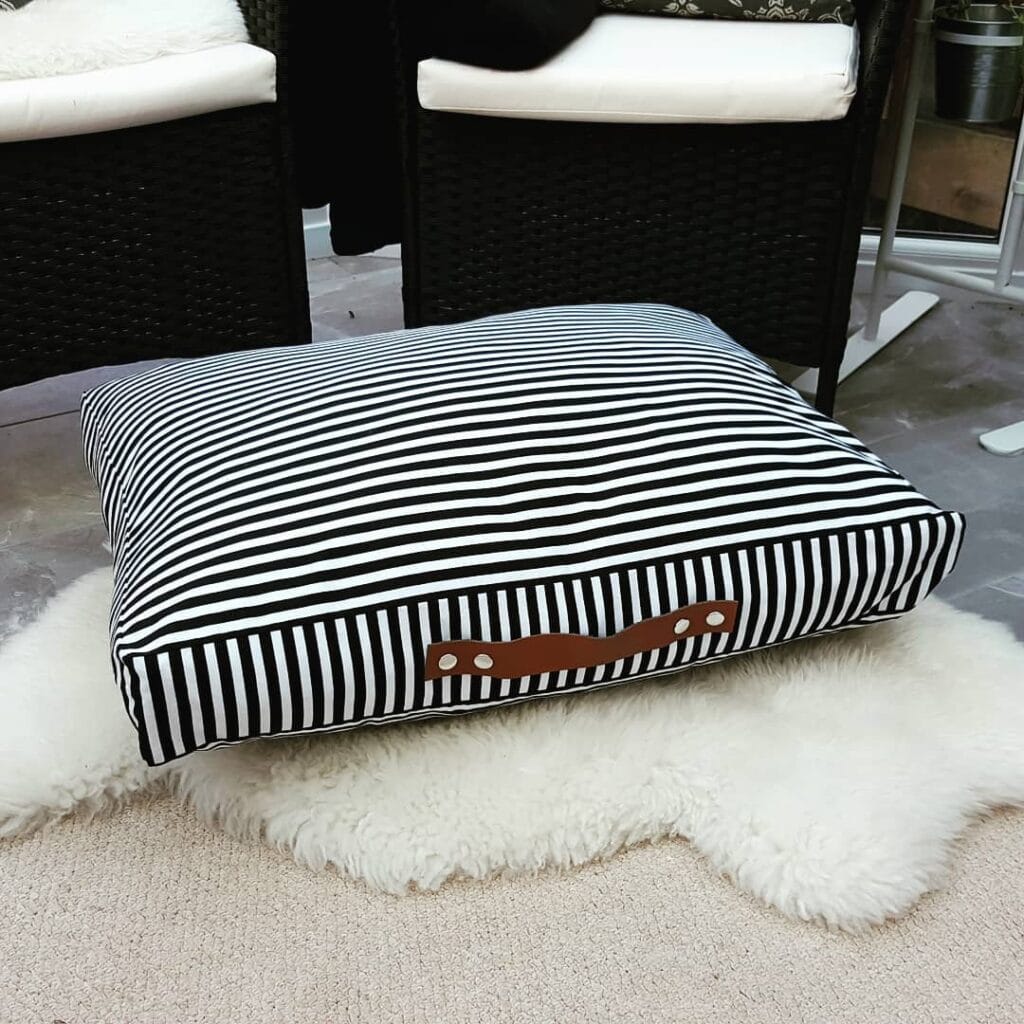
Your golden retriever just did that thing — the one where she circles your couch three times, plops down, and somehow takes up the entire cushion. You love her. But girl, she needs her own spot.
This one is it.
Materials & Tools:
– 1.5 yards of black and white striped cotton canvas fabric
– 10 oz polyester fiberfill or a 24″ x 30″ foam insert
– Brown leather strap (pre-cut, roughly 8 inches)
– 4 silver rivets (double-cap style)
– Sewing machine + matching black thread
– Fabric scissors, pins, rivet setter tool
– Iron for pressing seams
Prep Time: 20 min | Active Project Time: 1.5 hours | Difficulty Level: Beginner-Intermediate
### Instructions
Cut two fabric panels to 26″ x 34″ and one side gusset strip measuring 6″ wide by the full perimeter length. Press all edges before you sew — trust me, this is the step everyone skips and then regrets.
Sew the gusset strip around the perimeter of your bottom panel first, right sides facing. Pin generously at the corners so they stay sharp and boxy. That structured, suitcase shape you see in the photo? That’s what the gusset creates. A thick, supported pillow means your dog’s joints get real cushioning instead of pancake padding — and that’s the payoff that matters after a long walk.
Attach the top panel, leaving a 12-inch opening along one short edge for stuffing. Before closing it up, attach your leather handle. Punch two holes on each end of the strap, press it against the side gusset, and set your silver rivets using the rivet setter. It looks sharp. And it makes carrying the bed from room to room so much easier when you want her near you.
Stuff the pillow firmly — don’t be shy with the fiberfill — then slip-stitch the opening closed by hand.
The striped canvas wipes down fast and the removable cover idea works great here if you add a hidden zipper along that closing seam. Because golden retrievers and muddy paws are basically a package deal.
Pair this with 7 Creative Ideas for Your DIY Dog Washing Station so you can clean her up before she crashes on her new bed.
The stripes hide a lot of fur, by the way. A happy accident I stumbled onto when I made mine.
📸 Photo credit: Instagram @vanillapawsuk
The Filling Secret That Makes or Breaks Your Dog Bed Pillow
Okay, so here’s the thing nobody tells you when you first start making these — the filling is everything.
Most people grab whatever poly-fil is on sale and call it a day. Big mistake. Standard poly-fil compresses flat within weeks under a golden retriever’s weight. You basically just made your dog a very expensive floor.
Real talk: shredded memory foam is the move. Save old foam pillows, cut them up, or buy foam offcuts from fabric stores for next to nothing. It holds its shape and molds to your dog’s body like a dream.
Here’s my personal pitfall lesson — I once made the most Pinterest-worthy cover using a non-removable design. Gorgeous. Then mud paw prints happened. The whole thing was basically garbage after one rainy walk.
Always, always build in a hidden zipper closure. Use an envelope-style back if zippers intimidate you.
One more insider trick: layer shredded foam at the bottom and a thin poly-fil top layer. Your dog gets support AND that plush, cloud-like surface they’ll never want to leave.
Your Golden’s Mess Doesn’t Have to Win
You’ve got the house, the dog, the whole dream. Don’t let muddy paws and fur tumbleweeds make you feel like you have to choose between a beautiful home and your best friend.
Pick one thing this week. One mat, one cover, one storage basket. Small moves add up fast.
And honestly? Your golden deserves a space that works for both of you — not just a corner you’re embarrassed about when guests come over.
So tell me — what’s the one spot in your home where your dog’s chaos hits hardest? Drop it in the comments, I genuinely want to know. 🐾

Amr Mohsen is a software engineer who traded his keyboard for a leash — at least on weekends. His love for dogs inspired him to share what he learns as a dog owner and enthusiast, bringing a detail-oriented, research-driven perspective to every article he writes. If it’s about dogs, he’s probably already looked it up twice.


