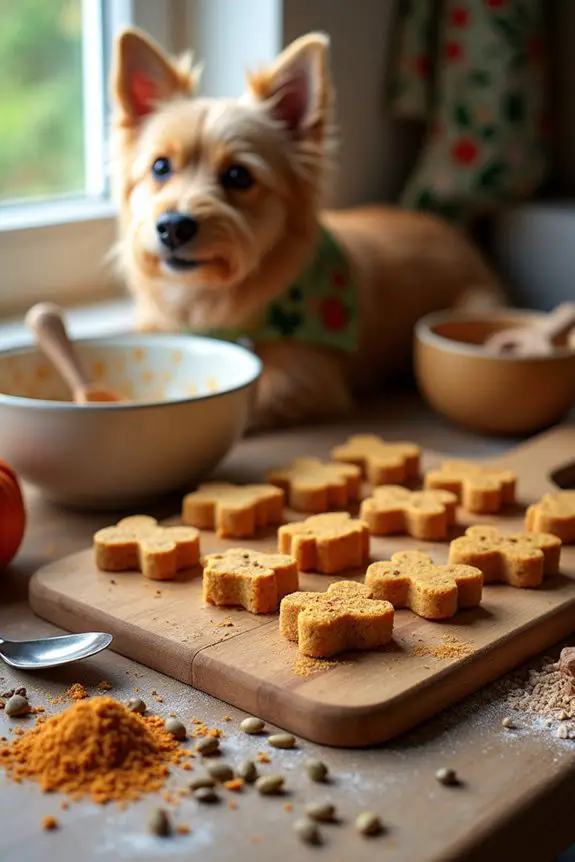
Did you know that some dog treats can actually be made with ingredients you already have in your kitchen? It’s true. Imagine whipping up a batch of deliciously playful dog treats, complete with fun shapes and colors that would make any pup wag their tail in delight. You’re probably wondering how to get started, right? Well, get ready to impress your furry friend with these easy designs that’ll satisfy their taste buds and elevate your treat-making game.
Dog-Friendly Flavor Combinations
When it comes to crafting homemade dog treats, flavor combinations are your secret weapon. Want to whip up some diy dog treats easy? Start by mixing peanut butter with pumpkin. Your pup’s tail will wag like crazy; you’ll think it might take off.
Try sweet potato and chicken for a savory delight. And don’t overlook banana with yogurt—it’s like dessert for dogs!
You’ll be amazed at how something so simple can make you feel like a gourmet chef. Can you picture your furry friend’s joy as they sniff out those tasty creations?
Remember, you can experiment. Maybe add a sprinkle of cinnamon or even some carrots. Just be sure to keep it safe for your canine companion.
Your kitchen might resemble a baking show disaster, but that’s part of the fun!
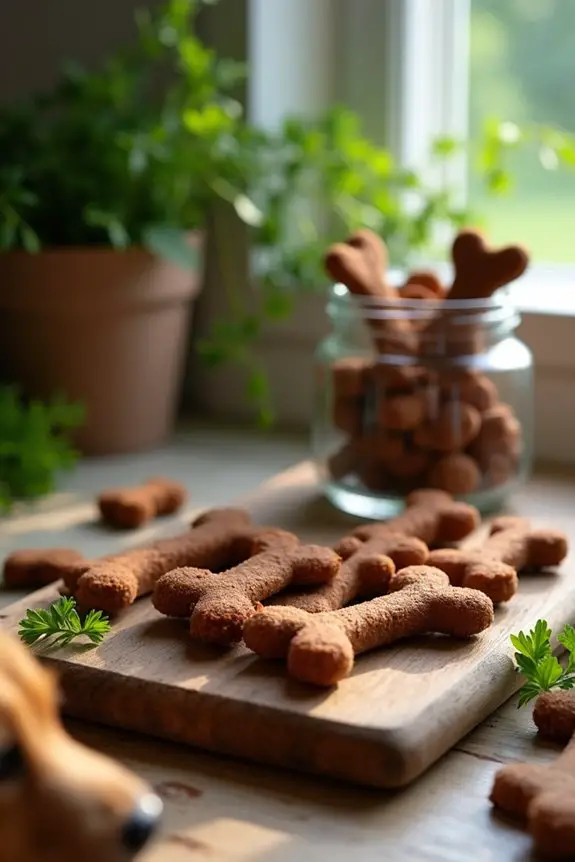
Our Collection
You’ll love our collection of dog treats that’ll have your pup wagging their tail in delight.
From Peanut Butter & Pumpkin Bites to Coconut and Berry Balls, there’s a flavor for every picky palate.
Trust me, after watching your dog go bonkers for these goodies, you might find yourself sneaking a taste or two—just don’t tell your furry friend.
1. Peanut Butter & Pumpkin Bites
If your dog is anything like mine, they go absolutely bananas for treats. You’re not just looking to reward them for a good deed, you’re also wanting to shower them with love. That’s why making your own dog treats is such a fantastic option—these Peanut Butter & Pumpkin Bites are easy to whip up, budget-friendly, and made with love. Plus, it’s always nice to know exactly what’s going into your pup’s snacks. Let’s get started, shall we? Premium dog treat makers are also a great investment if you want to create unique treats. Not only can you make the classics, but you can also experiment with different ingredient combinations that your pet will absolutely adore. Adding high-quality ingredients like freezedried salmon treats can elevate the flavor of your homemade snacks, especially when using a dog treat maker.
Materials Needed:
- 1 cup pumpkin puree (not the spiced pie filling)
- ½ cup peanut butter (make sure it doesn’t contain xylitol)
- 2 cups whole wheat flour (or gluten-free alternative if needed)
- 1 egg
- 1 teaspoon cinnamon (optional)
- Mixing bowl
- Rolling pin
- Cookie cutter (bone-shaped, if you’re feeling festive)
- Baking sheet lined with parchment paper
Step-by-Step Instructions:
- Preheat your oven to 350°F (that’s 175°C for my metric friends). This magical number is where the cookies come to life!
- Mix the wet ingredients. In a mixing bowl, combine the pumpkin puree, peanut butter, and the egg. You might find that using a spoon is like trying to mix glue and glitter—it can get sticky. But stick with it! (Pun intended)
- Add the dry ingredients. Slowly mix in the whole wheat flour and cinnamon (if you’re using it). You might need to switch to your hands because this mixture can get thick. Embrace the doughy experience—your hands will smell like a delicious treat.
- Roll out the dough. Dust your counter with a bit of flour and spread the dough out using a rolling pin to about ½ inch thickness. Think of it as a mini workout.
- Cut out your shapes. Use your cookie cutter to make fun shapes. Not into the bone shape? No problem, use whatever you have on hand or just cut them into squares. They’ll still taste amazing!
- Arrange and bake. Place the cutouts on your baking sheet lined with parchment paper. Pop them into the preheated oven and bake for 20–25 minutes. Keep an eye on them; you want them to be firm and golden, not charcoal pieces of art.
- Cool and enjoy. Once baked, take them out of the oven and let them cool completely before giving them to your pup. Trust me, you don’t want to be the one who gives a hot cookie to their furry friend. I may or may not have done that once… let’s just say the kitchen was a bit too chaotic.
Optional Add-ons/Variations:
- Flavored Fun: Want to mix things up? Add in a mashed banana for a little sweetness or some shredded carrots for a veggie twist.
- Creative Shapes: Get a little wild with your shapes! How about heart-shaped treats for a doggie Valentine’s Day or holiday-themed shapes for festive fun? Why not?
Pro Tip:
Always make sure the peanut butter you’re using doesn’t contain xylitol. This sweetener is toxic to dogs, and while we’re crafting these yummy treats, we don’t want anything ruining the fun. Keep it simple, keep it safe!
Making these Peanut Butter & Pumpkin Bites isn’t just about baking; it’s about crafting something special for your furry friend. So roll up those sleeves, and let’s get baking! Your pup will thank you with tail wags that might just knock you over.
2. Sweet Potato Cheddar Drops
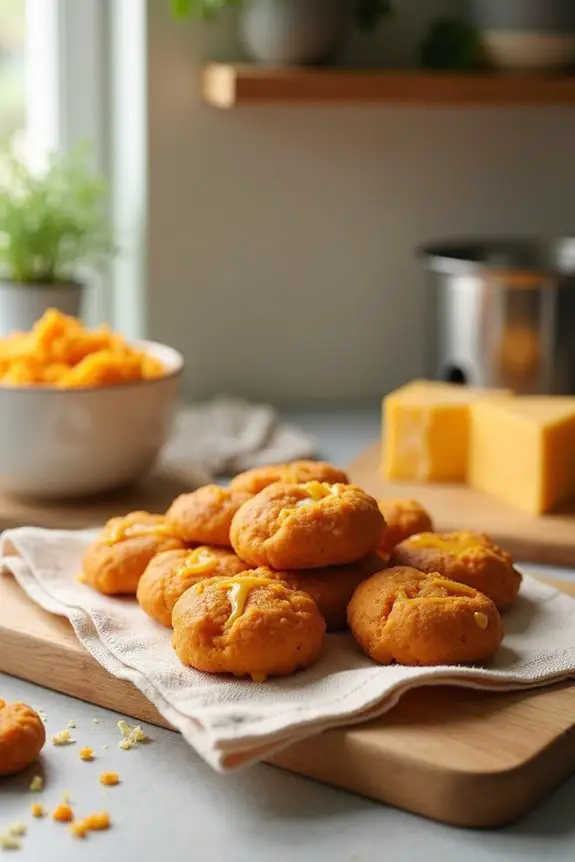
If you want to spoil your pup with something homemade, these Sweet Potato Cheddar Drops are a fantastic choice. Not only are they easy to make, but they also show your furry friend just how much you care. Plus, your wallet will thank you for avoiding store-bought treats that can be quite pricey.
Ready to whip up some tail-wagging goodness? Let’s jump in.
Materials Needed:
- 1 cup cooked sweet potato (mashed, about 1 medium sweet potato)
- 1 cup shredded sharp cheddar cheese
- 1 ½ cups whole wheat flour (or a gluten-free alternative)
- 1 egg
- 1 teaspoon garlic powder (optional)
- Mixing bowl
- Baking sheet lined with parchment paper
- Cookie scoop or tablespoon
Step-by-Step Instructions:
- Preheat your oven to 350°F (175°C). This setting is essential as it will help those yummy scents fill your home as they bake.
- Combine the ingredients. In a mixing bowl, combine the mashed sweet potato, shredded cheddar cheese, and egg. Mix until everything is well incorporated. It can get a little gooey, and you might feel like you’re making a science experiment—but that’s part of the fun.
- Incorporate the flour. Gradually add in the whole wheat flour and garlic powder (if using) to the sweet potato mixture. Stir until a dough forms. You may need to get your hands in there to fully combine—it’s totally normal, so embrace it!
- Scoop it out. Use a cookie scoop or a tablespoon to drop dollops of dough onto your lined baking sheet. Space them a few inches apart, as they’ll expand slightly while baking.
- Bake away! Pop the treats into your preheated oven and bake for 20–25 minutes until they’re firm and lightly golden on the edges. Just imagine the aroma wafting through the kitchen—if only they made a candle that smelled like this.
- Cool and serve. Once golden, remove them from the oven and let them cool completely before letting your pup indulge. Trust me, you don’t want to be responsible for a dog racing around the house with a hot treat.
Optional Add-ons/Variations:
- Cheesy Twist: Swap in different cheese varieties like mozzarella or gouda for a flavorful twist. You can also mix in some herbs like parsley for added freshness.
- Sweet Surprise: Try adding a pinch of cinnamon or nutmeg to give a warm, comforting flavor that both you and your dog might enjoy.
Pro Tip:
Before starting, make sure that your sweet potato is cooked thoroughly; this will help the dough come together beautifully.
Plus, if you cook a couple of extra potatoes, you can enjoy some delicious side dishes while your pup gets their special treats—sharing is caring after all. Just remember, moderation is key—even if those sweet potato drops smell good enough to eat yourself.
With these Sweet Potato Cheddar Drops, you’ll not only be showering your pup with love but also showing off your homemade treat-making skills. Your furry friend deserves the best, and now they can have it—one drop at a time.
3. Carrot and Apple Chews
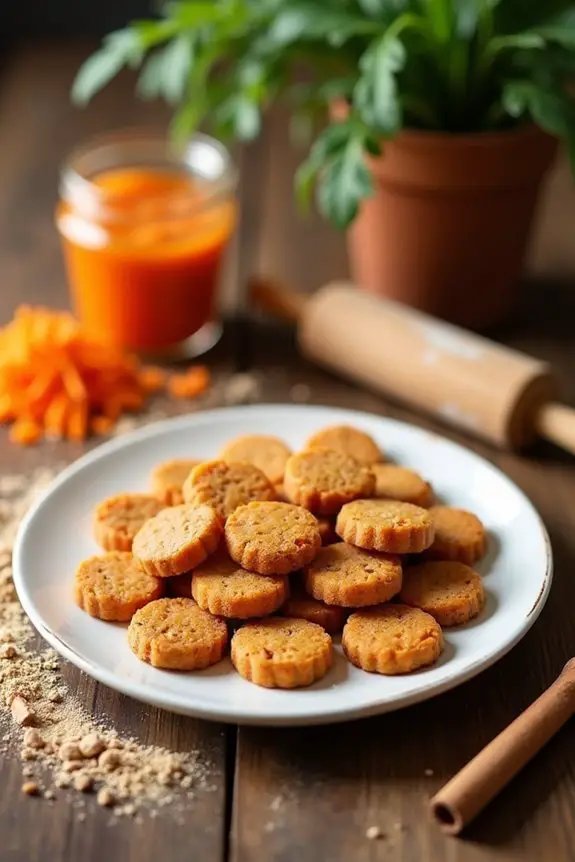
Who doesn’t love a good crunchy treat? These Carrot and Apple Chews are a delightful, healthy indulgence for your pup. Packed with natural goodness, they’re not only easy to whip up but can save you quite a bit of cash compared to those overpriced store-bought treats. Plus, they’re a great way to sneak in some veggies and fruits into your dog’s diet. Did you know that feeding your pup the right food, like premium dog food goldendoodle, can support their overall health? Ready to get those tails wagging?
Materials Needed:
- 1 cup finely grated carrots (about 2 medium carrots)
- 1 cup unsweetened apple sauce (make sure it has no added sugars)
- 1 ½ cups whole wheat flour (or a gluten-free alternative)
- 1 egg
- ½ teaspoon cinnamon (optional, but who doesn’t love a little spice?)
- Mixing bowl
- Baking sheet lined with parchment paper
- Rolling pin (optional, you can also just shape them by hand)
- Cookie cutter (fun shapes can make them extra special)
Step-by-Step Instructions:
- Preheat your oven to 350°F (175°C). Your house is about to smell like a bakery, and your dog won’t stop staring at you with those big, hopeful eyes.
- Mix it up. In a mixing bowl, combine the grated carrots and apple sauce. Stir in the egg until everything looks well-blended. It might be a little messy, but that’s part of the fun—embrace the chaos.
- Add the flour. Gradually mix in the whole wheat flour and cinnamon (if you’re using it). Keep stirring until it forms a consistent dough. If it feels sticky, no worries—just add a bit more flour until it’s easy to handle.
- Roll it out. If you’re feeling fancy, sprinkle some flour on your surface and roll out the dough to about ¼ inch thick. If you’d rather not dirty a rolling pin, simply shape the dough into small balls or squares with your hands.
- Cut out shapes. Use your cookie cutter to create fun treats. If you’re shaping them by hand, a simple rectangle or square works just as well. Place them on your baking sheet, spaced a bit apart.
- Bake those chews. Slide the baking sheet into your preheated oven. Bake for 20–25 minutes, until the edges are slightly golden and the treats are firm to the touch. Trust me, you’ll want to take a deep breath and savor that aroma.
- Cool them down. Once they’re out of the oven, let those tasty bites cool completely before giving them to your pup. Scalding-hot treats might lead to a dash for the water bowl—no one wants that scene.
Optional Add-ons/Variations:
- Flavorful Fork: Try adding mashed banana or pumpkin puree for a different flavor twist. Dogs love variety just as much as we do.
- Color Pop: If you want a splash of color, add a few drops of natural food coloring (like beet juice) to make the treats a bit more vibrant. Not that dogs care much about looks, but why not make them adorable too?
Pro Tip:
Always remember to check that any apple sauce you use is free from added sugars and artificial ingredients. A little love goes a long way, and you want these treats to be as wholesome as possible for your fur baby. Happy baking!
4. Banana and Oat Treats
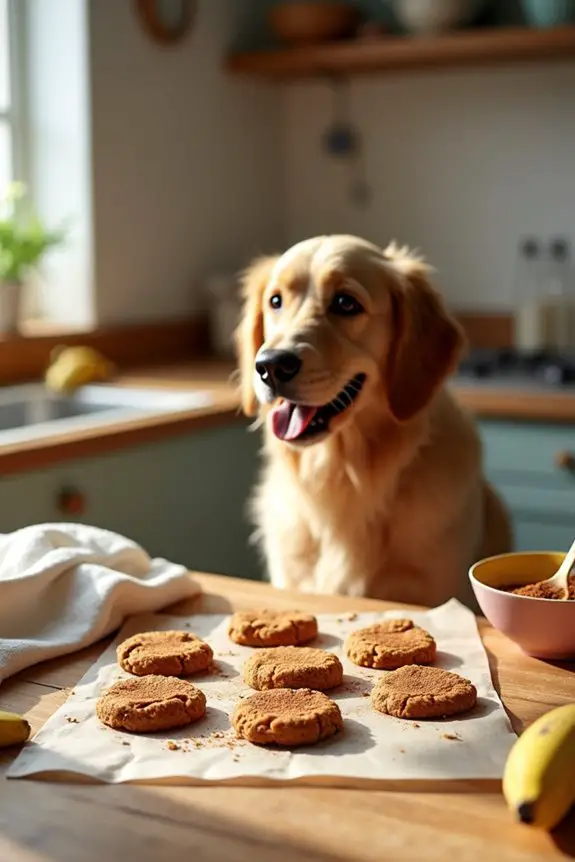
Looking to treat your furry friend to something extra special while keeping it healthy? These Banana and Oat Treats aren’t only easy to make, but they also whip up in no time using ingredients you likely already have at home. Plus, they’re a cost-effective way to show your dog just how much you love them without breaking the bank.
Materials Needed:
- 1 ripe banana (the riper, the better)
- 1 cup rolled oats (quick-cooking oats work too)
- 1/4 cup peanut butter (make sure it’s xylitol-free)
- Mixing bowl
- Fork (to mash the banana)
- Baking sheet lined with parchment paper
Step-by-Step Instructions:
- Preheat the oven to 350°F (175°C). Get ready for some mouthwatering smells wafting through your kitchen. Your pup will definitely want to “help” with the process.
- Mash the banana. In your mixing bowl, take that ripe banana and go to town with your fork. Smash it up until it’s nice and smooth. The more you mash, the easier it’ll be to mix everything later. Channel your inner pastry chef if you have to.
- Mix other ingredients. Add the rolled oats and peanut butter to your mashed banana. Stir it all together until it forms a chunky dough. Don’t worry if it looks a little rough; your pup won’t mind a perfect presentation.
- Shape the treats. Use your hands to form small balls or flatten them out into cute little discs. If you’re feeling extra creative, you could use cookie cutters to make fun shapes. Just remember, these aren’t for you, so no pressure on the aesthetics.
- Place on baking sheet. Space the treats out on your lined baking sheet. Aim for about 1–2 inches apart. They won’t spread much, but giving them a little room helps with even baking.
- Bake those goodies. Pop the baking sheet in your preheated oven and let the magic happen for about 15–20 minutes. They’re done when they start to look golden and firm.
- Cool it down. Once they’re out of the oven, let the treats cool completely. I know it’s tempting to offer one right away, but your pup will thank you for keeping their tongue safe from burns.
Optional Add-ons/Variations:
- Flavored Fun: Add in a tablespoon of honey or a sprinkle of cinnamon for an extra treat. Or mix in some shredded carrots for added nutrients. Your pup will appreciate the variety.
- Berried Treasure: Swap in some mashed blueberries for a fruity twist. Just be cautious not to use too many; dogs don’t need a berry explosion.
Pro Tip:
When it comes to keeping these treats fresh, store them in an airtight container. They should hold up for about a week, but something tells me they won’t last that long with your pup around.
If you want to keep them longer, toss them in the freezer—just remember to thaw them out before serving. Your dog’s taste buds will thank you.
Now, get ready to be showered with doggie kisses for your fantastic homemade efforts. And just think, you might even have some fun preparing these treats together with your furry friend, albeit, under close supervision—after all, they may try to do a little taste testing along the way.
5. Coconut and Berry Balls
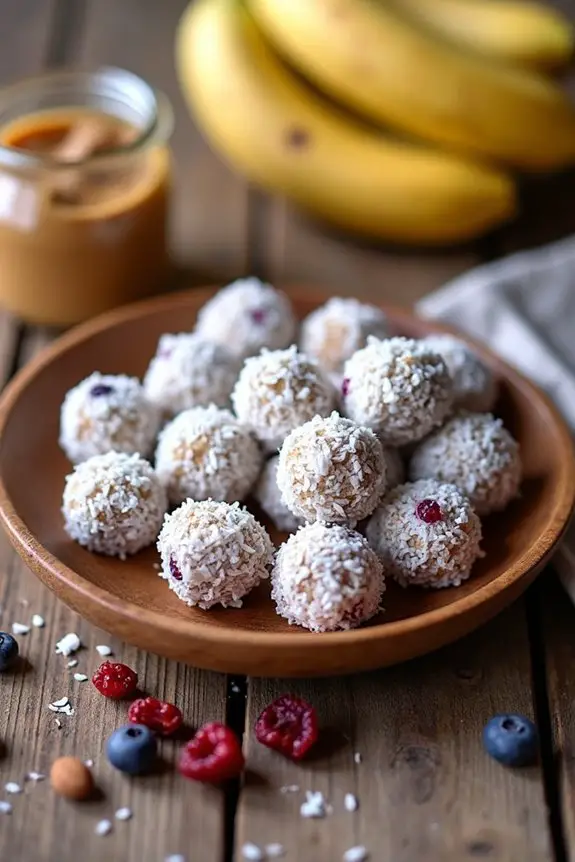
If you’re on the lookout for a tasty and nutritious DIY dog treat that’s super easy to whip up, Coconut and Berry Balls might just be your new go-to.
These little delights not only provide a healthy snack for your pup, but they also save you money compared to store-bought options.
Plus, they’re packed with wholesome ingredients that will keep your furry friend wagging their tail with delight.
Materials Needed:
- 1 cup shredded unsweetened coconut
- 1/2 cup rolled oats
- 1/2 cup mashed ripe banana (about one medium banana)
- 1/4 cup dried berries (like cranberries or blueberries)
- Mixing bowl
- Wooden spoon (or your trusty spatula)
- Baking sheet lined with parchment paper (optional)
Step-by-Step Instructions:
1. Get started by mixing dry ingredients. In a mixing bowl, combine the shredded coconut and rolled oats.
Give it a good stir with your wooden spoon until they’re well mixed.
This is the base for your tasty treats.
2. Mash the banana. In a separate bowl, take that ripe banana and mash it up until it’s nice and smooth.
A fork works wonders here, giving you a bit of a workout too.
Just think of it as a mini arm exercise session.
3. Combine everything. Now it’s time to bring the two bowls together.
Add the mashed banana and dried berries to the coconut-oat mixture.
Mix it all up until you get a sticky dough.
If it’s too dry, you can add a splash of water or a little more banana until it holds together.
4. Shape the treats. Now, for the fun part.
Use your hands to roll the mixture into small balls, about the size of a golf ball—or, you know, whatever shape you fancy.
(Just note that you might end up with sticky fingers, but that’s the price of creativity.)
5. Chill out. Place the finished balls on your parchment-lined baking sheet (or just leave them on a plate if you’re feeling lazy, we won’t judge).
Pop them in the fridge for about an hour to help them firm up.
This step is fundamental—your dog will definitely notice if you skip it.
6. Serve them up! Once they’re chilled and solid, they’re ready for your pup.
Store any leftovers in an airtight container in the fridge to keep them fresh.
Don’t worry, they won’t last long once your furry friend gets a taste.
Optional Add-ons/Variations:
– Nutty Idea: Feel free to add in some almond or peanut butter for a richer flavor.
Just make sure it’s xylitol-free.
It’s a win-win: more flavor for your dog and a bit of extra protein too.
– Berry Blast: Want to switch it up?
Swap out dried berries for other dog-safe dried fruits like apple or pumpkin puree.
Your pup might just love the new flavors.
Pro Tip:
Always keep an eye on your dog while they’re enjoying their new treats, especially if it’s their first time trying something new.
It’s a good safety precaution; you never know how they might react to different ingredients.
And if you want to save some extra cash, buy your ingredients in bulk for future batches.
Trust me, once your pup tries these, you’ll be making them again and again.
6. Beef and Liver Snacks
If you’re on the hunt for a meaty treat that will make your dog’s tail wag uncontrollably, search no more than these Beef and Liver Snacks. Not only are they packed with protein and flavor, but making them at home means you’re saving some cash while also guaranteeing they’re made from high-quality ingredients.
Trust me, your furry friend will appreciate the effort, and you’ll get the warm fuzzies seeing them enjoy a snack made just for them.
Materials Needed:
- 1 cup beef liver (fresh or frozen works great)
- 1 cup whole wheat flour (or gluten-free flour, if needed)
- 1/4 cup beef broth (low-sodium for health)
- 1/4 cup water
- Mixing bowl
- Blender or food processor
- Baking sheet lined with parchment paper
- Cookie cutter (optional, but fun)
Step-by-Step Instructions:
- Prep the liver. If you’re using frozen liver, be sure to thaw it completely first. This may take a couple of hours at room temperature, or you can speed it up by popping it in the microwave for a few seconds. Just beware of overdoing it—no one likes rubbery liver.
- Blend away. In a blender or food processor, add your beef liver along with the beef broth and water. Blend until it’s a nice, smooth mixture. You want it to be similar to a smoothie, minus the bananas and kale. This can be a bit messy, so maybe wear an apron—or just embrace the splatters, I suppose.
- Mix it up. In your mixing bowl, combine the blended liver mixture with the whole wheat flour. Stir with a spoon until all the flour is incorporated and you have a thick dough. This can be a workout, so don’t shy away from getting those arms moving.
- Roll and cut. Roll out the dough on a lightly floured surface until it’s about 1/4 inch thick. If you’re feeling creative, use cookie cutters to make fun shapes—your dog won’t care, but it’s a personal touch that adds a little whimsy.
- Bake those treats. Place your cut-out shapes on a baking sheet lined with parchment paper. Bake them in a preheated oven at 350°F (175°C) for about 20-25 minutes, or until they’re firm and slightly crispy. Your kitchen is about to smell amazing, so get ready for some curious doggy noses sniffing around.
- Cool it down. Let the treats cool completely on a wire rack before serving them to your pup. You’d think I’d learned this the easy way, but one time I handed a warm treat to my dog, and let’s just say the expression of disappointment when they couldn’t chew through it was heartbreaking.
- Store the leftovers! Keep any leftover treats in an airtight container in the fridge for about a week. If you make a big batch (because why not?), you can also freeze some for later snacks.
Optional Add-ons/Variations:
- Herbal Twist: Consider adding a sprinkle of parsley or a pinch of garlic powder for a little herbal flavor boost. Just be cautious not to use too much garlic, as it can be harmful to dogs in larger amounts.
- Shape-Shifting: Instead of rolling the dough flat, you can roll it into small balls for a different texture. Trust me, pups love variety—keep things interesting.
Pro Tip:
Always make sure to cut your treats into appropriate sizes based on your dog’s feeding habits. A small dog might feel overwhelmed by what seems like a giant steak in treat form, while a large pooch might gobble it down too quickly.
Keeping an eye on portion sizes not only helps with comfort but also guarantees they savor every bite. Plus, your dog will appreciate the thoughtful gesture—because who doesn’t love a little love in the snack department?
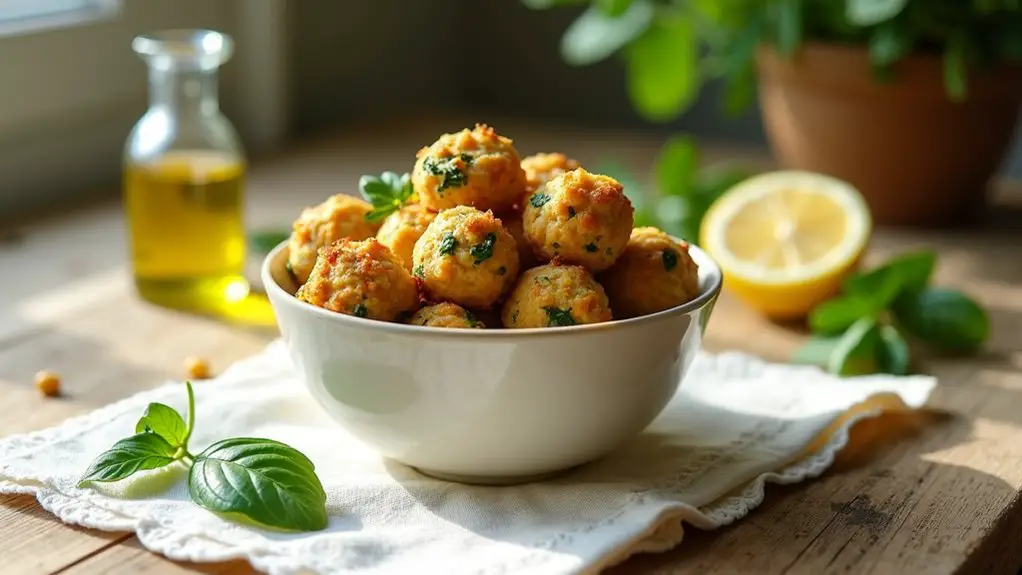
7. Chickpea and Spinach Bites

If you’re itching to whip up a healthy, tasty treat for your dog that’s kind to their tummy, seek no further than these Chickpea and Spinach Bites. Packed with protein and fiber, they’re not just nutritious but also easy to make, which means your wallet stays happy, too. Plus, what dog doesn’t love a homemade snack to show off at the park?
Materials Needed:
- 1 can (15 oz) chickpeas, drained and rinsed
- 1 cup fresh spinach (or frozen, thawed and squeezed dry)
- 1/2 cup rolled oats
- 1/4 cup shredded cheese (optional, but let’s be real, who can resist cheese?)
- 1 tablespoon olive oil
- 1 teaspoon garlic powder (optional)
- Mixing bowl
- Fork or potato masher
- Baking sheet lined with parchment paper
- Spoon for scooping
Step-by-Step Instructions:
- Mash it up. In a mixing bowl, grab your drained chickpeas and start mashing them with a fork or potato masher. You want a chunky texture that’s still able to hold everything together—think of it like making the filling for a veggie burrito, minus the tortillas.
- Mix in the greens. Chop the spinach into smaller pieces (if you’re using fresh) and add it right to the bowl. Don’t fret about making it perfect; just toss it in and get ready to mix. If you’re feeling extra fancy, you can squeeze in some lemon juice for a fresh kick.
- Add the extras. Now, stir in your rolled oats, shredded cheese (if using), olive oil, and garlic powder (if you’re feeling adventurous). Mix everything until fully combined. This step is a workout, so get ready to flex those mixing muscles.
- Scoop and shape. Using a spoon, scoop out the mixture and roll it into small balls or patties—whatever shape you think your dog would love. Place them on the prepared baking sheet, giving them a bit of space to breathe while they bake.
- Bake to perfection. Pop your baking sheet in the oven, set at 375°F (190°C), for about 20-25 minutes. You want them to turn golden and firm to the touch. Just a heads-up, your kitchen is going to smell so good that you might’ve a nosy pup staring at you.
- Cool before serving. Once they’re out of the oven, let those bites cool down completely on a wire rack. Trust me, there’s nothing worse than giving your dog a treat that’s still too hot. A disappointed pup is a sad sight.
Optional Add-ons/Variations:
- Want to switch things up? Try adding sweet potato puree instead of some chickpeas for a sweet twist.
- Or, go wild and mix in some herbs like parsley or basil to give it a flavor boost and a super sniff-worthy aroma.
Pro Tip:
To help keep costs down, consider making a double batch—these treats freeze well! Just store them in an airtight container, and you’ll have a stash of yummy bites for your dog anytime they deserve a special treat (which is, let’s be honest, every single day).
Plus, they make perfect training rewards, as your dog will practically be begging to do tricks just for a taste.
Extra Tips & Ideas
While whipping up tasty treats for your pup, why not sprinkle in a few extra ideas to make the experience even more fun?
Try using cookie cutters shaped like bones or hearts to add personality to your treats. It’s a simple way to impress your friends—they might even think you’ve got mad baking skills.
If you want to get fancy, consider drizzling some pet-safe yogurt on top for a yogurt glaze. Your dog won’t mind a little flair.
And don’t forget to involve your furry friend! Let him “help” by giving him a treat when you’re mixing, so he knows it’s his special snack.
After all, baking’s more fun with a wagging tail around, right?
Frequently Asked Questions
Can I Substitute Ingredients for Dogs With Allergies?
Yes, you can substitute ingredients for dogs with allergies. Just make sure to choose safe alternatives that won’t trigger their sensitivities, like using pumpkin instead of peanut butter or oat flour instead of wheat flour.
How Long Do Homemade Dog Treats Last?
Homemade dog treats can last about a week at room temperature, yet if you freeze them, they stay fresh for up to three months. So, enjoy them sooner or savor them longer—it’s your choice!
What Tools Do I Need for Making Dog Treats?
You’ll need a mixing bowl, measuring cups, baking sheets, and parchment paper. A rolling pin helps with dough, while cookie cutters create fun shapes. Don’t forget an oven or a dehydrator for baking!
Are There Any Unsafe Foods for Dogs?
Yes, there are unsafe foods for dogs. Avoid chocolate, grapes, onions, garlic, and nuts like macadamia. Always check ingredients before offering food, and remember some human snacks can harm your furry friend. Stay informed!
Can I Freeze Dog Treats for Later Use?
You can freeze dog treats for later use, extending their shelf life. Just pack them snugly in an airtight container and pop them in the freezer. Your furry friend will appreciate the tasty surprise later!
Conclusion
So, there you have it—10 pawsitively delightful designs for DIY dog treats. Making these tasty goodies is like painting a masterpiece, only instead of a canvas, you’ve got dough, and your pup’s the ultimate critic. Remember, it’s all about creativity and love (and maybe avoiding a floury disaster or two). So, get those cookie cutters ready and don’t stress if your treats come out a bit lopsided—it’s the tail wags that really matter. Happy baking!

Hi, I’m Ali Tarek, the founder of Animalsman. I’ve always been passionate about pets, especially dogs and cats, and I created this website to share practical tips, easy recipes, and helpful care advice for fellow pet lovers. My goal is to make pet care simple, enjoyable, and accessible for everyone. When I’m not writing or curating content, you’ll usually find me spending time with my furry friends or learning new ways to keep them happy and healthy.