
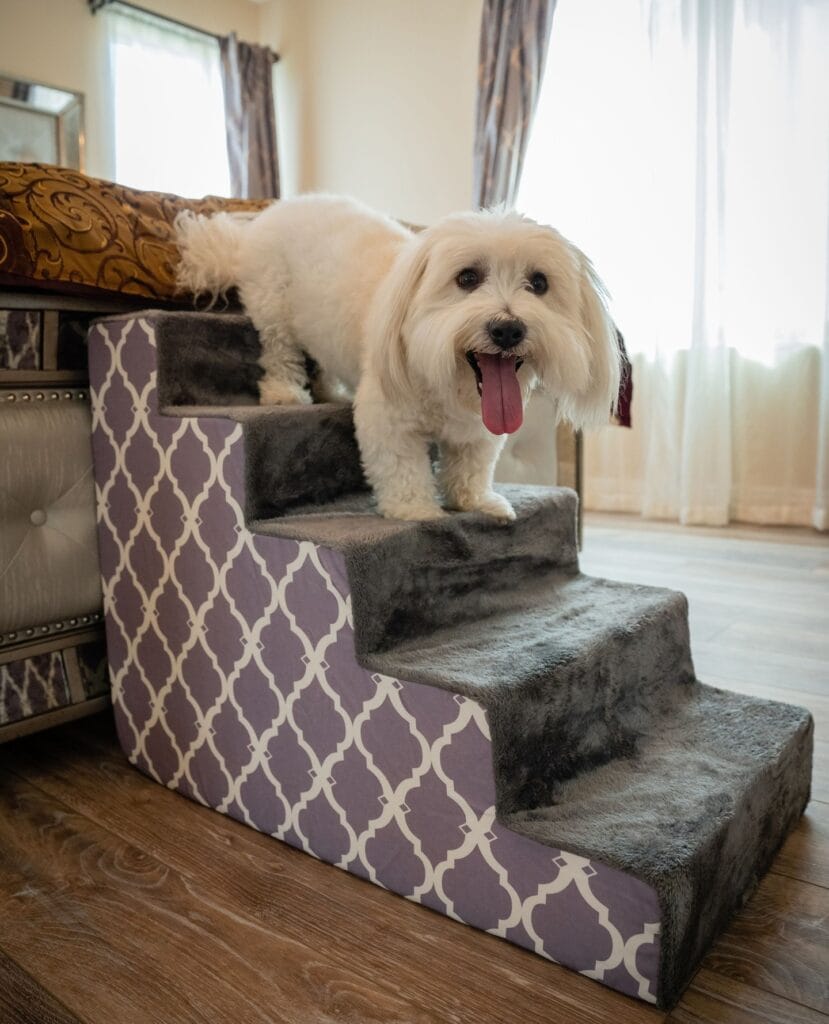
Your golden retriever just jumped on your bed, and your heart stopped a little.
It’s because he’s not a puppy anymore. That jump gets harder on his joints and you know it. But it’s hard to watch him struggle (or worse, slide back down).
Real talk: This happened to me with my aunt’s older lab. She decided to put a bunch of huge, ugly, foam blocks that looked like a construction zone next to her bed. My aunt had a pretty bed frame and it looked awful.
I’m happy to report that the dog stairs don’t have to wreck your bedroom aesthetic either. I’ve still got a Pinterest board bedroom and a happy, safe pup.
I absolutely love these 10 Creative Dog Stairs Designs for Bed. I saw them and knew they were the perfect bed for my 70 pound golden who thinks he’s a lap dog!
#1: The Minimalist Wire-Frame Dog Stairs That Look Like Actual Furniture
Your golden probably does that thing where she circles the bed three times, attempts the jump, and just stands there looking at you with those eyes. You feel terrible, but dragging out some chunky plastic step stool is not happening in your Pinterest bedroom.
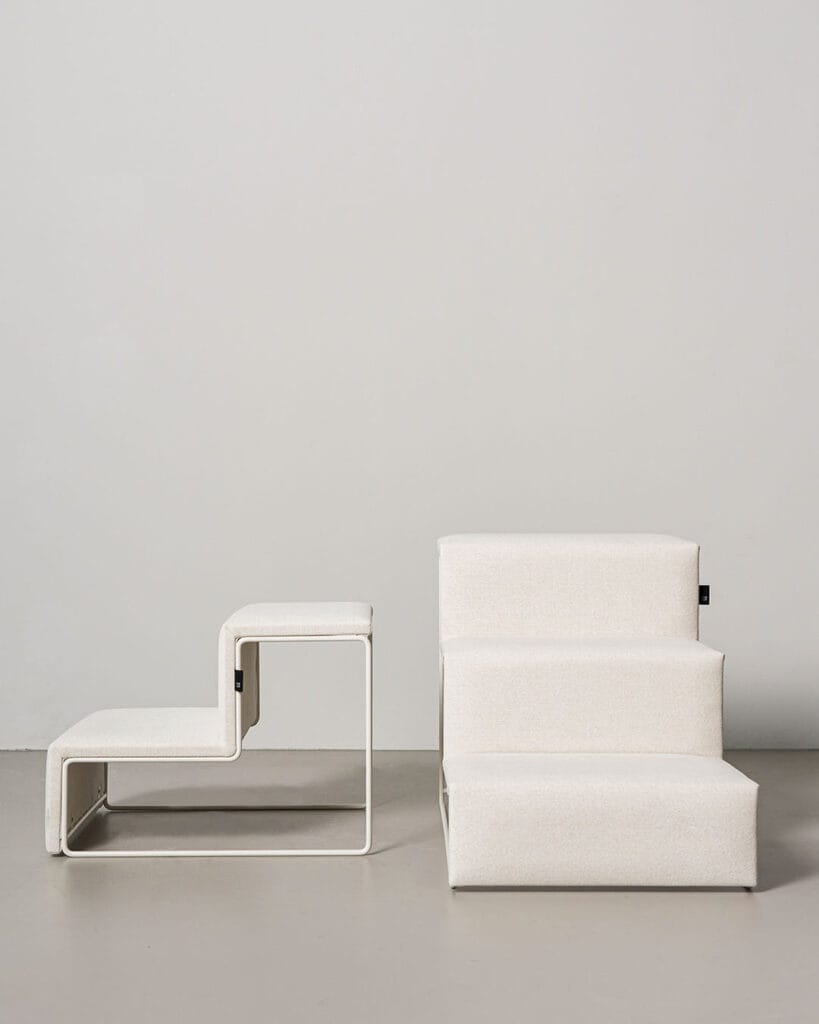
Can you believe these two designs from the image below have got me stopped in my tracks today?
On the left is a two step wire-frame stair with a powder-coated white steel frame wrapped in cream boucle fabric. The open metal base makes it look light and architectural. On the right, a three-step fully upholstered foam stair in the same cream boucle textile, sitting flush on the floor with zero hardware showing.
My friend got the version with the foam for her lab, and she said it works really well in her bedroom as well. She said she hardly ever sees anyone notice it.
Materials & Tools You’ll Need:
– 1-inch square steel tubing (for the wire-frame version)
– High-density foam blocks — cut to 8-inch rise per step
– Boucle or sherpa upholstery fabric (cream or white)
– Spray adhesive + staple gun
– White matte spray paint for the frame
– Measuring tape, box cutter, sandpaper
Instructions
Cut your steel tubing into a silhouette of a stair, with two vertical risers on the left and two vertical risers on the right connected by the horizontal steps. Sand every edge so they are smooth before painting as rough metal edges can snag fabric. Apply two coats of white matte spray paint and let it cure for 24 hours.
And then, cut your high-density foam into step platform pieces that fit snugly across each of the horizontal rungs. Wrap each of the foam pieces in your boucle fabric, making sure to pull the fabric tightly underneath and stapling it every 2 inches along the bottom edge. Get the fabric nice and taut underneath so you don’t have a lumpy step.
Slide the wrapped foam steps over the frame rungs so that they will grip without glue. If your measurements were correct, the foam inside the frame will press tightly against the bottom of the step and the paws of your dog will be on a cushioned non-slip surface with each step. This is a good thing for your dog’s joints as she ages.
Worth it because: boucle fabric hides dog hair between washes better than smooth fabric and still photographs beautifully.
If you choose to upholster the entire thing, stack your foam blocks in graduated heights and glue them together with spray adhesive. Wrap the entire staircase like a present, upholstering it as one piece.
If you love this style of furniture-forward pet design, then you’ll have a field day looking at these 14 Creative DIY Elevated Dog Bed Ideas You’ll Love.
Always have a lint roller behind the stairs. Boucle is beautiful, but can hold on to Golden Retriever hair like a magnet after a few days.
Prep Time: 30 minutes | Active Project Time: 3–4 hours | Difficulty Level: Intermediate
📸 Photo credit: Instagram @designforpets.co
#2: Foam Block Pet Stairs You Can DIY in an Afternoon (And They’re Actually Cute)
I have a dog, my sister has a dog, and those dogs come over, sit at the edge of the bed and give us this look… “Mom, help.” And then they’ll do that little jump-scratch thing on the mattress that leaves marks everywhere. That was my sister’s dog every single night until I made these for her.
Materials & Tools You’ll Need:
– High-density foam blocks (at least 2-inch thickness per step)
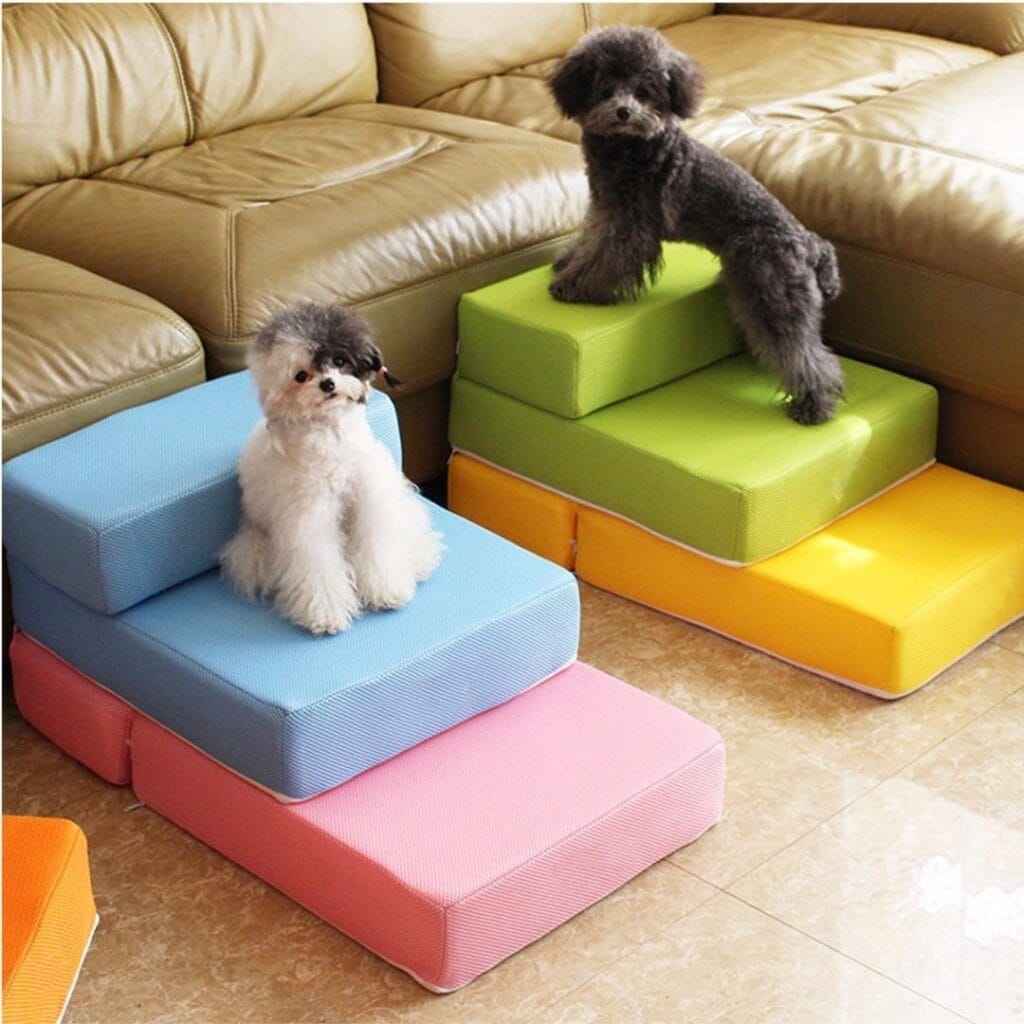
– Fabric covers in your color of choice — the image shows blue, pink, green, and yellow mesh fabric
– Fabric scissors
– Zipper or Velcro strips (12-inch length works per cover)
– Non-slip grip mat cut to fit each step base
– Measuring tape
Instructions
Cut the foam into two graduated rectangles. One that is larger (this will be the base of your step), and one smaller (this will be the top of your step). The larger rectangle (the base) should be about 4-5 inches taller than the floor before the second block (the smaller rectangle, or top) is attached on top, adding another 4-5 inches.
I was pleasantly surprised that I could slip each foam block into its own fabric cover individually. The cover is closed by a zipper, which means I can toss the cover in the laundry when my dogs have muddy paws.
– (I’ve got the smaller one on top of the larger one and pressed the non-slip mat underneath the bottom so my girl won’t slide off.)
Finally – something that doesn’t look like an eyesore next to your couch.
When she takes a step, the foam absorbs the impact to protect her joints and keep it quiet enough that you won’t hear a thing when you’re enjoying your morning sleep-in. If you like to build things for your pup, you’ll love these 7 Creative DIY Dog Stairs for Happy Pups – check it out!
They are made of mesh and they don’t get hot, so your dog will actually want to use them during the summer months, rather than avoiding them.
I picked this color since it is the same color as my living room. I love the idea of having a fun color block and blue & pink together look so good with a leather sofa as you can see from the image!
Prep Time: 20 minutes | Active Project Time: 45 minutes | Difficulty Level: Beginner
📸 Photo credit: Instagram @girlcaveuk
#3: The Painted Wood Staircase Your Dog Will Actually Use
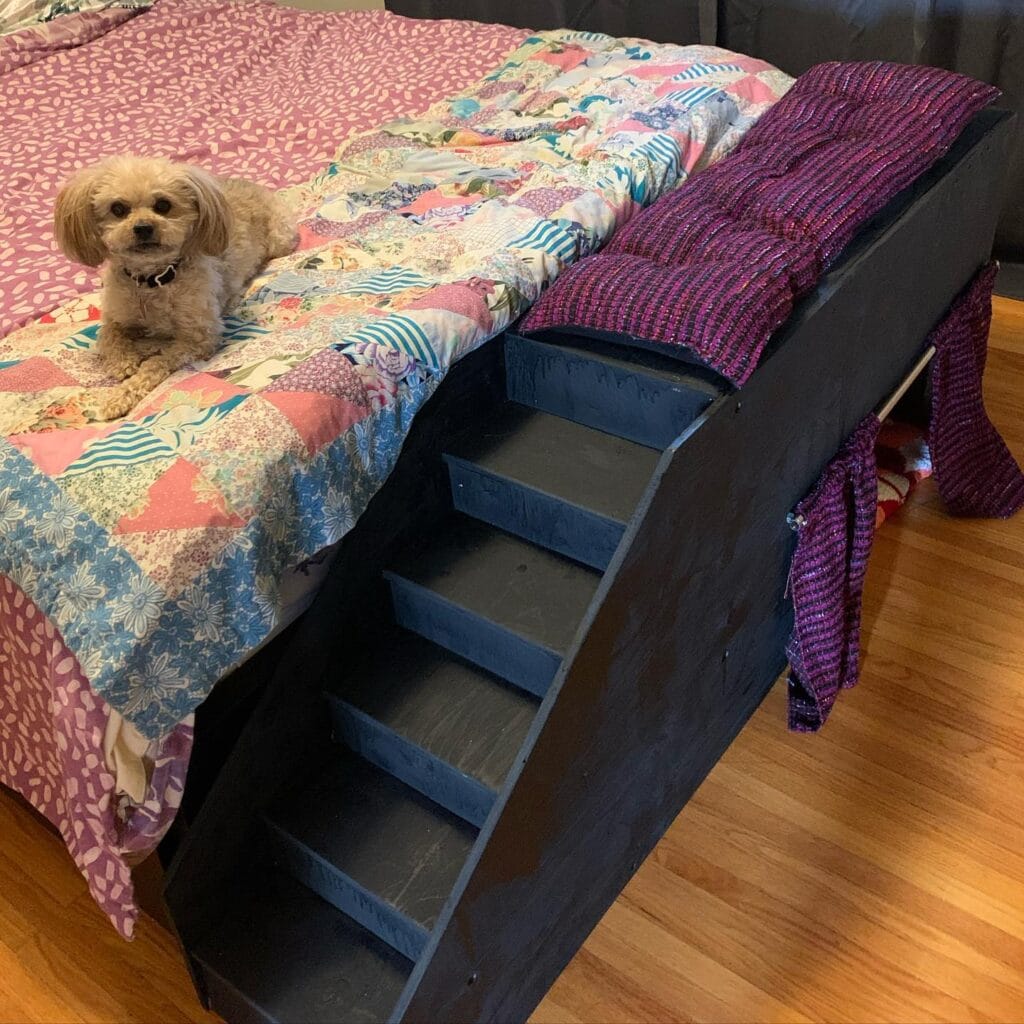
You know when your golden retriever is staring at the bed and tail is wagging and just doing the hop-hop to try to get on it but can’t? My aunt’s dog did that for 2 years until she build something like this and now I think of it every time I see a dog struggling.
made of solid wood and painted in dark navy/charcoal tone, this staircase is built directly against the bed frame. The staircase is very wide and stable and features four graduated steps that lead right to mattress level. No wobble, no slide.
Materials & Tools
– 3/4-inch plywood sheets (main structure)
– Wood screws (1.5-inch and 2.5-inch)
– Dark chalk paint (navy or charcoal)
– Sandpaper (120-grit and 220-grit)
– Wood glue
– Circular saw or jigsaw
– Drill + drill bits
– Measuring tape + pencil
– Paintbrush
Prep Time: 30 minutes | Active Project Time: 3–4 hours | Difficulty Level: Intermediate
Instructions
Start by measuring the height of your bed. Now divide that height by 4. The result is your individual step rise. For the sake of this project, we’re going to cut our plywood into two identical side panels. Use a pencil to mark the stair-step profile on the plywood, and cut out the notches with a jigsaw.
Cut four horizontal step boards, each around 12 inches deep. This is enough room for your dog to plant both back paws comfortably so they don’t feel rushed mid-climb. Remember, the steps can be any depth that will allow your dog to pause and feel confident mid-climb.
Sand all edges with 120-grit sandpaper, and then with 220-grit so that the ramp has zero splinters that can hurt your pup’s paws. Attach the side panels of the ramp together first using wood glue and 2.5-inch screws, then attach each step board from underneath using 1.5-inch screws.
But this is where most of us would rush. Let the glue cure for at least 2 hours before painting. Use two coats of chalk paint. Make sure the first coat is completely dry before applying the second. Chalk paint sticks well to wood without primer and gives a nice matte look.
The wide 12-inch steps allow dogs to land on the stair, which gives them more stability to walk on. This builds confidence in dogs to climb stairs and therefore reduces the amount of stress the joints experience. Dogs that are larger breeds like golden retrievers may need the extra step depth than smaller dogs.
Adding non-slip rubber pads underneath the base will keep the entire unit from moving on a hardwood floor.
📸 Photo credit: Instagram @heatherrforeverr
#4: The Carpeted DIY Dog Stairs That Look Like They Belong Inside Your Home
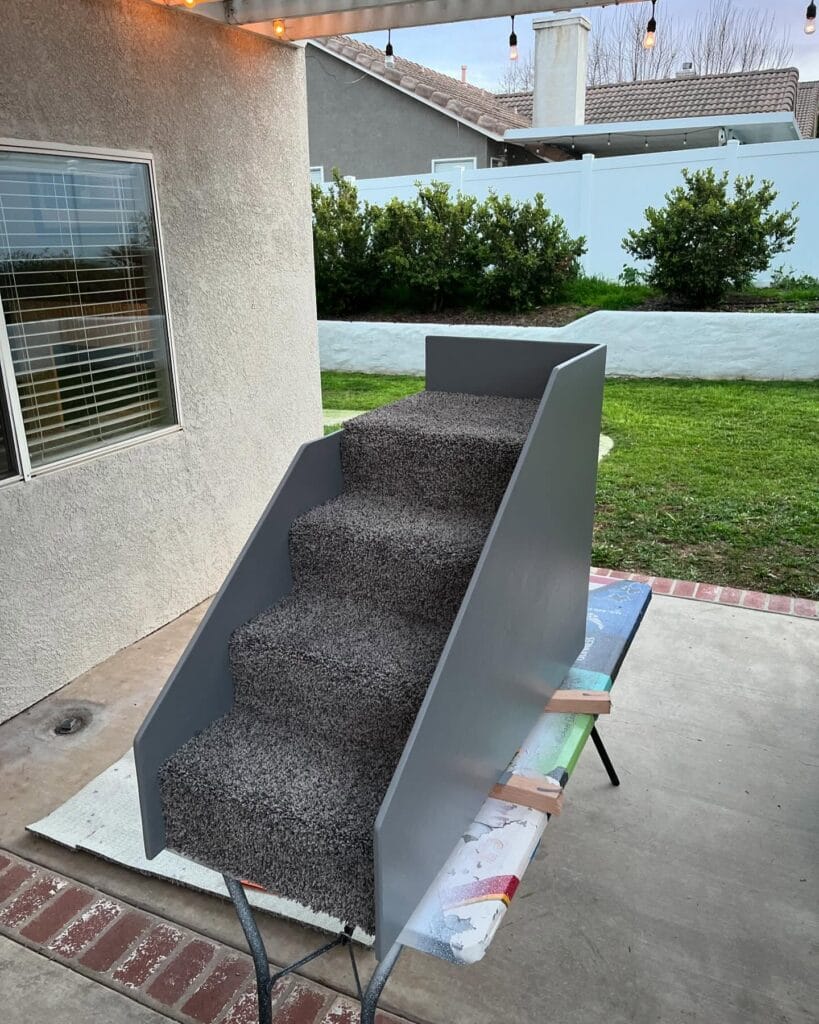
Your golden is standing at the edge of the bed again. Pawing at the mattress. Whining. And you’re half-asleep just praying she figures it out before you have to get up and lift her.
These stairs are the ones you’ve been dreaming of for months!
Made from the toughest ¾-inch plywood and painted in a matte gray, they feature dark charcoal carpet stapled across every step so that paws will grip and not slide. Side panels run the entire height of the unit with a small back guard panel at the top. There are no accidental tumbles from the top step.
Materials & Tools:
– ¾-inch plywood sheets (enough for 4 steps + 2 side panels + 1 back guard)
– Dark charcoal carpet remnant (approx. 2 ft x 4 ft)
– Carpet staple gun + ¼-inch staples
– Gray spray paint or latex wall paint
– Sandpaper (120-grit)
– Wood glue + 2-inch wood screws
– Circular saw or jigsaw
– Measuring tape + pencil
Instructions
Cut your side panels (these will be the stair stringers). Each side panel should be a stair-step silhouette cut out of the plywood. Sand all the edges of your panel with 120 grit paper because rough edges and dog noses are a very bad idea.
I attached the step platforms to both stringers with wood glue first and then used the two inch screws to drive them in. Wood glue first method prevents the wood from shifting while you drive the screws into the stringer and keeps the steps straight. No wobbling once your dog starts using the steps daily.
Once you have got your frame built, add the back guard panel at the top. It is a small panel at the back of the frame which stops the dog from overshooting the landing. Cut your carpet to the same size as the frame. Wrap it over the top of each step and staple underneath the overhang. Take it very tight before each staple otherwise you will get bubbles.
2 coats of matte gray paint on all the exposed wood surfaces. Done.
The carpeted steps give your dog some traction, which will prevent shock from slipping, and if she’s going up them at night, that’s important.
Leave your stairs open enough that your golden can plant both paws on each step so she’s not racing up the stairs in a panic.
Prep Time: 30 min | Active Project Time: 3–4 hours | Difficulty Level: Intermediate
📸 Photo credit: Instagram @bensfield_creations
#5: The Rustic Farmhouse Dog Stairs That Belong on Your Pinterest Board
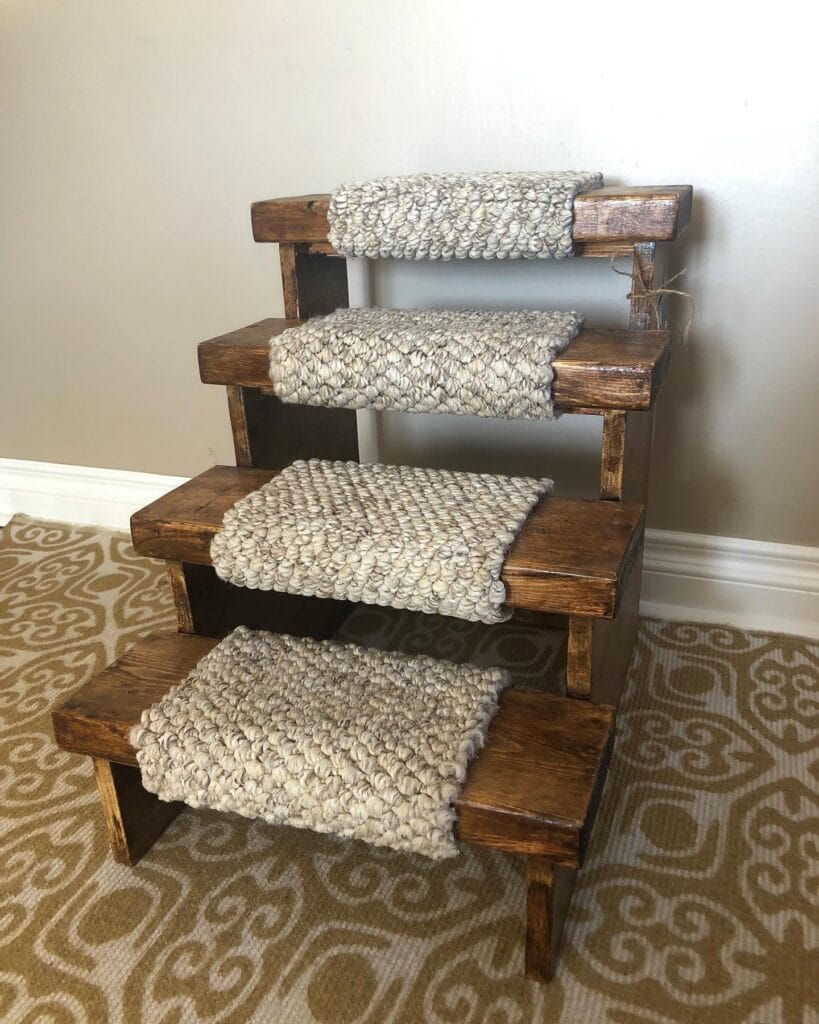
So Golden is staring at the bed again. That sad, hopeful look while her back legs struggle against the frame and you just can’t watch it anymore.
These 4-step reclaimed wood dog stairs from Man Made DIY are everything. Dark walnut stain, chunky hand-cut joinery, and textured loop-pile carpet treads on every step. It’s like they took a bedroom set straight from a farmhouse.
My cousin built one of these for her lab mix last winter and I just kept texting her asking if I could steal it and put it in my room.
Materials & Tools:
– 2×4 pine lumber (approximately 8 feet total)
– Dark walnut wood stain
– Sandpaper (80-grit and 120-grit)
– Wood screws (1.5 inch and 2.5 inch)
– Pre-cut loop-pile carpet squares (12×14 inches per step)
– Carpet adhesive or staple gun
– Drill, saw, measuring tape
Instructions
Cut the board into 4 pieces, the steps on each are about 4 inches higher than the last. Sand every edge of the pieces and make sure there are no splinters. Stain all of the wood pieces and allow them to dry completely before putting them together.
Next build the side frame using your 2.5 inch screws to connect the vertical support columns to the horizontal platforms. As the step gets wider towards the bottom, the top of the steps are also staggered, giving your dog a more natural stride as he/she climbs up the steps. This is especially important as it takes the strain off the hips for older dogs.
Attach each of the carpet treads to the frame with carpet adhesive or a staple gun underneath. Press firm and let it set overnight.
We added a distressed finish to the bedroom furniture as it adds a farmhouse feel to the room. It also hides the future scratches.
📸 Photo credit: Instagram @nail.onthehead
#6: The Solid Oak Dog Stairs That Look Like They Belong in a Cabin Retreat
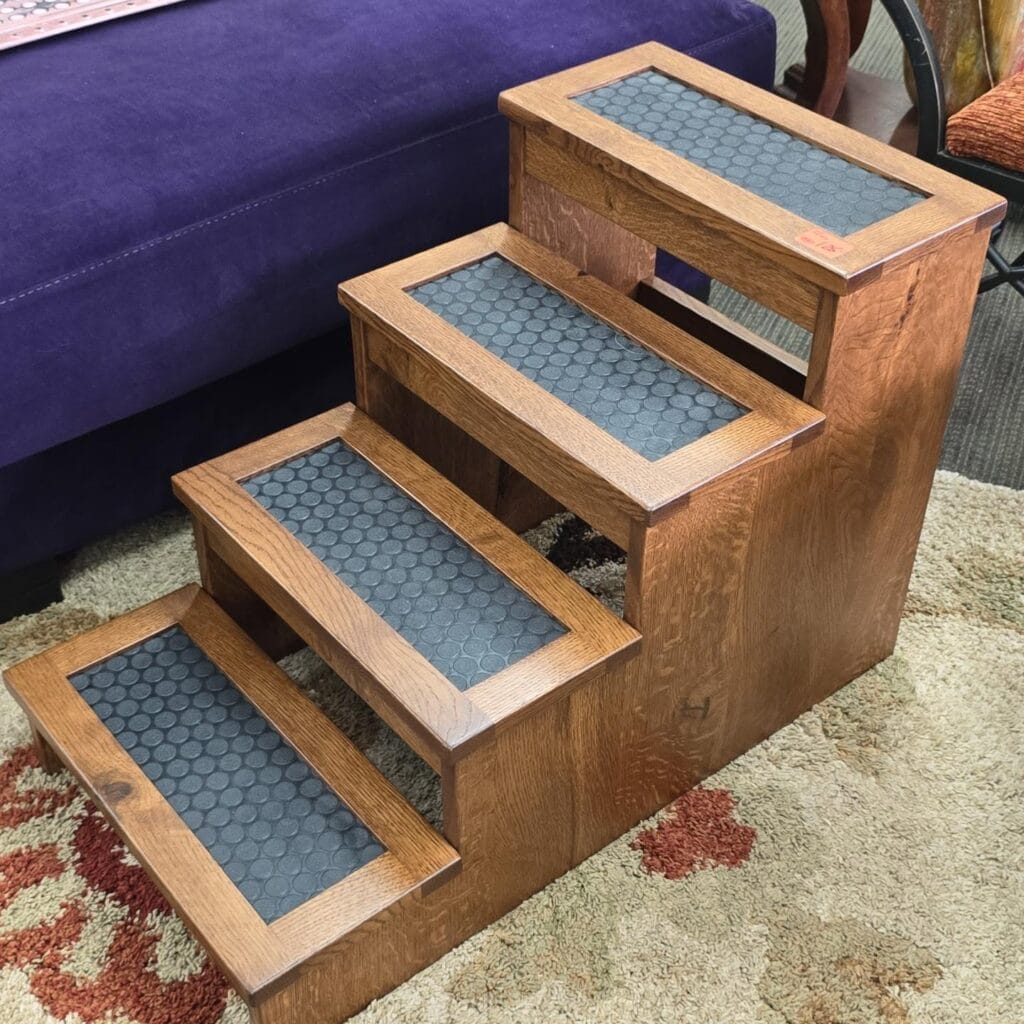
Why is your golden standing at the edge of the bed again? She’s got her front paws up, back legs scrambling and the little grunt. She’s almost there! And then the thud. Every night.
These solid oak dog stairs put a stop to that nightly chaos.
– 3/4-inch oak plywood, or solid oak boards – Gray rubber coin-top matting, non-slip surface inserts – Wood stain in a warm walnut or honey oak tone – Wood glue, 2-inch wood screws – Sandpaper (120-grit and 220-grit) – Circular saw or table saw – Drill and screwdriver bit – Measuring tape and pencil – Router (optional for a clean edge profile)
Instructions
Another note on the stairs: cut the oak boards into 4 platforms, each one slightly wider and deeper than the last. My cousin built something similar to this last winter and told me the key was to get the depth right (each step should be about 3 inches deeper than the one above it so your dog never feels rushed in the middle of the climb.
Sand every piece with 120 grit first, then follow up with 220 grit to make it nice and smooth. Apply two coats of your favorite stain. I used this honey oak stain and it’s such a Pinterest worthy shade of honey brown. This is a great shade to choose if you are looking for something that won’t clash with most bedroom color schemes and it’s not too “doggy” looking.
First you must attach the side panels. I glued and screwed each step platform onto the side supports so that all of the weight is carried on the sides. The non-slip rubber matting for each step is locked into a routed inset frame in the top of each tread so that it sits flush and will not move around.
As your dog steps on the rubber coin, the surface grips his paws which protects his joints on the way down (very important, especially as Goldens get older).
Prep Time: 30 minutes | Active Project Time: 4–6 hours | Difficulty Level: Intermediate
Pre-drill all screw holes before assembly. This will help avoid oak from splitting. Put the desk together against a wall. This will help keep the desk square as the glue dries.
📸 Photo credit: Instagram @regaofparis_georgetown
#7: Stacked Wooden Crate Dog Stairs (Dark Stain + Cushion Tops)
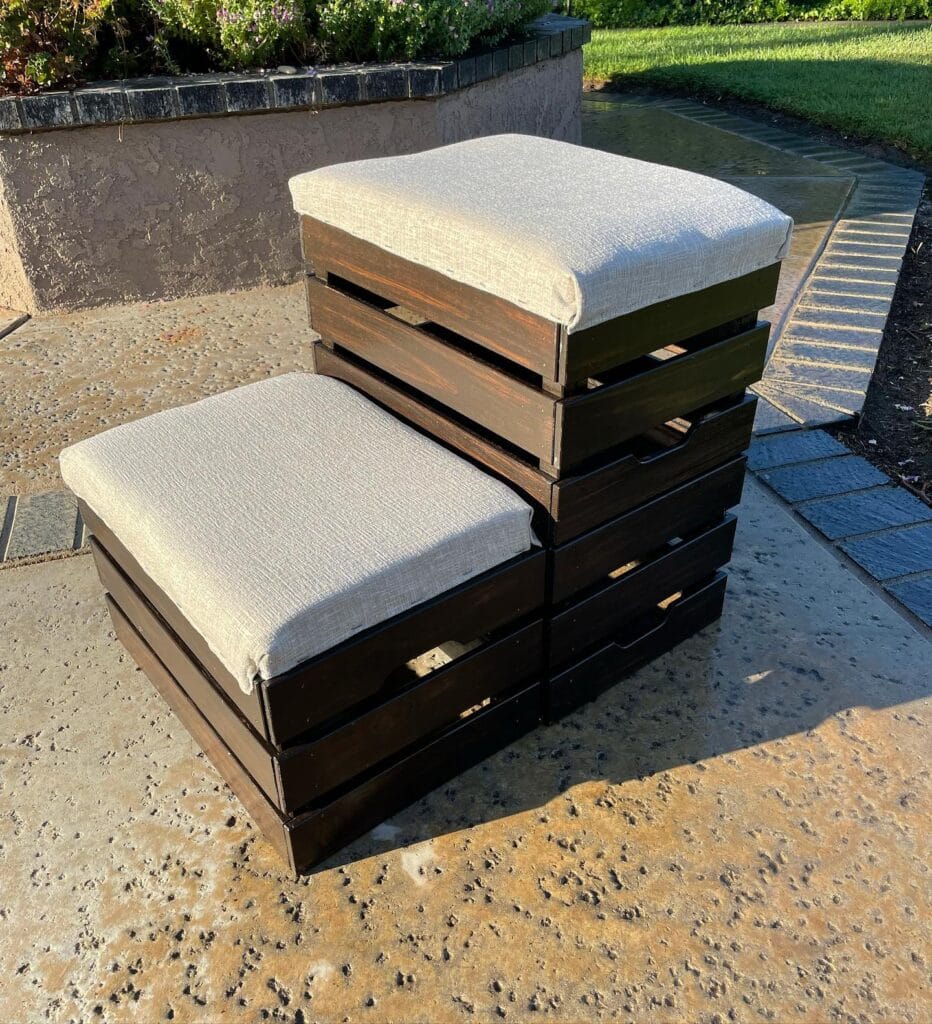
Dogs can’t talk…well unless you’re talking to them, but they can’t answer you. So when I am laying on the couch, and I see that golden looking at me. At that moment, I know she wants to jump up, but can’t. And I feel bad, but I also don’t want to pick up a 60 pound dog to lay on the bed at night.
These stairs are exactly what I built last summer. I’m obsessed with them.
Materials & Tools:
– 3–4 wooden crate boxes (slatted sides, roughly 12″ x 18″ each)
– Dark walnut or espresso wood stain
– Foam cushion cut to 18″ x 18″
– Beige or oatmeal outdoor fabric (water-resistant is your best friend here)
– Staple gun + staples
– Sandpaper (medium grit)
– Wood glue or L-brackets for stacking stability
– Paintbrush for stain application
Instructions
If your crates are unfinished wood, it is worth sanding each side before you start. Splinters are no fun on paws! Once the surface is nice and smooth, you can apply the dark espresso stain with long strokes. Let each coat dry completely before adding another. This usually takes two coats to get a nice rich almost black color.
also STACK THE CRATES for the steps. If you can, have two crated be the bottom step and one on top for the second step. Secure the bottom step with L-brackets (bottom part of the L) so nothing will move when your girl decides to leap at you from the top step at 11pm.
Cut your foam to fit each top, then wrap the fabric around and staple the underside clean. The cushioned tops mean her joints will land soft. feature: The padded surface means less impact on aging hips. benefit: She might actually use the stairs instead of avoiding them.
And as a added bonus, since the crate is stackable, you can adjust the height depending on your bed frame.
You can store treats or toys inside the hollow crates. My friend does this and says it’s now her dog’s favorite spot in the whole house.
Prep Time: 20 min | Active Project Time: 2–3 hours | Difficulty Level: Beginner–Intermediate
📸 Photo credit: Instagram @kathleen_jolliff
#8: The Foam Pet Stairs Dressed in Fall Pajamas (Yes, Really)
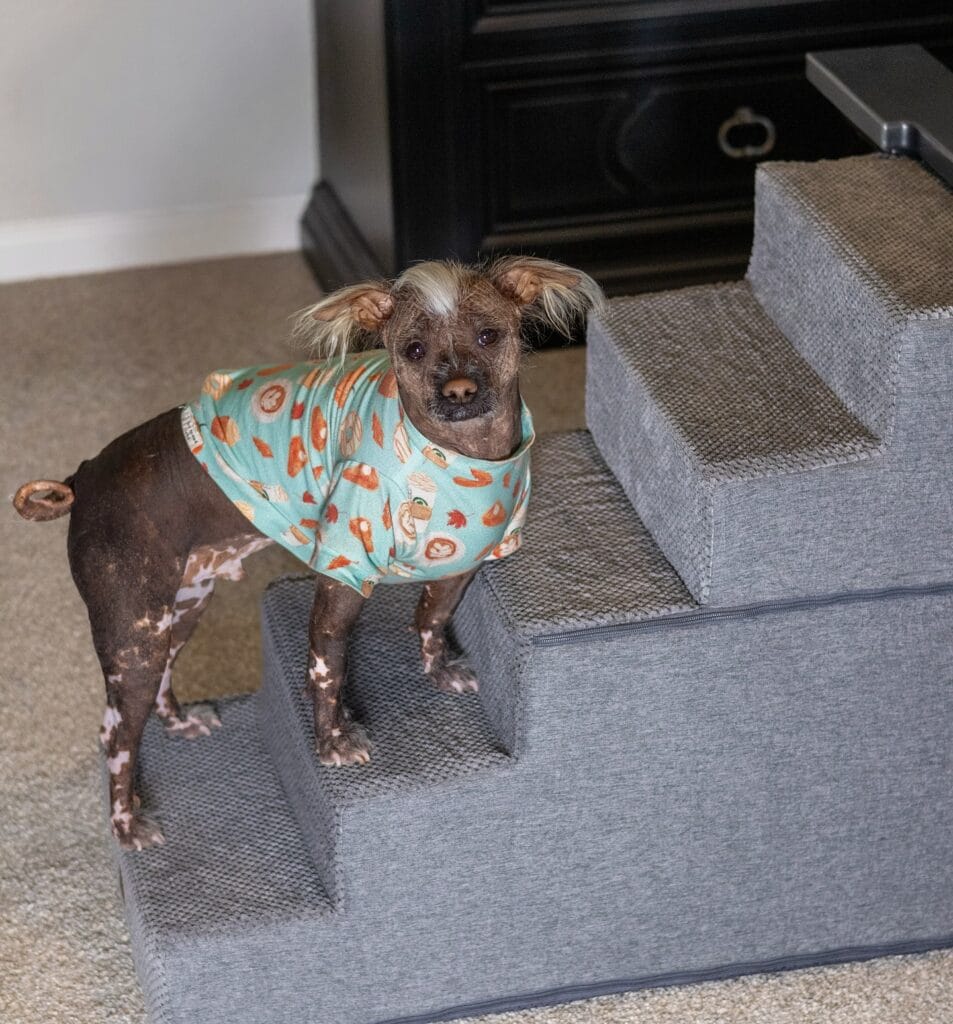
If your golden jumps off the bed wrong and you wince because you know that landing was bad for her joints, that’s her telling you!
That’s the moment this build was made for.
iClever 3-step foam pet stair covered with gray upholstered fabric, the steps are covered with a textured, carpet-like gripper material to improve the pet’s footing. The cover has a zipper, allowing you to pull it off and toss it in the wash, no fighting dried mud or golden retriever fur stuck in the seams.
Check out my little model up there in her mint green fall pajama shirt with all of the pumpkin spice latte prints! And can you tell? This whole set up feels like a mood.
Materials & Tools You’ll Need:
– High-density foam blocks (cut to 4″ rise x 12″ depth per step)
– Gray upholstery fabric (1.5 yards)
– Heavy-duty zippers (3 zippers, 14″ each)
– Non-slip carpet tile squares (12″ x 12″, one per step)
– Fabric glue or sewing machine
– Sharp utility knife or electric foam cutter
– Measuring tape and fabric chalk
Instructions
Cut the foam into 3 pieces of graduated heights, the bottom block should be the largest roughly 12” tall x 14” wide x 12” deep, the middle block 8” tall and the top 4” tall. Stack them like stairs and hot-glue them together so that you can test them against your bed height before gluing them together.
Next cut and wrap your fabric around each foam block individually, leaving a 1″ seam allowance on all sides. Sew or glue the fabric snug around each block and then sew on the zipper along the back seam of the cover. This is what makes sure that the cover comes off in one piece and not just something else that you will avoid doing for three weeks!
Cut your non-slip carpet tiles to fit each step surface and press them onto the top face of every foam tier to provide a textured grip. Your dog’s paws will not slide, so they won’t hesitate to start up a step or be stressed on old or arthritic hips or joints.
Once I have placed the covers on top of the bed, I stack my three blocks on top of each other and press them together. The weight of the tower keeps it from falling off the bed frame.
Now that it’s a removable-cover (vs. a solid wood stair) it can collapse flat for easy travel and storage. I also just found 15 of the best dog beds for every dog size and need and thought this low profile bed went great with these stairs.
Measure the height of the bed before you cut out the foam. Most beds are a bit less than 24″ to 26″ off the floor. If you have a longer bed, you will want a 3 step design. Anything taller than 24″ will be wobbly and anything less would be too steep for small breeds.
Prep Time: 30 minutes | Active Project Time: 2–3 hours | Difficulty Level: Intermediate
📸 Photo credit: Instagram @stripehairless
#9: The Hidden Storage Stair Box That Does Double Duty
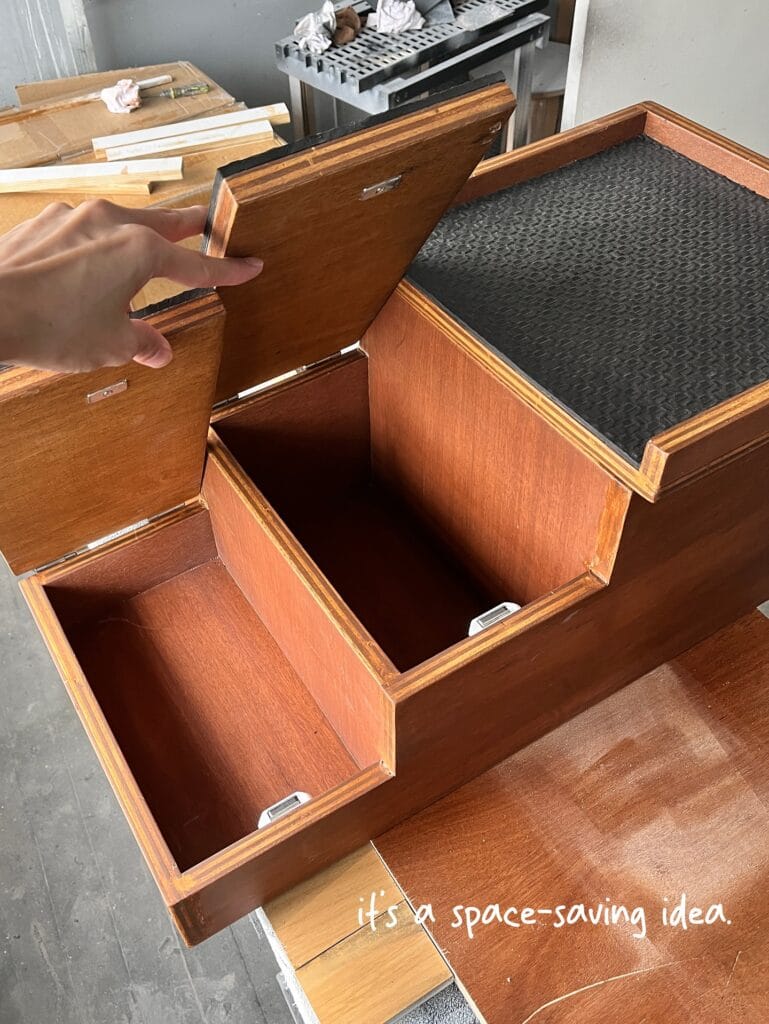
Your golden has been jumping on the bed for years and now you’ve got a pile of her toys, leashes, and random crap literally taking over your bedroom floor. It’s a mess. And you know that Pinterest board with those 400 dog stair ideas you’ve saved? This one beats all of those.
This teak wood stair box is exactly what it sounds like – a 3 step staircase made of solid mahogany-toned plywood with hinged lift-top compartments hidden inside each step. The tops of each step are lined with black rubber anti-slip matting so your girl gets grip on every step. Each compartment can fit leashes, treats, toys, or whatever chaos you’re fighting right now.
Materials & Tools:
– ¾-inch mahogany plywood (enough for 3 step boxes)
– Piano hinges (3, one per step)
– Black rubber grip mat cut to fit each lid
– Wood stain in a warm walnut tone
– Sandpaper (120 and 220 grit)
– Wood glue + brad nailer
– Metal pull tabs (3, for opening lids)
– Measuring tape, circular saw, drill
Instructions
Cut the plywood into 3 pieces. Have one piece 4 inches taller than the other, so you would have a piece that is 6 inches tall, 10 inches tall and 14 inches tall. Sand the edges of each piece with 120 grit, then finish it off with 220. This way you have no splinters near where the dog will be.
Wipe a thin layer of wood glue along every joint, then nail it with the brad nailer. Your boxes are stacked up like stairs, so be sure to make each one 2-3 inches shallower front to back as you stack them up to form a step.
Assemble the piano hinge along the back edge of each lid so that it opens toward you. Having hinged lids mean that your storage creation not only takes up no space on your bedroom floor, it doesn’t waste a single inch of bedroom space.
Stain everything before you put the rubber matting on. Once it dries, cut your rubber grip mat to fit each lid and secure it with contact cement.
just stack the 3 boxes by the bed frame. (i think mine is too high…)
I also made sure to sand the inside corners really smooth because my dog’s paws would be brushing them with every climb. If your golden is older or has joint stiffness, you can add a 1/4-inch piece of foam padding under the rubber mat on each step to give her knees a softer landing. If you like wood furniture for dogs as much as I do, 11 Stylish Wooden Dog Beds Your Pup Will Love has some great inspo.
Prep Time: 30 minutes | Active Project Time: 3–4 hours | Difficulty Level: Intermediate
📸 Photo credit: Instagram @thepetproject.ph
#10: The Foldable 4-Step Pet Stairs That Double as a Car Ramp (And Look Great Doing It)
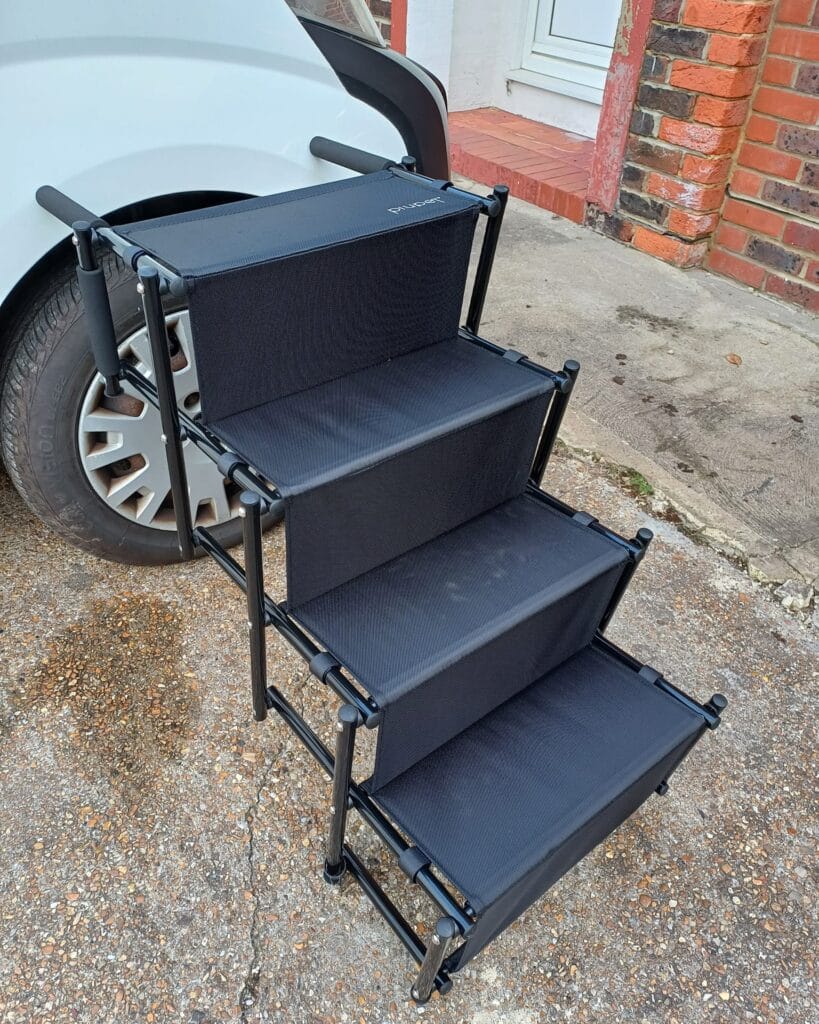
Of course, you know the situation I am talking about: Your golden is standing on the edge of the bed, giving you “those” eyes. The “please help me up” look. And you’re already half-asleep. That’s when I wanted to find something to help my golden, without an eyesore in the bedroom.
Materials & Tools You’ll Need:
– Black powder-coated aluminum frame tubes
– Oxford mesh fabric panels (black, cut to fit each step)
– Connector joints and end caps (plastic, black)
– Screwdriver and rubber mallet
– Measuring tape
Instructions
First lay the four aluminum frame sections out on a flat surface. Begin by connecting the bottom base frame by pushing each tube into the plastic joints until you hear a click. You may have to use the rubber mallet on some of the connectors. You don’t want to bend the tubes.
Attach the side rails of each step before attaching the Oxford mesh fabric panel to the top of each step. Stretch the panel tight and secure it at each corner. The mesh will be taut, giving your dog a stable, non-slip surface. She will have confidence in her paws and will not hesitate when taking each step up.
Add the foam handle grips on the top rails last. Angle the whole thing slightly toward your bed frame so you have a natural incline.
The 4-step design can be used on bed frames up to 30 inches high. It also can be flat packed for easy storage, folding flat in seconds to fit in a car trunk without a wrestling match.
If your dog is still a little tentative about the presence of stairs, you can put a treat on each step during the first few sessions.
Prep Time: 5 min | Active Project Time: 20 min | Difficulty Level: Beginner
📸 Photo credit: Instagram @tracykeethypno
The One Measurement Mistake That’ll Make Your Dog Stairs Useless
Most people buy dog stairs based off the height of the dog so it’s not a surprise that most people end up buying the wrong size stairs.
A little secret that nobody wants to tell you, but tread depth matters more than step count.
Golden Retrievers have longer strides than most dogs. If the stairs have a low rise (less than 10 inches), they will find it awkward to take two steps. They may not even try to use the stairs, so your expensive stair runner will just sit there while they continue to jump on the furniture.
I learned this the hard way with my aunt’s lab mix. I bought the cutest ramp/stairs hybrid she saw on Pinterest, but totally ignored the tread measurements. My dog refused to go on it for three months.
Before you purchase anything, measure the natural stride of your dog. Take a piece of paper under one front paw while walking. Mark where the opposite front paw touches the paper. That length is the minimum tread depth for your dog.
Also, if you have a Golden or another dog with fur on the pads of his feet, a non-slip surface is a must. They can’t grip the foam well or the bare wood as they are coming down the stairs. Try to find rubberized pads or carpeted steps.
you got it right…she will use them every time!
Your Dog-Proof Home Era Starts Right Now
Pick one room that is driving you crazy and get to work. Just one room. Take out that gross throw, put on a slipcover and tuck the ugly storage basket out of sight.
Honestly, the small changes hit different when you actually see mud wipe off in seconds rather than scrubbing for 20 minutes.
And if you want to keep the good vibes going outside, you’ve got to check out these great outdoor kennel ideas for your Golden Girl, too!
Which room in your house is your dog’s biggest victim right now? I’d guess it’s the one you’re in.

Amr Mohsen is a software engineer who traded his keyboard for a leash — at least on weekends. His love for dogs inspired him to share what he learns as a dog owner and enthusiast, bringing a detail-oriented, research-driven perspective to every article he writes. If it’s about dogs, he’s probably already looked it up twice.



