
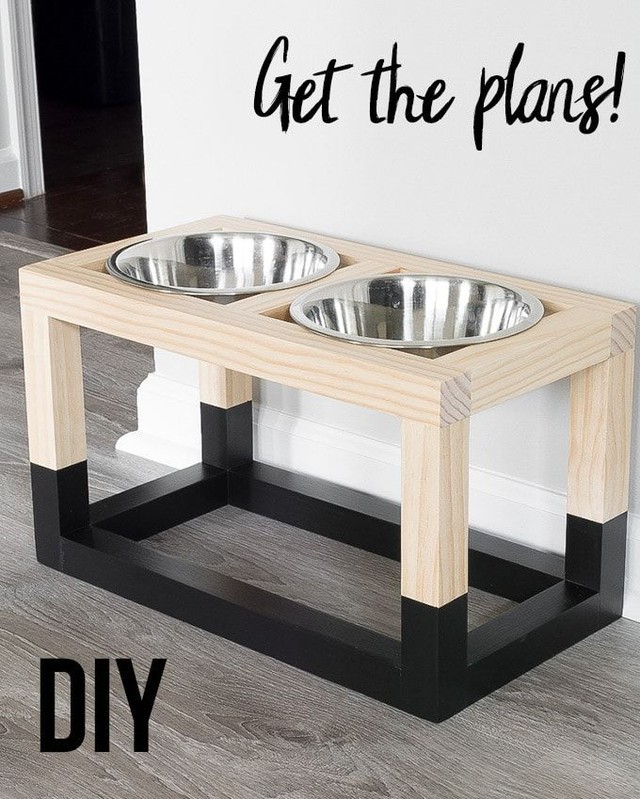
Your dog’s food bowl is an eyesore. I know you’ve been staring at that sad little plastic bowl sitting on your kitchen floor, ruining the aesthetic you worked so hard to create.
Girl, this is a bit of a sore spot for me. Last summer, my kitchen looked like a Pinterest board (minus the beautiful dishes). It was warm and rustic with wood tones, and clean lines. And then there was Biscuit’s beat up bowl just sitting on the counter looking completely out of place every morning.
But wait, what about the mess? Food all over, water splashing everywhere, your perfect golden retriever turning mealtimes into a crime scene.
Need something to get your pets off the floor so they can stop destroying your house? Or just need something that will make you drool at the sight of its cute beauty? Then look no further, this roundup of dog feeder designs are as practical as they are gorgeous!
#1: Wire Frame Elevated Dog Bowl Stand (The Pinterest-Worthy Feeder Your Golden Deserves)
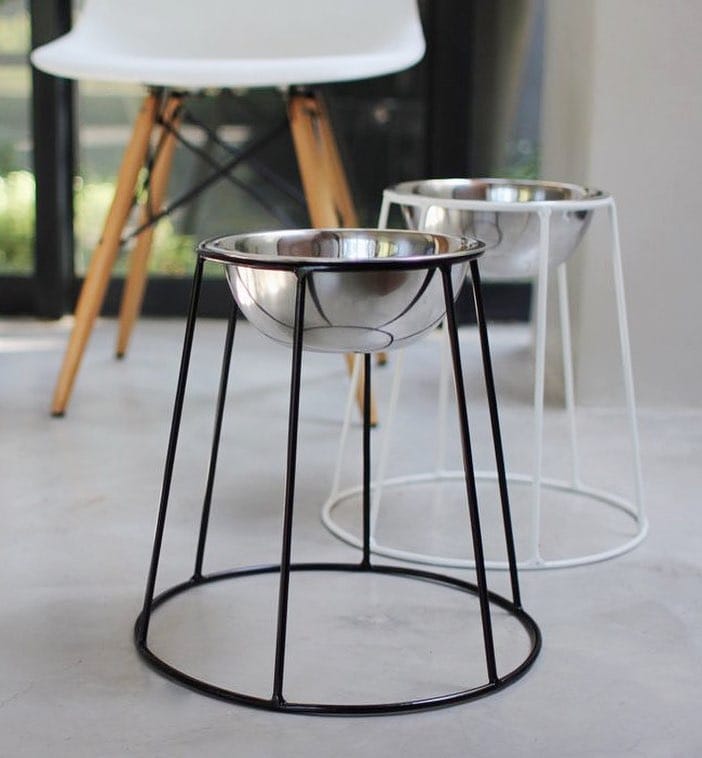
This scenario has happened to me on more than one occasion. My golden retriever is eating dinner, her ears are dragging through the bowl, water is splashing everywhere on my freshly mopped floor and I’m standing there thinking why is this so ugly and messy?!
This wire frame elevated dog feeder is the best one I’ve seen! It’s got black or white powder-coated steel wire and a stainless steel bowl, and it looks like it belongs in a design magazine, not a pet store.
– 4mm thick steel wire (black or white powder-coated) – 1 stainless steel dog bowl (standard 6-cup capacity) Wire cutters Needle-nose pliers Epoxy or strong metal adhesive Sandpaper (220-grit)
Instructions
Cut six wire legs and each wire leg is 12 inches long. Bend them out at the base with your pliers to form the flared shape shown in the picture. Then form a circular base ring from another piece of wire, 10 inches in diameter and weld or epoxy the legs onto the ring.
Make the top ring for the bowl at 6 inches diameter. This will cradle the bowl. Attach the legs to the top ring so that they are evenly spaced apart and sand down any rough edges so your puppy doesn’t catch her fur.
Plus, elevated feeders are actually worth it. Raising the bowl to 8-10 inches reduces neck strain for larger dogs, which means fewer trips to the vet.
Quick note: If you’re a sucker for projects like this, you’re going to love these 13 Genius DIY Dog Stuff Every Pet Parent Needs to Try Today!
You might want to spray the entire thing with another coat of paint when its done for a neater look.
Prep Time: 20 min | Active Project Time: 1.5 hours | Difficulty Level: Intermediate
📸 Photo credit: Instagram @designmilkpets
#2: DIY PVC Pipe Gravity Dog Feeder with Wooden Stand
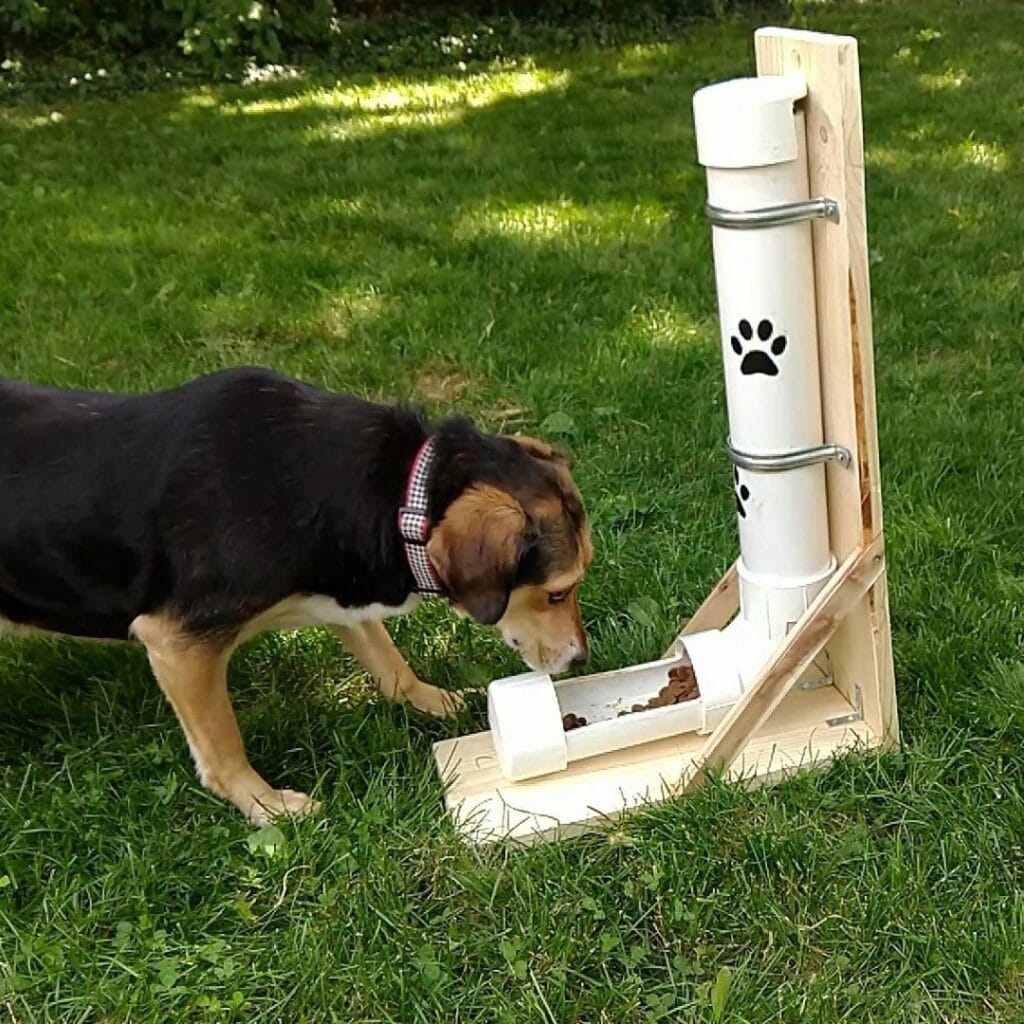
Your Golden’s food bowl is empty again – and you didn’t even hear it happen. You’re in the kitchen and she’s staring at you with her eyes – and you’re just tired of the twice a day scramble.
This feeder fixes that.
Materials & Tools:
– 4-inch diameter PVC pipe (white) — two 12-inch sections for the reservoir tower
– 1 short elbow PVC connector for the bottom dispensing curve
– PVC end cap for the top
– Black paw print stickers for decoration
– Two metal pipe clamps (standard U-bolt style)
– Pine wood planks — one vertical board and one angled base frame
– Wood screws, drill, sandpaper, wood glue
– L-bracket corner hardware
Instructions
First, cut your pine planks into an L shape. So one tall vertical board and one flat base board that sits at roughly 45 degrees. Sand every edge until it’s smooth enough so that your dog doesn’t snag her fur.
Attach the two U-bolt clamps directly onto the vertical board, spacing them 6 inches apart. Then, slide your stacked PVC pipe sections through both clamps, so that your gravity feed tower stands upright. Gravity will do the work here: kibble loads from the top cap will drop down through the elbow curve into the bottom tray.
The angled base keeps the whole thing from tipping when she nudges it with her nose. She will nudge it.
Drill the base boards together using your L-bracket hardware at every corner joint. Load kibble into the top, and watch it cascade into the tray below.
The gravity-feed keeps the food portion-ready so she doesn’t have to hover and eat, and that means she eats slower so you get your mornings back.
So if you don’t have it yet, add these paw print stickers to your pipe today. and add one of these 12 Heartfelt Designs for DIY Dog Accessories too to get a full set!
Cut the bottom section of the pipe just a little shorter than the reservoir so there is a little height difference to prevent the kibble from jamming at the curve. I’ve been told that pine wood can be stained to match your patio furniture if you want to.
Prep Time: 20 minutes | Active Project Time: 1.5 hours | Difficulty Level: Beginner-Intermediate
📸 Photo credit: Instagram @jasonabalos
#3: Rustic Torched Wood Dog Feeding Station (Dog-Shaped Silhouette)
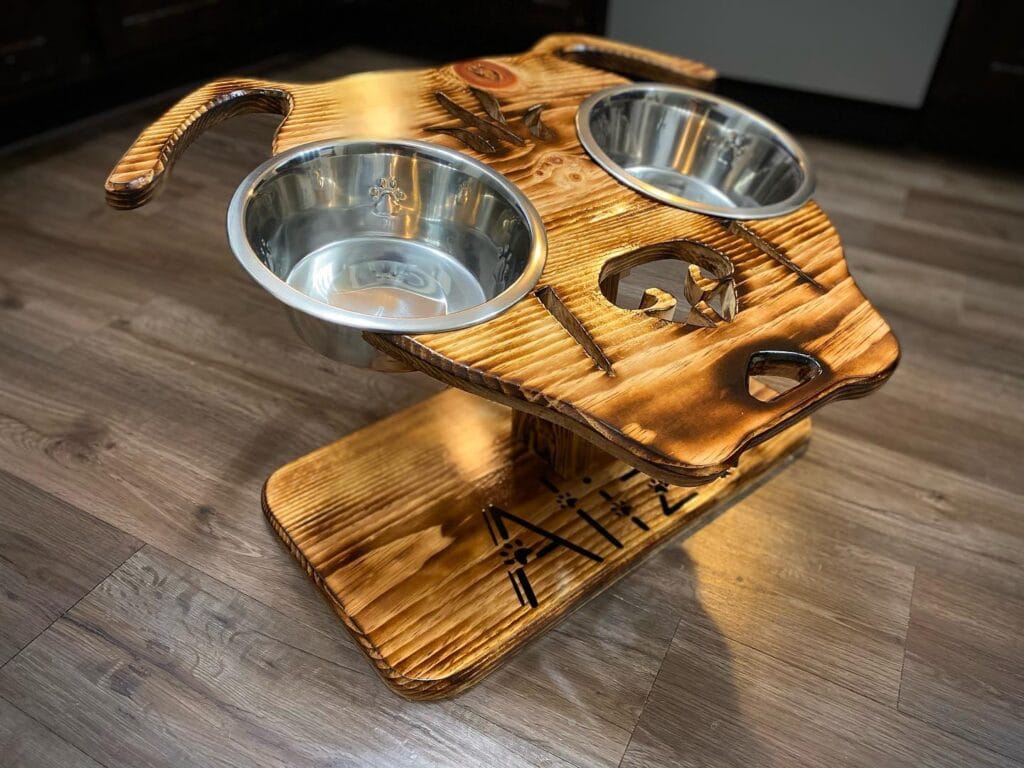
you know the scene where you’re padding through the kitchen in the morning, half-asleep, and slip on the water your golden somehow splashed three feet from his bowl? yeah. i’ve been your friend dani for the rest of your life. that’s what she’s been saving up for.
Materials & Tools:
– 2-inch thick pine or Douglas fir lumber (torched with a propane torch for that warm, honey-brown finish)
– Two stainless steel dog bowls (standard 6-cup capacity)
– Jigsaw (for cutting the dog-shaped silhouette and decorative bone/paw cutouts)
– Wood burner tool (for etched name or paw print details)
– Food-safe polyurethane sealant
– Sandpaper (80 and 220 grit)
– Wood glue + 2-inch screws
– Drill with hole saw bit (sized to your bowls’ rim diameter)
Prep Time: 30 min | Active Project Time: 4–5 hours | Difficulty Level: Intermediate
### Instructions
Start by sketching the silhouette of your dog on the lumber so you have the ears, snout, etc. Cut this out with a jigsaw. Once you’ve cut it out sand the whole thing with 80 grit, then 220 to get a clean edge that your dog won’t get his fur caught on.
I torch the tops of them using a propane torch and I do long, even passes with the flame. The grain rises and darkens giving the boards a rustic finish without using a stain.
Next we cut two circles out of the top panel with our hole saw bit and sized the bowls so they would drop in and sit flush at the rim. Bowls that are at the dogs chest will mean less strain on his neck, and that is something we want.
I made a center pedestal using leftover lumber and glued and screwed the top panel to it. I attached both pieces to a flat rectangular base board for stability. I used my wood burner to etch my dog’s name or his paws onto the base board. I sealed everything with two coats of food safe polyurethane.
And if you LOVE the way this looks and function, you should definitely also check out 14 Stylish DIY Dog Crate Furniture Ideas You’ll Love as well.
Let the sealant cure for a full 24 hours before your dog uses it. If not, the dog will lick it off.
📸 Photo credit: Instagram @randymoncus
#4: Elevated YETI Dog Bowl Stand (Blackened Wood + Teal Bowls)
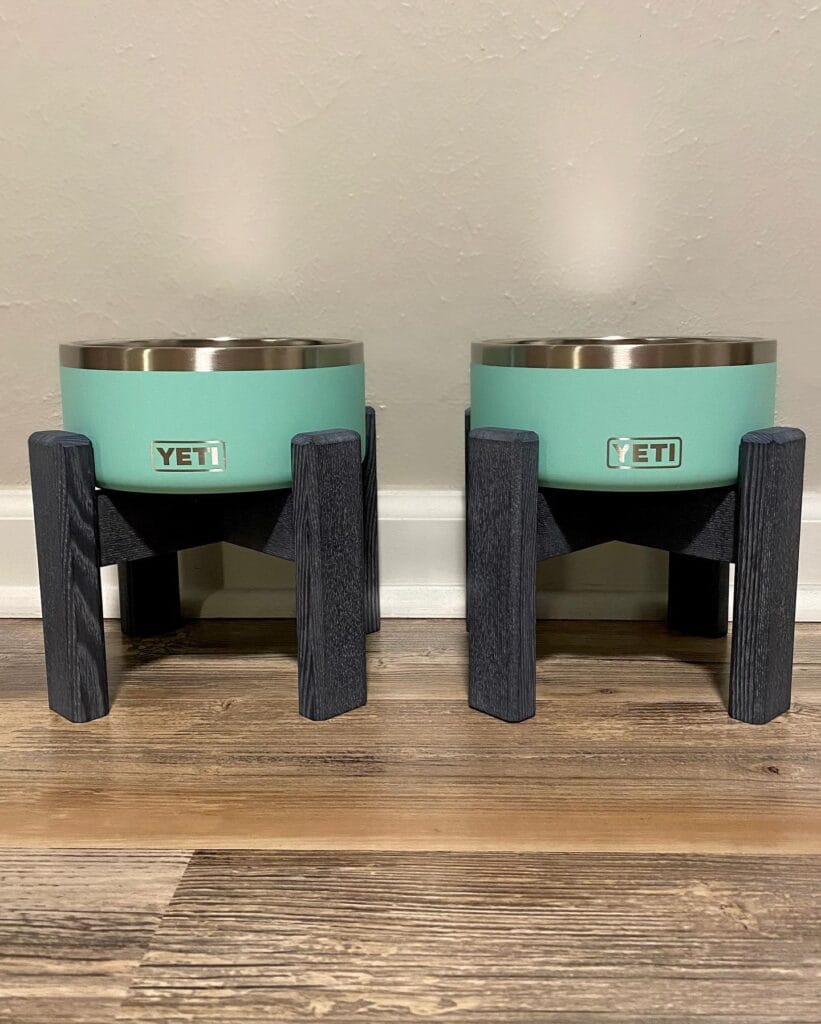
It happened one day. My dog’s water dish finally stopped spilling over the entire kitchen floor…because it was actually sitting still for once. That’s when I realized my dog Koda’s water bowl was sliding around my kitchen floor every single day. I was done.
2 YETI Boomer dog bowls in Seafoam/Teal 8oz or 4oz (I used 8oz) 4 2×2 wood posts cut to 4 inch lengths 2 flat wood pieces (crossbars) cut to 6 inch lengths Black wood stain or ebonizing solution Wood glue 2 inch wood screws Sandpaper (120 grit, then 220 grit) Drill Drill bit set Paintbrush for wood stain application
Instructions
Sand the wood pieces to reveal the grain, starting with 120-grit and then finishing with 220-grit to get a clean, furniture grade look. Apply black ebonizing stain in long strokes to the wood pieces, let dry for 24 hours.
Attach two legs to each crossbar with wood glue, then use screws to reinforce. This bowl design keeps the bowl cradled and free from showing clips or hardware. What kitchen wouldn’t want to look intentional?
Space the two should be about 3 inches apart. One for water, one for food.
The extra height will take the strain off your neck while eating meals and also mean you will not get up out of your seat post-meal to pace about your lounge room!
Wipe with a damp cloth between uses; the ebonized finish will not need to be resealed.
Prep Time: 30 min | Active Project Time: 2 hours | Difficulty Level: Beginner-Intermediate
📸 Photo credit: Instagram @lumberlabinc
#5: Striped Wood Dog Bowl Stand (The One That’ll Make Your Kitchen Look Like a Pinterest Board)
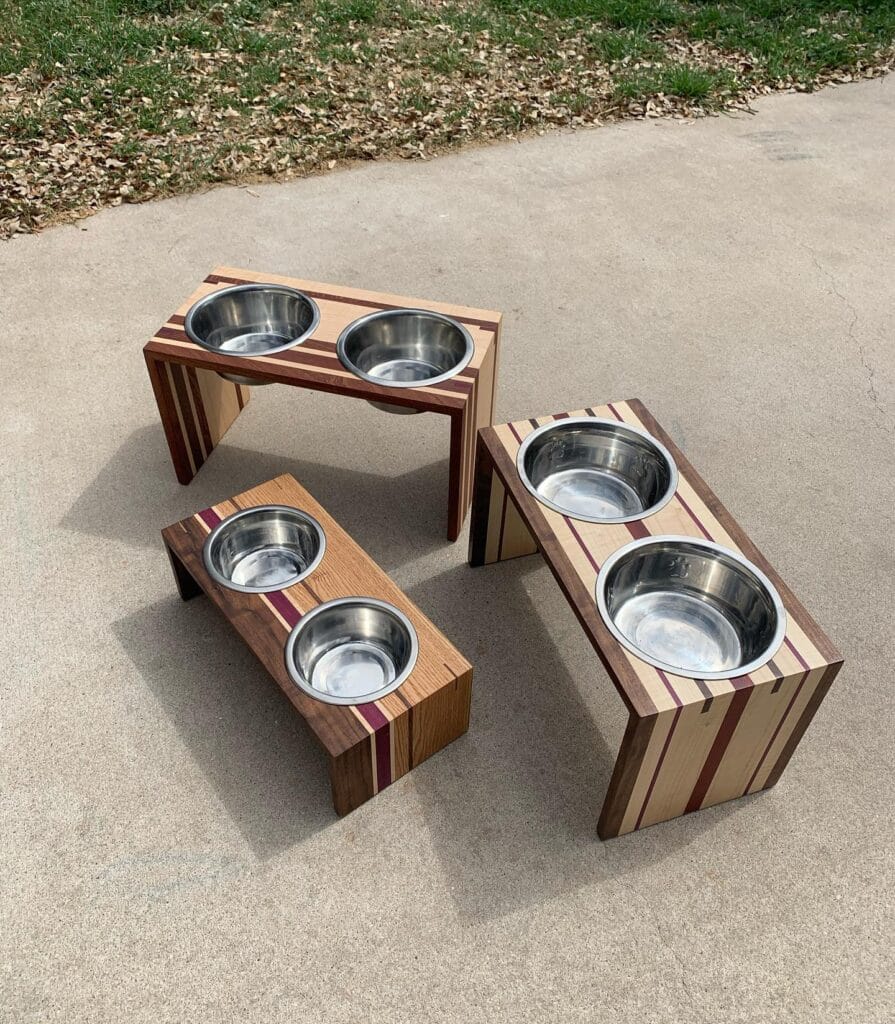
See your furry pal do a full squat just to reach her water bowl or watch her slosh half of it on the floor? Then this is for you!
Materials & Tools:
– Walnut, maple, and purpleheart wood strips
– Stainless steel dog bowls (2 per stand)
– Wood glue
– Clamps
– Table saw
– Router or hole saw bit
– Sandpaper (80, 150, 220 grit)
– Food-safe wood finish or mineral oil
Prep Time: 30 minutes | Active Project Time: 3–4 hours | Difficulty Level: Intermediate
### Instructions
Start by ripping your walnut and maple into ¼” strips, alternating them with thin purpleheart strips. The purpleheart (the dark purple lines on the following picture) makes it look really expensive. Really.
Glue and clamp the strips together flat. Let that sit for an hour.
Once the shower curtain is dry, cut your top panel and the two side panels to the height of your dog’s shoulders. My golden retriever should be about 10-12 inches tall.
Use a hole saw to cut circles just snug enough to hold your bowls without dropping through. If you are a little paranoid, you can test fit your bowl to make sure your circles are not too big. Nothing worse than a circle that is a half-inch off.
Sand with all three grits of sandpaper, going with the grain. Apply two coats of food-safe mineral oil.
But even better than the fact that she gets to eat her lunch at her shoulder height instead of hunched over the bowl is that I get to eat a sandwich at lunchtime today. How about that?
If your pup has a corner that is theirs, this can be paired with one of the 7 Cozy DIY Indoor Dog Kennel Ideas setups and can make that space intentional.
Real talk: Seal the underside too. Moisture can work it’s way under the wood stands faster than you might think and will warp the stand.
📸 Photo credit: Instagram @humbleroots_tx
#6: The 5-Gallon Bucket Gravity Dog Feeder That Keeps the Bowl Full All Day
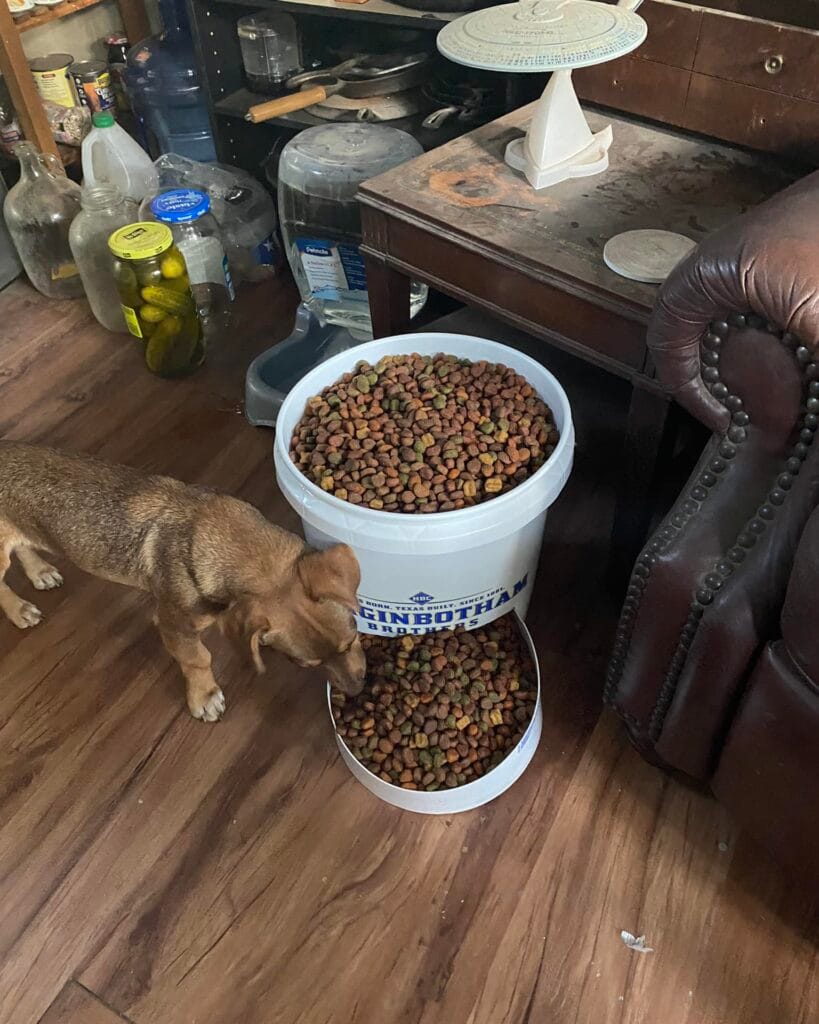
You know that moment when you’re in the middle of something — cooking, on a call, literally just sat down — and your golden is pawing at an empty bowl like it’s a personal attack?
Yeah. This DIY fixes that.
This gravity feeder uses two 5-gallon white plastic buckets (like the kind you can get at the hardware store or farm supply store and if you look closely at the image you can see the words “Higginbotham Brothers”) with the top bucket feeding kibble into the bottom bucket as your dog eats. It’s a gravity feeder that regulates itself — no timers or batteries required.
Materials & Tools:
– 2 x 5-gallon plastic buckets with lids
– 1 hole saw bit (3–4 inch diameter)
– Power drill
– Sandpaper (120-grit)
– Measuring tape
– Marker
Instructions
Take your top bucket and turn it upside down. Take a pen and draw a circle that is about a 3.5 inch circle, and then take a drill with your hole saw and punch a hole right in the middle of the circle. This will be your “kibble release” point. I would make sure this is exactly in the center. You can sand down the edges of the hole just in case there are any little pieces of plastic that might catch on your food.
Then you put the drilled bucket on top of the second bucket, and the kibble gets poured into the hole at the top, but then gravity pulls it down and it gets into the bottom bucket where the dog eats from.
Fill the top bucket with dry kibble of some sort. I like using the tri-color kibble from in the photo, but your dog won’t care.
With the gravity release design, a steady supply of food is always available for your dog, meaning there are fewer interruptions from you and less anxiety eating on your dog’s part.
Cut a small notch in the rim of the buckets where the kibble streams meet, so the air can circulate and avoid clumping of the kibble or getting stuck in the flow.
Prep Time: 10 minutes | Active Project Time: 20–30 minutes | Difficulty Level: Beginner
They are food safe, easy to rinse out, and hold enough food for my medium-sized, but fairly large dog, to last 3–5 days between fill ups.
📸 Photo credit: Instagram @musichawk_
#7: DIY Elevated Three-Bowl Dog Feeder Stand (The Pinterest-Worthy One Your Golden Deserves)
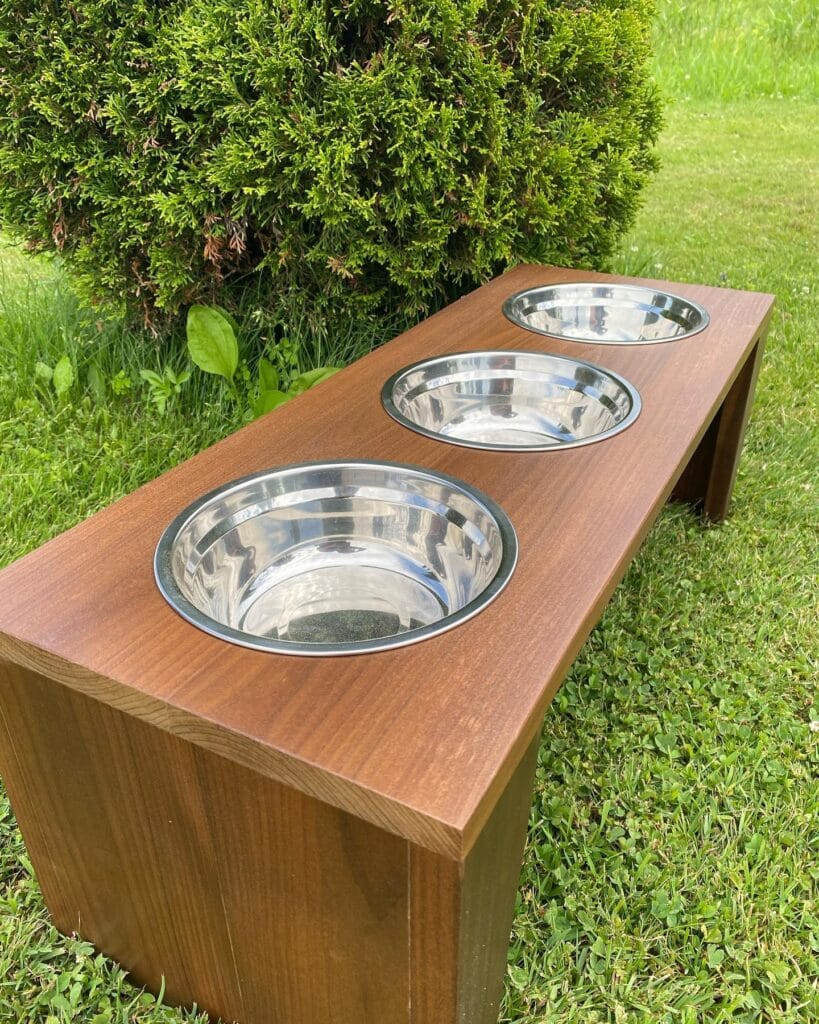
You know that feeling, right? You have your golden retriever sitting beside their food bowl. Their face is practically in the bowl and water is splashing everywhere. And then somehow the kibble ends up three feet away on your kitchen rug. Well, this was my life too until I saw this setup. And I almost gasped.
This feeder stand is made from solid oak wood finished in a warm walnut stain. That rich chocolate brown color that could only be found in a Pottery Barn catalog. It holds three stainless steel bowls. I may or may not have a second bowl of water for Goldie, because even though she’s a Golden Retriever, she’s dramatic about having water.
Materials & Tools:
– 3/4-inch oak plywood or solid oak boards
– Walnut wood stain + polyurethane sealant
– Three 6-inch stainless steel dog bowls
– Jigsaw or hole saw kit (6-inch diameter bit)
– Sandpaper (120-grit and 220-grit)
– Wood glue + clamps
– Measuring tape, pencil, safety glasses
Instructions
Cut the top board to be 36 inches long and 10 inches wide. Cut two side panels at 10 inches tall, just enough to keep a large dog like a golden retriever from hunching her neck down, which actually reduces the strain on her joints over time. The elevated height will also make her happier at mealtime.
Sand the top of the board first with 120-grit, and then finish it with 220-grit for a smooth, splinter-free surface. Mark your 3 holes for the bowls evenly spaced on the top of the board. Center your 6-inch diameter circles on the board and space them about 2 inches apart. Cut them out with a hole saw or jigsaw.
attach side panels with wood glue and clamps. wait 24 hours before adding any screws to reinforce attachment. apply two coats of walnut stain. allow each coat to dry completely between applications. seal the entire frame with polyurethane so water spilled on the frame doesn’t warp the wood.
Drop your stainless bowls in. Done.
The stainless steel bowls slide out for easy washing. I have other bowls that my dog’s kibble gets stuck to the bottom because they are a permanent fixture in the stand. In addition, the stand is not a light weight which is also a plus for us. No nosing around the bowls.
We use a staining, caulking, and sealing product to stain the inside of the bowl cutouts in order to seal the wood from moisture from splashing bowls. Otherwise, the inside of the holes will soak up water and warp from the inside out.
If you’ve been looking for a way to seamlessly incorporate your dog into your home setup, then 7 Creative Ideas for Your DIY Dog Washing Station is a must read project if you’re creating your very own pet zone.
Prep Time: 30 minutes | Active Project Time: 3-4 hours | Difficulty Level: Intermediate
📸 Photo credit: Instagram @jdwoodworkinganddesigns
#8: Farmhouse Trestle Elevated Dog Bowl Stand (Natural Wood)
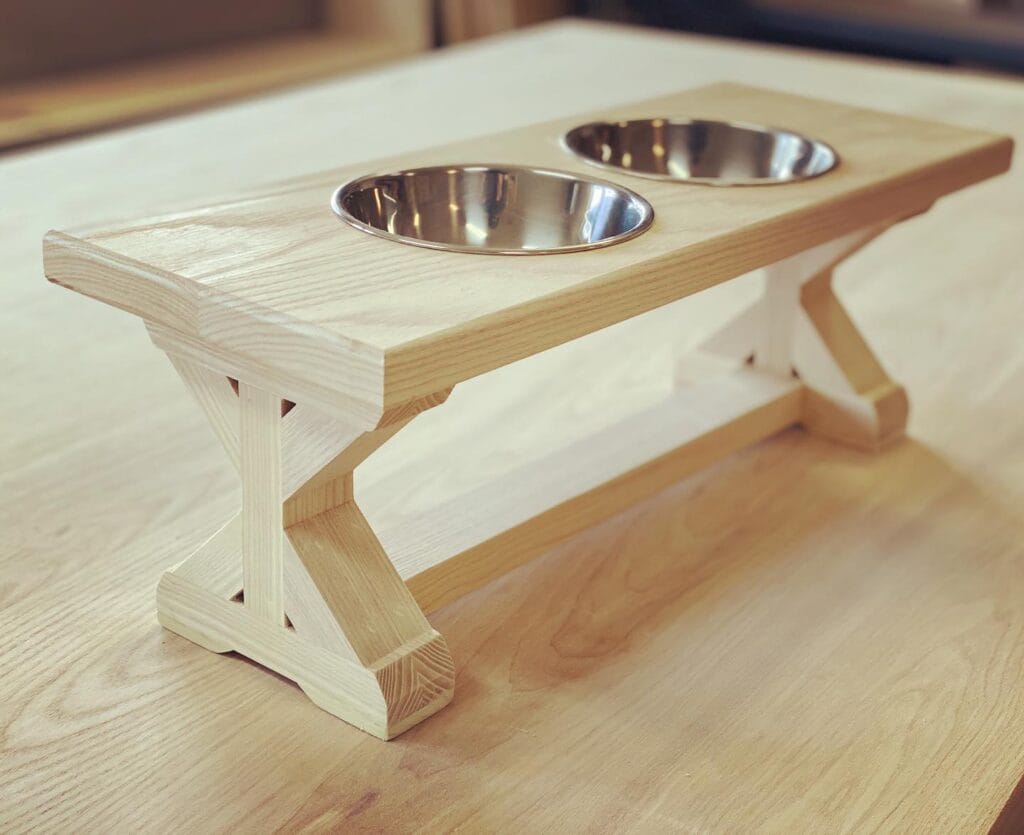
You know that exact moment when your golden retriever finishes eating breakfast, walks away and water is still dripping from her chin, directly onto your kitchen rug? My cousin’s dog did that to her kitchen rug for a year before she decided to build one of these puppies.
Giving full farmhouse dining table energy, this stand’s solid ash or pine wood, natural unfinished finish and classic trestle base with the X-cross bracing on each side. It also has two stainless steel bowls (roughly 4-cup capacity each) that keep your dog’s food off the ground. It is about 6 inches tall for medium to large dogs like goldens.
Materials & Tools:
– 1×6 pine or ash board (approximately 36 inches for the top)
– 2×4 lumber for the trestle legs and cross supports
– Wood glue + 1.5-inch wood screws
– Two 4-cup stainless steel dog bowls with rubber-grip bases
– Jigsaw, drill, sandpaper (120-grit then 220-grit)
– Optional: food-safe clear coat sealant
Instructions
Cut your 36×10-inch top board first then sand all the edges so that your dog’s ears won’t get scratched. Cut two identical trestle leg assemblies from your 2×4. The leg should be shaped like a capital A. Put a piece of wood at the bottom of the A to keep it stable. Glue the A legs together using wood glue then screw them in so that they do not wobble.
Trace your bowls with a pencil – on my bowl the opening is 4″ in diameter. Trace them out every 6 inches. Cut them out with a jigsaw. This is where most people get anxious and crack the wood. Go slow on the curve.
Attach the legs to the underside of the top board with corner brackets. This will help keep your goldens neck straight while eating and help reduce strain on the neck when eating thus helping digestion and your goldens will eat better, feel better and will keep your floors dry !
One last sanding with 320-grit and lightly sand the whole piece one more time with 220-grit, then apply a food-safe beeswax or water-based sealant if you want it to last through years of wet bowl splashing.
Prep Time: 20 min | Active Project Time: 2–3 hours | Difficulty Level: Intermediate
You can leave this rustic piece raw for that Pinterest-worthy natural look or you can stain it a warm walnut to match your kitchen cabinets. Either way, this piece looks like something you would spend $80 at a boutique shop but you made it for under $25.
📸 Photo credit: Instagram @rusticvalleywoodworking
#9: Built-In Walnut Dog Feeding Station With Quartz Countertop
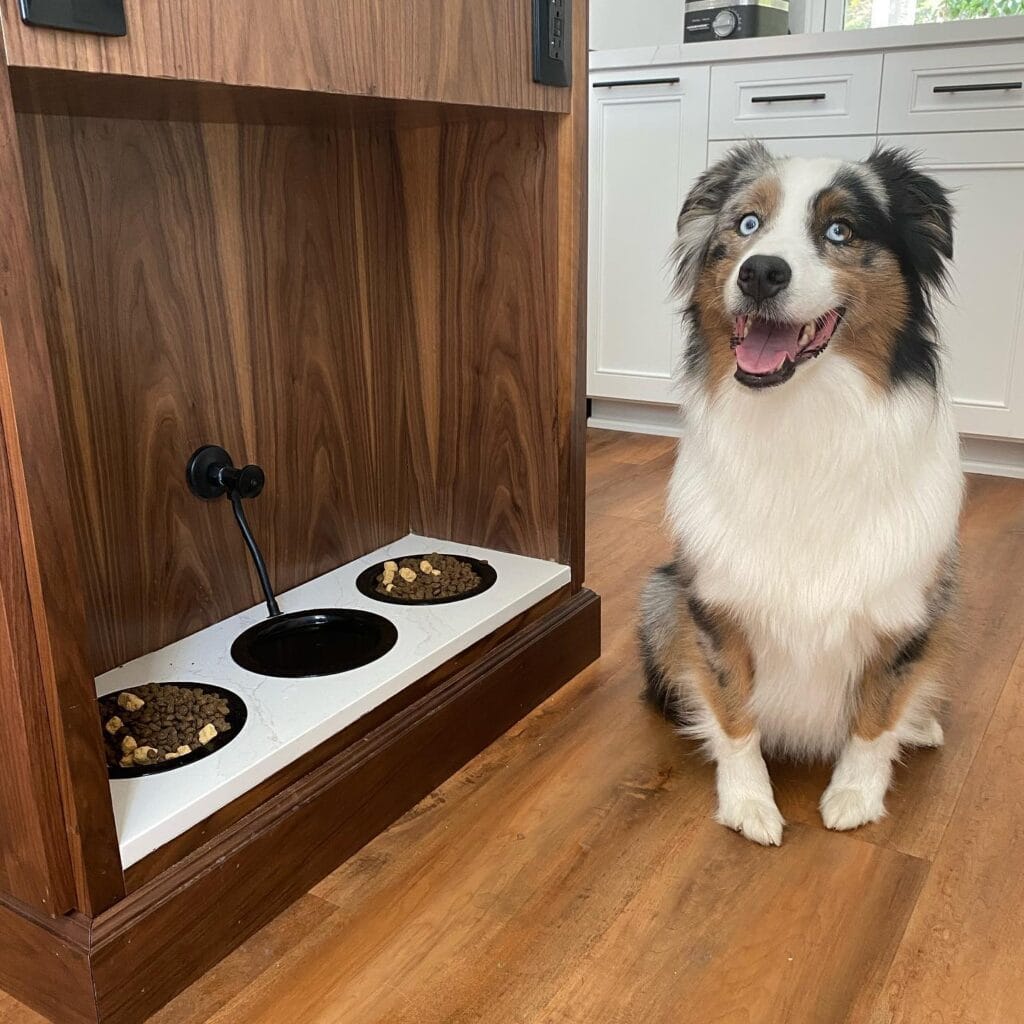
Your dogs’ food bowls are always in the way. You are tripping over them, kicking them across the kitchen tile, watching as kibble flies every time she dives in a bit too fast. Me, too. Until I saw this one and could not stop thinking about it.
This dog bowl has been built directly into the walnut wood cabinet panel so it is flush with the base of a kitchen island or mudroom wall. The surface is white quartz stone. The bowls are recessed black metal bowls, two for food and one for water, so your dog can eat without the bowls sliding around. It even has a wall mounted black iron faucet spout for a water line hook-up.
Materials & Tools:
– 3/4″ walnut plywood or solid walnut panels (for the alcove frame)
– White quartz slab (for the countertop surface)
– Three 8-inch recessed black stainless bowls
– Black iron wall-mount faucet + copper water supply line
– Jigsaw, drill, circular saw, wood clamps, construction adhesive, sandpaper (120 + 220 grit)
Instructions
Cut the walnut panels into a “three-sided alcove box” with two side walls and a back panel. Sand everything to 220 grit before assembly. If you rush the sanding process, the grain splinters easily. Glue and clamp the panels together and allow them to cure overnight.
Cut the quartz counter to fit the width of the alcove. Have a stone shop pre-cut the three circular bowl openings – please don’t try to cut that with a jigsaw at home. Put the bowls in and make sure that they fit flush. If they fit flush then when the golden’s nose pushes against the bowl, it won’t slide on the counter. No more scraping sound of the golden bowl as he’s eating.
Mount your alcove box to your wall or base of your island using construction adhesive and 3-inch wood screws into wall studs. In the back, run your copper water supply line up through the back panel before mounting the alcove up.
When you get your [url=]black iron faucet[/url] ready, you’ll want to install it on the back wall panel of your alcove, connect it to the copper line, seal the base of the faucet with plumber’s putty, and test it for drips before closing anything up.
As a bonus, your dog is eating at a more natural neck level, reducing the risk of gulping and bloat, and your kitchen floor stays clean.
Apply food-safe Danish oil to all walnut surfaces for water resistance, and apply a matte polyurethane topcoat.
Prep Time: 2 hours | Active Project Time: 6–8 hours | Difficulty Level: Advanced
If you love this style but want to try something easier first, check out 7 Creative Dog Feeding Station DIY Ideas. You can try an easy project for every skill level.
The color of the walnut will darken with age, this is not a flaw but a characteristic of the grain. Wipe the quartz surface weekly with a damp cloth, and re-oil the wood every 6 months to prevent the color from drying out.
📸 Photo credit: Instagram @sandiegocustomcabinets
#10: The Built-In Faucet Dog Feeding Station That’ll Make Your Kitchen Look Like a Pinterest Board
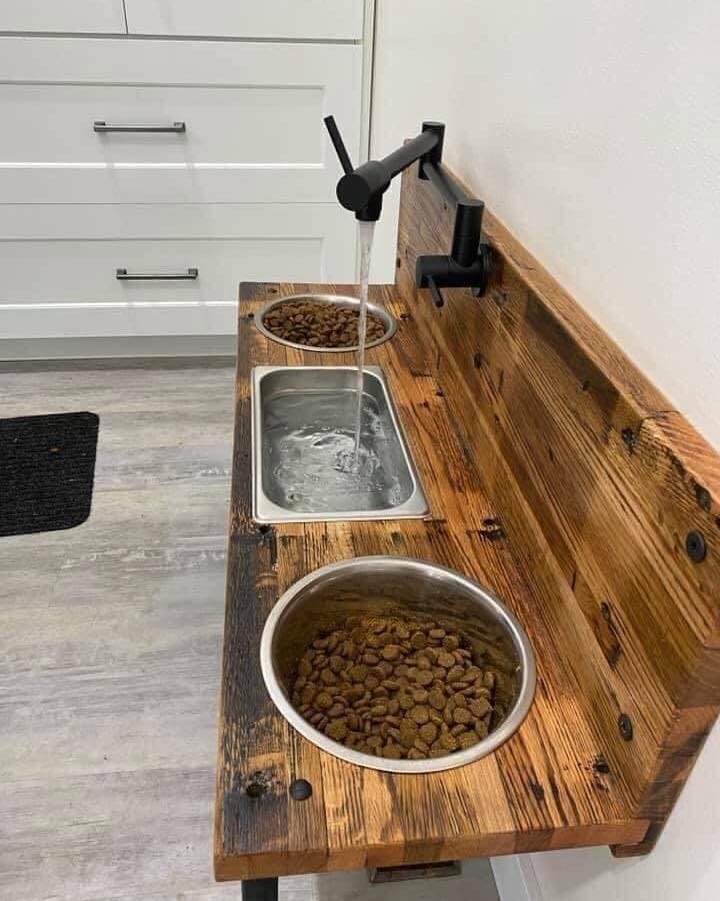
It happens to the best of us. That moment your golden comes sprinting in from the backyard, slides across the floor and dunks her whole face into the water bowl. And suddenly there’s a puddle the size of Lake Michigan on your kitchen tiles. Well, we have the solution!
Yeah. That was my cousin’s life every single day until she built this.
Materials & Tools You’ll Need:
– Reclaimed pine wood planks (aged, knot-filled — that rustic brown tone in the photo)
– 2 stainless steel round bowls (one large, one small)
– 1 rectangular stainless steel basin (acts as the built-in water reservoir)
– Matte black wall-mount faucet with articulating arm
– Black metal pipe fittings for faucet connection
– Wood stain (dark walnut tone)
– Wood screws and sandpaper
– Jigsaw for cutting bowl cutouts
– Plumber’s tape and basic plumbing tools
– Metal legs or base frame (visible in the photo’s lower edge)
Instructions
Cut your reclaimed pine planks to size. The station in the photo is about 36 inches wide by 14 inches deep. Sand the entire surface of the wood until it is smooth. Apply two coats of dark walnut stain. Let it cure completely before touching it. If I was in a rush, the stain would show.
Once dry, use the jigsaw to cut two holes large enough to fit the round stainless bowls. Then cut a third, larger hole in the base that will fit your hotel pan basin flush with the wood. Make sure that the basin fits in the wood at a lower level than the bowls. It will catch water as it is coming out of the faucet.
Mount your matte black articulating faucet directly to the wall above the station using the black pipe fittings. The faucet can be swung over the water basin to fill it hands free and then swung away. The built in faucet will mean that your dog has fresh water available all the time and you will need to refill less.
Attach your metal base frame legs under the wood top bolting them in securely. I found the height in the photo to be perfect for my large breed dogs. It seems to take a lot of the strain off their necks and if your dogs are fast eaters then they wont eat to quickly.
Both food bowls are on the opposite sides of the water bowl so as to avoid the water splash on the food bowls.
The stain gets even darker with a little water exposure, and adds a little more aged character.
We applied a food-safe sealant to all of the wood surfaces that are near the water basin. The last thing we want is for our raw pine friend to get sick from drinking water.
Prep Time: 30 minutes | Active Project Time: 4–6 hours | Difficulty Level: Intermediate
📸 Photo credit: Instagram @simplyvintageva
The One Mistake That Ruins Most DIY Dog Feeders (And How to Skip It)
But no one tells you this: bowl height is everything.
Many people will build their dog’s feeder, and then they realize that their dog’s bowl is too low or too high for their dog. I have seen this happen so many times and it is so sad!
Measure the shoulder height of your dog. The water bowl should be positioned about 6 inches below this height, thus reducing the strain on your dog’s neck. In addition, it will reduce the amount of water that your dog will splash out on the floor.
My friend Leila built this beautiful cedar feeder last fall. She got the height wrong so had to rebuild the base. What a waste of two weekends!
Pro secret: Drill your bowl holes slightly smaller than the size of the rim of the bowl, that way the bowls don’t slide around while your dog is eating.
And seal every wood surface before you assemble your dresser, not after. I have had this happen to me before. If you stain the finished gaps, it can be hard to match the color of the stain. My dog’s drool gets into every crack!
Your Dog Deserves a Clean Couch (And So Do You)
If your pups are anything like mine they can really ruin the ambiance of a cozy night on the couch, by tracking mud everywhere. Here are some tips to keep their paws off the couch.
Pick one thing on the list and just start there. Or if you’re not super crafty, a waterproof blanket thrown over your cushions will buy you some peace of mind. Or maybe you’re super crafty and want to make your dog’s bathing station more darling than ever. She can walk in clean!
Small changes can make a big difference. Your home can look good AND survive dog mom life. I promise those two aren’t mutually exclusive.
So, what is the one spot in your house that your pup has claimed as theirs?

Amr Mohsen is a software engineer who traded his keyboard for a leash — at least on weekends. His love for dogs inspired him to share what he learns as a dog owner and enthusiast, bringing a detail-oriented, research-driven perspective to every article he writes. If it’s about dogs, he’s probably already looked it up twice.



