
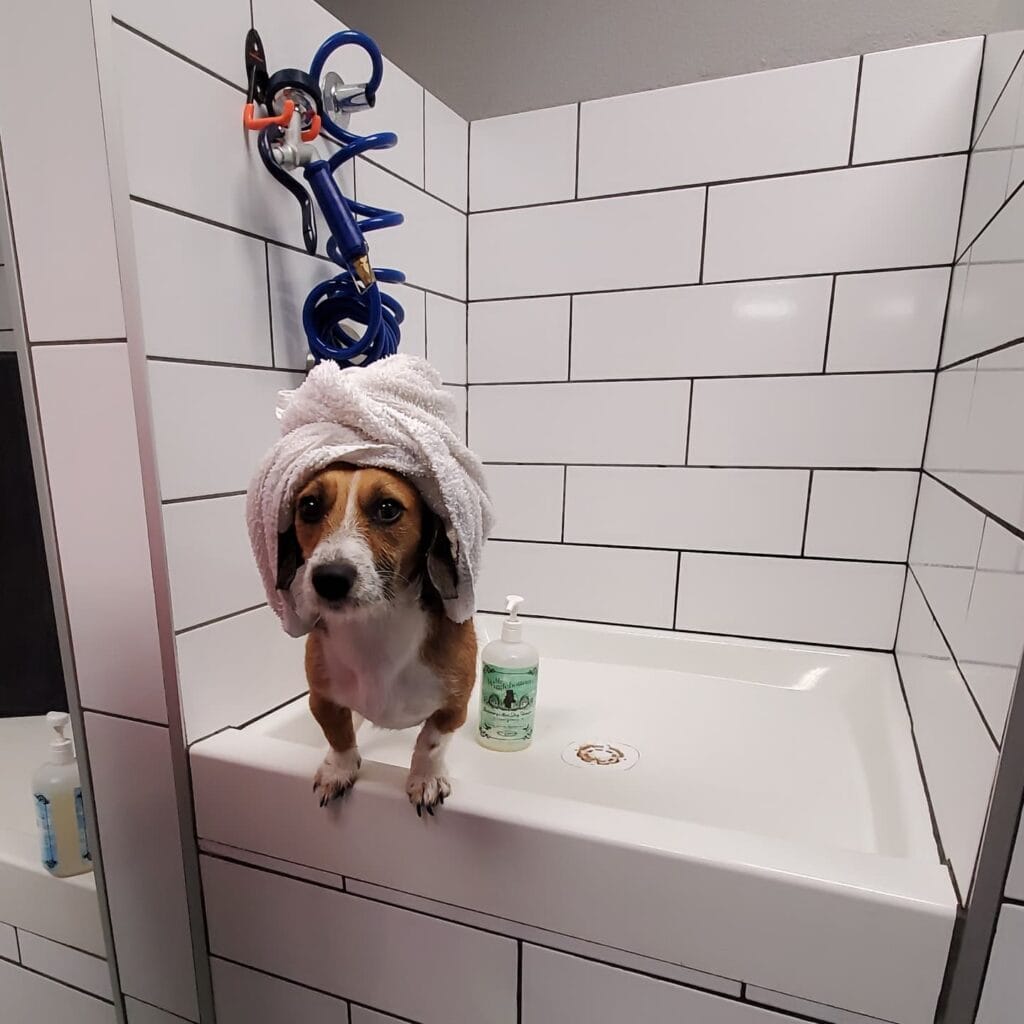
My dog just shook half the backyard off in my hallway. Again.
Well, now you’ve got mud on that cream-colored rug that you found on Pinterest that took you three weeks to track down, and I feel that right in my soul.
Bath time with a big dog can be a lot of fun, for him. You’re wet, he’s running laps around the bathroom, and your back is killing you from hunching over the tub. Last summer I helped my cousin set up a little outside wash area for her lab, and she literally texted me the next day about how much easier it was.
Yes! Finally. I’ve got these 7 ideas that you can use to make your own diy dog bathing station so that bath day doesn’t feel like such a punishment for both of you! In addition to being cute enough to fit your style, they’re also easy enough for your floor to thank you for.
#1: Built-In Dog Wash Station (The One That’ll Make You Never Dread Bath Day Again)
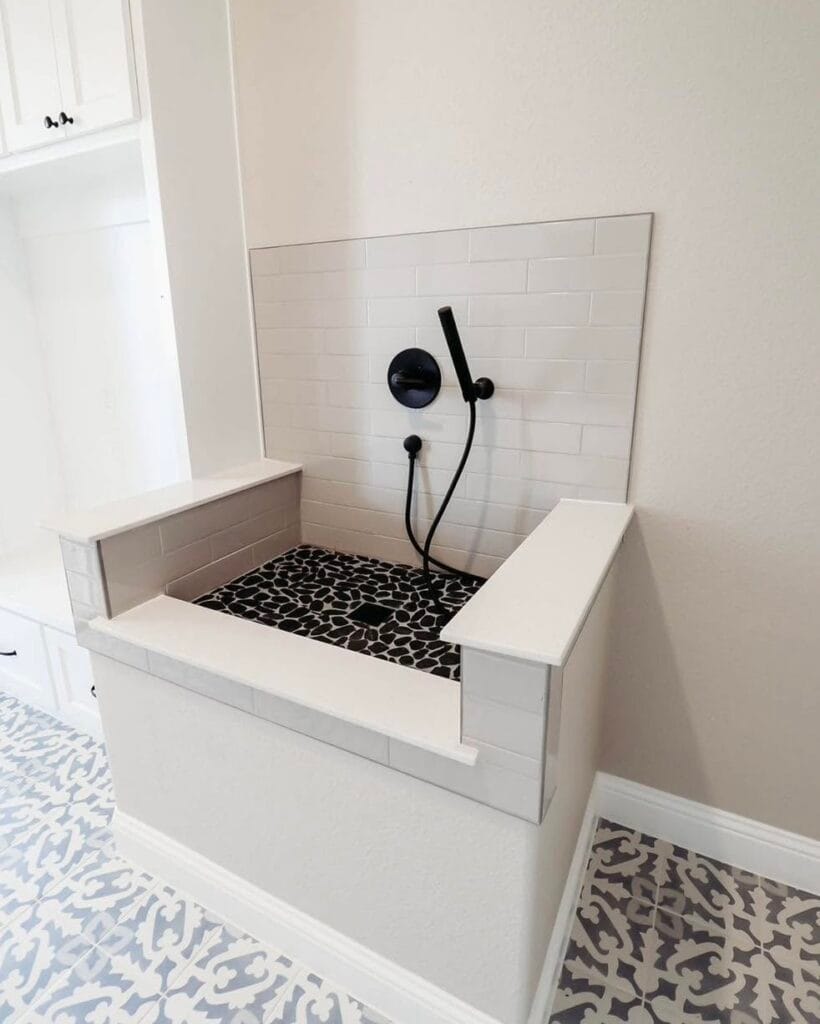
You know that feeling of when your golden is coming in from the backyard and he is covered in mud and you are standing there with a towel and your like…what do i do now? I feel that way every time I dog sit for my cousin’s lab.
This is the built-in dog wash station that you never knew you needed.
Materials & Tools:
– White subway tiles (4×8 inch) for wall backsplash
– Black and white mosaic pebble tiles for the basin floor
– White quartz or marble slab for the side ledges
– Matte black handheld showerhead with wall-mount valve
– Cement board for waterproof wall backing
– Tile adhesive, grout (white for walls, dark for floor)
– Waterproof membrane/liner
– Center floor drain (matte black to match fixtures)
– Tile saw, trowel, level, drill
Instructions
make a knee-wall enclosure about 36×30 inches high using 2×4 studs… can’t go to high, my knees are only so high. My basin is only about 18-20 inches high, which means I can load my middle size to large dog without wrecking my back.
I started this from the top down…I don’t know if it’s the right way to do it. I installed cement board on the inside of the walls first. I’ve heard it’s not a good idea to skip this step because it will cause the inside of the walls to get wet within a few months.
After placing all of the sheeting over the cement board, be sure to cover every seam and corner with the waterproof membrane. This membrane should remain on the cement board for at least 24 hours before you are able to touch the tile.
Set your mosaic pebble tiles on the bottom of the basin with a slight slope towards the centre drain. The pebbles will offer your dog something to grip onto, meaning they’ll be less likely to slip and stress out.
cover interior walls and exterior knee walls with your white subway tiles in a standard brick pattern and keep grout lines tight at 1/16 inch.
Cut and set your quartz ledge pieces on both side walls. These ledges will serve a dual purpose. Somewhere to rest shampoo bottles, and a spot for an anxious pup to perch while I wash him.
After you mount your matte black wall valve at about 36 inches high, attach your handheld shower head to the hose. Having a handheld shower means that you can control where the water goes, making it easier to rinse your dog’s belly and legs.
Grout everything, and seal the floor tiles with waterproof silicone caulk in all the corners.
Prep Time: 1 day | Active Project Time: 3-4 days | Difficulty Level: Intermediate
The built-in ledges keep your shampoos within reach so that bath time is cut in half and my golden actually starts tolerating it. Finally.
I keep a small squeegee in the subway station. I run the squeegee over the subway tiles after each bath to keep them free of soap scum.
📸 Photo credit: Instagram @tonymillerconstruction
#2: Built-In Tiled Dog Wash Station (The One That Makes Bath Time Actually Enjoyable)
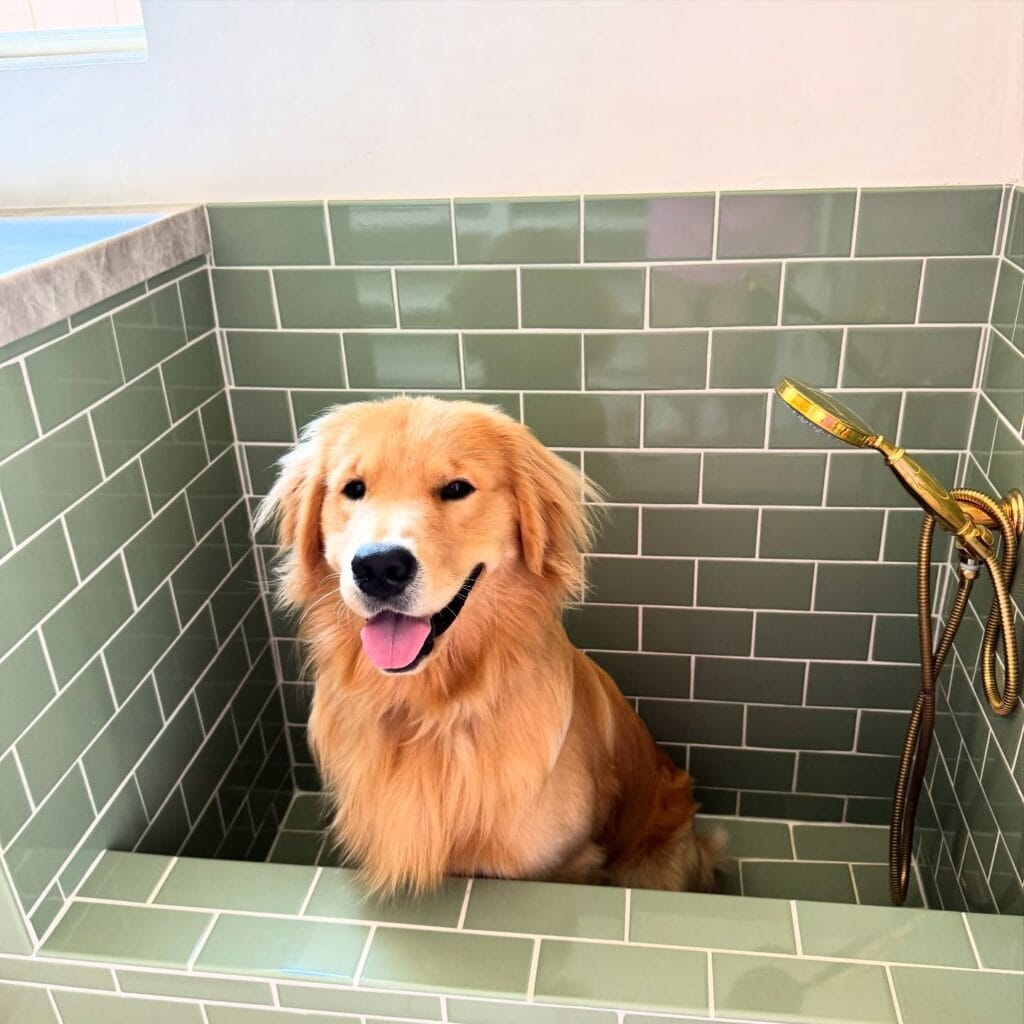
Anybody else’s dog run through the yard then come in all muddy paws and get to jumping on you? You are standing there with a garden hose wondering why you can’t do better than this.
This built-in dog wash station is it.
Prep Time: 2–3 hours planning | Active Project Time: 2–3 days | Difficulty Level: Intermediate
Materials & Tools:
– Sage green 3×6″ subway tiles (you’ll need roughly 40–50 tiles for a 24×24″ enclosure)
– Marble or stone cap tiles for the top ledge
– Waterproof cement board backer (1/2 inch thick)
– Mold-resistant grout in white or light gray
– Brass handheld showerhead with flexible hose mount
– Tile adhesive and waterproof sealant
– Level, tile cutter, trowel, grout float
Instructions
I’d constructed the enclosure using cement board framed into a 24x24x18″ box. The depth of the box helps to contain any splashing, and gives my goldens just enough room to sit comfortably without feeling cramped.
Apply tile adhesive, the tile adhesive is slathered onto the wall. The tile is then pressed into the tile adhesive in a brick lay pattern from bottom to top. Allow the adhesive to cure fully before grouting. If the grouting is done too soon there is a good chance the tiles will crack.
Once the grout is dry, seal all the surfaces with waterproof sealant. The walls should be completely sealed up so that water does not go into your house.
Attach your brass handheld showerhead to the right wall, at about shoulder height for your dog. Because the showerhead can be adjusted, you can easily rinse your dog’s belly and paws without wrestling with them.
We also liked the little detail with the marble cap ledge at the top edge of the bath – it’s a nice spot to put shampoo bottles while you’re in the bath.
I finished up the grout in a warm white (pantone 13-3402) to bring out the sage tiles. It photographs beautifully (always important).
Cauly all the corners with 100% silicone caulk instead of grout. The grout cracks and weeps eventually in the corners. Silicone is flexible and will keep water out for years.
📸 Photo credit: Instagram @renaudinbuilders
#3: Built-In Dog Shower Nook With Subway Tile and a Handheld Sprayer
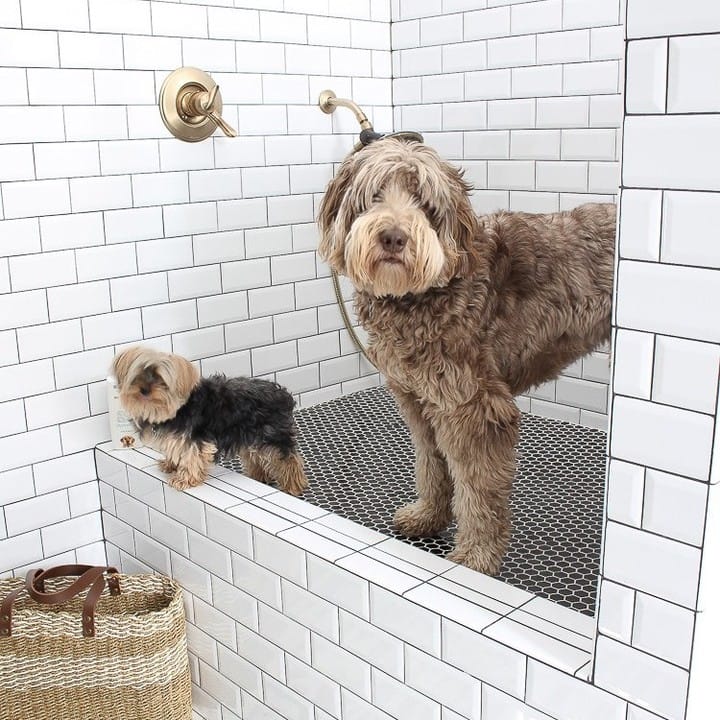
You open the back door and your golden just zips through the backyard and is back looking like a swamp creature. There’s mud on your bathroom mat, there’s paw prints on the toilet and you’re basically wrestling with a 60 pound wet dog in your tub while your back is killing you.
Yeah. We’ve all been there.
I love this built-in dog bathing nook! It’s a raised shower bench tiled into the wall. There is a handheld sprayer mounted at dog height, so no more bending over. Very clever.
Materials & Tools:
– White 3″x6″ subway tiles (wall coverage)
– Black penny mosaic tiles (floor grip surface)
– Brushed gold handheld shower head + valve fixture
– Cement board backer
– Tile adhesive, grout (charcoal), tile spacers
– Waterproof membrane
– Grout sealer
– Level, wet saw, trowel, caulk gun
Instructions
Make your bench at 18-20 inches high using 2×4 studs. Put cement board over the top of it. Put waterproof membrane on all the walls, bench top and corners.
Tile your subway tiles starting from the center of each wall and working out. Keep your grout lines at 1/8 inch for a clean look. Once you have tiled all your walls, lay the black penny tile down over the bench top. The texture of the penny tile will ensure that wet paws will not slip on this surface.
Mount your gold valve at shoulder height (on you, not them), and position the handheld hook to be at dog chest level. This means the dog will be less likely to thrash and the built in sprayer means you control the rinse and do not have to do the full squat body movement which ruins knees.
And since the bench is raised a bit, small dogs can sit right on the edge and big dogs stand inside — no height difference.
Make sure you seal every grout line twice. I’ve had gold fixtures that when you run your finger over them, they have gotten a little bit oxidized from the water. So make sure you put the grout in and seal the grout twice.
And to go with this, check out 12 Heartfelt Designs for DIY Dog Accessories! Bath day will be a whole vibe and not a whole disaster.
Prep Time: 1 day (waterproofing cure) | Active Project Time: 2–3 weekends | Difficulty Level: Intermediate
📸 Photo credit: Instagram @warmyourfloor
#4: Built-In Dog Wash Station with Open Shelving and Handheld Shower
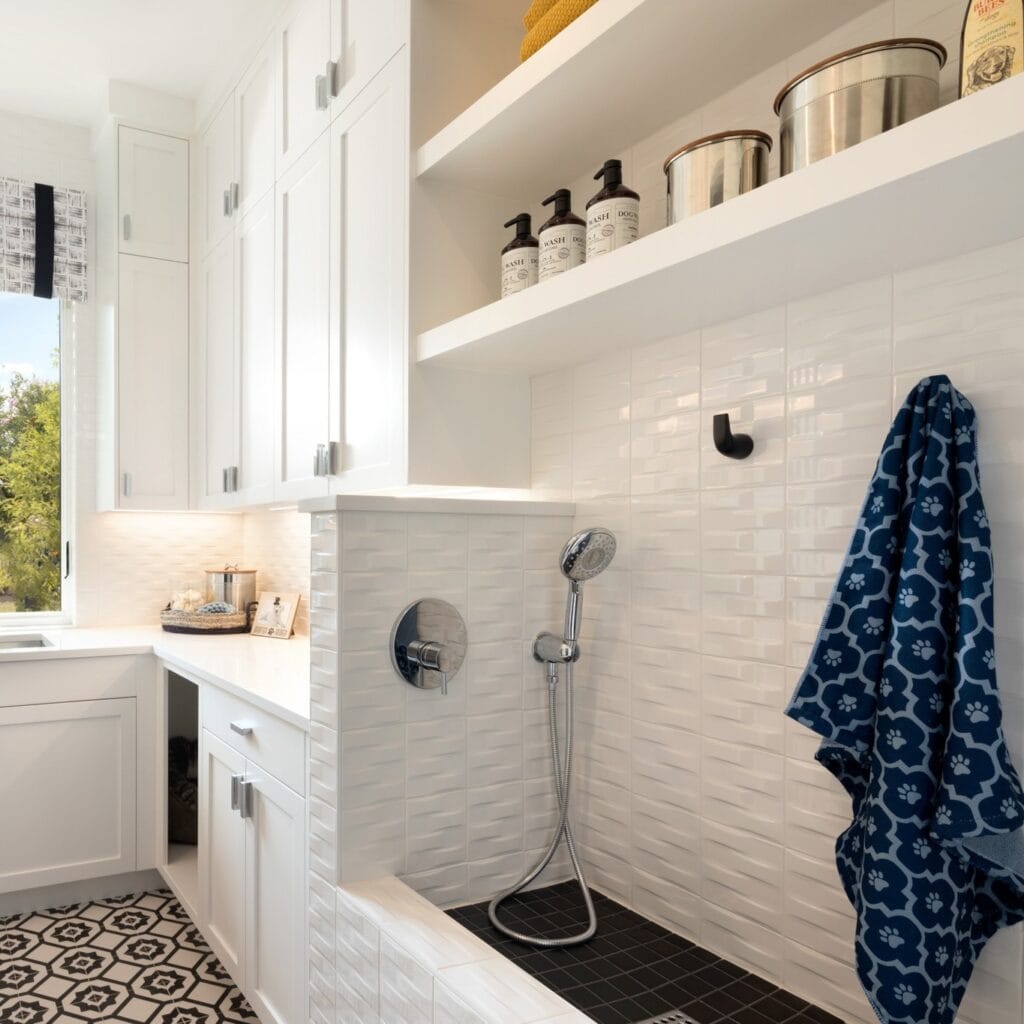
I know that golden moments moment when my golden comes barreling in the door after her walk in the rain with mud caked on her paws and she starts shaking all over the freshly mopped floor. This station was made for that moment.
It doesn’t get much better than this. My dog wash area is a tiled walk-in dog wash bay with a chrome handheld shower head on a flexible hose, white subway tile walls, black mosaic floor tiles for grip, and floating white shelves stocked with dog wash bottles and stainless steel storage canisters. The surrounding cabinetry is shaker-style white, and a matte black wall hook holds a navy paw-print towel at arm’s reach.
Materials & Tools:
– 12×4 inch beveled subway tiles (white, glossy) for walls
– 1×1 inch black mosaic tiles for the shower floor
– Cement board for waterproofing the walls
– Schluter drain system for the floor
– Chrome handheld shower kit with flexible 60-inch hose
– Floating shelf brackets (heavy-duty)
– ¾-inch birch plywood for shelves, painted white
– Shaker cabinet boxes with soft-close hinges
– Waterproof tile adhesive and unsanded grout
– Tile saw, level, notched trowel, grout float
Instructions
Frame the opening to the bay with 2×4 lumber. Make sure the low knee wall is around 18 inches high, tall enough to contain splashing, but low enough that you can lift your dog in without throwing out your back.
One of the things that we always do in our bay is to apply cement board on every single surface inside the bay prior to tiling. People tend to skip this step and “live to regret it”. In order to prevent cracks on the seams between 2 cement board, we tape all the seams using mesh and seal them with waterproof membrane.
Then set your Schluter drain at the lowest point of the floor. Next, lay the black mosaic tiles starting from the drain in a slight slope outwards to the drain. The textured floor surface means your baby Golden won’t slip when you scrub her mid-bath, which in turn keeps her calm and the bath faster.
I tiled my walls with the beveled subway tiles in a staggered brick pattern. The variation in the tile face catches the light and hides water spots between washes – beautiful in real life, not just photos.
Place your floating shelves above the spray zone at least 18 inches above the knee wall. I store my dog wash products in matching dispensers so everything is at arm’s reach. I never step away for a moment and come back to lose control of a wet, soapy dog.
Install the handheld shower fixture on the inside wall of the knee wall, 6 to 8 inches from the top so you can rinse down as opposed to fighting the angle.
Hang your matte black hook just outside the spray zone so you can towel dry your dog without having to chase them through the house.
Once the grout is fully cured you will want to seal all the grout lines with a penetrating grout sealer. Reapply the seal every year and the whole station will stay this clean.
Prep Time: 2 hours | Active Project Time: 3-4 days | Difficulty Level: Advanced
📸 Photo credit: Instagram @erinkentinteriors
#5: The “You Had Me at Woof” Built-In Dog Wash Station
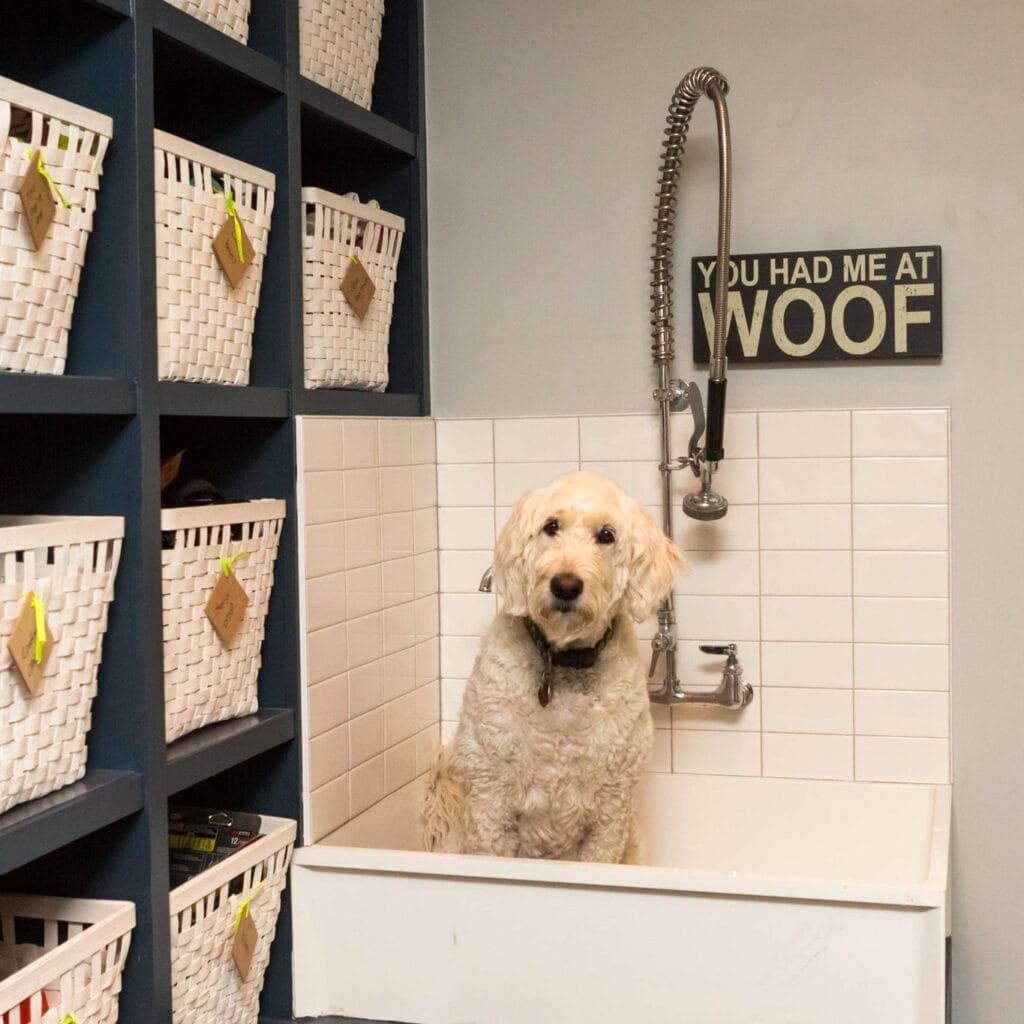
If you’ve ever had a golden retriever that came barreling through the back door after a muddy walk (yep, paws caked in mud and all), you know the only place to put them is the bathtub. My friend Dani had to do it every weekend until she built something that made me jealous.
This setup is everything.
Materials & Tools You’ll Need:
– White utility sink (freestanding, approx. 24″ x 20″)
– 4″x4″ white subway tiles for the backsplash surround
– Navy blue wood shelving unit (cube style, 5-6 cubbies high)
– White woven storage baskets with leather tag labels
– Wall-mounted pre-rinse spray faucet with flexible stainless steel coil hose
– Wall-mount faucet fixture (brushed nickel finish)
– Tile adhesive, grout, level, drill, and mounting hardware
– Decorative sign (the “You Had Me at Woof” touch is chef’s kiss)
Instructions
First you will want to mount your sink. Mounting the utility sink to the wall at “hip height” is a good idea. In other words, 34 inches above the floor so that you don’t have to hunch over while giving your golden retriever a bath. The sink can then be secured with heavy duty wall brackets into the studs as the wet golden retriever is not light.
Once the sink is level, we tiled the back wall surround with a straight stack of white 4×4 subway tiles. Apply tile adhesive to the wall, press each tile down firmly, then let the adhesive cure for 24 hours before grouting in white.
Next, mount your wall-mount faucet to the back of the sink, at a comfortable reach. The coil pre-rinse spray hose mounts directly above on a bracket. The hose stays neatly coiled out of the way, so your dog won’t get spooked by it when he’s in the tub.
And what about your nautical shelving unit? Simply anchor it to the wall next to the station. Slide in your lovely white woven baskets (label them with what goes in them – towels, shampoo, or whatever else you like to put in there).
After the tiles have been installed and grout has been cured, seal all of the tile grout lines with a waterproof grout sealer to help prevent soap scum and splashes.
Hang your sign above the hose for that Pinterest-perfect moment. Prep Time: 2 hours | Active Project Time: 1.5 days | Difficulty Level: Intermediate
📸 Photo credit: Instagram @erinkentinteriors
#6: The Tiled Walk-In Dog Bath That Makes Muddy Retriever Days Actually Manageable
Prep Time: 2–3 weekends | Active Project Time: 12–15 hours | Difficulty Level: Intermediate
There is nothing more glorious than seeing your Golden come barreling in from the backyard, soaking wet and smelling like a swamp and you are standing there holding a towel wondering how you got to this point. This is the build that will solve that problem for you.
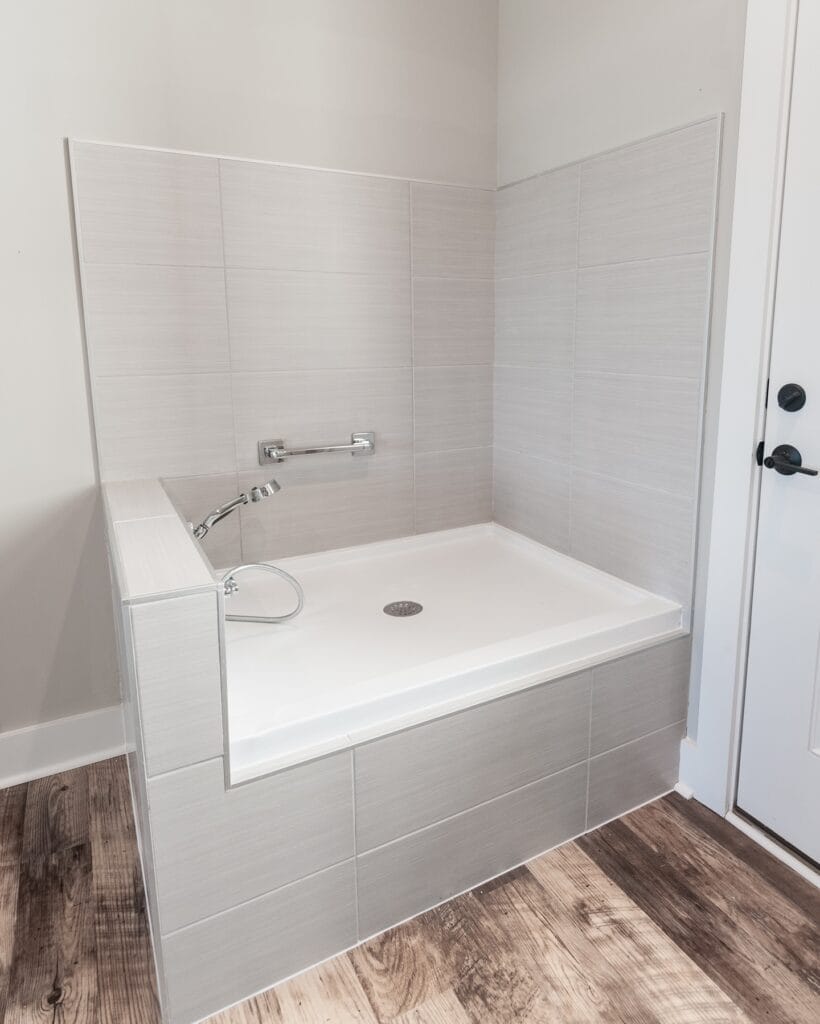
My DIY dog washing station is installed into a corner nook with tiled walls, a raised acrylic shower base and wall mounted faucet. It looks like something straight off my Pinterest board and it works like a dream!
Materials & Tools:
– 12″x24″ light gray porcelain tile (wall and apron surround)
– White acrylic shower pan (approx. 36″x48″, center drain)
– Chrome wall-mount tub filler faucet with handheld sprayer attachment
– Chrome grab bar (18″ length) mounted at dog entry height
– Tile adhesive, grout, waterproof backer board
– Level, tile saw, drill, silicone caulk
Instructions
Begin by framing the nook so it appears more as an alcove using 2×4 studs, then have all the walls inside lined with cement backer board before doing anything else to the nook. Skipping this step is the most common mistake people make when working with wet areas.
Put your acrylic shower pan inside the framed shower base at roughly 14-16 inches off the floor. High enough that you are not bending over to get her in and out, but low enough that you can easily place your dog in the shower or help her to climb in herself. The raised shower floor plus the grab bar mean that you can keep control of your wiggly, wet, 65-pound retriever without throwing out your shoulder.
Tile the front apron and both side walls with large-format 12″x24″ gray porcelain tiles stacked vertically. This allows the vertical pattern to “lift” the space and since we’re all sloshing around like dogs with a big bone, the grout lines aren’t as noticeable. Grout the front and sides with a sanded, waterproof, light gray grout.
Install your wall mount chrome tub filler about 30 inches off the pan floor. Docks the handheld sprayer right underneath it. Fill up the tub for a soak and use the sprayer for a rinse. This way, you can have 2 water sources in the tub and not have to chase your dog around to rinse her underbelly.
Mount the chrome grab bar on the left side wall panel at about 18 inches high so you have something to grab while she does her signature shake before you’re ready move.
I seal every seam where the tile meets the pan with 100% silicone caulk. Never put grout there because it will crack. The silicone will move with the pan.
I like how the wood-look LVP flooring outside the bath area keeps the whole room looking nice and doesn’t get warped by splashing water as real wood would.
If your dog is having trouble accepting the bath, try placing a lick mat with peanut butter inside the pan. This may help ease them into the tub, and it’ll help you too!
📸 Photo credit: Instagram @blueridgecustomhomes
#7: The Raised Outdoor Dog Wash Station With a Butler Sink
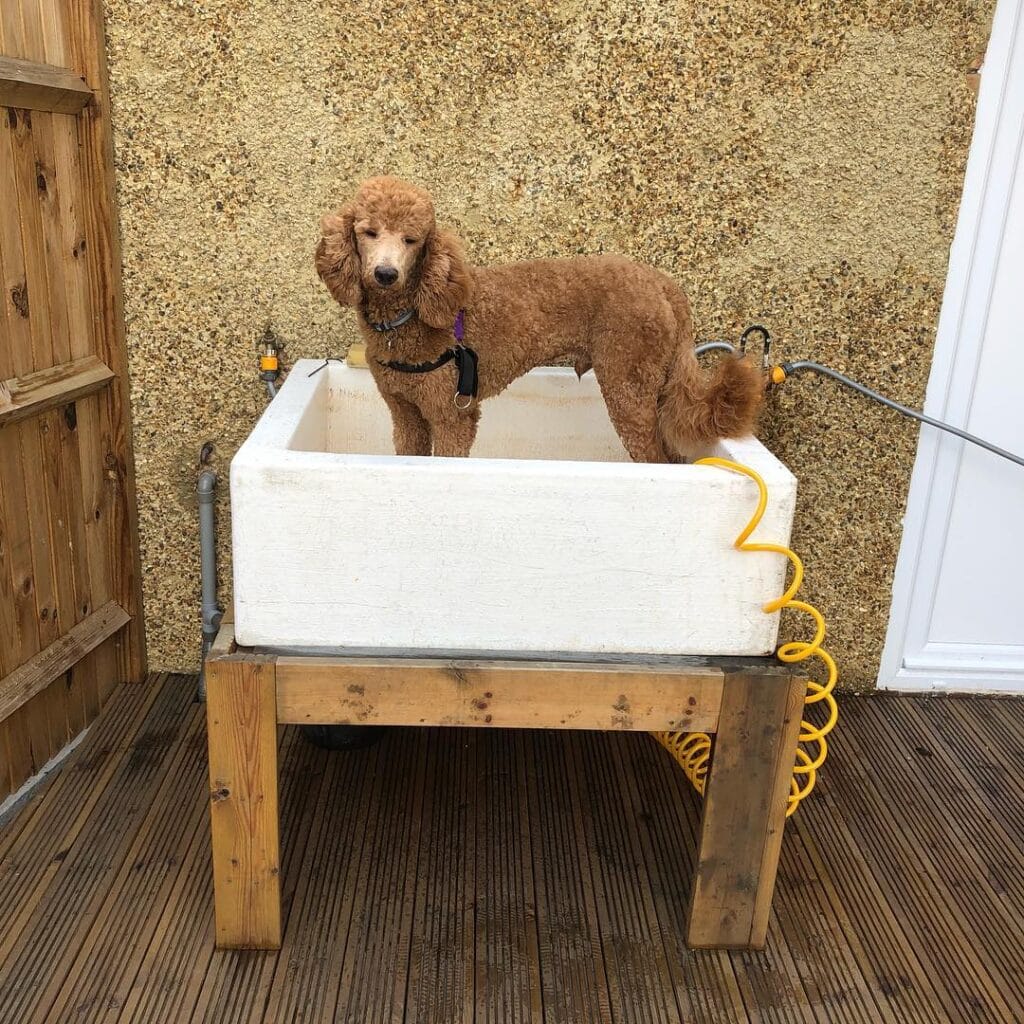
Your golden retriever just ran through the backyard (again) and somehow, you now have mud on your white shiplap, paw prints on your entryway, and dirt on the ceiling (don’t ask).
Being bathed by the big dog used to make me feel wet, achy in the back from bending over the tub and like I was in a murder mystery, the bathroom looked like a crime scene. The raised butler sink station changed things a bit.
Materials & Tools You’ll Need:
– Reclaimed or new ceramic butler/Belfast sink (approx. 24″ x 18″)
– 4×4 lumber posts (4 pieces, cut to 18″ height)
– 2×4 lumber for the frame supports
– Wood screws (3-inch, exterior grade)
– Yellow coiled garden hose with spray nozzle attachment
– Hozelock-style quick-connect fittings (the orange/yellow connectors visible in the image)
– PVC pipe (1-inch gray, for water supply line)
– Exterior wood stain or sealant
– Drill, saw, level, measuring tape
– L-brackets for sink support
Prep Time: 30 minutes | Active Project Time: 3–4 hours | Difficulty Level: Intermediate
### Instructions
First, cut your 4×4 posts down to 18 inches. You’ll want to cut them to this length because it will bring the sink up to hip level, therefore, no back strain while scrubbing behind those ears.
A rectangular frame is built using the 2×4 lumber. All four posts at the top are connected with screws and L-brackets. Make sure you check level on all four corners before tightening. A wobbly station will shift the moment your dog steps in, so take an extra two minutes here.
Set your ceramic butler sink into the top of the frame. The sink’s weight will be enough to keep it in place, but you might want to add a couple of L-brackets on the inside edges of the frame for added security. Because of the thick walls of a butler sink (usually 4-5 inches deep), the dog will stay put, and the splashing will stay in the tub rather than on your deck.
Attach a piece of gray PVC supply line to the base of the frame on the left side and run it up to the outdoor water source. Attach a Hozelock quick-connect fitting on the right side rail for the coiled hose. That coiled yellow hose is the best part! It automatically retracts to keep everything tidy between washes.
Seal the entire wood frame with exterior waterproof sealant in a honey-pine color. It will help to prevent rot and the deck will look better than if it was left raw lumber.
And for your golden? They feel more secure on the raised height and don’t scramble around on the slippery tub floor… a calm dog makes bath time quicker and quicker bath time means more time to do things on your Saturday!
Give the deck at least a second coat after 24 hours, especially on the horizontal parts of the frame, where water will collect. If your deck is composed of composite materials or treated wood, also add rubber furniture pads to each of the legs of the posts so they don’t scratch the surface of the deck.
📸 Photo credit: Instagram @willow.bean.thestandardpoodle
The One Mistake That’ll Flood Your Bathroom (And How to Skip It Entirely)
My husband built our dog bathing station, so he didn’t angle the floor toward the drain, which would have been helpful. Without a slope, it was a little bit of a puddle every bath, and our golden retriever was doing a full-body shake in the middle of it.
Here’s a secret not many people tell you, but under your station base you should have a textured rubber mat. This will grip the floor and absorb vibration caused by your girl wiggling around in the tub.
I am learning this the hard way. My cousin installed this set up and I watched for 3 months as water seeped under the baseboards.
Also, and this is the money saver, install a handheld showerhead with a pause button on the spray. Not just a detachable head. A PAUSE button. You can soap up without water running the whole time, and it cuts your water bill.
Worth every penny, I promise.
Your Dog’s Muddy Paws Don’t Have to Win
Pick one thing from this list and just try it. Don’t feel like you need to replace your whole house this weekend!
Once you find what works for your golden, the chaos that is her becomes, well, manageable and your home looks like the cozy, put together place you work so hard to make.
Plus, it feels good to know that your pup is clean and your rugs are safe. Then you get to have some fun like building your dog a backyard playground they will absolutely go feral over.
So tell me… what’s the ONE mess your dog makes that drives you crazy?

Amr Mohsen is a software engineer who traded his keyboard for a leash — at least on weekends. His love for dogs inspired him to share what he learns as a dog owner and enthusiast, bringing a detail-oriented, research-driven perspective to every article he writes. If it’s about dogs, he’s probably already looked it up twice.



