
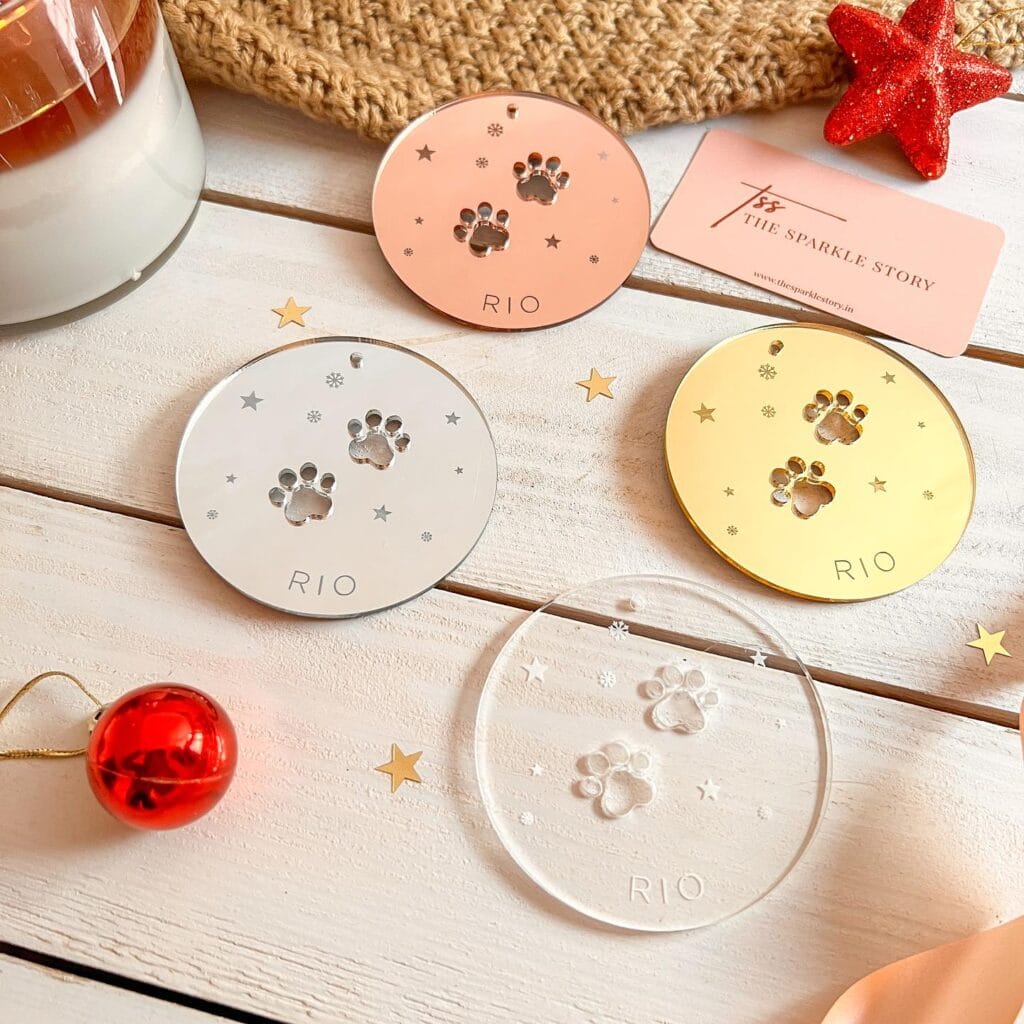
Dog hair on every ornament. Glitter everywhere. Your dog is giving you those big puppy eyes while you try to hot glue something without burning your fingers.
Now that I have a puppy, holiday crafting is a whole situation.
And, last Christmas I spent all this time doing a fancy ornament I saw on Pinterest. My dog knocked it off and I spent the rest of the day chasing it under the couch. I was done.
I was actually very excited about making my own DIY dog ornaments. It didn’t turn out to be a battle we were losing, but the cozies, most “us” tradition we start this year.
These are some of our favorite home designs. Homes with fur on the couch and dogs that think they’re helping.
Your tree is about to look so good.
#1: Needle Felted White Dog Ornament With a Burlap Bow
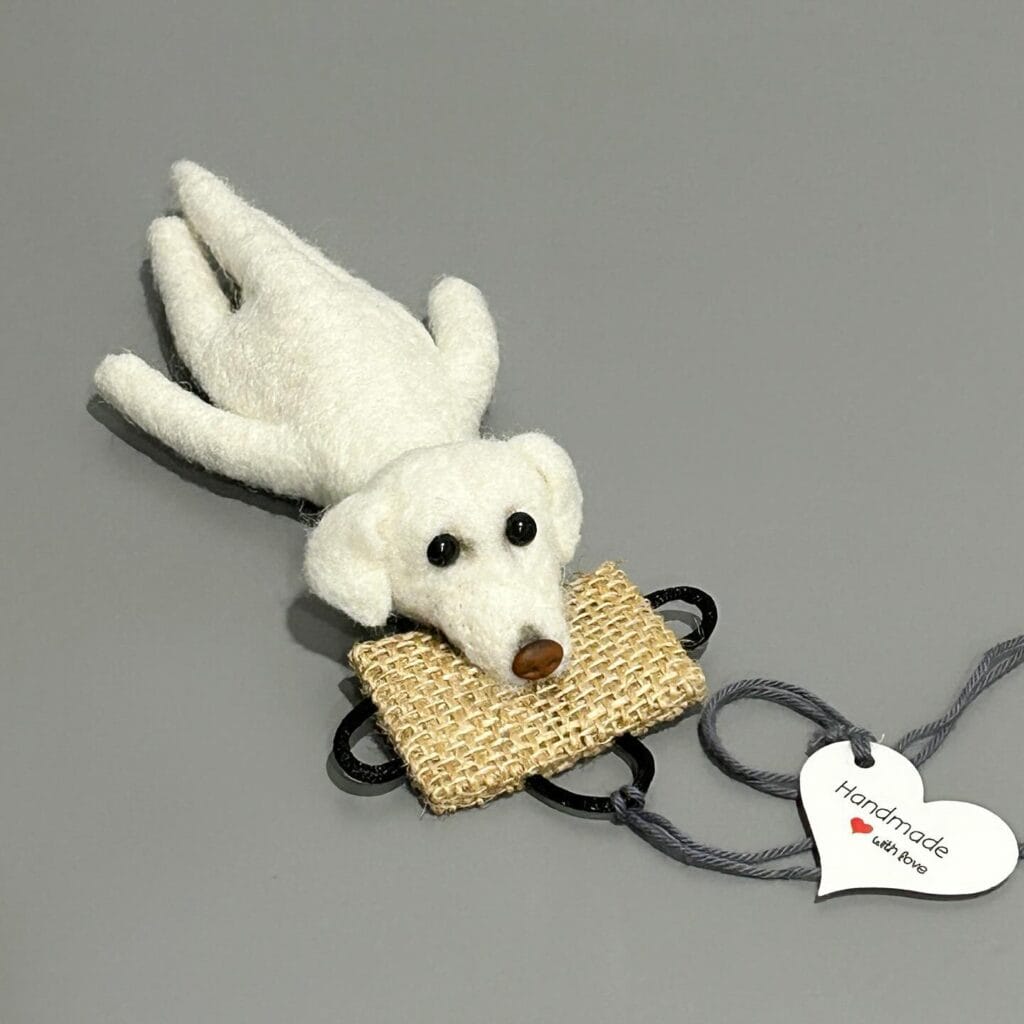
You know that moment when your golden is just flopped across the floor, chin resting on the ground, giving you the big puppy eyes? If you get that feeling just looking at this ornament then we have done our job. The first time I saw one I nearly cried.
En est une ornement de chien en fil à prêter main, American needles Félin, avec un bouquet en tissu de saule et yeux en perles en verre noir, un bouton de briques de terre ou de bois, qui ressemble à votre petit chien qui envoie des mots de félicitations en installant son beau cadeau sous l’arbre. The whole thing is only 2-3 inches long and has a gray twisted cord loop for hanging.
Materials & Tools:
– White wool roving (approximately 10–15g)
– Felting needle (38-gauge or 40-gauge)
– Foam felting mat
– Black glass seed beads (2, for eyes)
– Small brown wooden or clay bead (for nose)
– Burlap fabric scrap (cut to roughly 1.5 x 1 inch)
– Small black wire (for bow frame, optional)
– Gray twisted cord (for hanging loop, 6–8 inches)
– Strong craft glue or needle and thread
– Small scissors
Instructions
Begin with a handful of white wool roving in your hand. Pull this into a fairly thick sausage shape. This is the dog’s body. Place it on your foam felting mat and begin stabbing it with your 38-gauge felting needle, using fairly short, firm strokes. Don’t rush this; you are trying to compress the fibers. Be sure to rotate the body as you work to help it felt into a compact oval shape.
Pull out a smaller piece of roving for the head. Roll it tightly into a ball and felt it separately, tight but not rock hard. Pinch the bottom of the felt body in a slight downward angle, as if the animal were resting their chin on their paws, and needle felt them together until they are one piece with no gap visible.
For the ears, pull out two thin wisps of roving, shape into a long, flat, teardrop shape, and lightly felt each one. Attach them to the sides of the head by stabbing along the edge of the ear into the skull, and needle felt a small ridge above the area around the eyes to give the face some dimension.
Next, press the black glass beads into position for the eyes and glue them on with a dab of craft glue or by threading them on with a needle and knotting the thread inside the body. Put the brown bead nose at the very end of the muzzle and glue it firmly.
Cut your scraps of burlap to about 1.5 x 1 inch and fray the edges a bit. Fold the scraps into a bow shape and add a piece of thread or wire to the center to cinch it. Add a dab of glue to the bottom of the bow and attach under your dog’s chin.
A second loop of your gray twisted cord should be tied into a knot and tied off to the back of the dog’s body with a few anchor stitches or a glue point.
Let everything cure for at least one hour before hanging.
By lightly pinching her ears slightly forward, just before the wool sets, I got a nice, sleepy expression. Which, for some reason, reminded me of Golden Retrievers. If you want more of these cozy handmade ideas, check out 13 Genius DIY Dog Stuff Every Pet Parent Needs to Try Today! for more sweet projects.
Prep Time: 10 minutes | Active Project Time: 60–90 minutes | Difficulty Level: Intermediate
📸 Photo credit: Instagram @a_and_a_hand_made
#2: Tiny Poodle Pipe Cleaner Charm (The One That’ll Live on Your Bag Forever)
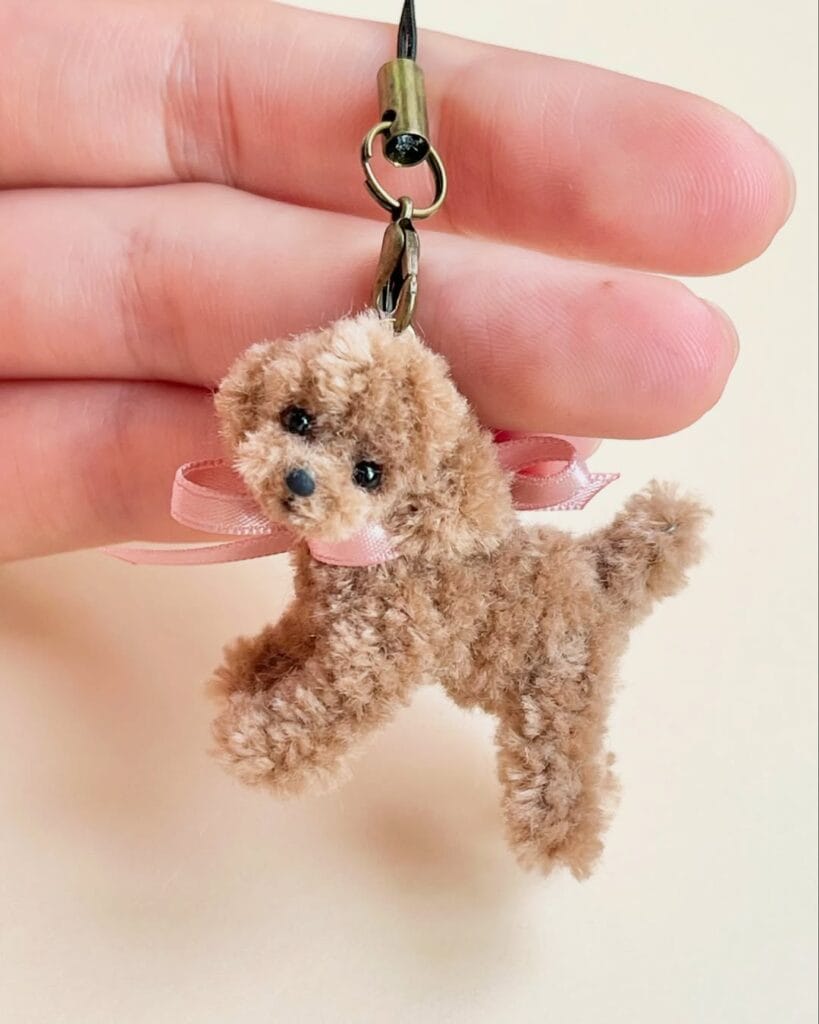
You know how when your golden does something so unbelivably cute that you wish you could just freeze the moment forever? This little charm gives me that feeling every time I look at it.
Prep Time: 10 min | Active Project Time: 45 min | Difficulty Level: Intermediate
Materials and Tools:
■ Brown chenille/pipe cleaners (soft, fluffy ones, not the stiff ones from the craft store)
■ Small black beads (2 for eyes, 1 for nose)
■ Pink satin ribbon (⅛ inch wide)
■ Antique bronze lobster clasp + jump rings
■ Black cord (to attach strap)
■ Scissors, craft glue, needle-nose pliers
Instructions
Twist a piece of a 6 inch pipe cleaner into a tight oval for the head and wrap a second one around it in a circular motion for the fluffy poodle (the more pipe cleaners you wrap, the fluffier your poodle will be).
Work the body with a 3-inch loop. Bend over 4 1.5-inch segments for legs. Twist each leg base twice to make it hold its shape when you move it.
Press the black beads into the face when it is still pliable. Glue the nose bead on centered under the eyes.
Attach the head to the body by twisting the connecting pipe cleaner 3 times tightly. Fluffy chenille hides the join completely.
Tie the pink ribbon in a bow around the neck of the charm. This will keep the charm looking neat and polished on a bag. Thread the jump ring through the top loop and attach your lobster clasp.
Trim any stray pieces of fabric off with a pair of scissors. Just a little brushing with a stiff toothbrush will fluff the fabric back up.
📸 Photo credit: Instagram @barked
#3: Salt Dough Paw Print Ornament — A Keepsake That Actually Lasts
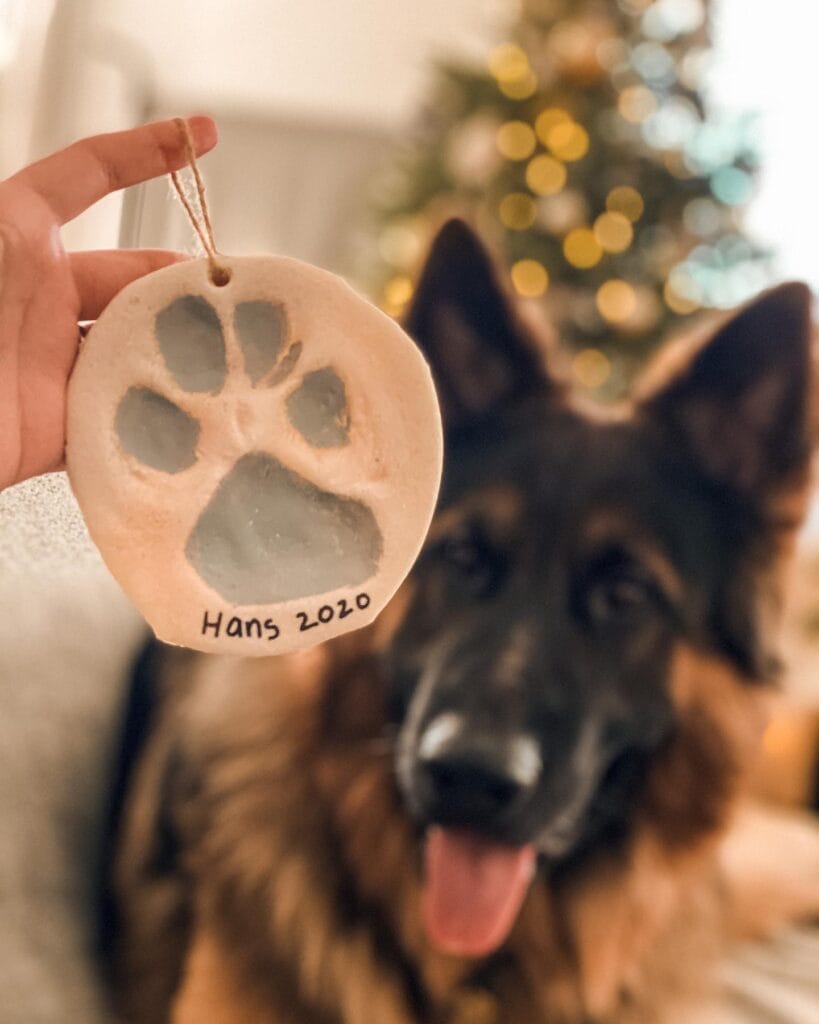
Our golden’s paw is only that big right now. A year from now you’ll forget exactly how it felt to have her paw pressed against your palm… that soft paw, and that faint puppy smell. This ornament will freeze that memory for you.
– 1 cup all-purpose flour – 1/2 cup salt – 1/2 cup water – Rolling pin – Round cookie cutter (about 3 to 4 inches) – Black acrylic paint or ink pad – Fine-tip permanent marker – Twine or jute string – Drinking straw (for the hanging hole) – Baking sheet
Instructions
Mix together your flour, salt, and water, then knead it together until you have a smooth dough. Roll it out to about ¼ inch thick and cut out a circle. Put the dogs paw in the center, but be sure to press it in firmly but gently.
Use a straw to poke a hole near the top of your biscuit before baking. Bake at 200°F for 2–3 hours until completely hardened.
Once it’s cooled down, I paint the inside of the impression with a gray or black acrylic. Then I write the dog’s name and the year using a fine-tip Sharpie (just like “Hans 2020” in the picture) and thread the natural jute twine through the hole.
My bread hardens enough that I can hang it on my tree every year, so this one ornament becomes a decade of memories for my tree.
Make a few extra loaves while your dough is fresh. They don’t last long here as gifts.
Prep Time: 10 min | Active Project Time: 20 min + baking | Difficulty Level: Easy
📸 Photo credit: Instagram @hansandmats
#4: Hand-Painted Wood Slice Pet Portrait Ornament
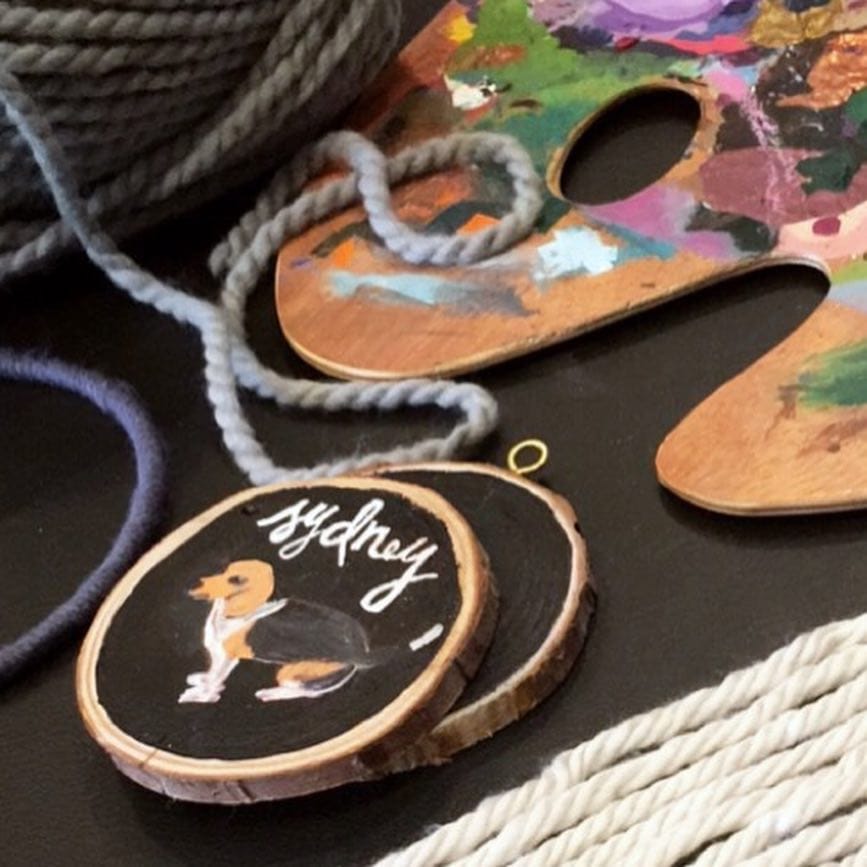
Every single year, your dog does something really dumb this time of year… knocks over the tree, steals an ornament, gives you that look. And somehow there’s nothing on your tree that celebrates her.
This one fixes that.
Materials & Tools:
– Oval wood slice (approximately 2–3 inches wide with natural bark edge)
– Black acrylic paint (base coat)
– Fine detail brushes (sizes 0 and 2)
– Acrylic paints in burnt orange, white, and brown (for golden retriever coloring)
– White paint pen or fine brush for lettering
– Small gold jump ring (for hanging loop)
– Matte sealant spray
– Fine-grit sandpaper (220 grit)
Prep Time: 20 minutes | Active Project Time: 2–3 hours | Difficulty Level: Intermediate
Instructions
Sand the wood slice smooth on one side, and paint it two full coats of black acrylic paint on the face. Let the paint dry completely between coats.
Before you start a collage, I recommend drawing a light-sketch of your dog in white pencil. Work from the body out, blocking in large burnt orange and brown shapes before adding in some white highlight details. The black background will make every colour pop.
Once the portrait is dry, letter your dog’s name in white script on the upper portion of the portrait. Keep the letters loose and slightly uneven so it reads warmer than perfect type.
Attach the gold jump ring to the top through a small hole you drilled, and give it two light matte spray coats.
Why this works: sealed matte finish to protect against handling all season – the ornament will always be gift-worthy!
I like how the bark is left raw, and unpainted, the contrast between the wild natural wood, and the portrait really makes this look expensive.
📸 Photo credit: Instagram @indigoandvioletstudio
#5: Wine Cork Dog — The Cutest Little Holiday Ornament You’ll Make in One Sitting
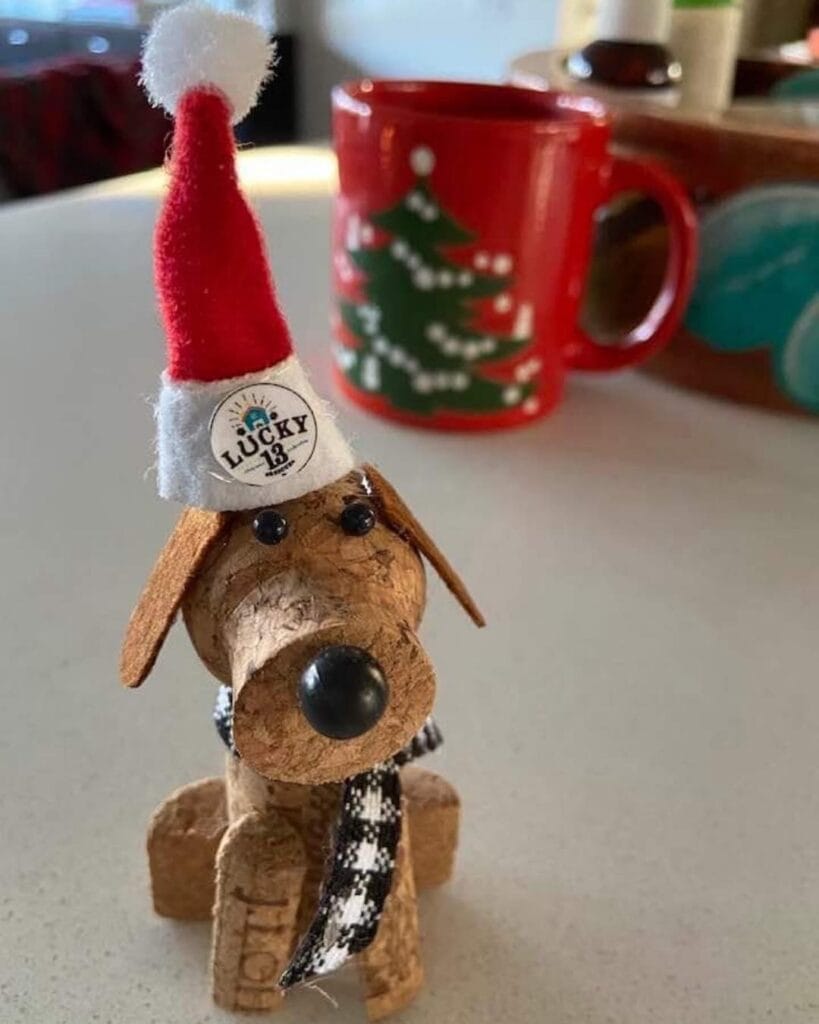
Probably your golden has already chewed through 3-4 ornaments this holiday season. Why not give him something to chew on that’s fun, like this little one?
This little dog is made from 3-4 natural wine corks, two small corks for the legs, craft wood veneer or thin balsa wood for the ears, black craft beads (one large for the nose, two small for the eyes) and a tiny red felt Santa hat with a white pom-pom topper. You’ll need a black and white ribbon scrap for the scarf, hot glue gun, craft wire, and sandpaper.
– 3-4 corks (body + head) 2 short corks (front legs/base) Thin piece of balsa wood or wood veneer (ears) 1 large black craft bead (nose) 2 small black craft beads (eyes) Red felt + white fleece + mini pom-pom (Santa hat) Black and white ribbon (scarf) Hot glue gun + glue sticks Small craft wire Sandpaper (fine grit)
Prep Time: 10 min | Active Project Time: 30–40 min | Difficulty Level: Beginner
### Instructions
Lightly sanding the ends of your corks will make the glue bond better. This is a step that most people skip and then wonder why the dogs head falls off by Christmas morning.
Stack one cork horizontally for the body, then stack the second cork slightly upwards and forwards to form the head. I would leave them at that angle and then hot glue the two corks together at the bottom. Let the glue set for a good minute or two before moving on.
Cut two ear shapes from your balsa wood, slightly rounded and floppy looking. Glue them on each side of the head cork but angled slightly downward so they hang like dog ears. This is where it starts to look like a dog, wild. It’s crazy how fast this is coming together.
Gently glue the two smaller corks flat-side down (as the front paws and bottom part) to give it that sitting-pup pose in the photo.
press a large bead nose onto the front of the head cork with a drop of hot glue. add 2 smaller eye beads just above it. set aside to cool.
I used a triangle cut from the red felt for the Santa hat. Rolled it into a cone and glued the seam. Added a thin strip of white fleece to the base of the hat and top with a pom-pom. I added a Lucky 13 (or any tiny label you love) to the white band!
Wrap the ribbon scarf loosely around the neck and attach with a tiny dot of glue at the back.
My beads glued on the outside don’t budge – so it doesn’t wobble when this little pup sits on your mantle all season long. Worth 40 minutes of careful assembly.
Try using slices of balsa wood instead of the balsa wood ears, but cut them at an angle so you have two rough sides instead of just one. The whole thing will look chunkier and more rustic (and it photographs really nicely next to a candle or holiday mug).
📸 Photo credit: Instagram @lucky13rescue
#6: Lifelike Dog Breed Figurine Ornaments (Golden Retriever, German Shepherd & More)
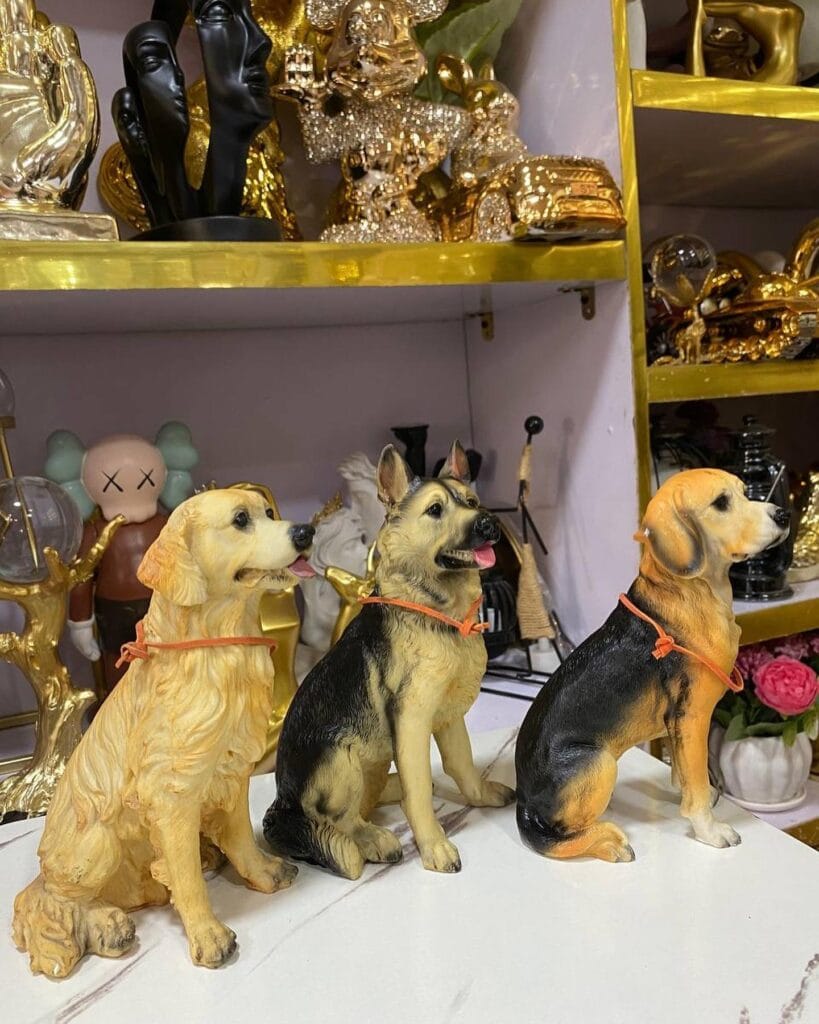
You know that moment when your golden retriever plops down right in front of your bookshelf and just sits there and looks majestic? I wish I could freeze this moment forever. Girl, same.
Last spring, I found these resin dog figurines at one of those little shops and I kept thinking about them. They really looked like real dogs! Tongue out, ears up, the whole thing.
Materials & Tools You’ll Need:
– Unfinished resin dog figurines (golden retriever, German shepherd breeds available)
– Acrylic paints — golden yellow, black, tan, and white
– Fine-detail paint brushes (sizes 2 and 4)
– Matte sealant spray
– Red or orange thin ribbon or elastic cord (for collar detail)
– Gold metallic paint for collar hardware accent
– Sandpaper (220-grit)
Prep Time: 20 mins | Active Project Time: 2–3 hours | Difficulty Level: Intermediate
### Instructions
Lightly sand the figurine so the paint will better grip the surface. Work in thin layers to achieve a realistic texture, and not a flat toy-look.
Build up the coats and colour up the dog’s ears with warm golden yellow and dry-brush the cream on the chest and face. Don’t forget the tongue and add a tiny stroke of coral pink to give it life.
To make the German shepherd, you will need a layer of black across the back and saddle area first, then blend the tan into the legs and chest while the black is still slightly wet.
And then once the main part is dry (after about 15 min) add a thin orange or red elastic cord tied snugly around the neck. This little detail really ties the whole ornament together!
Seal everything with two light coats of matte sealant. The sealant helps protect the paint and gives the ornament a more realistic, non-plastic look. Resin holds the sealant well, so the ornament will be display ready for years.
What this means for you: a shelf piece that guests always ask about – because it looks like your dog.
If the tongue keeps smudging let each layer cure for a full 30 minutes before touching it. Being patient will also help you have cleaner detail lines.
📸 Photo credit: Instagram @dtop_interior
#7: Blown Glass Bernese Mountain Dog Ornament (That Looks Like It Belongs in a Museum)
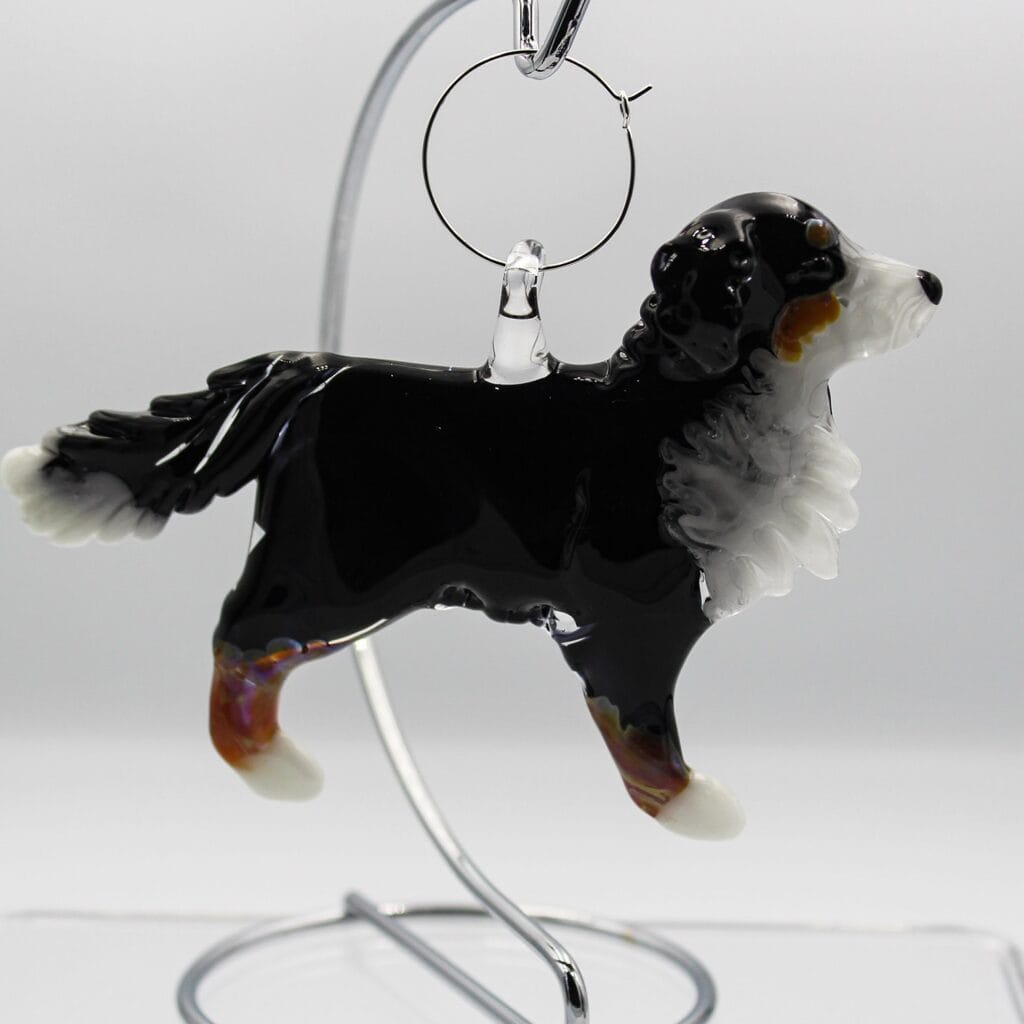
I don’t know about you, but when I am decorating my tree my golden just sits there and watches me, tail sweeping the floor, like she should be on the tree too.
Yeah. Same.
This little piece stopped me cold when I saw it. It’s a lampworked borosilicate glass ornament that is shaped like a Bernese Mountain Dog, but with the black, rust, and white coloring, it could be any tricolor pup.
Materials & Tools:
– Borosilicate glass rods (black, white, ivory, rust/amber)
– Lampworking torch (propane/oxygen setup)
– Tungsten pick for detailing fur texture
– Clear glass for the hanging loop
– Metal wire ornament hook (silver finish)
– Kiln for annealing
Instructions
Step 1: Melt the black glass rod and make the body mass, but don’t make it too round or bulky, keep it flat and slightly elongated. Make the chest and haunch separately then fuse them together while hot. Use tungsten pick to pull out the fur on the chest and tail when it is still hot. Layer the white glass onto the chest, paws and tail tip. Add the rust accents on the legs and eyebrow spots.
Shape the head last. Glue the head on at a slight upward angle (this is the angle which makes it appear alive). Insert a very thin, clear glass loop into the back spine of the fish, not the neck, so that it hangs level.
Anneal the glass in the kiln at a temperature of 960˚ F then cool it slowly over 45 minutes.
That clear glass loop connects right to a silver wire hook which keeps it spinning slightly so it catches the light, which then catches your eye and your guests eye, and you’ll get compliments on it everywhere you go.
However, work your fur texture before the glass is below orange-hot. It will be too stiff if you wait until it is red-hot, and you are apt to crack the surface.
Prep Time: 20 min | Active Project Time: 1.5–2 hours | Difficulty Level: Advanced
📸 Photo credit: Instagram @neusole_glassworks
#8: Laser-Engraved Wood Slice Dog Ornament (That Looks Like It Cost $50)
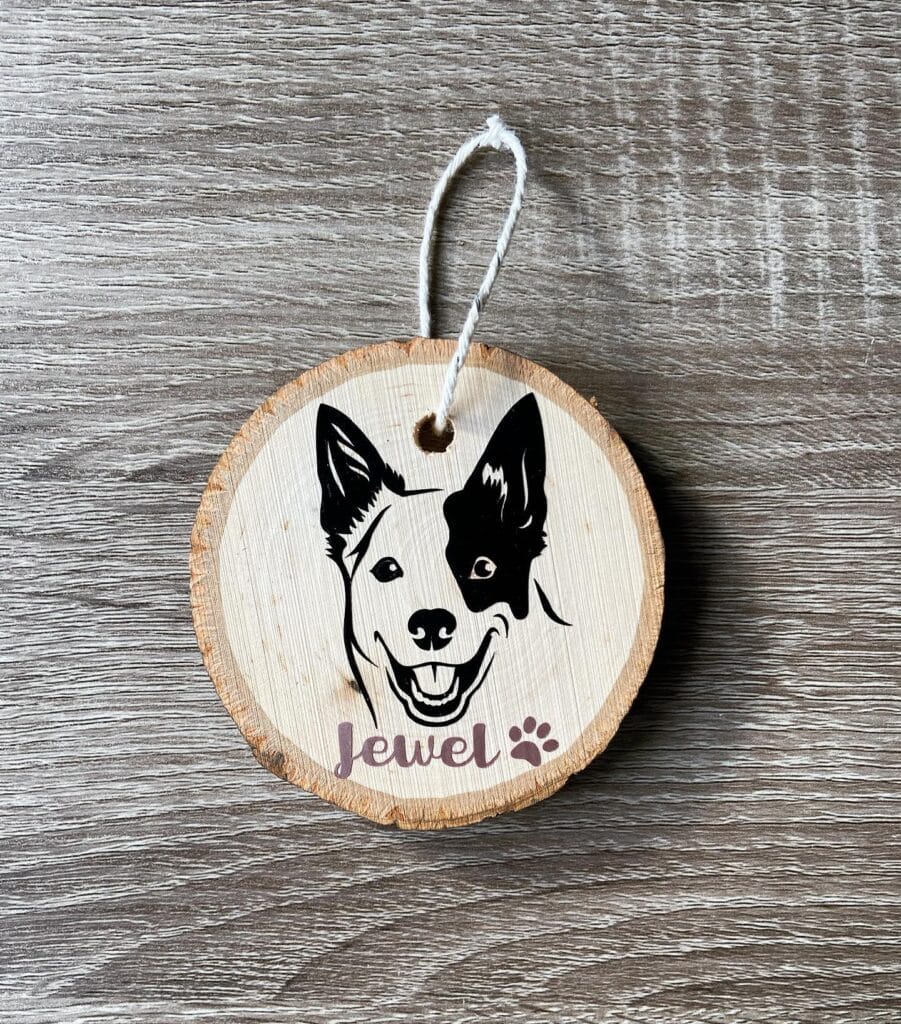
Today I was feeling the Christmas spirit and decided to pull out my Christmas box to get started early. I was in the process of pulling out ornaments and when I looked up, I realized that I didn’t have anything with a golden on it. Like… not one thing that said “YES! A golden retriever lives here!”.
Last year I had the exact same moment. I grabbed a cup of coffee and went to decorate and felt nothing looking at those plain round ball ornaments. That’s when I started looking for something to put up. I’ve been collecting for a while, but have never used all of them.
I couldn’t not fall in love with this wood slice ornament with a laser-engraved dog portrait.
-Materials & Tools: -3-4 inch natural wood slice (birch or basswood best) -Laser engraver (Glowforge or xTool D1 Pro) -Vector pet portrait (Canva or Procreate) -Twine or baker’s twine (white/natural) -Small drill bit (⅛ inch) -Mini hand drill or Dremel
Instructions
Start with a dried, sanded piece of basswood slice and sand it again after you engrave. Import a photo of your dog into your laser software and convert it to high-contrast black and white vector. Test engrave on a piece of scrap wood at 300 DPI, 60% speed.
Once your portrait engraves have been cleaned up, drill a small hole at the top, thread your baker’s twine through, and knot it twice. You might want to lightly sand the edges of the engravings after burning as this removes some of the black char and makes your engraving pop against the grain of the wood.
The engraved dog portrait shows the exact markings of your dog, making a keepsake that actually looks like her, not just any dog.
Love that? Add her name under the portrait in a script font before you engrave the plaque. Now it will be something that you will never part with.
Prep Time: 20 minutes | Active Project Time: 30-45 minutes | Difficulty Level: Intermediate
📸 Photo credit: Instagram @stringsandthings.to
#9: Wood-Burned Pet Portrait Ornament (The One That’ll Make You Cry Happy Tears)
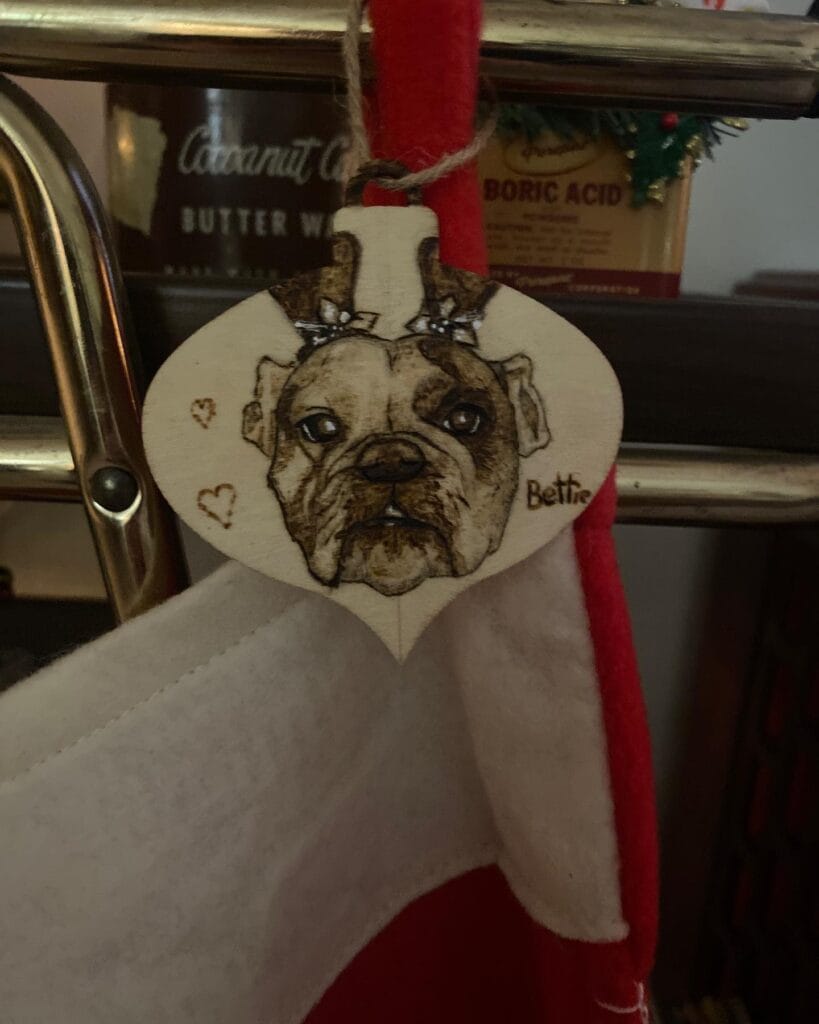
Have you ever seen something so perfect for your favorite furry that you gasp out loud? That’s what happened when I found this wood-burned portrait ornament on Pinterest a few weeks ago. I couldn’t stop thinking about it ever since!
* Unfinished oval wood slice (3-4 inches wide) * Wood burning tool with fine-tip nib * Pencil for tracing * Printed reference photo of your dog * Fine-grit 220-grit sandpaper * Brown and sepia wood-burning ink (optional, for shading) * Twine or jute cord for hanging * Clear matte sealant spray
Prep Time: 20 minutes | Active Project Time: 2–3 hours | Difficulty Level: Intermediate
### Instructions
Now sand your wood oval smooth first. Any rough spots will come out when you add your fine detail lines so you want to start off with a smooth wood oval to work with.
Lightly sketch your dog’s portrait onto the wood with a pencil. Keep your lines loose as the wood burner will be the one to shade in your portrait.
Apply the burning tool from the outer edges of the ornament toward the center. A fine shader tip should be used for darker areas, such as the nose and eye sockets. Take your time with the eyes as they are the part that really makes people stop breathing when they see this ornament.
I would love to add a couple of hearts and my dogs name beside the portrait just as the poem says “Bettie” The tiny hearts makes it feel very personal and not store bought.
When you’re all finished, 2 light coats of matte sealant will keep the burn marks from getting rusty in your stocking. Thread a piece of natural jute twine through the top hole and knot it twice. Be sure not to knot it too tightly around the neck.
Burn slowly in small circles when shading fur, but don’t burn fast or you will have uneven streaks. If you are too hot the whole portrait will flatten. Set heat level lower to ensure control on the lighter wood grain areas around the muzzle.
📸 Photo credit: Instagram @sugarpie_sunshine
#10: Golden Retriever Beaded Ornament (The One That Looks Exactly Like Your Dog)
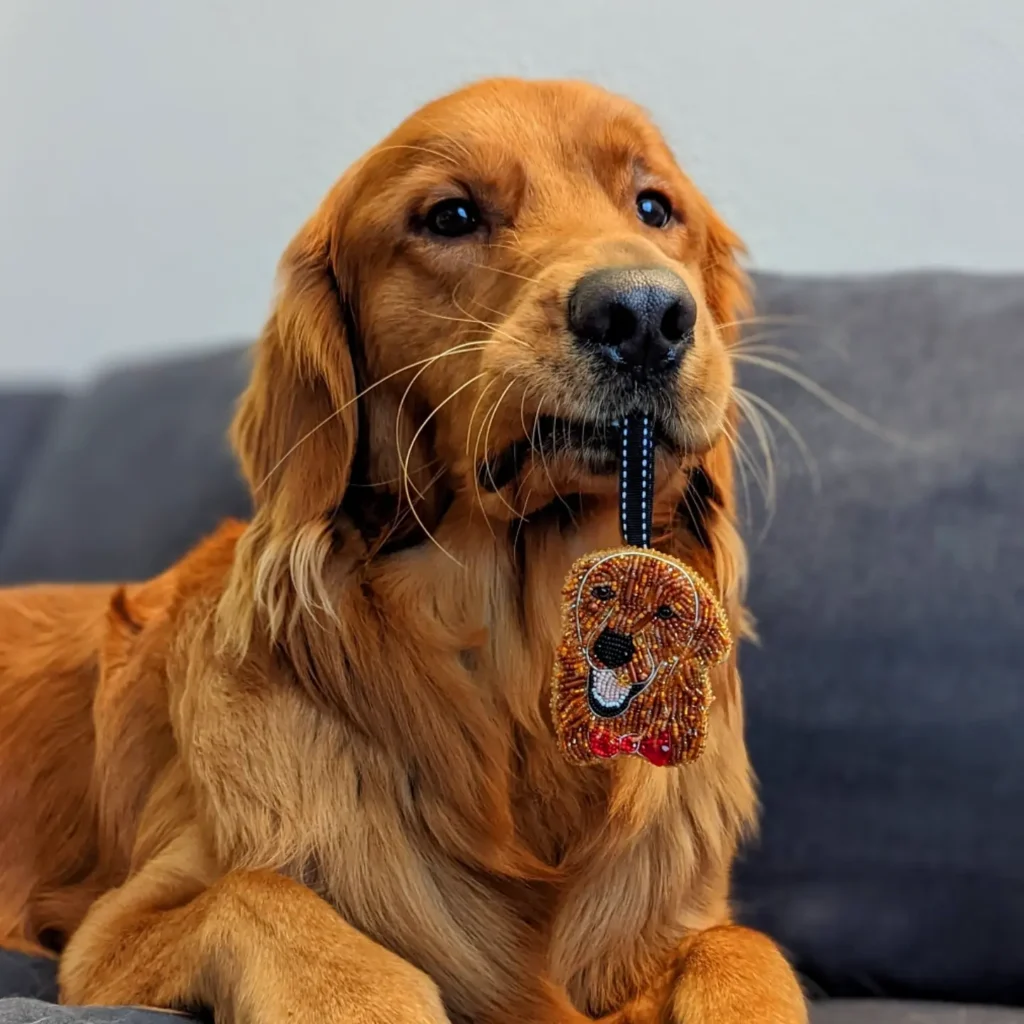
You know the moment your golden gives you that look (head tilted, eyes soft, just being a golden in all its perfect golden glory), and you think, “I need to remember this moment forever!”
That’s this ornament.
When I first saw these adorable beaded portraits ornaments I gasped. It looks just like a tiny version of your dog, stitched together bead by bead.
Materials & Tools:
– Seed beads in golden amber, dark brown, black, and cream/white
– Red seed beads for a bow tie accent
– Black felt or stiff fabric as the base (4″ x 4″ minimum)
– Beading needle + 0.5mm nylon thread
– Fabric scissors
– 1/4″ black ribbon (for the hanging loop, approx. 6 inches)
– Reference photo of your dog
– Pencil + transfer paper
– Strong fabric glue or backing felt (matching size)
Instructions
Print your golden’s face in 3 inches wide. Trace the outline onto your felt with the transfer paper and a pencil keeping the lines light.
Begin at the nose and work outward. Make sure that you begin with black beads for the nose and eyes first. This will help keep your proportions right. Thread your needle with about 18 inches of nylon thread and knot the end.
Working in short rows, and using the lazy stitch method, pick up 3-5 beads for each stitch and lay them flat against the felt, anchoring at both ends. This keeps the beads tight so they don’t shift.
For your fur I added a little layer of golden amber and dark brown beads in slightly curved rows to resemble the direction of your fur. Play with the shades of the beads within a single row to create a warm and dimensional coat for your golden.
Add some white/cream beads around the muzzle area. This tiny detail will make people do a double-take. Add 3-4 red beads on the chin for the bow tie.
Once the bag is fully beaded I cut a piece of felt to match the shape of the bag. I fold over a piece of black ribbon to make a loop, lay the ends of the ribbon between the two felt layers and glue or stitch the felt bag to the felt backing.
Allow it to dry completely, at least 2 hours, before hanging.
The beading gives the ornament a sturdy and heirloom-quality surface that holds detail like a painting, so your ornament will stay beautiful on your tree for years without fading.
I suggest matching your bead colors to your dogs actual picture in natural light (not indoors) to make the color difference more accurate.
Prep Time: 30 minutes | Active Project Time: 4-6 hours | Difficulty Level: Intermediate
📸 Photo credit: Instagram @the_little_golden_moose
The One Trick That Makes DIY Dog Ornaments Actually Look Professional
To be honest, what no one tells you is that sealing is everything.
Last December I ruined a whole bunch of clay paw print ornaments because I skipped the final step of sealing the ornaments. I thought it wasn’t necessary, but guess what happened? They cracked within a week and the paint started peeling off the tree.
The secret is to apply a two-coat system. The first coat is applied to the surface before painting and helps to lock in the details. The second coat is applied after painting to lock down the paint and prevents the paint from flaking off when your golden retriever knocks the tree over with her tail.
Also, make the paw impression when your dog is sleepy. A drowsy dog will lie still for about 30 seconds, which is exactly the amount of time you have to work with air-dry clay.
One last piece of advise… Stay away from dollar store clay! It shrinks when it dries and your gorgeous paw print looks all squished and weird.
Small change, big win: switching to a soft polymer clay made my ornaments go from “cute attempt” to actually Pinterest-worthy.
Your Pup-Proof Home Is One Decision Away
Girl, stop overthinking this. Pick one product, try it this weekend, and see what it feels like to sit on your couch without worrying about your golden’s muddy paws.
I’ve been there. You spend so much time and energy trying to protect your space that you forget to enjoy it. You can have a Pinterest-worthy home and a dog. Both things are true.
Also, if you’re in the mood for an upgrade, this DIY dog bowl stand is such a cute way to keep things tidy and on-theme with your decor.
So which product are you getting first??

Amr Mohsen is a software engineer who traded his keyboard for a leash — at least on weekends. His love for dogs inspired him to share what he learns as a dog owner and enthusiast, bringing a detail-oriented, research-driven perspective to every article he writes. If it’s about dogs, he’s probably already looked it up twice.



