Your dog’s water bowl has skidded across the kitchen floor again — and this time it took half your Pinterest-worthy tile grout with it.
I feel you. My cousin’s lab mix turned mealtime into a full contact sport every single day. Water everywhere. Kibble scattered. The whole vibe of her kitchen? Gone.
And it’s not just the mess, right? It’s that the bowls look so out of place sitting on your floors. You worked hard on that space. Your golden deserves better, and honestly? So do you.
A good diy dog bowl stand pulls double duty — it keeps those bowls locked in place AND looks like something you actually pinned on purpose.
These 7 ideas are genuinely doable on a weekend, and a few of them cost almost nothing.
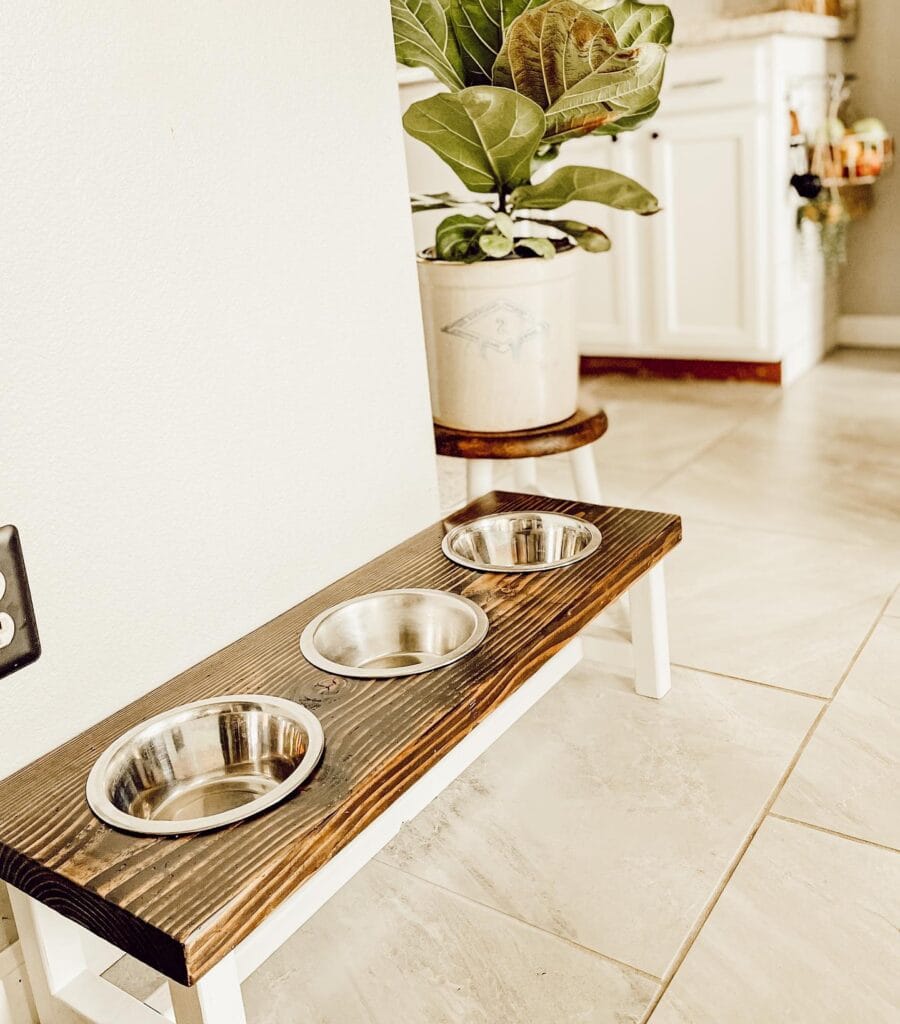
#1: DIY Elevated Dog Bowl Stand (Dark Stain Wood)
Okay so picture this — your golden is scarfing down her dinner so fast the bowl is sliding halfway across the kitchen floor, and you’re just standing there watching it happen again.
This pine wood elevated bowl stand is the fix you didn’t know you needed.
Materials & Tools:
– 1×6 pine boards (approximately 24 inches total length)
– Minwax Pre-Stain Wood Conditioner (visible in the image)
– Dark wood stain — the build uses what looks like Minwax Dark Walnut
– Wood glue + 1.5-inch pocket screws
– 2.5-inch hole saw drill bit for bowl openings
– Sandpaper (120-grit, then 220-grit)
– Miter saw, drill, clamps
Instructions
Cut your pine boards into two identical trapezoid side panels — wider at the bottom than the top, which gives that angled modern look you see here. Cut a flat top piece and a base piece to match.
Sand everything with 120-grit first, then finish with 220-grit. Apply the Minwax Pre-Stain Conditioner before staining — this step keeps the pine from blotching. Let it sit 15 minutes, then wipe off.
Cut your two bowl holes using the 2.5-inch hole saw centered on the top panel. Space them about 4 inches apart so there’s solid wood between them.
Assemble using wood glue and pocket screws. The angled sides attach to both the top and base, creating that open frame underneath. That open bottom isn’t just pretty — it means your golden isn’t hunching her neck down, which reduces strain on her joints over time. Elevated feeding height supports better posture, meaning fewer aches after mealtime.
Apply two coats of dark stain. Let each coat dry 24 hours.
Applying stain with the wood grain using a lint-free cloth gives you that even, rich coverage you see in the photo — a brush leaves streaks on pine.
Prep Time: 30 minutes | Active Project Time: 3–4 hours | Difficulty Level: Beginner-Intermediate
📸 Photo credit: Instagram @aevilleneuve
#2: Walnut Wood Double Dog Bowl Stand (CNC-Cut Raised Feeder)
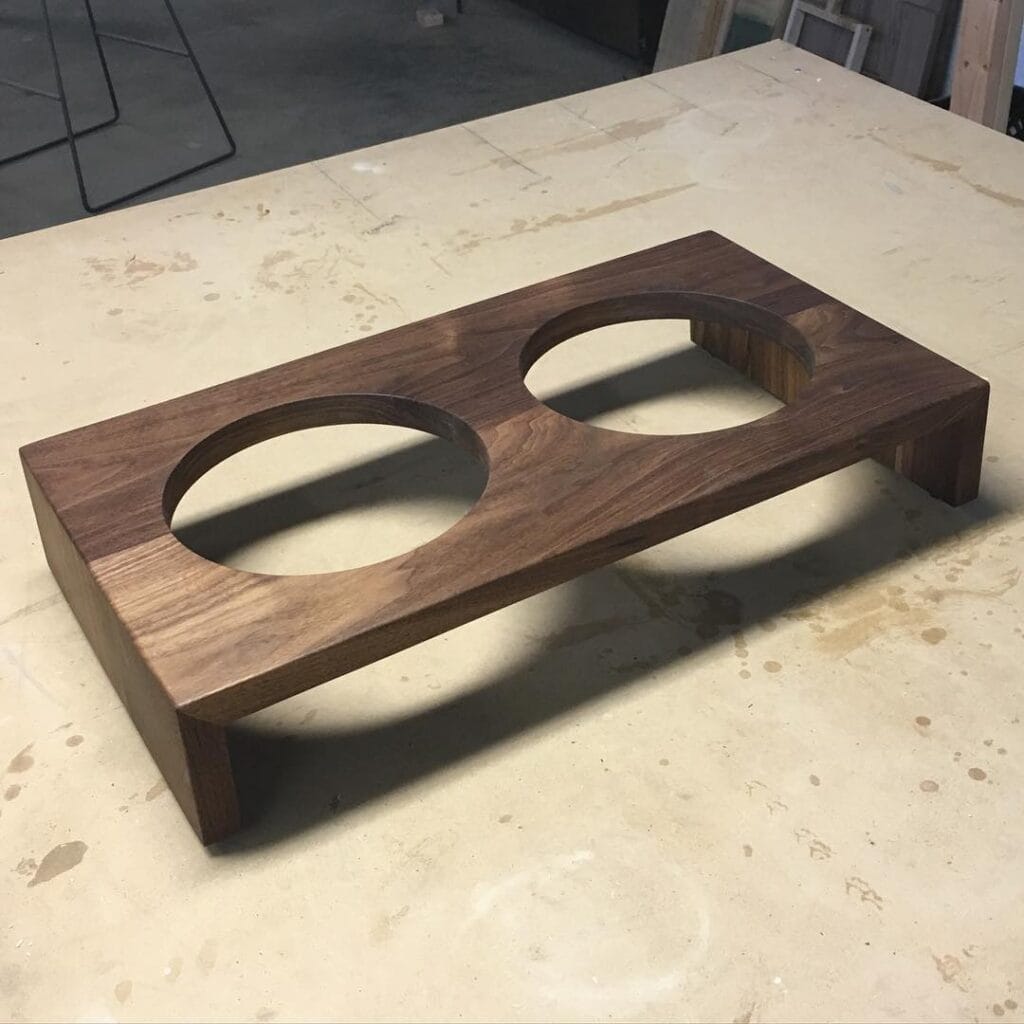
Okay so you know that moment when your golden has basically inhaled her dinner so fast that the bowl slides halfway across the kitchen floor? And then there’s the drool trail. Everywhere. Yeah, that’s what we’re solving today.
This raised walnut feeder stand looks like something straight off your Pinterest board — and honestly, it might be the most satisfying build you’ll ever do.
Materials & Tools
– ¾-inch thick black walnut hardwood board (approximately 18″ x 10″)
– CNC router or jigsaw with a circle-cutting jig
– Two circular cutouts sized to 5-inch diameter (fits standard medium dog bowls)
– Sandpaper: 120-grit, then 220-grit
– Food-safe walnut oil or beeswax finish
– Wood clamps and measuring tape
Instructions
Start by cutting your walnut board to 18″ x 10″. Mark your two circle centers, spacing them 5 inches apart from each other’s edges — this middle “bridge” is what gives the stand that gorgeous figure-eight look you see here.
Cut both circles using your CNC or jigsaw. Then cut four small 1-inch tall feet from leftover walnut and glue them at each corner. This raises the stand just enough to reduce neck strain for your pup — less strain on joints means more comfortable mealtimes, which payoff is huge for larger breeds over time.
Sand everything starting with 120-grit, finishing with 220. Wipe down with food-safe walnut oil to pull out that deep chocolate grain.
Sand with the grain near the circle edges — going against it creates micro-tears that catch food residue later.
Prep Time: 20 min | Active Project Time: 2 hours | Difficulty Level: Intermediate
And if you’re already in a DIY mood, 13 Genius DIY Dog Stuff Every Pet Parent Needs to Try Today! has some seriously good projects worth bookmarking.
📸 Photo credit: Instagram @bain_made_studio
#3: Elevated Farmhouse Dog Bowl Stand With a Cross-Base Pedestal
Okay, you know that moment when your golden’s food bowl slides halfway across the kitchen floor mid-meal, and she’s basically doing a split just to reach it? Yeah. That’s the thing we’re fixing today.
This piece is stunning — dark walnut stain, cross-brace pedestal base, and two stainless steel bowls that sit flush into the top. It looks like something straight off your Pinterest board, not a weekend workshop project.
Materials & Tools:
– 2×4 pine lumber (approximately 8 feet total)
– 1×6 poplar board for the tabletop (24 inches long)
– Two 6-inch stainless steel dog bowls
– Dark walnut wood stain
– Wood glue + 2-inch pocket screws
– Jigsaw, drill, pocket hole jig, sandpaper (120-grit and 220-grit)
Instructions
Cut your 2x4s into four 14-inch vertical legs and eight 6-inch diagonal cross pieces. Sand everything with 120-grit first, then finish with 220-grit — that smooth surface is what makes the stain absorb rich and even.
Assemble each pedestal side by gluing and screwing the diagonal cross-braces between two vertical legs. Let that dry completely before attaching the two pedestal sides together with horizontal stretchers at top and bottom.
For the tabletop, center your bowls on the 1×6 board and trace circles. Cut those holes with a jigsaw — go slow on the curves. The bowls should drop in and rest on their rim, no slipping.
Apply two coats of dark walnut stain, letting each coat dry 24 hours. Drop your bowls in and you’re done.
The raised height keeps your golden’s neck at a comfortable angle during meals, which reduces strain and supports better digestion — that’s the feature that makes this more than just a pretty stand.
Keep this in mind: leaving a tiny gap between your bowl cutout and the bowl rim makes cleaning so much easier — just lift and rinse.
And if you love building things for your pup, 14 Creative DIY Elevated Dog Bed Ideas You’ll Love will absolutely keep you busy next weekend.
Prep Time: 30 min | Active Project Time: 3–4 hours | Difficulty Level: Intermediate
📸 Photo credit: Instagram @makingwooddust
#4: The Walnut Cabinet Dog Feeding Station (With Hidden Storage!)
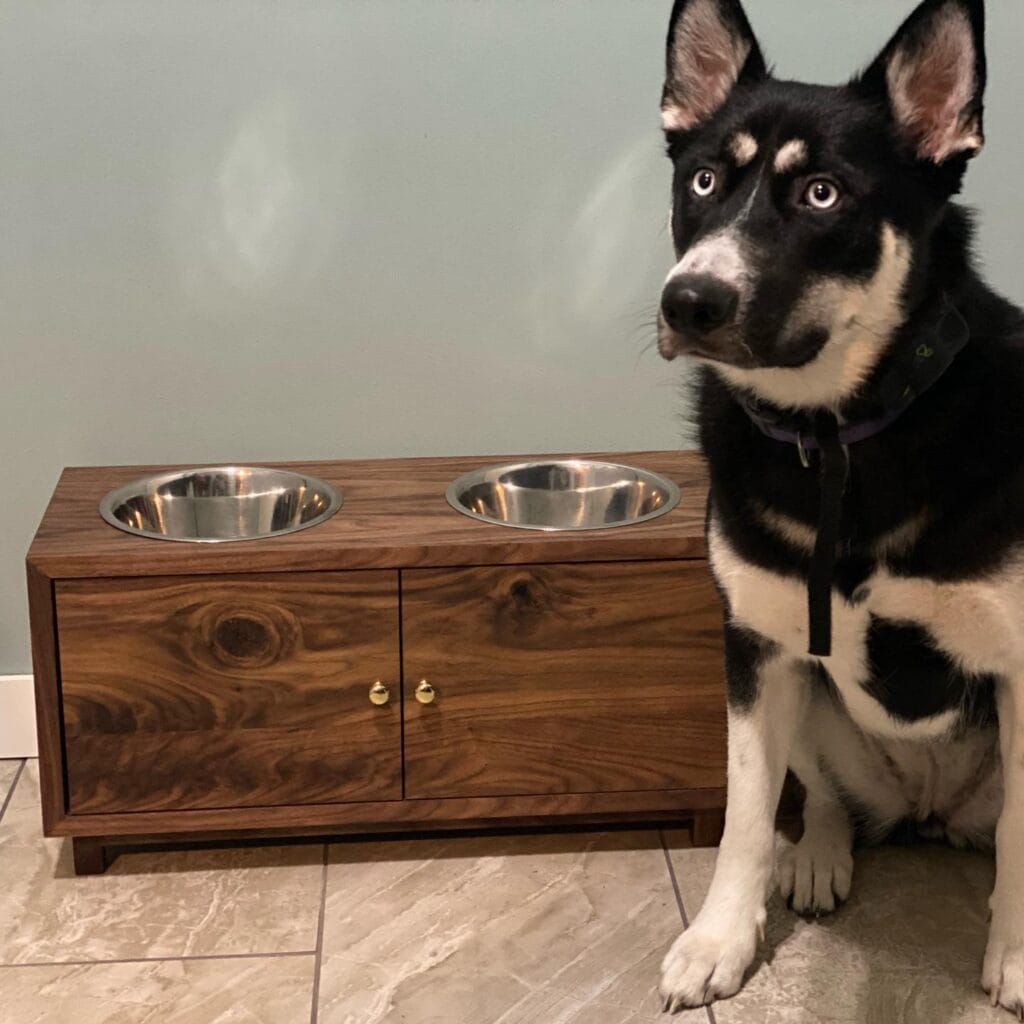
Okay so you know that moment when you trip over the dog food bag again on your way to the coffee maker? Yeah. That’s what this build fixes.
This feeding station is solid walnut wood with a mid-century modern cabinet base, two stainless steel inset bowls, and brass knob hardware. The cabinet doors swing open to hide your dog food, treats, or leash clutter — completely out of sight.
Materials & Tools:
– 3/4″ walnut hardwood boards (approximately 24″ L x 10″ W x 12″ H for the cabinet body)
– Two 6-cup stainless steel dog bowls
– Brass cabinet knobs (two)
– Wood glue + pocket hole screws
– Circular saw, drill, hole saw bit (sized to your bowls)
– Sandpaper (120 + 220 grit)
– Walnut-toned wood stain or natural oil finish
Instructions
Cut your walnut boards to form a rectangular box — two side panels, a top, bottom, and a center divider. Glue and screw the box together using pocket holes for clean joints. The center divider creates two separate cabinet compartments, which means your kibble bag stays on one side and leash gear on the other.
Sand everything starting with 120-grit then finish with 220-grit for that buttery smooth surface. Apply two coats of natural oil finish, letting each coat dry fully — walnut deepens into that rich brown you’re seeing in this photo.
Cut two circular holes into the top panel using your hole saw, sized just slightly smaller than your bowl rim so they sit flush. Attach your cabinet doors using small hinges, then add the brass knobs centered on each door panel. Real talk: the brass against walnut grain is honestly what makes this feel like actual furniture, not a pet accessory.
An elevated feeding position reduces neck strain for larger dogs — so the 12″ height keeps your pup comfortable during every meal, which means less gulping and better digestion over time.
If walnut feels pricey, white oak gives you a similar grain with slightly lighter tones. And if you love building furniture-style pieces for your dog, 14 Stylish DIY Dog Crate Furniture Ideas You’ll Love has some seriously gorgeous projects worth bookmarking.
Seal the inside cabinet walls with a food-safe finish so spills wipe clean without soaking into the wood.
Prep Time: 30 minutes | Active Project Time: 4-5 hours | Difficulty Level: Intermediate
📸 Photo credit: Instagram @noblefurnitureco
#5: The Trestle-Style Raised Dog Bowl Stand That Makes Your Kitchen Look Like a Pinterest Board
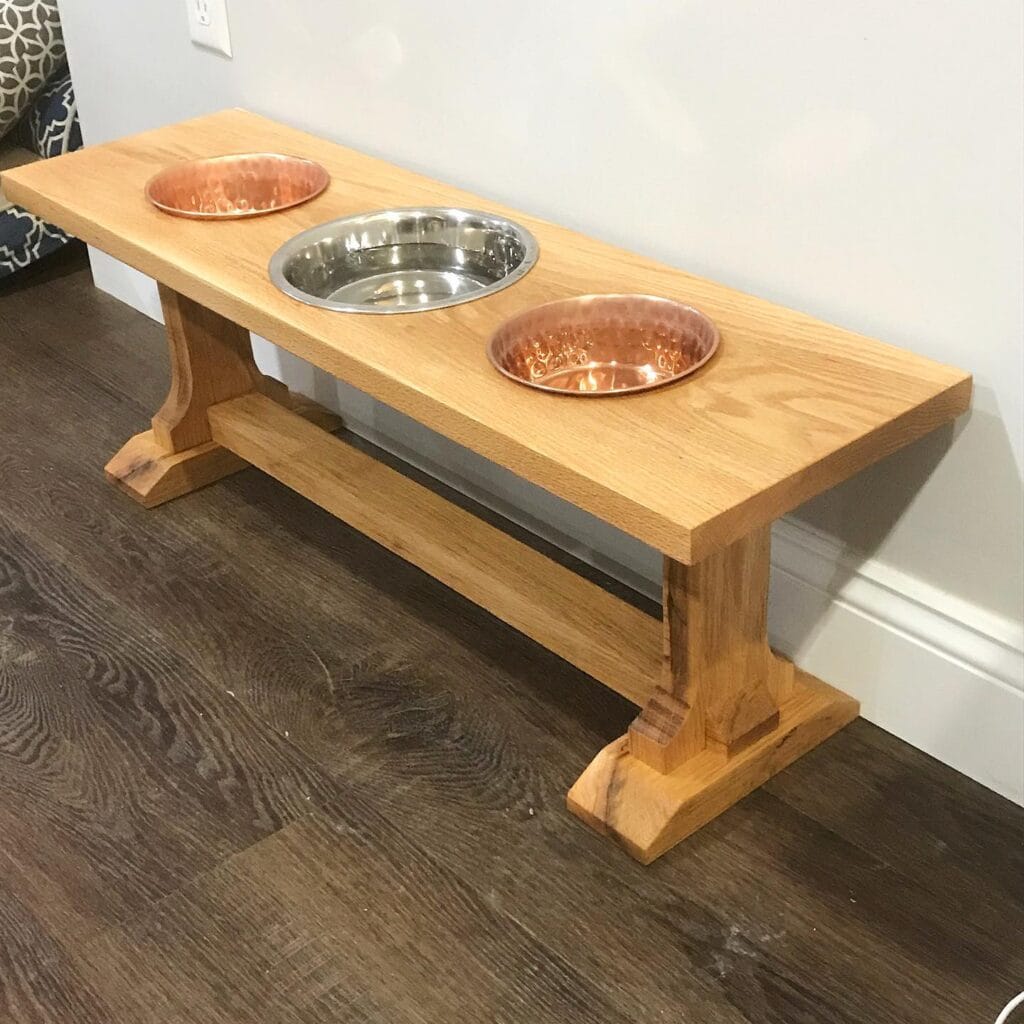
You know that moment when your golden retriever finishes drinking and just… walks away, sloshing water across your hardwood floor?
Yeah. That’s the moment this stand was built for.
This solid oak trestle-style raised feeder is exactly what I’ve been obsessing over lately. My cousin built one for her lab last winter, and I genuinely thought it was a furniture piece at first. The copper-tone bowls flanking a center stainless steel bowl against that warm natural oak finish — it looks intentional, like something you’d style on a shelf.
Materials & Tools You’ll Need:
– 1x oak board (36″ x 10″ x 1.5″) for the top
– 2x oak boards (8″ x 8″ x 3.5″) for trestle base feet
– 2x oak corbel-cut side supports (10″ tall)
– 1x stretcher board (28″ x 3″ x 1″) for bottom brace
– Three bowl cutout holes (sized to your bowls — typically 6″ diameter)
– Wood glue + 2.5″ pocket screws
– Jigsaw, drill, pocket hole jig
– 150-grit and 220-grit sandpaper
– Food-safe polyurethane finish (satin)
– 2 copper hammered bowls + 1 stainless steel center bowl
Prep Time: 30 minutes | Active Project Time: 3–4 hours | Difficulty Level: Intermediate
Instructions
Start by cutting your oak top board to 36″ and marking three evenly spaced bowl holes across the center. Space the outer holes about 6″ from each end and center the middle hole perfectly between them. Use a jigsaw to cut each circle — go slow on the curves so the bowls sit flush without gaps, because a snug fit means no sliding bowls during mealtime, and zero food spills on your floor.
Sand the top board with 150-grit first, then finish with 220-grit until it feels like glass under your fingers. This step matters more than people think. Rough grain will grab dirt and water like a sponge over time.
Now build your trestle legs. Cut the corbel-shaped side supports with a jigsaw — the curved cutout at the base is what gives this piece that farmhouse character you see in the image. Attach each support to its base foot using wood glue and pocket screws driven from underneath, so no hardware shows from the front.
Connect both trestle assemblies with the stretcher board running along the bottom center. This horizontal brace is what keeps the whole stand from racking sideways — raised feeders take a lot of daily lateral pressure from big dogs like goldens, so don’t skip it.
Attach the finished top to the trestle base using wood glue and screws driven up from inside the supports. Wipe off any squeeze-out immediately.
Apply two coats of food-safe polyurethane, letting each coat dry fully. Drop your bowls in. And honestly, step back and just look at it.
A raised feeder keeps your golden’s neck at a comfortable angle during meals, which reduces the strain on their joints over time — and the 11″ height shown here hits that sweet spot for medium-to-large breeds.
Sealing the wood with a third thin coat of polyurethane around the bowl holes specifically will protect against daily water splashes far longer than two coats alone.
📸 Photo credit: Instagram @rusticera
#6: Burnt Wood Double Bowl Stand That Looks Like It Belongs on Pinterest
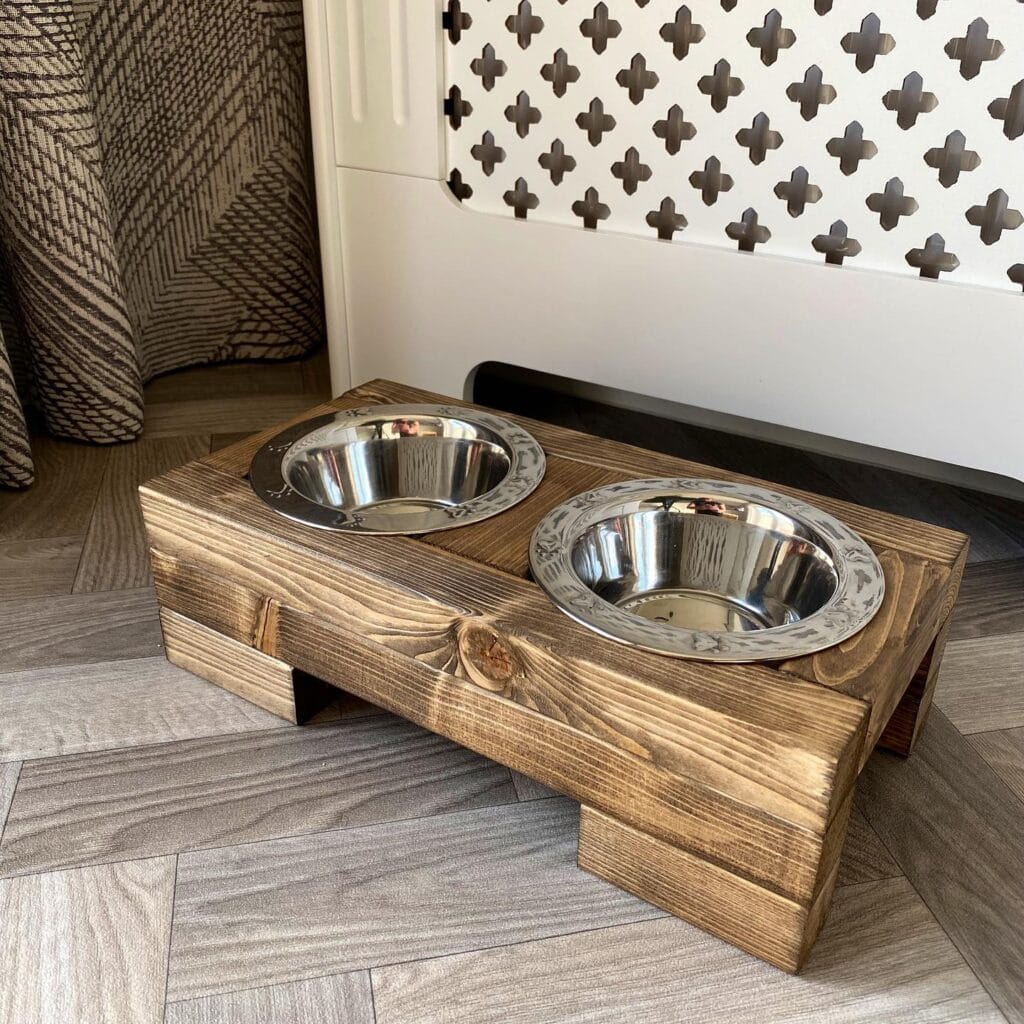
Your golden tracks water from her bowl all the way across your kitchen floor. Every single meal. You’ve wiped that same puddle up approximately 400 times this month.
This burnt pine double bowl stand is the fix. The wood gets a torch-scorch finish that gives it that deep, caramel-brown color you’re seeing in the photo — rich grain lines, dark knots, the whole thing. And two stainless steel bowls sit recessed into the top so they don’t slide, tip, or splash.
Materials & Tools:
– 2×6 pine boards (enough for a 14″ x 8″ x 5″ tall frame)
– Two stainless steel dog bowls (sized to your dog’s breed)
– Wood glue + 1.5″ wood screws
– Propane torch
– 80-grit + 220-grit sandpaper
– Hole saw drill bit (sized to your bowls)
– Food-safe sealant or beeswax finish
Instructions
Cut your pine boards to length — two long side pieces and two short end pieces. Glue and screw them together into a solid rectangular frame, then attach small 2″ foot blocks underneath each corner. This lifts the stand just enough to protect your floors.
Trace your bowl rim onto the top board, then drill your hole saw through each marked circle. Test-fit both bowls before going further. Sand everything with 80-grit first, then finish with 220-grit for a smooth surface.
Now the fun part. Run your propane torch slowly across the entire surface in long strokes. The wood darkens, the grain pops, and it starts looking exactly like that photo. Wipe off ash with a dry cloth.
Seal with a food-safe beeswax finish — raised feeding position reduces neck strain for your golden, and the recessed bowls keep water contained instead of halfway across your kitchen.
Drop your bowls in. Done.
The stand looks intentional next to a cozy DIY dog bed for large dogs if you’re building out a whole corner for her.
Let the sealant cure a full 24 hours before first use. And if your torch scorches unevenly, hit those spots twice — uneven char actually adds character here, not mistakes.
⏱ Prep Time: 20 min | Active Project Time: 2–3 hours | Difficulty Level: Beginner-Intermediate
📸 Photo credit: Instagram @masontoolsnwood
#7: DIY Elevated Dog Bowl Stand With a Wooden X-Base (And It Looks Like It Belongs in a Magazine)
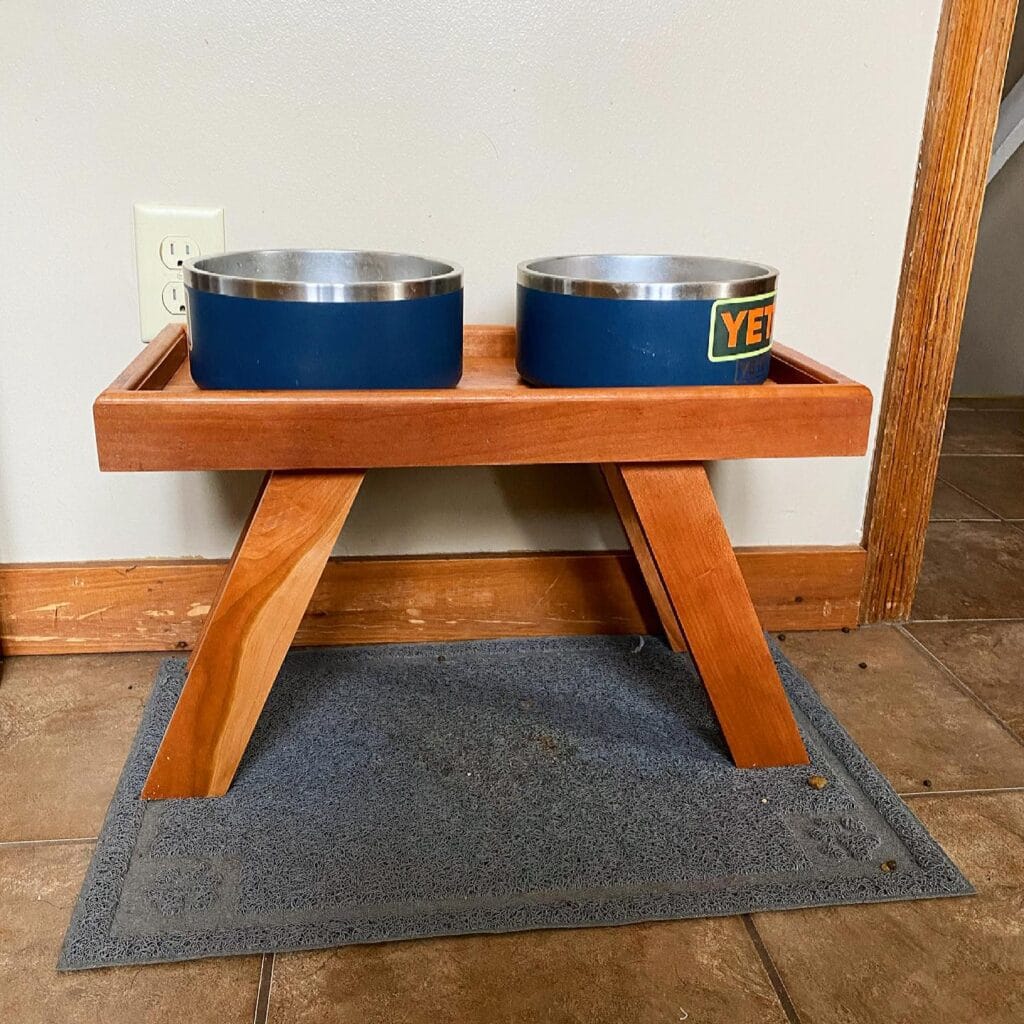
Okay, you know that moment when your golden is just demolishing her water bowl across the kitchen floor? Like, she’s eating and the bowl is literally traveling. You’re mopping up a puddle for the third time that day and you’re just done.
This solid cherry wood elevated stand is the answer.
Materials & Tools You’ll Need:
– Cherry wood boards (2 long planks for the X-base legs, 3 boards for the tray top)
– Wood stain in a warm mahogany tone
– Wood glue + wood screws (1.5 inch)
– Sandpaper (120-grit and 220-grit)
– Saw, drill, measuring tape
– 2 YETI Boomer 8 Dog Bowls in navy blue (the insulation keeps water cool longer — huge deal in summer)
Prep Time: 30 minutes | Active Project Time: 3–4 hours | Difficulty Level: Intermediate
### Instructions
Cut your leg pieces at a 45-degree angle on each end so they cross cleanly into that signature X-shape. Sand everything with the 120-grit first, then finish with 220-grit so the surface feels smooth before staining.
Assemble the X-base by overlapping the two leg pairs at the center and securing them with your screws through a pre-drilled pilot hole — this prevents the wood from splitting. Apply wood glue at the joint for extra hold.
Build your tray top by joining the three planks side by side. Leave just enough spacing between them so your bowls sit snug without sliding. The raised lip around the tray edge — that little wood border you see in the photo — keeps bowls locked in place. Elevated feeding reduces neck strain, which means your girl isn’t hunching awkwardly every single meal.
Apply two coats of stain, letting each dry fully between coats.
My cousin built one of these last fall and said the hardest part was getting the leg angles even. Here’s the simple fix: cut both legs from the same board in one pass so the angles mirror each other.
Place it on a rubber-backed mat underneath to protect your tile and catch any drips.
The cherry wood grain against those navy YETI bowls looks genuinely beautiful. Functional and actually pretty — that payoff hits different when your kitchen corner stops looking like a disaster zone.
📸 Photo credit: Instagram @samgreen_maker
The One Mistake That’ll Ruin Your DIY Dog Bowl Stand (And How to Skip It)
Okay, real talk — the thing nobody tells you before you build a dog bowl stand? Bowl diameter measurements lie.
Most people measure the top of their bowl and cut their hole to match. Then the bowl either falls straight through or won’t sit right. What you actually want is to measure the widest point of the bowl, then subtract about half an inch. That ledge is what holds everything.
I made this mistake with my first build. Spent a whole Saturday on it, cute wood stain and everything, and my pup’s bowl just… dropped to the floor. Heartbreaking.
The other thing — seal the wood inside those bowl holes. Dogs are messy. Water and kibble dust collect right at that rim, and unsealed wood warps fast. Two coats of food-safe polyurethane inside the cutout saves you from rebuilding the whole thing in six months.
If you’re already deep in a dog-friendly DIY phase, these creative outdoor dog washing station ideas pair so well with a stand build.
Your golden will absolutely judge your craftsmanship. Build it right the first time.
Your Dog-Proof Home Starts This Weekend
Pick one room. Just one. Swap out the rug, throw a slipcover on the couch, or finally get that washable blanket you’ve been eyeing on Pinterest for months.
Small changes hit different when your golden stops being a source of stress and starts being just… your dog again. The one you actually want sprawled across your living room.
And hey — if you’re already in “let’s make this space work for both of us” mode, creative dog feeding station ideas might be your next rabbit hole.
So tell me — which room in your house is your golden currently winning?

Amr Mohsen is a software engineer who traded his keyboard for a leash — at least on weekends. His love for dogs inspired him to share what he learns as a dog owner and enthusiast, bringing a detail-oriented, research-driven perspective to every article he writes. If it’s about dogs, he’s probably already looked it up twice.


