Think of your indoor dog washing station as the ultimate spa day for your pup, minus the fancy cucumber slices and calming music. You’re probably wondering how to make this space functional yet stylish, right? From adjustable showerheads to portable tubs, there are so many creative options that can make both you and your dog happy. Stick around, and let’s explore how to turn a mundane chore into a delightful bonding experience.
Showerheads With Adjustable Heights
When it comes to dog washing stations, having a showerhead with adjustable heights can make all the difference—trust me, your back will thank you.
Imagine bending over for a muddy dog while trying to reach that fixed showerhead. Not fun, right? With a DIY dog washing station indoor, you can customize the height to suit both you and your furry friend.
It’s as easy as pie. Grab a showerhead with a detachable hose and install it on an adjustable mount—voilà! You can wash your pup without ending up in a yoga pose you never wanted.
Plus, your dog will appreciate it too. Just think about the joy of not wrestling a wiggly pup under a spray meant for giants.
Simple adjustments can lead to much better bath times.
Our Collection
Let’s talk about our collection of must-have items for your indoor dog washing station.
You’ll love the portable dog bathtubs that make cleanup a breeze, along with non-slip mats to keep your pup steady while they get scrubbed down—no one wants a slippery situation, right?
And then there are foldable bathing tables and handy soap dispensers, just waiting to make bath time a little easier and a lot more fun.
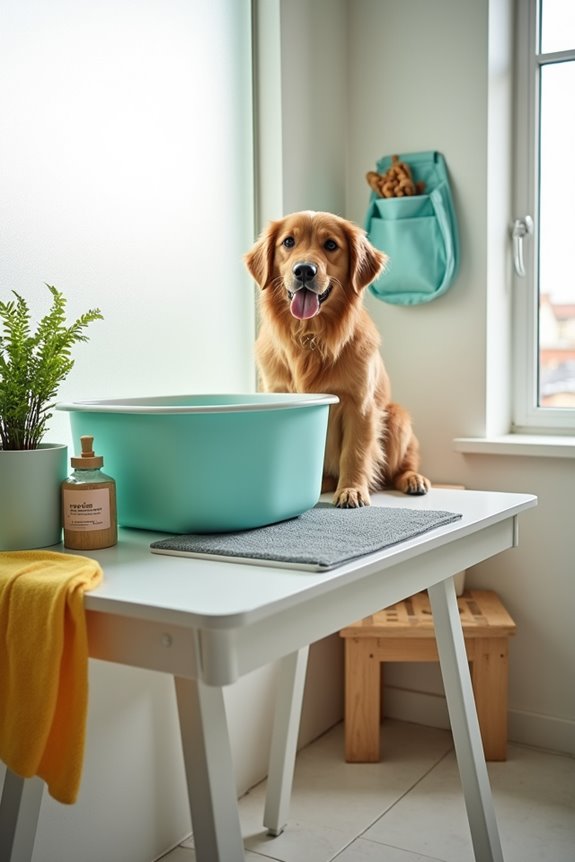
1. Portable Dog Bath Tubs
Creating a portable dog bath tub isn’t just a fun DIY project; it’s a beautiful blend of functionality and practicality for busy dog owners. Imagine this: you’re able to wash your pup after a muddy playdate, right in your garage or even outside, without the hassle of scrubbing your bathtub. You’ll save money on trips to the groomer and keep your home cleaner. Plus, having luxury pet ramps and stairs can help your furry friend access the bathing area comfortably, enhancing their overall experience.
Plus, there’s something undeniably rewarding about crafting something useful for your furry friend. These accessories can also elevate your overall dog walking experience, making outings more enjoyable for both you and your dog(premium dog walking accessories).
Materials Needed:
- An inflatable kiddie pool (preferably medium size)
- A showerhead attachment or handheld sprayer
- A waterproof mat or tarp
- A utility sink or a large plastic tub (if you prefer a more contained design)
- Some dog shampoo (because, you know, hygiene)
- A towel for drying off
- Non-slip bath mat (for added comfort)
Step-by-Step Instructions:
- Choose Your Spot: Find a flat surface to set everything up—maybe the garage, your backyard, or even a covered patio. If it’s outside, make sure there’s easy access to a water source.
- Set Up Your Pool: Inflate the kiddie pool according to the manufacturer’s instructions. Lay down the waterproof mat or tarp beneath it to protect your floor from any sneaky water spills.
- Install the Showerhead: If you’re using a handheld sprayer, set it up right next to the pool. This way, you can easily wash your pup without them escaping. If you have a utility sink, position it near your setup.
- Add Non-Slip Mat: Place the non-slip mat or bath mat inside the pool to give your dog a comfortable footing. Nobody likes to slip and slide around when they’re getting a bath.
- Get the Doggie Shampoo Ready: Have your dog shampoo within arm’s reach, so you’re not scrambling with slippery hands when it’s your pup’s turn to shine. Dogs can sense chaos, and trust me, we want bath time to be as calm as possible.
- Invite Your Pup: Now comes the best part. Calmly guide them to the bath area. Use treats to coax them if they’re a little hesitant. Make it fun—dogs love a little extra praise and attention.
- Wash, Rinse, and Dry: Use your handheld sprayer or showerhead to wash and rinse your pup. Make sure to dry off with the towel afterward because a wet dog dancing through your house isn’t exactly what we’d call a designer look.
Optional Add-ons/Variations:
- Color It Up: Feel free to paint or decorate your utility sink in bright colors to match your home decor. Imagine a cheerful yellow sink against your neutral walls. It’s like adding a pop of color to your life and your dog’s bath time!
- Add a Canopy: If you’re doing this outside, consider setting up a canopy or a simple tarp overhead. This adds a bit of shade and keeps your fur baby cool during warmer months.
Pro Tip:
Keep a few dog treats near your washing station. Reward your pup for being brave and cooperative during bath time. It’ll build positive associations, so the next time you pull out the bath tub, they might be more willing to jump in, instead of hiding behind the couch like it’s a game of hide-and-seek.
With this portable dog bath tub, you’re not just creating a bathing station—you’re enhancing your pet care routine, making it easier and more fun. Happy washing!
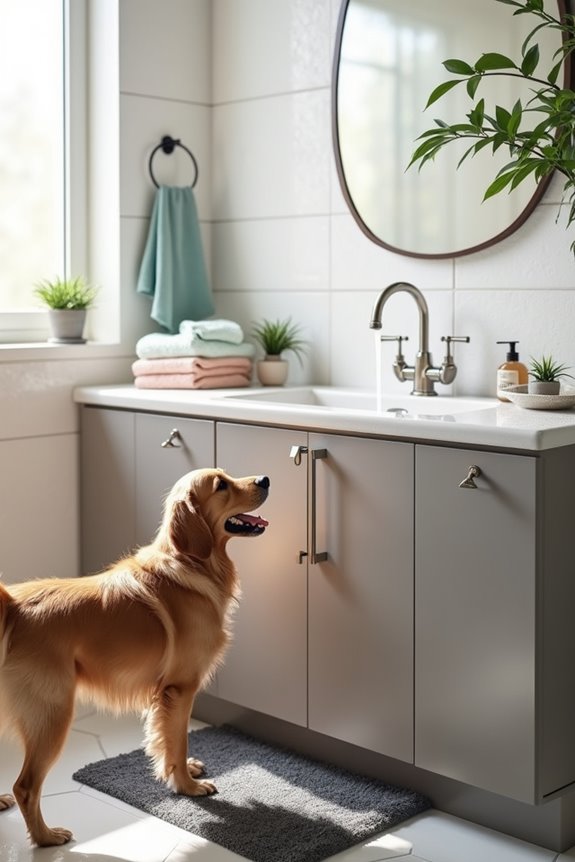
2. Non-slip Bath Mats
If you’re tired of watching your pup wobble and wiggle during bath time, a non-slip bath mat is your best friend. These mats not only guarantee your furry buddy feels secure as they’re getting cleaned up, but they also help keep the bath area tidy and stylish. Additionally, having a designated wash area can encourage regular grooming, which aligns perfectly with our selection of premium dog food packages to keep them healthy and happy. An attractive dog food storage cabinet can further organize your pet’s essentials, reducing clutter and enhancing your space. It’s essential to keep dog food in airtight containers to maintain freshness and prevent pests. Say goodbye to slippery paws and hello to stress-free washing sessions, all while adding a splash of charm to your indoor setup.
Materials Needed:
- Non-slip bath mat (available in various sizes and colors)
- Scissors (for cutting to fit, if necessary)
- Mild detergent (for cleaning your mat occasionally)
- Water (to keep things fresh and clean)
Step-by-Step Instructions:
- Measure Your Space: Before you head out to shop or start cutting, measure the area where you want to lay the bath mat. This will save you from returning to the store to grab the right size or slicing the mat down to size unnecessarily.
- Choose Your Mat: Head to your local pet supply store or browse online for a non-slip bath mat. You’ll want it to be both comfortable and functional. Remember, colors and patterns can add flair too, so pick something that pleases your aesthetic!
- Cut to Size (if needed): If your mat is a bit too big, take your scissors and trim it down to size. No one wants a mat flapping around like it’s in a wind tunnel. Just be careful and take it slow—those scissors have a way of snipping where you least expect.
- Clean the Area: Give the floor where you’ll place the mat a good clean. You want a nice, clean surface to support your pup’s new favorite spot. Bonus points if you do a little dance while vacuuming—because who doesn’t love a clean space?
- Lay It Down: Once your area is clean and prepped, lay the bath mat in place. Make sure it’s flat and secure, so your pup doesn’t feel like they’re on a trampoline when it’s bathtime.
- Test It Out: Before your dog steps on it, give the mat a quick test yourself. A few gentle (or not-so-gentle) nudges with your foot will tell you if it’s stable enough for your furry friend. If it slips, you might need to reposition it or try another one.
- Invite Your Pup for a Test Run: Now that your beautiful mat is all set, it’s time to show your dog their new wash zone. Bring them over and let them experience the comfort firsthand. Just remember, any excitement they show might lead to muddy paws stepping all over your lovely mat, so prepare for a bit of fun chaos.
Optional Add-ons/Variations:
- Color and Pattern Play: Choose a bath mat in a fun color that matches your indoor decor, or mix things up with bold patterns. You can even grab fabric paint to add cute paw prints or designs if you’re feeling crafty.
- Decorative Overlays: Sew or glue some adorable fabric trim around the edges of your mat to really personalize it. It’s an easy way to make it a true reflection of your home style—and let’s face it, who doesn’t love a little flair?
Pro Tip:
To guarantee your non-slip bath mat lasts, give it a gentle wash with a mild detergent every few weeks. Dirt and excess fur can cling to it like no one’s business. A quick clean means a fresh, non-slippery surface for your fur baby, keeping both of you happy during bath time.
And hey, a clean dog means fewer unexpected mud prints on your freshly vacuumed floor!
3. Dog-friendly Soap Dispensers
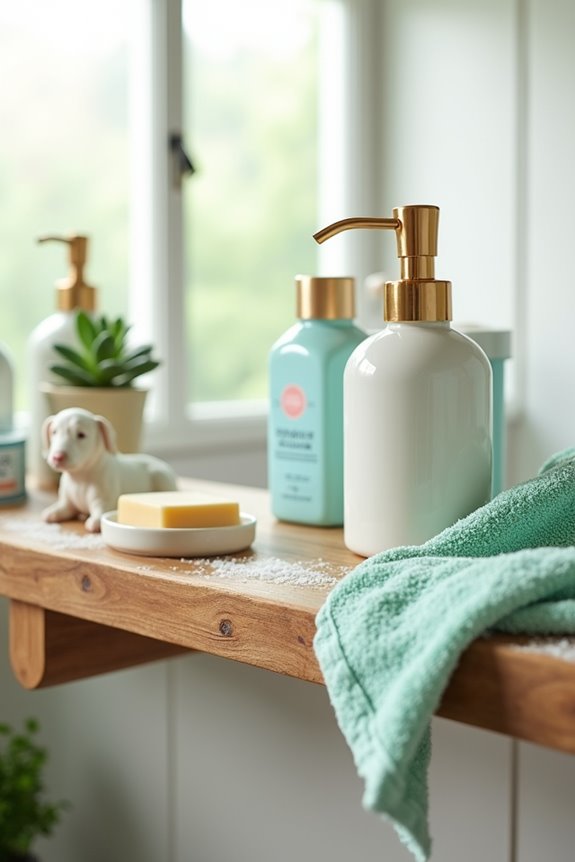
If you’re a dog parent, you know bath time can be a bit of a scene. Slippery pups, impatient wiggling—yikes. Enter the dog-friendly soap dispenser. Not only does it keep your washing area organized, but it helps you control the soap situation with just a squirt, meaning cleaner pups and fewer messy moments. Plus, they look pretty neat—just think of it as stylish storage for your doggy bathing goodies.
Materials Needed:
- A pump soap dispenser (plastic or glass)
- Dog-friendly shampoo (make sure it’s safe and non-toxic)
- Optional: stickers or paint (for personalizing your dispenser)
Step-by-Step Instructions:
- Pick Your Dispenser: First, check your pantry or bathroom for a pump soap dispenser. If you don’t have one handy, you can grab a cute, affordable one online or at a local store. Think about how it’ll fit in with your home’s vibe. You want it to be part of the decor, not an eyesore.
- Clean It Up: If you’re reusing an old dispenser, give it a thorough clean! Hot, soapy water or a splash of vinegar can do wonders here. Rinse well to make sure no soap residue lingers because we don’t want any conflicting smells during bath time.
- Fill It Right: Now comes the fun part. Pour in your dog-friendly shampoo. Avoid fancy fragrances—dogs can be sensitive to certain scents. Consider a formula with oatmeal or aloe for extra nourishment. Leave a little space at the top to let the pump work its magic without overflowing.
- Customize (Optional): If you want to add some flair, use some stickers or non-toxic paint to label the dispenser—“Paw-some Wash” or “Bubbling Buddy,” anyone? It’s a fun way to make the washing station uniquely yours. Just be sure any decorations don’t interfere with the pump mechanism.
- Test It Out: Give your new dispenser a squeeze to make sure it works. If it dispenses a nice foamy product, you’re golden. If not, check if the pump is properly attached and give it another go—it should be smooth sailing.
- Display It with Pride: Now that you have your stylish, functional soap dispenser ready to go, find a nice spot by your bathing area. Make sure it’s accessible so you can quickly grab it during bath time. Less waiting means less fidgeting from your pup, and who doesn’t want that?
- Time to Clean Up: Next time bath time rolls around, you’ll be armed with your dog-friendly soap dispenser. Just one pump of that shampoo, and you’re ready to tackle dirt and fur—no fuss involved.
Optional Add-ons/Variations:
- Color Code: If you use different shampoos for various purposes (sensitive skin, moisturizing), label them in bright, funky colors. Your pup will have a whole collection of bath goodies to choose from.
- Travel Size: Want to keep it portable? Grab a smaller dispenser for those trips to the dog park or your favorite dog-friendly beach. A refillable travel dispenser will save space while ensuring you’re always prepared.
Pro Tip:
Watch out for slippery floors. Keep a towel nearby for quick cleanups. A little safety goes a long way—no one wants to see their pup do the “slip and slide” move during bath time.
Also, buying a bulk bottle of dog shampoo can save money over time; refill your cute dispenser to keep costs down while pampering your furry friend.
With this easy DIY, bath time can transform from chaotic to charming. Happy washing!
4. Foldable Dog Bathing Tables
If you’re tired of wrestling your dog into the bathtub or struggling to find a comfortable space for a wash, a foldable dog bathing table might just be the game-changer you need. It’s practical, saves on costly trips to pet groomers, and keeps your home cleaner—what’s not to love?
Plus, these tables neatly fold away, making them perfect for any space, big or small. Let’s explore how you can create your very own foldable dog bathing table to pamper your pup like a pro.
Materials Needed:
- A sturdy folding table (can be found at most home improvement stores)
- Non-slip mat or rubber grips
- Dog grooming tub (optional for added comfort)
- Measuring tape
- Saw (if needing to trim the table)
- Sandpaper (if trimming)
- Non-toxic paint (if you want to add color)
- Paintbrush (if using paint)
Step-by-Step Instructions:
- Choose Your Table: First, pick a folding table that suits your space and your dog’s size. A height of about 30 inches is generally good, making it easier on your back while you work. A lightweight table is a bonus for storage.
- Add Non-Slip Grip: If the surface feels slippery to you, it’ll be slippery for your pup too. Cut the non-slip mat to fit over the table surface and attach it securely using adhesive or double-sided tape. This way, your furry friend won’t feel like they’re standing on an ice rink during bath time.
- Measure Twice, Cut Once: If you need to adjust the table to fit in your space better, measure it out and use a saw to trim it. Remember to sand any rough edges to keep things safe—nobody wants a splinter during bath time.
- Make It Pop: Feeling crafty? Use non-toxic paint to give your table a little personality. Maybe you want a bright blue or a chic beige that complements your bathroom vibe. Let it dry thoroughly before using it.
- Test-It-Out Time: Before bringing in your dog, test out the sturdiness of the table. Give it a good shake. If it remains firm and stable, you’re all set. Your pup’s safety is the top priority, after all.
- Fold Away When Not in Use: Enjoy your new bathing table! When bath time is done, just fold it up and store it in a closet or behind a door. It’s a simple way to reclaim your space and keep things tidy.
- Have a Splashy Time: Bath time can be stressful for dogs, but with the right setup, it doesn’t have to be. Use treats and calming voices to help your dog associate the table with a positive bathing experience.
Optional Add-ons/Variations:
- Color Your World: Besides the paint, consider using fabric to cover parts of the table for extra cushioning. You can go with fun patterns or calming colors—whatever suits your dog’s personality best.
- Personalized Paw Print: Use stencils to add your dog’s paw print on the table, making it a special spot just for them. It’s more than a bathing table; it’s their exclusive pamper station.
Pro Tip:
Make sure to keep a towel handy or attach a small storage bag to the side for grooming tools. It keeps everything within reach and prevents slippery surprises.
Plus, you can set the mood with treats nearby—anything to sweeten the experience for your pooch.
With this foldable dog bathing table, bath time is upgraded from a chore to a delightful bonding moment. Enjoy your clean pup and the minimal mess, and who knows, you may find that bath time now comes with a lot more smiles (and fewer escape attempts).
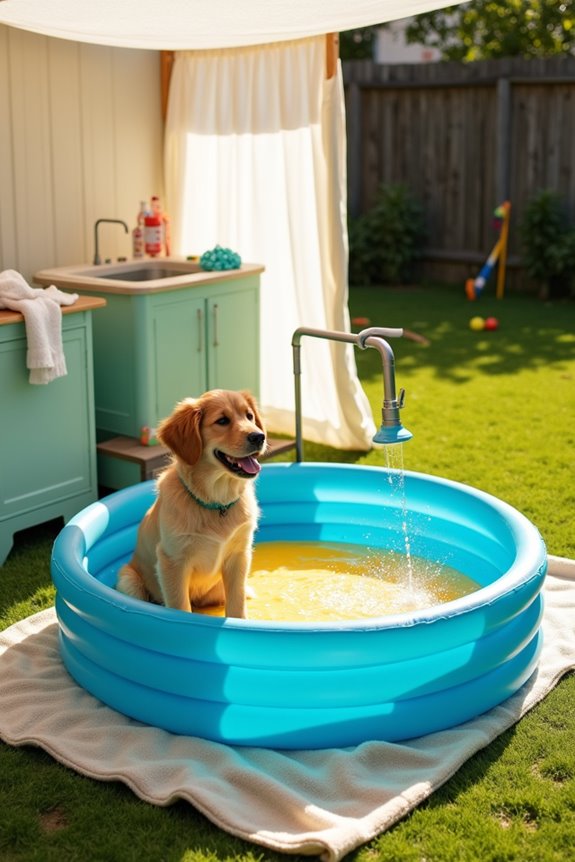
5. Portable Dog Shower Attachments
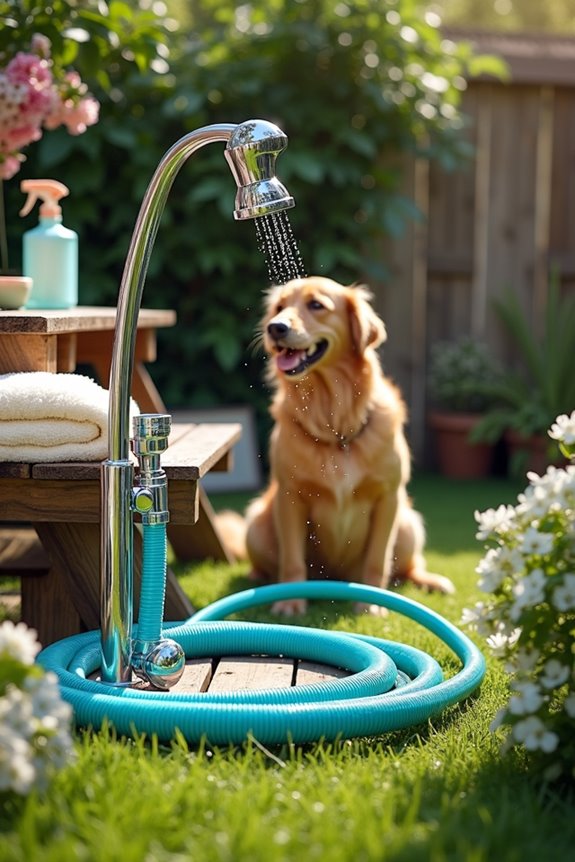
If you’re looking for a way to make bath time a breeze, why not create your very own portable dog shower attachment? This handy tool makes washing your pup outside or at the park super easy, saving you the hassle of tracking mud and fur through your home.
Plus, it’s budget-friendly and can be customized to suit your style. Let’s plunge into how you can whip one up in no time.
Materials Needed:
- A standard garden hose
- A pet shower nozzle attachment (available at pet stores)
- Hose adapters (if needed for a secure fit)
- Scissors or a utility knife
- Electrical tape or hose clamps
- Optional: A spray bottle for easy mixing during bath time
Step-by-Step Instructions:
- Gather Your Hose: Grab your trusty old garden hose. This can be one you don’t mind sacrificing for this project or a brand-new one. Make sure it’s long enough to reach your washing area.
- Choose a Shower Nozzle: Head to your local pet store (or browse online) to pick up a pet shower nozzle. These nozzles are designed to be gentle on your dog’s skin and are usually adjustable to control the water flow, which is a big plus.
- Cut the Hose: If your hose is too long, measure it out and use your scissors or utility knife to cut it to a more manageable length. Don’t worry; you won’t need to wrestle with any weird connections here.
- Attach the Nozzle: Screw the pet shower nozzle onto one end of the hose. If it doesn’t fit snugly, use hose adapters to secure the connection. A tight fit means no surprise leaks, and that’s a win in everyone’s book.
- Seal It Up: Secure the junction with electrical tape or hose clamps. This step might sound a bit extra, but trust me, we don’t want any “waterworks” happening where we don’t want them.
- Test the Waters: Before you bring your dog into the mix, turn on the water at a low pressure to check for leaks. Test the nozzle to make sure everything flows nicely. A little practice on yourself can help get the hang of the pressure settings—now’s your chance to feel like a human sprinkler.
- Get Ready for Bath Time: Once you’ve confirmed there are no leaks and the water sprays out perfectly, you’re ready to tackle bath time—whether it’s in your backyard or at a dog-friendly park.
Be sure to keep a few towels nearby for after the wash; you know how dogs love to shake off right after a bath.
Optional Add-ons/Variations:
- Paint It Pretty: Give your garden hose a splash of color with some non-toxic spray paint. Just make sure it’s fully dry before use. This way, not only is it functional, but it can also brighten up your outdoor washing area.
- Personalized Labels: Use waterproof labels to mark your nozzle with your dog’s name or even fun phrases like “Spa Time.” It adds a small touch of personalization that can make you smile every time you use it.
Pro Tip:
When using the portable shower, keep the nozzle away from your dog’s face to avoid startling them. Start with a light spray on their side to ease them into it. And always remember to reward them with treats and praise for being such a good pup during bath time. A little comfort goes a long way in building positive bath associations.
With this portable dog shower attachment, you and your furry friend are bound to have a good time—less mess, more fun, and plenty of tail-wagging happiness!
6. Built-in Water Filtration System
Imagine having a space where your furry friend can jump into the bath while you’re confident that the water is as clean and pure as it can be. That’s where a built-in water filtration system comes in. Not only does it provide fresh water to your dog during baths, but it also cuts down on the use of bottled water and the hassle of carrying heavy containers.
Plus, it adds a touch of elegance to your dog washing station—talk about a win-win.
Materials Needed:
- Water filtration system (under-sink or countertop model)
- PVC pipe fittings (for connecting to your existing plumbing)
- Adjustable wrench
- Teflon tape (to establish leak-proof connections)
- Drill with bits (if necessary for installation)
- Level (to make sure everything is straight)
- Clear silicone sealant (for added security)
Step-by-Step Instructions:
- Choose Your Location: Find a suitable spot for your built-in system. This could be under the sink in the dog washing station or on a countertop nearby. Make sure it’s close to where you’ll need the water for bathing your dog.
- Read the Manual: Before you embark on installation, give that manual a good read. Each filtration system can be a little different, so familiarize yourself with the specific requirements and instructions.
- Turn Off the Water Supply: Safety first! Locate the main water supply and turn it off. Give your pipes a little time to drain so you don’t have a surprise splash when you start unscrewing things.
- Install the Filtration System: Follow the instructions for your system. Use the adjustable wrench to connect the filtration system to your plumbing, applying Teflon tape on the threads to prevent leaks. Make sure to fit everything tightly, but not too tightly that you end up breaking something.
- Drill If Needed: If any holes need to be drilled for your filtration system, carefully do so now. Ensure you’ve marked the spots clearly before you start drilling—let’s not do any extra work, right?
- Seal It Up: Once everything is in place, apply clear silicone sealant at the joints and connections for peace of mind. You don’t want any sneaky leaks ruining your day.
- Turn the Water Back On: Now it’s time for the grand reveal. Turn the main water supply back on slowly. Check for any leaks around the new filtration system, and if all looks good, give it a test run!
Optional Add-ons/Variations:
- Customize the System: If you’re feeling creative, why not paint the exterior of your filter cabinet to match your home décor? A splash of color can make it look chic and blend seamlessly with your interior.
- Integrated Dispenser: Consider adding a dog-friendly drinking fountain attachment to the filtration system. This way, your dog always has access to fresh water, making them feel like royalty.
Pro Tip:
For ultimate peace of mind, consider installing a filtration system that includes a sediment filter before the main filter. It adds an extra layer of protection, establishing even the tiniest dirt particles don’t ruin bath time.
After all, who wants to wash their dog with less-than-perfect water? And let’s be honest, a happy, clean dog means a happy owner—so it’s worth the effort.
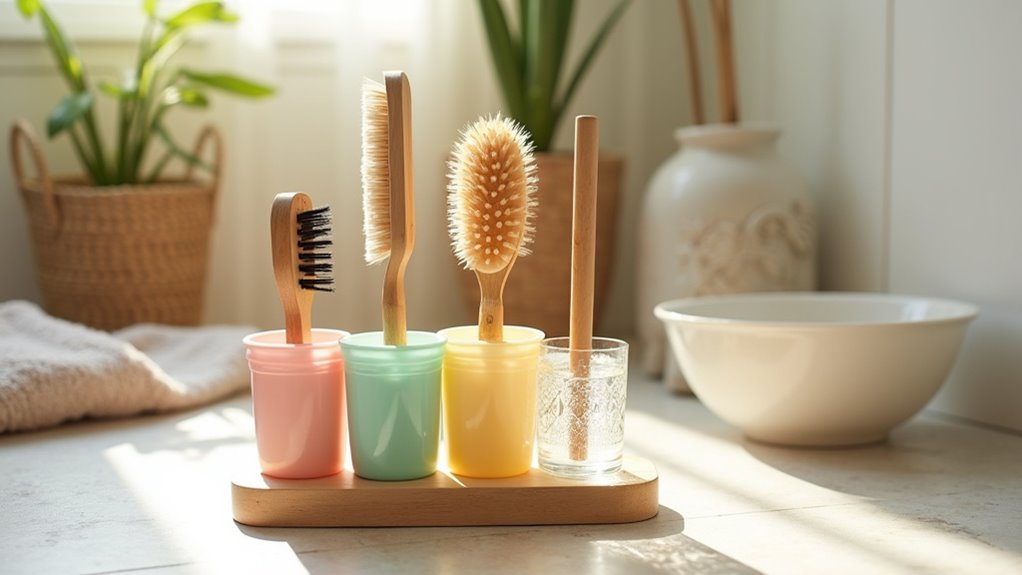
7. Grooming Brush Holder Stand
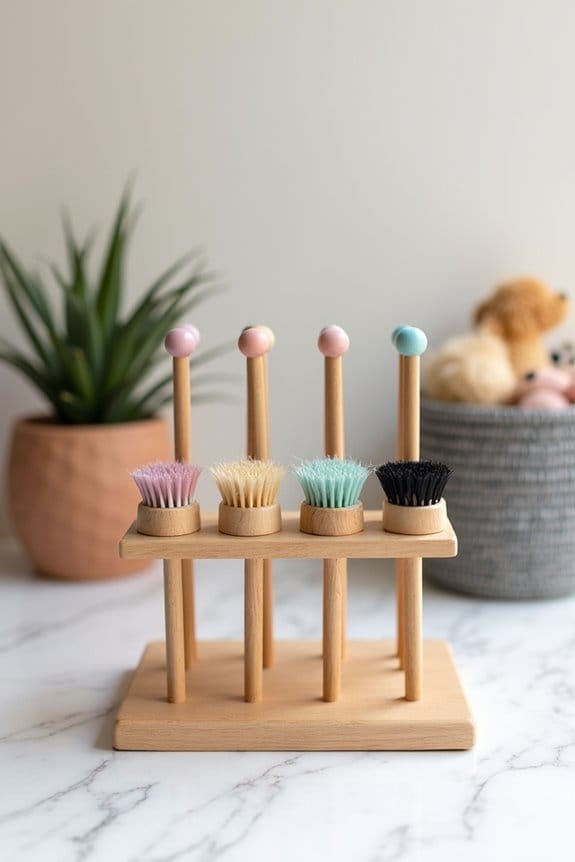
If you’re like many dog owners, you know that grooming your pup can sometimes feel like a chaotic event. Brushes tangled in the corner, stray hair everywhere, and in the hustle to find what you need, you may have accidentally adopted the role of a doggy detective.
Enter the DIY grooming brush holder stand—a simple yet clever solution that keeps your grooming tools organized, so you can focus on what really matters: bonding with your fluffy friend. Plus, it looks great in your home, saving you time and stress while preventing that ever-dreaded “Oh no, where’s the brush?” panic.
Materials Needed:
- Wooden dowels (1/2 inch diameter)
- Wooden base (any flat board, about 12” x 12”)
- Small wooden or plastic cups (to hold brushes)
- Drill with drill bits
- Wood glue
- Sandpaper
- Paint or wood stain (optional)
- Paintbrush or cloth (if staining)
- Measuring tape
- Pencil
Step-by-Step Instructions:
- Plan Your Design: First, decide how many brushes you want to hold. Measure the spaces between the dowels according to how many cups you have—this will determine how far apart they should be.
- Prepare the Base: Take your wooden base and give it a good sanding. This helps to make everything smooth and nice. If you want to paint or stain it, now’s the perfect time. Just remember to let it dry completely before proceeding.
- Mark Your Holes: Using a pencil, mark where you’ll drill holes for the dowels. It’s essential to measure carefully so they’re evenly spaced. Think of it as giving your brushes a stylish condo instead of a cramped apartment.
- Drill the Holes: With the drill, carefully drill holes into the base. You want them to be just a bit smaller than the dowels, creating a snug fit. Make sure to take your time—suddenly having a hole too big sounds like an unfortunate scenario we all want to avoid.
- Insert the Dowels: Push the wooden dowels into the holes. This might require a little gentle force—no need to go full Hulk here, just enough to get them in tight.
- Secure the Cups: Once the dowels are in place, glue the small cups at the top of each dowel. This is where your brushes will sit, so make sure they’re positioned securely. Give everything some time to dry.
- Finishing Touches: Double-check again that everything looks even and straight. If you’ve decided to paint or stain, apply a finishing coat of your choice once the assembly is complete.
Optional Add-ons/Variations:
- Get creative with color! Use bright paints or even patterned fabric wrapped around the base or dowels. It could be paw prints, polka dots—whatever speaks to your dog-loving heart.
- Instead of cups, you could use small jars or box-shaped holders for a rustic look. Just make sure they won’t slide off the dowels!
Pro Tip:
Always allow glue and paint to dry thoroughly before putting your brushes in. You wouldn’t want the unexpected surprise of a brush falling mid-bath and turning a peaceful grooming into a slapstick comedy show of wriggly pup chaos.
Plus, keeping this area clean and organized makes grooming so much easier—you’ll wonder how you ever lived without it.
Extra Tips & Ideas
While it might seem intimidating to set up the perfect indoor dog washing station, a few extra touches can transform the whole experience into something magical—well, as magical as bathing a wet, squirmy pup can be.
Consider adding a splash mat, so your floor doesn’t become a slip-and-slide nightmare. And don’t forget a nearby treat jar! You’ll need bribes for those moments when your dog just won’t cooperate.
Soft, warm towels within arm’s reach make drying off a breeze, while calming music can take the edge off for you both. You might even try using a handheld showerhead for better control. Trust me, it beats chasing your dog around with a bucket.
It’s all about making bath time less of a chore, right?
Frequently Asked Questions
What Materials Are Best for Building an Indoor Dog Washing Station?
For your indoor dog washing station, opt for waterproof materials like acrylic or tile for the walls, heavy-duty plastic for the tub, and slip-resistant vinyl flooring. These choices guarantee durability and easy cleaning when washing your pup.
How Much Space Is Required for a Dog Washing Station?
You don’t need an entire mansion for a dog washing station! Just a cozy 3-foot by 3-foot space will do. This size guarantees you can wash your furry friend comfortably without splashing water everywhere!
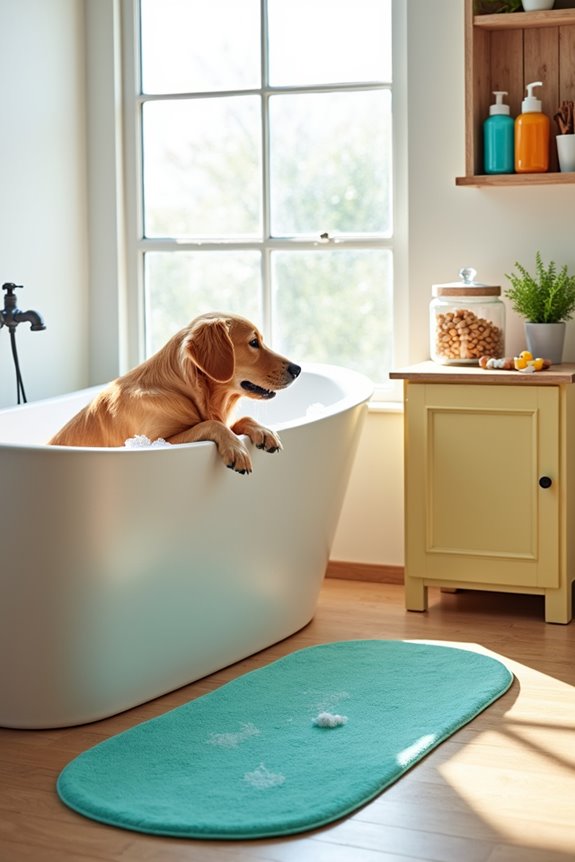
Can I Use a Regular Bathtub for Dog Washing?
Yes, you can use a regular bathtub for dog washing. Just make certain you have a non-slip mat, some towels handy, and consider using a detachable showerhead for easier rinsing and controlling water flow.
What Features Should I Prioritize in a Dog Washing Station?
Think of it as crafting a cozy spa for your pup. Prioritize a nonslip surface, easily adjustable height, proper drainage, and warm water. These features make bath time enjoyable for both of you.
How Do I Maintain Cleanliness in the Washing Station?
To maintain cleanliness in your washing station, regularly rinse and scrub surfaces after each use. Use pet-safe disinfectants, keep towels organized, and guarantee drains are clear. Frequent maintenance prevents buildup and keeps the area fresh.
Conclusion
So there you have it—your dog washing station dreams come to life. Picture your pooch, gleefully splashing around, while you channel your inner dog groomer. Sure, you might end up drenched, and that stray shampoo bottle might just slip right out of your hand, launching like a small rocket across the room, but isn’t that part of the charm? Creating a fun, functional dog washing haven means less dog hair on your couch and fewer surprises in your laundry.

Hi, I’m Ali Tarek, the founder of Animalsman. I’ve always been passionate about pets, especially dogs and cats, and I created this website to share practical tips, easy recipes, and helpful care advice for fellow pet lovers. My goal is to make pet care simple, enjoyable, and accessible for everyone. When I’m not writing or curating content, you’ll usually find me spending time with my furry friends or learning new ways to keep them happy and healthy.

