Your dog is the cutest thing ever – until he’s not.
One day your dog is doing great, the next you’re scrubbing the couch…again. Yep. I’ve been there. My dog Koda went through a phase after his surgery where I was strongly considering covering every surface in my house with towels. Not one of my finer moments.
And store bought diapers do not fit right on them. They fall off or they leak. Plus they cost too much for something your dog will probably destroy in 20 minutes.
That is why I got crafty. These 10 DIY dog diaper designs work (and a few of them are cute enough that I didn’t completely hate seeing them on Koda).
Your floors, sofa, and sanity will thank you.
#1: DIY Dino Dog Diaper — The Cutest Fix for Your Pup’s Messy Moments
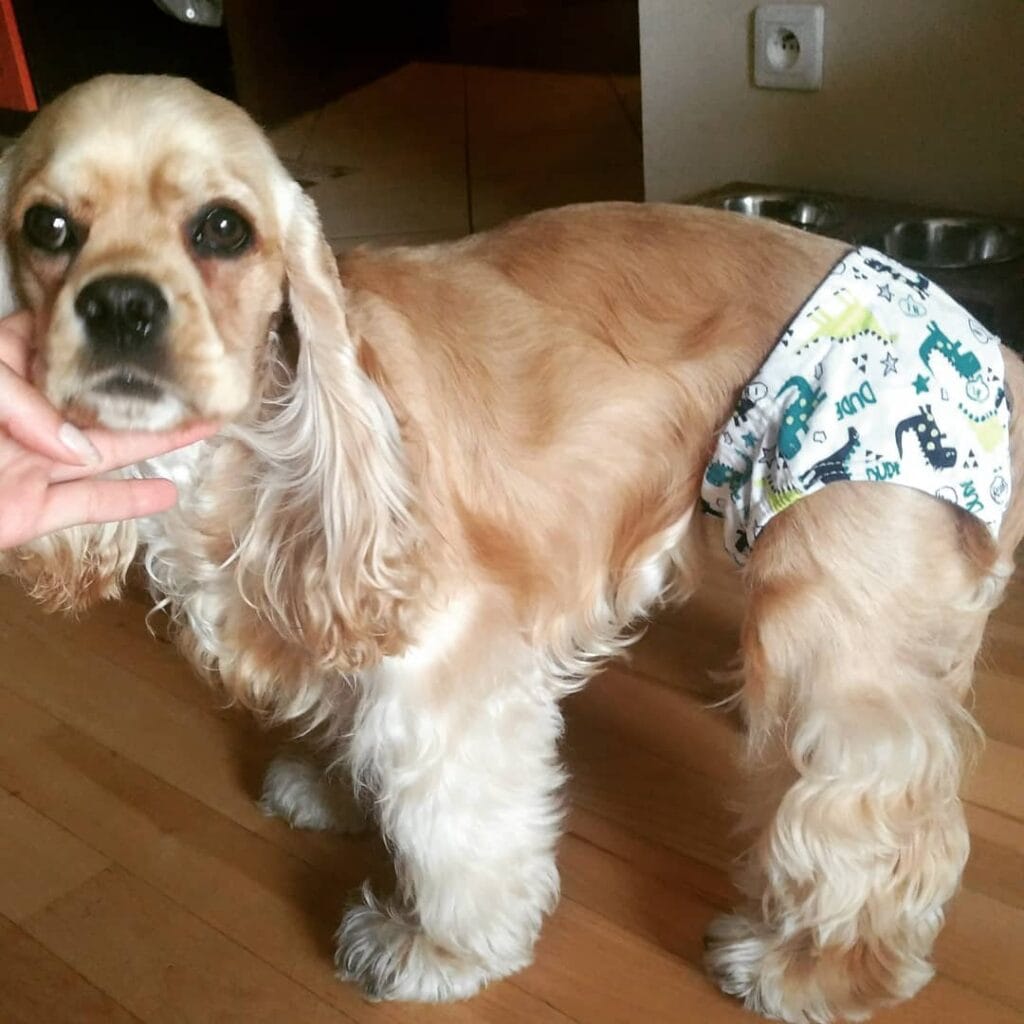
And you know that feeling when your dog is in heat and she’s literally sitting on your white couch? Yeah that was me this summer with my cousin’s cocker spaniel. I panicked.
Yup, this is why we are loving this dinosaur-print dog diaper so much.
Yardage: 1/4 yard cotton quilting fabric (white with dino print, I used the “Dude” print). 1 absorbent pad insert cut from an 8” x 6” incontinence liner 3/4 inch soft elastic band (12–14 inches long for a cocker spaniel-sized dog) Fabric scissors Sewing machine or needle and thread Pins Fabric marker
Instructions
Cut your fabric into a curved rectangular shape (roughly 12″ long x 8″ wide), so that it narrows at both short ends to about 5″ to form the underwear shape shown in the picture.
Fold the edges under a half inch all around and press flat with an iron. This keeps things clean and won’t fray on your dog’s skin. This takes two extra minutes but is definitely worth it.
Sew a 3/4-inch channel along both short ends of the fabric. Thread your elastic through both channels, making sure it’s snug but not tight – you should still be able to fit two fingers between the elastic and your dog’s belly. Stitch the ends of the elastic in place inside the channels.
Make sure you tuck the absorbent liner inside before putting it on your dog. The absorbent liner is against the body of your dog and catches everything, while the cotton shell that is against your dog’s fur is soft and doesn’t chafe your dog (therefore making the dog actually tolerate wearing it).
What’s up with the Spongbob and the dinosaurs? Honestly, though, the dino print is giving me less sad vibes.
Change your liner at least every couple hours. Wash the cotton shell in cold water by hand and let it air dry so the elastic doesn’t break down too fast.
If you love to make things for your dog, here are 13 Genius DIY Dog Stuff Every Pet Parent Needs to Try Today! that you’ll definitely want to try.
Prep Time: 10 min | Active Project Time: 30–40 min | Difficulty Level: Beginner
📸 Photo credit: Instagram @amiga_leyla_un_perro
#2: Floral Dog Diaper Dress — The Cutest DIY Fix for Heat Cycles and Post-Surgery Recovery
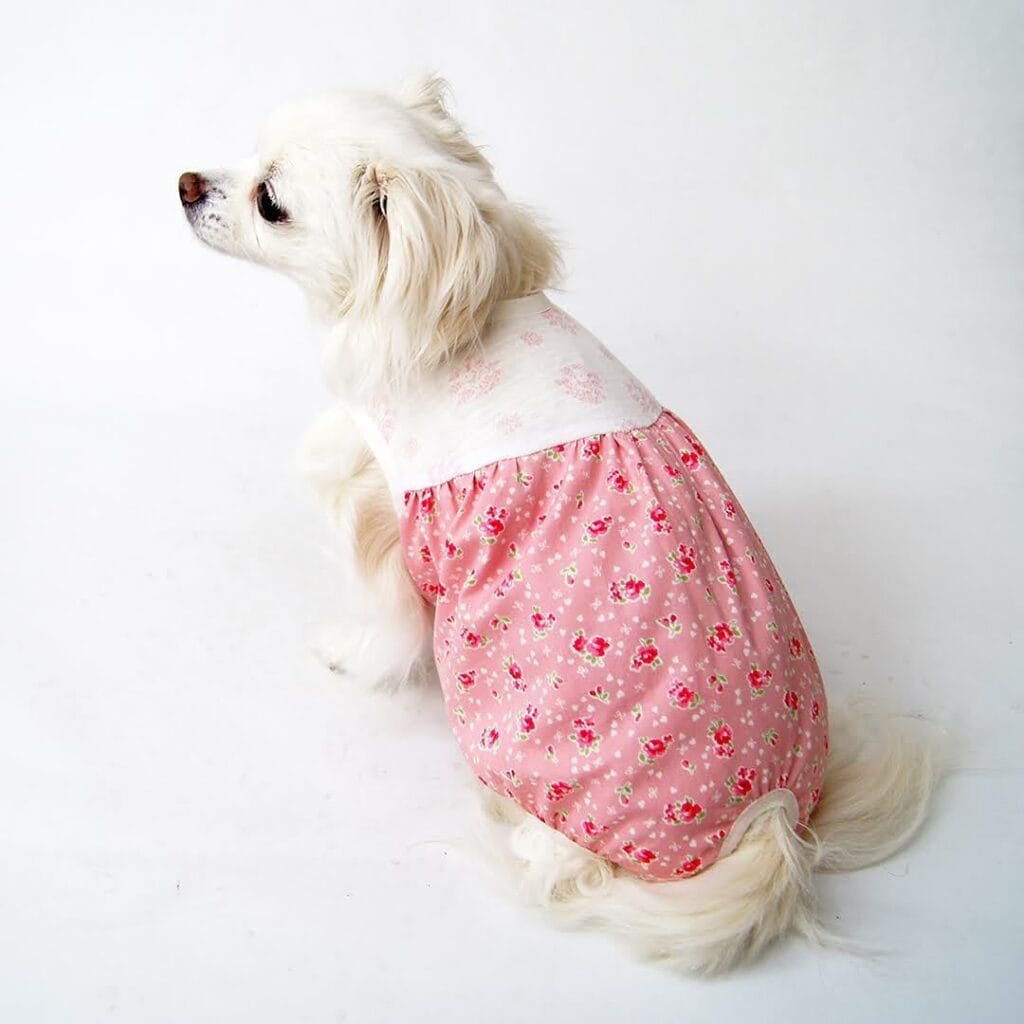
You know that moment when your golden girl is in heat and you are frantically searching under the sink for anything that could possibly work as a makeshift diaper? Yeah. I’ve been there with my aunt’s Maltese and I’ve got to tell you it was an entire situation involving paper towels and hair ties. Not our finest hour.
I love this pink floral cotton romper-style diaper!!! It actually works for me!
Materials & Tools:
– ½ yard pink floral cotton fabric (quilting cotton works best)
– ¼ yard white toile or lace fabric for the yoke/collar panel
– 1 inch wide soft elastic band (8-10 inches for small dogs)
– Fabric scissors
– Sewing machine or needle and thread
– Measuring tape
– Pins
– Velcro strip (3 inches)
– Thin disposable panty liner (the insert)
Prep Time: 15 minutes | Active Project Time: 45 minutes | Difficulty Level: Beginner-Intermediate
Instructions
First, you need to measure your dog’s waistline, chest girth and length from chest to tail. Get these 3 numbers wrong and nothing will fit right.
Cut your pink fabric into a rectangle roughly 1.5 times the girth of your dog’s chest in width and your chest to tail measurement in length. This will give you that gathered, full skirt effect you see in the photo.
Cut the white toile panel to match the width of your dog’s back and about 4 inches in length. Sew it to the top edge of the pink rectangle with a straight stitch, right sides together. Flip and press flat. This is the two-fabric design. The soft white cotton panel will sit against the dog’s spine and won’t scratch.
Fold in the side edges ½ inch on each side and hem them. Fold up the bottom edge 2 inches to create the channel for the leg openings. Thread your elastic through the channel and stitch the ends together. Don’t cut your elastic until you’ve threaded it – this is easier to adjust.
Sew Velcro strips along the back opening so that I can slide the panty liner in and out without having to remove the garment. This way, the reusable fabric part of the pad will not get thrown away. I wash on cold and air dry.
Because the cotton-elastic blend fits snug but not tight enough to dig in, your dog can sleep comfortably through recovery or heat without constantly kicking it off. If you like to make things for your dog, 12 Heartfelt Designs for DIY Dog Accessories has a bunch of projects to try, too.
Cut a small tail hole in the back seam. This should be about 1.5 inches. Be sure to reinforce the edge with a quick zigzag stitch so that it doesn’t fray in the wash.
📸 Photo credit: Instagram @celebdog_sewing
#3: DIY Colorful Reusable Dog Diaper (That Actually Stays Put)
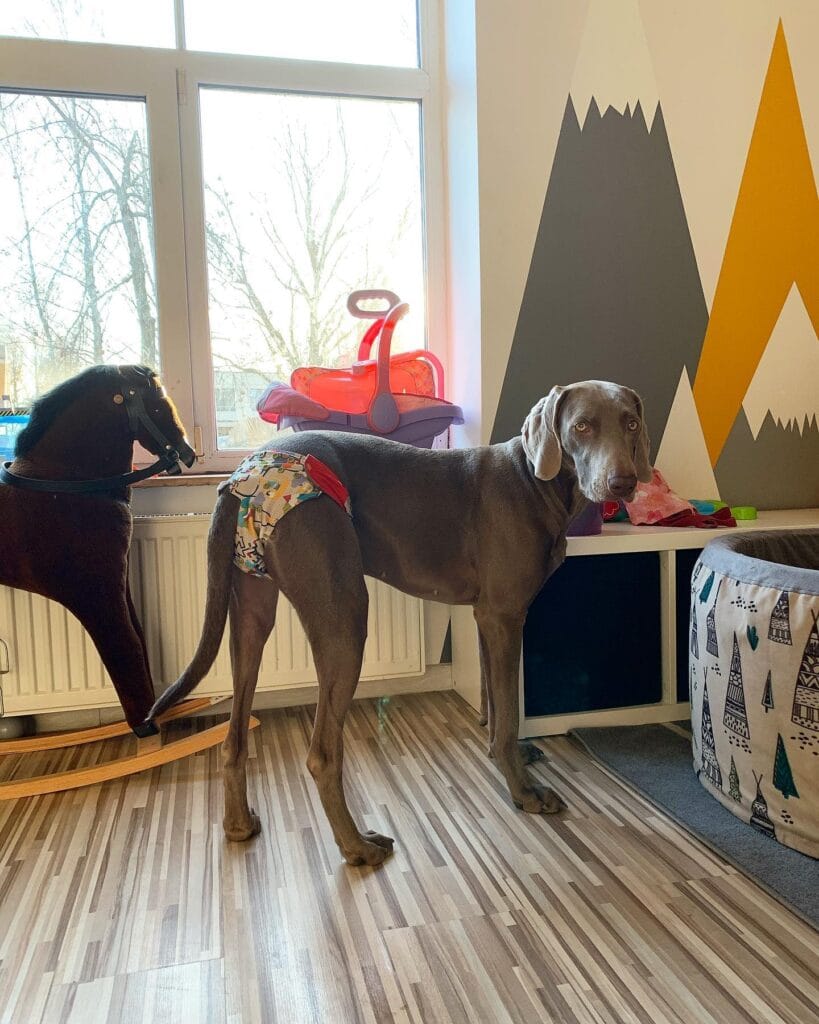
I know you know what I’m talking about. You’ve got your golden in heat and you’ve got your Pinterest-perfect cream rug spread across the floor and you panic. Been there. Scrubbing spots at midnight is not my idea of a good time.
This dog in the photo is giving me everything. This is a cloth reusable dog diaper made from a colorful, stretchy cotton-blend fabric with a red elastic waistband that wraps snugly around the midsection. The diaper fits my Weimaraner just right with no sagging or shifting.
Materials & Tools
– 1/2 yard of stretchy cotton-blend fabric (fun print, your call)
– 1-inch wide red elastic (approximately 14–18 inches depending on dog’s waist)
– Absorbent pad insert or cut feminine hygiene pad
– Fabric scissors, pins, sewing machine, measuring tape
Instructions
Take measurements of your dog’s waist (where the ribs end and the belly begins) and the base of his tail. Cut your fabric into a rectangular shape approximately 12 x 16 inches, then round both short ends into a gentle curve that hugs the belly.
Fold the edges in about 1/2 an inch and pin before sewing. Raw edges tend to fray and ruin the fit of the pants. Thread a piece of elastic through a channel that you have sewn on the waistline. The elastic will keep the pants snug on your dog, but it will not restrict their movement so they stay comfortable for hours.
Tuck the absorbent insert into the cover before putting it on, and it’s even removable, so it’s easy to wash.
Quick note: Sew a small velcro tab near the tail opening so you don’t have to rip it off every time you adjust it.
Prep Time: 10 min | Active Project Time: 45 min | Difficulty Level: Beginner
📸 Photo credit: Instagram @best_hound_bros
#4: DIY Dog Diaper Using a Wire Pen Setup (The “Stay-Put” Method)
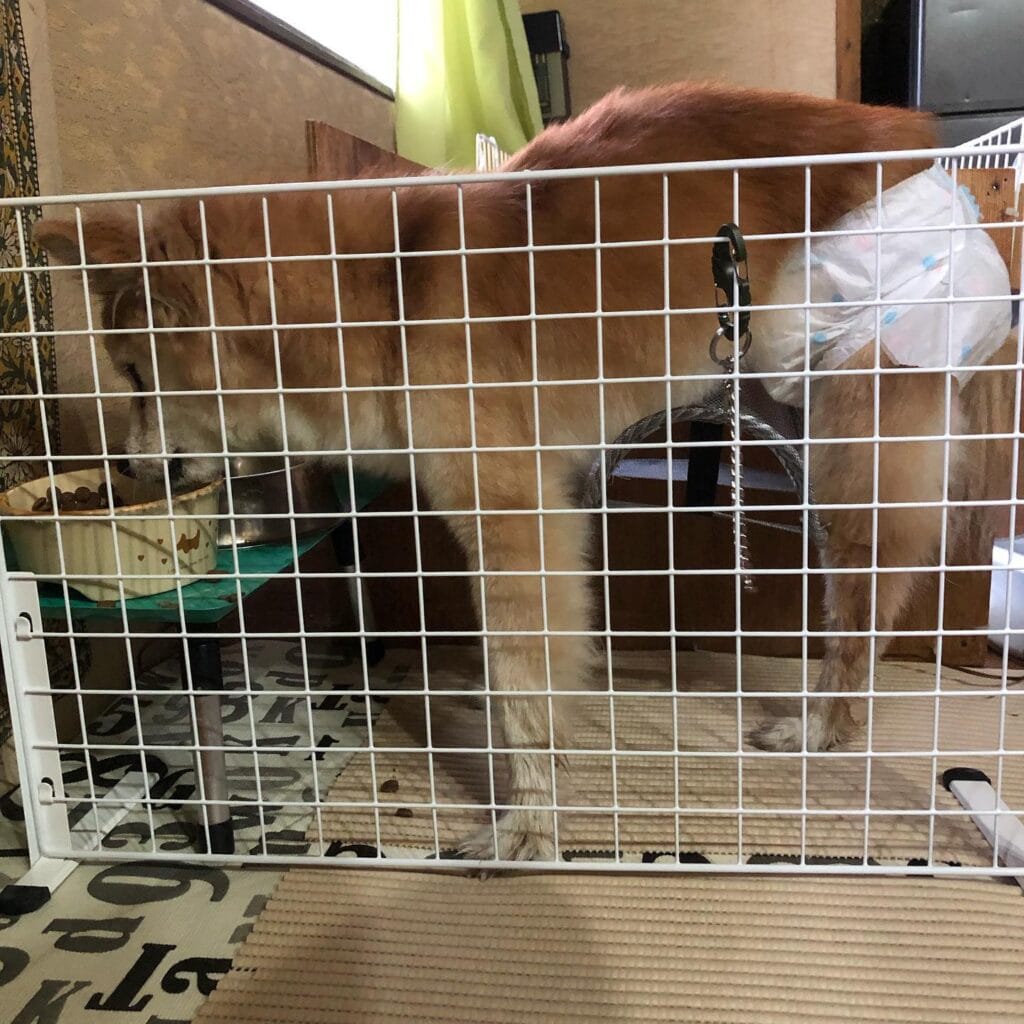
Your golden just had surgery. She’s wearing a harness, and she’s wearing a diaper on sideways — and it’s already sliding off — and you haven’t even made your morning coffee yet.
yeah.. i’ve been there with my aunt’s dog and it was a mess..
If you look at the picture above, I’ve got her in a white wire grid pen (pen made of 1-inch square mesh panels). She’s wearing a gray mesh harness that’s clipped directly to the pen wall, with a carabiner hook. The carabiner hook is key for keeping her centered in the pen — it keeps the diaper from bunching up underneath her.
Materials & Tools
– White coated wire grid panels (standard 14 x 14-inch squares)
– Gray mesh dog harness (size large for goldens)
– 1 metal carabiner clip
– Disposable baby diapers (size 4 or 5 — cut a 1-inch tail hole)
– Anti-slip mat or cardboard for the pen floor
Instructions
Cut a hole in the tail at the top of the diaper. It should be about 1 inch wide. Slide her tail through the hole, then pull the diaper under her belly.
I put her harness on as I normally would, then clip the carabiner from the D-ring of her harness to the pen grid at about hip height. This keeps her from circling the pen which, in turn, keeps the diaper from rotating. Talk about a time saver.
Keep this in mind: The carabiner needs to be at the right height. If it’s too high she may strain herself if she has to pull to use it or if she clips it too high she will have to stretch to eat or rest. If the carabiner is at the right height she can move around and eat/rest with no issues.
Put her food bowl inside the pen in the pen at nose level on a small stool as in the photo. This keeps her calm and still while she eats and that is when she is most likely to mess her diaper.
For goldens recovering from surgery, I love this pen and harness combo. Plus, it goes with 7 Creative Dog Crate Topper DIY Ideas if you want to build her a covered and cozy recovery zone on top.
Change the diaper every 3-4 hours and check the harness clip for any skin rubbing each time.
The diaper comes with a carabiner tether. This keeps her in place so you don’t have to constantly re-adjust the diaper.
Prep Time: 5 min | Active Project Time: 10 min | Difficulty Level: Easy
A baby diaper in size 4 works better than the ones for pets. The tabs don’t grip the fur as harshly and the diaper fits around her tail better.
📸 Photo credit: Instagram @fabbrica_blu
#5: The Colorful Paw Print Harness Diaper That Actually Stays Put
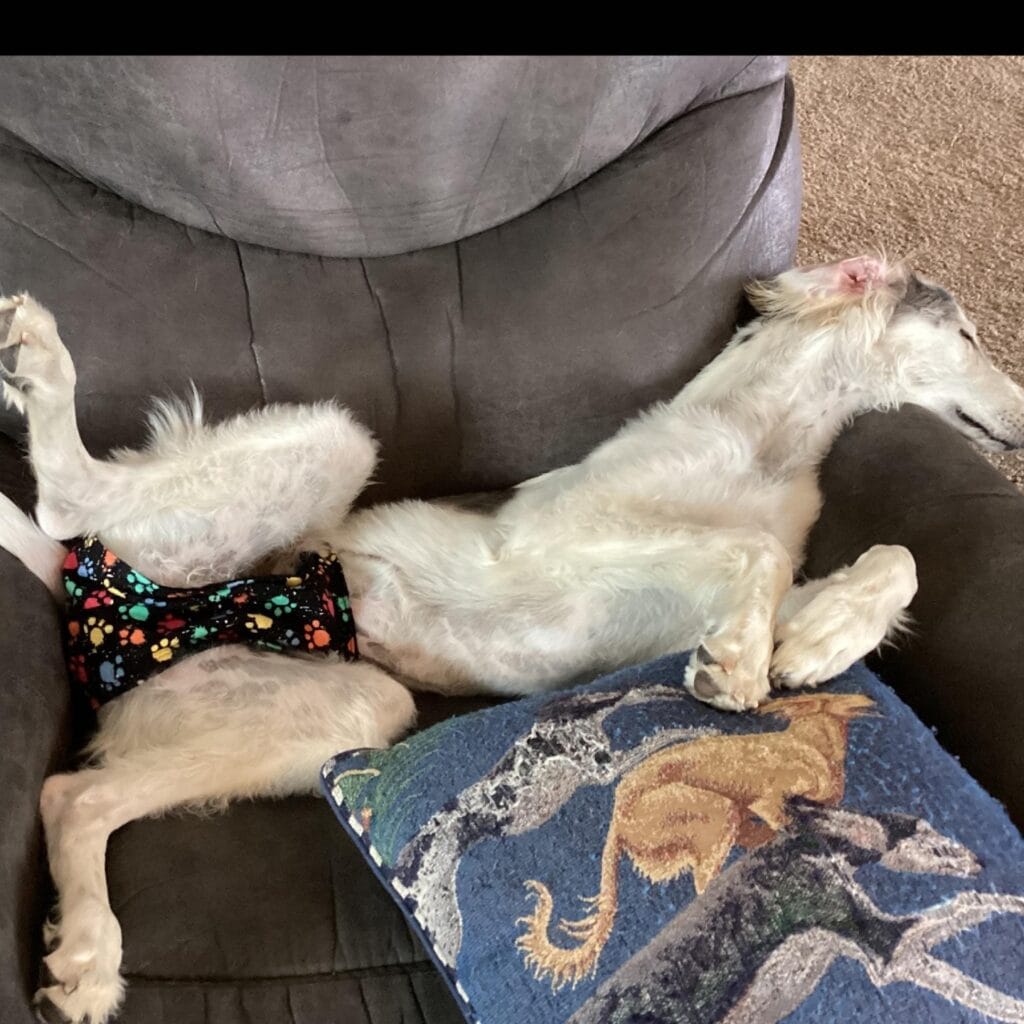
Well, what if one of those soft paws is sprawled across your favorite chair, and it has paws all over the place, and you are just praying that she doesn’t leak on the spot on the cushion you have spent three Saturdays looking for on Pinterest?
Yeah. That’s exactly what this DIY is for.
I’m loving this black cotton fabric harness-style diaper with a multicolor paw print pattern. I’ve found it wraps around the torso more like a vest than a basic belly band, so it doesn’t slip down or bunch up like one.
Materials & Tools:
– ½ yard black cotton quilting fabric (paw print or any fun print)
– Two 1-inch adjustable plastic side-release buckles
– 1-inch wide elastic (6–8 inches per diaper)
– Velcro strips (2 inches, soft-side and hook-side)
– Absorbent incontinence pad inserts (cut to 4×6 inches)
– Fabric scissors, sewing pins, measuring tape
– Sewing machine + matching thread
Instructions
Cut the fabric into one 14×10-inch main body panel. Fold the long edges of the panel under ½ inch and press. This will help to keep the edges from fraying.
Sew a 1-inch channel along both short ends. Thread your elastic through each channel and stitch it secure. The elastic will create a gentle compression around the belly, which will keep the diaper snug without restricting your dog’s breathing or movement. This will be a most welcome payoff if your dog often sleeps with the diaper riding sideways.
To attach the strap ends, run the straps up and over the back of the doll and connect the straps in the front over the doll’s spine. Sew the Velcro onto the inside of the center panel where the insert will sit.
Tuck your absorbent insert into the Velcro pocket and you are done!
Prep Time: 10 min | Active Project Time: 45 min | Difficulty Level: Beginner-Intermediate
Wash your fabric before you cut it. Cotton shrinks. You do not want to cut your diapers before you wash them. You do not want to make your baby uncomfortable!
📸 Photo credit: Instagram @coatsmadebyde
#6: Hugo Boss Underwear Hack — The DIY Dog Diaper That’s Actually Stylish
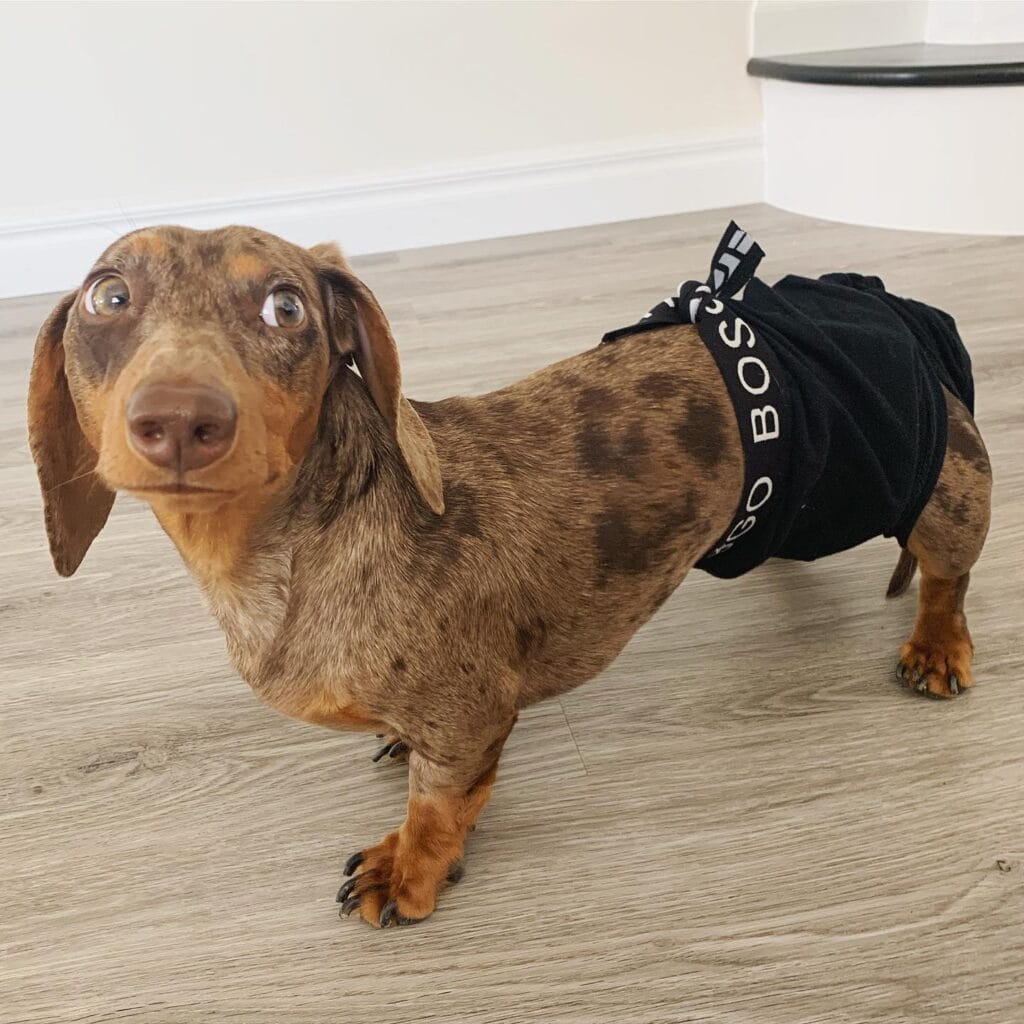
That moment you know your dog is about to come into heat, and you’re frantically scanning the house for anything that can double as a doggie diaper, I have been there. My cousin’s dachshund, Rosie, had a little bloody accident on a cream-colored rug last summer.
This one genuinely surprised me though.
Materials & Tools:
– Hugo Boss black cotton boxer briefs (the waistband does all the work)
– Scissors
– Feminine pad or pet liner (cut to size)
– Optional: needle and thread for a tighter fit
Instructions
Lay the boxer briefs flat and cut a small 1.5-inch tail hole in the back center seam. If you mess up you can always cut a little wider. Slide the boxer briefs onto your dog from the back legs first, pulling the elastic waistband up towards their lower back. The waistband sits right at the hip. There is a little “HUGO BOSS” waistband poking out right at the hip bone.
I always tuck my pad inside before putting it on him – the cotton interior keeps it flat against his body so that it doesn’t shift during walks.
Additionally, I think the fit on my Dachshund’s long torso works really well for this style. The snug fit on the waistband keeps everything from shifting around so that she’s comfortable and there’s no mess or leaks to worry about and no frantic scrubbing of the floors.
If your dog is between sizes, it is better to go with a smaller waistband, that way it will hold the liner in.
Prep Time: 5 min | Active Project Time: 10 min | Difficulty Level: Easy
📸 Photo credit: Instagram @leodaweenie
#7: DIY No-Sew Dog Diaper Harness Using a Repurposed Harness and Fabric Wrap
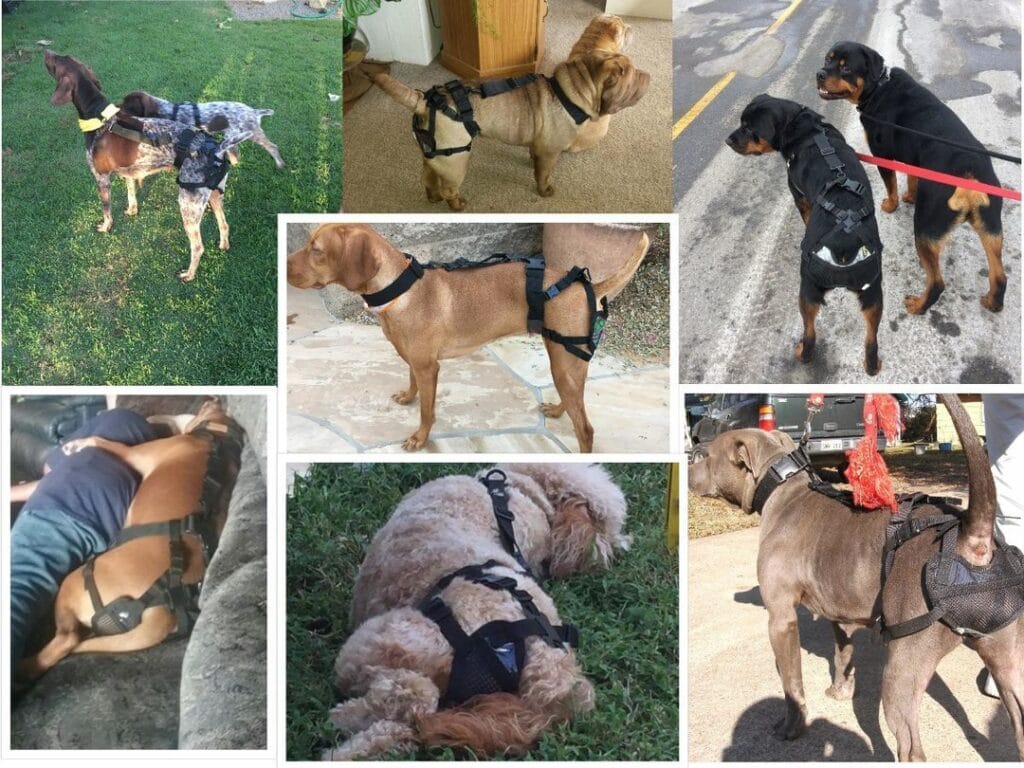
Well, your golden is finally settled on your cream linen couch, when you look over at the couch and see a little wet spot on it, where you just steam-cleaned it. UGH!
This one’s a game-changer, girl. Looking at these photos, it would appear that people are taking a basic black nylon dog harness and adding a fabric pouch that sits snug against the belly and rear, to convert it into a diaper support system.
Materials & Tools:
– Standard black nylon adjustable harness (sized to your dog’s chest and girth)
– 12″ x 12″ breathable mesh fabric or an old cotton t-shirt in a neutral color
– Hook-and-loop velcro strips (2″ wide, at least 6 inches long)
– Fabric scissors
– A regular disposable pad or size small dog diaper insert
– Safety pins (backup only)
Instructions
Cut the fabric into a U-shape pocket about 10” wide and 8” deep. Attach the Velcro strips to the open edges of the pocket so that when the pocket closes around the insert, it will do so without bunching. Loop the fabric through the rear strap of the harness (the horizontal strap that goes across the back in the picture) so that it holds everything in place.
You just slip it in and snap it onto your dog, and the pocket is flush against his belly. Since the harness distributes pressure across the chest and back, it doesn’t dig into your dog’s skin during a long afternoon nap on the couch.
And because the insert can be removed and replaced, it takes all of ten seconds to do so, as you don’t have to wrestle the dog through leg holes and you don’t have to re-tye anything.
If your golden is in between sizes, you might want to try the larger size harness. I found that the harness needs to be snug otherwise it will push the pouch out of position. Wash the fabric pouch in a separate load of cold water to avoid snagging the velcro.
Prep Time: 5 minutes | Active Project Time: 20 minutes | Difficulty Level: Beginner
📸 Photo credit: Instagram @pabs_delayherspay
#8: The Red Satin Rose Cape Diaper – Because Your Girl Deserves to Look Fabulous
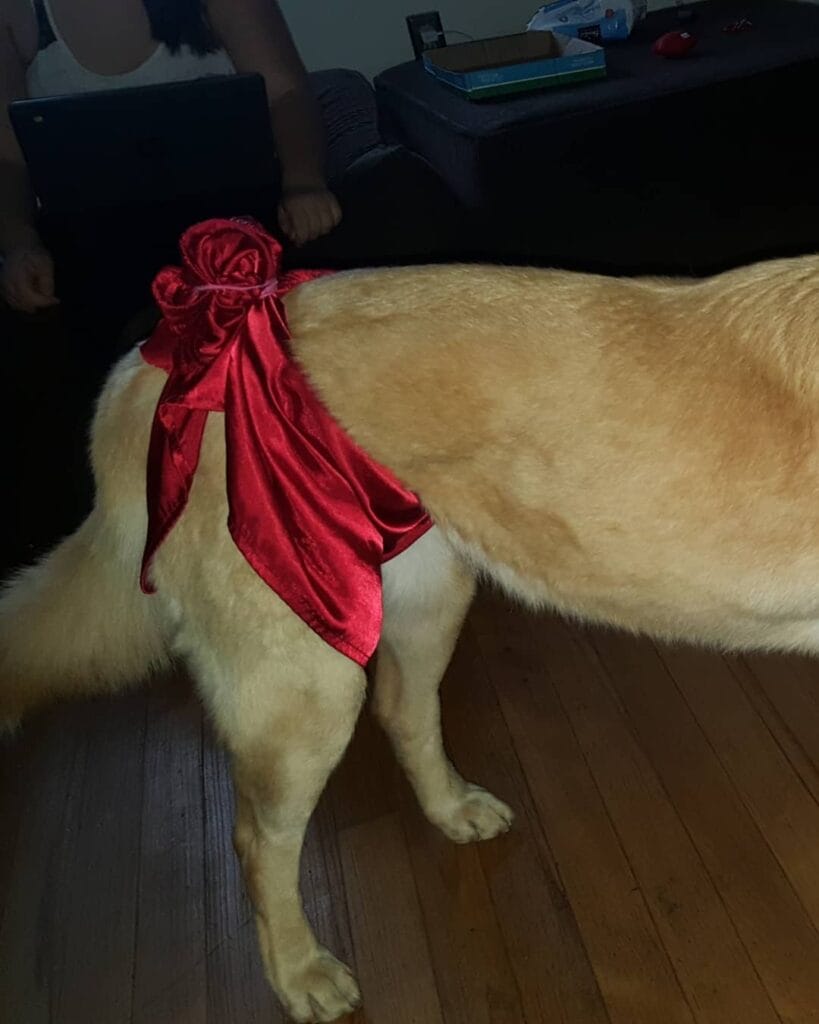
Sounds like you have a heat cycle dog with company on the way, and she just dragged her butt across your cream colored rug…. again. Yeah, we’ve been there.
This DIY is one of my favorites and it’s super quick and easy! It’s a red satin fabric diaper cover styled like a cape, with a handmade satin rosette pinned at the back! It looks like something off pinterest, but you just whipped it up in an afternoon!
1/2 yard red satin fabric, some satin ribbon (any color, match the red for the bow, about 12 inches), needle and thread or a hot glue gun, 1 safety pin or a small hair elastic, scissors, a standard disposable dog diaper (worn underneath).
Instructions
Cut the satin into a rectangular cape (roughly 10×14 inches depending on the size of your dog). Cut the bottom corners off to round it out and so that it will lay flat. Roll a 3 inch strip of the leftover satin from one end into a tight roll to create the rosette. Glue or stitch the bottom of the rosette to the cape.
Fold over the top edge of your cape by about ½ inch, and stitch a small channel in it. Thread your elastic or ribbon through, and tie it snugly around your dog’s waist above the diaper.
Pin the rosette centered at the top back. The satin drapes over the diaper completely — that coverage keeps the diaper in place and stops your dog from pawing at it, which means fewer accidents on your floors.
The drape was loose enough for her to walk and sit without being restricted.
Make two or three capes at a time, then alternate them through the washing machine while she’s on cycle.
Prep Time: 10 min | Active Project Time: 25 min | Difficulty Level: Beginner
📸 Photo credit: Instagram @qocwhiskerhouse
#9: The Black Bow Harness Diaper — A DIY That Actually Looks Cute on Your Dog
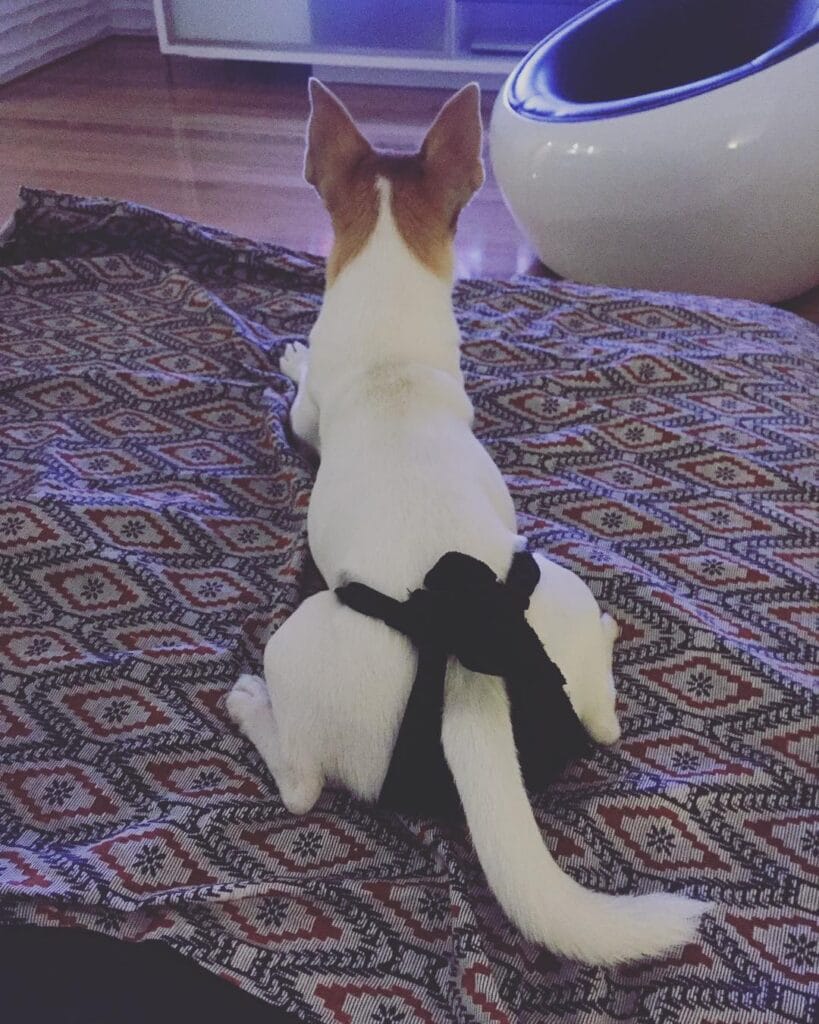
Prep Time: 10 minutes | Active Project Time: 20 minutes | Difficulty Level: Beginner
Has your golden ever done that spin squat thing on your favorite rug? And you just stood there? Yeah, we’ve all been there.
This is my favorite find because it looks like a fashion accessory instead of a medical situation.
Materials & Tools:
– 1 piece of black cotton fabric (approximately 12″ x 6″ for small dogs)
– White elastic band, 1 inch wide (about 14-16 inches total)
– Scissors and a sewing needle with black thread
– A small sanitary pad or absorbent liner insert
– Optional: fabric glue for a no-sew version
Instructions
Cut the black fabric into a rectangular band that will wrap around my dog’s lower back and hips. Fold both long edges inward about half an inch, and stitch them down (this way the fabric won’t scratch my dog). Thread your white elastic through both short ends, and knot them securely so the band won’t slip off.
Cut a separate 3" x 6" strip of the same fabric and fold it into an accordion, or bow, shape. Pinch the center of the bow and wrap a small scrap around it. Attach to the back of the main band with a stitch or glue. Insert your absorbent liner into the pouch before putting the pouch on your dog.
The cotton is designed to breathe, so your dog is comfortable – and that means no irritation during long wear periods.
You should be able to fit two fingers between the elastic and your dog’s skin. If the bow shifts, you can put a small safety pin underneath the liner pocket to keep everything centered.
📸 Photo credit: Instagram @rosiechanthejackrussell
#10: DIY Fleece-Lined Dog Diaper with a Unicorn Pug Patch (Because Your Girl Deserves Cute and Functional)
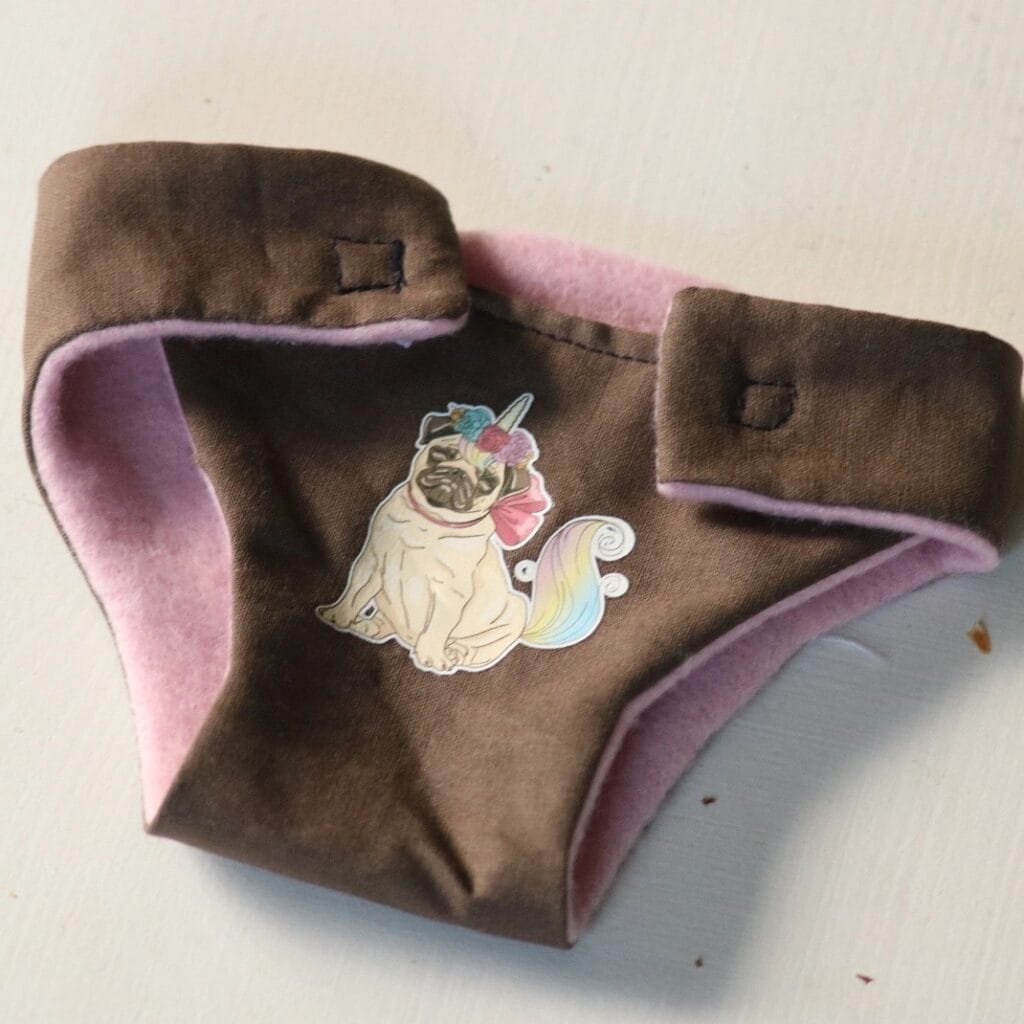
You’ve all probably had one of those moments at book club when your favorite dog trots through the living room leaving a little trail of pee on your freshly mopped floors. Yeah, it happened to me at my cousin’s house and I still think about it.
What’s cuter than a brown cotton twill and pink fleece diaper? Uh, maybe nothing. The snaps on both sides make it easy to secure everything and that iron-on unicorn pug patch is to die for.
Materials & Tools:
– ¼ yard brown cotton twill fabric (outer layer)
– ¼ yard pink fleece fabric (inner lining — soft against skin)
– 2 metal or plastic snaps (size size 20 recommended)
– Snap plier tool
– Fabric scissors
– Sewing machine + thread (brown and pink)
– Iron-on novelty patch of your choice
– Fabric pencil + diaper template (printable online for your dog’s weight)
Instructions
Print the template out to your dog’s measurements. A golden retriever will typically need a 14-16 inch waist cut. Trace the template onto your twill fabric and cut out two pieces-one from the twill and one from the fleece.
Place the sides with the wrong sides facing out and sew around the edges leaving a 2-inch gap. Flip the sides right side out and top stitch around the entire border, sealing the gap.
Now press your iron on patch to the center of the outer panel. This time I pressed it for about 15-20 seconds, and pressed down firmly.
Attach your snaps at both hip tabs with your snap pliers. Your snaps will create a snug adjustable fit which means no leaks and no wardrobe malfunctions mid-walk.
The fleece lining wicks the moisture away from the dog’s skin. Who knew this would be such a payoff for an afternoon of sewing?
If your golden is in heat or has just had surgery, sew a 3-inch pocket into the inside of the lining and insert a cut-to-fit menstrual pad. This will double the absorbency without adding bulk.
Prep Time: 15 min | Active Project Time: 45–60 min | Difficulty Level: Beginner–Intermediate
📸 Photo credit: Instagram @sykontoen
The One Sewing Trick That Makes DIY Dog Diapers Actually Stay On
I know I’m a little late to the party, but recently, I’ve been re-thinking my approach to dog diapering. There are a lot of tutorials out there for how to make dog diapers, but one important detail is always left out. Until I found the right tutorial, it bothered me for months.
I have seen several comments about the fabric used. The thing to notice is where the elastic is placed.
I always run a second piece of elastic along the outside edge of the tail hole. It seems to keep the diaper from riding down my pups back end when they are zooming around. My friend’s golden retriever Biscuit destroyed three of these diapers one afternoon before we figured it out.
The easiest mistake to make is to cut the hole in the tail to big. I know it feels like you are being kinder by cutting the hole bigger but trust me, it’s best to go smaller. The fabric will stretch.
On the advice of my running buddy, I decided to try using a thicker layer of my special “core” – the absorbent part of the pad. Then I layered a microfiber cloth (which is against my skin) and a cotton layer on top of that. This seems to wick moisture away faster than a single layer.
I’m just trying to look Pinterest-y but also not kill my dog.
Your Dog-Proof Living Room Starts This Weekend
Choose one spot that drives you crazy–the couch, the entryway rug, that one corner where your golden shakes off after a walk–and just start there. You don’t need to redo everything at once.
However, with a washable cover or a dedicated dog zone, even the bathroom can be made more appealing. Once you see how good it can look, you’ll want to keep going.
If you’re in the mood to be creative, here are a few ideas for DIY dog couch ideas for your furry friend for your pets to give them a spot of their own so they’d stay off yours.
What is the one room in your house that your goldendoodle has completely taken over?

Amr Mohsen is a software engineer who traded his keyboard for a leash — at least on weekends. His love for dogs inspired him to share what he learns as a dog owner and enthusiast, bringing a detail-oriented, research-driven perspective to every article he writes. If it’s about dogs, he’s probably already looked it up twice.