
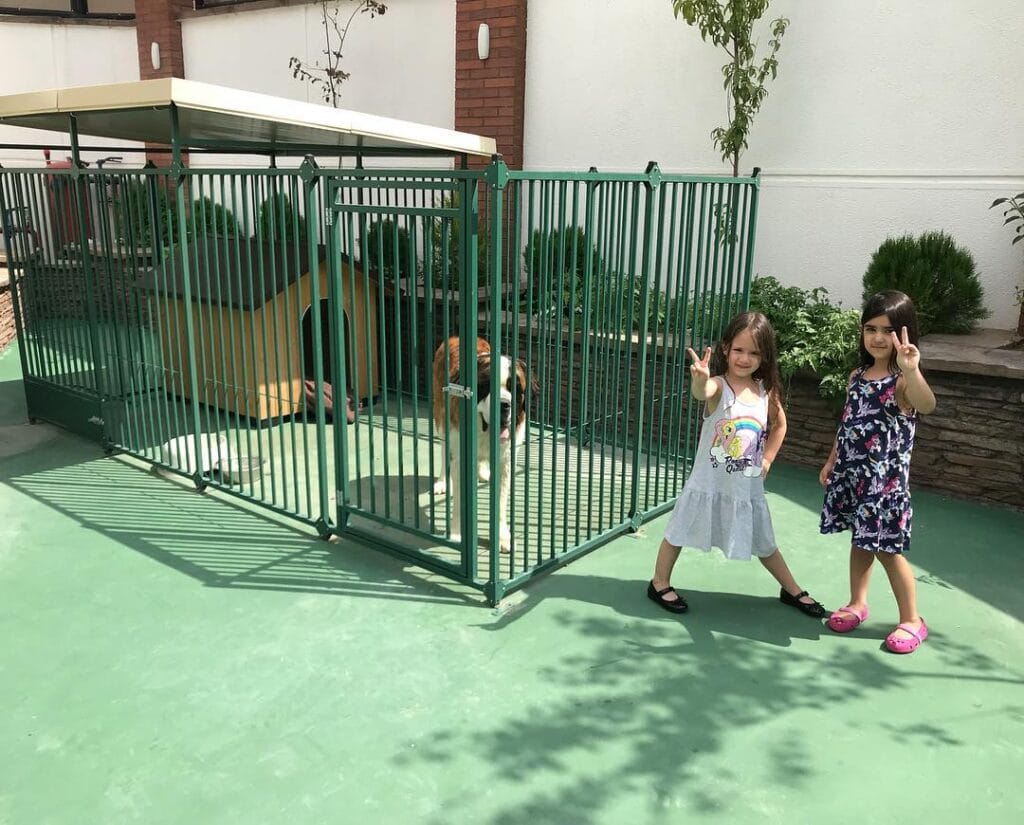
This means that your golden just kind of OWNS your house!
My dog did that too. Mud on the rug, chewed baseboards and that one corner of the couch that is totally gone. I love her, but I needed a system to keep her in check.
And that was when I started looking into building a diy dog pen. I wanted something that actually looked good in my space, not something that I dragged in from a storage unit.
Also, and this is the best part, it doesn’t have to be an eyesore. A well-built pen can actually complement your Pinterest aesthetic, and give your pup a space that feels like theirs.
Well, I thought I’d share 10 designs that are cute, doable, and won’t make you cringe every time you walk by them!
#1: Build a Heavy-Duty Galvanized Steel Dog Kennel Run (With a Shelter Attached)
Anyone else have one of those golden dogs who likes to “play” in the yard? Inevitably they will start running around my freshly planted garden beds and I am desperately trying to keep them out.
Prep Time: 2–3 hours | Active Project Time: 1–2 days | Difficulty Level: Intermediate
Materials & Tools You’ll Need:
– 50mm x 50mm galvanized welded wire mesh panels (heavy gauge)
– 40mm square galvanized steel tubing for the frame
– Corrugated metal sheeting (colorbond or zinc-coated) for the shelter side wall
– Artificial grass turf (cut to fit the pen floor)
– Steel post anchors or concrete mix for ground mounting
– Angle grinder, drill, zip ties or bolt clamps, measuring tape, wire cutters
Instructions
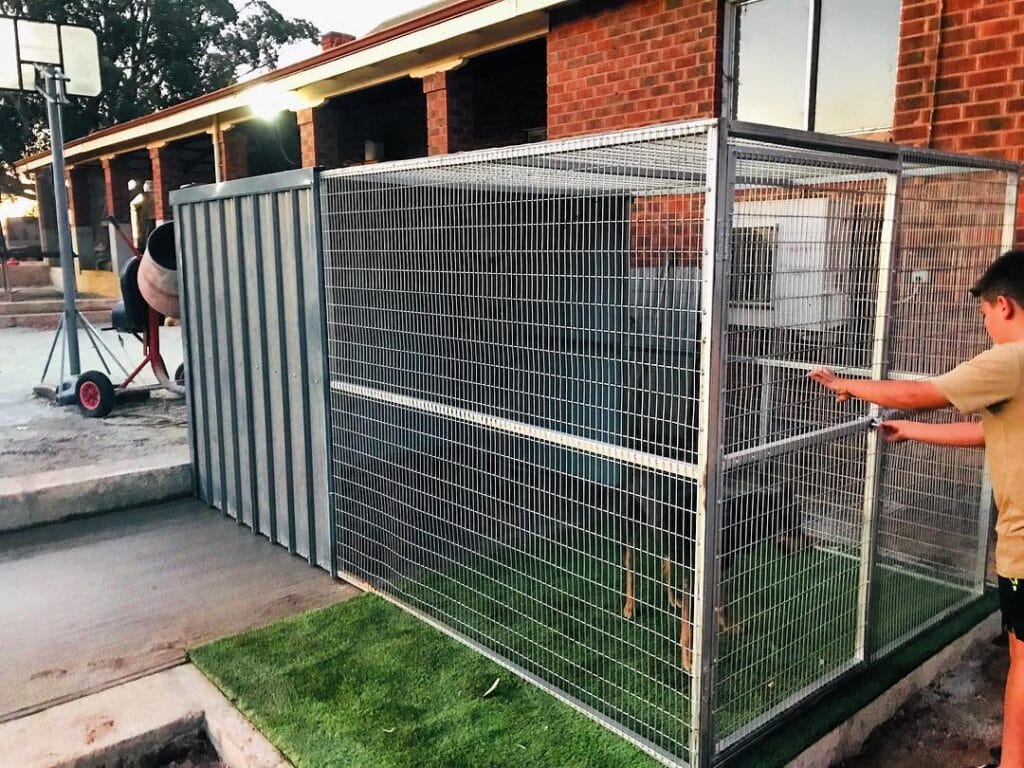
Make sure you measure out the space you will have available, cut your tubing and frame out the outside perimeter of your pen. The pen I am building is about 10 feet long by 5 feet wide, the walls are approximately 6 feet tall that is more than enough to keep even a jumpy dog in.
Once you have welded or bolted your steel frame together using square tubing, connect your galvanized mesh panels to the frame using bolt clamps every 6 inches, in order to keep the panels rigid and prevent your dog from being able to push them out over time.
On the left side of this kennel, a piece of corrugated metal sheeting is bolted to a timber or steel subframe. This provides a shaded sheltered area, allowing your dog to rest in the shade on a hot summer afternoon. This will help keep them cooler and they may actually use the pen more willingly.
Lay a layer of [url=]artificial turf[/url] over the entire base. It drains well and cleans easy. Your golden will no longer be tracking mud inside.
The door panel is made out of the same mesh framing and has a bolt latch. It is positioned in the corner so that you can access it without disturbing the entire door. If you like this dog pen idea, you need to see the 16 Creative Outdoor Dog Pen Ideas for Your Furry Friend. There are several more layouts like this!
Because galvanized steel doesn’t rust, you will only have to replace the fence every few years (as opposed to replacing a flimsy plastic pen once or twice every season).
Seal any raw-cut metal edges with zinc cold-galvanizing spray. This will keep those areas from rusting and forming rust spots when you made cuts on them.
📸 Photo credit: Instagram @farmingfreedom
#2: DIY Welded Wire Dog Pen (The One That Actually Holds a Golden)
You know how you turn your back for literally two minutes and you come back to find your dog in the laundry room, knocked over the trash and is now proudly walking up to your white couch with something in her mouth? Yeah, well, I need to talk to you about this pen.
I actually made one of these very similar to this last spring after my cousin’s dog destroyed her entire mudroom! Needless to say, it completely changed things.
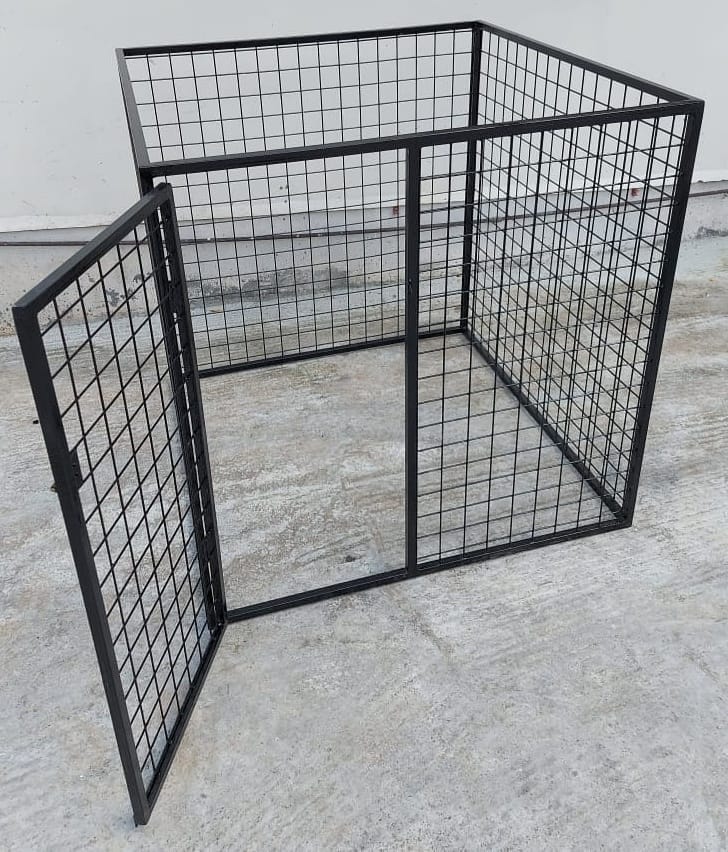
This is a black powder-coated steel welded wire pen. It is the kind of pen that looks Pinterest worthy, but can actually be used. The square wire grid panels are about 2″ x 2″ inside the 1.5″ square steel tube frame. The pen stands roughly 4 feet tall, so even the bounciest of golden’s can’t get over it.
Materials & Tools You’ll Need:
– 4 welded wire mesh panels (approx. 36″ x 48″ each, 2″ x 2″ grid)
– 1.5″ square steel tubing (cut to frame each panel)
– Black spray paint or powder-coat paint
– Steel hinges (2 per door panel)
– Bolt snaps or barrel bolt latch (for the door)
– Angle grinder or metal saw
– MIG welder or heavy-duty zip ties (no-weld option)
– Sandpaper (120-grit)
– Safety gloves and goggles
– Measuring tape and marker
Instructions
The first step is to cut the steel square tubing into lengths that will fit around the perimeter of each mesh panel. I then sand all of the cut edges with 120-grit sandpaper so that there are no sharp points that could scratch the dog or get caught in the fur during zoomie hour.
I welded or zip-tied the mesh panel flush inside each frame. If you are going to not weld it, I would recommend using some heavy duty black zip ties every 4 inches or so along the perimeter (it holds much better than it looks, and the black blends in with the frame nicely).
Once you have all the panels framed, stand them up in a square and affix the three panels to the walls with either corner bolts or weld joints, leaving one panel as the door. Attach the door with two steel hinges on one side and a barrel bolt latch on the other. This way, you will be able to walk in and out without having to take the thing apart and your golden will have her own little space without all the drool on your living room couch!
First, spray the whole thing with black rust-resistant powder coat paint. Apply in two thin coats. Make sure it has fully dried in between coats. This will give it a clean and modern look instead of the “I built this in a panic” look.
And because the open-top design keeps it airy, your dog won’t feel trapped and will settle in it faster than a fully enclosed crate. For more ideas like this, check out 13 Genius DIY Dog Stuff Every Pet Parent Needs to Try Today! to see some other great companion projects.
With the open top + modular panel design, the cage can be expanded later by adding a fifth or sixth panel. The pen does not need to be completely rebuilt.
Measure your space before you cut anything! A 4’ x 4’ footprint will fit most living room corners without blocking off traffic flow, but if you add 6 inches to each side of the footprint, it gives your golden more room to stretch out and spin in circles before he goes to sleep.
Prep Time: 30 minutes | Active Project Time: 3–5 hours | Difficulty Level: Intermediate
📸 Photo credit: Instagram @happypawsey
#3: DIY Modular Wire Panel Dog Pen With Cozy Sleep Zone
Is your golden retriever a little too eager to get into the craft room? You turn around for two seconds and she’s chewed through a spool of ribbon and knocked over your candle display. My golden retriever was making a mess of things until I built this craft room table top. Now she has her own spot and doesn’t have to sit on my work.
Prep Time: 20 minutes | Active Project Time: 1.5–2 hours | Difficulty Level: Beginner
Materials & Tools:
– White coated wire grid panels (12 panels, each 15.7″ x 15.7″) with white plastic connectors/clips
– Solid white fabric privacy panels (2–3 panels for den-like corner)
– Gray plastic tray for the potty/pee pad area (approx. 24″ x 18″)
– Yellow and green fabric dog bed with dark lining (roughly 18″ x 18″)
– Automatic water dispenser (white, ball-top style)
– Pink crocheted plush toy, rope ring toy, and a small yellow toy
– White tile or vinyl flooring mat as base
– Zip ties or panel clips (included with most wire panel kits)
### Instructions
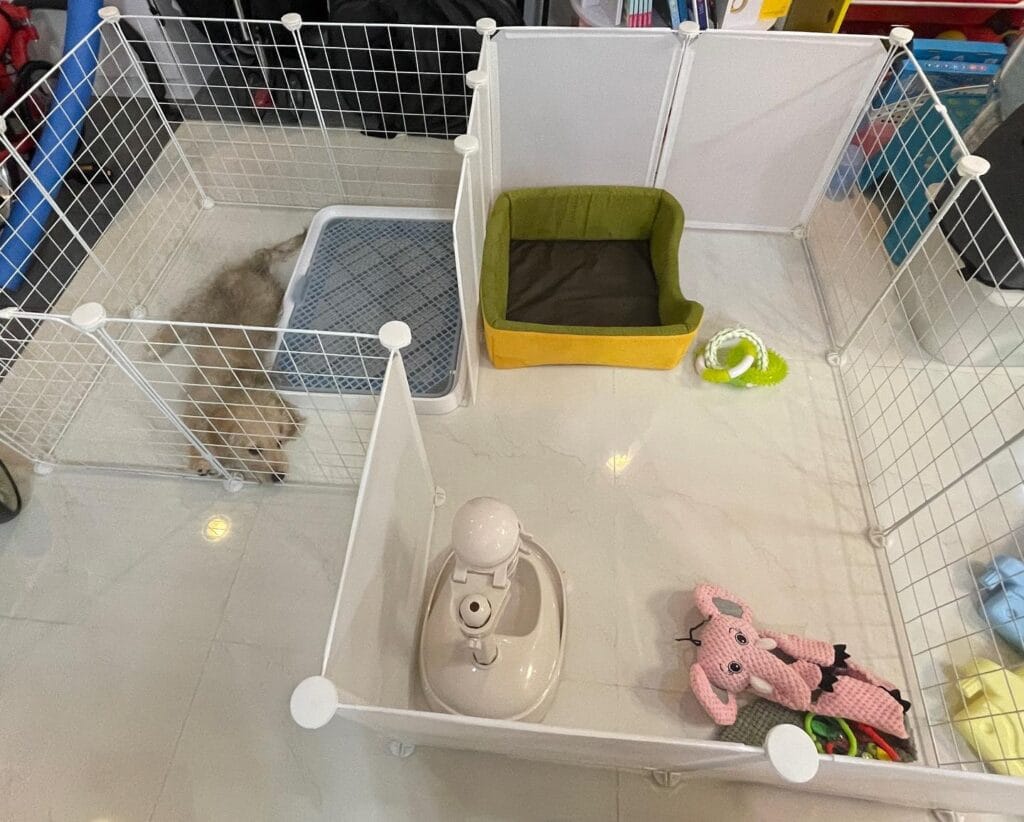
Lay out your white tile flooring mat first to establish the boundaries of your dog’s pen. I used a mat that is roughly 5′ x 5′. Big enough for my medium dog to move around in without feeling cramped. Less room to get anxious, and more room to lie down comfortably.
Attach your wire grid panels together using the white plastic ball connectors. Start with the outside perimeter. Work corner by corner so that the structure remains square. This portion will take maybe 20 minutes if you are doing this solo.
Once the outer frame is complete, add your solid white fabric privacy panels to the back corner. This reduces visual stimulation, as that feature blocks outside distractions which is perfect for dogs who tend to get overstimulated. This will leave you with a calmer, sleepier pup by the end of the day!
I put the gray potty tray in the upper left corner, away from the sleep corner. Sundance figured out the spot to go potty in a couple of days – I couldn’t believe it! I put the yellow and green fabric bed right next to the potty spot so it feels like a separate zone.
Make sure the automatic ball-top water dispenser is positioned towards the front. This way your golden always has a fresh glass of water without you checking the bowl every 10 minutes.
Scatter the toys like the pink crocheted plush, the rope ring, and the small yellow toy in the open right zone. The separation between play, sleep and potty keeps the whole area organized.
If you love the look of this pen, we also like the idea of using this for a DIY dog gate from repurposed materials and adding it to our dog pen for extra space!
I keep the pen close to the wall so it doesn’t slide around when zoomie’s are happening. Also if my dog keeps nose nosing the fabric panels apart i will zip tie it to the top of the pen so it stays shut. It takes 2 seconds but it saves me from having to put it back together again.
📸 Photo credit: Instagram @jappieong
#4: Teal Acrylic Panel Dog Playpen (The Pinterest Setup Your Pup Actually Needs)
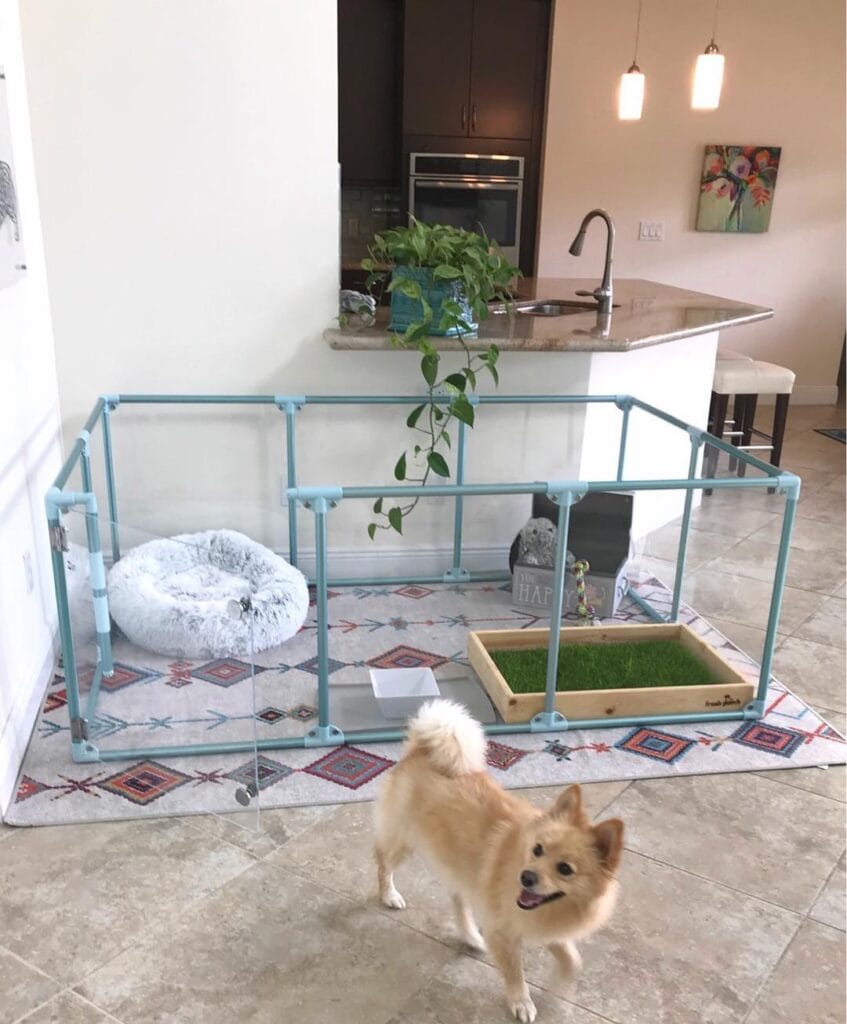
You know that day when your goldens decides that the living room rug is basically a bathroom? Well, my cousin went through that with her lab puppy, and girl, the rug never recovered.
This setup from the image is able to solve this issue.
Prep Time: 30 min | Active Project Time: 2–3 hours | Difficulty Level: Moderate
Materials & Tools:
– Teal powder-coated PVC pipe panels with acrylic/clear panel inserts
– Corner connector joints (hinged, for flexibility)
– Fresh Patch grass tray (real grass insert, wooden frame)
– Round plush donut dog bed (fluffy, white-gray)
– Small white ceramic water bowl
– Patterned area rug (Aztec/geometric print, cream/red/blue)
– Screwdriver, zip ties, level
Instructions
This is a great project for your dog and you! I had a free rug and so I decided to use it. To begin this project, I put the rug down first because otherwise, the pen will slide around on the tile. I used the hinged corner joints for the teal pipe panels and built a rectangle big enough for my dog to move around and sleep in without feeling cramped.
Snap the acrylic clear panels into the lower half of each frame. Your dog will be able to see out, making them less anxious and prone to whining when you have them outside (and for you, it means you can actually finish your cup of coffee).
Place the Fresh Patch grass tray in one corner for your pup to use for potty breaking, so accidents will stop happening on your actual floor. Tuck the donut bed in the opposite corner, drop the water bowl in one corner and you’re done!
If the grass tray is longer than the panel, you can cut it down so that it fits snugly against the panel. That way it won’t slide when your dog steps on it.
📸 Photo credit: Instagram @mydogiscutest
#5: Build a Sturdy Outdoor Dog Pen Frame With 2x4s (The Weekend Project That Actually Works)
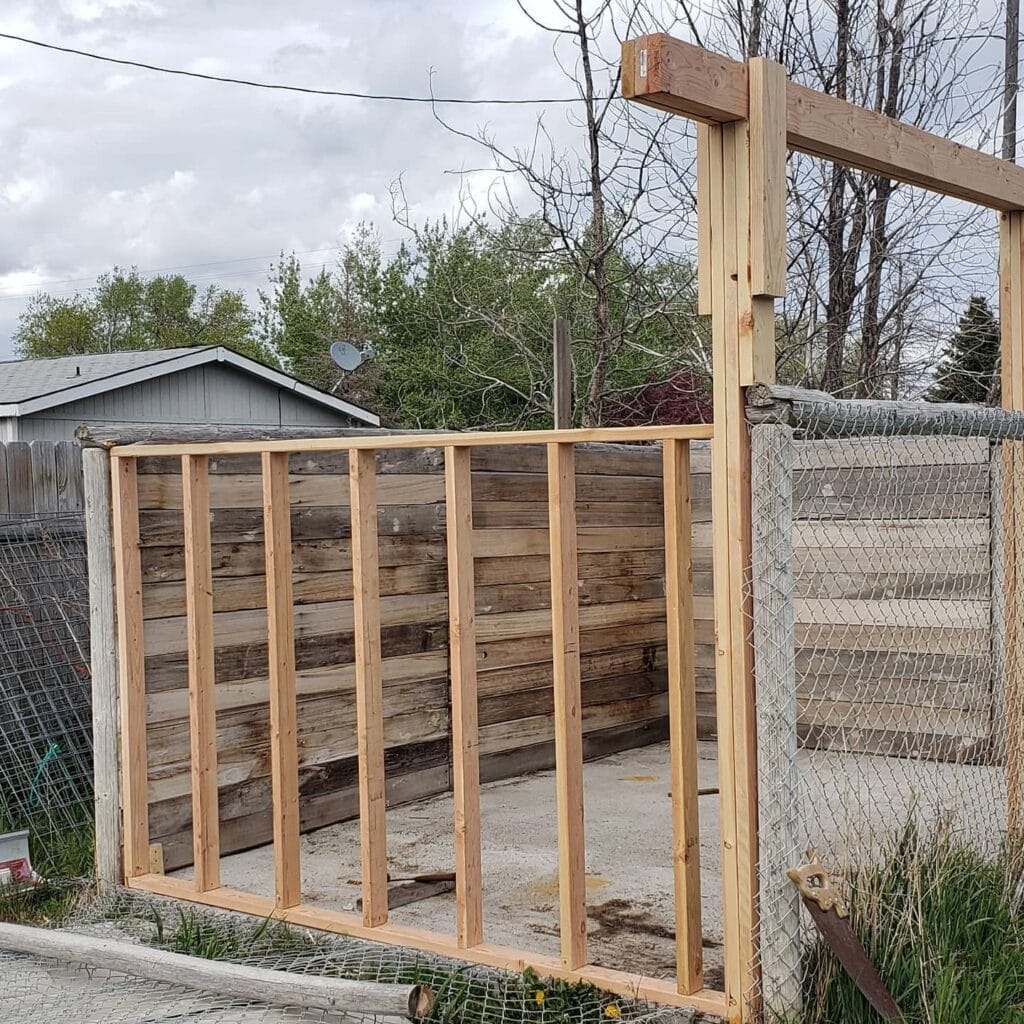
Prep Time: 30 minutes | Active Project Time: 4–6 hours | Difficulty Level: Intermediate
You know that moment when your dog is racing around the backyard and you’re just praying the fence doesn’t give way? Yeah. I’ve been there.
This outdoor dog pen is framed with pressure-treated 2x4s for the vertical studs and rails, and chain-link mesh stapled along one side. A wall of weathered wood planks closes off the back wall for extra wind protection.
Materials & Tools:
– 2x4x8 pressure-treated lumber (qty: 10–12 pieces)
– Chain-link or welded wire mesh (48 inches tall)
– 3-inch exterior screws
– Post anchors or concrete mix
– Circular saw, drill, tape measure, level
Instructions
Cut your 2x4s into 6 foot vertical studs. Space the studs 16 inches apart. This will give you enough rigidity that even a 70-pound retriever can’t shake the frame loose.
Attach the top and bottom horizontal rails to the frame, then toe-screw each vertical stud into the frame (make sure they’re even…a crooked frame is no fun to put mesh on).
When your frame is standing square, staple the chain-link mesh to the inside face of the frame with fence staples every 6 inches. The rigid frame keeps the mesh tight so that there are no gaps for clever dogs to sneak through.
Real talk: seal the cut ends of the lumber with exterior wood sealer before assembly. in areas with wet springs, raw cuts will absorb moisture fast and you may lose an extra 2 years out of this pen.
If you’re looking for a covered version, 7 Cozy DIY Indoor Dog Kennel Ideas also have some great ideas for the roof framing of this build.
📸 Photo credit: Instagram @goodneighborlawncare
#6: DIY Modular Dog Playpen for Camping and Backyard Use
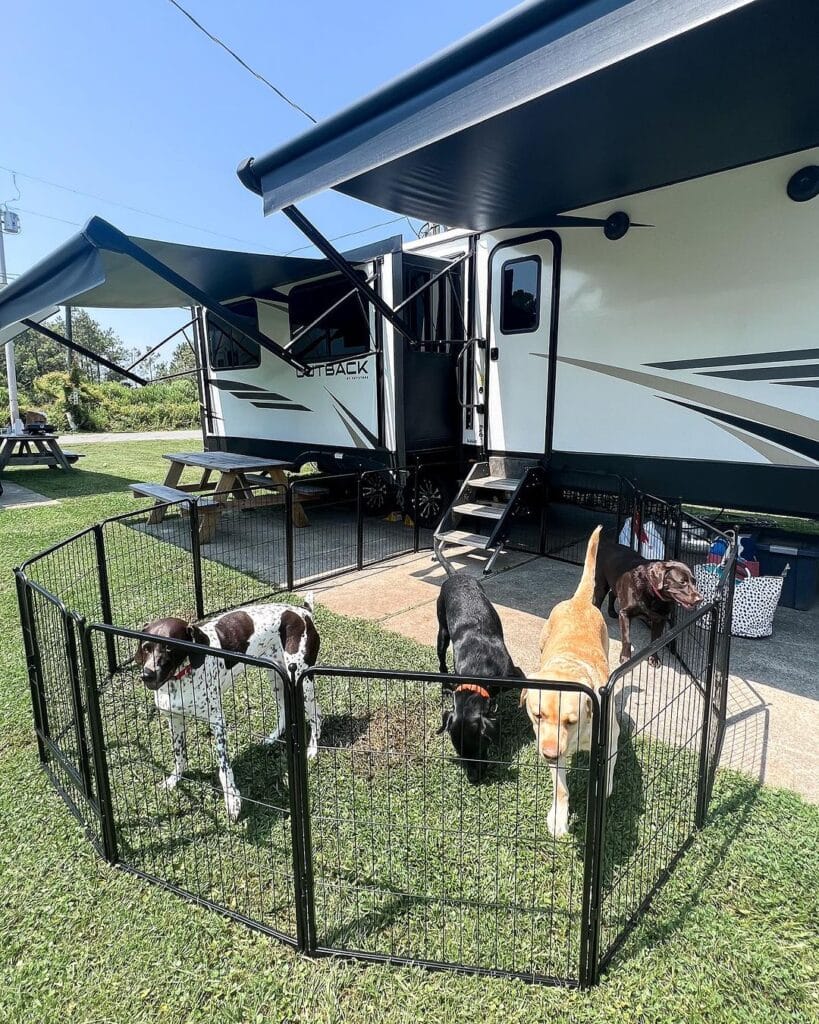
There’s nothing more frustrating than trying to enjoy a beautiful morning coffee on your porch and your golden is sniffing the neighbor’s yard, bolting for the road or just absolutely refusing to relax.
Yeah. This setup is the answer.
What You’ll Need:
– 8-panel black steel wire exercise pen (each panel approx. 24″ wide x 28″ tall)
– Ground anchors or tent stakes (4-6 pieces)
– Zip ties (6-inch black, for reinforcing panel joints)
– Rubber feet or foam padding for panel bases
– Optional: foldable shade canopy if using outdoors
Instructions
Spread the 8 panels flat on your grass. You can create any shape but we recommend to start out with a classic octagon as shown in the image. This should give your dog about 32 square feet to run around in – plenty of space for a golden to stretch, spin and sniff without feeling cramped.
Hook up the panels with the hinge clips that come with the tent (They snap together but I added a zip tie at the top and bottom of each joint anyway just in case the wind catches them).
Use a tent stakes and push it through the bottom feet of the panels. Do this at all 4 corner points. This will stop the whole tent from shifting when your dog leans into the side of it (and they will).
The steel wire construction stays visible so you can always see your dog, so you can walk away, leaving them with zero anxious hovering on your part.
The key is to place the pen next to your RV door or back patio. Your dog will feel closer to you that way. Our dogs settle down faster if they can see their person.
The panels fold flat for travel so you can tuck the whole thing behind your rv seat.
📸 Photo credit: Instagram @fxw_us
#7: DIY Chain-Link Dog Kennel with Concrete Base
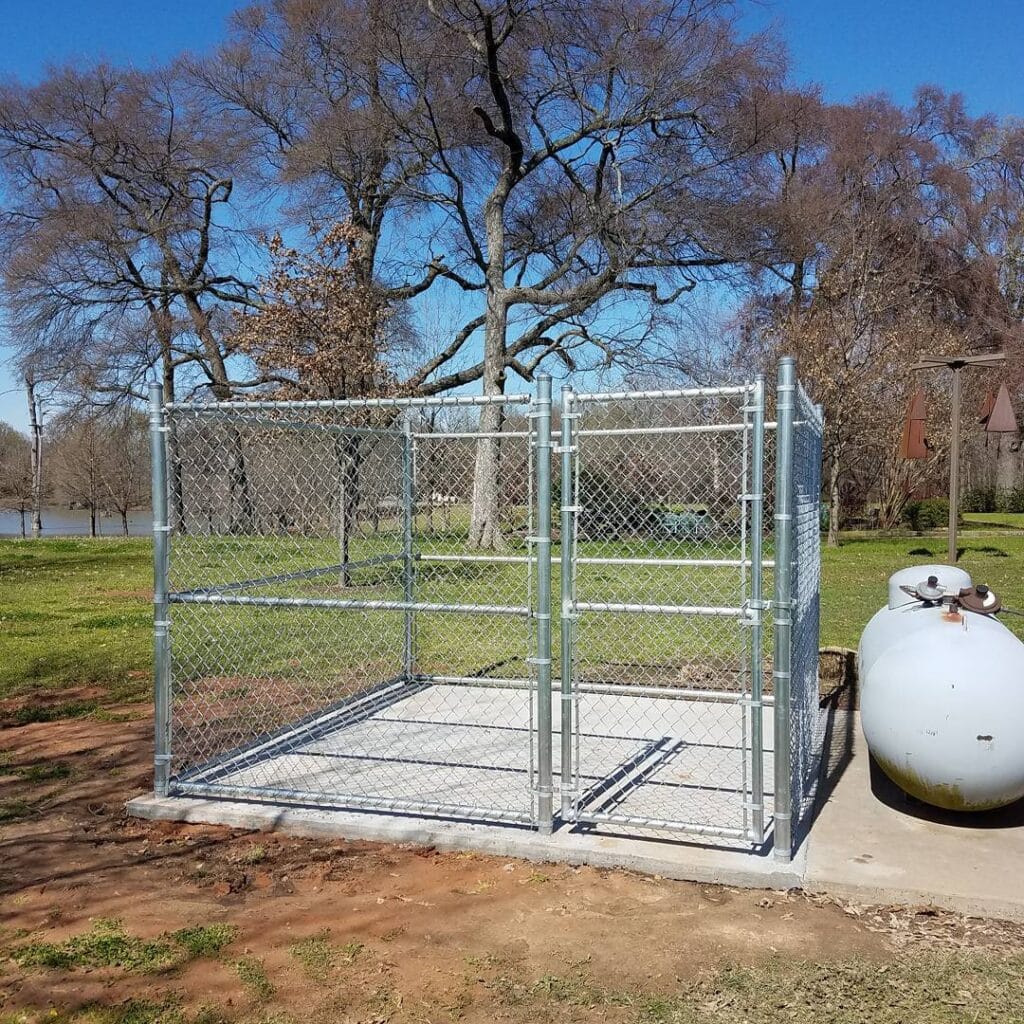
Does your dog bolt out the back door and go running into the neighbor’s yard yet again? So did my cousin, and her lab mix… which made her chase him across three yards in flip-flops rather annoying.
This kennel setup is the fix.
Prep Time: 2–3 hours | Active Project Time: 1–2 days | Difficulty Level: Intermediate
Materials & Tools:
– 10-gauge galvanized chain-link fabric (enough for a 10′ x 10′ enclosure)
– 1-5/8″ galvanized steel fence posts (terminal and line posts)
– Post clamps, tension bands, and rail end caps
– Top rails for horizontal support
– Double-door gate panel with latch hardware
– 80 lb bags of concrete mix (6–8 bags)
– Gravel base material
– Post hole digger, level, wire ties, pliers
Instructions
Start by marking a 10′ x 10′ square in the yard with stakes and string. Dig the holes for the corner posts 24 inches deep. Mix concrete and set each of the galvanized steel posts in the holes. Check the posts with a level to make sure they are plumb before the concrete sets. Let the concrete cure overnight.
Once your posts are solid, attach your top rails to the posts with rail end cups and clamps. Unroll your chain-link fabric along the outside of your fence, pulling it taut before securing it with the tension bands at each post. Make sure there’s no slack or your fabric will sag.
The last piece to install is the double-gate panel. I placed mine centered on one side to make access easier. I attached the latch hardware to both the top and bottom.
One thing to remember: a concrete floor slab inside the enclosure. The base is pinned to the concrete so no digging can be done to escape. The chain link fence contains your girl so she can’t jump out into traffic.
Also, can’t help but notice the doggie setup is next to a propane tank. But actually a smart idea as they are close to the house. They will appreciate that.
Fill the base with a thin layer of pea gravel over the concrete to allow drainage and to provide comfort on hot days.
measure the width of your dog’s shoulders, time two — you want to be able to walk in there with a leash without squeezing awkwardly.
📸 Photo credit: Instagram @jboomahfouz
#8: The Sage Green Chicken Coop-Style Dog House Pen With Gravel Base
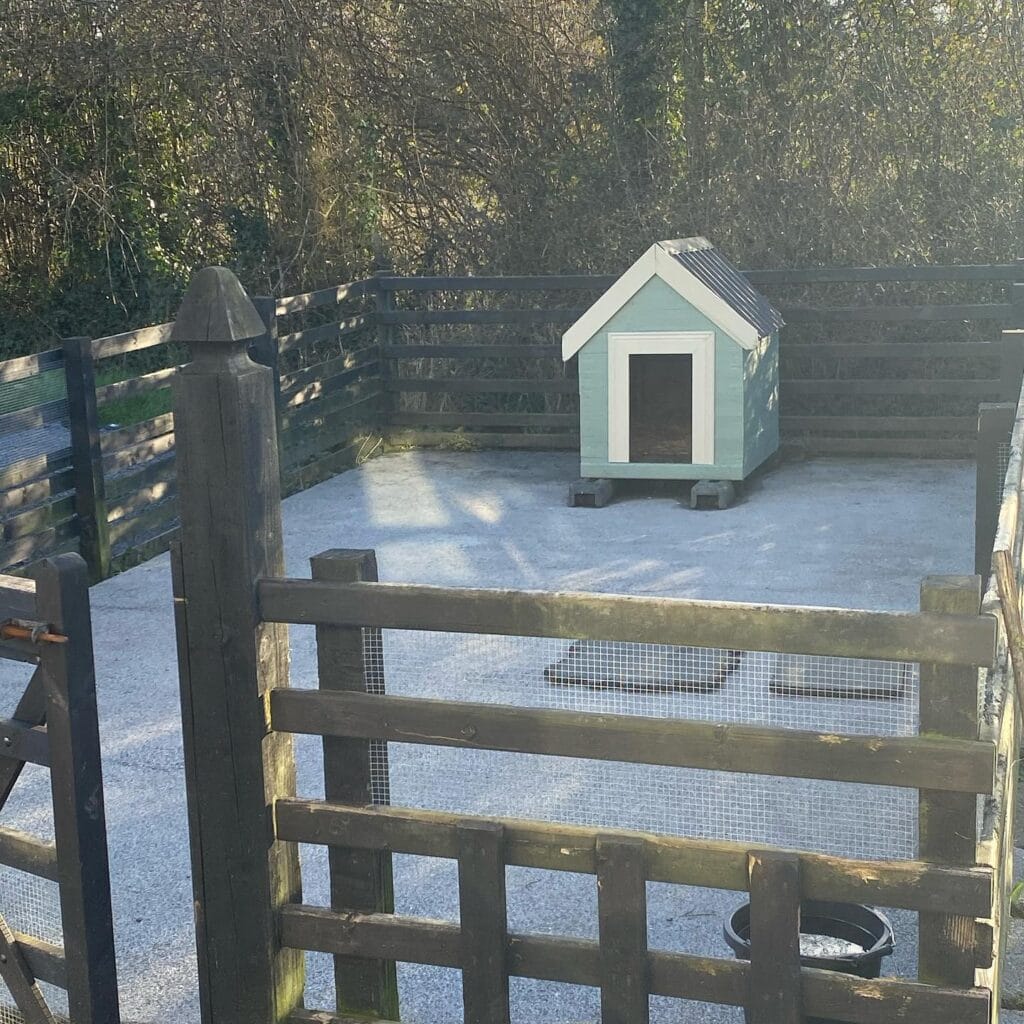
My neighbor built one of these last spring and I was SO JEALOUS!! She has a border collie who was ruining her back yard, and this little porch has completely changed her outdoor space.
Picture this: *your golden tracks mud in from the yard every single morning*this morning you’re on your hands and knees scrubbing the kitchen floor before coffee again.
* Pressure-treated lumber – for the fence frame and gate posts. * Horizontal cedar slats – for the fence posts. (painted dark charcoal/espresso) * Pea gravel – to cover the entire pen floor. * Wire mesh panel – to lay flat as a dig-prevention barrier under the gravel. * Prefab dog house – painted sage green with white trim and a corrugated metal roof. * Exterior wood paint – sage green and white. * Concrete mix – to set the posts. * Drill, screws, level, post hole digger. * Black rubber water bowl.
Prep Time: 2 hours | Active Project Time: 6-8 hours | Difficulty Level: Intermediate
### Instructions
First, you mark a pen perimeter on your floor. I marked one in the photo below that’s roughly 10×12 feet — big enough for a golden retriever to stretch out and move without feeling cramped.
Dig your corner and gate post holes at least 18 inches deep. Pour your concrete mix in and let it set for at least 24 hours before attaching anything to it. This is the biggest cause of a wobbly gate.
Once my posts were set, I attached my horizontal cedar slats. I left a gap of 2 inches between each board (which gives the pen a little air flow and is not big enough for the animals to escape through). I did paint everything charcoal before putting it all together (just seemed like it looked cleaner and it was easier to cover some scratches).
2. lay your wire mesh panel flat on the ground and it will stop your golden from digging under and escaping. It is hidden by the peas, but it does all the work. Shovel your pea gravel on top in a 3-4 inch deep layer. It will drain after a rain perfectly and will stay much cleaner than bare dirt or grass.
On the back corner of my yard is a sage green dog house which is raised on small wooden feet. I know the best way to keep our dog dry is to keep the bottom from getting wet so the inside won’t get damp. The corrugated metal roof keeps the inside dry even if it rains a lot. And my dog is comfy, too, because she can’t dig in the dirt to get out.
The gate also has the same horizontal slats on the top with a simple latch and hinge on the left. Easy to open for me, but you better help your golden figure it out.
If you’re also thinking about putting a wash-down station nearby for muddy paw days, 7 Creative Ideas for Your DIY Dog Washing Station would also work great with this pen setup.
After assembling the pen, seal all the painted wood surfaces with an exterior waterproof topcoat. It adds maybe 30 minutes to your day, but it will make this pen look gorgeous for many seasons.
📸 Photo credit: Instagram @murphy_and_co
#9: DIY Foldable Fabric Pet Playpen (No Sewing Required)
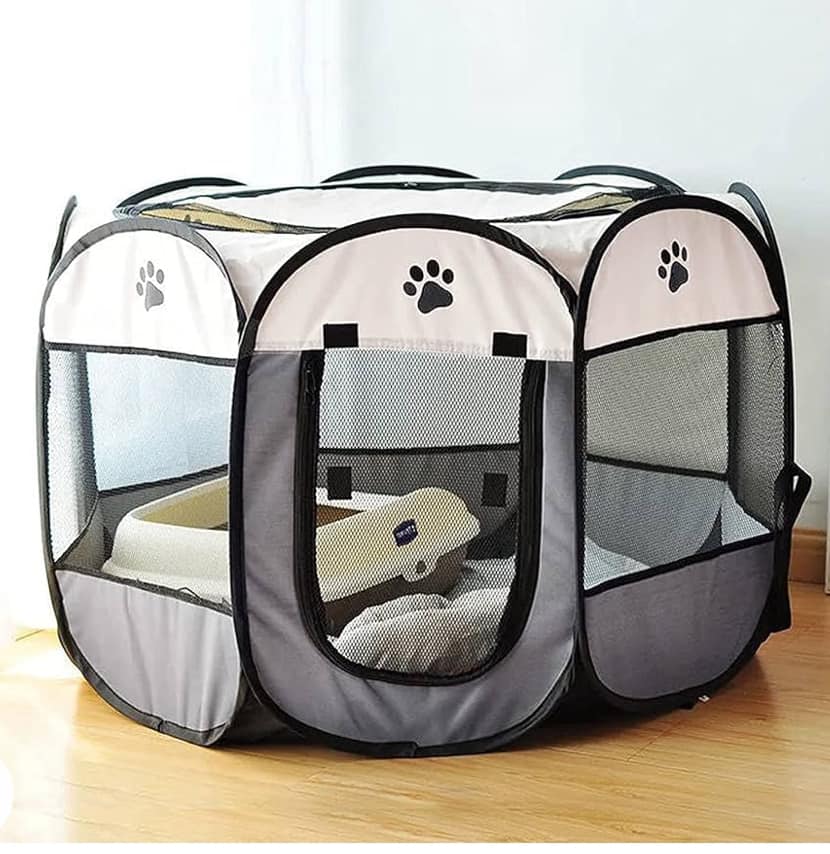
Prep Time: 15 minutes | Active Project Time: 45 minutes | Difficulty Level: Beginner
Or, you know, the time that you’re trying to host a dinner party for friends, and your dog is literally zooming between everyone’s legs while stealing appetizers off of the coffee table? Yeah, that’s what this project is all about.
I made one for my cousin’s lab puppy last summer and I was shocked how cute it looked in her living room. It didn’t even look like “dog stuff” in her house!
Materials & Tools:
– Octagonal pop-up mesh playpen frame (collapsible steel wire, approximately 47″ x 47″ x 24″)
– Gray and white Oxford fabric panels (water-resistant, 600D polyester)
– Black mesh ventilation panels (each panel roughly 12″ x 18″)
– Black zipper tape (#5 nylon coil, 3 yards)
– Paw print iron-on patches (black, 2″ diameter)
– Fabric glue or an iron
– Scissors and measuring tape
### Instructions
Take the steel wire frame and lay it out on a flat surface. The frame is like a pop-up tent and will spring open. Once the frame is laid out and the upper and lower panels of Oxford fabric are laid over each of the sections. Make sure that the lower panels of the Oxford fabric are on the bottom of each section and the upper panels are on the top.
Attach the panels with the pre-sewn velcro tabs along the frame. The mesh panels should be placed on the inside of each section. Mesh panels allow for good ventilation and the dog will stay cool and calm in the crate rather than panting and scratching to get out.
I ran a zipper tape along the front two mesh panels and created a door opening. I ironed the paw prints on the top of the white panels. I put three on the front panels and it looks just like the store version.
Leave the bed or blanket in the crate. The collapsible frame folds flat in under 30 seconds, so it takes no effort or space to store between uses.
Keep the zipper pulls on the outside. Dogs learn how to do the door faster than you might think.
📸 Photo credit: Instagram @sonia_boyd_davidson
#10: The Expandable Modular Dog Pen With a Built-In Crate Zone
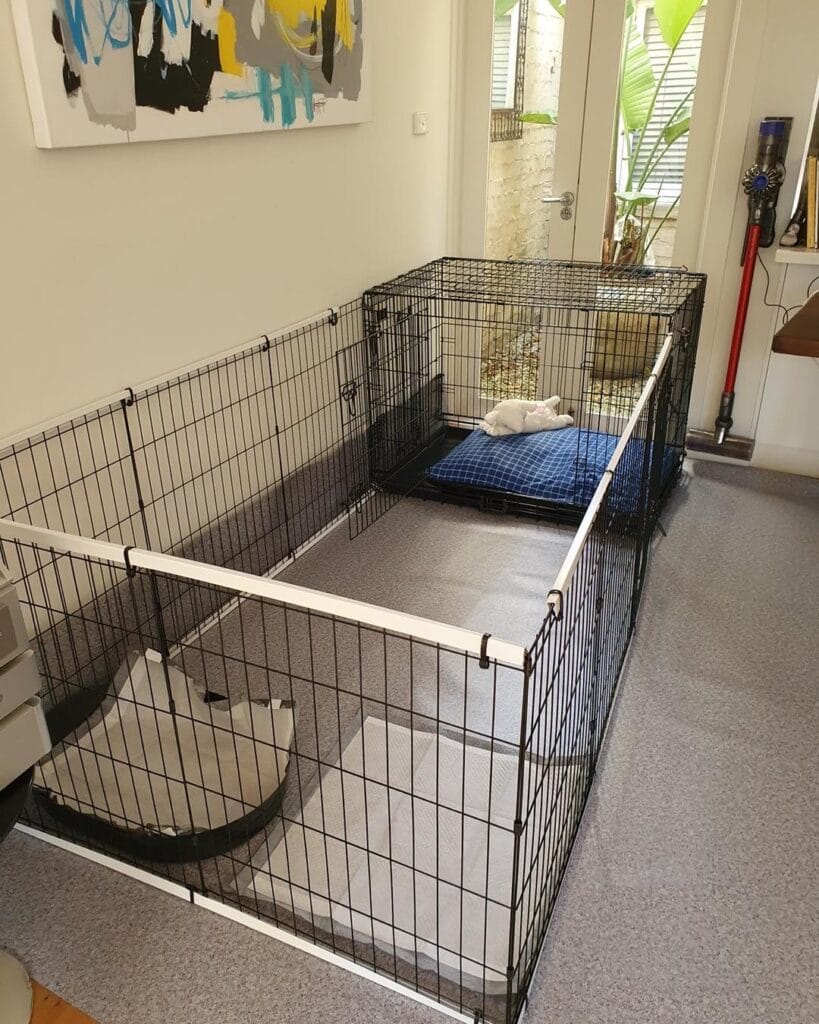
My golden is being a jerk again. She is pacing the hallway and knocking into the side table. She leaves a trail of fur across the one rug that I like. I want her to be contained but not miserable. This picture is just what I need.
Materials & Tools:
– Black wire modular panels (12–16 panels, each approx. 24″ x 24″)
– Extra-large wire dog crate (48″ length) with a tray bottom
– White PVC pipe or wooden dowels (for the internal divider rail, approx. 1″ diameter)
– Panel connectors/zip ties (heavy-gauge, black)
– Gray foam-backed carpet mat cut to fit the full pen footprint
– Blue plaid cushion (42″ x 28″ fits inside the crate section)
– Panel clamps (the white corner brackets visible in the photo)
### Instructions
The first thing I recommend you do is to roll out your gray carpet mat, which you’ll cut to roughly 6 x 10 feet in size so that it will cover both the open play zone and the crate zone underneath. This helps to give your dog traction on your floors and also helps to protect the floor from being scratched (and to prevent the ‘zoomies’ chaos that can occur after a bath).
I put the crate about two feet from the back wall and oriented it so the door is facing out into the pen. The crate is a good anchor point. The modular panels clip to the side bars of the crate with zip ties or the included connectors. This makes sure the pen stays put even if the dog leans against it.
Slide the panels out from both sides of the crate to make the open play area in the front. This area is made up of about 4 panels wide and 3 panels deep. I connected the panels at the corners with the white PVC rails that are positioned horizontally at the center of the panels. This rail helps keep the play area from wobbling when the girls jump and body slam it.
Put the blue plaid cushion inside the crate on top of the tray. This will give your dog a defined area to sleep in so she will start to self-settle in the crate instead of your sofa. At last!
This area is left open in the front with water bowls and toys and a second smaller mat. Because the crate is integrated and not separate from the main room, your dog can go back and forth from resting to playing without you having to move anything. Again, it will feel more relaxing for you.
keep the door unlatched on the crate during the day that way she can move around the pen freely at night just swing the door shut .
If your hallway or room is narrow like the one in the photo, place the long side of the pen against the wall so that it is out of the walking path. It’s an unusual look that almost seems intentional, like built-in furniture!
Prep Time: 20 minutes | Active Project Time: 45–60 minutes | Difficulty Level: Easy
📸 Photo credit: Instagram @vebopet
The One Measurement Mistake That’ll Cost You a Weekend (and Your Sanity)
I thought I would share some of the things I learned while helping my cousin build a pen for her lab mix puppy. I am hoping to spare you some of the headaches I went through.
Most people measure their dog standing still. Big mistake.
Golden Retrievers are drama queens so I measured my dog mid-stretch with her front paws up on a fence to see how high she could jump. I added 6 inches to that for good measure.
The other thing that nobody tells you is that the floor of a room is more important than the walls.
This will spare your dog’s paws from being scraped up by the harsh concrete after just a few weeks. Use a mat made of rubber or compacted pea gravel to give your pup a place to grip without ruining his paws.
One more pro secret: build your gate to open inwards. an excited dog (retriever,)get the body slam on an outward gate, and you’ll have new hinges in a month. Inwards gate will hold up against even the most enthusiastic welcome home wiggle.
Your Dog-Proof Home Starts This Weekend
Pick one piece to start with: Maybe it’s the sofa cover that your golden is claiming as his throne or the rug that’s been covered in muddy paw prints.
I swapped out my living room rug first. I really didn’t think it would change much, but somehow suddenly the whole room felt intentional again. Like I actually lived there on purpose.
You can have it both ways. A beautiful dog friendly home. Maybe you’re thinking about making your own DIY dog bathing station.
which room are you in at the moment? i have an advantage of studying here even if it’s ruining me in some ways. haha

Amr Mohsen is a software engineer who traded his keyboard for a leash — at least on weekends. His love for dogs inspired him to share what he learns as a dog owner and enthusiast, bringing a detail-oriented, research-driven perspective to every article he writes. If it’s about dogs, he’s probably already looked it up twice.



