
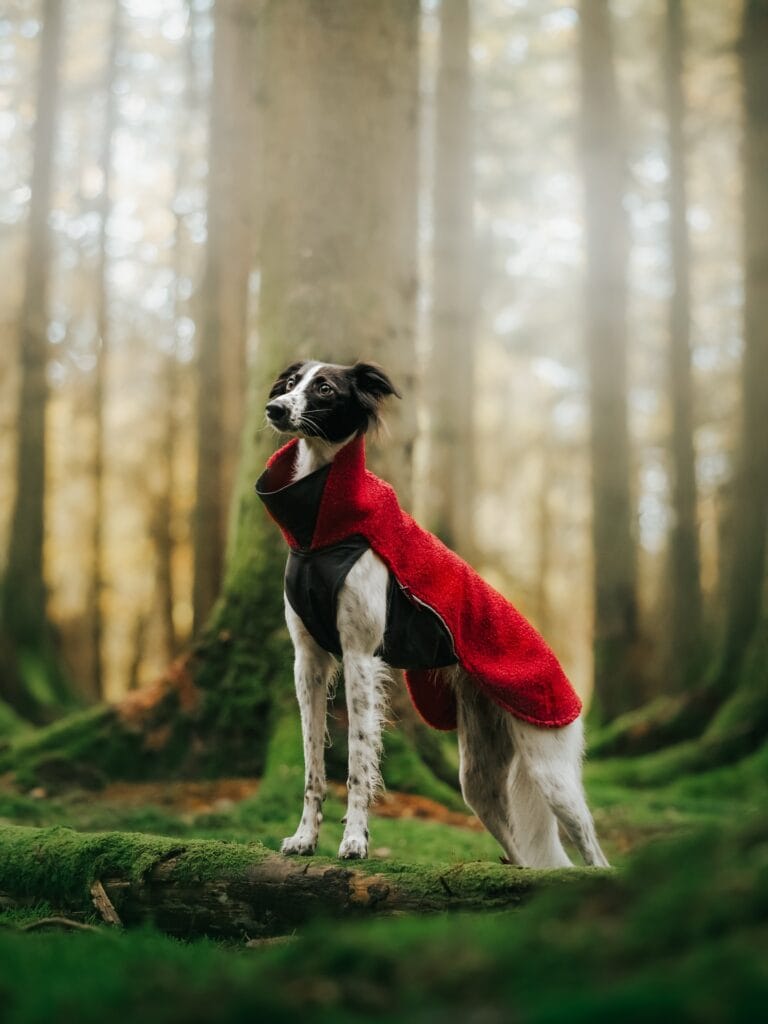
Your golden retriever has once again hit the door soaking wet and your entryway rug smells like a swamp.
Having to walk the dog in the cold mornings should not mean that he is shivering, damp, and pressed up against your leg the whole way home. And if you buy one of those dog jackets in the store, they’re either ugly, or they’re stupid expensive, or they fall apart after a few washes. I bought one last winter, and by February the velcro was all gone.
I know it sounds like a lot of work, but I promise you, it isn’t! Plus you end up with a diy dog jacket that fits your dog’s body, and matches your aesthetic.
Can I share with you my 10 favorite designs that are cute enough for your Pinterest board and durable enough for a muddy golden retriever? I’ve got warmth and style without the sad velcro disasters!
#1: DIY Cable-Knit Pom-Pom Dog Sweater Dress (The One That’ll Make Everyone Stop You at the Dog Park)
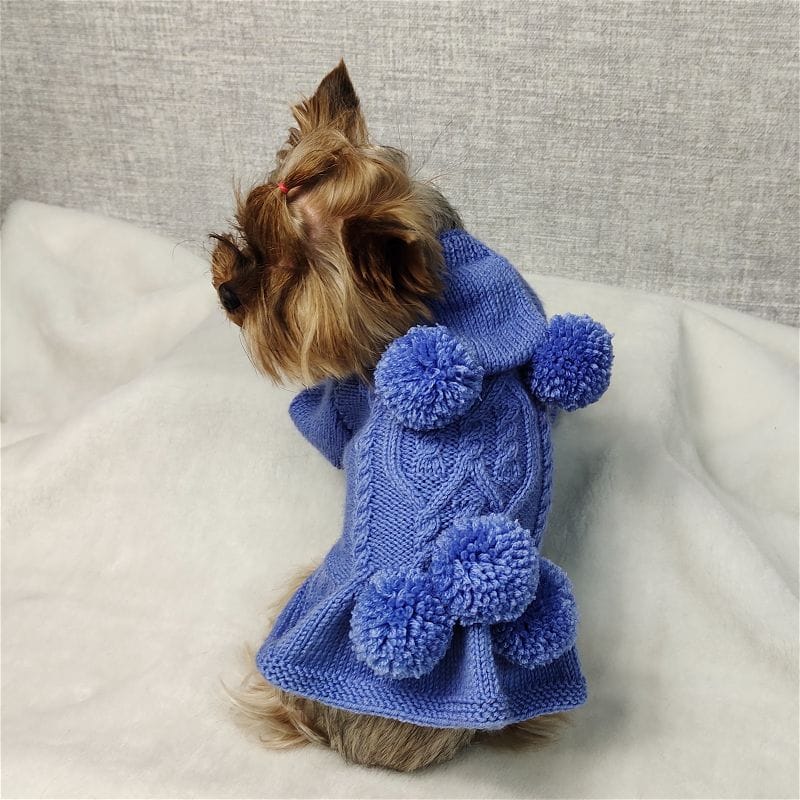
You know those moments when it’s FINALLY cold enough to wear your favorite sweaters, and you find yourself layering up in your cozy knit sweater…only to turn around and see your pup standing there, shivering…looking at you with those puppy dog eyes. Yeah, we have too.
How fabulous is this periwinkle blue cable-knit sweater dress with it’s oversized pom-pom details?! It’s exactly the kind of Pinterest moment you didn’t know you needed.
Materials & Tools:
– Worsted weight yarn in periwinkle blue (approx. 200g)
– US size 7 (4.5mm) knitting needles
– Pom-pom maker (large size, 3.5 inch)
– Stitch markers
– Yarn needle
– Scissors
– Measuring tape
Instructions
Start by taking the dog’s neck, chest and back length. Cast on the appropriate amount of stitches for the neck opening, using a 2×2 rib stitch for about an inch, which keeps the neckline snug enough so as not to restrict movement, but not too tight. The cables hold the warmth closer to the dog’s body making cold walks a little more comfortable.
Change to a classic 4-stitch cable. Cross every 6th row. Work the body panels outward from the spine, increasing the number of stitches gradually to create the adorable flared skirt you see in the photo. The flare gives your dog freedom of movement with warmth!
Make five large pom-poms with your pom-pom maker. Attach two to the back spine and three along the skirt. I made mine a bit uneven the first time. But I thought it looked charmingly odd.
Keep the leg openings loose- I like about two fingers worth of space in there.
Prep Time: 30 min | Active Project Time: 8-10 hours | Difficulty Level: Intermediate
Blocking your finished piece with a damp cloth and letting it dry flat will help keep those cables defined and sharp looking.
For the more creative pet projects, then check out 13 Genius DIY Dog Stuff Every Pet Parent Needs to Try Today!
📸 Photo credit: Instagram @dog.moda
#2: DIY Quilted Dog Jacket (The One That Actually Stays On)
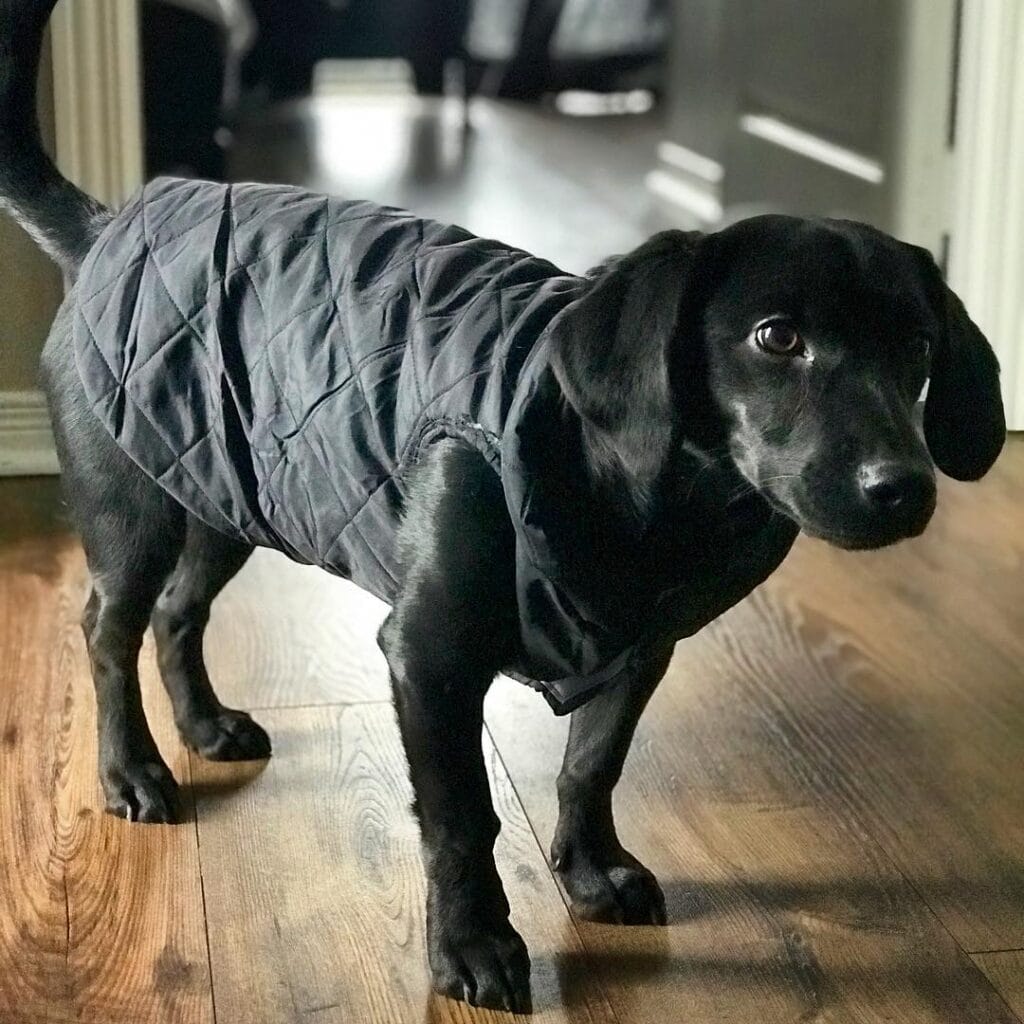
You know that moment, when you’re ready to go out for a walk with your golden, and he/she is shivering by the door, doing the little dance? Well, this just made me do it.
Prep Time: 20 min | Active Project Time: 2–3 hours | Difficulty Level: Beginner–Intermediate
Materials & Tools:
– 1/2 yard quilted fabric (pre-quilted diamond-pattern works perfectly — black looks chef’s kiss sleek)
– 1/4 yard soft fleece lining fabric
– 2–3 velcro strips (1-inch wide)
– Fabric scissors
– Tailor’s chalk or washable marker
– Measuring tape
– Sewing machine + matching thread
– Dog measurement: neck, chest girth, and back length
### Instructions
Start by measuring your dog. Measure from your dog’s collar to the base of the tail and around the widest part of your dog’s chest. Cut your quilted outer fabric into a rectangular body panel sized to fit your dog’s measurements, adding a 1-inch seam allowance to all sides.
Cut out a fleece lining to match. Place them together, right sides facing and sew the three sides leaving a short end open to turn right side out. This will make a fleece lining that is against the skin of the dog. You don’t want anything bulked up against the skin, but you do want it to be warm.
Flip it, press the edges and fold and stitch two side belly flaps that wrap under the chest. Attach velcro strips to those flaps to secure the jacket (this is the part that actually keeps the jacket on during zoomies).
Cut the neckline into a soft curve so that it sits just below the collar.
Last but not least, everyone should reinforce the edges of the velcro so that the whole jacket doesn’t rip off. It’s just a couple extra minutes and saves you time in the long run.
12 Heartfelt Designs for DIY Dog Accessories for those who still need some more inspiration to make your pup look stylish this season!
📸 Photo credit: Instagram @awomanofalltrades_
#3: Knit a Cozy Button-Up Sweater for Your Dog (With a Matching Scarf!)
Okay, so here’s the scenario: your golden retriever rolls inside from the backyard, it’s a weird sort of cold-but-not-quite-winter, and your dog is shivering while she’s giving you the eyes. You know the ones.
This is exactly when I started thinking about knitting my own dog sweater. It sounds like a lot of work but I found it was actually doable.
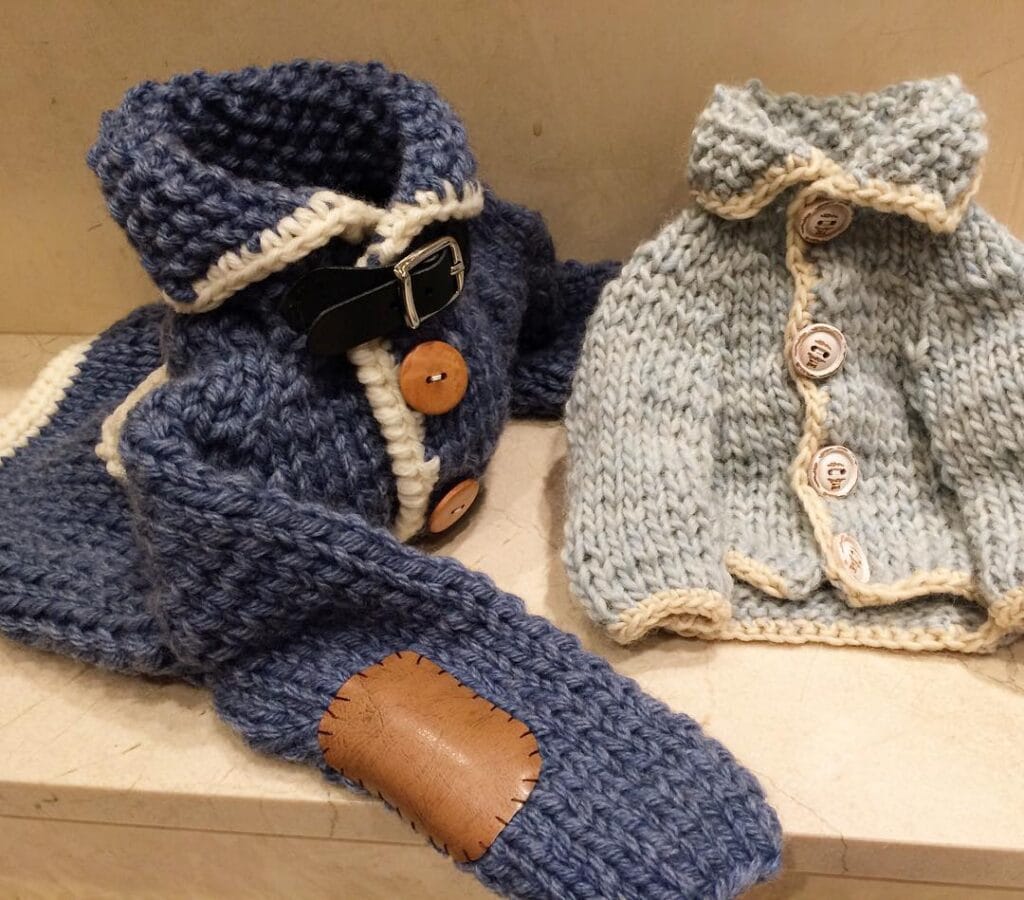
I got this idea after seeing the most Pinterest worthy duo in the history of Pinterest – a steel blue chunky-knit cardigan paired with a matching scarf that has a genuine leather elbow patch sewn on! I love how the cardigan has cream-trimmed edges, wood toggle buttons, and a fold-over collar that makes it look like something out of a tiny boutique. And I loved the small metal belt buckle at the fold-over collar.
Materials & Tools You’ll Need:
– Bulky weight yarn in steel blue and cream white
– US size 10 (6mm) knitting needles
– 3–4 wooden toggle buttons (approx. 1 inch diameter)
– 1 small metal buckle (optional, decorative)
– Leather scrap (2″ x 3″ patch) + brown thread for hand-stitching
– Yarn needle, scissors, stitch markers
Instructions
Make a slip knot. Cast on 30 stitches in the blue yarn. Use a long-tail cast on for the cleanest, most stretchy edge possible — this is going to have to go over your dog’s head without a wrestling match.
Work in seed stitch for the first 4 rows, which will give you the chunky collar. Seed stitch is a stitch pattern in which you alternate knit and purl stitches. This will help to keep the collar from curling under. Work in stockinette stitch for the body of the scarf, knitting until the piece is 10 inches for a medium sized dog, like a golden retriever.
3. Put the cream trim on: Pick up stitches along both front edges and knit 2 rows in your cream yarn. This will create the cute little border you see in the photo. Bind off, then hand-sew your wooden buttons on the right front edge, evenly spaced apart.
For the buckle, I stitched a few loops of yarn just near the top of the collar to add some extra detail.
It’s just a little knit-every-row garter stitch scarf, maybe 4 inches wide by 18 inches long, but once it’s done, cut out your leather patch, punch tiny holes around the edges, and hand-stitch it on with brown thread to one end of the scarf and people will be asking where you bought it.
Put a damp cloth on top of your pieces before you start sewing. This helps the project to look more finished. The wooden buttons work really well to pull the pieces of the collar closed. They keep you nice and warm at the neck.
Prep Time: 20 minutes | Active Project Time: 4–6 hours | Difficulty Level: Intermediate
📸 Photo credit: Instagram @chocodahlilin
#4: DIY Red Skull Fleece Dog Jacket (And It’s Giving Full Punk Energy)
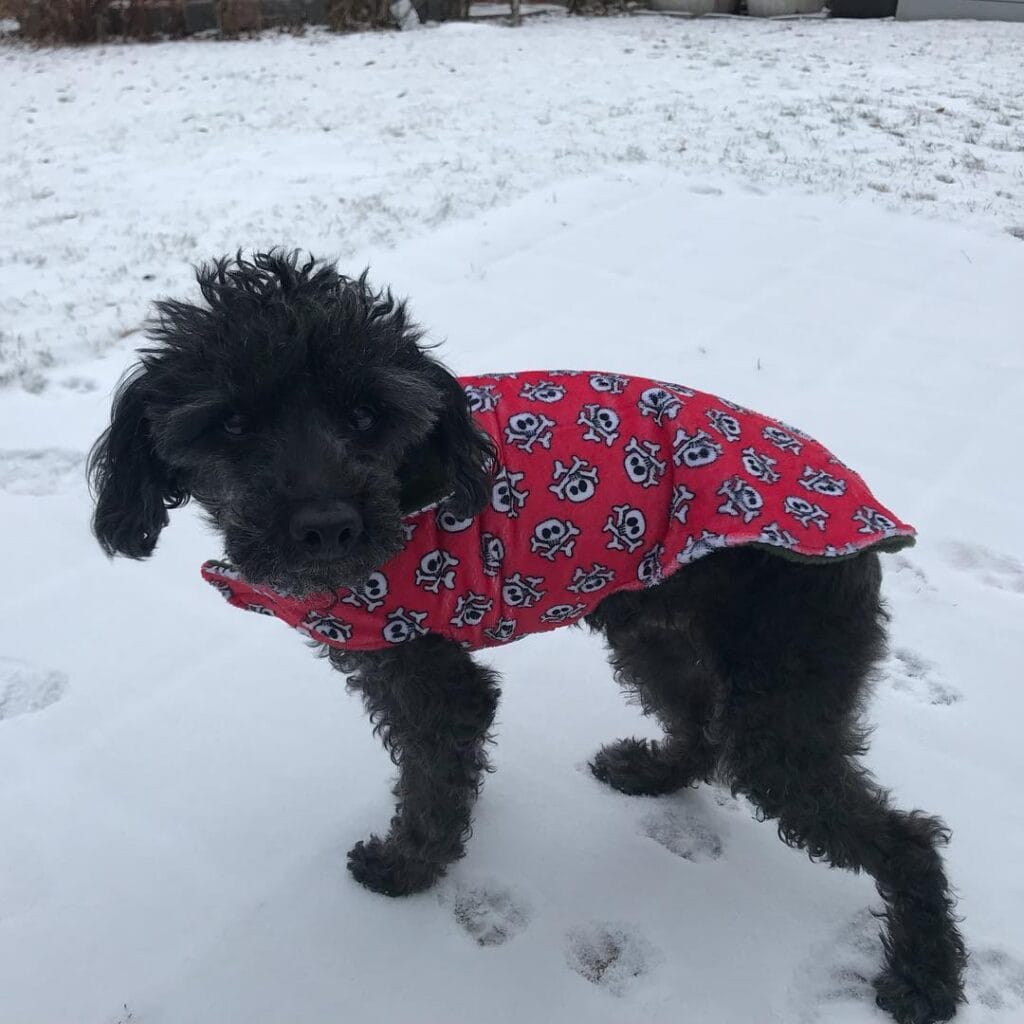
I am sure you all have had those moments… It is finally snowing and your golden is just standing there shivering and looking at you with those big sad eyes! Well that was me with my little rescue last winter. I felt so bad I literally ran inside and grabbed a blanket to throw over her.
The red skull-print fleece jacket is perfect, and honestly it’s so much cuter than anything I’ve seen at the pet store.
Materials & Tools:
– Red skull-print fleece fabric (about ½ yard for small dogs)
– Olive green fleece for the lining (½ yard)
– Fabric scissors
– Chalk or fabric marker
– Sewing pins
– Basic sewing machine (or needle and thread)
– Dog measurement tape
Prep Time: 15 min | Active Project Time: 45 min | Difficulty: Beginner
### Instructions
Start by measuring your dog’s back length and chest girth. Next, cut the outer red skull fleece and the lining into a vest shape. The vest should be widest at the chest and narrower at the neck.
I put the two layers together, with the patterned sides facing in, and sewed around the edges, leaving a small opening for me to turn it right side out. The fleece on fleece layer is thick and wind proof and keeps him warm without adding stiffness that will make my dog scratch or struggle to turn.
Topstitch around the entire edge to close the gap and give it that finished look you’d see on 7 adorable DIY dog clothes ideas to try.
And since fleece doesn’t fray, you can also skip hemming it…which saves you 20 minutes right there.
Cut two small side slits and add velcro tabs at the belly for easy on-and-off. Dogs with deep chests especially love the looser fit!
The fleece does stretch a bit, so it doesn’t have to be an exact fit. If the jacket is slightly too big in the back, just trim the side panels a bit closer so that it lays flat.
📸 Photo credit: Instagram @makesescapes
#5: The Dachshund Raincoat That’ll Make Your Dog Look Like They Have Their Life Together
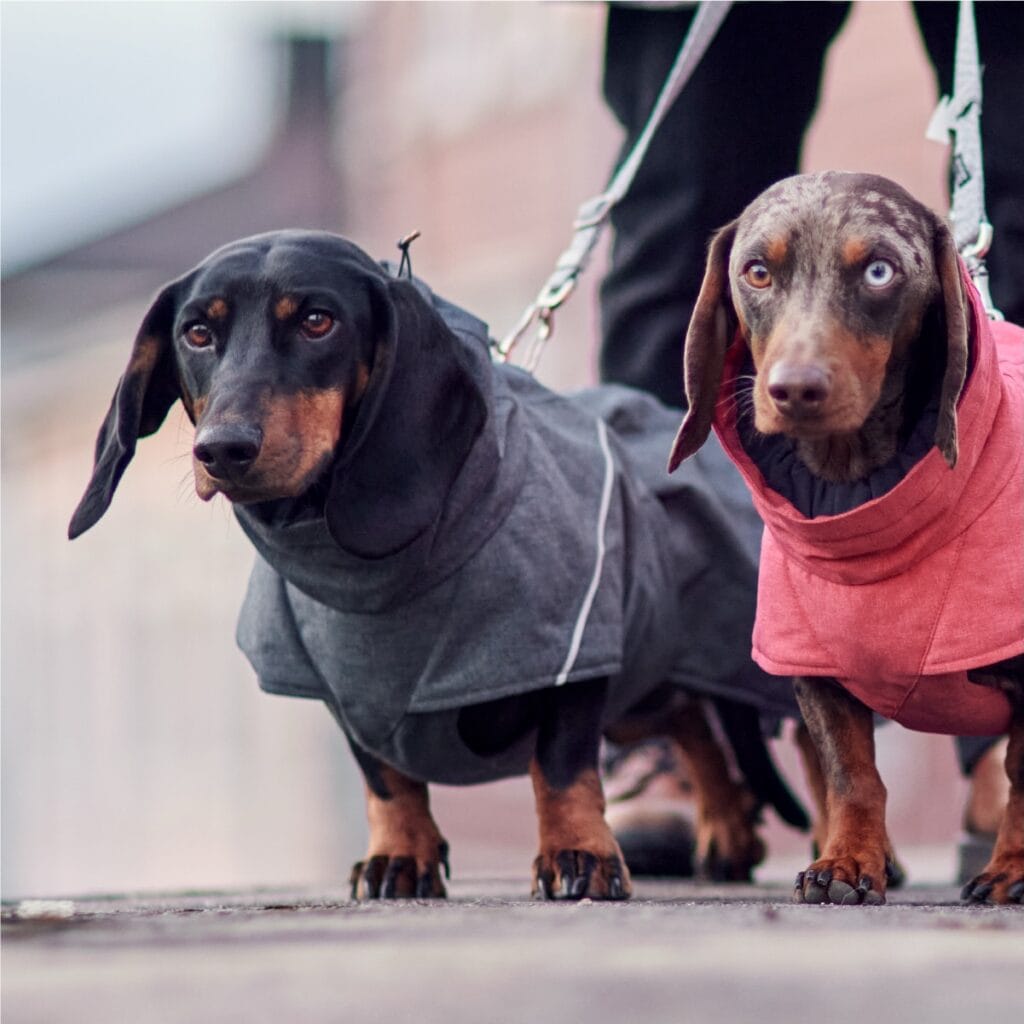
Your golden is probably WAY bigger than these little sausages, but the second I saw this, I thought of you. Because the concept…look at those two dogs in their custom fitted raincoats strutting down the street like they own the place! The one in the slate grey raincoat and the one in the dusty rose one. I literally gasped.
And that’s what I’m telling you we should be chasing for your pup.
Materials & Tools You’ll Need:
– ½ yard of waxed canvas or water-resistant ripstop nylon (grey or pink — your call)
– 1 yard of soft fleece lining fabric
– ¼ inch reflective piping or trim
– Fabric scissors, pins, tailor’s chalk
– Size 16 sewing needle (heavy-duty thread in a matching color)
– Velcro strips (¾ inch wide)
– A soft measuring tape
– Your dog’s measurements: neck, chest girth, back length
Prep Time: 20 minutes | Active Project Time: 2–3 hours | Difficulty Level: Intermediate
Instructions
The first step is to measure your dog’s back length from the base of the neck to the base of the tail. The next step is to measure the chest width right behind the front legs (this is usually where most homemade dog jackets fail, so don’t forget it).
Cut the outer waxed canvas into a simple cape shape with a wider back and a small point at the neck. Cut the fleece lining to fit the cape shape exactly.
After you do that, pin all of the reflective piping along the outer edges before sewing anything together. See that grey jacket in the photo? That jacket has a white trim on the hem, giving it that clean & structured look instead of a homemade look.
sew the piping first. then layer your fleece, pretty sides in, to the canvas. sew around the perimeter, leaving a gap at the neck to flip it right side out.
Flip it over and top-stitch around the edge. This keeps the lining flat against the shell. Our water-resistant shell will keep your dog from getting wet and wind in the ears and our fleece lining will trap in their body heat so they stay dry AND warm on those gross November walks.
At the belly, I added Velcro strips. Cut two 3-inch pieces and sew them at the chest opening. Now there is a secure closure at the dog’s belly so the jacket does not slide to the side when the dog performs their entire, dramatic shake routine.
If your dog despises (my dog does), practice sliding it on during calm moments before it is raining outside.
The dachshund in the pic with the dappled coat and one blue eye? She looks a little suspicious, but completely cozy, and that’s exactly what I’m going for.
Cut the hood piece as a separate half oval and attach it last. It will give you more control over the fit around the neck and it won’t bunch up.
📸 Photo credit: Instagram @hurttacollection
#6: DIY Blue Plaid Fleece Dog Jacket With Sherpa Collar
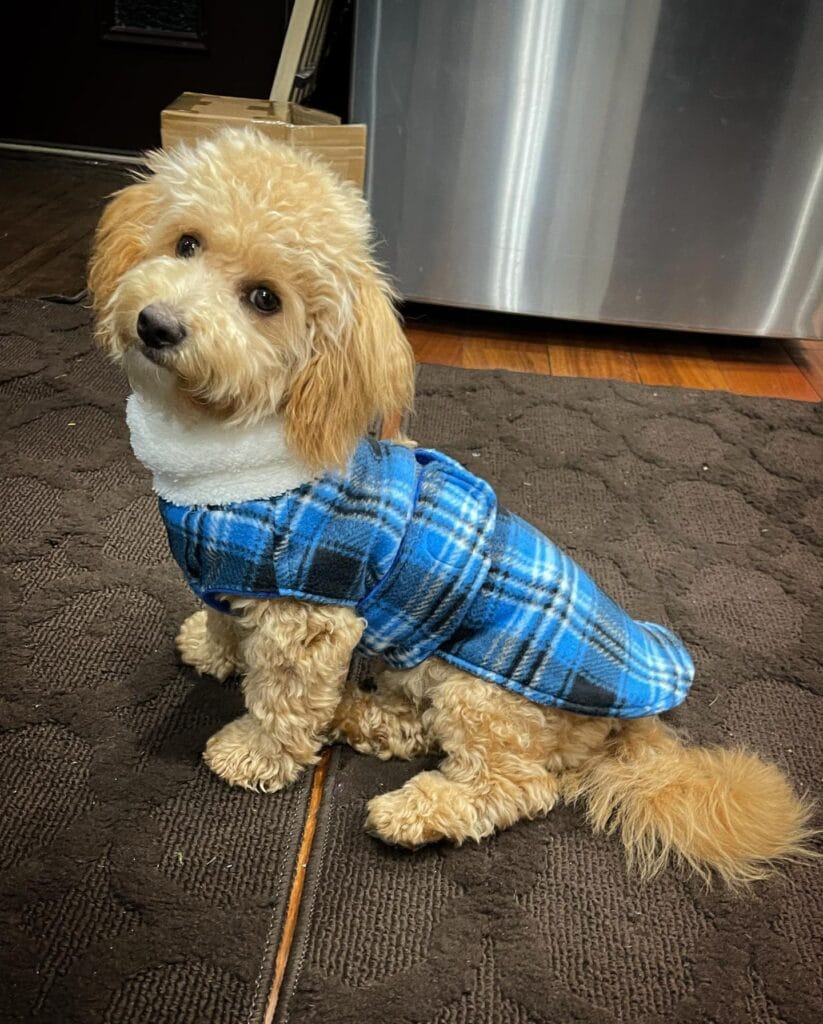
I have had this problem with my dog many times and it happened again today. It was freezing cold outside and I was just about to leave, when my dog was shivering by the door and doing that little paw tap on the door. I should have done this a long time ago.
That cozy cabin feeling from a blue plaid fleece coat with a sherpa collar though. It looks great on small to medium curly breeds too.
Materials & Tools:
– 1/2 yard blue tartan plaid fleece fabric
– 1/4 yard white sherpa fleece (collar lining)
– 1 strip of velcro tape (closure at chest)
– Fabric scissors, pins, chalk marker
– A simple dog coat pattern (sized to your pup’s back length)
– Sewing machine or needle and thread
Instructions
Cut the plaid fleece to fit the pattern pieces for the back panel, the two belly flaps, and the curved piece for the collar. Cut the sherpa piece to fit the collar piece.
Place the piece of the sherpa collar face-to-face with the plaid collar. Stitch along the outer edge of the sherpa collar. Flip the sherpa collar inside-out so the fluffy part of the collar is facing up.
Sew the back panel and belly flaps together, leaving the front chest open. Attach velcro strips to the chest opening, so you can dress your dog with one hand (it will save you lots of time).
Topstitch around all edges to help keep the fleece from curling. Because the jacket is so structured, it stays in place when my dogs are walking, and doesn’t bunch up under their armpits.
The two Velcro closures on the front allow you to adjust the size easily. Fleece is used on the inside of the dress to trap body heat, and keep your dog warm, without you having to shell out $45 at the pet boutique.
If your dog is a bit deeper chested, add an extra inch or so to the belly flap width before you cut it off. Also, fleece doesn’t fray so it’s okay if the raw edge of the inside of the seam shows.
Prep Time: 15 min | Active Project Time: 1.5 hrs | Difficulty Level: Beginner-Intermediate
📸 Photo credit: Instagram @austin.the.lake.pup
#7: Crochet Dog Jacket That’ll Make Your Golden the Cutest Pup on the Block
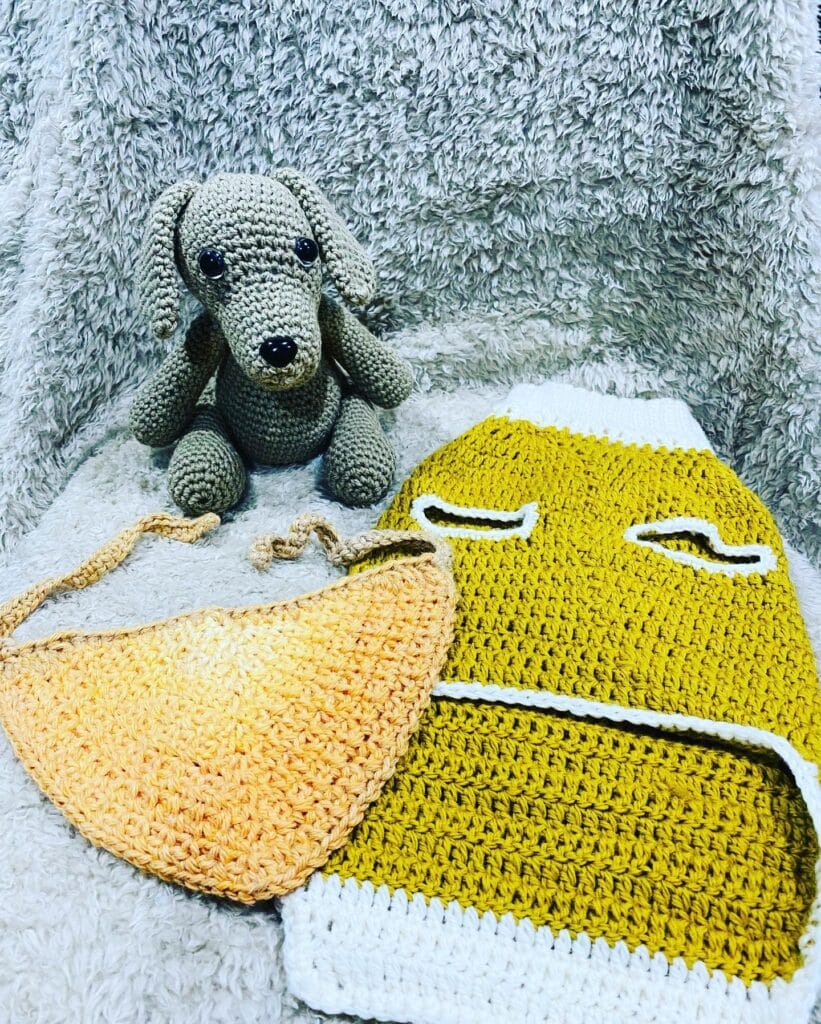
Your Golden Retriever shakes off the cold as soon as you two step outside, and you’re standing there thinking why doesn’t she have something warmer. This mustard yellow crochet dog jacket is the answer, and honestly, it gives cozy Pinterest board energy in the best way.
Prep Time: 20 min | Active Project Time: 6–8 hours | Difficulty Level: Intermediate
Materials & Tools:
– Mustard yellow chunky yarn (worsted weight, ~200g)
– White yarn for border trim (~50g)
– 5mm crochet hook
– Yarn needle
– Scissors
– Measuring tape
– 2 stitch markers
Instructions
Start by measuring your dog’s chest girth, back length and neck circumference. You only need these three numbers. Using a foundation chain the same width as your dog’s chest, cast on with the mustard yarn. Then work rows of half-double crochet until you reach the full back length of your dog.
Add two horizontal buttonhole gaps on each side panel about 3 inches apart. These openings allow the legs to slip through the jacket while keeping it snug enough that your girl can still run after that tennis ball.
Change to a white yarn, and single-crochet around all four edges (white trim is not only cute but also adds to the seams to help jacket hold its shape after wash).
Weave in all ends tightly. Block the finished piece flat before attempting to fit.
The double layer border gives some structure to the jacket and keeps it from bunching up underneath her belly as she walks.
📸 Photo credit: Instagram @kina_cavoodle
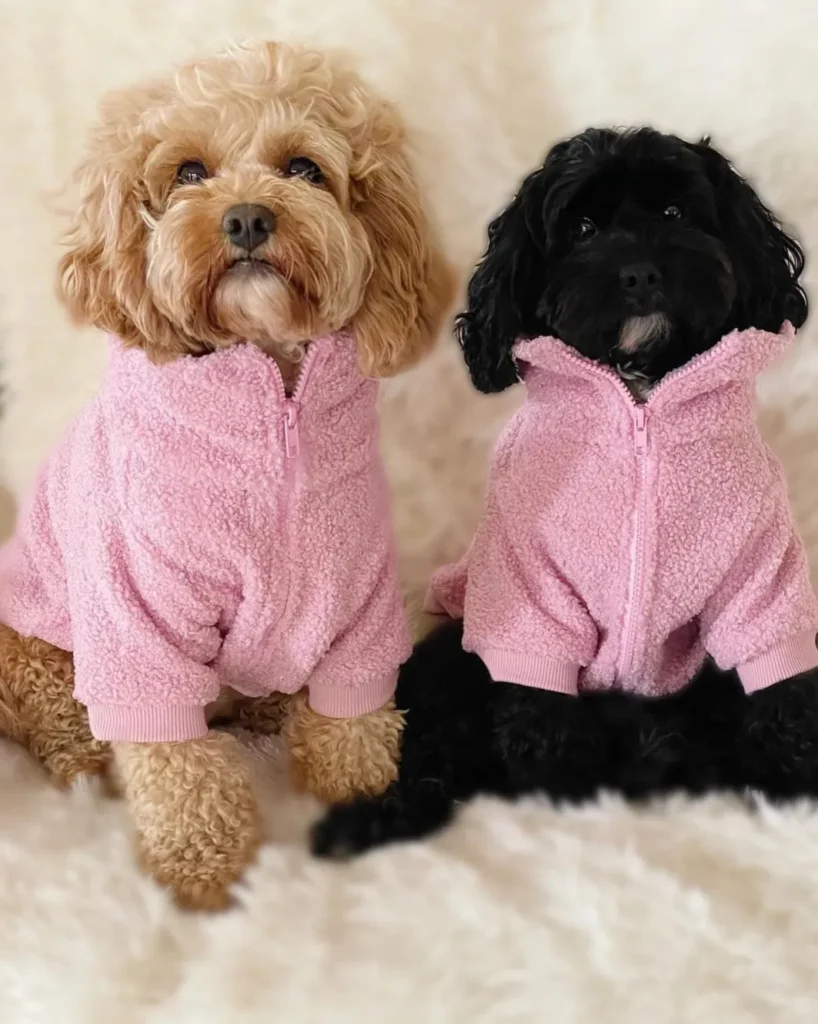
#8: DIY Pink Sherpa Zip-Up Jacket for Small Dogs
Prep Time: 20 minutes | Active Project Time: 2–3 hours | Difficulty Level: Intermediate
You know how when your golden retriever comes inside from being out in the backyard, she just refuses to stop shaking and you know that she’s too cold? That was me last winter with my little cousins’ cavoodles, and I knew I had to do something about it.
This post was inspired by the most adorable matching moment. Can you guess what it is? Yes, a goldie and a blackie cavoodle both wearing super cute soft pink sherpa zip-up jackets with ribbed pink cuffs. They look like little humans in their jackets and I died!
Materials & Tools:
– ½ yard of pink sherpa fleece fabric (bouclé/teddy texture)
– Pink ribbed knit fabric for cuffs (about 6″ x 12″)
– One 8-inch pink nylon zipper
– Fabric scissors, pins, sewing machine
– Dog measurements: neck, chest, back length, and front leg circumference
– Tailor’s chalk or washable fabric marker
– Iron-on hem tape (optional for clean edges)
Instructions
Take the measurements of the dogs chest girth, length of back from collar to the base of the tail and width of neck. These three numbers are very important.
Cut two mirrored body panels from the pink sherpa fabric. Leave a ½-inch seam allowance on all sides. Because of the texture of the sherpa, the seams won’t fray, and the seams will be warm.
Sew the back seam first, with right sides together. Attach the ribbed knit cuffs to the front leg openings. As you sew, stretch the ribbing slightly so that it hugs the leg (but don’t cut off circulation). The snug cuff keeps the cold out, so your dog stays warm on shorter walks and doesn’t need to wear multiple layers.
Attach the pink zipper to the front of the sweater along the opening. Sew it in slowly, as the sherpa material can shift. Use a zipper foot on your sewing machine and stitch slowly near the teeth of the zipper.
Finish the neck edge with a folded sherpa band or a small ribbed collar piece. Topstitch everything down flat.
Try the jacket on your dog before any final stitching, especially around the chest, to make sure that it fits right and will not bunch up under your dog’s armpits.
It can be a bit of an insulator so beware of wearing it if you are feeling a little warm, the zip allows you to dress and undo it easily (as you need to be able to reach for the remote easily) and most of all your dog will want to wear it!
You love to create fun things for your dog, so 7 Creative Slinky Dog Costume DIY Ideas will inspire you to create great costumes for your dog!
The teeth of my zipper are a bit long at the base. They snag on the loops of the sherpa. A tiny detail, but makes it look store bought.
📸 Photo credit: Instagram @sass_hound
#9: The Quilted Puffer Jacket That Makes Your Dachshund Look Like a Tiny Fashionista
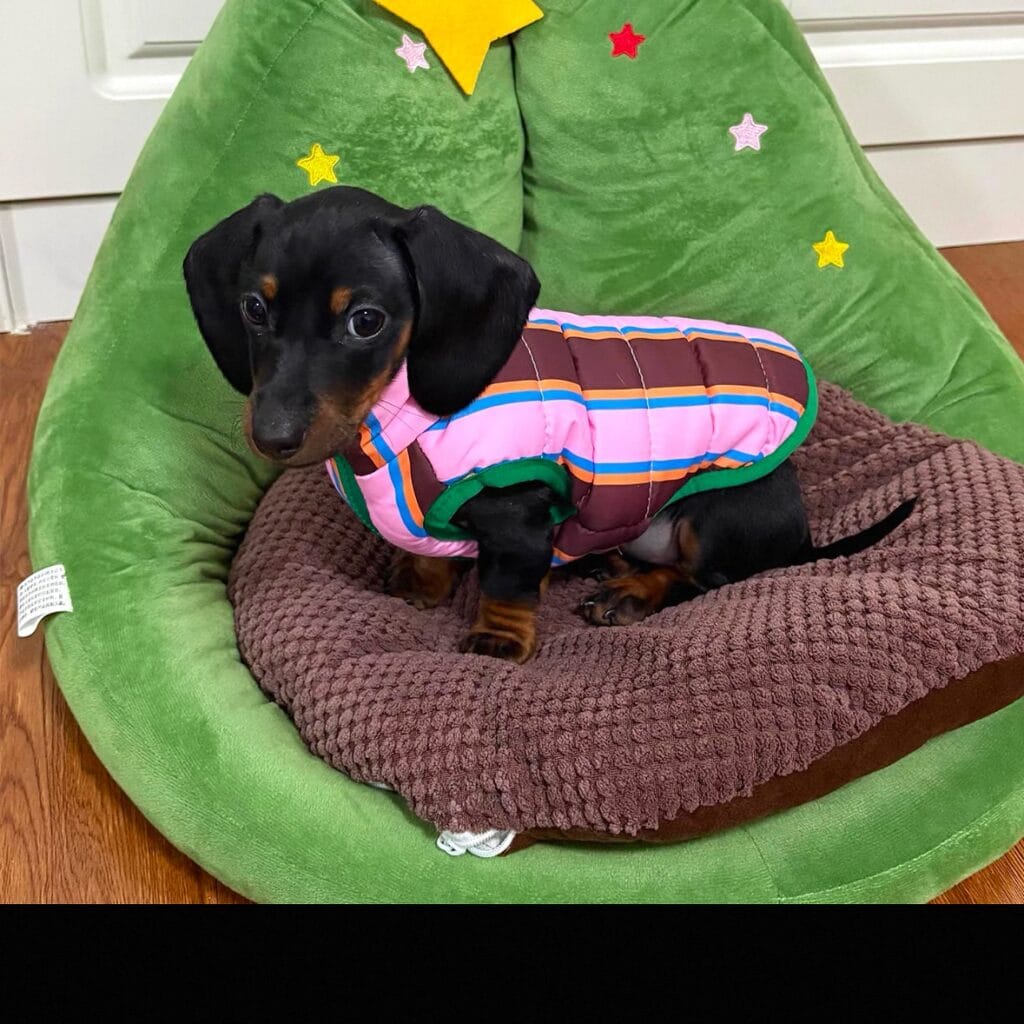
My golden retriever has thick fur to keep her warm. But I wouldn’t mind lending my tiny dog a cozy puffer jacket to keep warm this winter! This quilted puffer jacket is just perfect from the picture.
Materials & Tools:
– ¼ yard burgundy quilted fabric (pre-quilted works best)
– ¼ yard pink satin or nylon fabric
– 1-inch wide striped ribbon in orange, blue, and green
– Green bias tape for edge finishing
– Fabric scissors, pins, and a sewing machine
– Velcro strips (2 inches each) for belly closure
– Tailor’s chalk and a flexible measuring tape
Prep Time: 20 minutes | Active Project Time: 1.5–2 hours | Difficulty Level: Intermediate
Measure your dog’s back length from the collar to the base of his tail, and take his chest measurement. Add ½ inch seam allowance all around the pattern pieces.
Instructions
Cut two pieces for the front of the jacket from your burgundy quilted fabric. The quilted texture will trap the warmth of your body and give a puffy, structured look to your jacket, as in the photo.
Layer your pink satin panel onto your burgundy piece, right sides facing. Sandwich the striped ribbon trim in the center back seam of both layers of fabric. Pin the layers to your ribbon along the center back seam. Sew a ½ inch seam down the center back seam.
Turn the jacket inside out. I like the pop of pink against the dark burgundy. It looks intentional not homemade!
Attach the bias tape (green) to the raw edges, starting with the neck hole, moving toward the leg holes, and lastly the belly flap. This prevents fraying and gives it the clean look as seen in the picture.
Sew the 2-inch pieces of Velcro under the belly flap. The adjustable closure allows the dog to stay warm without feeling constricted and gives him the freedom to move around.
Why this works: The quilted outer layer keeps body heat locked in, the satin lining reduces friction against short fur (dachshund or any other smooth coated breed), and the striped trim adds a little personality.
Quickly clip off any loose threads, give your puppy a quick fit check and then tuck him into his new jacket.
Press the seams open before flipping the jacket right side out. You don’t want that bulky ridge along the center back of your jacket. You want to stay smooth and flat.
📸 Photo credit: Instagram @thedoxieworld
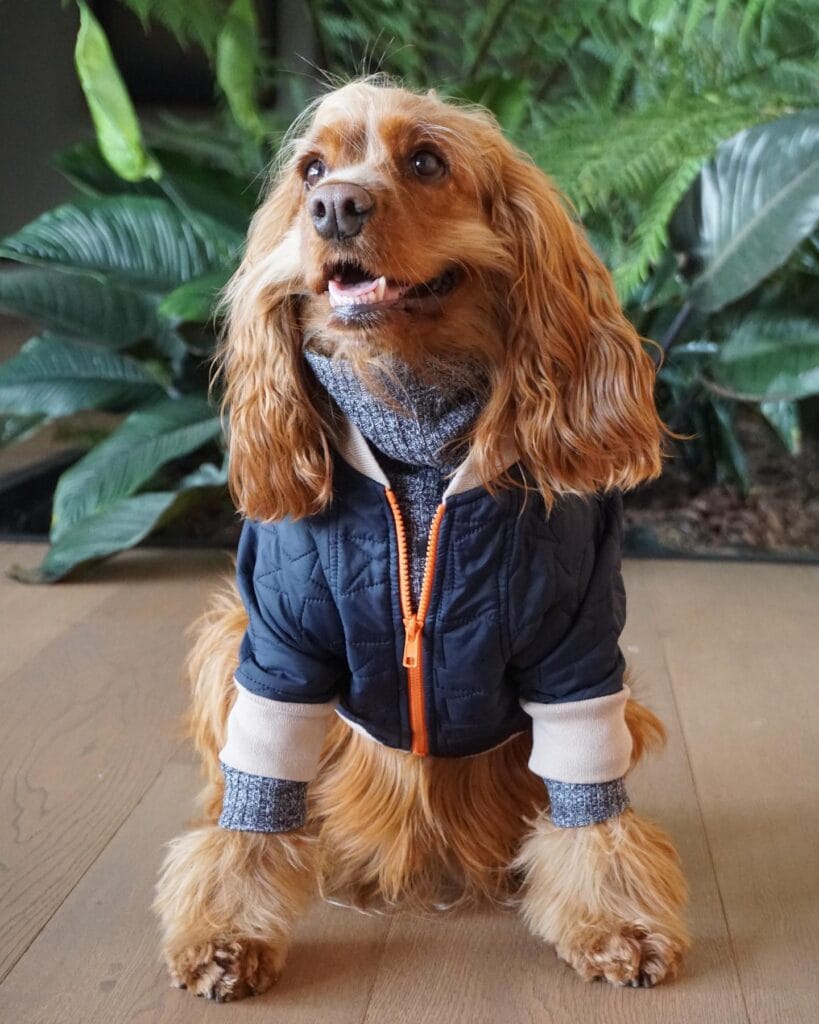
#10: DIY Quilted Bomber Dog Jacket (With a Cozy Sweater Layer Inside)
Prep Time: 30 minutes | Active Project Time: 2–3 hours | Difficulty Level: Intermediate
And this is one of those moments when your golden is shivering by the back door, and you’re standing there like… “she needs something” but nothing at the store fits her weird barrel chest.
Materials & Tools:
– Navy blue quilted nylon fabric (½ yard)
– Heathered gray knit fabric (¼ yard, for the inner turtleneck collar and leg cuffs)
– Cream ribbed jersey fabric (for sleeve cuffs, ¼ yard)
– Bright orange zipper, 10–12 inches
– Sewing machine + matching navy thread
– Fabric scissors, pins, tailor’s chalk
– Your dog’s measurements: neck, chest, back length, leg circumference
### Instructions
Take a piece of paper and trace your dog’s body. Make the body about the length of his back and around the width of his chest, and taper to a point for his belly. Cut out two pieces of the quilted nylon that are the same size.
Cut the gray knit into a wide tube for the turtleneck. The knit is very stretchy, so make it snug; it will fold down at the collar and sit around your neck like the picture. Sew it to the edge of the neckhole before closing up the body panels.
At the bottom of the chest you will see an orange zipper. This is your new favorite zipper. Attach it down the center of the jacket. It is very easy to use and will keep your pup warm on walks without the struggle of trying to wrestle her into it for ten minutes.
Cut four small cuff tubes from the gray knit, and four from the cream ribbed jersey. Top-stitch them to the skin-colored knit with a stretch stitch to prevent them from popping off when she bolts after a squirrel.
Turn everything right-side out, press gently, and do a fit check. The jacket should sit past your ribcage with zero pulling at the shoulders.
The knit inner layer wicks heat back onto your body, the quilted shell blocks the wind, and the fitted cut means you can run (or at least stand up straight) and not have it billow out behind you.
If you love making things for your pup, 7 Creative DIY Dog Halloween Costumes to Try will send you down the best rabbit hole.
Cut the length of the cuff a little shorter than you think you want. The knit fabric will stretch over time and be loose. It will be a little snug at first, but thats perfect.
📸 Photo credit: Instagram @thestripeddog
The One Sizing Secret That’ll Save Your DIY Dog Jacket (Most People Skip This)
More often than not, the biggest mistake people make is measuring their dog when they are standing still. Their jacket fits great until the dog starts moving around.
So, I finally got a couple of measurements from my cousin’s lab in three attempts that failed miserably. Turns out you need to measure while they’re actually walking or at least in mid-stretch. I don’t think I’d realized that the chest and belly measurements would change so much, but they do. The extra inch or so that I was adding “just in case” turns out not to be enough.
The pro secret is measuring the girth at the widest point while the horse is moving, and not while it is still. A girth that is measured at rest will spin your horse around on the trail.
If you’re walking the dog in the warmer months, it’s probably best to skip cotton underwear, which can hold moisture close to the skin when your dog sweats or hits a puddle. Choose a moisture-wicking fleece instead.
Very Cute! I would sew velcro on the belly instead of buttons. This is a lot easier to put on a wiggly dog.
If you have a little fun to spare, you have to check out 7 Creative DIY Dog Costume Ideas for Fun .
Your Dog-Proof Living Room is One Purchase Away
Don’t let your pup trash your house! The work you’ve already put in to make your home beautiful shouldn’t be wrecked by your golden.
As you go through this list of toys, pick one. Just one. Test it with muddy paws, zoomies, and full body flops onto the couch. And I promise you will be back to get the rest of these toys.
If you’ve got that “I want everything to be cute, and functional” mindset, you might be up for these DIY dog enrichment ideas for happy pups.
So tell me, which piece are you going to put in your cart first? ⭐️

Amr Mohsen is a software engineer who traded his keyboard for a leash — at least on weekends. His love for dogs inspired him to share what he learns as a dog owner and enthusiast, bringing a detail-oriented, research-driven perspective to every article he writes. If it’s about dogs, he’s probably already looked it up twice.



