
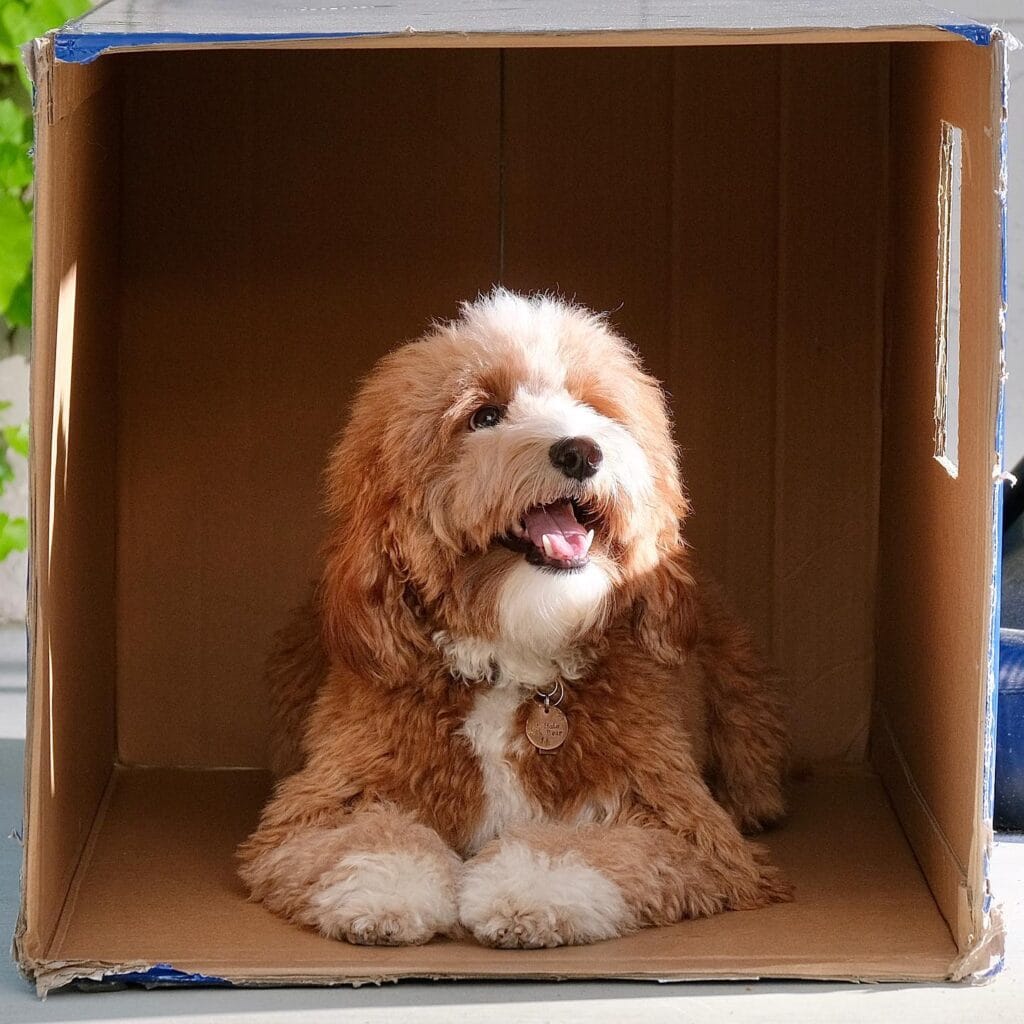
Your golden retriever has just dragged his muddy paws over your beautiful living room rug — yet again! — and now he’s eyeing your linen sofa as though it were his own throne.
you guys love that dog more than anything, but his “space” is a sad little corner with an old bed that clashes with every Pinterest board you’ve ever saved.
Last summer I felt like I had a similar situation with my sister and her dog, Copper. She wanted something cozy for him but didn’t want to spend hundreds on something ugly.
That’s when we started messing around with cardboard. And what we came up with blew us away.
But there’s nothing worse than a dog house that looks like a school project. Make one that looks like it actually belongs in your home.
You can’t help but want your pup to have a super stylish spot. For their comfort, a space that reflects their personality and style. Here are 10 design ideas that will give your pup a spot and give your space a touch of your pooch’s personality.
#1: DIY Cardboard Dog House Painted Like a Real One — “Lil Dude” Style
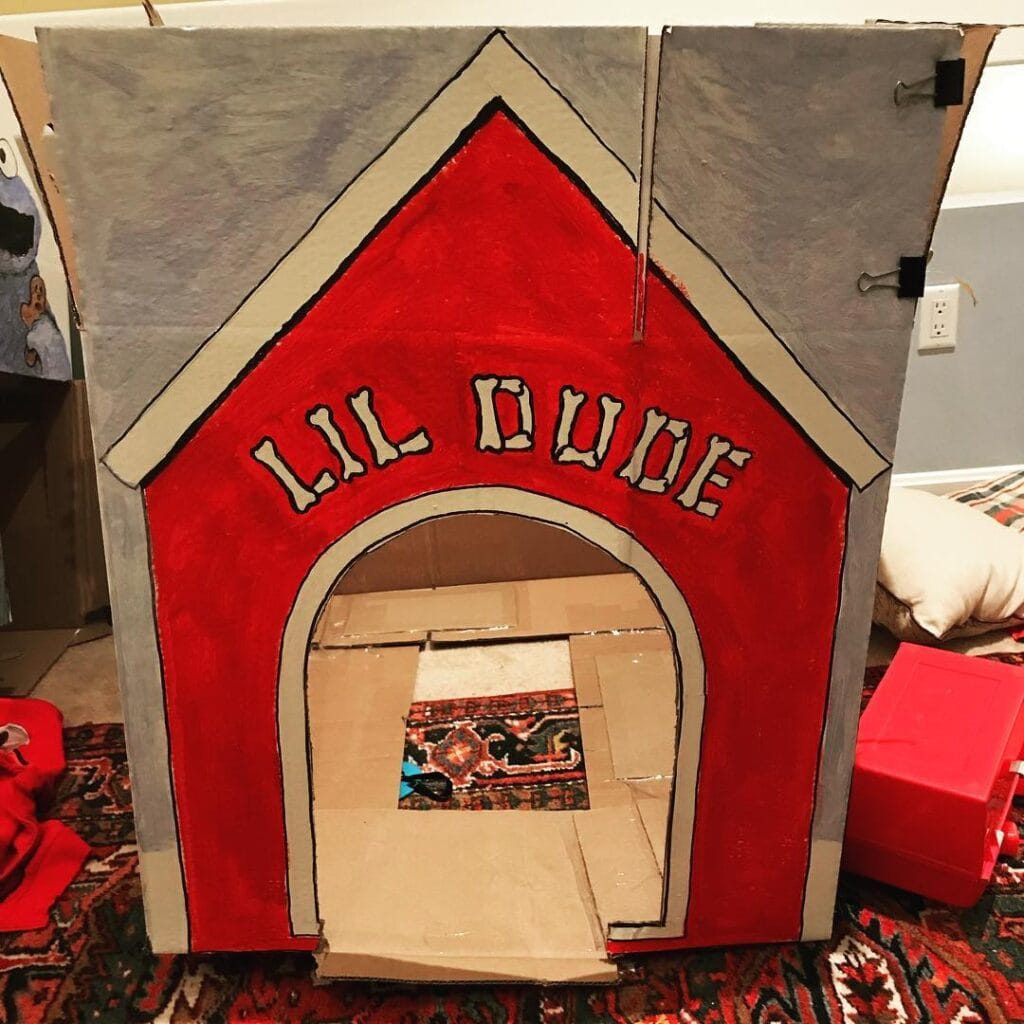
Maybe you’ve also had that moment when your pup just needs her own spot, but your living room already looks like a Pinterest board you worked hard to create? Yeah, me too. This project was born out of that moment for me.
Prep Time: 30 min | Active Project Time: 3–4 hours | Difficulty Level: Beginner-Friendly
Materials & Tools:
– Large double-wall cardboard sheets (at least 36″ x 48″)
– Gray and red craft paint (acrylic works best)
– Black marker or paint pen for outlines
– Bone-shaped letter stencils or freehand lettering
– Binder clips (those big black ones) to hold panels together
– Box cutter or craft knife
– Packing tape or duct tape for reinforcing seams
– A small area rug or mat for the interior floor
– Pencil for sketching
Instructions
I cut the cardboard panels into a shape similar to the front facade (a flat rectangle with a peaked roofline drawn and scored at the top). It’s important to score that peak line, don’t cut it, as it needs to fold cleanly.
Paint the entire front panel gray. Let it dry. Then paint the upper part of the front panel a bold red. It should form a peaked shape. Then add a red rectangle below it. Leave a cream or off-white border where the trim lines meet. This will give it the dog-house graphic look.
Cut out your arched doorway with a box cutter. Be careful cutting out the curve of the arch. If it’s too big, the arch opening will be about 14″ wide x 18″ tall. Plenty of room for your golden retriever to walk in without knocking the whole thing over!
This is the key: …outline every edge in thick black marker once the paint has dried. It gives it that illustrated, cartoon quality to the whole build.
Paint your dog’s name on the top red section in bone-style block letters. Use a pencil sketch to start, then mess it up, repaint, and try again… mine was charming but still needs a couple more tries.
Secure your side and back panels with binder clips and duct tape along the inside seams. We used a small, patterned area rug inside along the base of the cardboard floor. This makes it soft for our dog to land on, and adds a cozy touch to the inside of the tiny home.
Also, she gets her own space. Stop being a hog of the couch and take your stinky dog to the bedroom. More space for me. My clean cushions, thank you.
If your pup loves the outdoors too, Best Dog Houses for Outside Dogs: The Ultimate Guide for Pet Owners has great options for when cardboard won’t cut it weather-wise.
I seal the outside with a clear acrylic spray. It’s only a few extra minutes and saves the whole build. Take a look at how I do it in this video.
📸 Photo credit: Instagram @annie_the_architect
#2: How to Make a Cardboard Dog House with Your Kid (Omar-Style, No Tools Needed)
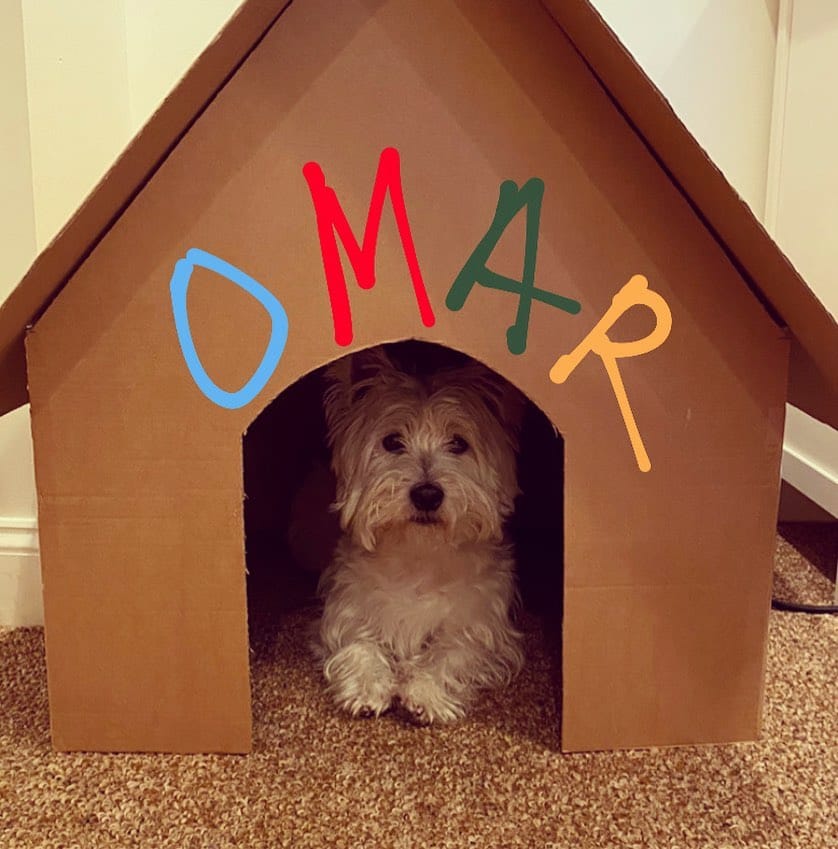
Your golden is sprawled across the living room floor, gazing longingly at the cardboard Amazon boxes you’ve thrown in the trash. And you’re over here pinning aesthetic pet corners on Pinterest wondering why you never just did it.
This one’s for you.
Prep Time: 20 min | Active Project Time: 1.5 hours | Difficulty Level: Beginner-friendly
Materials & Tools:
– 1 large double-wall corrugated cardboard box (at least 24″ x 24″ x 24″)
– Craft knife or box cutter
– Hot glue gun + extra glue sticks
– Acrylic paint (red, blue, green, yellow — or whatever your kid grabs first)
– Wide paintbrush set
– Ruler + pencil for marking cuts
– Packing tape (brown, to blend)
– Scissors
—
Instructions
Grab your largest box. The one that came with your last piece of furniture. I use a craft knife to cut the top flaps off of it, but I save them as well. The flaps will be used as the roof panels.
Cut a large arched opening on one side of the base. I’ve traced one bowl to determine the shape, but you can probably eyeball it. Make the arch about 10 inches wide and 12 inches tall. This is to give a westie or a smaller golden puppy room to duck inside without feeling cramped.
Take 2 of the flaps you saved and fold them into a triangle peak. I used hot glue to attach the 2 pieces together on the ridge of the peak. I let the glue set for a full 60 seconds or else the roof will slide.
Glue the roof on the box walls. Use packing tape to reinforce every seam on the inside. The tape inside keeps the outside of the dog house looking nice and Pinterest-ready, but the dog house will stay solid. Your dog won’t accidentally sleep in a pile of packing tape.
paint the whole thing that warm kraft brown color if you want to have that cozy gingerbread look like Omar’s house up there. let your kid go wild on the name. chunky letters in mismatched colors? i am all about that. Chefs kiss! that part takes about 20 minutes, but it could also easily be an afternoon activity.
Why this works: The double wall cardboard makes it sturdy enough that your dog can lean against the sides without the walls caving in. She gets her own little den that is just enough enclosure for a dog who is feeling a little anxious, but it’s adorable in your living room!
I did not put three layers of tape on the bottom flaps until my dog had moved in. My golden retriever carries a lot of water on his paws so cardboard on the bare floor gets soggy quickly.
If this little project inspires you to start a whole DIY pet craze, the best DIY dog collars are another beginner project you can combine with your house.
📸 Photo credit: Instagram @omar.gosh.the.westie
#3: The Cutest Cardboard Dog House DIY Your Pup Will Actually Use
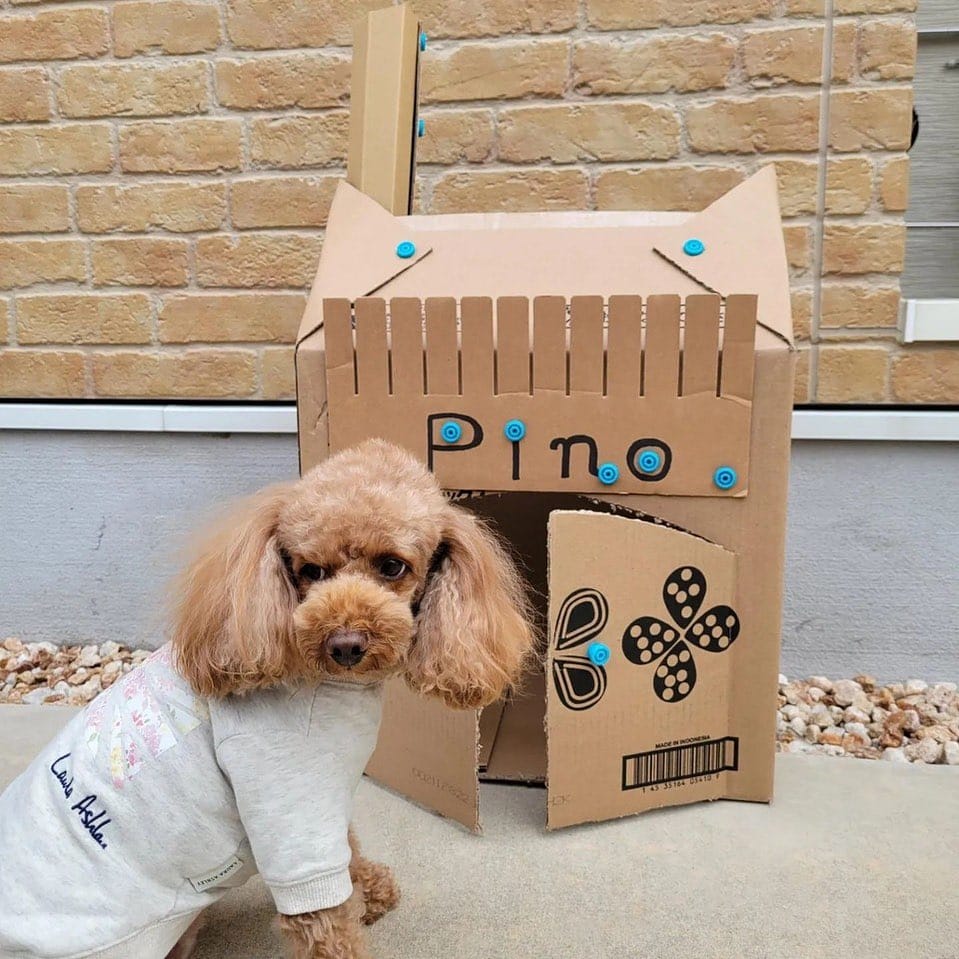
As a dog owner, I know the feeling of looking at my golden retriever waiting to see if she will finally lay down in her bed. She stares at it as if it’s a brand new present, a little reluctant to accept it. This is what the build gives off to me.
This is something I made for my cousin’s toy poodle, Pino (yes, that Pino – the one wearing the lovely Laura Ashley sweater in all the photos), and it only took me one lazy Sunday afternoon and a pile of boxes I had stacked by the recycling bin.
Prep Time: 20 min | Active Project Time: 2–3 hours | Difficulty Level: Beginner
Materials & Tools:
– 2–3 large cardboard boxes (double-wall corrugated works best)
– Blue paper fasteners / brads (these act as decorative rivets)
– Utility knife or box cutter
– Ruler and pencil
– Black marker for lettering
– Scissors
– Optional: printed cardboard panels for door decoration
Instructions
This is how you flatten your largest box, so it becomes the floor and back wall of your fort. Score and fold the back wall so that it stands upright behind your base floor.
Cut the second box into the roof panel. Cut out two triangular ear cut outs at the top corners (about 4-5 inches tall) to give your dog that adorable little house cat silhouette you’re seeing in the photo. (That makes the dog house look a lot more like a home than a box, which means it actually fits your aesthetic, too.)
Real talk: The secret to having a clean fence along the roof line is to cut uniform strips, approximately 1.5 inches wide and 4 inches tall, from a spare piece of cardboard. Stagger the strips and attach them to the front of the house with blue brads. Space them evenly.
On the front panel cut a rectangular doorway wide enough for your dog to walk through without ducking. Attach a decorated side panel (the one with the floral print in the picture below is just a side of a box I had on hand) as a door flap using a single brad as a pivot hinge.
Punch blue brads into rows along the front of each box. These hold the panels together but also look super cute. Write your dog’s name in chunky black marker on the front face of the box – this means your dog has a space that is just for her, which helps to give her a sense of security, and hopefully reduce the amount of her roaming around the house.
Crumple or roll up any extra cardboard strips and place them inside the folds. This will help keep the whole structure from falling over if your dog nudges it with her nose. Golden retrievers are not gentle.
If you love building stuff like this, 13 Genius DIY Dog Stuff Every Pet Parent Needs to Try Today! has so many more projects in the same vein.
Some people leave the interior of the pit bare, or cover it with a folded fleece blanket (nice and cozy, but it doesn’t trap hair the way a padded bed might).
📸 Photo credit: Instagram @makedo
#4: How to Make a Cardboard Dog House With Fabric Curtains (And It Actually Looks Cute)
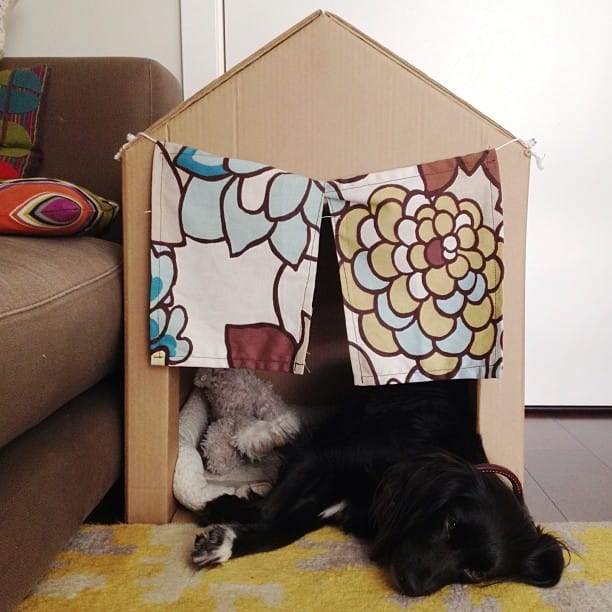
Prep Time: 20 min | Active Project Time: 1.5 hours | Difficulty Level: Beginner
You know that moment when your dog is just sprawled out on your living room floor, nudging every throw pillow off the couch looking for “her spot?” Yeah, I’ve been there. My dog Naya would do the same thing every single afternoon until I made her something that she could actually claim as hers.
This one is so good.
Materials & Tools:
– Large double-wall cardboard box (minimum 24″ x 24″ x 30″)
– One yard of bold floral fabric (the image uses a white base with blue, olive, and brown blooms)
– Thin twine or jute rope — about 18 inches
– Box cutter or X-Acto knife
– Hot glue gun + glue sticks
– Ruler and pencil
– Two small binder clips or clothespins
– A stuffed animal or plush dog toy (trust me, it makes it cozy)
Instructions
Use your craft knife to cut the cardboard into the shape of the house. Cut out a large rectangle (this will be the bottom of the house, the wall and the roof) and a smaller triangle (this will be the peak of the roof). You will see in the picture, the peak of the roof I made was two angled cuts, which meet at the top. This is how a house would be if you were to draw it like a kid. I used my box cutter to score the side folds gently so the cardboard would bend nicely and not tear. I then used my hot glue gun to stick the corners of the house together while someone was holding them up for me. The double wall cardboard is firm enough that if the dog leans on it, it won’t fall over.
Then, cut out an arch shaped door way about 10″ wide by 14″ tall and place it in the bottom front panel.
Cut the fabric into two equal curtain panels, each about 10″ wide by 16″ long. Thread twine through the top hem of each curtain panel, using a loose running stitch, and tie both ends of the twine to holes punched on either side of the doorway arch. The curtains will drape open right down the middle, just like the picture, so you can still let air flow. If your dog is peeking out of the curtains, she’ll feel more secure, and is more likely to use them as a little den.
Keep this in mind: The hot glue on the cardboard can warp if it gets wet, so place the house on a rug, such as the yellow geometric one in the photo. This will anchor it to the floor.
I put a little plush toy in the back corner of the bed, and if Naya sees it, she will walk right into the house. She doesn’t even hesitate to go into the house.
If you love making things for your pups, then you’ll like these 12 Heartfelt Designs for DIY Dog Accessories. They’re fun and simple and pack a lot of personality.
Cardboard is known to absorb a dog’s scent quickly, so it’s likely your dog will return to this new found box day after day.
📸 Photo credit: Instagram @ramblinworker
#5: The Birthday Gingerbread Cardboard Dog House That’ll Make Your Pup Feel Like Royalty
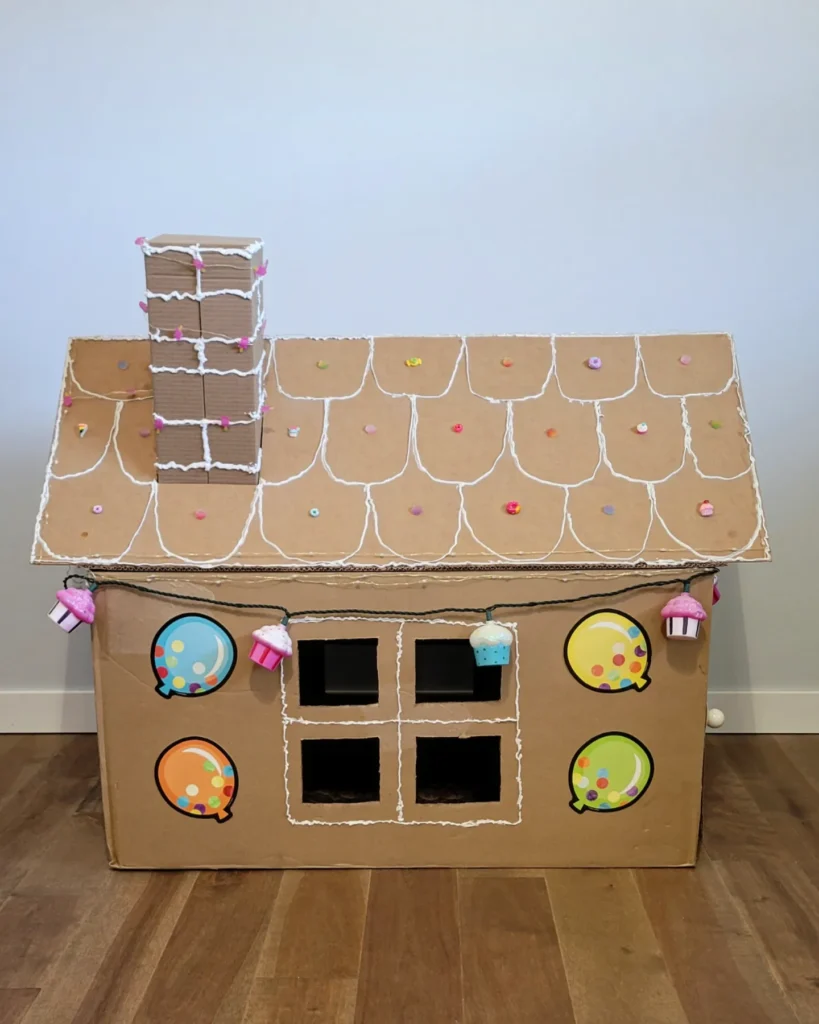
So imagine your little Golden Retriever, sniffing the corner of your living room, totally bored out of her mind and you’re on Pinterest wishing that you could build your dog something magical without breaking the bank.
This one is everything.
Materials & Tools:
– Large double-wall cardboard box (minimum 24″W x 18″H)
– Smaller cardboard boxes for the chimney stack
– White acrylic paint or white puffy paint
– Colorful balloon and cupcake stickers (or foam cutouts)
– Small sequins and buttons for roof candy details
– Dark yarn or twine for the garland string
– Mini cupcake ornaments (plastic or paper)
– Box cutter or craft knife
– Hot glue gun
Instructions
cut 4 rectangular openings from the front panel (2 on the top, 2 on the bottom). Cut out from the top and bottom windows each needs to be about 4″x5″. Stack the smaller boxes to make the chimney and glue each layer with the hot glue gun.
Paint a scalloped shape onto the top of the box using white acrylic paint to add a little texture and give your pup a cozy feeling that this is her space. Press in some colorful buttons and sequins into the wet paint to add a little sweetness.
Attach the dark yarn garland across the front wall of the tree and hang mini cupcake ornaments every few inches. Glue the balloon cutouts directly onto the walls flanking the windows.
Gave my golden retriever her own space and she finally stopped climbing on my sofa. I also thought the cupcake garland was “chef’s kiss.”
Take some extra sequins in a small bag for touch ups after the dog’s first enthusiastic sniff.
📸 Photo credit: Instagram @swooby_doo
#6: Build Your Dog a Cardboard Castle (Yes, Really — And It’s Adorable)
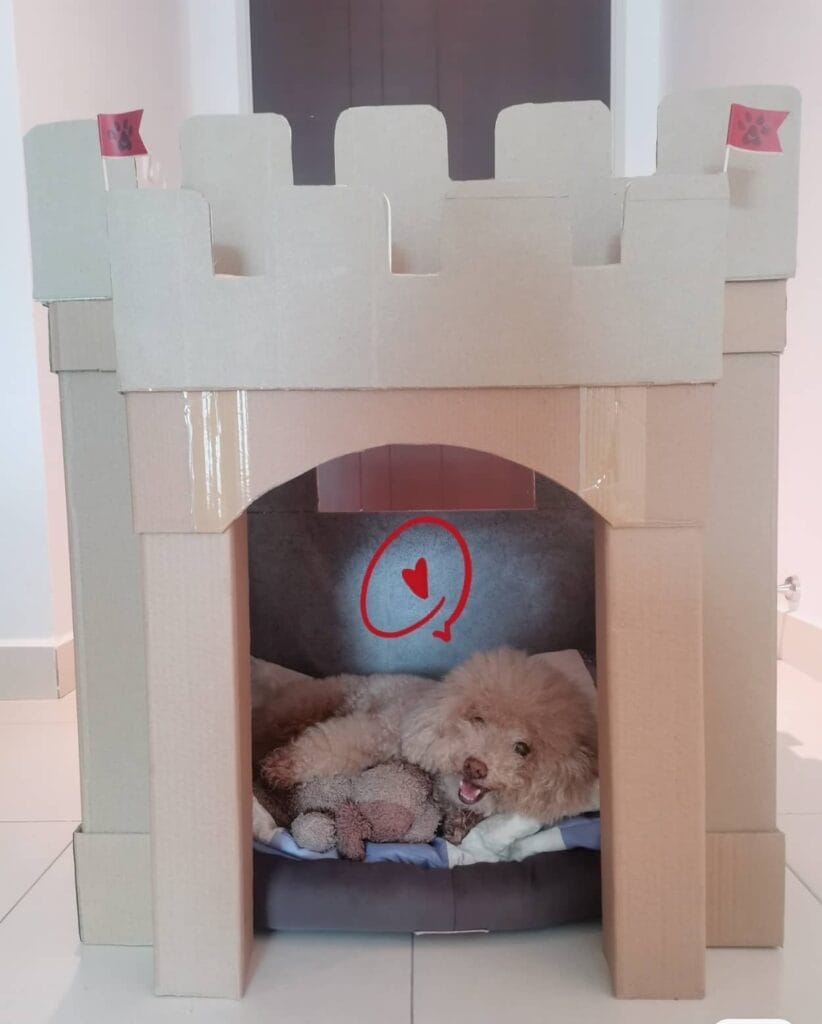
You know that moment when your golden retriever drags her dog bed to the corner of the room and just stares at you like she’s desperately trying to tell you something? That happened to me for weeks until I finally got that she wanted her own space.
Prep Time: 30 min | Active Project Time: 2–3 hours | Difficulty Level: Moderate
Materials & Tools:
– Large double-wall corrugated cardboard sheets (at least 3mm thick for stability)
– Craft knife or box cutter
– Hot glue gun + extra glue sticks
– White or gray acrylic paint + foam roller
– Small red felt squares (for the flags)
– Soft dog bed insert (blue fleece, like the one in the photo)
– Ruler, pencil, cutting mat
– Clear packing tape (reinforces inner seams)
Instructions
Cut your base panel at 24″ x 24″. From that panel, cut two side wall panels at 18″ x 20″, and one front panel at 24″ x 20″. Leave a 12″ arched opening centered at the bottom of the front panel. The arch makes this less like a cardboard box.
Score your arch with your craft knife, very slowly. If you rush you’ll split your cardboard. Once your front arch is nice and clean, I like to stick the side walls on the base first then the front panel. Make sure you stick every seam on the inside of your arch with packing tape, before the glue has the chance to cool. Once you’ve done this, you’ll find your arch can hold your little girl’s full weight on the side wall (I know mine does!)
Next build the battlement top. Cut a 24” x 8” strip of corrugated cardboard. Cut five even rectangular cutouts that are 2” wide and 2” deep. This will be the crown on top of the castle. Then, attach two corner towers using 6” x 6” cardboard tubes or square panels stacked on top of each corner of the front of the castle.
Paint everything with two coats of gray-white acrylic. Let dry between coats. Glue your red felt flags onto 4″ skewer sticks and press into the tops of the towers.
She slides into the blue fleece dog bed and into her favorite stuffed animal. And it’s done.
The double-wall cardboard gives the walls enough rigidity to stay upright, so no need to rebuild it every weekend. And your girl gets a cozy enclosed den – dogs with anxiety especially like having walls on three sides.
Love these kind of projects, if so check out 14 Stylish DIY Dog Crate Furniture Ideas You’ll Love for some new inspiring next level builds.
Paint the inside of the walls a dark charcoal before assembly. It just makes the den seem darker (as shown in the photo) and your dog will be drawn to it even faster.
📸 Photo credit: Instagram @vickie1004
#7: The “Bobby” Cardboard Dog House With a Clock Tower and Paw Print Details
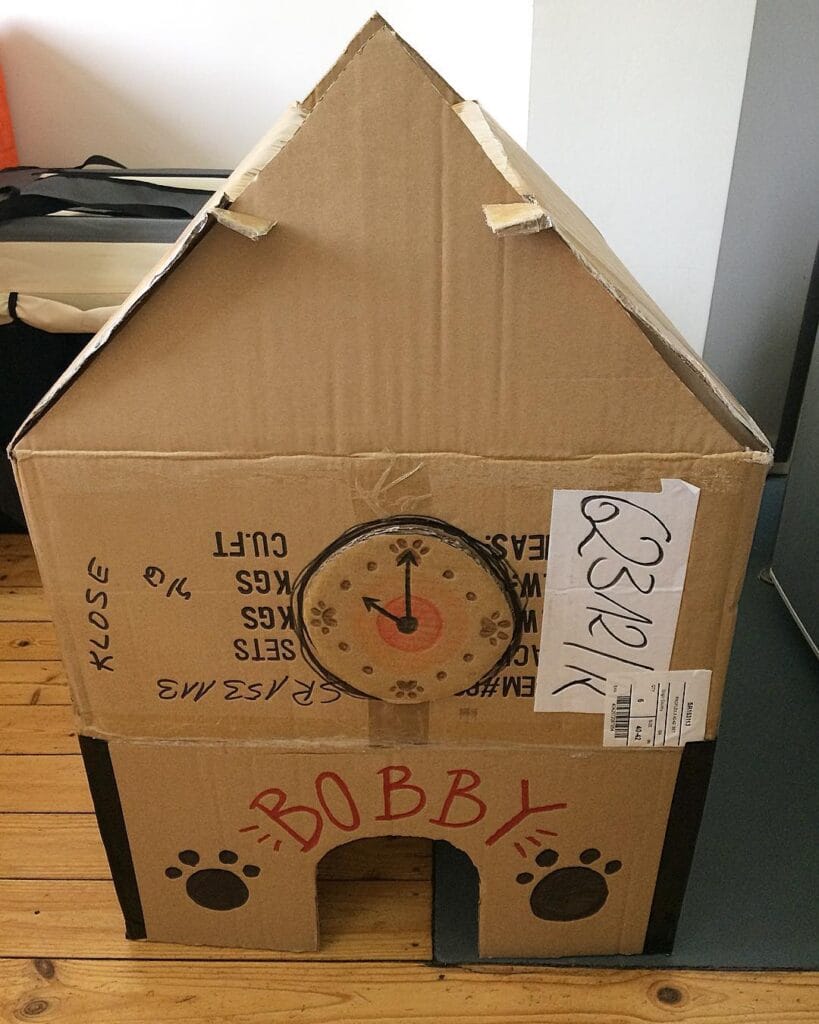
So you know when your dog just sits there and stares at you from across the room until you put her in her cozy corner spot, right? Well that’s what got me started on building this cardboard dog house!
Prep Time: 30 min | Active Project Time: 2–3 hours | Difficulty Level: Medium
Materials & Tools:
– 2–3 large corrugated cardboard boxes (moving-size, minimum 18″ x 24″)
– 1 smaller cardboard box for the triangular roof peak
– Masking tape and packing tape for structure
– Black marker (thick) for paw prints and outlines
– Red paint or marker for the name lettering
– 1 pet clock (the round paw-print face shown is a ceramic or resin clock, roughly 6″ diameter)
– Craft knife or box cutter
– Ruler and pencil
– Twine (for hanging or securing the clock)
– Optional: black acrylic paint for the arched doorway shading
Instructions
Start by flattening one of the larger boxes completely. Score a triangle shape for the top (so that it forms an A-frame roof). Cut two identical triangles from the flattened cardboard, and tape them together along the spine with three layers of packing tape so that the peak holds its shape. The pitch of Bobby’s house should be roughly a 45 degree angle. This gives the entire thing a “house” silhouette, and your little golden retriever pup will look adorable peeking out of it.
Now take your box and leave it in its fully assembled state. Cut a hole in the top of the box to make the arched doorway. I cut my arch wide and low. I didn’t want anything taller than about 10″ wide by 9″ tall for my dog to fit through. It should be large enough to fit your dog through but not so large that the front panel will have no rigidity (i.e., don’t cut it bigger than 3″ on either side of the arch).
The paw prints on the bottom of the front panel are done with a thick black marker, filled in solid. I started with a big oval for the main pad, then four small ovals above it. I did them twice, one on each side of the doorway, and it instantly looks like it was meant to be there, and adorable, rather than just a random box.
To hang your clock above the doorway, punch a small hole through the cardboard and thread the twine through it so it hangs centered above the arch. (The clock pictured has a paw print on the face and a sort of warm terracotta color. You can find a paw print wall clock at any pet boutique or on Amazon.) A mounted clock is a good idea because you want your dog to have a “focal point” on the front of his little house — yes, I said it — his little house.
Put your dog’s name in big, bold, red block letters right across the front lower panel. If you’d like, you can make your dog’s name look as if it’s hand-drawn, just like we did with Bobby’s name in the photo.
Attach the roof by taping the bottom of the triangle to the top edges of the main box with packing tape, on both the inside and outside of the joint. You might want to add a strip of masking tape over the spine of the triangle at the top for a “ridge” effect, as seen in the photo.
A sturdy triple-taped roof joint keeps the house from collapsing every time you dog comes flying in, so you don’t have to rebuild it every other week. Plus, your dog gets a house that won’t collapse on him.
If you love this kind of cozy pet space, 7 Cozy DIY Indoor Dog Kennel Ideas has some really great builds that combine real wood and fabric in a pet space.
I also learned that cardboard absorbs moisture quickly. I now place a waterproof placemat on the bottom of the potty before my puppy uses it, and the whole thing lasts much longer without getting soft on the bottom.
📸 Photo credit: Instagram @tomcklose
#8: DIY Cardboard Gingerbread Dog House — A Christmas Hideaway Your Pup Will Actually Use
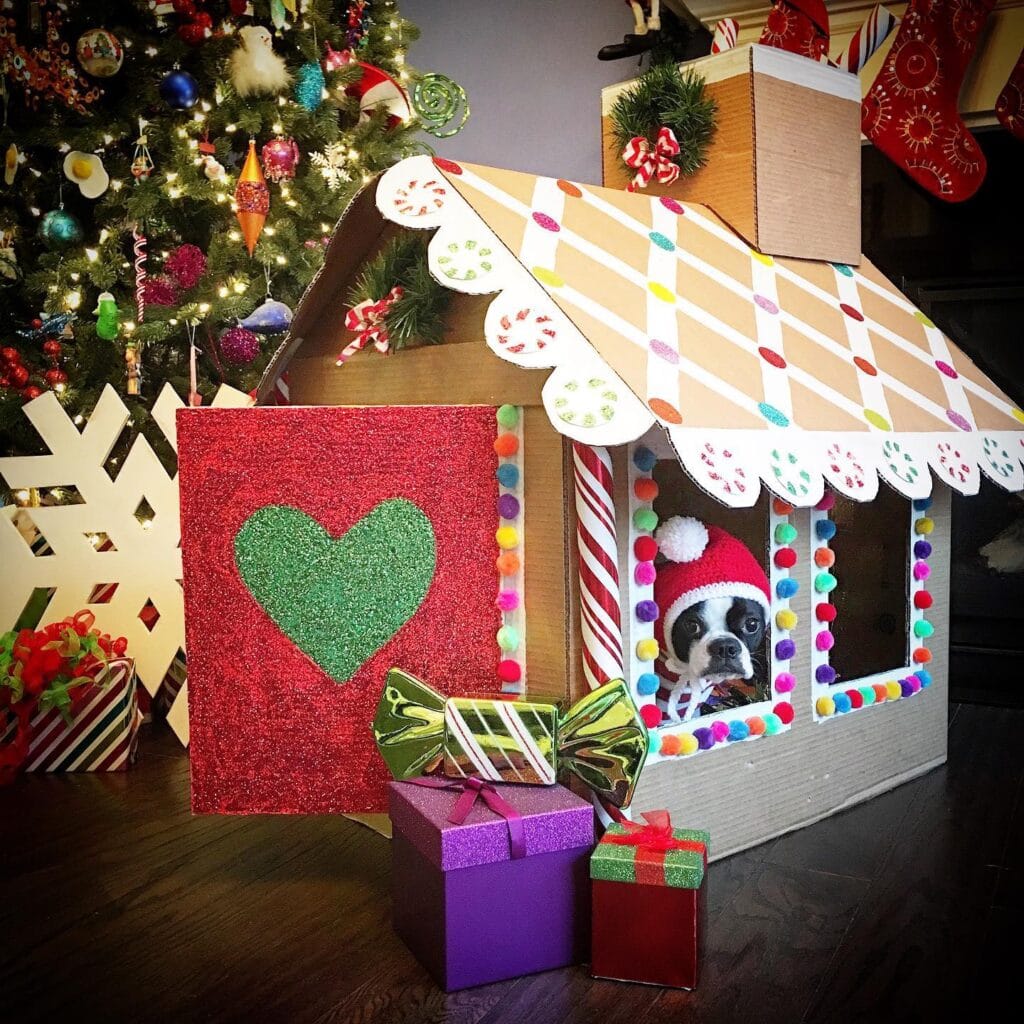
Prep Time: 1 hour | Active Project Time: 3–4 hours | Difficulty Level: Intermediate
This might be the life I wish I had but it’s not the life my dog has. My dog is on the living room floor right now, sprawled out on her dog bed, just ‘right there’ in the middle of all of my holiday decor. I wish there was a way to make her part of the aesthetic.
Girl, this is it.
This cardboard gingerbread dog house from @lola.b.boston is one of the most Pinterest-worthy DIY projects I’ve ever seen. A Boston Terrier is peeking out of a window wearing a tiny Santa hat and I almost screamed.
Materials & Tools:
– Large corrugated cardboard sheets (appliance boxes work great)
– White acrylic paint + tan/brown acrylic paint
– Red and white washi tape or paint for candy cane stripes
– Multicolor pom-poms (1 inch and half-inch sizes)
– White foam board for scalloped roof trim
– Red glitter cardstock for the door panel
– Green glitter foam sheet for the heart cutout
– Colorful dot stickers or painted circles for roof “candy” details
– Hot glue gun + extra glue sticks
– Box cutter and metal ruler
– Pencil, scissors, craft knife
– Small cardboard box for the chimney
– Artificial greenery sprig + mini candy cane ribbon for chimney decor
– Multicolor pom-pom trim ribbon for window and door edges
– Red and white striped cardboard tubes (wrapping paper rolls) for corner columns
Instructions
Cut out the following panels from your main cardboard sheets: 2 Rectangular side walls 2 Triangular gable ends 1 Peaked roof, split into 2 equal panels. Score the two panels of the roof along the middle to aid in folding the panels so that they create a single ridge.
Go ahead and paint all the outside of all the panels with the tan or light brown acrylic paint. Let that dry completely. No messing around with other parts of it until this is dry or you will have streaks and those show.
While your walls are drying you can cut your white foam board into wide scallops that will be your roof trim and eave edges. Make the scallops wide enough so they will cover the base of the walls. Paint the scallops white and add tiny red and green dot details with a small paint brush or pencil eraser dipped in paint.
After the base coat is dry, use white acrylic paint and a wide brush to make a diagonal crosshatch pattern over both roof panels. This replicates the classic iced gingerbread look. Press colored dot stickers (or paint dots) over the grid in red, green, teal and yellow.
Cut out two windows on the front wall with your box cutter. Frame each window with hot-glued pom-pom trim in alternating colors. This trim is what makes the whole thing look finished, not crafty.
For the door panel, I cut a rectangle out of red glitter cardstock and glued a green glitter foam heart right in the middle. This is my front door and it really looks like something you would buy and not make.
wrap your cardboard tube columns with red and white washi tape in a spiral stripe pattern and hot glue them to the front corners of the house for those classic candy cane pillars.
I cut the chimney out of a small square cardboard box and painted it to match the house. I attached a sprig of artificial greenery on top with a mini ribbon bow. I hot glued the chimney to the back of the roof panel before I attached the roof to the house.
Use hot glue to glue all the walls together at the edges and then attach the roof panels on top of them. Press down on each joint for at least 1 minute – this is the only way to ensure that the structure remains square.
Merry Christmas, Pups! A cozy house gives your dog a place to feel safe and quiet from the holidays chaos. Less anxious pacing and more napping with the humans is nice. If your golden is used to having her own cozy space to retreat to, then adding a soft bed inside will only make this house more inviting.
On the front of the card, I’ve got some small wrapped gift boxes, a gold foil candy decoration, and a white cardboard snowflake on the side.
You might consider cutting the back wall shorter, or leaving it off entirely, this will give your dog easy access without feeling trapped in there, it also makes the structure more stable if it’s on hardwood.
📸 Photo credit: Instagram @lola.b.boston_oz.e.griff
#9: IKEA Box Turned Cardboard Dog House (With Shingle Roof!)
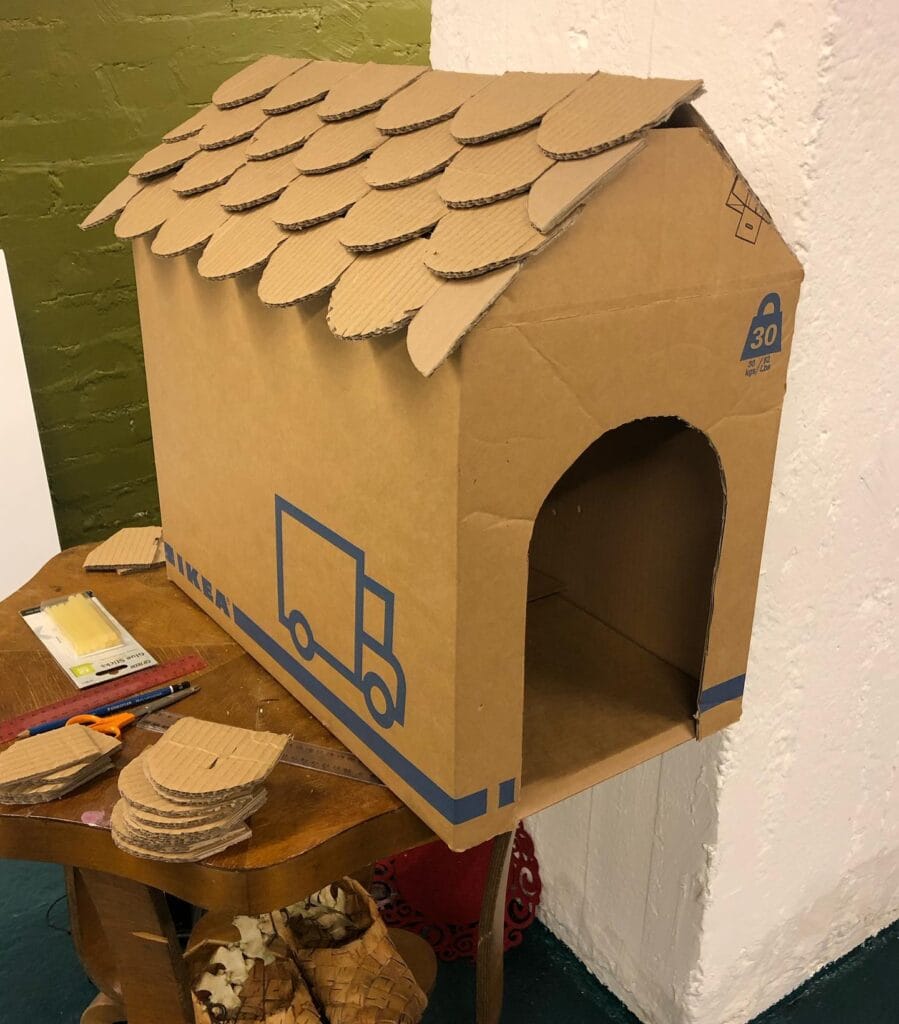
And then there are those moments when your dog just sprawls out on the floor and looks bored, and you feel kind of guilty because you haven’t taken them anywhere fun in weeks? Yeah, that happened to me last winter, and that’s when I grabbed an old moving box and got busy.
Prep Time: 20 min | Active Project Time: 2–3 hours | Difficulty Level: Medium
Materials & Tools:
– 1 large IKEA moving box (or any 30 lb / 30 kg rated cardboard box)
– Extra corrugated cardboard sheets for shingles
– Hot glue gun + glue sticks (the yellow ones in the photo work great)
– Orange-handled scissors or a box cutter
– Ruler or measuring tape
– Pencil or marker
Instructions
First, I folded the top flaps of my box upward at an angle to make a peaked roof. Two flaps went up, two flaps folded inward to support them. I used hot glue to hold them in place. The peaked roof is key here – it makes it look like a house for your pup, not just a sad box.
Using a jigsaw, cut the archway into the front panel of your kennel. Make the archway about 8 inches wide and 10 inches tall so that a golden can waddle in comfortably. Also round the top of the archway so that there are no sharp corners near your dog’s face.
Finally, using a pair of scissors, cut out oval or teardrop shapes from your spare cardboard. Cut them about 3-4 inches long. Beginning at the bottom row of your roof, glue each piece down, overlapping them on top of one another to create a layer of tiles on your roof. The more layers of cardboard you add to your roof, the warmer your little buddy will be.
keep a flat ridge piece of the top of the chimney to seal the peak.
The arch entrance keeps drafts low, and gives her easy access; a feature that keeps cold air out (i.e., she wants to hang out inside rather than shivering on the kitchen tile at 6am).
If your pup loves a challenge too, 7 DIY Dog Agility Course Ideas for Fun is a perfect weekend project!
Score the cardboard on the wrong side before folding to make clean bends. This will also make your roof look much better by not having it crumpled. Always glue shingles down with the corrugations horizontal so they are flat to the roof.
📸 Photo credit: Instagram @wickscrafts
#10: The Cardboard Box Dog House That Actually Looks Adorable (And Costs Almost Nothing)
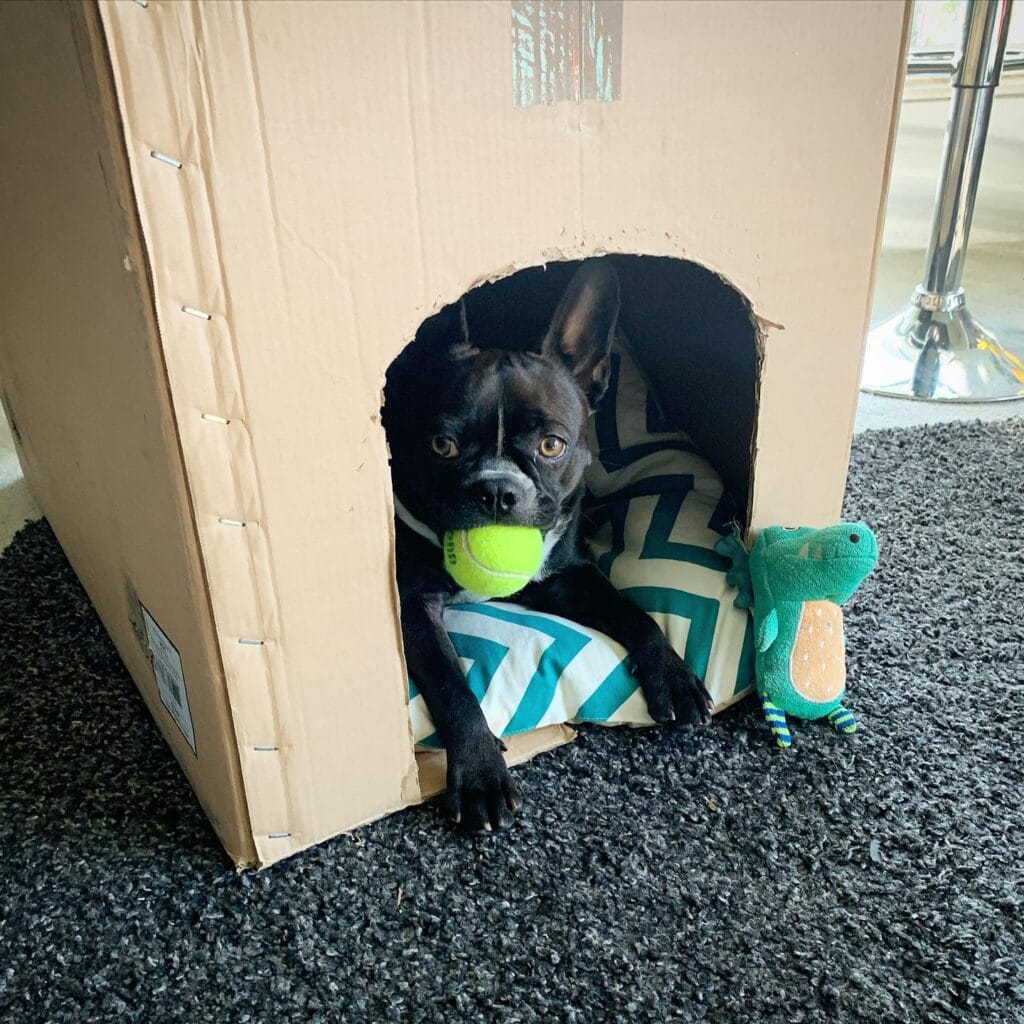
As your golden ages she may not be as interested in the chaos of the living room and may prefer her own little spot. Low-key, privacy, right? This build does just that.
Prep Time: 20 min | Active Project Time: 45–60 min | Difficulty Level: Easy
Materials & Tools:
- 1 large double-wall corrugated cardboard box (appliance-sized works best)
- Chevron-print cushion or pillow cover in teal and white
- Box cutter or craft knife
- Packing tape or metal staple fasteners (you can see them along the box seams in the image)
- A marker for tracing the door arch
- Optional: acrylic paint for decorating
Instructions
Place the box upright and trace an arch shape on the front panel of the box. This arch should be rounded at the top and wide enough for your dog to walk through without squishing their ears down.
Cut along the traced line using the box cutter. Try to score the line first before cutting along it. The cardboard will be quite thick so go slow when you cut along the curved area.
Fold all of the rough edges inward and tape them flat with packing tape to ensure that your dog’s back is not scratched as she goes into the hole.
Slide your chevron pillow inside of it. I like the teal and white zigzag fabric that works really well with the kraft cardboard tone. Tuck a plush toy near the entrance of the fort so she’ll feel like it’s been here since day one, like the little green dinosaur in the image.
That awesome smell of the cardboard with the nice soft cushion inside. It feels like a little den and gives your dog less anxiety and a better sleep.
If it is a “double walled” type of box, you may have to tape it up again along the seams. This is the type of cardboard where the two layers overlap, but it doesn’t reinforce the corners. This box will last longer if you can reinforce the corners as well.
📸 Photo credit: Instagram @thebobbiebarker
The Cardboard Trick That Makes Your Dog House Last 3x Longer
The truth is that most people buy a box, cut a hole in it for the door and call it done. Then their golden child is born and, on day two, tries to walk out of the box and it collapses.
Here’s the pro secret nobody tells you: double-wall your panels before you build anything.
Glue 2 pieces of cardboard together with the corrugation running in opposite directions. It takes about five minutes and actually makes the structure pretty darn strong. My dog could lean against it or even nudge it and not knock it over, and she’s a golden retriever, so she has no problem body slamming me to get my attention!
I often see people using packing tape on the outside edges and then wondering why it all peels off after one humid week. I would use hot glue along every interior seam and then wrap it in packing tape as back up. The hot glue is your real bond.
One thing to remember: I also sealed the bottom edges of the flaps with a bit of glue. That’s where the most moisture sneaks in first.
If you’re looking to build out the rest of your backyard for your pooch, these DIY dog playground ideas for your backyard can go great with this project.
Your Couch Deserves Better — And So Do You
You’ve already got the aesthetic down. The throw pillows, the cozy vibe, the Pinterest perfect living room. But muddy paws and wet-dog smell, well, they’re the villain of the story.
Choose one of these products from the list and just try it. The worst that will happen is your dog will still love you even after you have to wash the couch cushions.
Make a few small changes and your home will feel like home again, not just a giant dog bed with pillows on top.
Which one are you grabbing first ? 🐾

Amr Mohsen is a software engineer who traded his keyboard for a leash — at least on weekends. His love for dogs inspired him to share what he learns as a dog owner and enthusiast, bringing a detail-oriented, research-driven perspective to every article he writes. If it’s about dogs, he’s probably already looked it up twice.



