Your dog can’t walk anymore, and it’s breaking your heart.
I know how you feel. My aunt’s little dog lost the use of his back legs two years ago. Seeing him drag himself around the floor I cried.
Fortunately you don’t have to watch your dog suffer from this condition, and you don’t have to spend a fortune on a commercial wheelchair for him or her either.
Because golden retrievers are big, happy, LARGE dogs, and your dog deserves to move again without you draining your savings account.
There’s nothing worse than seeing your pup trying their hardest and not knowing what to do to help. I know that feeling well and I’m hoping these designs help make that feeling go away.
Check out our list of 10 DIY dog wheelchairs that real pet owners have built at home. Something on this list will get your dog back on their feet.
#1: Build a 3D-Printed DIY Dog Wheelchair That Actually Works
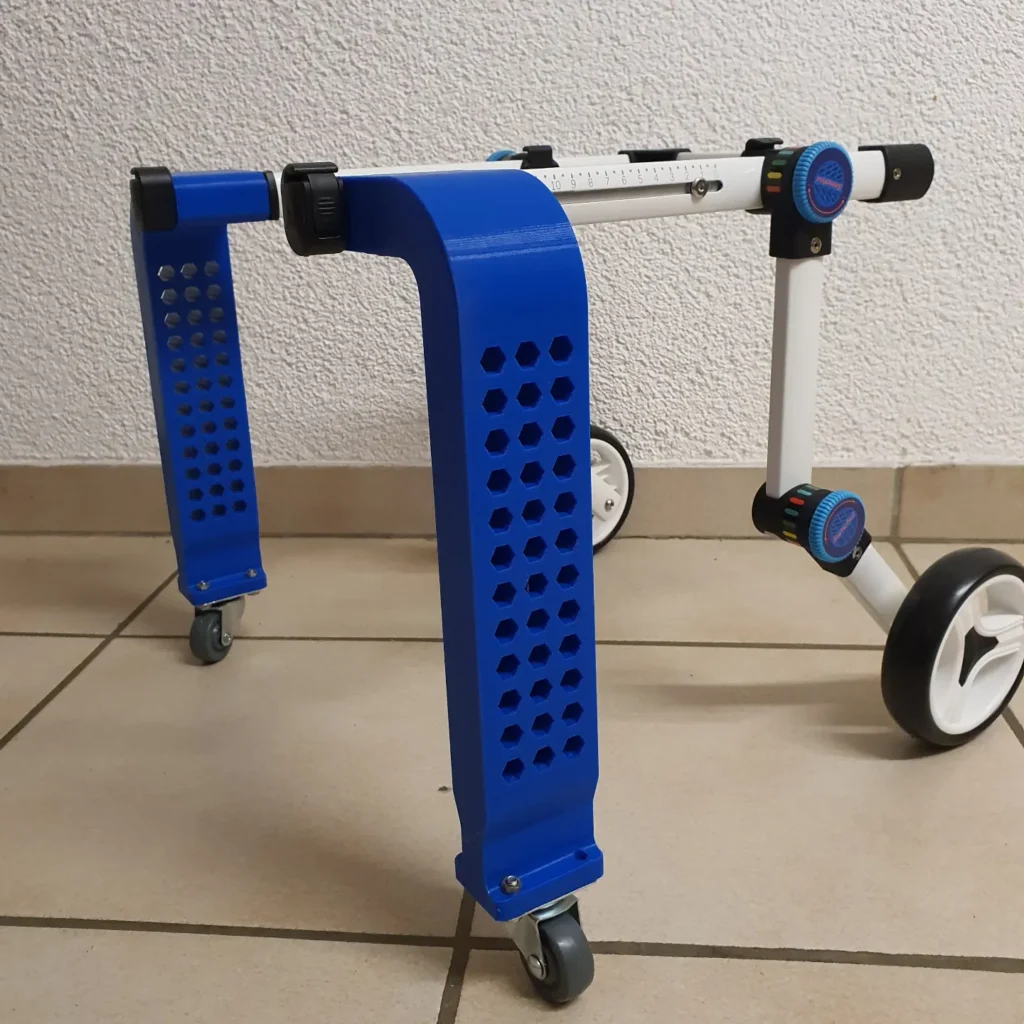
Do you know that moment when your golden’s back legs just give out while she’s walking? And she looks up at you with those big brown eyes as if to say I’m sorry? That was the moment that broke my heart when I saw my neighbor’s dog, Maple, having a seizure.
And that’s when I fell down the rabbit hole of Do It Yourself Dog wheelchairs and came across this blue 3D-printed wheelchair build.
Materials & Tools You’ll Need:
– Blue PLA filament (for the U-shaped frame panels with honeycomb cutouts)
– White aluminum tubing (adjustable cross-bar with measurement markings)
– 4 swivel caster wheels (2 small gray front casters, 2 large white rear wheels)
– Teal adjustment knobs with color-coded markers (red, yellow, green)
– Black quick-release clamps
– M4/M6 bolts and screws
– 3D printer (minimum 200mm x 200mm build plate)
– Allen wrench set
– Sandpaper (220 grit)
Prep Time: 6–8 hours printing | Active Project Time: 2 hours assembly | Difficulty Level: Intermediate
### Instructions
Print the two blue PLA side panels first. These are the iconic U shaped pieces with the honeycomb cut out into them. Having the honeycomb shape allows for less material weight without losing strength for your dog to carry around. Make sure to print these at a 30% infill minimum so the frame will hold up.
Sand every printed edge with at least 220-grit sandpaper before assembly. You don’t want your dog to have rough edges to scratch their belly or legs on.
Slide the white aluminum cross-bar through the black clamp brackets that are located on top of each side panel. The cross-bar has ruler markings etched on it to allow you to determine the exact width of your dog’s body. Tighten the black quick-release clamps when you have reached the proper width.
We attach the teal adjustment knobs to each corner joint. The color-coded markers (red, yellow, green) act like a torque guide: green means secure, red means back off. This feature prevents over-tightening, which will prevent the printed plastic from cracking in the future.
Secure the small gray swivel casters to the front base brackets and the large white rear wheels to the back uprights. The back wheels carry the bulk of the dog’s weight, so check all the bolts here.
Real talk: The length of the adjustable cross-bar can be changed from the wheelchair so that the wheelchair can grow with your dog. This means that the owner will not have to purchase a new wheelchair when the dog’s posture changes and adjusts.
If your dog is new to her wheelchair, put her in it for just 5 minutes at first, and leave the frame on the floor. Let her sniff it, take her time getting comfortable with the frame before strapping her in.
If you’re looking for some fun and creative ways to build stuff for your pup, check out 13 Genius DIY Dog Stuff Every Pet Parent Needs to Try Today! for some great ideas!
📸 Photo credit: Instagram @3d.germany
#2: DIY Pipe Frame Dog Wheelchair With Wooden Push Handles
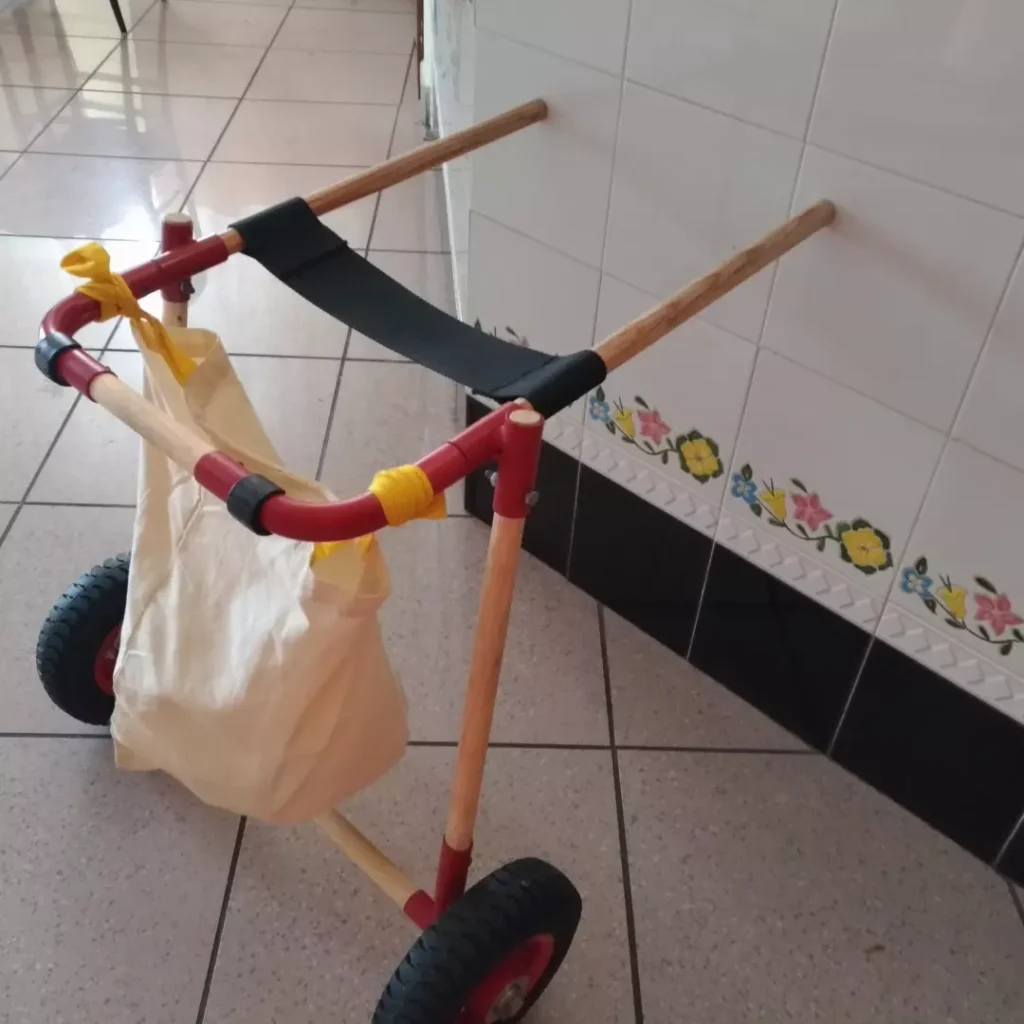
Picture your golden living in a world that is full of people who are not dog people, struggling to get up from the cold tile kitchen floor, her back legs just not cooperating.
That’s exactly why this build exists.
Materials & Tools You’ll Need:
– Red powder-coated steel pipe (bent into frame shape with elbow joints)
– Two 6-inch rubber pneumatic wheels with red hubs
– Two natural wood dowels (approximately 1-inch diameter, cut to 24 inches)
– Black canvas sling fabric (cut to 8 x 5 inches)
– Black foam pipe insulation for padding
– Yellow velcro straps (2 pieces for bag attachment)
– One lightweight fabric tote bag
– Pipe bender, drill, screws, zip ties
Instructions
Begin by bending the red steel pipe into a U-shaped base with two side arms that point upward. The two wooden dowels are to fit in the front of the frame, and will be the handles to push the device. The handles will be angled outward so the hands will fit when pushing the wheelbarrow.
Attach the canvas sling between the two horizontal pipes using the foam-padded clamps. This sling cradles the dog’s hindquarters and the soft support keeps pressure off the joints and reduces skin irritation on the dog when walking for longer distances.
Place the rubber wheels underneath the rear section of the frame so that the axle screws through the pipe joints. This wheel placement is just far enough back that the dog’s front legs will carry some of the weight, which will actually help to rebuild muscles over time.
Loop the yellow straps around the front crossbar for your tote bag, also for treats or waste bags.
Prep Time: 30 min | Active Project Time: 2–3 hours | Difficulty Level: Intermediate
The pipe padding matters more than I thought – make sure to wrap the whole section of the body that your dog’s body is going to touch with the pipe insulation before tightening anything. This makes it much gentler on the dog and she’s already frustrated with her body so it was something I was glad to do. If you’re a crafter and love building things for your dog check out these 12 Heartfelt Designs for DIY Dog Accessories.
📸 Photo credit: Instagram @andreafarina11
#3: DIY Dog Wheelchair With PVC and Aluminum Frame (The One That Actually Holds Up)
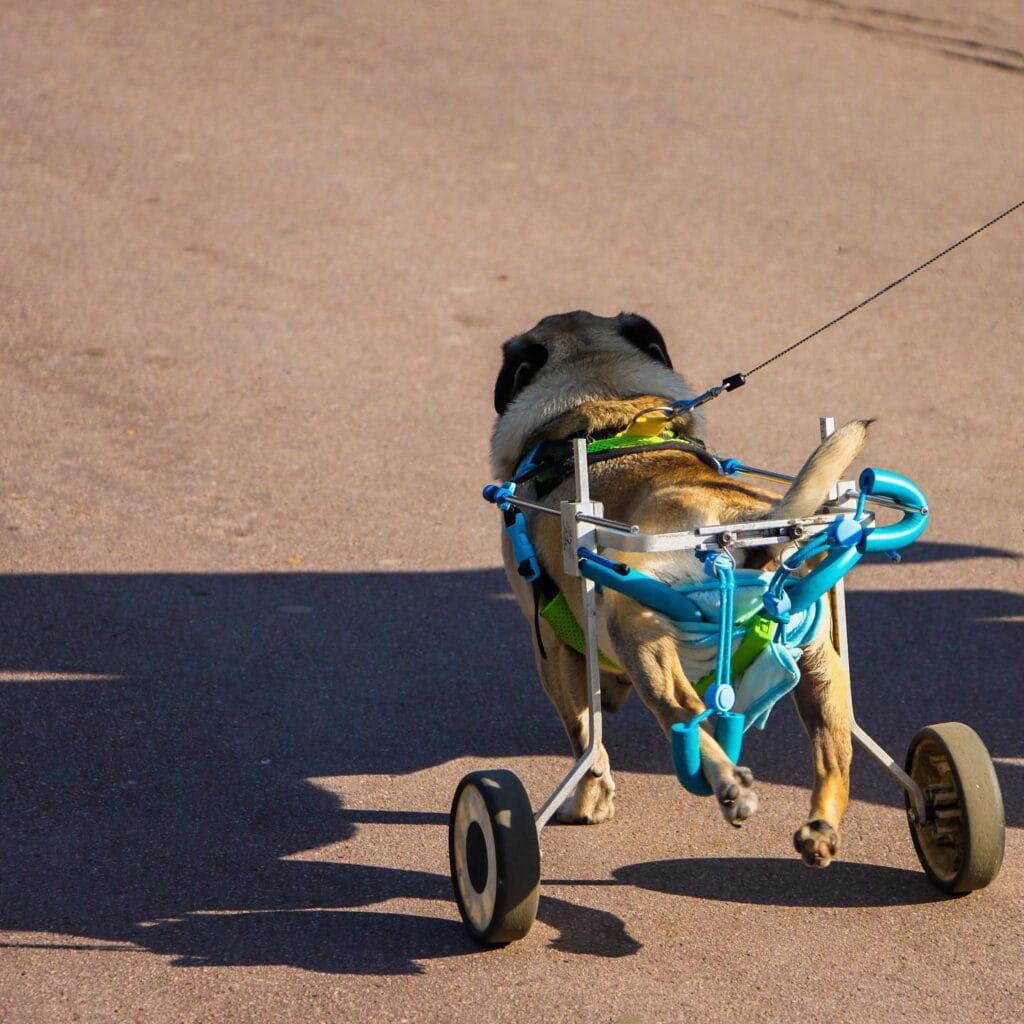
Now, imagine that your dog is having trouble moving her back legs and watching her drag herself across your hardwood floors while her tail is still wagging is heart breaking every single time.
This build is inspired from a real setup I saw that used a blue powder-coated aluminum frame and a silver steel rod chassis. It has a structured, purposeful and sturdy look.
Materials & Tools You’ll Need:
– 1-inch aluminum square tubing (frame base)
– Blue powder-coated steel rods (rear support arch)
– 2 rear wheels (6-inch rubber wheelchair wheels)
– Neon green mesh saddle harness (for belly and hip support)
– Light blue diaper/wrap cloth
– Adjustable metal connectors and bolts
– Drill, hacksaw, measuring tape, sandpaper
Instructions
Cut the tubing into a rectangular base frame that matches the length of your dog’s body. Measure from the shoulder to the hip and add two inches to both sides of the measurement. Sand down every edge so that nothing can snag your dog’s skin.
Attach the “blue steel arch” at the back of the frame and bend it into a curved handle to support your dog’s lower body weight so that his front legs can walk without being strained while he moves naturally.
Now, mount your 6-inch wheels onto the base frame. You can use your adjustable connectors to make sure they are placed slightly behind the hip joint. These will roll freely so your dog gets a real momentum and does not just drag it.
I threaded the green mesh harness under the dog’s belly and clipped it to the frame sides. The mesh doesn’t rub against his skin so he has no raw spots when we’re on long walks. It’s snug, but not too tight. I can slide two fingers under the mesh.
Wrap the light blue cloth around my hips before I’m ready to put the dress on, so it will cushion my pelvic bones and make it possible to walk a block on the sidewalk without pain. The thing is, this has become a very long process. I have been wearing the shirt for over an hour, and we still aren’t done!
Prep Time: 30 min | Active Project Time: 3–4 hours | Difficulty Level: Intermediate
Adjust the frame height so that your dog’s spine remains level. If your dog’s spine is tilted up or down, it will put pressure on the joints in the front of your dog’s body and fatigue your dog quickly. If your dog starts out pulling hard on the leash to one side, don’t worry, that’s normal. Your dog is probably figuring out the new center of gravity.
And if you’re already in the mood to work on a project, 12 Creative DIY Dog Gate Ideas for Your Home would be a perfect project to work on while your dog is adjusting to being in one room only.
📸 Photo credit: Instagram @brucealborough
#4: Balance Bike Frame Dog Wheelchair (The Blue-Wheel Upcycle)
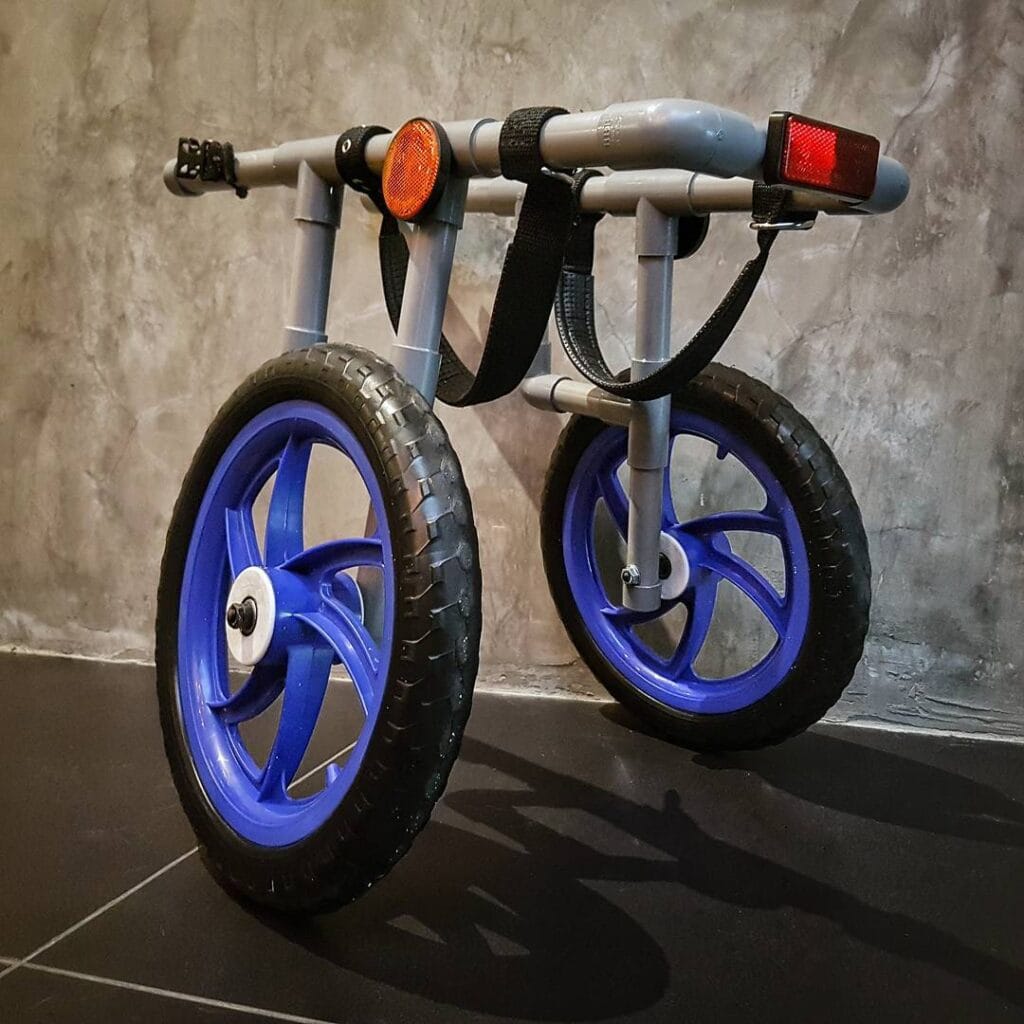
Yeah, you know that moment when your golden is struggling to get up from their favorite rug spot, back legs just not cooperating and your heart just breaks a little? Yeah, that’s exactly why this one got me.
Someone took a kids’ balance bike — the kind with blue plastic spoke wheels and a gray aluminum frame — and turned it into a working rear-support wheelchair. It works great.
Materials & Tools:
– Balance bike for kids (12-inch wheels are better)
– 2 black nylon webbing straps (adjustable, 1.5-inch width)
– 2 reflector lights (orange front, red rear) already mounted on the handlebar here
– Scissors or rotary cutter
– Adjustable wrench
– Measuring tape
Instructions
Remove the seat post so that the frame sits lower on the bike. You should also flip the bike so that the handlebar is the rear support bar. This is the bar that cradles your dog’s behind.
Attach the nylon straps to the frame tubes, crossing them in a harness shape. Make sure that the straps sit behind your dog’s front legs, so that they do not press into the belly. Adjust the buckles until there is no pinching, but enough lift to take the weight off the rear legs.
With the pneumatic rubber tires, your dog will roll over the hardwood floor and tile without screeching, and without losing his balance.
Slide your dog in from the side, clip both straps and let him find his footing.
The handlebar’s natural width keeps the bike from tipping sideways, which helps to ease dogs who are still not trusting the bike’s support.
📸 Photo credit: Instagram @dogwheelchairmalaysia
#5: DIY Dog Rear Wheelchair From Scratch (The One That Actually Works)
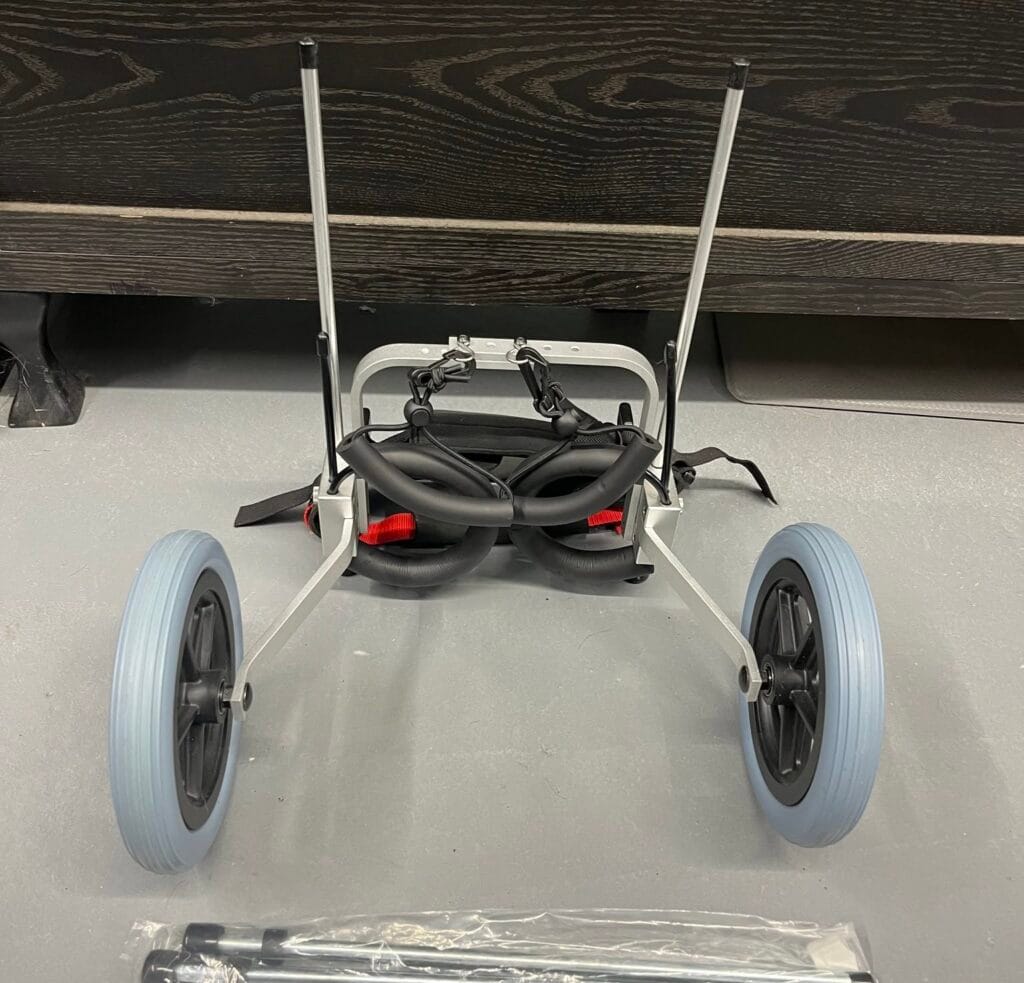
Picture your dog, who is dragging her back legs across your freshly mopped floor. You just know a trip to the vet is going to lead to tears of joy, and dollars down the drain, when you’re looking at a bill for a commercial wheelchair. Been there. My cousin’s lab mix lost mobility in her hindquarters last year, and we spent three weekends figuring out this build-out.
Prep Time: 1 hour | Active Project Time: 3–4 hours | Difficulty Level: Intermediate
[IMAGE] MATERIALS & TOOLS Aluminum square tubing (lightweight, rust-resistant silver frame) Two 8-inch foam-filled gray rubber wheels Black spoke hubs Black padded saddle harness Red nylon adjustment straps Two vertical aluminum handle rods (approximately 18 inches tall) Quick-release black carabiner clips Drill, metal saw, sandpaper, measuring tape
Instructions
Cut your aluminum tubing in to the rectangular frame for the base. It should be the width of your dog’s hips. Measure twice. Cut out the ends for the two back wheels and attach the wheels with the axle bolt (they should be on the outside of the frame so your dog does not drift off to one side when walking on them). Make sure that both wheels on each side are level so they are not scraping on the ground.
Attach the two vertical handle rods to the front of the frame. These attach to the harness and keep the weight of the cart balanced behind your dog’s hips. The cart will then be balanced at a point which allows your dog to move forward rather than having to fight the cart.
Next, slip the saddle onto the base frame, then hook the carabiner hooks through the loops on either side of the harness. Then you use the red adjusters on the front to get the saddle to sit comfortably in the hollow under your dog’s belly but not press on her spine.
Not to mention getting that saddle height just right before your first test walk is a must! Her front legs should be hitting the ground at a natural angle and zero strain should be put on her shoulders.
If you decide to use the metal, pad any raw edges with foam wrap before your golden ever touches this thing. The metal burrs can be sneaky!
📸 Photo credit: Instagram @cocosclosetthriftstore
#6: DIY PVC Pipe Dog Wheelchair — Support Your Pup’s Back Legs for Under $30
Prep Time: 30 minutes | Active Project Time: 2–3 hours | Difficulty Level: Intermediate
Let’s say your dog’s back legs just stop working properly one day, be it slowly or suddenly. You watch your dog trying to drag themselves across the floor and your heart breaks.
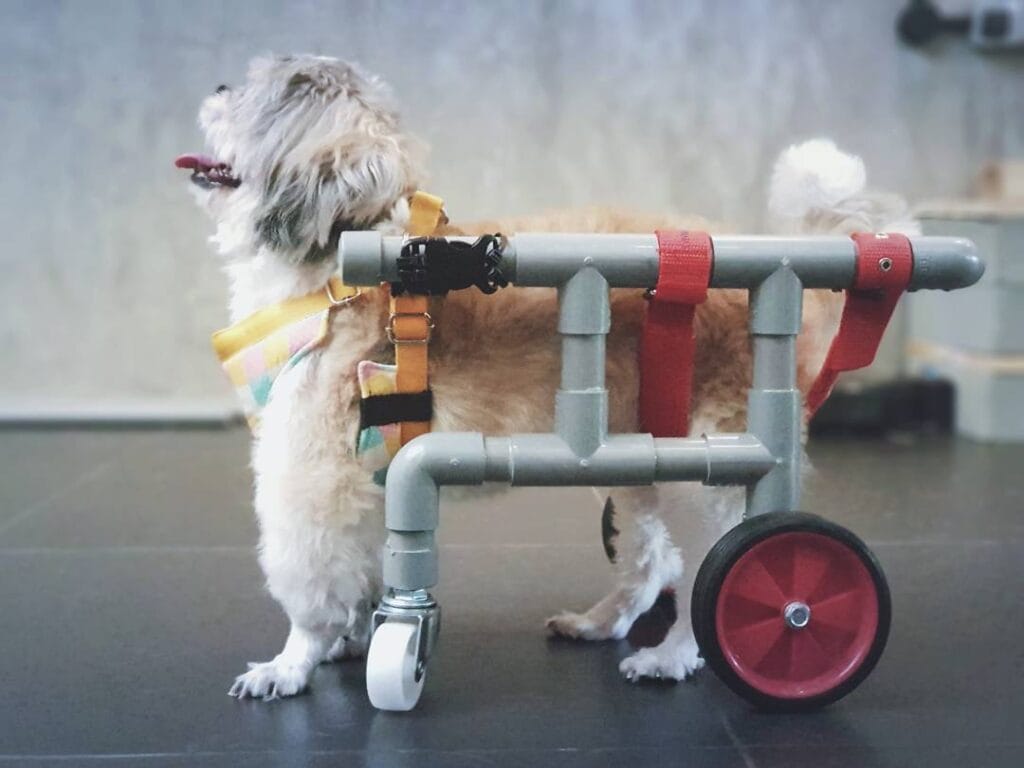
This little build changed everything for dogs like that little fluffy guy in the photo. And honestly, it’s not as hard as you may think.
Materials & Tools:
– ¾-inch gray PVC pipes (approximately 36 inches total length)
– ¾-inch PVC elbow and T-joint connectors (x6)
– 1 swivel caster wheel (front, white, 2-inch)
– 1 pair of red-hub rubber wheels (4-inch diameter, rear)
– Red nylon webbing straps (1-inch wide, x2)
– Orange adjustable belly harness strap
– PVC primer and cement
– Hacksaw or pipe cutter
– Sandpaper (medium grit)
– Drill + screws for wheel axle mounting
– Measuring tape
– Soft padding or fleece scrap for strap lining
Instructions
First, take a tape measure and measure the distance between your dog’s front legs and back legs. Next, measure the width of the dog’s hips. Finally, measure the height of the dog’s belly from the floor. These measurements are important because every cut will depend on them.
Cut your ¾ inch PVC pipe into lengths that are the same as the measurements you used in your front to back leg measurement, your hip width measurement, and your belly height measurement minus the diameter of your wheels. Make sure that you sand the ends of each of the cuts, rough cut edges can cause stress on the joints and the whole frame wobbles.
Before you cement anything, dry fit your T-Joints and elbow connectors on the frame. People usually skip this step and then have a crooked frame. Lay the frame down flat on the floor and check to see that all four legs are even. Take the frame apart and cement each connection one at a time. Hold each connection for 30 seconds before moving to the next.
After the frame cures (it takes a full hour), attach the swivel caster wheel to the front center of the frame with a screw mount. This is the wheel that will do the “steering” and allow your dog to turn as you walk him. Mount the two 4-inch red-hub wheels on a metal axle rod across the rear crossbar on each side of the frame. The wider stance at the back of the frame keeps the dog from tipping to one side when they get excited.
2. Thread the red nylon straps through the rear frame to cradle the hinds. I cut scrap pieces of fleece so that the webbing doesn’t rub against their skin. I added a orange adjustable belly strap in the middle of the frame to keep everything snug, without restricting breathing.
The strap placement, right at the dog’s center of gravity, keeps the chair balanced, so your pup can actually move, rather than fighting the equipment the whole time.
Fit your dog into the chair with their front legs fully on the ground and front paws flat. Rear of their body should be just off the floor, perhaps half an inch off the floor.
Check the straps after the first five minutes of use, and readjust if necessary. Dogs often shift their weight around once they realize that they can go somewhere.
A colorful patchwork vest or harness under the frame (like the one in the photo) provides a cushion layer between the pvc and their ribs, and makes the whole set up way cuter!
📸 Photo credit: Instagram @dogwheelchairmalaysia
#7: DIY Dog Rear Wheelchair With Chrome Frame and Harness Support
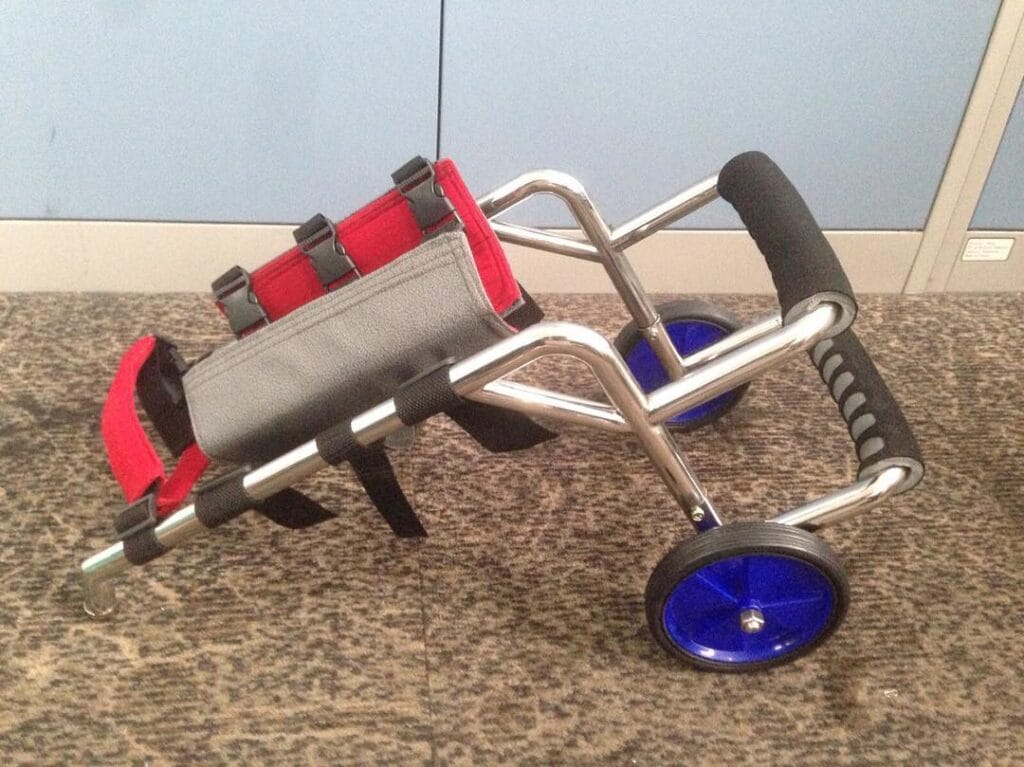
Now, imagine your furry, best friend struggling to get up and down or dragging her back legs on the floor of your living room. You know she wants to play with you but she just can’t get there. This heartbreaking moment is what pushed me down the rabbit hole of building dog wheelchairs.
this shit right here is giving me exactly what my girl needs.
Materials & Tools You’ll Need:
– Chrome-plated steel tubing (approximately ¾ inch diameter)
– Blue plastic spoke wheels (6-inch diameter, rubber-edged)
– Black foam grip handles (pipe insulation works perfectly)
– Gray neoprene saddle pad (8 x 5 inches)
– Red nylon support harness straps with black buckle clips
– Black nylon webbing for belly and chest support
– Pipe bender, drill, metal file, zip ties, measuring tape
Instructions
First, measure your dog’s torso length, hip width and the height of the rear legs. With these measurements, cut a chrome tube in half, creating a U-shaped rear axle frame. Then bend a second inverted U of the chrome tube to form the handle arch using your pipe bender.
File every cut edge of the file smooth. Attach the axle to the handle frame with two diagonal crossbars, fastening each with a bolt at the junction.
Slide your black foam grip over the handle. Attach the blue wheels to the ends of the axles.
Saddle: The gray neoprene pad sits directly under her belly. Attach the red nylon straps across the top with the black buckle clips at three points. This is a three point harness which keeps her hips stable. This allows her to push forward without tipping sideways.
Test the height by setting the dog gently in it and checking that the front paws are flat on the floor.
adjust the straps so she is not too tightly held, but so that she is being well supported and will not wriggle about. you want her to breathe easy and to be able to move around.
If your pooch needs some help getting in and out during recovery, this ramp should help a lot. Additionally, it would make a nice addition to a DIY dog ramp project.
Keep this in mind: I pad the bars so that they don’t rub on my skin when I’m wearing them for a longer period of time.
Prep Time: 30 minutes | Active Project Time: 3–4 hours | Difficulty Level: Intermediate
📸 Photo credit: Instagram @kursirodaanjing
#8: DIY Rear-Support Wheelchair for Dogs With Hind Leg Weakness
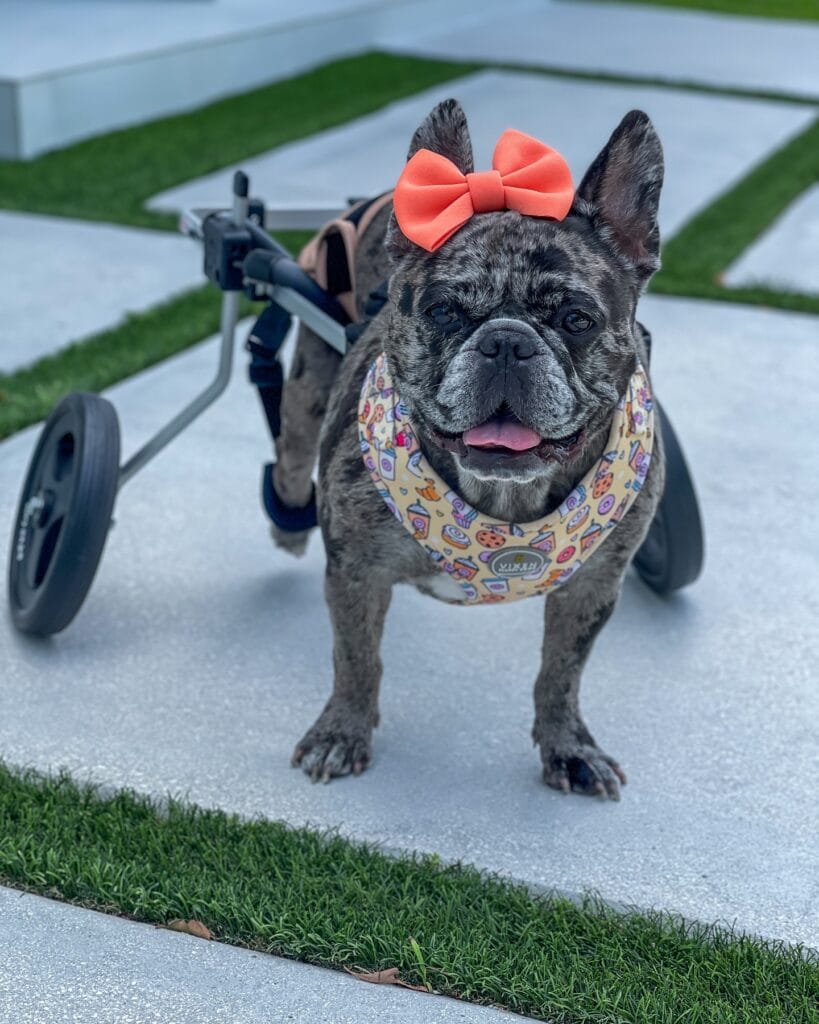
Prep Time: 30 minutes | Active Project Time: 2–3 hours | Difficulty Level: Intermediate
Every dog owner will know that terrible moment where their dog tries to follow them across the room but their back legs just sort of…give out. It’s that moment that makes you want to cry everytime.
Looks awesome. And from what I can see, this is a set up for a real dog. One of the more thoughtful builds I’ve ever seen for a pup.
Materials & Tools You’ll Need:
– ¾-inch aluminum square tubing (lightweight, rust-resistant)
– Two 6-inch rubber wheels with axle bolts
– 1-inch nylon webbing straps with adjustable buckles
– EVA foam padding (for hip/belly contact points)
– Carabiner clips (for harness attachment)
– Drill, hacksaw, measuring tape, sandpaper
Instructions
Cut the aluminum tubing into a U-shaped rear frame. Cut two 12-inch vertical side posts and a 10-inch horizontal crossbar. Sand every cut edge so nothing scratches your dog’s skin.
Drill two holes through the bottom of each vertical post and thread your wheel bolts through. Tighten with locking nuts – we don’t want any wobbly wheels now, do we?
I’ve covered all the points of contact with the frame with EVA foam and fastened it down with medical grade adhesive tape. This protects the hips when we’re out for longer rides.
Attach your [https://www.amazon.com/dp/B006WVY0T8 nylon webbing] in a figure-eight belly sling pattern. Run straps from the crossbar up over each hip to attach to adjustable buckles at each end. With an adjustable buckle you can make the fit just right so the dog can move freely without chafing or slipping.
Using the front harness clips on my dogs existing chest harness (attached with carabiners) — the whole system does not restrict the front legs.
Adding a colorful bandana or bow (like the coral one on our sweet little French bulldog) makes the whole set-up feel less clinical and more joyful.
Check the wheel alignment before going out with your dog. Even a slight tilt puts uneven pressure on your dog’s spine over time.
📸 Photo credit: Instagram @missoreo_thefrenchie
#9: Full-Body Support Dog Wheelchair With Adjustable Aluminum Frame
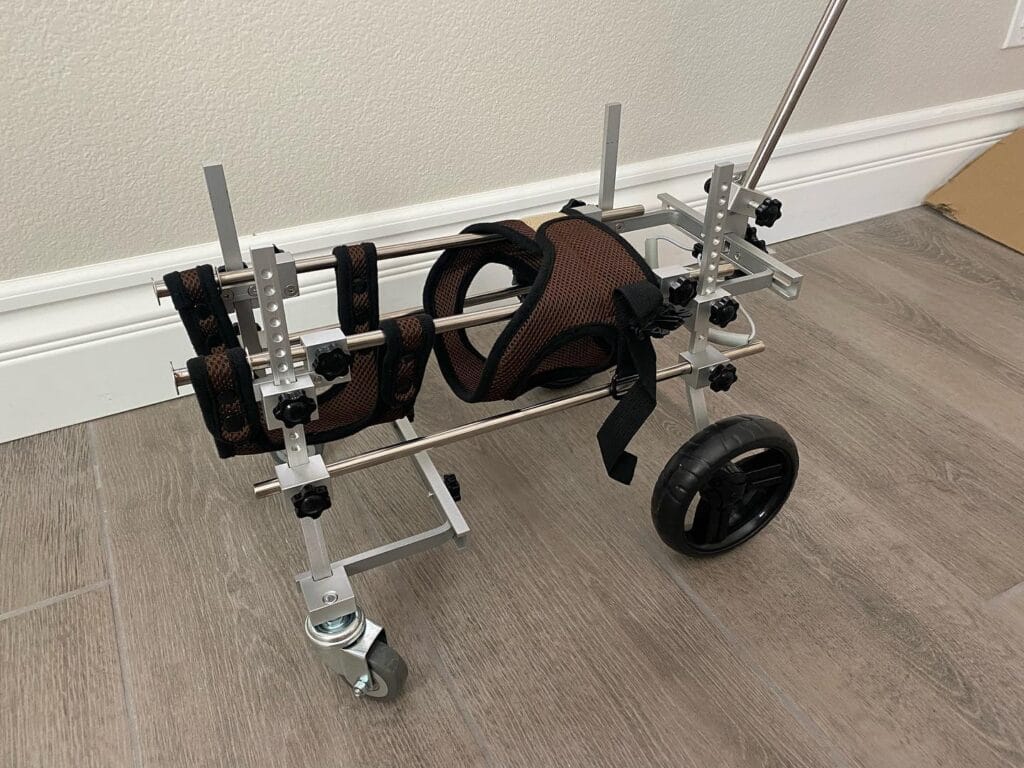
Our golden has finally started moving around again, but seeing her struggle to push herself across my hardwood floor with her back legs dragging is sad! Here’s a simple build to make her life easier.
Prep Time: 30 minutes | Active Project Time: 2–3 hours | Difficulty Level: Intermediate
Materials & Tools:
– Aluminum square tubing (for the main frame rails)
– Stainless steel rods (½ inch diameter) for cross supports
– Two rear wheels (6-inch black rubber, spoked hub style)
– Two front swivel caster wheels (bolt-on, 360-degree rotation)
– Black knob-style locking bolts (for adjustability)
– Brown mesh padded saddle harness with black nylon straps
– Black velcro leg wraps for front limb support
– Drill, hacksaw, measuring tape, wrench
### Instructions
Cut your aluminum square tubing into four pieces. Two long pieces to form the side rails and two shorter pieces for the cross bars. Measure the length of your dog’s body from the shoulder to the hip. That’s the length your rails need to be.
Using the stainless steel rods, slide them through the drilled holes on each side rail. These rods carry the saddle and so need to be level, which in turn ensures the brown mesh saddle cradles her weight and keeps her spine neutral, reducing fatigue.
Next, thread the locking knob bolts through each connection point. Don’t tighten them fully yet, as we’ll need to adjust things later while fitting the harness to her body.
Attach the rear 6-inch rubber wheels to the axle rod on both sides. Snap the front swivel caster wheels on the front legs with the bolt on mounts. The rear wheels do the propelling and the front casters turn so she will steer herself.
I wrapped the padded black velcro support around her front legs, then attached the brown mesh harness to her midsection using the nylon buckle straps. Then I tightened all the knobs bolts.
Take her for a slow first roll on your hardwood before trying the carpet.
I love this chair. Its adjustable and will grow with her. I just have to loosen the knobs and adjust the rails wider or narrower and retighten. She will not need a new chair each month.
Thanks! I will keep the mesh harness hand washed in cold water so it doesn’t stretch out. I don’t want it to be too stiff so that it puts uneven pressure on her hips.
📸 Photo credit: Instagram @thereverenddunk
#10: DIY Dog Wheelchair for Hind Leg Support (The Bernese Mountain Dog Build)
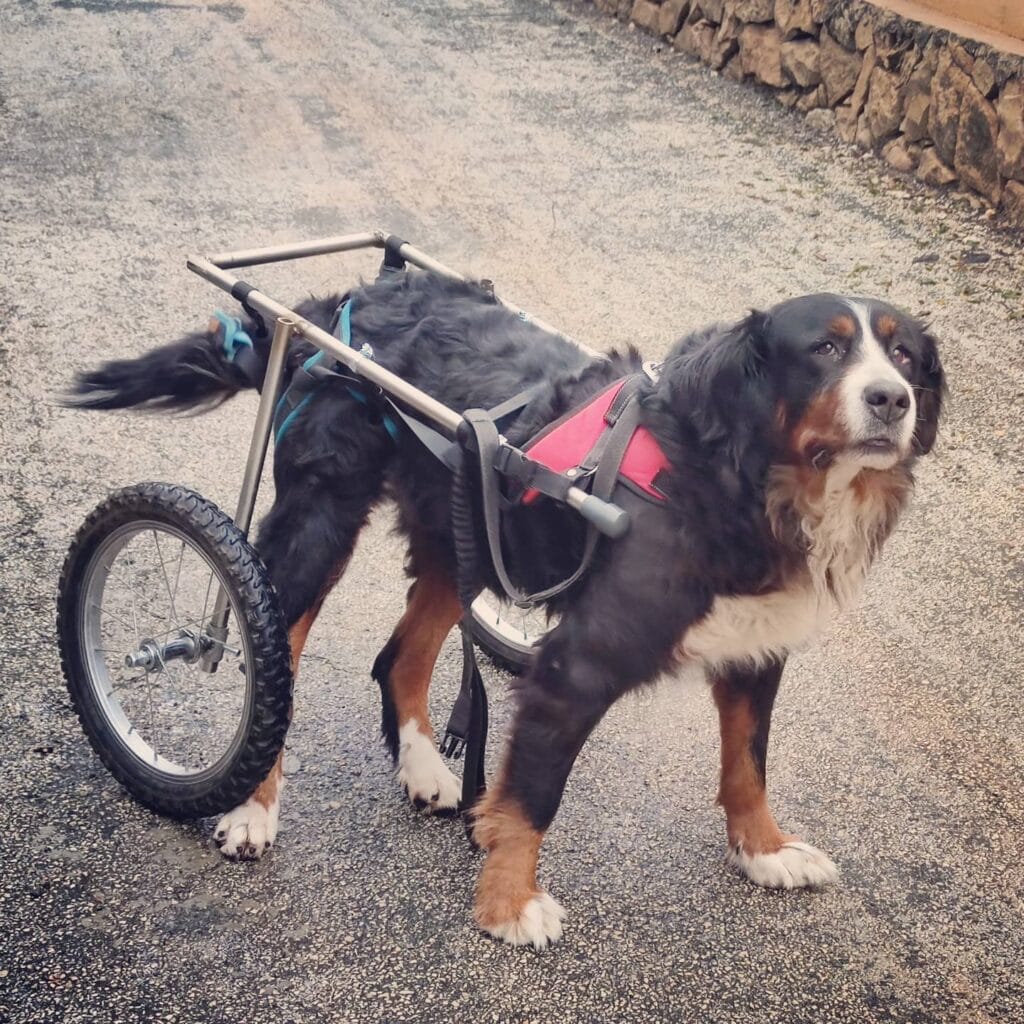
So, your dog starts getting slower, and his back legs are not working quite like they used to. He is still goofy and loving, he still wags his tail, and he is still trying to get up the kitchen tile, but you hurt just watching him struggle.
This is exactly what you build when giving up is not an option.
Prep Time: 30 minutes | Active Project Time: 3–4 hours | Difficulty Level: Intermediate
Materials & Tools:
– 3/4-inch aluminum tubing (lightweight, rust-resistant)
– Two 12-inch pneumatic wheels with standard axle bolts
– Nylon webbing straps in teal and gray (adjustable, padded)
– Red neoprene saddle harness (front support vest)
– Steel pipe connectors and Allen wrenches
– Measuring tape, hacksaw, sandpaper, zip ties
Instructions
Measure the height of the dog’s back legs (from the ground) and cut the aluminum tubing to this height. Cut the tubing to this height for both of the vertical side supports. Sand the cut edges so that nothing catches the dog’s fur or skin.
Attach the two vertical pieces together with a horizontal crossbar and form a U-frame that rests over the dog’s lower back. The frame should float just above the dog’s spine – never resting on it. Attach the 12-inch wheels to the bottom of the vertical tubes using your axle bolts. Spin the wheels by hand to check for wobble before moving forward.
Pass your [http://www.petsmart.com/product/index.jsp?productId=2968197&cp; 50 ft nylon webbing straps] through the frame at two points, one around the belly and one around the chest area. Pad any areas that may contact metal or other hard surfaces. Attach the [http://www.petsmart.com/product/index.jsp?productId=3094408 10 ft red neoprene harness] over the front half of your dog’s body. Connect the harness to the front frame handle so that you can guide or assist your dog as necessary.
The adjustable straps will keep your dogs hips at a natural walking angle so they use the muscles they have, and don’t cause more damage by compensating wrong.
First, have your dog stand in the chair on a flat surface. Notice the shifting of his weight. Tighten or loosen the belly strap so that his back is level and not tilted left or right. This helps to protect the spine during movement.
Velcro or zip-tie the end of any loose straps so it doesn’t drag on the ground and get caught in the wheels.
Start this on a road or pavement and work up to gravel – maybe 15 mins a day the first week. His core muscles are a little bit out of sorts with the new movement pattern and so is he! .
📸 Photo credit: Instagram @thethingswellmake
The One Measurement Mistake That Makes Most DIY Wheelchairs Useless
I have to give you this piece of advice because I see people do this all the time. They measure their dog, standing still, build the chair then wonder why their dog can’t move right.
I measure her from the middle of the chest to the feet (not when she is standing square)
When your golden is walking, her back slightly dips and her hip angle shifts. When you take her measurement in the static posture, the chair ends up sitting too high and her weight falls forward onto her front legs. This causes her to get tired faster, and in some cases can make her situation worse.
My neighbor went through three rebuilds before she figured this out. I’m not kidding. 3. I felt so bad for her.
If you would prefer a less precise measurement, you can always make a short video of your dog walking. Pause the video during the step you want to measure and then take a measurement from the video.
Pad every single contact point BEFORE your dog ever sits in it. Do not wait to see if it rubs, it will!
Your Home Doesn’t Have to Pay the Price for Having a Dog
So here’s the thing, you don’t have to choose between loving your golden and having a home that looks put-together. You really don’t.
Please choose one product from this list and just try it. It may change your sanity in your daily life.
If you’re the kind of person that loves a good weekend project, you might just find that you have a new obsession in DIY dog enrichment ideas. I’d say it’s a lot more fun than scrubbing muddy paw prints off my couch (not that I ever do that).
What is the one mess your dog makes that you are so done dealing with?

Amr Mohsen is a software engineer who traded his keyboard for a leash — at least on weekends. His love for dogs inspired him to share what he learns as a dog owner and enthusiast, bringing a detail-oriented, research-driven perspective to every article he writes. If it’s about dogs, he’s probably already looked it up twice.