Okay, so you know that moment when a guest walks in and the first thing they see is your golden’s muddy paw print smeared across your front door? Yeah. Not exactly the Pinterest vibe you were going for.
I felt that last fall when my sister visited and literally the first thing she said was “girl, your entryway…” I wanted to disappear.
Here’s the thing though — your dog is part of your home’s story. Why hide that?
A dog paw wreath DIY flips the whole situation. Instead of apologizing for the paw prints, you’re putting a gorgeous, handcrafted wreath right on that front door that says yes, a dog lives here, and we’re proud of it.
These 10 designs are the answer — whether your style runs cozy farmhouse or clean and modern, there’s something here that’ll make your entryway feel like you.
#1: Chunky Yarn Paw Print Wreath (The One Your Golden Will Approve Of)
You know that moment when someone walks into your house and their eyes go straight to your front door? Yeah. That moment. The one where you want them to see something that says “a dog lives here and we’re proud of it” — not just muddy paw prints on the welcome mat.
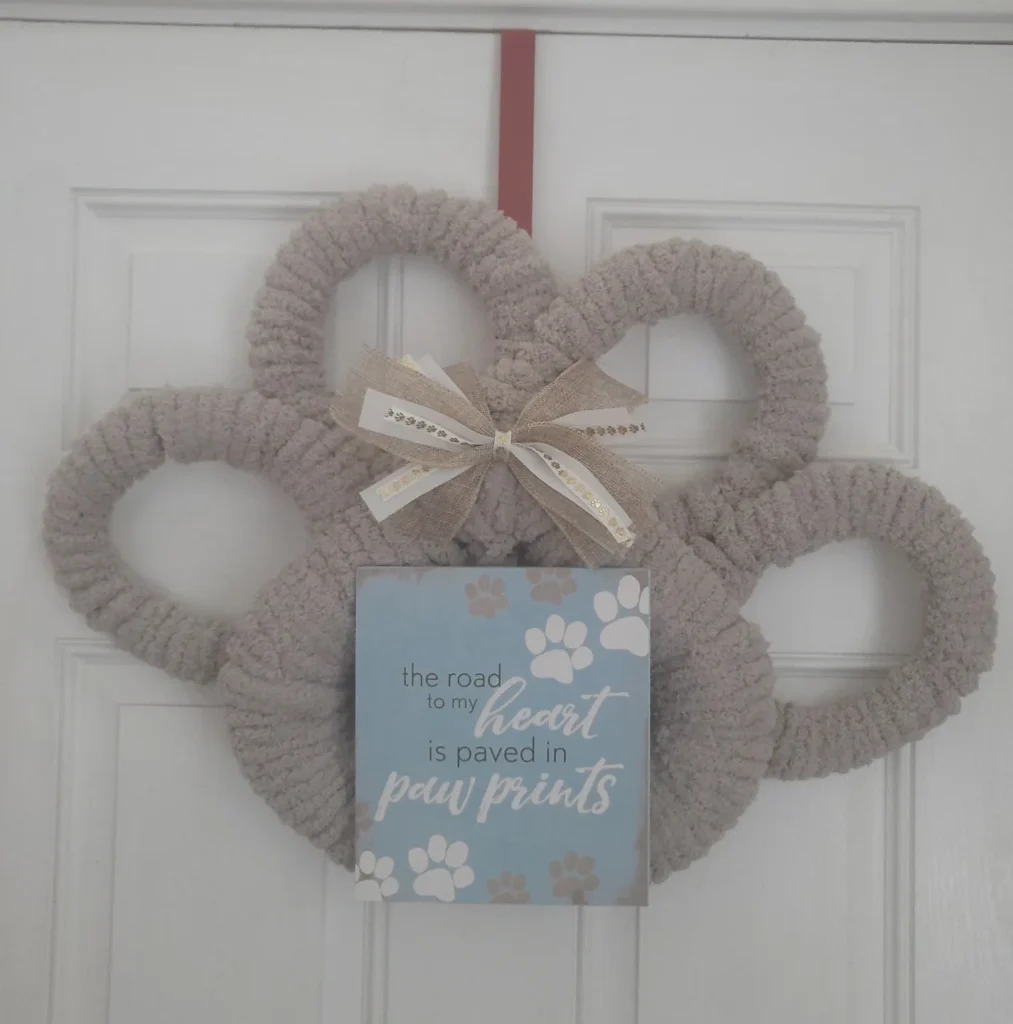
This chunky chenille yarn paw wreath is giving me all the feels. It’s shaped like a dog paw — four looped “toe” shapes surrounding one big palm loop — and it hangs right on your front door like a little love letter to your golden.
Materials & Tools You’ll Need:
– Chunky chenille yarn (color: warm greige/taupe — think the color of a latte)
– 5 wire wreath frames — four 6-inch frames for the toes, one 10-inch frame for the palm
– Floral wire or zip ties to connect the frames
– Burlap ribbon and a thin metallic ribbon for the bow
– A small decorative sign (light blue with white paw print graphics)
– Wire cutters and scissors
Instructions
Start by wrapping each wire frame separately. Take your chunky chenille yarn and anchor the end to the frame with a simple knot, then wrap tightly around the frame in even, overlapping spirals — this is what gives the wreath that full, fluffy texture you see in the photo. Wrap until zero wire shows through.
Once all five frames are wrapped, arrange them in the paw shape. Place the 10-inch palm frame at the bottom center. Then position the four 6-inch toe frames above it — two on top sitting slightly angled outward, and one on each side sitting just below the top two. This staggered layout is what creates that recognizable paw silhouette.
Secure each toe frame to the palm frame using floral wire. Wrap the connection points tightly and tuck the wire ends into the yarn so they disappear. And honestly, this step matters more than people think — a loose frame will shift over time and ruin the shape.
Now make your bow. Layer the burlap ribbon with the thinner metallic ribbon and tie them together into a full, knotted bow. The metallic ribbon adds a little shimmer without being loud. Pin or wire the bow right where the toes meet the palm — it covers the connection point and adds a polished finish.
Attach your decorative sign below the bow using a small loop of wire or ribbon. The light blue background with white paw prints in the photo reads “the road to my heart is paved in paw prints” — exactly the kind of thing your golden retriever’s fan club needs to see on your door.
Hang the whole thing using a ribbon loop draped over the top of your door.
The chenille yarn wraps snugly around each frame, so the paw shape holds its structure season after season — that’s the feature, the benefit is you’re not remaking this every fall, and the payoff is a front door that stops people in their tracks.
If you love projects like this, you’ll find even more inspiration in 13 Genius DIY Dog Stuff Every Pet Parent Needs to Try Today!
For extra fullness, double-wrap the 10-inch palm frame since it’s larger and can look thin if wrapped only once. And store it flat when it’s not hanging — chenille yarn holds its shape better that way.
Prep Time: 15 minutes | Active Project Time: 2–3 hours | Difficulty Level: Beginner-Friendly
📸 Photo credit: Instagram @kraftsxkatie
#2: Beware of Dog Kisses Wreath — The Cutest Front Door DIY for Golden Retriever Moms
You know that moment when someone knocks on your door and your golden loses her entire mind — tail spinning, paws everywhere, already trying to kiss a total stranger through the screen?
Yeah. Your front door deserves to warn people.
This wreath does exactly that, and honestly it’s one of my favorite builds from the whole 12 Heartfelt Designs for DIY Dog Accessories category.
Prep Time: 20 min | Active Project Time: 45–60 min | Difficulty Level: Beginner-Friendly
Materials & Tools:
– 18-inch wire wreath frame
– Burlap deco mesh in natural tan (about 10 yards)
– 2.5-inch wired ribbon — three patterns: black-and-cream stripe, brown buffalo check, and dog bone print
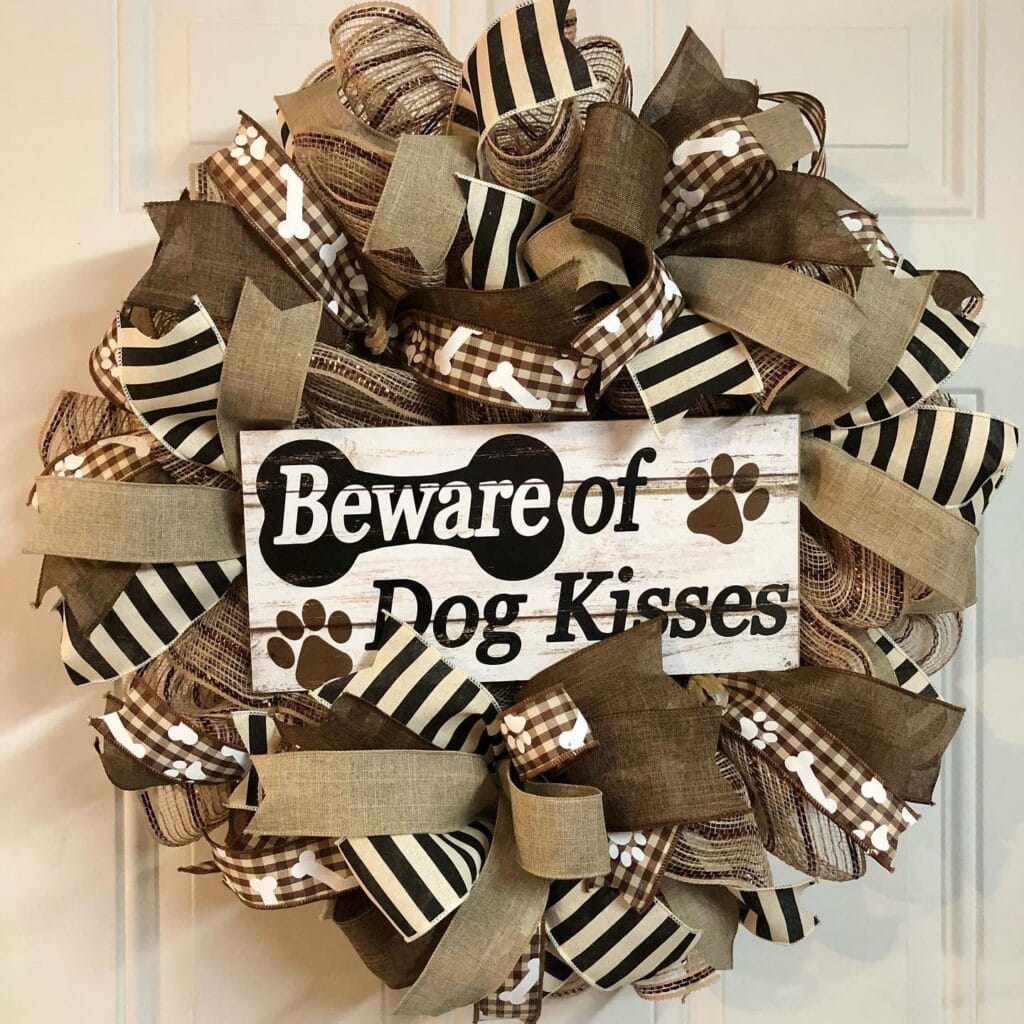
– “Beware of Dog Kisses” wooden sign (distressed white finish, roughly 10″ x 5″)
– Pipe cleaners or zip ties
– Hot glue gun + extra glue sticks
– Wire cutters
Instructions
Start by attaching your pipe cleaners along the wire frame — space them every 4 inches around the full circle. This gives you anchor points that actually hold without warping your mesh.
Pull your burlap deco mesh into 6-inch loops and secure each one to a pipe cleaner. Don’t overthink the spacing. Slightly uneven loops make it look handmade, not messy.
Now layer your ribbons. The striped ribbon goes first, weaving between mesh loops all the way around. Then tuck in the buffalo check ribbon at random points — maybe every third loop — so it peeks through without dominating. The dog bone print ribbon is your accent, so use it sparingly near the bottom and sides.
Here’s what to do: before you glue the sign, hold it against the center and step back. Seriously, just look at it from across the room. Centering it slightly above middle reads better in photos and at eye level.
Hot glue your wooden sign to the mesh once you’re happy with placement. Press it firm and hold for 30 seconds.
Fluffing matters more than people realize. Pull each mesh loop outward — the fuller the wreath, the more expensive it looks. The volume of layered mesh means the wreath holds its shape through humidity and light rain without drooping.
Swap the wooden sign seasonally and the whole wreath gets a new personality with zero rebuilding.
📸 Photo credit: Instagram @kellyeskreationsllc
#3: Dog Bone Grapevine Wreath with Paw Print Bow — A DIY That Actually Looks Like You Bought It
You know that moment when someone walks into your house and their eyes go straight to your front door? Yeah, my neighbor literally stopped mid-sentence last fall when she saw mine. That’s the energy this wreath gives off.
And honestly? It’s exactly the kind of Pinterest-worthy piece that feels personal — not like a generic store shelf grab.
Materials & Tools:
– 3 grapevine rings (one 12-inch main ring + two 6-inch side rings)
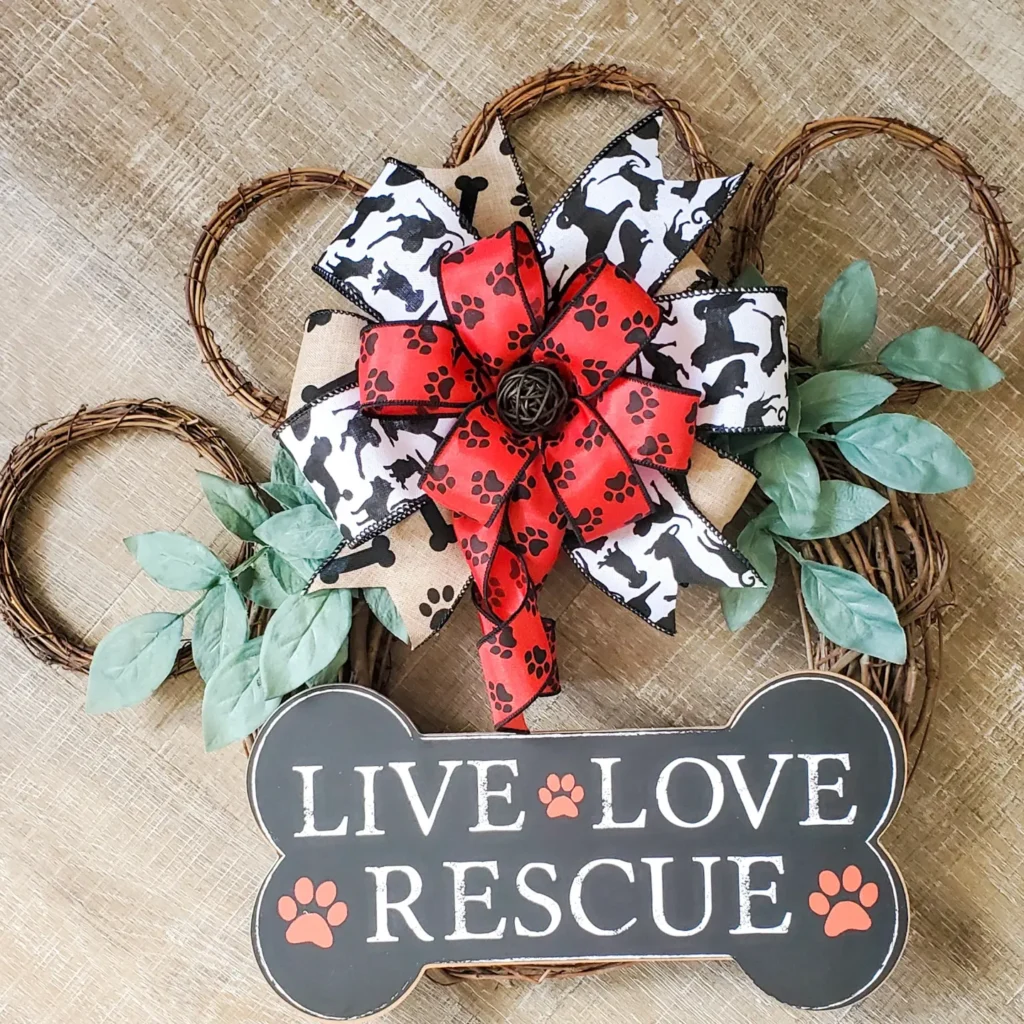
– 1 black painted wood dog bone sign (approx. 10 x 5 inches) with “Live Love Rescue” lettering in white
– 1.5-inch red paw print wired ribbon (about 3 yards)
– 1.5-inch black and white dog silhouette wired ribbon (about 3 yards)
– Natural burlap ribbon, 2.5-inch width
– Faux eucalyptus or sage leaf stems (2-3 bundles)
– Small twig/rattan ball for bow center
– Brown floral wire
– Hot glue gun + glue sticks
– Wire cutters
– Scissors
Instructions
Start by wiring your three grapevine rings together. Place the large 12-inch ring flat, then position the two 6-inch rings on either side slightly overlapping the bottom half — this creates that wide paw-like silhouette shape you see in the image. Wrap brown floral wire around each connection point at least three times and pull tight. The joined rings need to feel rigid before you add anything else.
Next, build your bow. Cut your burlap ribbon into 18-inch strips first — this forms the wide background layer. Then alternate loops of the red paw print ribbon and black and white dog silhouette ribbon, layering them on top of each other in a pinwheel shape. Each loop should be about 4 inches long. Use floral wire to cinch the center hard, then hot glue your rattan ball right over that wire knot. The layered ribbon bow construction means it holds its shape through weather, humidity, and your golden’s enthusiastic front-door greetings.
Hot glue the bow to the top center of the main ring. Press and hold for 30 full seconds — don’t rush this part.
Tuck your faux eucalyptus stems into the grapevine weave on the lower left and right sides of the main ring. No glue needed at first — the grapevine holds them. Once you’re happy with the fullness, add a small dab of hot glue at the base of each stem to lock them in.
Finally, wire or glue your wood bone sign along the bottom edge of the main ring. Make sure it sits level. Step back and adjust the bow loops and leaf placement before everything fully cools.
Hang with a heavy-duty wreath hook — the triple-ring design adds weight.
The “Live Love Rescue” bone sign isn’t just cute — it tells your story the second someone walks up, which means your home feels intentional instead of just decorated.
For golden retriever moms who also love 14 Stylish DIY Dog Crate Furniture Ideas You’ll Love, this wreath pairs beautifully with matching dog-themed interior pieces throughout your space.
Swap the bone sign text seasonally without rebuilding the whole wreath — just rehot-glue a new sign. It saves you from starting over every few months and keeps the look fresh year-round.
Prep Time: 15 min | Active Project Time: 45-60 min | Difficulty Level: Beginner-Intermediate
📸 Photo credit: Instagram @ljswreaths
#4: How to Make a Lush Eucalyptus & Pine Dog Paw Wreath (No-Fuss, No Glitter, All Charm)
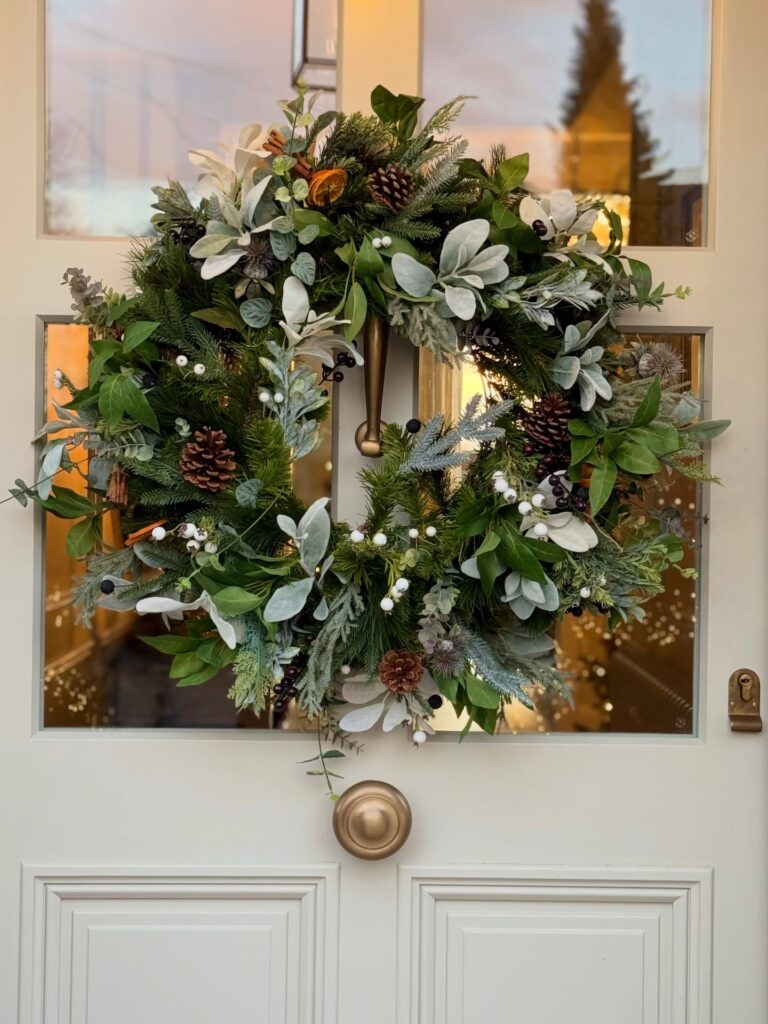
You know that moment when your golden comes barreling through the front door, muddy paws and all, and you catch yourself thinking, why does my entryway look so sad? Same. My front door used to be just… a door. Then I made this wreath and honestly my whole porch energy shifted.
This style — lush, textured, botanical — is exactly what I made last December after seeing one too many sad plastic wreaths at the dollar store. Mine uses real and faux elements so it lasts the whole season without drooping.
Materials & Tools:
– 18-inch wire wreath frame
– Fresh or faux eucalyptus stems (silver dollar variety, about 12-15 stems)
– Lambs ear stems — the soft, velvety white-green ones you see throughout the image
– Fraser fir or noble fir clippings (8-10 stems)
– 3-4 natural pine cones (medium size)
– White snowberry or white berry picks (6-8 stems)
– Dark/black berry clusters (adds contrast)
– Dried orange slice (one or two)
– Cinnamon sticks (bundle of 3)
– Thistle or sea holly stems (2-3 stems)
– Floral wire
– Hot glue gun + extra glue sticks
– Wire cutters
Prep Time: 20 minutes | Active Project Time: 90 minutes | Difficulty Level: Beginner-Friendly
### Instructions
Start by sectioning your wire frame into four quadrants mentally — this keeps the design balanced without stressing over perfection.
Wire your eucalyptus stems first, overlapping each one by about two inches so the base looks full and no bare wire shows through. Work in one direction only, always clockwise. This is what gives the wreath that layered, organic look you’re seeing in the photo.
And here’s where the texture magic happens — tuck your Fraser fir clippings between the eucalyptus, angling some stems slightly outward. The fir pokes out in different directions in the image, and that’s intentional. It gives dimension instead of that flat, grocery-store wreath vibe.
Hot glue your lambs ear stems next, distributing them around the wreath like little soft clouds. These are doing the heavy lifting visually — they catch light and break up all that green.
Now press your pine cones in at natural intervals. Wrap floral wire around the base of each cone and twist it into the frame before adding a dab of hot glue. They won’t budge through rain or your golden’s enthusiastic sniff-greeting.
The white berry picks go in clusters — 3 stems grouped together, not scattered one by one. Grouping them creates impact the way you see in the image. Same with your dark berry clusters — place them opposite each other for balance.
Your dried orange slice and cinnamon bundle are the finishing details. Hot glue these near the top-center like in the photo. They add warmth and honestly make the whole porch smell incredible when the sun hits them.
Hang using the existing door hardware or a wreath hook rated for 5+ pounds.
The faux-and-fresh combo means you get longevity from the faux base while the real elements (fir, citrus) bring that sensory richness — which means one wreath carries you from Thanksgiving straight through New Year’s without a replacement run.
Lambs ear stems tend to flatten if the wreath presses too tight against the door — leave at least half an inch of breathing space between the wreath back and the door surface so those soft leaves stay fluffy and three-dimensional all season.
And if you love DIY projects that make your home feel pulled-together, 7 Creative Dog Crate Topper DIY Ideas bring that same cozy, Pinterest-worthy energy to the inside of your space too.
📸 Photo credit: Instagram @the_hollies
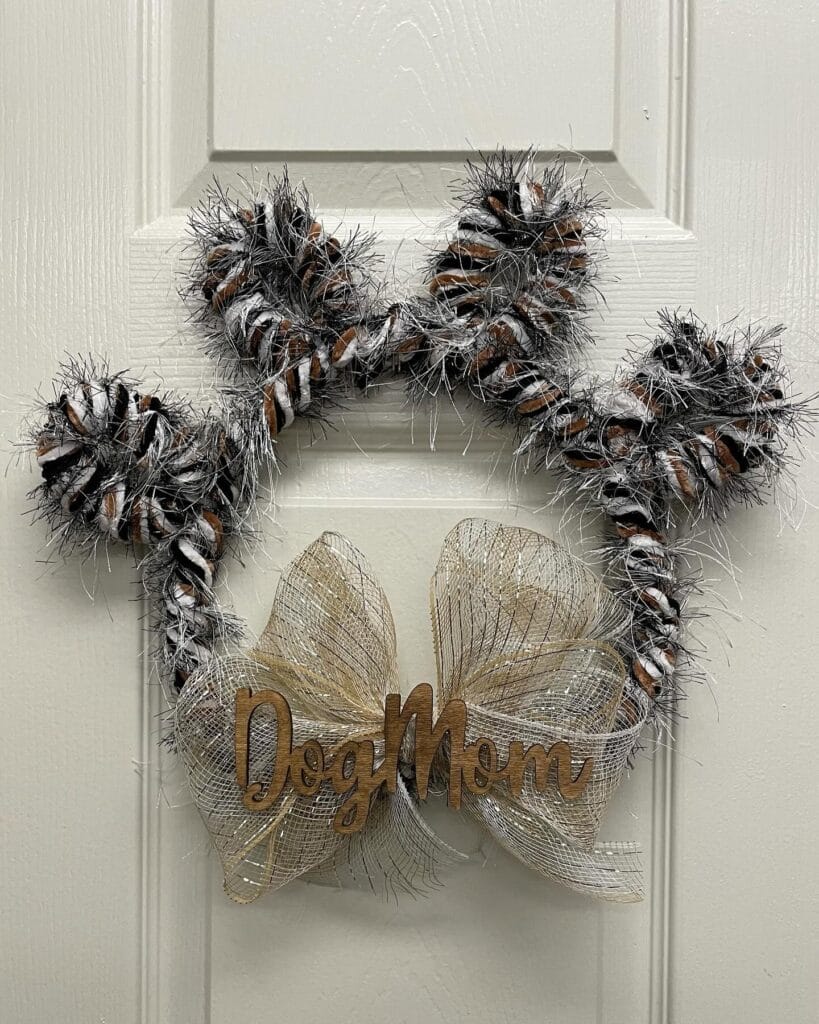
#5: Pinecone Paw Print Wreath — The “Dog Mom” Door Decor You Didn’t Know You Needed
Your golden retriever bolts inside, muddy paws everywhere, tail wagging like crazy — and your front door just sits there, doing nothing.
This wreath fixes that.
Materials & Tools:
– Wire wreath frame (12–14 inch)
– Silver and black tinsel garland (about 3–4 yards)
– 8–10 white-dipped pinecones (paint tips white, leave base brown)
– Metallic spray paint (silver and black)
– Burlap mesh ribbon (gold/cream, 2.5 inches wide)
– Laser-cut wooden “Dog Mom” sign
– Hot glue gun + extra glue sticks
– Floral wire
Instructions
Shape your wire frame into a paw print silhouette — one large oval base with four smaller circles clustered at the top. This is the move most people skip, and it’s what makes the whole thing look intentional.
Wrap each section with silver-black tinsel garland, layering it tight so no wire shows through. The mixed black and silver tones give it that frosty, winter-night texture.
Hot glue 2–3 pinecones per section, pressing the flat base against the garland. Cluster them close. And the white-dipped tips catch light in a way plain pinecones never do — that shimmer effect is exactly what makes this feel Pinterest-worthy versus craft-fair.
Tie your burlap mesh ribbon into a full bow at the bottom. Center your wooden “Dog Mom” sign directly on the bow, securing it with floral wire through the back.
The rigid wire base keeps the paw shape crisp through wind and rain — built to last the whole season, not just one Instagram photo.
Prep Time: 20 min | Active Project Time: 45–60 min | Difficulty Level: Beginner-Friendly
Your front door already says a lot about you. Make it say dog mom with a wreath that actually looks like you tried — because you did, and it took less than an hour.
Lightly mist the finished wreath with a clear sealant spray to protect the white paint on the pinecones from humidity. It keeps the contrast sharp for weeks longer than you’d expect.
📸 Photo credit: Instagram @sassy_southern_nc_girl
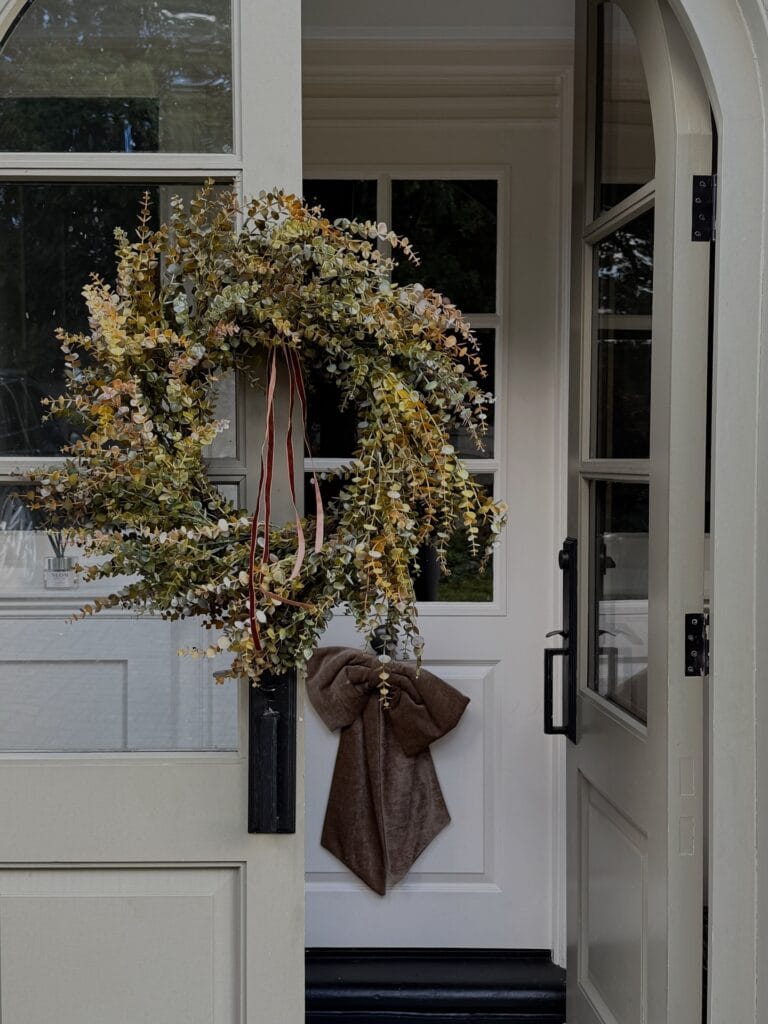
#6: Eucalyptus & Dog Paw Wreath That Actually Looks Like Pinterest Came to Your Front Door
Okay so you know that moment when you open your front door and your golden just barrels through, leaving muddy paw prints everywhere, and you’re standing there thinking — why does nothing in this house feel intentional anymore?
This wreath changed that feeling for me.
Prep Time: 20 minutes | Active Project Time: 1.5 hours | Difficulty Level: Beginner-Friendly
Materials & Tools:
– 16-inch wire wreath frame
– Fresh or dried eucalyptus stems (grab 20-25 stems — the silver dollar variety gives you those soft, round leaves you see here)
– Burgundy velvet ribbon (1.5 inches wide, about 2 yards)
– Taupe linen fabric cut into a 12×24 inch bow piece
– Floral wire and wire cutters
– Hot glue gun with extra glue sticks
– Moss green floral tape
– Scissors
### Instructions
Start by sorting your eucalyptus into small bundles — roughly 5-7 stems each. This is where most people rush, and the whole wreath ends up looking flat. Don’t.
Wrap each bundle with floral tape at the base, then attach it to your wire frame using floral wire, layering each bundle so it slightly overlaps the last. Work in one direction only — this creates that full, cascading waterfall effect you see in the image.
Here’s the trick: angle every third bundle slightly downward. That drooping, organic movement is what makes this look expensive instead of craft-store-basic.
Once your frame is full, hot glue your burgundy velvet ribbon trailing down from the top center — two separate strips work better than one loop. The contrast between the deep red and the muted eucalyptus greens does something really good to the eye.
For the bow, fold your taupe linen fabric into a generous, floppy knot — not a perfect bow. Structured bows age this look fast. Linen material stays soft and relaxed, which means your wreath looks effortless for months without touching it again.
Hang using a black wreath hanger on a painted door — the dark hardware grounds the whole arrangement the same way it does in the image.
Eucalyptus has natural calming properties, so if your golden tends to park herself right by the front door, she’s probably onto something with this one. The scent is subtle but real.
Tuck a few shorter stems back into gaps after hanging — wreaths always look different vertical than flat on your table, and those little fixes take two minutes but make the whole thing look intentional.
📸 Photo credit: Instagram @renovating.no10
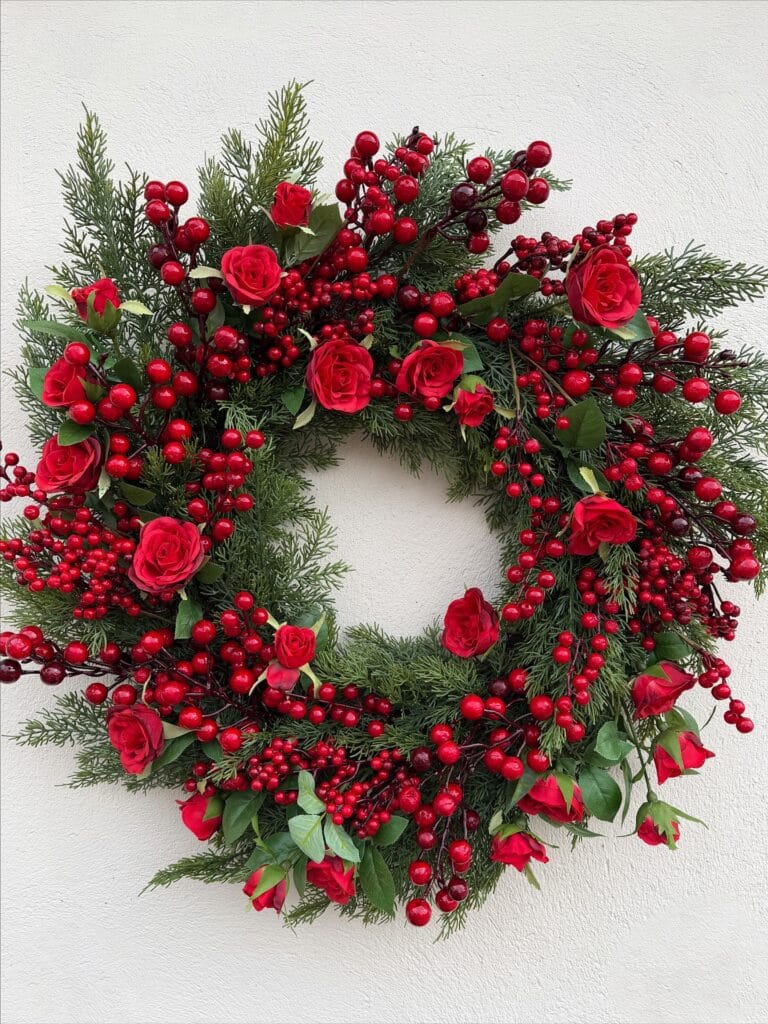
#7: Red Rose & Berry Christmas Wreath with a Paw-Print Twist
You know that moment when your golden is finally napping and the house looks actually put-together? Yeah, this wreath is for that moment. The one where you want your front door to match your Pinterest board AND your holiday spirit.
I made one of these last December and my neighbor literally stopped her car to ask about it. No joke.
Materials & Tools:
– 18-inch wire wreath frame
– Cedar and pine sprigs (fresh or faux, both work)
– Red silk roses (12-15 stems)
– Red berry picks (large and small cluster varieties)
– Dark burgundy berry branches for depth
– Floral wire and wire cutters
– Hot glue gun + extra glue sticks
– Green floral tape
Instructions
Start by wrapping your cedar sprigs around the wire frame using floral tape, layering them so no bare wire shows. Work in one direction — this keeps everything tight and full-looking.
Next, push your pine branches between the cedar layers at slight upward angles. This creates that wild, lush texture you see in the photo.
Here’s the good part: alternate your large and small berry clusters around the entire ring before adding a single rose. Spacing berries first gives you exactly the right balance — so your roses don’t end up crowded into one spot.
Hot-glue your red silk roses at varied heights. Tuck some low, let others pop forward. The feature is the layered dimension, the benefit is a wreath that photographs like a florist made it, and the payoff is everyone assuming you spent $200 at a boutique.
Tuck burgundy berry branches last — these add shadow and richness between the brighter red elements.
Keep a few rosebuds pointing downward at the bottom of the wreath. That asymmetry is what makes it look real, not crafted.
Prep Time: 15 min | Active Project Time: 45-60 min | Difficulty Level: Beginner-Friendly
📸 Photo credit: Instagram @artificial_hannah
#8: Berry & Bloom Dog Paw Wreath DIY (The Pinterest-Worthy Front Door Moment You Deserve)
You know that feeling when you open your front door and Cooper bolts past you, muddy paws and all, and you just stand there looking at your sad, bare door thinking — really? This is the vibe we’re giving?
Yeah. Same.
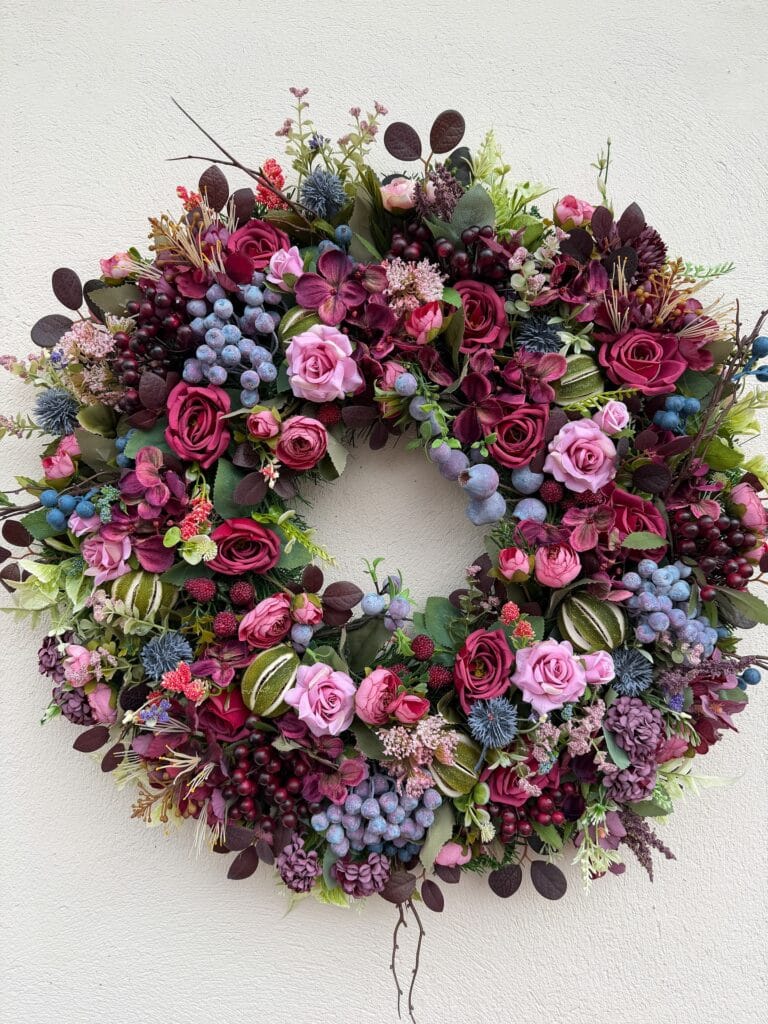
This wreath fixes that instantly. Deep burgundy roses, blueberry clusters, purple hydrangeas, dusty blue thistles — it’s moody, lush, and honestly looks like something from a high-end boutique. And the best part? You made it.
Materials & Tools:
– 18-inch wire wreath frame
– Faux roses in deep magenta and soft pink
– Faux blueberry/grape clusters (blue-purple tones)
– Faux hydrangea blooms in burgundy and mauve
– Dusty blue thistle picks
– Dark burgundy eucalyptus stems and dark coin leaf sprigs
– Faux red berry sprigs and blackberry clusters
– Moss green sage leaf bundles
– Small purple carnation clusters
– Floral wire, hot glue gun, wire cutters
– Ribbon or twine for hanging
Prep Time: 30 minutes | Active Project Time: 2–2.5 hours | Difficulty Level: Intermediate
### Instructions
Start by securing your base. Wrap dark eucalyptus stems around your wire frame using floral wire, spacing them so the whole ring feels full but not stiff. This gives you a dense, dark green foundation that makes every flower pop against it.
Next, hot glue your largest blooms first — the deep magenta roses. Place them in natural clusters of two or three, not evenly spaced. Uneven groupings look handmade in the best way. Push them slightly low into the base so they sit deep in the greenery.
And then comes the fun part.
Tuck your soft pink roses between the dark ones to create contrast. The burgundy hydrangea clusters go in next — break them into smaller sections so they fill gaps without overpowering. Keep this in mind: odd numbers always look more natural than even ones.
Now layer in your blueberry and grape clusters. These are the secret that makes this wreath feel like a moody harvest moment instead of a basic floral ring. Hot glue them in groups of three throughout the wreath, letting some hang slightly over the inner edge.
Fill every remaining gap with thistle picks, red berry sprigs, blackberry clusters, and coin leaf sprigs. The dark leaves add depth — push them in at different angles so the wreath feels dimensional, not flat.
Finally, hang it with twine looped through the top of the frame.
Faux materials mean zero wilting, zero replacing every season, and zero worrying about Cooper sniffing it off the door. The weather-resistant blooms stay full and rich for years — hang it once and you’re genuinely done.
Snip stems at varied lengths before gluing — shorter stems sit deeper for a lush look, and longer ones create that wild, organic texture you see in the image.
📸 Photo credit: Instagram @artificial_hannah
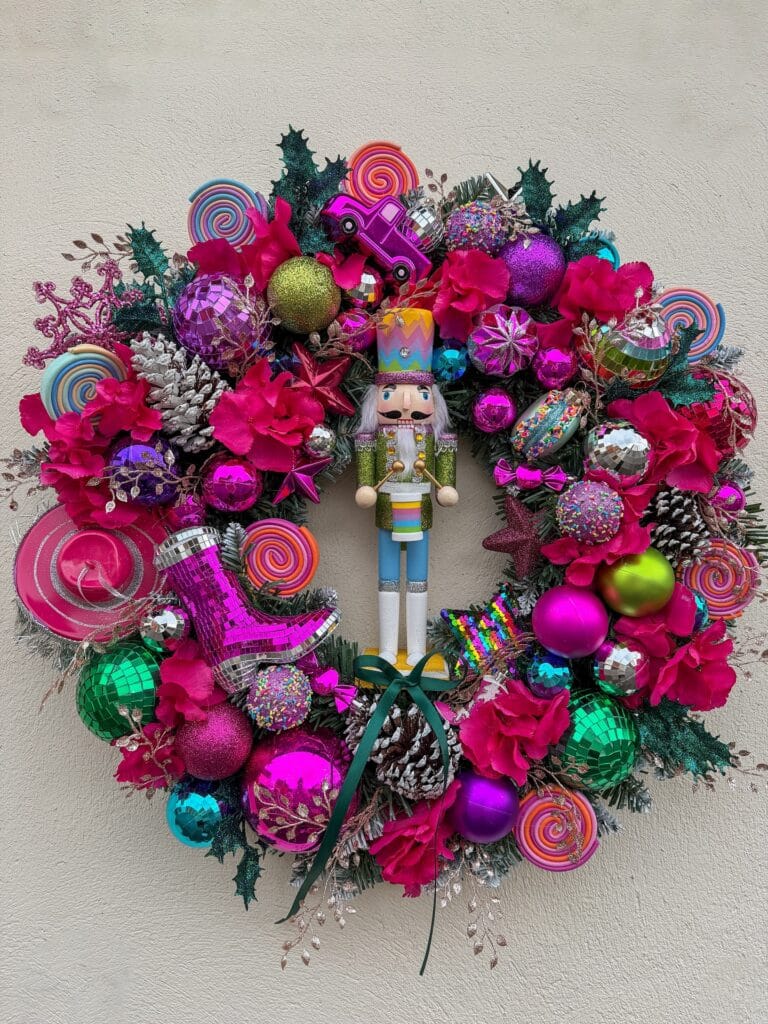
#9: The Candy Land Nutcracker Wreath That’ll Make Your Front Door the Talk of the Street
Your golden retriever sits by the front door every single morning, tail wagging, nose pressed against the glass. That door deserves something as extra as she is.
And honestly? This wreath is it.
Prep Time: 30 minutes | Active Project Time: 2–3 hours | Difficulty Level: Intermediate
What You’ll Need:
– 22–24 inch artificial pine wreath base (full and dense)
– Hot glue gun + extra glue sticks
– Faux hot pink hydrangea clusters (at least 8–10 stems)
– 3-inch disco ball ornaments in magenta, green, teal, and purple
– Glitter ornaments in lime green and fuchsia
– Swirled lollipop picks (pastel rainbow colorway)
– 1 centerpiece nutcracker figurine in green and blue (approximately 10 inches tall)
– Silver-painted pinecones
– Holly branch picks with dark teal glitter
– A magenta disco cowboy boot ornament
– Tiny toy car ornament in hot pink
– 1.5-inch wide dark green satin ribbon
– Wire cutters and floral wire
Instructions
Start with your wreath flat on a table and section it mentally into four quadrants — top, bottom, left, right. This keeps the final look balanced even when it feels gloriously chaotic.
Work your pine base first. Hot glue the holly picks at the top and sides, pushing them deep into the branches so they anchor securely. The dark teal glitter catches light the same way a disco ball does, and that shimmer is the whole point.
Next, place your hydrangea clusters. Tuck them throughout all four quadrants — don’t cluster them all in one spot. Three on the left, two on the right, a couple at the bottom. They add richness and give the eye places to rest between all that sparkle.
Now the ornaments. This is where most people get nervous, but the trick is working in odd-numbered groups of three. Place your largest ornaments first — the 3-inch disco balls and the glitter spheres. Hot glue each one, then press it firmly into the wreath for a full 30 seconds. Placing ornaments in groups of three, spaced at natural intervals, creates that lush layered look — and that’s the feature-benefit-payoff right there: the clustering technique gives you that expensive, curated appearance without needing a florist.
Add the lollipop picks next. Push them in at slight angles so they pop up above the wreath surface like they’re growing out of a candy garden.
Now wire your nutcracker to the bottom-center of the wreath. Use two separate pieces of floral wire — one through his feet, one at his waist — looped tight around the wreath frame. He needs to feel secure, not like he’s about to topple onto your porch the second the door swings open.
The best part: finish with a small dark green ribbon bow right at the nutcracker’s base. It grounds the whole composition and gives the eye a natural focal point.
Hot glue the disco cowboy boot to the lower left and the tiny pink car tucked into the upper section. These unexpected pieces are what make people stop, laugh, and take a photo.
Hang it, step back, and let her sniff it once before you decide she’s officially not allowed near the front door anymore.
Hot glue tends to loosen in cold weather, so add a second dab of glue under any ornament that feels even slightly wobbly before hanging. A wreath hook rated for at least 5 pounds will keep this beauty where it belongs all season long.
📸 Photo credit: Instagram @artificial_hannah
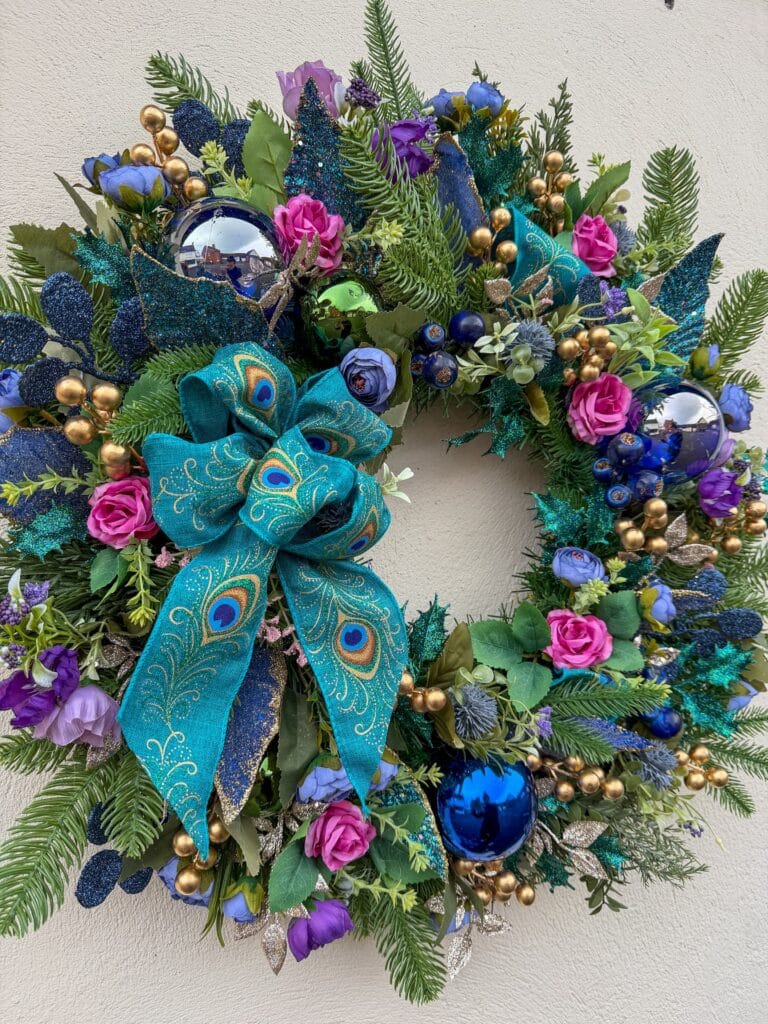
#10: Peacock-Themed Dog Paw Wreath DIY (And Yes, It’s as Gorgeous as It Sounds)
You know that moment when your golden retriever comes bounding through the front door, muddy paws everywhere, tail knocking into your carefully styled entryway? Mine did that last December, straight into my wreath display. I stood there looking at the chaos and thought — okay, we need something that celebrates the dog energy, not fights it.
This peacock wreath? It’s that something.
Prep Time: 20 min | Active Project Time: 2–3 hours | Difficulty: Intermediate
Materials & Tools:
– 18–20 inch foam or grapevine wreath base
– Faux evergreen pine picks (mixed lengths, full and wispy)
– Teal peacock-print wired ribbon (2.5 inch wide, 9 feet total)
– Navy blue glitter picks and teal glitter leaf sprays
– Faux silk roses in hot pink, lavender, and periwinkle blue
– Gold berry picks and navy berry clusters
– Cobalt blue ornament balls (60mm and 80mm)
– Deep navy mirror-finish ornament balls
– Faux holly picks with dark green leaves
– Purple and lavender faux ranunculus
– Silver leaf sprays
– Hot glue gun + extra glue sticks
– Floral wire and wire cutters
– Stem cutters or scissors
### Instructions
Start by laying your wreath base flat on a protected surface — I used an old beach towel, which my dog promptly tried to steal. Push your pine evergreen picks in first, working in one direction around the entire ring. Vary the lengths so some sprigs point outward and some lay flat against the base. This creates that full, layered background that holds everything else together.
Next, tuck in your teal glitter leaf sprays and navy glitter picks at uneven intervals. Don’t space them evenly — you want organic, not symmetrical. The glitter catches light and gives the whole wreath that peacock iridescence without needing actual feathers.
Add your faux holly picks and silver leaf sprays next, pushing stems deep into the base so they don’t shift. These create texture contrast against all that lush green.
Now the flowers. Hot glue your pink silk roses first — they’re your anchor color and the most eye-catching element. Cluster two or three together in different zones rather than scattering them solo. Follow with the lavender ranunculus and periwinkle roses, filling gaps between the pink clusters. Mixing bloom sizes here — the ranunculus feature tight, layered petals that add visual density, which means your wreath looks expensive without actually being expensive. That’s the payoff.
Wire your cobalt blue ornament balls directly to the base using a small loop of floral wire twisted tight at the back. Hot glue alone won’t hold these through a windy day. Alternate the mirror-finish navy balls with the matte cobalt ones for depth.
Push in gold berry picks throughout, especially near the ornament clusters. Then tuck navy berry clusters into any remaining thin spots. Stand the wreath upright periodically and check for balance from a distance.
For the bow — this is the moment the whole thing clicks. Use your wired peacock ribbon to make a 6-loop bow with two long tails. Wire the center tight, then fluff each loop open. Attach it at the lower-left position (around the 7 o’clock spot on the wreath), which is exactly where the eye naturally lands first. Curl the ribbon tails slightly downward.
Hanging your finished wreath in the entryway means your golden retriever gets greeted by something beautiful every single time they come home — and honestly, they deserve that.
Quick note: wired ribbon holds its shape far better than non-wired in humid or outdoor conditions, so don’t skip that detail if you’re hanging this near a door your dog uses.
If the wreath gets a paw print smudge on the ribbon, a quick dab with a damp cloth lifts it. Ask me how I know.
📸 Photo credit: Instagram @artificial_hannah
The One Trick That Makes Your Dog Paw Wreath Look Store-Bought (Not Sad)
Okay so here’s the thing nobody tells you — the paw print placement is everything, and most people just randomly stamp all over the wreath base and then wonder why it looks chaotic.
Real talk: do a dry run first. Press your golden’s paw in the paint, then test the print on paper to see how much pressure gives you a clean stamp. Too much pressure and it bleeds into a blob. Too little and you get a ghost print.
This is the key: work in a circular flow around the wreath, not randomly. I did mine going clockwise with the prints slightly overlapping, and it looked intentional instead of accidental.
Also — seal those paw prints with a matte Mod Podge layer before you add any ribbon or greenery. I skipped this step once and my ribbon bled color right onto the prints. Whole wreath ruined.
Let the base layer dry a full 24 hours too. I know it’s tempting to rush it, but patience here saves you a total redo.
Your Couch Deserves Better — And So Do You
Pick one waterproof cover this week. Just one. Your golden is going to zoom in from the yard, soaking wet, and you’ll either wince or shrug — and I want you to shrug.
Honestly, the moment I stopped stressing about muddy paw prints on my furniture was huge for me. Like, I actually enjoyed cuddle time again.
If you want to go full dog-mom mode, DIY dog bathing station ideas can cut down on the mud before it even reaches your couch.
So tell me — which cover style fits your living room vibe right now?

Amr Mohsen is a software engineer who traded his keyboard for a leash — at least on weekends. His love for dogs inspired him to share what he learns as a dog owner and enthusiast, bringing a detail-oriented, research-driven perspective to every article he writes. If it’s about dogs, he’s probably already looked it up twice.


