Your golden retriever hit the backyard like a tiny, wet hurricane last summer — and your Pinterest-perfect patio paid the price.
Muddy paw prints on the deck. That soggy dog smell baked into the cushions. And your girl just staring at you, tongue out, completely unbothered by the chaos she caused.
I’ve been there. My cousin’s lab mix turned her entire yard into a slip-and-slide situation, and honestly? We stood there watching him and thought, there has to be a better way.
Turns out, there is.
A DIY dog pool gives your pup a spot to cool off and splash around — without destroying everything you’ve worked so hard to style.
And the best part? These 10 designs actually look good. Like, really good. Backyard goals, not an eyesore.
#1: DIY Pool Ramp for Your Golden Retriever (The One That Actually Works)
Okay, so you know that moment when your girl finally gets out of the pool and immediately shakes herself dry — right onto your freshly painted deck? Yeah. And then she’s slipping around trying to climb out because the pool edge is just… not made for dogs. My friend went through this with her golden, Maple, last summer. Maple kept scratching up the pool liner trying to get out. It was chaos.
This wooden dog pool ramp is the fix.
Materials & Tools You’ll Need:
– 2×6 cedar planks (cut to 48–60 inches long)
– Non-slip rubber stair treads or grip tape strips
– 4 metal L-brackets (galvanized, rust-proof)
– Wooden handrail posts (1.5-inch diameter, 24 inches tall)
– Exterior wood screws (2.5-inch)
– Wood sealant (waterproof, clear)
– Drill, saw, measuring tape, sandpaper (80-grit)
Prep Time: 30 minutes | Active Project Time: 2–3 hours | Difficulty Level: Intermediate
### Instructions
Start by cutting your cedar planks down to fit your pool’s entry width — usually 48 inches works for most backyard pools. Sand every edge with 80-grit sandpaper so your dog’s paws don’t snag.
Lay three planks side by side to create a 14–16 inch wide walking surface. Screw them together using the L-brackets underneath for stability. The cedar’s natural density holds weight up to 100 pounds — so even a chunky golden is totally fine here.
Attach the handrail posts on both sides using exterior screws angled inward slightly. This keeps the ramp from wobbling when she’s charging up it (and you know she will). Once the frame is solid, apply two coats of waterproof wood sealant and let it cure for 24 hours.
Then add your non-slip rubber treads across each plank. The textured grip means she gets confident traction getting in and out — which protects her joints over time and finally stops the panicked scratching. Ramp access means less joint strain, which pays off big as she gets older.
Angle the ramp at about 30–35 degrees into the water. Too steep and she won’t use it. Too flat and it’ll float. Use a bungee cord or pool hook to anchor the deep end.
If you love building functional stuff for your pup, 13 Genius DIY Dog Stuff Every Pet Parent Needs to Try Today! has some seriously good ideas worth bookmarking.
Cedar naturally resists moisture and warping — reseal it every season and it’ll last for years. And honestly? Watching her trot up that ramp like she owns the place is the best thing.
📸 Photo credit: Instagram @atlanta_dog_trainer
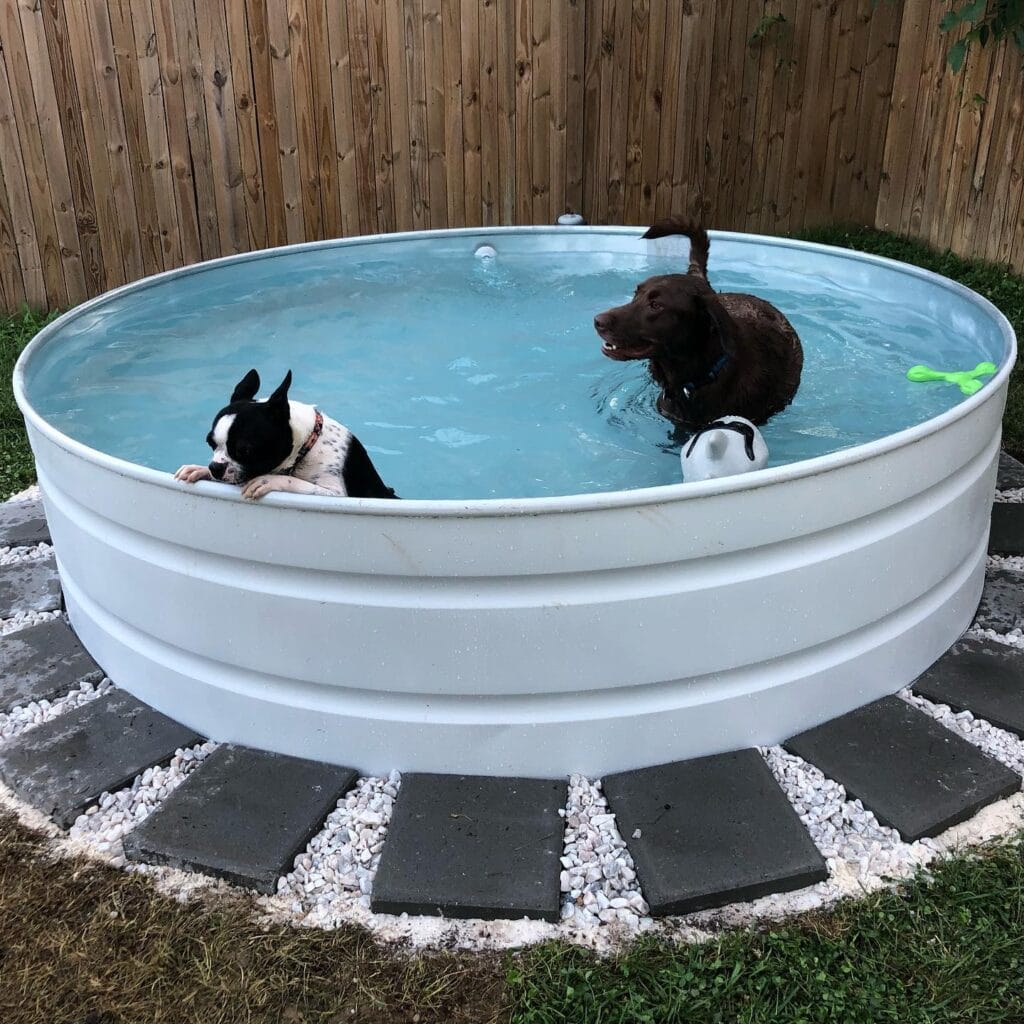
#2: Stock Tank Dog Pool (The Backyard Upgrade Your Golden Has Been Waiting For)
Your golden is soaked. You’ve got muddy paw prints across the patio, a dog who won’t stop panting, and a garden hose that just isn’t cutting it anymore. Yeah, I’ve been there.
This galvanized steel stock tank pool is giving me all the Pinterest feelings — and honestly? It’s one of the easiest DIY dog projects out there.
Materials & Tools:
– 8-foot diameter galvanized steel stock tank (roughly 2 feet deep)
– 1/2-inch drill bit for drainage
– Garden hose
– Non-slip rubber mat (cut to fit the bottom)
– Hose spigot attachment (optional but worth it)
Instructions
Drill a 1/2-inch drainage hole near the base of the tank on one side. This lets you empty and refill without hauling anything heavy. Position your tank on a flat, grassy surface — the grass cushions any shifting and looks exactly like the setup in this photo.
Lay your non-slip rubber mat flat on the bottom before filling. This gives your dog traction when they jump in — no scrambling, no panic. Fill it with your garden hose to about 12–14 inches of water.
And here’s why this works so well: the galvanized steel keeps the water noticeably cooler longer than plastic, meaning your golden actually stays in instead of bailing after two minutes.
Keep a towel and a DIY dog accessory station nearby — it makes post-swim cleanup so much smoother.
Scrub the interior with white vinegar weekly to prevent algae buildup without exposing your pup to harsh chemicals.
Prep Time: 15 minutes | Active Project Time: 30 minutes | Difficulty Level: Beginner
📸 Photo credit: Instagram @chiselbuilt
#3: DIY Wooden Frame Tarp Pool — The Backyard Splash Zone Your Dog Will Lose His Mind Over
Prep Time: 1 hour | Active Project Time: 2–3 hours | Difficulty Level: Beginner-Friendly
Okay so you know that thing where your golden is panting so hard in July that you feel genuinely guilty just looking at him? Yeah. That was me with my cousin’s husky last summer — he kept pressing his nose against the sliding door like, please, I am melting.
This build is exactly what you’re seeing in the photo. A cedar wood lattice frame (that warm reddish-brown) wrapped around a simple pool liner made from a heavy-duty blue polyethylene tarp. It looks like something off a Pinterest board, but it’s weekend-afternoon doable.
Materials & Tools:
– 2×4 cedar or pine lumber (four 6-foot sections for the frame base)
– Pre-built cedar lattice panels (4×4 feet, two panels minimum)
– Corner post lumber — 4×4 inch, cut to 4 feet tall
– Heavy-duty blue poly tarp, minimum 8×10 feet (the thicker the mil, the longer it lasts — go 6 mil or higher)
– Outdoor wood screws (3-inch galvanized)
– Staple gun with heavy-duty staples
– Waterproof outdoor wood sealant
– Drill + saw
– Measuring tape + pencil
Instructions
Build your rectangular base frame first using the 2×4 lumber. Screw the four sections into a 6×4 foot rectangle lying flat on the ground — this becomes your pool’s footprint. Secure a 4×4 corner post upright at each corner, drilling two screws per post from below. That frame isn’t going anywhere.
Attach your lattice panels to the outside of the corner posts on the long sides. This is what gives it that gorgeous, structured look — plus it acts as a wind block so your dog’s splash zone stays contained. Seal all exposed wood with your waterproof sealant and let it cure.
Here’s the simple fix for liner wrinkling: drape your blue poly tarp loosely from the inside before you add water, then staple the excess over the top edge of the frame. The water weight naturally pulls the tarp flat and snug — no wrestling required.
Fill it with 4–6 inches of water. That depth lets dogs wade and cool off without the drowning risk, which means the pool doubles as a safe solo hangout spot. A shallow fill → comfortable wading → your dog actually uses it instead of avoiding it.
Cut your tarp a little oversized. Excess tarp folded over the frame edge acts as a built-in splash guard, and your deck stays way drier.
📸 Photo credit: Instagram @bokumarley
#4: The Bright Green Above-Ground Dog Pool That Actually Works
Your golden just got back from the park and she’s soaked. Not “cute damp” — full-on dripping, shaking water everywhere, and you’re watching it hit your entryway rug in slow motion.
This bright lime-green above-ground dog pool is the answer. Built from a rigid plastic stock tank and fitted with a built-in entry ramp, it gives your girl a dedicated splash zone so your living room stays dry.
Materials & Tools:
– Large rigid plastic container (approx. 47″ x 31″ x 16″) in UV-resistant green
– Metal ramp frame with anti-slip grip surface (steel, powder-coated green)
– Rubber edge trim for pool rim
– Garden hose for filling
– Waterproof sealant
– Power drill + screws
Instructions
Set your container on a flat, grassy surface away from direct afternoon sun. Attach the metal ramp frame to the short end of the pool using your drill — angle it at roughly 30 degrees so your dog walks in without jumping. Run rubber trim along the top rim edge so no sharp plastic catches her belly.
Fill with 4–6 inches of water. That shallow depth keeps smaller goldens safe while still letting them fully cool down.
And that’s the real payoff — the ramp means zero hesitation getting in, which means she uses it, which means your floors stay clean.
Keep the water fresh every 2–3 days. A splash of white vinegar keeps algae from forming on those green walls.
📸 Photo credit: Instagram @letorridelgarda
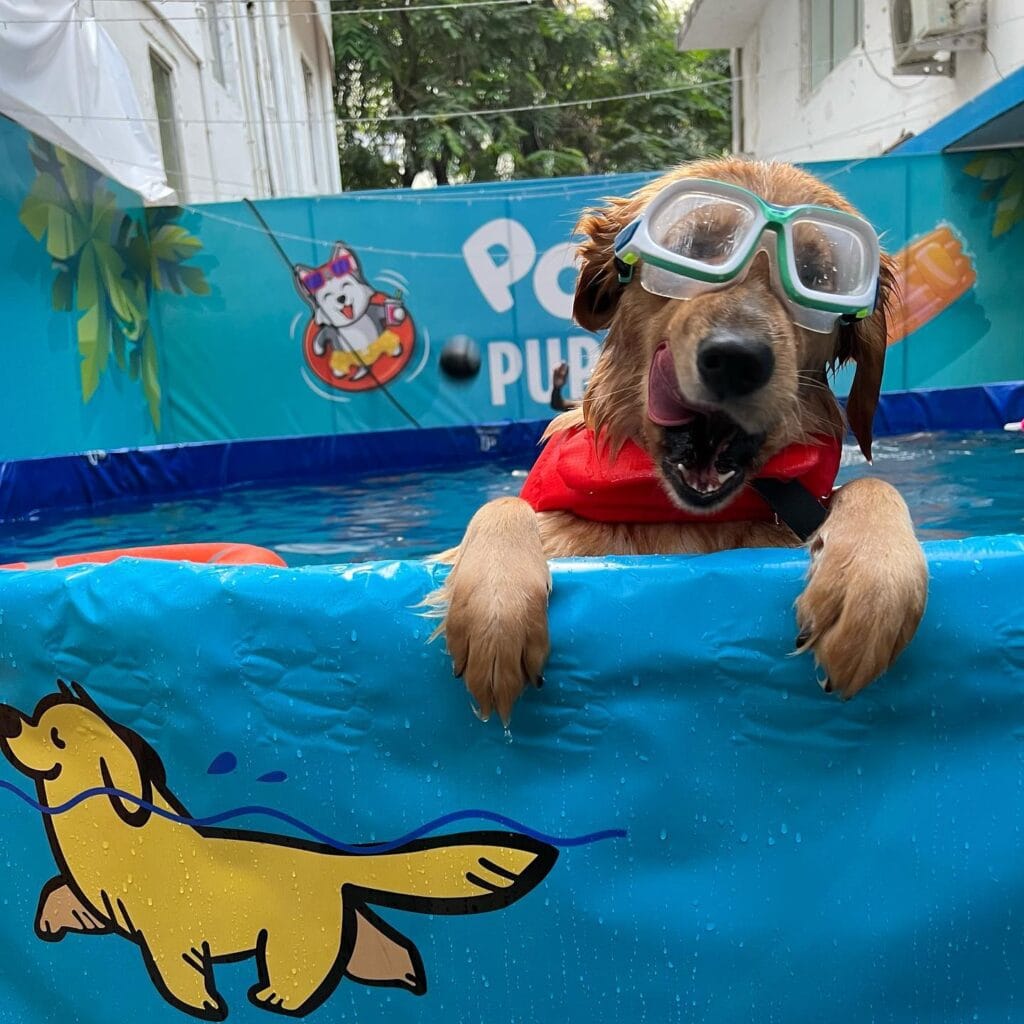
#5: The “Paws & Goggles” Inflatable Dog Pool Party Setup
Your golden just body-slammed the kiddie pool again and water went everywhere — the patio, your sandals, your iced coffee. And she’s looking at you like she did nothing wrong.
This setup? It’s the one that actually holds up.
Materials & Tools You’ll Need:
– Blue inflatable rectangular pool (approx. 8ft x 5ft x 18in depth)
– Red nylon dog life vest with chest strap and handle
– Child-size swim goggles (green-framed, 4–5in wide)
– Waterproof pool banner/backdrop for decoration (tarp-weight vinyl)
– Cartoon dog pool decals or iron-on stickers
– Inflation pump (electric saves your lungs)
– Garden hose
Instructions
Start by laying the pool flat on a level surface — grass or concrete both work, but grass gives better grip for paws when she’s climbing out. Inflate using your electric pump until the walls feel firm but not tight, around 80% capacity. Overfilling makes the sides collapse under a 60-pound golden’s enthusiasm.
Fill with water to about 10–12 inches deep. That’s enough for splashing without drowning anxiety.
Fit the red life vest on your pup before she gets in. The chest handle lets you lift her mid-panic if needed — and trust me, there will be a moment. Snap the goggles on her head loosely. They don’t need a watertight seal; they’re mostly for the adorable factor (and eye splash protection, genuinely).
Attach your vinyl backdrop to the pool’s outer edge using zip ties. The cartoon dog decals on the front panel add that Pinterest-worthy touch without any extra effort.
Real talk: keep a dry towel folded near the edge. The moment she decides she’s done, she’ll shake directly onto you.
Prep Time: 15 min | Active Project Time: 30 min | Difficulty Level: ⭐ Easy
The shallow fill depth keeps water contained — which means less mess on your patio and more time actually enjoying the afternoon instead of mopping it up.
If your golden loves the water but gets anxious in deeper pools, start with just 6 inches and let her build confidence. Most dogs take two or three sessions before they stop treating the pool like a predator.
📸 Photo credit: Instagram @poolpupper_petpark
#6: The Kiddie Pool Splash Zone (A.K.A. Your Dog’s New Favorite Summer Spot)
You know that moment when your golden comes barreling through the back door, soaking wet, and shakes right next to your linen couch? Yeah. Summer with a big dog is… a whole thing.
Last July, my neighbor literally zip-tied a tarp to her fence to try and contain the splash zone situation. I felt that in my soul.
This setup? So much better.
Prep Time: 15 minutes | Active Project Time: 20 minutes | Difficulty Level: Easy
What You’ll Need:
– Blue hard plastic kiddie pool (we’re talking the classic 60-inch diameter kind — grab it at Walmart or Target)
– A garden hose
– A mesh safety fence (the dark green kind, staked into the ground around the pool — this is the real game-changer)
– A colorful floating toy (Nemo vibes are chef’s kiss)
– Optional: a rubber mat underneath for grip
### Instructions
Start by picking a flat spot in your yard — shaded if possible, because that water heats up fast in direct sun. Set the pool down and run your hose until the water hits about 8–10 inches deep. That’s the sweet spot.
Here’s where most people skip a step: stake your green mesh fence in a loose circle around the pool. It gives your dog a contained splash zone, which means the mud and chaos stay inside the perimeter instead of tracking across your patio. Fence contains the splash — your patio stays clean — and you actually enjoy watching them play instead of dreading the aftermath.
Toss in the floating toy before your dog gets in. It builds excitement and gets them comfortable entering on their own.
And honestly? Let them figure out the entry themselves the first time. German Shepherds and goldens both tend to step in cautiously, sniff everything, then go full chaos mode — which is the best thing you’ll ever see.
Keep the water fresh every couple of days and rinse the pool with a little white vinegar to prevent algae buildup along the plastic rim.
If your pup loves this kind of active outdoor play, 7 DIY Dog Agility Course Ideas for Fun are a perfect next step for burning that extra summer energy.
📸 Photo credit: Instagram @therealpupsofga
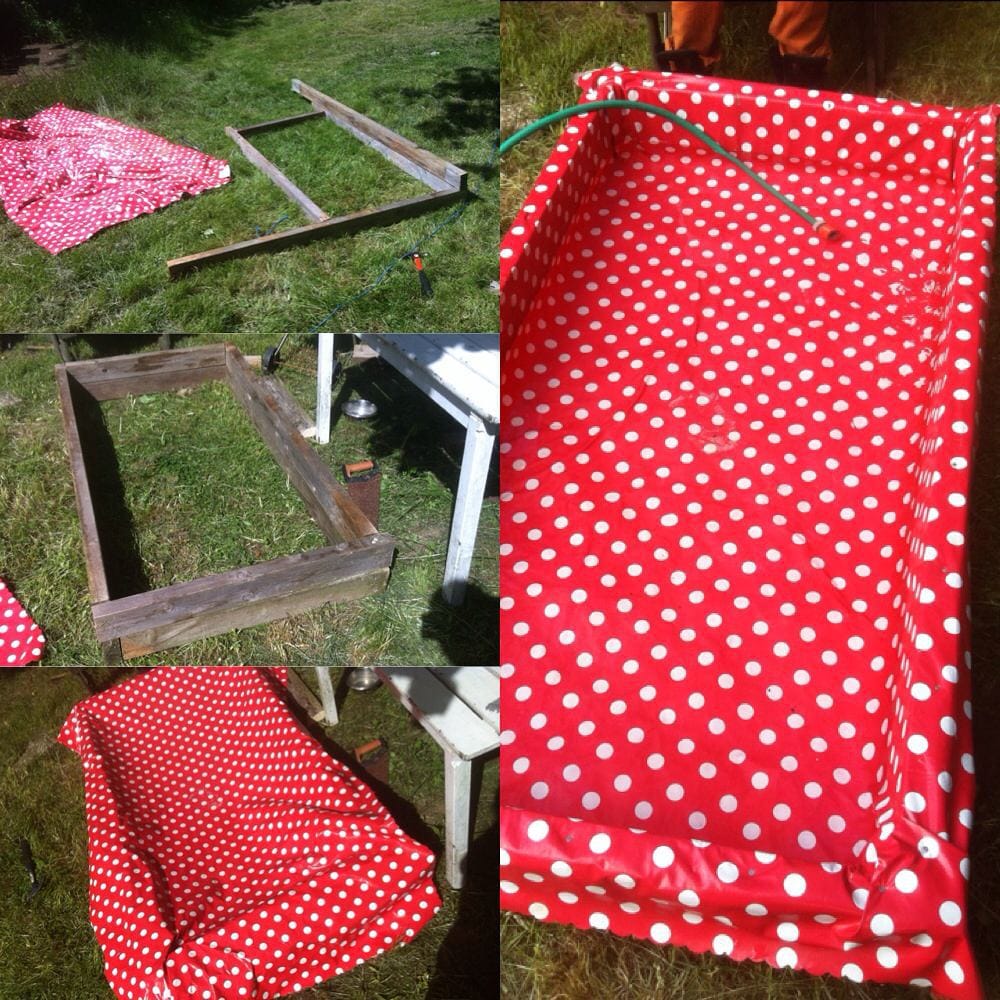
#7: DIY Wooden Frame Pool With a Polka Dot Tablecloth Liner
Okay, so picture this — it’s a scorching July afternoon, your golden is panting like a furnace, and she’s doing that thing where she just stares at you with those sad, melting eyes. You know the look. I had the same moment with my dog last summer, and I was not about to spend $200 on a plastic kiddie pool that would crack by August.
Prep Time: 20 min | Active Project Time: 1 hour | Difficulty Level: Beginner
Materials & Tools:
– 4 pieces of 2×6 lumber (two at 48″, two at 30″)
– Wood screws (3-inch)
– Red and white polka dot vinyl tablecloth (waterproof, at least 60″ x 84″)
– Garden hose
– Power drill
– Staple gun
### Instructions
Start by laying your lumber pieces flat on grass and screwing them into a rectangular frame — the 48-inch boards form the long sides, the 30-inch boards close the ends. Drill pilot holes first so the wood doesn’t split on you.
Once your frame sits sturdy, drape the vinyl tableclothgenerously over the inside, pressing it into the corners and pulling it tight over the outer edges. Staple the excess down along the outside of the frame to lock it in place. The vinyl lining holds water without cracking — which means your golden gets a real splash session, not a deflated puddle.
Run your garden hose in and fill it up. That vinyl holds the shape surprisingly well once water weight settles in.
Trim any excess tablecloth hanging past the staples so your pup doesn’t snag it stepping in. And honestly? Reinforcing the four corners with extra staples saves you from a slow leak mid-splash.
📸 Photo credit: Instagram @xanthinka
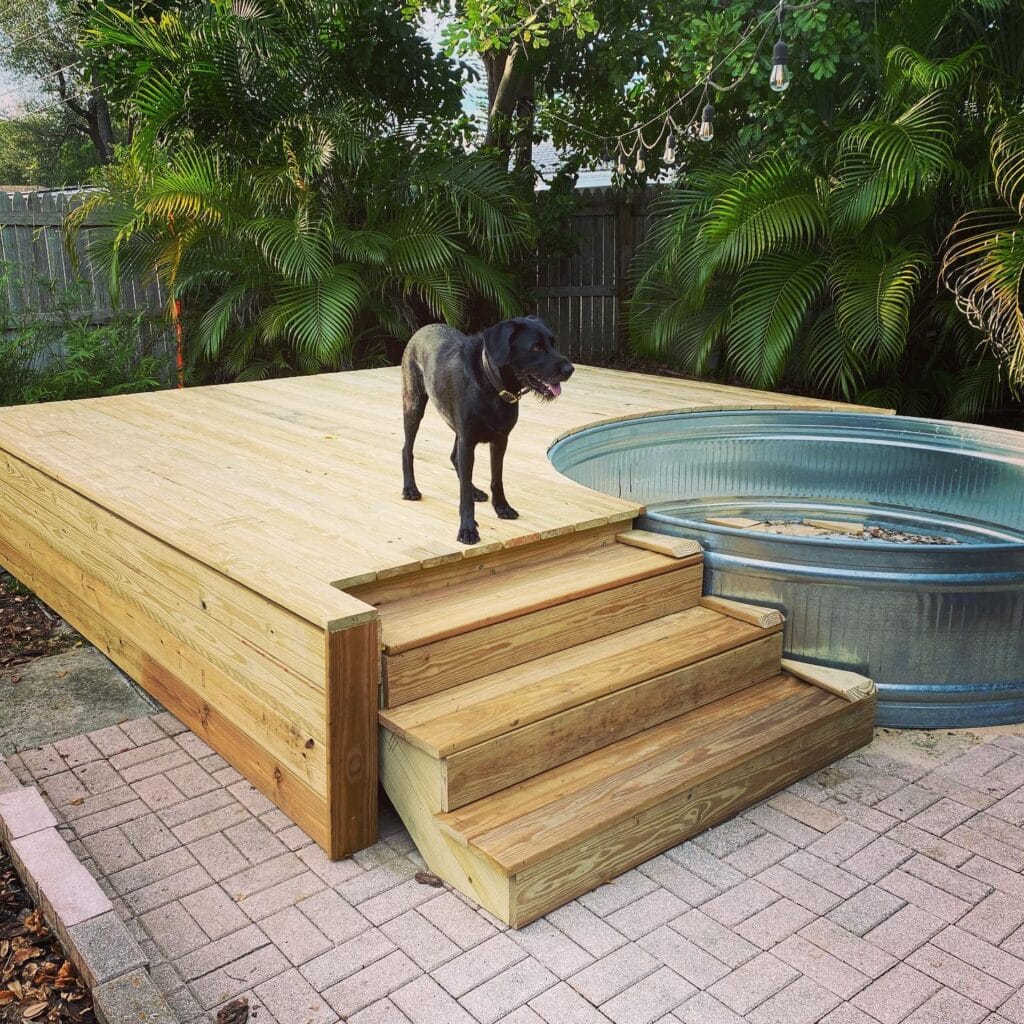
#8: Stock Tank Pool With a Built-In Wooden Deck (The Backyard Upgrade Your Dog Deserves)
You know that moment when your golden is desperate to cool off, circling the yard, panting, and you’re just standing there with a hose like… this can’t be the solution?
Yeah. Been there.
Prep Time: 2–3 hours | Active Project Time: 1–2 days | Difficulty Level: Intermediate
Materials & Tools:
– 8-foot round galvanized stock tank (the kind used for livestock — rust-resistant and seriously sturdy)
– Pressure-treated 2×6 lumber for the deck frame
– 5/4 x 6 pressure-treated deck boards for the surface
– Concrete pavers for the base layer
– 3-inch exterior wood screws
– Circular saw, drill, and level
– Gravel for drainage inside the tank base
– String lights (optional but chef’s kiss)
Instructions
Start by laying your pavers flat and level — this is the step most people rush, and it’s the one that makes or breaks the whole build. Get it wrong here and your deck wobbles forever.
Once your paver base is solid, build a rectangular frame from 2×6 boards, sized to wrap around three sides of the stock tank. My neighbor did something similar last summer and said the framing took longer than anything else, but getting it tight against the tank is what makes it look intentional rather than thrown together.
Lay your 5/4 x 6 deck boards across the frame, cutting a curved edge where the tank sits flush into the deck. That curve is the detail that makes the whole thing look like a Pinterest post — and yes, it’s worth the extra 20 minutes.
Secure every board with 3-inch exterior screws, leaving a small gap between boards for drainage. Then attach your 3-step staircase on the front corner using the same lumber. The stairs aren’t just cute — they protect your dog’s joints. That ramp-free, low-impact entry means your golden isn’t leaping in and crashing their hips every single time, which adds up over a summer of daily swims.
Fill the tank, hang your string lights, and call it done.
And honestly? The pressure-treated wood paired with the galvanized steel tank means this combo handles heat, rain, and dog claws without warping or rusting out by September. Feature-wise, the built-in deck creates a dry landing zone — which means zero muddy paw prints tracked straight into your house after swim time.
If you love backyard builds like this, 15 DIY Dog Playground Ideas for Your Backyard has some seriously good inspo to pair with this setup.
Seal the wood with an exterior-grade wood sealant before filling the tank — it locks out moisture from the start and keeps that fresh lumber color from graying out too fast.
📸 Photo credit: Instagram @gingerbeardman1986
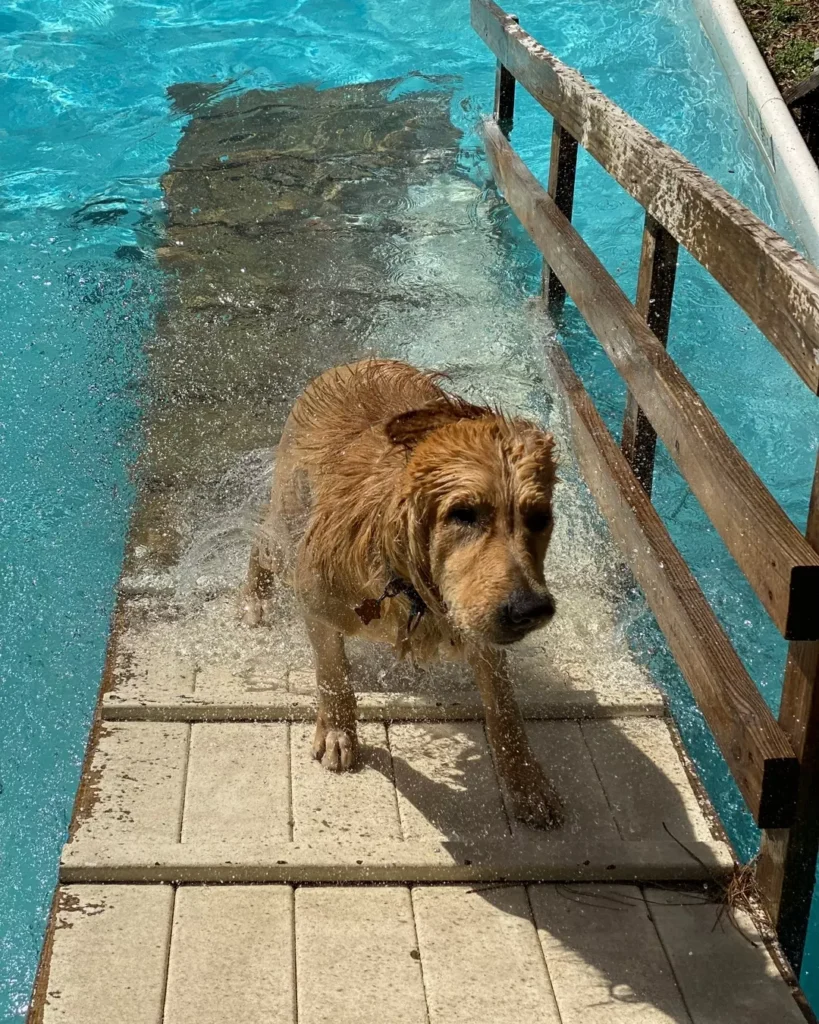
#9: DIY Wooden Ramp Entry Above-Ground Dog Pool
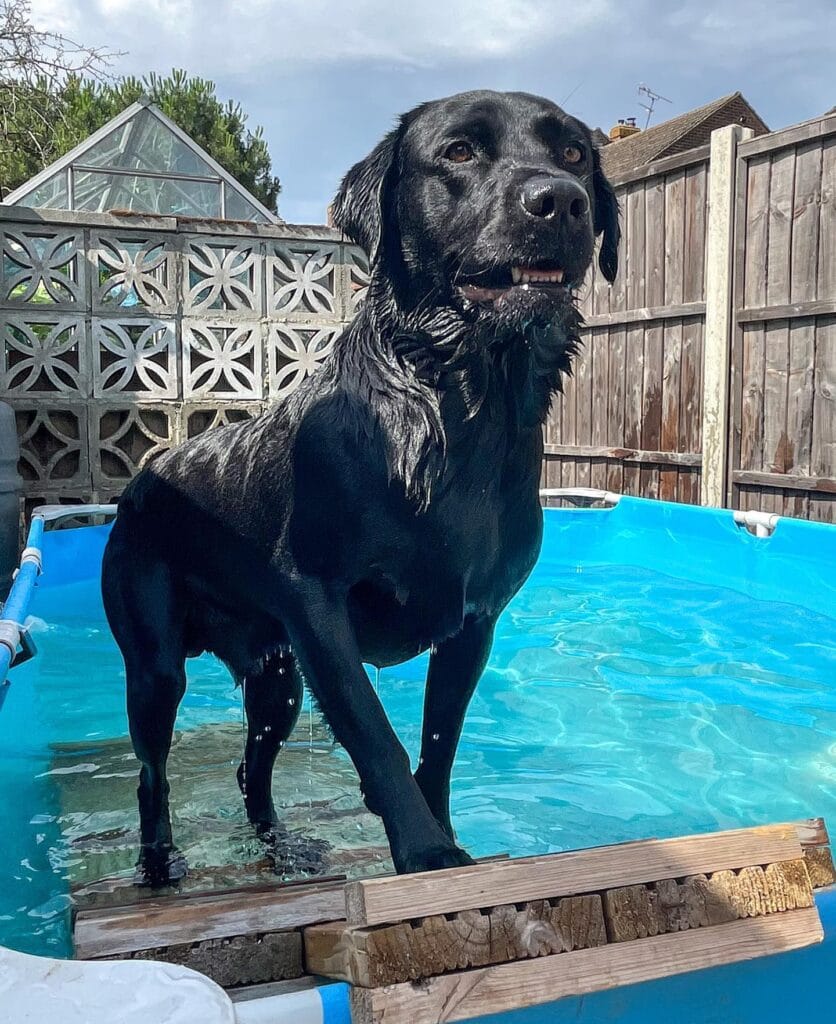
Okay, so you know that moment when your golden is losing her mind trying to clamber into the inflatable pool, claws scraping the side, water sloshing everywhere onto your patio? Yeah. That’s what this build solves.
This setup in the photo is exactly what summer dog ownership should look like — a sturdy wooden plank ramp resting over the edge of a blue above-ground frame pool, giving your dog a proper entry and exit point without the chaos.
Materials & Tools:
– 2-3 pressure-treated wooden planks (roughly 24 inches wide x 48 inches long)
– Wood screws (2.5 inch)
– Drill
– Coarse-grit sandpaper (60-80 grit)
– Waterproof wood sealant
– Non-slip rubber mat or grip tape strips
Instructions
Sand every plank edge first — splinters and wet dog paws are a bad combination. Lay your planks side by side and drill them together with cross-support planks underneath at both ends. This keeps the ramp rigid when a 50+ pound dog hits it at full speed.
Rest one end flat on the pool floor, the other on the outer pool edge. The raised lip of the frame pool acts as a natural anchor — no hardware needed against the pool wall.
The solid base means your dog gets confident footing, which means zero panic-scratching against the pool liner. Seal the wood every season to prevent rot.
After a swim, a rinse with one of these 7 natural DIY dog shampoos for a soft coat without harsh chemicals keeps everything clean and coat-friendly.
Prep Time: 20 min | Active Project Time: 1.5 hours | Difficulty Level: Beginner
Cut the entry-side corner of the ramp at a slight angle so it sits flush — that small detail makes the whole ramp feel locked in and safe.
📸 Photo credit: Instagram @workingwithmonty
#10: The Blue Kiddie Pool Setup That’ll Make Your Dog Forget It’s Bath Time
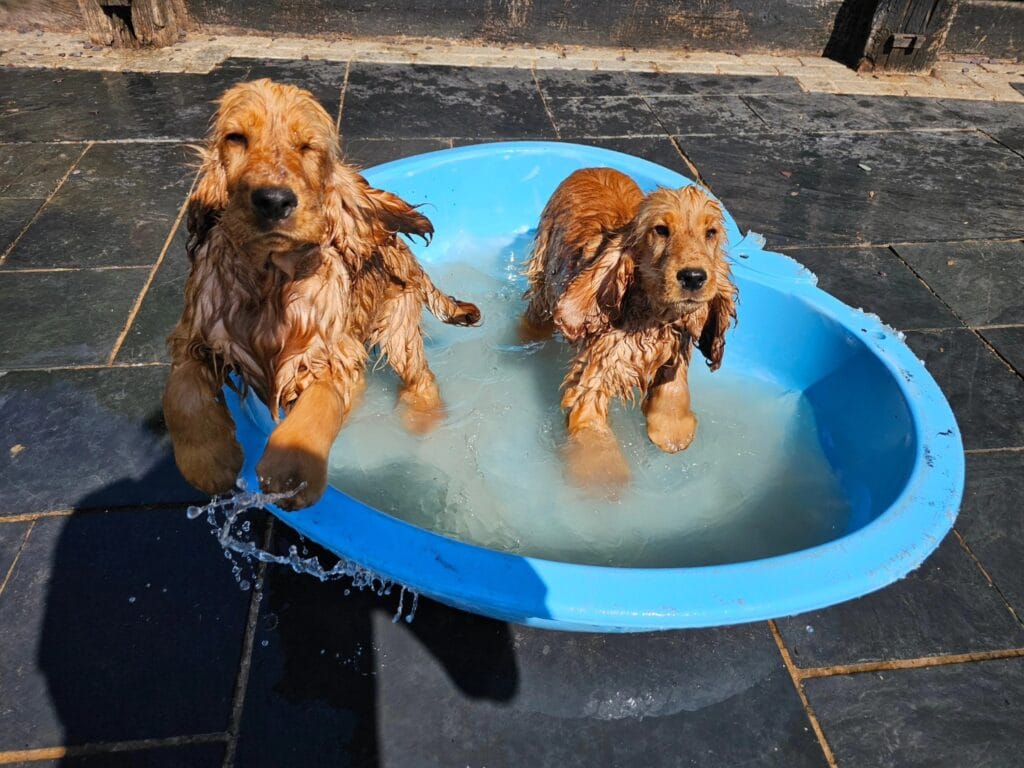
Okay, you know that moment when your golden comes barreling through the back door after digging in the garden, paws caked in mud, shaking water everywhere before you can even grab a towel? Yeah. That chaos is exactly what this is for.
Prep Time: 10 minutes | Active Project Time: 20 minutes | Difficulty Level: Beginner
Materials & Tools:
– Blue oval plastic kiddie pool (approx. 47–55 inches in diameter)
– Garden hose
– Non-slip bath mat (fits inside pool base)
– Mild dog-safe soap (optional)
– Flat stone or slate patio tiles underneath for stability
### Instructions
Fill the pool with about 4–6 inches of cool water — enough to cover your dog’s paws and ankles without overwhelming them. Place it directly on your slate or stone patio surface so it stays level and doesn’t tip when two excited spaniels decide to splash at once. (And trust me, two will always find their way in.)
Start with just one dog. Let them sniff the edge, paw at the water, get curious on their own terms. The shallow depth means dogs feel the ground under their feet — that security makes them way more willing to step in and stay in.
Shallow water keeps their core temperature down on hot days, which means longer outdoor time without overheating.
Rinse the pool after each use and tip it on its side to dry. Mold builds fast in standing water, and nobody wants that.
📸 Photo credit: Instagram @villaspaniolcocker
The One DIY Pool Mistake That’ll Have You Draining It by Day Two
Okay, real talk — most people build their dog pool and forget to think about drainage until they’re standing in a swampy backyard situation.
Here’s the pro secret nobody tells you: slope matters more than size.
When you’re setting up a kiddie pool or a lined wooden frame pool, tilt it just slightly — like a half-inch drop toward one corner. Then cut or position your drain plug at that lowest point. When cleanup time hits, the water practically empties itself. No more tipping a 200-pound waterlogged pool while your golden retriever watches you struggle.
I learned this the hard way last summer. My cousin built this gorgeous cedar pool for her Lab and spent 45 minutes fighting the water out every single time. One simple adjustment fixed everything.
Also? Line the bottom with a rubber bath mat before your pup jumps in. Their paws get zero grip on a bare plastic surface, and slipping around actually scares them off the pool entirely.
Keep her paws happy in the water, and her whole backyard setup becomes her favorite hangout — kind of like how a solid dog house DIY plan gives her a shady retreat right next to it.
Your Dog-Proof Living Room Starts Right Now
Okay, so here’s the thing — you don’t have to keep choosing between loving your golden retriever and loving your home. Both can exist. I used to think that was impossible until I actually made the swap, and now my couch doesn’t smell like wet dog after every rainy walk.
Pick one thing from this list and start there. Just one. Maybe it’s the washable slipcover, maybe it’s the indoor mat situation — whatever feels like your biggest daily headache.
And hey, if your pup needs their own cozy corner too, these DIY dog couch ideas might save your actual sofa from becoming their bed.
So tell me — what’s the one spot in your home your golden retriever has completely taken over?

Amr Mohsen is a software engineer who traded his keyboard for a leash — at least on weekends. His love for dogs inspired him to share what he learns as a dog owner and enthusiast, bringing a detail-oriented, research-driven perspective to every article he writes. If it’s about dogs, he’s probably already looked it up twice.


