Dog food bags are the worst, right? You finally get your kitchen looking cute — like, actual Pinterest goals — and then that giant, crinkly bag is just… sitting there. Out in the open. Judging you.
And okay, maybe you’ve tried tucking it in a cabinet, but then your golden is nose-deep in the pantry the second you turn around. Been there. My cousin had the same nightmare with her lab, and honestly her whole entryway smelled like kibble for months.
Here’s the thing — a good DIY dog food storage container fixes all of that. No more ugly bags, no more stale food smell, no sneaky paw situations.
These 10 designs are actually doable on a weekend, and most of them will look so good in your space that guests won’t even know what’s inside.
#1: This DIY Dog Food Station Is the Pinterest Project Your Golden Retriever Deserves
You know that moment when you’re rushing to feed your dog before work, and the kibble bag tips over again, scattering pieces everywhere across your kitchen floor?
Yeah. That was my life every single morning.
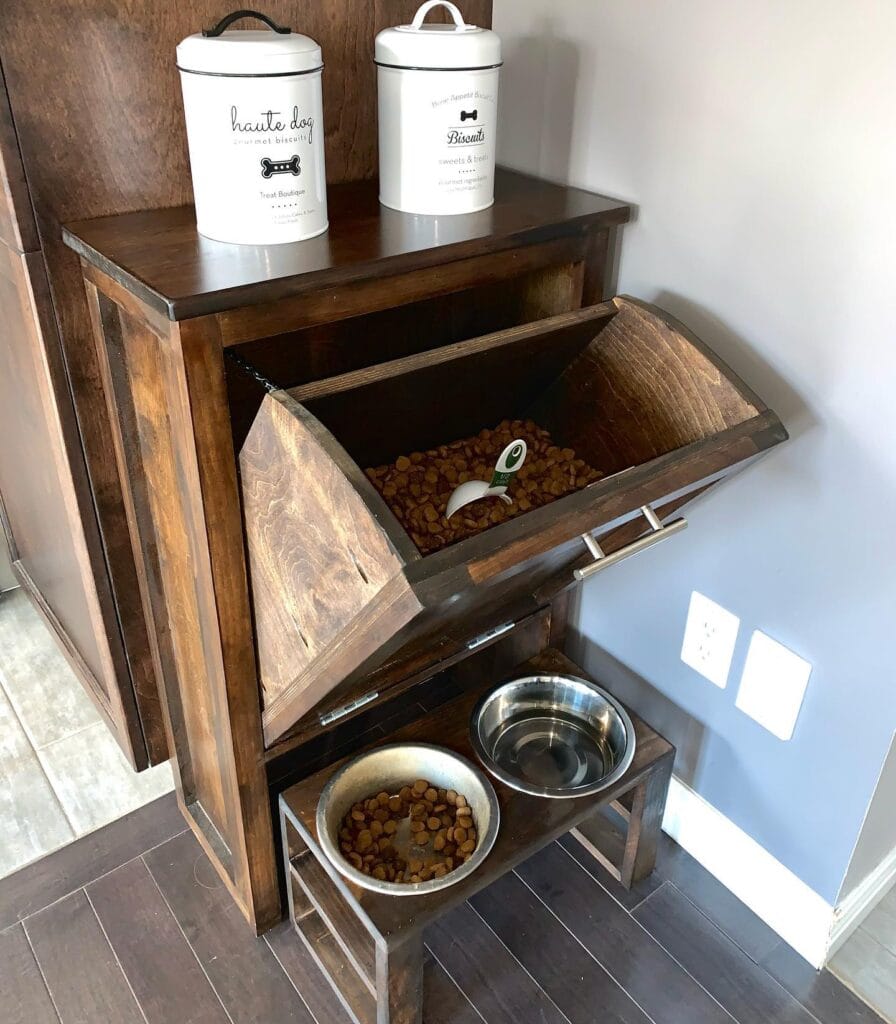
This dark walnut-stained pine wood dog food station completely changed the feeding routine in my house. It’s got a flip-top bin that holds a full bag of kibble, a measuring scoop stored right inside, two stainless steel elevated bowls sitting in a built-in stand below, and two white ceramic treat canisters on top labeled “haute dog” and “Biscuits” — honestly the cutest thing I’ve ever seen in a kitchen corner.
Materials & Tools
– 1×10 pine boards (approximately 8 feet total)
– Dark walnut wood stain
– Piano hinge and chain stopper for the flip-top lid
– Two stainless steel bowls (6-inch diameter)
– Silver drawer pulls (×2)
– Wood glue, pocket screws, sandpaper (120-grit and 220-grit)
– Polyurethane sealant (food-safe)
– Circular saw, drill, clamps
Instructions
Cut your pine boards into the cabinet frame pieces first — two 16×30-inch side panels, one 16×12-inch top shelf, and one 16×16-inch bottom platform for the bowl stand.
Sand every piece with 120-grit paper, then finish with 220-grit for that smooth, furniture-grade surface your kitchen actually deserves.
Assemble the outer frame using pocket screws and wood glue, letting it cure for a full 24 hours. Don’t rush this — a wobbly frame means a rattling lid every single feeding.
Build the interior bin next. Cut a 45-degree angled divider from your remaining pine and secure it inside the cabinet cavity. This angled wall funnels kibble toward the front so you’re never digging around the bottom of the bin with your whole arm. The bin holds roughly 30 pounds of dry food, which means fewer store runs and zero half-open bags cluttering your pantry.
Attach the flip-top front panel using a piano hinge at the base and a short chain on each side to keep it propped open at the right angle. Those chains are the small detail that makes the whole thing feel intentional — no lid crashing down while you’re scooping.
Cut the two circular holes in the bottom platform for your bowls, spaced 8 inches apart. The elevated height sits at about 10 inches off the floor, which reduces neck strain for your golden during meals. Better posture at the bowl means easier digestion — that’s the real payoff here, especially if your girl is dealing with a sensitive stomach. (Speaking of which, pairing this station with the best dog food for sensitive stomach makes the whole setup work even harder for her.)
Apply two coats of dark walnut stain, letting each coat dry for 4 hours. Finish with a food-safe polyurethane sealant on all interior surfaces. This protects the wood from moisture and keeps the kibble fresh longer.
Prep Time: 30 minutes | Active Project Time: 6–8 hours | Difficulty Level: Intermediate
Store your treat canisters on the top shelf and keep a 4-cup measuring scoop right inside the bin. The best part: every single thing your dog needs lives in one spot, and your kitchen corner finally looks like something you meant to do.
Seal the inside of the bin with an extra coat of polyurethane and let it cure for a full 48 hours before adding kibble. The smell of fresh stain can be strong, and your golden’s nose will thank you for the patience. You can also line the bottom of the bin with a thin food-safe silicone mat to make cleaning even easier.
📸 Photo credit: Instagram @dc_woodcrafts
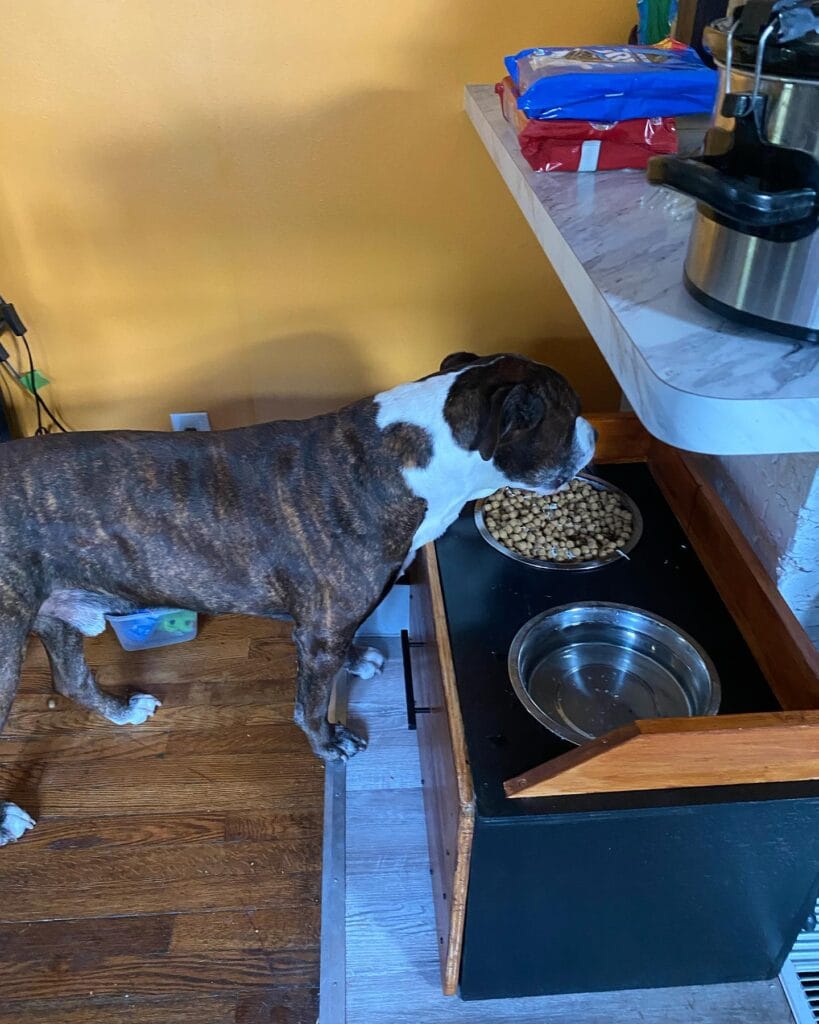
#2: The Raised Drawer Dog Feeding Station (With Hidden Storage)
You know that moment when you’re trying to keep your kitchen looking like a Pinterest board… and then there’s a giant bag of kibble just sitting on the floor, ruining everything?
Girl, same.
My cousin built something like this for her boxer mix and I genuinely thought it was a piece of furniture at first. That’s the whole vibe here.
Materials & Tools You’ll Need:
– 1-inch thick oak wood planks (for the drawer frame)
– Black matte MDF board (for the inner tray surface)
– Two 7-inch stainless steel bowls
– Drawer slide rails (18-inch, heavy duty)
– Wood screws (1.5-inch), wood glue, sandpaper (120-grit)
– Jigsaw, drill, measuring tape
Instructions
Cut your oak planks into a 12″ x 24″ rectangular frame. Sand every edge because splinters near a dog’s face are a hard no. Attach the black MDF panel as your tray floor — this is what gives it that clean, modern look that doesn’t scream “dog stuff.”
Mount your drawer slide rails on both inner sides of the frame, then slide the tray in to test the glide. Trace your bowl openings with a pencil, then cut them with your jigsaw so the stainless steel bowls drop in flush. That snug fit keeps bowls from sliding — which means zero kibble avalanches at 6am.
Worth it because: the raised height reduces neck strain for bigger breeds, which means better posture during meals and less mess on your floor.
Stash the food bags on the shelf above like you see here, and the whole unit looks intentional.
And if you’re already DIY-ing your dog’s setup, pairing this station with Homemade Salmon Dog Food Recipes: Nutritious and Delicious Meals for Your Pup makes the whole routine feel chef’s kiss.
Seal the oak with a food-safe polyurethane coat — two thin layers beat one thick one every time.
Prep Time: 30 min | Active Project Time: 3–4 hours | Difficulty Level: Intermediate
📸 Photo credit: Instagram @bearbear85
#3: Elevated Double-Bowl Feeding Station With Built-In Food Storage Cabinet
Your golden’s dinner routine is… a lot. The bowl slides across the kitchen floor, food bits scatter everywhere, and somehow the kibble bag ends up wedged behind the trash can again.
This pine wood feeding station with a dark walnut stain top fixes all of that in one build.
Materials & Tools:
– 1×6 and 1×8 pine boards (light natural finish)
– Dark walnut wood stain (for the top panel)
– Two stainless steel bowls (12-inch diameter each)
– Black cabinet pull handle
– Wood glue + 2-inch wood screws
– Sandpaper (120-grit and 220-grit)
– Jigsaw, drill, measuring tape
– Vinyl decal or wood-burning tool (for the name)
Instructions
Cut your pine boards to build a box frame roughly 24 inches wide, 12 inches tall, and 14 inches deep. Sand every edge with 120-grit first, then finish with 220-grit so the wood feels smooth under your hands.
Attach the four side panels with wood glue, then reinforce every corner with 2-inch screws. Cut a front panel slightly smaller than the frame opening — this becomes your cabinet door. Attach it with two small hinges and add the black pull handle centered near the top.
For the top, cut your stained walnut board and trace two circles matching your bowl diameter. Cut them with the jigsaw, then drop the bowls in. The raised height keeps your dog’s neck comfortable during meals, which reduces strain over time — especially important for large breeds like goldens.
Burn or vinyl-cut your dog’s name onto the front panel before sealing everything with a food-safe clear coat.
The cabinet door underneath stores a full kibble bag or canned food, keeping your kitchen counter finally clear.
If your golden has specific dietary needs alongside the feeding routine upgrade, Homemade Dog Food for Diabetic Dogs: A Complete Guide to Managing Diabetes Through Diet is worth a read.
Stain the top panel at least 24 hours before assembly so it cures without warping the wood underneath.
Prep Time: 30 min | Active Project Time: 3–4 hours | Difficulty Level: Intermediate
📸 Photo credit: Instagram @l_atelier_12
#4: Pull-Out Cabinet Pet Food Station with Dual Airtight Bins
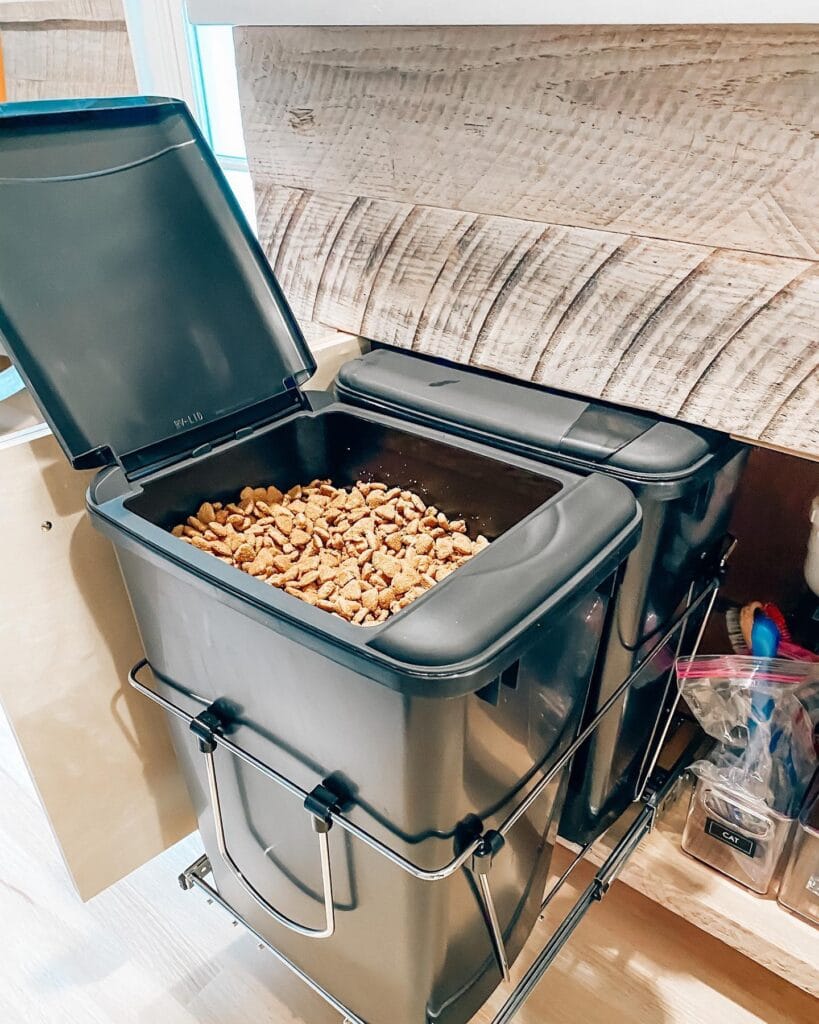
You know that moment when you’re scooping kibble out of a half-ripped bag at 7am, dog circling your legs like a shark, and somehow half the food ends up on the floor? Yeah. That was my life every single morning until I spotted this setup and immediately sent it to three people.
This one uses a pull-out cabinet organizer with chrome wire rails mounted inside a lower kitchen cabinet. Two dark charcoal gray plastic bins sit side by side on the sliding rack — one holds dog kibble, the other can store cat food (that little “CAT” label on the acrylic container to the right? chef’s kiss for organization lovers).
Materials & Tools
– Pull-out cabinet organizer with chrome sliding rail system (fits 12–18″ cabinet width)
– Two airtight flip-top storage bins (approximately 33-liter capacity each)
– Reclaimed wood panel for cabinet facing (whitewashed finish shown)
– Small acrylic label holders with printed inserts
– Drill, screws, measuring tape, level
Instructions
Measure your cabinet opening first — this step saves you so much heartache later. Mount the chrome pull-out rail system to the cabinet floor using your drill, making sure both rails sit level side by side.
Slide both bins onto the rack before securing anything permanently, because you want to confirm they clear the cabinet door when rolling out. The flip-top lids on these bins open toward you, so they need about 4 inches of clearance above when the drawer extends.
Once placement feels right, secure the rails with screws. The airtight seal on these bins locks out moisture and keeps kibble fresh — fresher food means better digestion for your golden, and zero stale smell wafting through your kitchen cabinet.
Attach your reclaimed wood panel to the cabinet face for that Pinterest-worthy finish. Sand any rough edges so it sits flush.
For your crockpot dog food recipes, this setup works perfectly as a dry ingredient station right beside your cooking area.
Label each bin with printed inserts slipped into acrylic holders — takes five minutes and makes the whole thing look intentional and polished.
Store a small scoop inside each bin so it’s always right there when your girl is staring you down at breakfast.
Prep Time: 15 min | Active Project Time: 45–60 min | Difficulty Level: Beginner
📸 Photo credit: Instagram @cwhome_charlotte
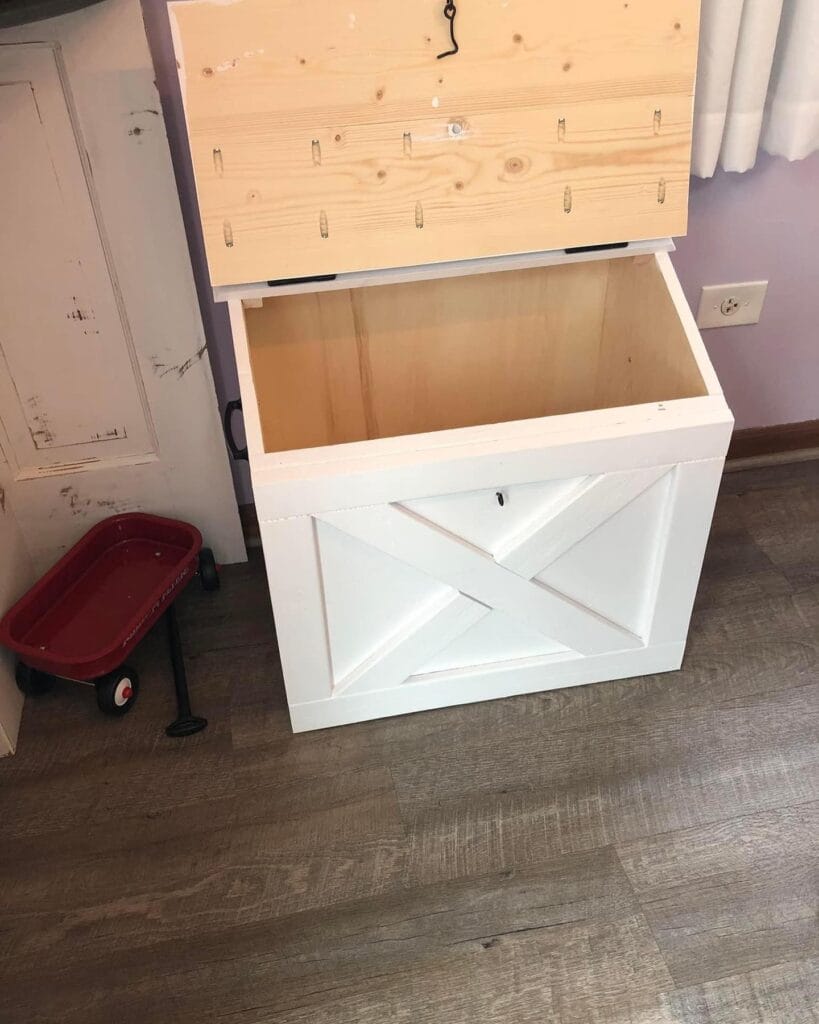
#5: DIY Farmhouse Toy Box Turned Dog Food Storage — The X-Brace Chest That Actually Looks Good in Your Living Room
You know that moment when your golden retriever is doing her excited breakfast spin, and you’re trying to scoop kibble from that flimsy paper bag that’s already ripping at the seam? Yeah. That chaos ends here.
This white-painted pine wood chest with the farmhouse X-brace front panel is everything. It holds a serious amount of food, the lid stays propped open while you scoop, and it looks like something straight off your Pinterest board.
Materials & Tools:
– 1×6 pine boards (sides, front, back, bottom)
– ¾-inch plywood sheet (lid panel)
– Pocket hole screws and Kreg jig
– Piano hinge (full-width, black finish)
– Lid support cable (keeps the lid from slamming on little paws)
– Decorative X-brace trim pieces (cut from 1×2 pine strips)
– White chalk paint + sealer
– Sandpaper (120-grit and 220-grit)
– Wood glue, brad nailer
Prep Time: 30 min | Active Project Time: 4–5 hours | Difficulty Level: Intermediate
### Instructions
Start by cutting your pine boards to build a simple rectangular box — the one shown measures roughly 24 inches wide × 18 inches deep × 20 inches tall, which fits about 50 lbs of kibble comfortably.
Join the four side panels using pocket hole screws drilled at 15-degree angles — this gives the joints serious strength without visible hardware on the outside. Attach the bottom panel the same way.
Now cut your 1×2 pine strips into four diagonal pieces for the X-brace. Dry-fit them first before gluing because the angle cuts need to meet exactly at the center. A miter saw set to 45 degrees does this cleanly. Glue and nail them flush to the front panel face.
Sand everything with 120-grit first, then finish with 220-grit for a smooth paint surface. Apply two coats of white chalk paint, letting each coat dry fully. The chalk paint — flat, matte, farmhouse finish — means scuffs from dog bowls and muddy paws buff right back out without repainting the whole thing.
Attach the piano hinge along the full back edge of the lid. Then attach the lid support cable inside — this is the part people skip and then regret when the lid crashes down mid-scoop. That cable holds the lid at 90 degrees, keeps your hands free, and protects your dog from a lid falling on her head during feeding time.
The lid support cable feature keeps the box open hands-free so you can scoop with both hands, which means zero spilled kibble and a safer feeding routine for your pup.
Seal everything with a food-safe polyurethane topcoat on the interior panels. It makes wiping out crumbs and old kibble dust actually easy instead of a whole project.
The interior raw pine finish you see in the photo? Leave it natural. It breathes better than painted wood for food storage, and it won’t trap moisture under the kibble.
If you love projects like this, 13 Genius DIY Dog Stuff Every Pet Parent Needs to Try Today! has more builds worth bookmarking for your next weekend project.
📸 Photo credit: Instagram @jakenjillswoodshop
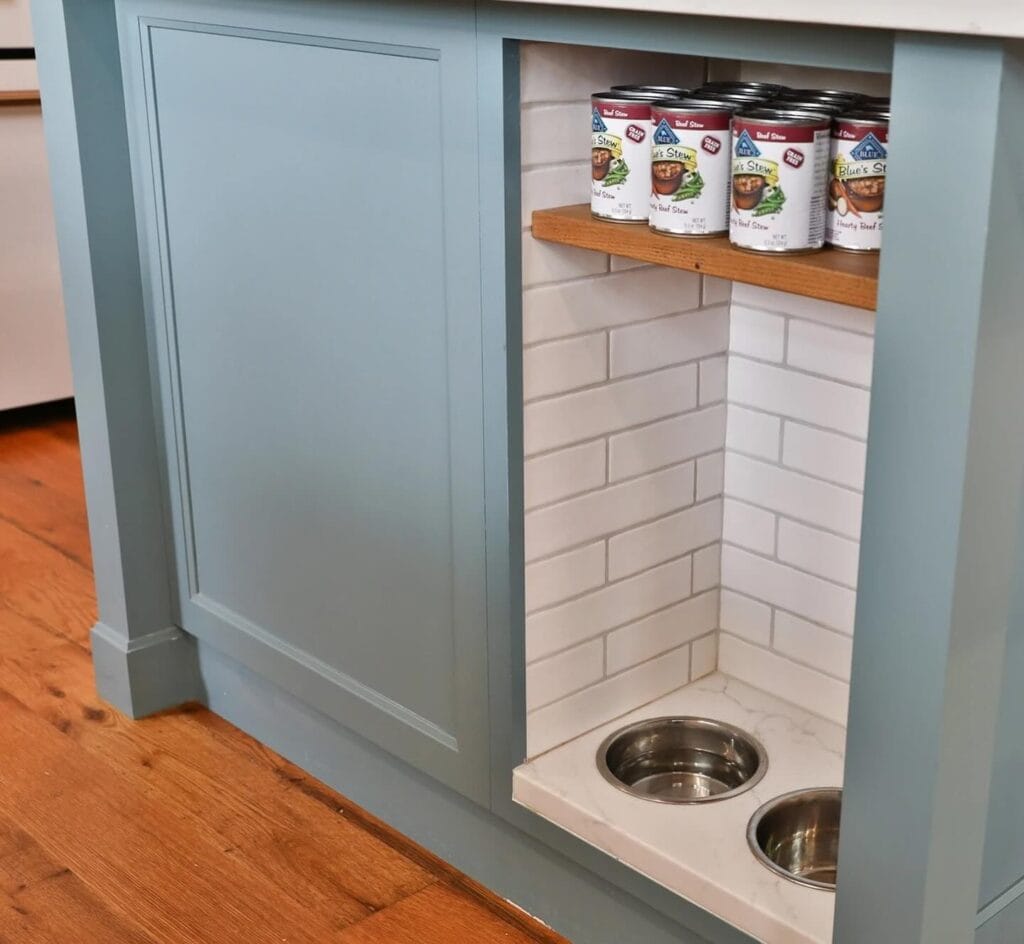
#6: Built-In Kitchen Island Pet Station with Subway Tile and Raised Bowls
You know that moment when your golden’s food bowls are sliding across the floor again, and you’re basically doing a little dance trying not to kick them over while you cook dinner? Yeah. That used to be my life too.
This built-in pet station tucked right into a kitchen island is the setup I didn’t know I needed until I saw it.
Materials & Tools You’ll Need:
– Blue-gray painted MDF or wood for the cabinet frame
– White subway tiles (standard 3×6 inch) + tile adhesive and grout
– Hardwood shelf board (oak or similar, approximately 3/4 inch thick)
– White quartz or marble-look countertop slab for the bowl platform
– Two stainless steel inset dog bowls (32 oz each)
– Circular hole saw, tile saw, level, sandpaper, paint roller, wood screws
Instructions
Start by cutting an open niche into the base of your kitchen island — aim for roughly 18 inches wide by 20 inches tall. Frame it out with 3/4-inch plywood, then apply your subway tiles to the back and side walls using standard tile adhesive. Let that cure a full 24 hours before grouting.
While the tile sets, cut your oak shelf board to fit the upper portion of the niche. Sand it smooth, seal it with food-safe wood finish, and secure it with hidden brackets. This shelf becomes your dog food storage — those Blue Buffalo Beef Stew cans slide right in, perfectly within reach.
For the bowl platform, install your quartz slab at floor level, then use a hole saw to cut two circles sized for your stainless bowls. Drop the bowls in flush — because a built-in bowl means zero sliding, zero mess, zero “where’s the bowl” scramble before your morning coffee.
And honestly, painting the frame to match your existing cabinetry is what makes this look intentional instead of tacked-on.
Here’s the takeaway: built-in storage plus raised bowls in one niche keeps your golden’s eating area clean, your kitchen cohesive, and your sanity intact.
Seal the grout with a penetrating grout sealer after curing — dogs are messy, and unsealed grout will stain fast. Also, use epoxy-based paint on the wood frame so it wipes clean without peeling.
If you love projects that make your dog’s life part of your home design, the 14 Creative DIY Elevated Dog Bed Ideas You’ll Love have that same built-in, intentional feel.
Prep Time: 1 hour | Active Project Time: 2–3 days (including tile cure time) | Difficulty Level: Intermediate
📸 Photo credit: Instagram @newmarketdesignbuild
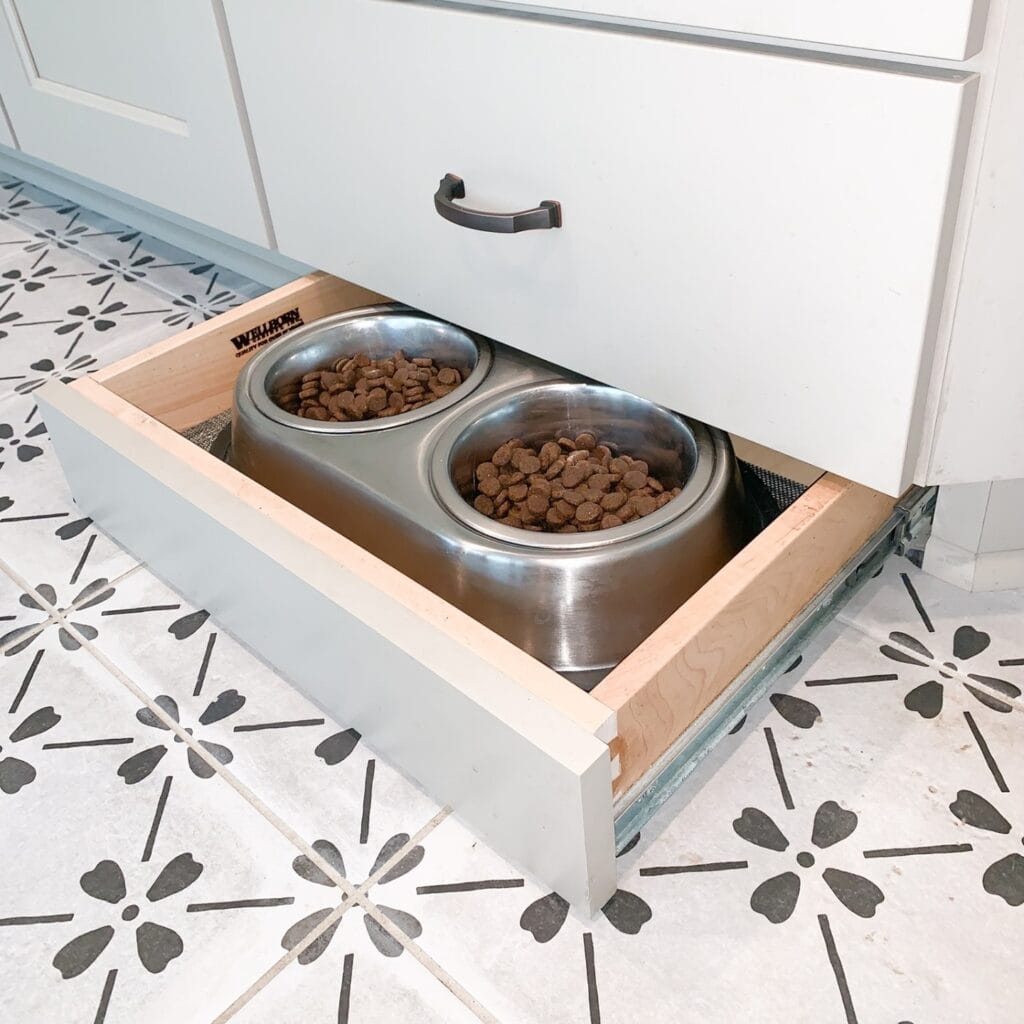
#7: Built-In Pull-Out Drawer Pet Feeding Station
Okay, you know that moment when you’re rushing around the kitchen and you literally trip over Goldie’s food bowls again? They’re always in the way, the kibble spills onto your nice tile, and honestly the whole setup just looks so chaotic.
This built-in pull-out drawer feeding station is everything.
Materials & Tools You’ll Need:
– 3/4-inch maple plywood (for drawer box sides and base)
– White-painted MDF (for the drawer front panel)
– Two stainless steel raised pet bowls (fitted to sit flush)
– Undermount soft-close drawer slides (22-inch)
– Bronze drawer pull hardware
– Wood glue + brad nails
– Jigsaw (for cutting bowl openings)
– Sandpaper (120-grit and 220-grit)
– Non-slip drawer liner mat
Instructions
Cut your maple plywood into four drawer box pieces — two 22-inch side panels and two 14-inch front and back panels. Glue and nail them into a rectangle, then attach your 3/4-inch plywood base underneath.
Now for the easy part: trace your bowl rims onto the base, then use your jigsaw to cut those circles out so the bowls drop right in and sit flush. Sand every edge smooth — splinters near a dog’s face? Hard no.
Mount your soft-close drawer slides at the very bottom of your cabinet kick space, then slide your drawer box in. Attach the white MDF drawer front and add your bronze pull.
That pull-out feature keeps bowls hidden when Goldie’s done eating, which means zero tripping hazards and a kitchen that actually looks like your Pinterest board.
The drawer liner underneath catches any spilled kibble, so cleanup is just sliding it out and wiping it down. My cousin built one of these last spring and said she couldn’t believe she waited so long. Honestly, same.
If you love tucking pet stuff into your home’s design, 14 Stylish DIY Dog Crate Furniture Ideas You’ll Love has so many gorgeous ideas that work in the same style.
Double-check your cabinet’s kick plate height before you build — most are 3.5 to 4 inches, and you need at least 4 inches of clearance for standard bowls to sit comfortably.
Prep Time: 30 min | Active Project Time: 3–4 hours | Difficulty Level: Intermediate
📸 Photo credit: Instagram @edenandgraydesignbuild
#8: Rustic Wooden Dog Food Storage Box With a Lift-Top Lid
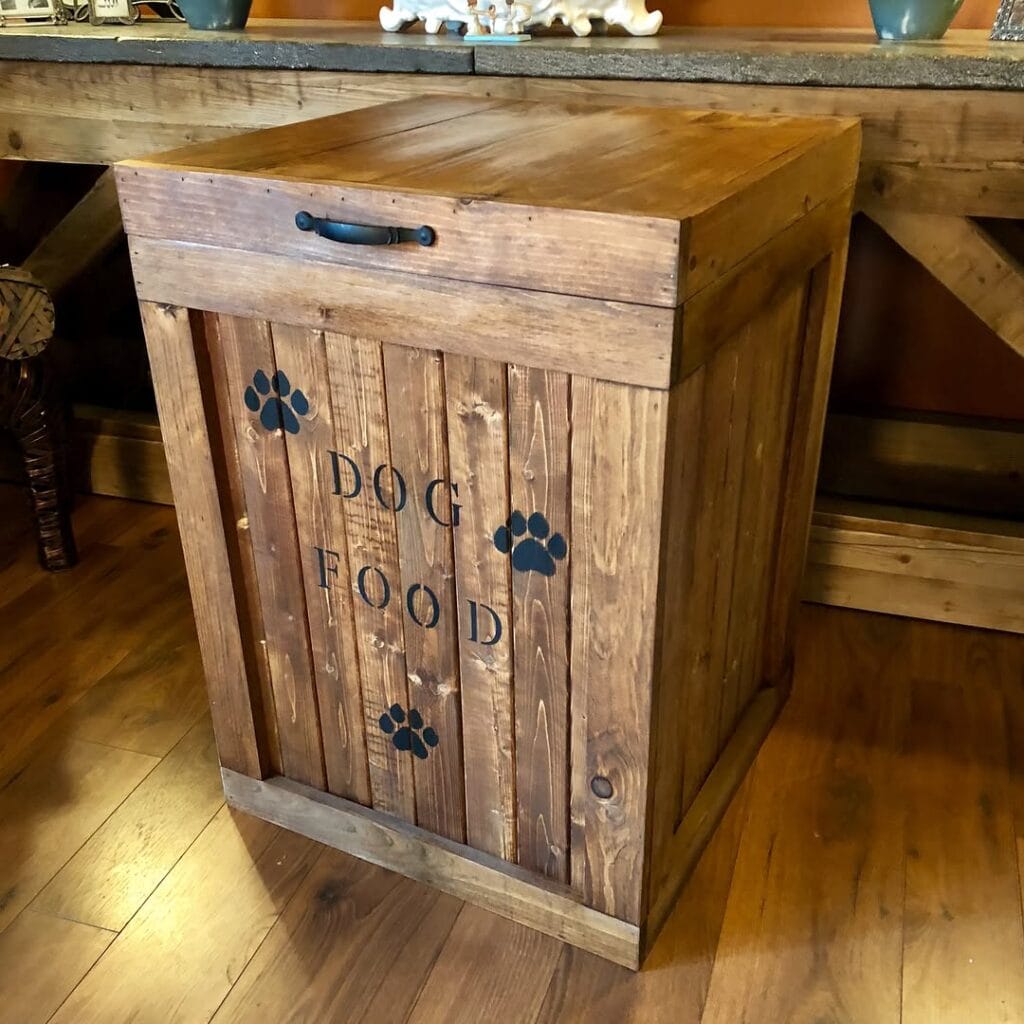
Your golden retriever nudges that giant kibble bag across the kitchen floor again. It tips. Kibble everywhere. You’re sweeping at 7am in your pajamas, half-awake, wondering why you haven’t fixed this yet.
This stained cedar plank lift-top box is the answer.
Prep Time: 30 min | Active Project Time: 3–4 hours | Difficulty Level: Beginner-Friendly
Materials & Tools:
– 1×6 cedar boards (enough for four sides, bottom, and lid)
– Dark walnut wood stain
– Black letter stencils + black craft paint
– Paw print stencils
– One black drawer pull handle
– Wood glue + 2-inch wood screws
– Sandpaper (120-grit and 220-grit)
– Polyurethane sealant (food-safe)
### Instructions
Start by cutting your cedar boards into four side panels, one bottom piece, and one lid panel — the lid should overhang the box by about ¾ inch on each side. Sand every piece with 120-grit first, then finish with 220-grit so the stain soaks in smooth.
Assemble the four sides using wood glue along each joint, then reinforce every corner with 2-inch screws. Attach the bottom panel the same way. The vertical plank look from the image? Achieve that by gluing narrow ¼-inch cedar strips across the front face panel before staining — it adds that farmhouse texture without extra cutting.
Apply two coats of dark walnut stain, letting each coat dry fully. Once dry, seal everything with food-safe polyurethane — cedar seals well and keeps moisture and pests completely out, which means your dog’s kibble stays fresh longer and you’re not throwing away stale food every week.
Attach the black drawer pull centered on the lid. Then stencil “DOG FOOD” down the front panel in black, surrounded by three scattered paw prints like the image shows.
Small change, big win: hot-glue a thin rubber strip along the inside lid edge so it closes with a soft seal instead of a clunk.
The sealed lid keeps kibble fresh, the cedar construction resists moisture, and the stenciled front makes it look like it belongs in a magazine spread — not a utility closet.
Cut a small circular hole near the base of one side panel (just like in the image) for airflow. It prevents any musty smell from building up inside.
📸 Photo credit: Instagram @sd_wood_designs
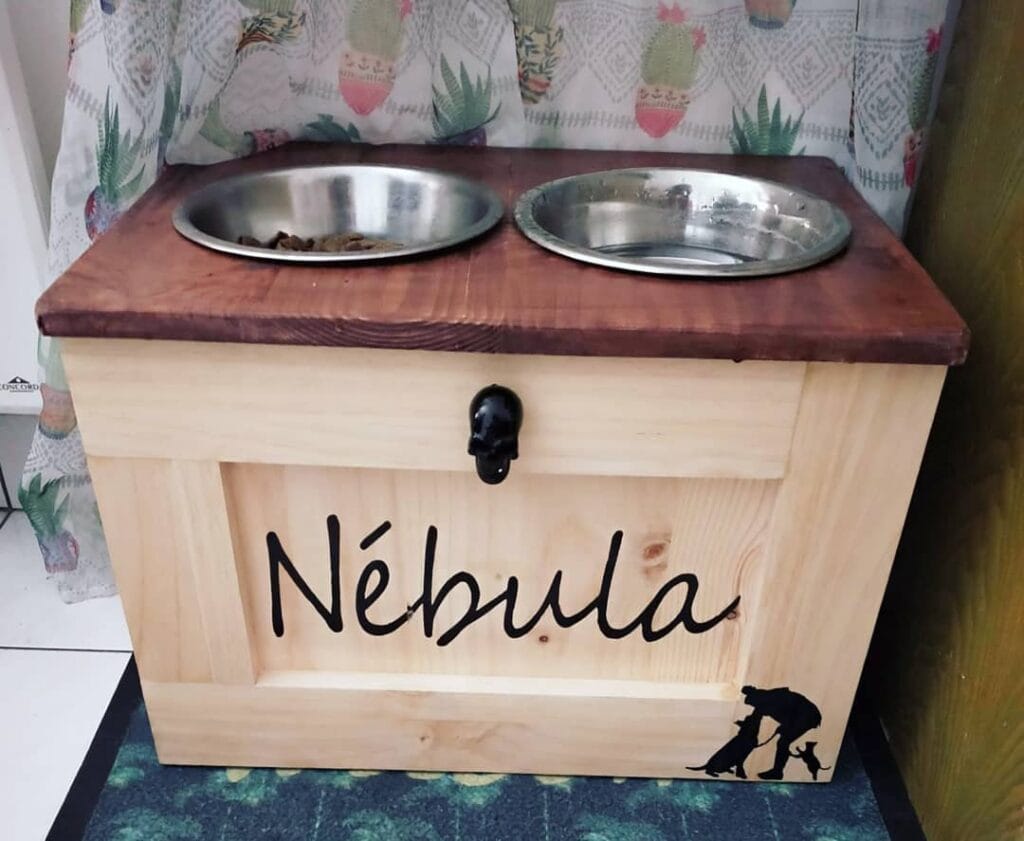
#9: DIY Raised Dog Feeding Station With Built-In Storage Box
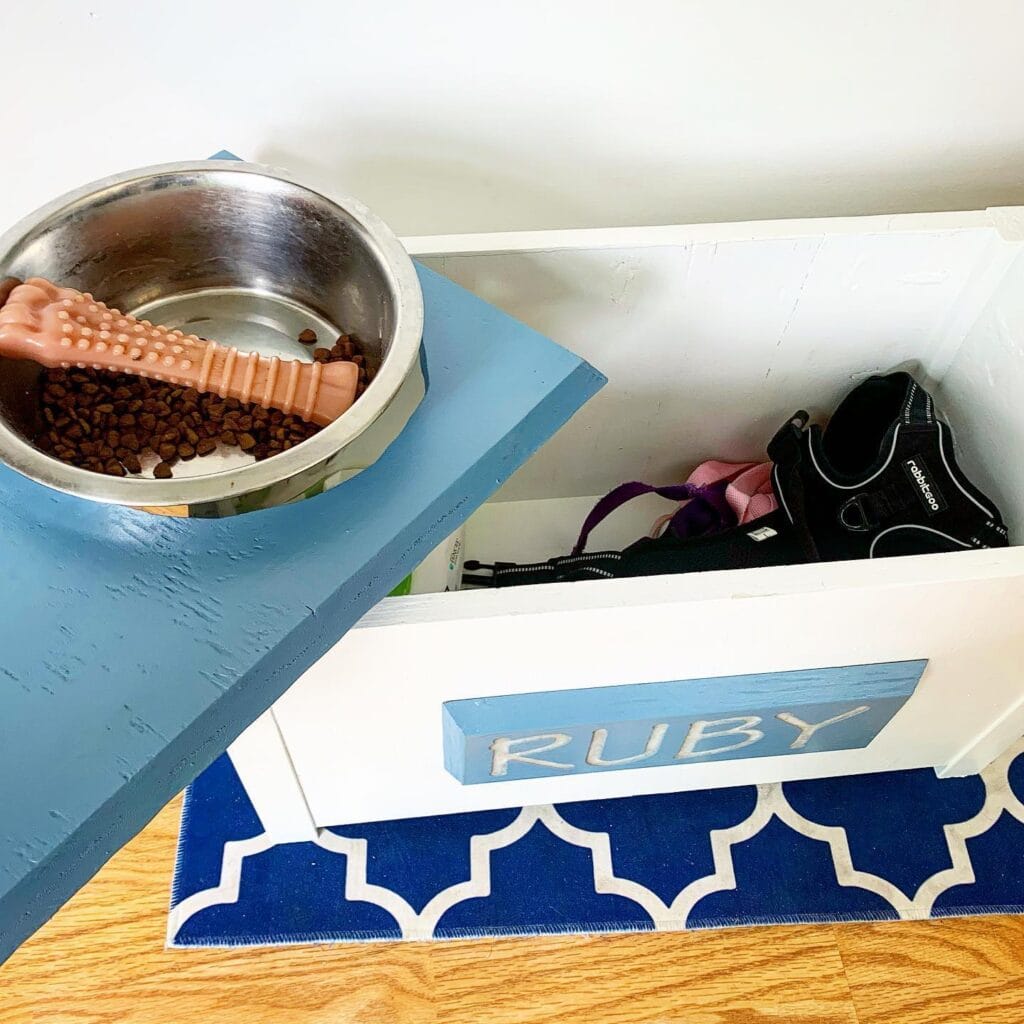
You know that moment when you’re rushing out the door and you’re stepping over Ruby’s leash, her harness is somewhere under the couch, and the kibble bag just tipped over again? Yeah. That chaos is real.
This project fixes all of it in one spot.
Materials & Tools You’ll Need:
– 1-inch pine wood boards (white-painted)
– Light blue chalk paint (for the raised platform and name plaque)
– Stainless steel dog bowl (standard size fits the platform cutout)
– Rubber bone chew toy for the bowl area
– Rabbitgoo dog harness and leash set for storage reference sizing
– Wood letters or stencil for your dog’s name
– Navy blue Moroccan-pattern rug (24″ x 36″ recommended)
– Sandpaper, wood glue, screws, paintbrush
Instructions
Start by cutting your pine boards into four side panels and one base to build an open-top storage box roughly 12″ tall x 18″ wide. Sand every edge smooth — splinters near a dog’s nose are a hard no.
Assemble the box with wood glue first, then reinforce each corner with screws. Paint the entire box white, letting it dry completely before adding a second coat.
Cut a separate blue-painted platform piece slightly wider than the box top. This elevated surface holds the bowl at a comfortable height, which reduces neck strain for bigger dogs like golden retrievers — exactly the kind of small detail that makes a huge difference long-term.
Paint a small rectangular plaque light blue, stencil your dog’s name in white, and attach it centered on the front panel.
Drop your harnesses, leashes, and spare collars straight into the open box. And the stainless bowl sits right on top of that blue platform, kibble ready to go.
Place everything on the navy Moroccan rug to anchor the whole station visually and catch any food spills before they hit your hardwood.
Seal all painted surfaces with a clear matte polyurethane coat — this keeps the chalk paint from chipping when Ruby bumps into it during breakfast.
Prep Time: 30 min | Active Project Time: 3–4 hours | Difficulty Level: Beginner-Intermediate
If your storage box ends up deeper than expected, toss a small basket inside to corral shorter leashes so they don’t get buried under bulkier harnesses.
📸 Photo credit: Instagram @makersbestfriend
#10: Built-In Corner Bench Dog Food Station With Hidden Storage
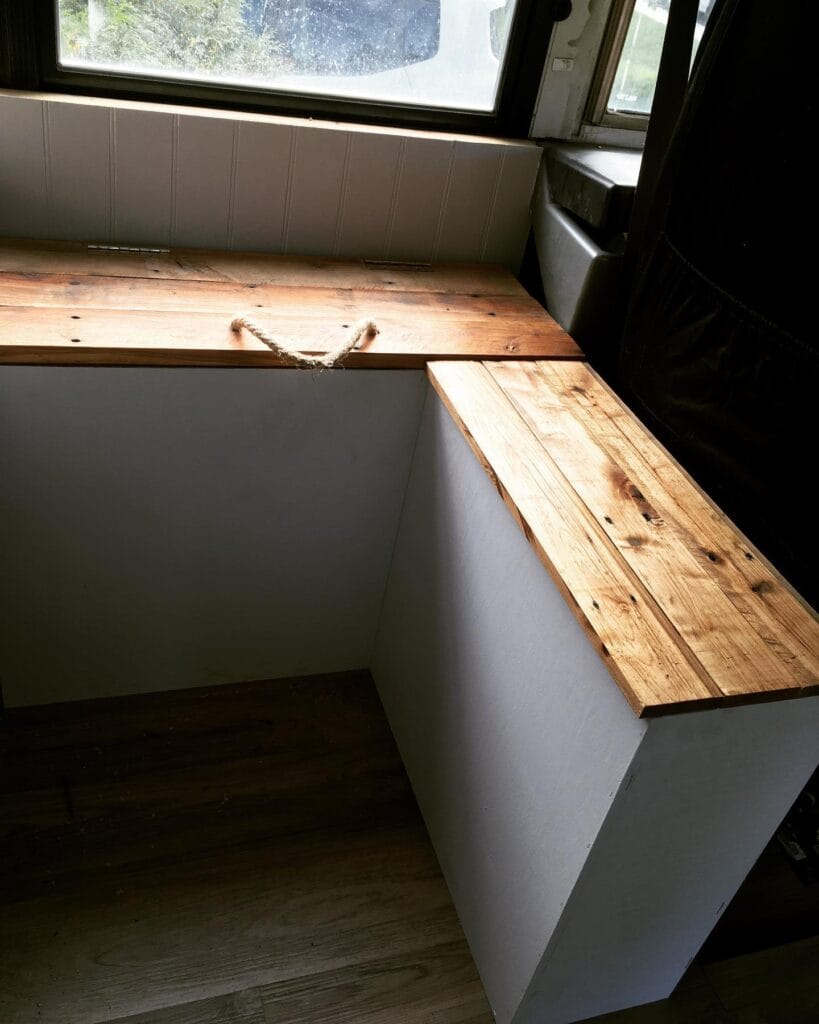
Okay, you know that moment when you’re trying to feed your golden and the bag of kibble just… tips over? And suddenly there’s dog food everywhere — on the floor, under the fridge, in places you won’t find until three weeks later?
Yeah. This corner bench fixes that.
Prep Time: 30 minutes | Active Project Time: 1 weekend | Difficulty Level: Intermediate
What You’ll Need:
– 3/4-inch plywood (for the base box structure)
– Reclaimed wood planks (for the bench top — cedar or pine work best)
– White paint or primer (for the exterior panels)
– 2-inch piano hinge or two standard cabinet hinges
– Thick jute rope (for the pull handle)
– Wood stain in a warm walnut or honey tone
– Drill, screws, sandpaper, measuring tape
– Beadboard paneling (optional, for the wall backing)
### Instructions
Start by building your L-shaped box frame from 3/4-inch plywood — cut two rectangular sections that meet at a corner, then screw them together with 2-inch wood screws. The box depth should be at least 18 inches to fit a standard dog food bin or airtight container inside.
Sand every plywood edge until it’s smooth — splinters near a dog’s feeding area are a no.
Paint the exterior panels matte white and let them dry fully before moving on. And honestly, two coats give you that clean, Pinterest-worthy finish that holds up against muddy paws and food spills.
Cut your reclaimed wood planks to fit the L-shaped top, then stain them in a warm tone that contrasts the white base. This is the key: the lid sits on piano hinges at the back, so you can flip it open with one hand while scooping food with the other — zero bending, zero wrestling with a clunky bin.
Drill two holes at the front of the lid and thread a loop of jute rope through — knot it underneath so it holds firm. That rope handle is what makes the whole thing feel intentional, not just functional.
If you’re mounting this near a window like in the photo, add beadboard panels to the wall behind the bench for a cohesive, cottage-style look.
The hidden storage compartment keeps your kibble dry and contained — airtight bins inside the box lock in freshness, which means fewer digestive issues for your pup and fewer pantry smells for you. Built-in storage, cleaner feeding routine, happier dog — that’s the payoff.
Seal the wood top with a food-safe polyurethane coat so spills wipe right off.
Screw the bench base to the wall studs at the back for stability, especially if your golden is the type who leans on everything (and we both know she is).
The bench doubles as extra seating when you have guests over, which honestly makes it one of the hardest-working pieces in a small space.
📸 Photo credit: Instagram @the_muss_bus
The Airtight Secret That Keeps Kibble Fresh Way Longer Than You’d Think
Okay, real talk — the number one mistake I see people make with DIY dog food storage? They focus on the container and completely forget about the seal.
A cute wooden crate or that upcycled tin looks gorgeous on your Pinterest board. But if air sneaks in, kibble goes stale fast, and worse — it goes rancid. Your golden retriever will literally turn her nose up at it, and you won’t even know why she’s suddenly being picky.
Here’s the pro move: always line your DIY container with a food-grade mylar bag before filling it. I started doing this after my sister’s dog got sick from oxidized food — never again. The bag blocks moisture and oxygen completely, even if your outer container isn’t perfectly airtight.
Also? Never store kibble in the garage. Temperature swings break down the fats in the food faster than anything.
The container is decoration. The seal is the actual job.
And honestly, if you’re already going full DIY mode for your pup, the 7 Creative Ideas for Your DIY Dog Washing Station situation deserves the same attention.
Your Couch Deserves Better — And So Do You
Okay, real talk — pick one product and just try it. You don’t need to overhaul your whole house. Grab the couch cover, or the door mat, or whatever feels most urgent right now. Your golden is not slowing down, and neither is the mess.
I started with just the sofa protector and honestly? That one win gave me so much motivation to keep going.
Small changes add up fast. And if you want to go even further, DIY dog feeding station ideas can make your whole pet setup look Pinterest-level cute.
So tell me — what’s the one spot in your home your dog has completely taken over? 🐾

Amr Mohsen is a software engineer who traded his keyboard for a leash — at least on weekends. His love for dogs inspired him to share what he learns as a dog owner and enthusiast, bringing a detail-oriented, research-driven perspective to every article he writes. If it’s about dogs, he’s probably already looked it up twice.


