Remember that time you tried to make pumpkin pie from scratch and ended up with a big squishy mess? Creating DIY furniture dog crates can feel a bit like that—scary at first, but oh-so-rewarding when it all comes together. You’ve got a pup that needs their own stylish space in your home, and trust me, it doesn’t have to look like a cramped kennel. So, what if I told you there are ten creative designs that might just inspire you to grab those tools?
Stylish Crate Bench Designs
When it comes to creating a stylish crate bench for your furry friend, you might be surprised at just how many fantastic options there are out there.
DIY furniture dog crate designs can elevate your pet’s space and your home décor. Imagine your pooch lounging on a cushy bench, nestled just perfectly into your living room. You could start with a simple wooden crate as your base and attach a comfy cushion on top.
Add a few cute pillows and you’ve got a cozy nook! Or, paint it to match your furniture for a seamless look. Don’t forget to ponder ventilation and size.
Your pup deserves style, too, right? Plus, you’ll feel like a design guru, even if you just barely survived that last DIY project.
Our Collection
Let’s check out our collection of DIY dog crate designs that not only keep your pup cozy but add style to your space.
You’ll find everything from a wooden crate with a hidden storage drawer to a chic metal wire version that’ll impress your friends.
And who wouldn’t want a fabric-covered crate couch or a reclaimed wood crate table that doubles as a pet-friendly nightstand?
1. Wooden Crate With Storage Drawer
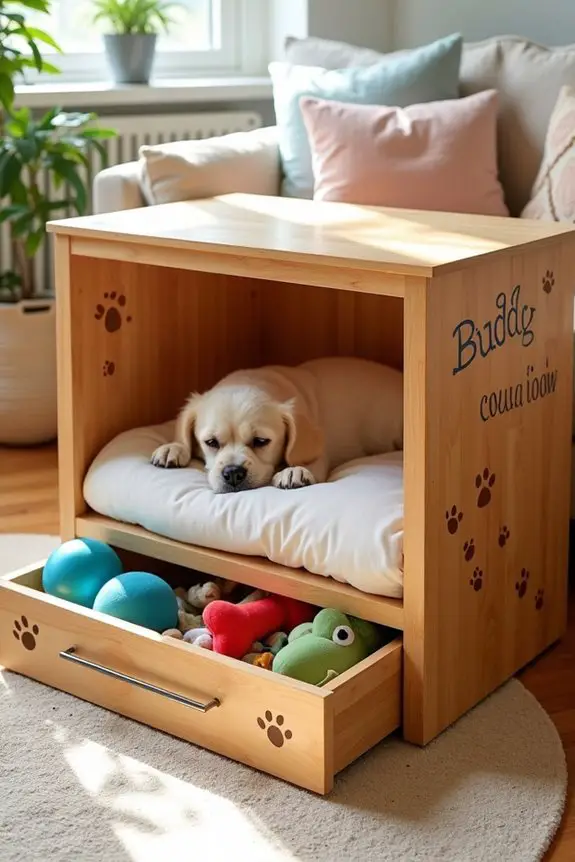
Creating a wooden crate with a storage drawer is a fantastic DIY project for dog owners looking to combine functionality and style. Not only does it provide a cozy den for your pup, but it also offers a place to store all their toys, treats, and other essentials, making your home tidier and more organized. Additionally, investing in premium dog training equipment can enhance your pet’s training experience and overall well-being. Incorporating stylish elements into your crate can make it among the finest pieces of high end kitchen appliances for your home, marrying function and design seamlessly.
Materials Needed:
- Plywood sheets (1/2-inch thick)
- Wood screws (1.5-inch)
- Wood glue
- Drawer slides (1 pair)
- Sandpaper (medium and fine grit)
- Wood stain or paint (optional)
- Wood finish (optional)
- Measuring tape
- Saw (hand saw or circular saw)
- Screwdriver
- Clamps
- Drawer handle
- Safety goggles
- Dust mask
Step-by-Step Instructions:
- Measure & Cut the Pieces: Using your plywood, measure and cut the following pieces:
- (1) Bottom: 36×24 inches
- (2) Sides: 24×24 inches
- (1) Back: 36×24 inches
- (1) Front: 36×24 inches
Make sure you’re wearing your safety goggles and dust mask. Sawing can get messy.
2. Assemble the Crate: Lay the bottom piece flat. Attach the side pieces to the edges, using wood screws and wood glue for extra strength. Then, attach the back and front pieces in the same way; your crate will start taking shape.
3. Create the Drawer Frame: For the storage drawer, cut two pieces measuring 15×20 inches for the sides, one piece at 15×22 inches for the front, and one piece at 20×22 inches for the back. Assemble this frame using screws and glue.
4. Add the Drawer Slides: Attach the drawer slides to the inside of your crate, following the manufacturer’s instructions. They help the drawer open and close smoothly.
5. Finish the Drawer: Attach the bottom of the drawer by cutting a piece of plywood same size as the outer dimensions of the drawer frame and securing it with screws.
6. Sanding & Finishing Touches: Sand all surfaces, focusing on edges and corners to avoid splinters for both you and your dog.
If you want to add some flair, now’s the time to apply wood stain or paint.
7. Personalize Your Crate: Once everything is dry, install the handle on the drawer front. Finally, place cozy bedding inside the crate. Voilà! You’ve got a stylish and functional crate for your furry friend.
Optional Add-ons/Variations:
- Customize the Color: Give your crate a pop of personality by painting it in a vibrant color that matches your décor. Or consider a soft pastel for a more subtle look.
- Decorative Stencils: Use stencils to add your dog’s name or fun patterns on the sides. It’s like a puppy boutique right in your living room.
Pro Tip:
Make sure the edges are smooth and splinter-free. A happy dog needs a safe dog.
Also, consider placing the crate in a quiet corner, away from bustling activity, so your pup can enjoy some peaceful snooze time. Keeping the drawer stocked with toys means fewer doggy disasters around the house.
2. Chic Metal Wire Crate
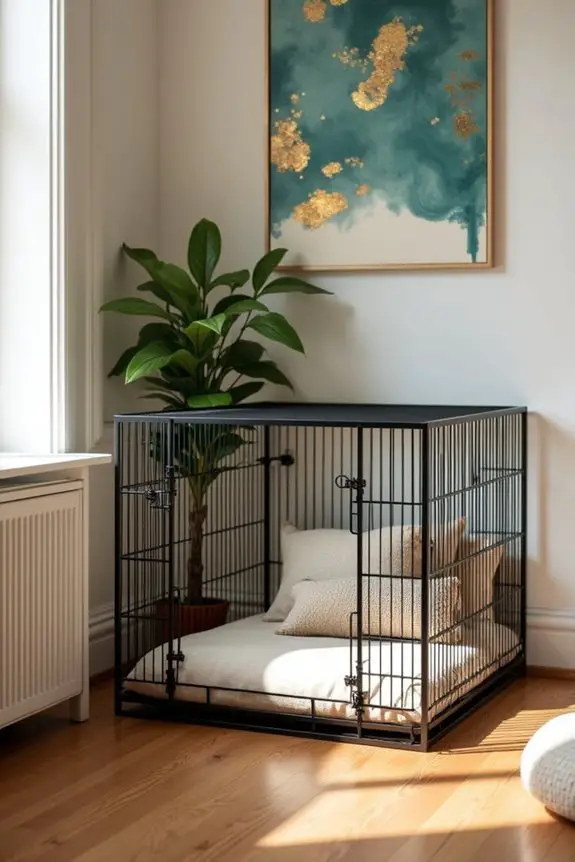
If you’re looking for a stylish solution to your pup’s crate needs, a chic metal wire crate is a perfect option. It not only allows for visibility and air circulation, but it also adds a modern touch to your home decor. Plus, making your own means you’ll save a few bucks while creating a cozy space for your furry friend. It’s essential to consider premium dog food brands when selecting the best nutrition for your dog, as their health and well-being rely on proper diet.
Materials Needed:
- Metal wire (from a hardware store or online)
- Wire cutters
- Pliers
- Hinges (2-4, depending on design)
- Latch or lock (to secure the door)
- Measuring tape
- Cardboard or paper (for templates)
- Sandpaper (for smoothing sharp edges)
- Paint (optional, for a pop of color)
- Non-toxic pet-friendly paint (if painting)
- Safety goggles
- Dust mask
Step-by-Step Instructions:
- Design Your Crate: First things first, sketch out your crate design on paper. Decide the dimensions based on your dog’s size. For example, a crate of about 30”x20” works for medium-sized pups.
- Cut the Metal Wire: Measure and cut lengths of metal wire according to your design. You’ll need pieces for the sides, top, bottom, and door frame. Be careful with the wire cutters; they can be a bit tricky, so wear your safety goggles.
- Assemble the Frame: Start constructing the base by creating a square or rectangle with the wire pieces for the bottom. Secure the corners with pliers by twisting the wire ends together tightly. This is where patience comes in—I once spent an hour trying to get my wires all to cooperate, but trust me, it’s worth it.
- Attach the Sides: Add vertical pieces for the sides by attaching them from the bottom frame upward. Again, twist the ends securely so they don’t wobble.
- Create the Top: Use the same method to create the top part of the crate. The best part? You can make the top removable or hinged for easy access and cleaning.
- Build the Door: For the door, cut out an opening in one of the sides, then create a matching frame that fits perfectly. Attach it to the crate using hinges. Make sure it swings freely but stays secure—your pup doesn’t need a getaway plan!
- Finishing Touches: Sand any sharp edges to keep those little paws safe. If you want to add a splash of color, paint the crate with a non-toxic pet-friendly paint—pick a color that makes you smile.
Optional Add-ons/Variations:
- Accessorize with Cushioning: Add a cushioning layer inside with a soft, washable blanket or dog bed. Your dog will appreciate a cozy spot that feels like home.
- Colorful Accents: If you want an even bolder look, consider applying a fun pattern using wire mesh in different colors. Stripes or polka dots can definitely give a playful vibe.
Pro Tip:
Always check for sharp edges on your created wire crate. You can even use small rubber caps on the ends of wires to avoid any poking hazards for your pup. Plus, consider lining the bottom with a waterproof mat. It’ll make cleaning up a breeze and keep your crate looking fresh!
Crafting a chic metal wire crate can’t only enhance your home’s aesthetic but also provide your furry friend with a safe, comforting place to call their own. Happy building!
3. Fabric-Covered Crate Couch
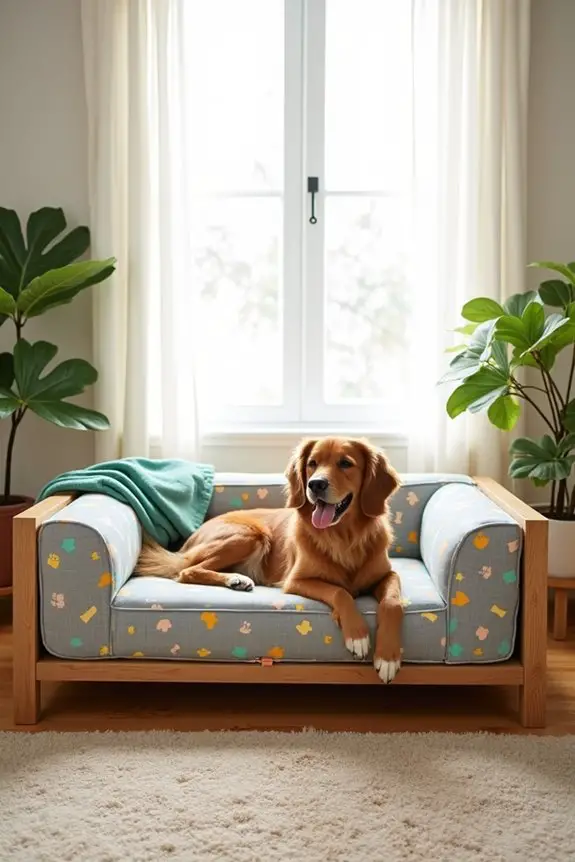
If you’re tired of your dog’s crate being an eyesore in your living room, a fabric-covered crate couch is the perfect solution. Not only does it blend seamlessly with your home décor, but it also creates a cozy and stylish spot for your pup to rest. Plus, it’s a great way to save money while giving your dog a comfy place to chill—talk about a win-win! Adding a luxury dog bunk bed can also provide a stylish option for your pet while enhancing your home environment. In addition, investing in luxury dog furniture orthopedic ensures your dog will receive the support they need while lounging.
Materials Needed:
- Wood boards (for the base and top)
- Foam cushioning or a thick dog bed
- Fabric in your choice of pattern or color
- Staple gun and staples
- Scissors
- Measuring tape
- Sandpaper
- Screwdriver and screws (to assemble the frame)
- Optional: paint (for the wood base, if desired)
Step-by-Step Instructions:
1. Measure and Cut the Wood: Start by measuring a suitable size for the crate couch. A good starting point is about 36”x24”—enough room for medium pups to stretch out.
Cut the wood boards according to these dimensions using a saw (you might want to ask a friend for help here, so you don’t end up singing the “awkward solo” while you struggle).
2. Assemble the Frame: Create a rectangular frame using the wood boards. Use the screwdriver to secure the corners with screws, making sure everything is tight—no wobbly couches for our furry friends.
3. Sand the Edges: Once assembled, don’t forget to sand down any rough edges. This step is vital to keep those paws safe. You wouldn’t want your pooch to have a splinter party, right?
4. Add the Foam Cushioning: Lay the foam cushioning or dog bed snugly on top of your wooden frame. If the bed is too large, trim it down to fit. Your dog deserves to be comfy, after all—think of it as their new throne.
5. Cover with Fabric: Now for the fun part: covering your creation. Cut the fabric to size, leaving a little extra on the sides.
Use the staple gun to secure the fabric tightly around the frame, pulling it smoothly to avoid any wrinkles. Don’t worry if you accidentally staple your fingers—the joy on your dog’s face will make it worth it, right?
6. Finishing Touches: Once the fabric is secured, trim any excess, and make sure everything looks tidy. If you chose to paint the wood, now’s the time to apply a non-toxic paint to give it some flair.
Optional Add-ons/Variations:
- Change Up the Fabric: Want your couch to pop? Experiment with different colors, textures, or patterns. Consider adding some fun patterns, like stripes or dog-themed prints, so it reflects your style (and your dog’s personality, of course).
- Add a Canopy: Turn it into a cozy nook by adding a small canopy or tent-like cover. It’ll be like your dog’s private hideaway, and who doesn’t want a pup that looks like they just stepped out of a design magazine?
Pro Tip:
Make it easy to clean by choosing removable fabric covers that can be tossed in the wash. You’d be surprised how many doggy snacks might go missing in the cushions over time.
You want your project to last, so using durable fabrics means your stylish creation will hold up against your dog’s happy digs and occasional drool.
Now, get ready to build the ultimate hangout for your furry friend—because every pup deserves a throne in your kingdom!
4. Reclaimed Wood Crate Table
If you’re looking to add a rustic charm to your home while providing a functional living space for your pup, then a reclaimed wood crate table is the perfect DIY project for you. This stylish piece not only adds storage but also elevates your pet’s comfort—all while being wallet-friendly. Plus, who wouldn’t want to sip coffee from a stunning table that sparks conversation?
Materials Needed:
- Reclaimed wood crates (2-3 depending on your design)
- Sandpaper (medium and fine grit)
- Wood screws
- Screwdriver or drill
- Non-toxic wood stain or varnish
- Paintbrush (for stain)
- Measuring tape
- Optional: Wheels (if you want a mobile table)
Step-by-Step Instructions:
- Select Your Crates: Start by choosing sturdy reclaimed crates. Check that they’re free from mold and splinters—your dog might be lurking nearby, and safety is a priority.
- Prepare the Wood: Sand down any rough edges using medium grit sandpaper, then finish with fine grit for that smooth touch. Just imagine the smoothness compared to a cat’s belly—pure bliss!
- Assemble the Table Top: Stack the crates side by side or on top of each other, depending on the height you want. For added stability, use wood screws to secure the crates together. It’s like creating a little fort for your dog—smart, safe, and stylish!
- Add the Stain: Use a paintbrush to apply a non-toxic wood stain or varnish to give your table a beautiful finish. Feel free to let creativity flow; maybe you want a deep walnut look for that cozy feel. Or go lighter for an airy vibe.
- Secure the Bottom Crate: If you want to add mobility to your table, now’s the time to attach wheels to the bottom crate. Imagine showing off your new mobile table at a picnic, effortless and chic!
- Finishing Touches: After drying, inspect your table for any rough spots that might need a quick fix-up. Now, take a moment to admire your work before placing your favorite items (and some doggy toys) on it. Your furry friend will appreciate having their bone collection displayed in style.
Optional Add-ons/Variations:
- Customize the Stain: Try out different stains to see what works best with your home décor. Whether it’s a bold color for fun or a muted tone for elegance, don’t be afraid to mix and match until it feels just right.
- Add a Glass Top: For an extra layer of sophistication and functionality, consider placing a glass top over your crate table. Not only does it give it a polished look, but it’s easier to clean (hello, spills) without sacrificing charm.
Pro Tip:
When working with reclaimed wood, always inspect it thoroughly for any hidden nails or sharp edges that could become a hazard for you or your furry friend.
Plus, if you’re on a budget, check out local salvaged wood shops or rehabilitative programs where you can find unique pieces at lower costs. You might even score a fantastic find that deserves a place in your home.
5. Pet-Friendly Crate Nightstand
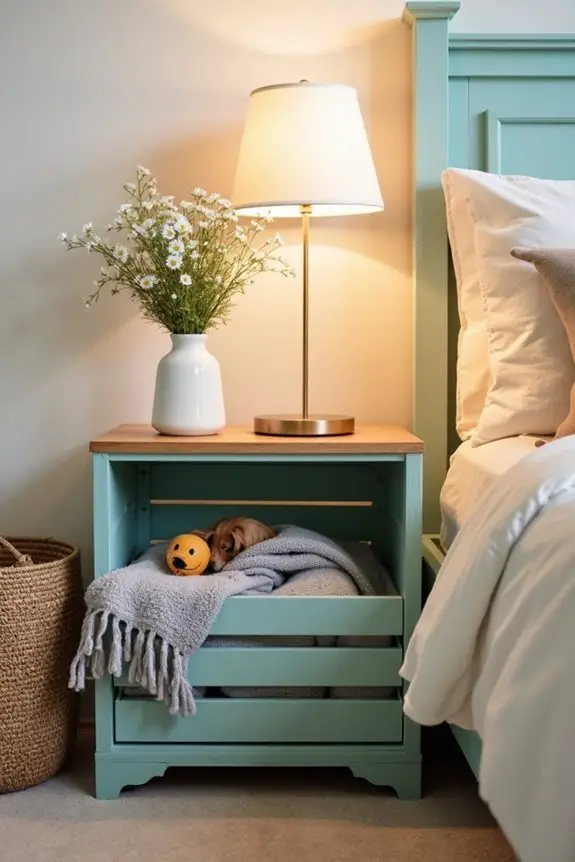
Looking for a stylish yet functional piece of furniture that serves not only as a nightstand but also as a cozy nook for your furry friend? A pet-friendly crate nightstand might just be your answer. This versatile DIY project not only saves money but also incorporates your dog’s comfort into your home decor, making bedtime a little more special for both of you.
Materials Needed:
- Wooden crate or an unfinished cabinet (check your local hardware store)
- Sandpaper (medium and fine grit)
- Non-toxic wood stain or paint (your favorite color)
- Paintbrush
- Wood screws
- Screwdriver or drill
- Measuring tape
- Optional: cushion or cozy blanket (for dog comfort)
- Optional: decorative stencil or decals (for personalization)
Step-by-Step Instructions:
- Choose Your Crate: Start with a wooden crate that suits your style. Make sure it’s sturdy enough for your dog to curl up in, like that cozy blanket on a chilly day.
- Sand It Down: Use medium grit sandpaper to remove any rough edges, then finish with fine grit for a softer touch. It’s like giving your crate a spa day—smooth, inviting, and ready for action.
- Add a Fun Color: With a paintbrush, apply your non-toxic wood stain or paint to the crate. Pick a shade that complements your bedroom decor. Who wouldn’t want a bold turquoise or calming gray next to their bed?
- Secure the Top: If your crate isn’t already equipped, you can create a stable surface by adding a wooden board on top and securing it with wood screws. It’s like building a little rooftop for your dog’s perfect hideaway.
- Final Touches: Once the paint or stain has dried, inspect your masterpiece. Check for rough spots that could snag a curious paw, and sand those down if necessary. Think of it as puppy-proofing your furniture.
- Cozy Up Inside: For the final touch, add a soft cushion or a small blanket inside the crate section. This is where your dog can snuggle up and dream sweet dreams, nearby but not in the way.
Optional Add-ons/Variations:
- Decorative Stencil or Decals: Get creative and personalize your nightstand with stencils or decals that showcase your dog’s name or even playful paw prints. Let your personality shine while celebrating your pup.
- Different Wood Types: If you’re feeling ambitious, try using different types of wood—perhaps something more exotic or reclaimed could add an eye-catching appeal. Play with textures that match your home style.
Pro Tip:
When choosing paint or stain, always check for non-toxic options to keep your furry friend safe. It’s an easy way to guarantee their cozy den remains a happy place.
Plus, think about using fabric softeners that are safe for pets for those cozy blankets; because who likes a rough night’s sleep, right?
Now you’ve got a snazzy crate nightstand that doubles as a pet haven—what’s not to love? Your dog will enjoy their little retreat, while you can revel in the beauty of practical furniture that doesn’t scream “pet owner.”
It’s the perfect blend of style and comfort, and, honestly, who wouldn’t want that?
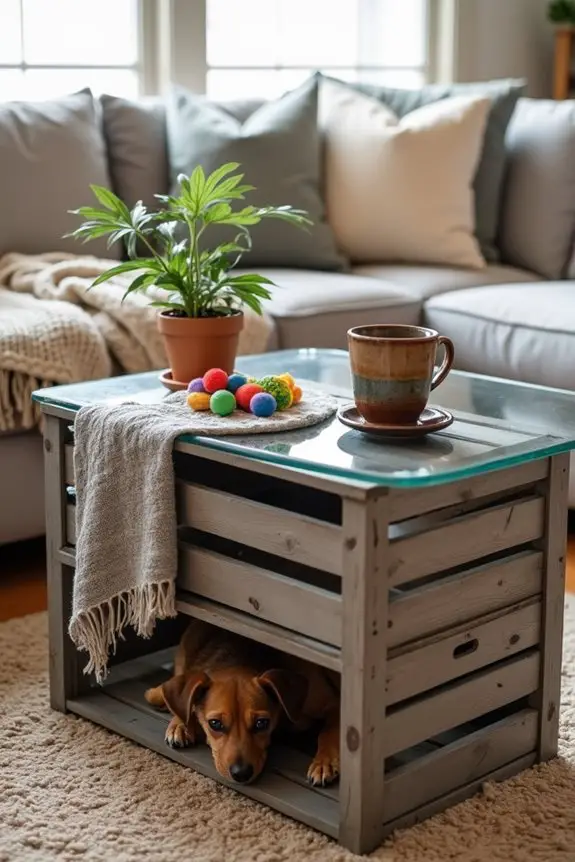
6. Glass-Top Crate Coffee Table
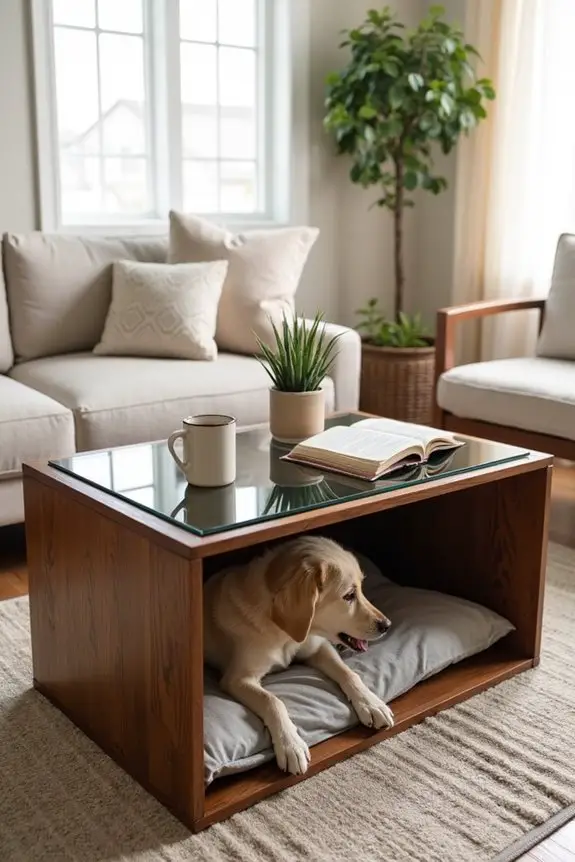
Transforming your dog’s crate into a chic glass-top coffee table? Yes, please! This stylish DIY project isn’t just a clever way to add a functional piece to your living room; it also provides a cozy, chic hideaway for your furry friend.
You’ll save money while keeping your home looking classy and inviting. Who wouldn’t want to sip their morning coffee while their pup lounges beneath the table?
Materials Needed:
- A sturdy wooden dog crate (confirm it’s big enough for your dog)
- A glass tabletop (cut to fit your crate)
- Sandpaper (medium and fine grit)
- Non-toxic wood stain or paint (your choice of color)
- Paintbrush
- Wood screws
- Screwdriver or drill
- Measuring tape
- Rubber bumpers (to protect the glass and prevent slipping)
- Optional: small dog blanket or pillow (for added comfort)
Step-by-Step Instructions:
- Pick the Right Crate: Select a wooden crate that fits your dog comfortably. Your pup should be able to stretch out and feel secure—think of it as their very own lounge spot.
- Prep the Wood: Sand down any rough edges on the crate using medium-grit sandpaper followed by fine grit. You want it smooth enough that your dog doesn’t accidentally snag a paw while stretching.
- Paint or Stain: Using your paintbrush, apply a non-toxic stain or paint of your choice. From grey to vibrant red, choose a color that complements your living space. Remember, it’s like giving your crate a fashionable makeover!
- Measure Up and Place the Glass: Once the paint or stain is dry, carefully measure the top of the crate to confirm your glass fits perfectly. Get that glass tabletop and place it on top, but make sure it’s sturdy.
- Secure with Bumpers: Attach rubber bumpers on each corner of the crate’s edge before placing the glass down. This will help keep the glass secure and avoid any slipping. Nobody wants a rogue coffee spill—let’s keep it classy.
- Add a Cozy Touch: Inside the crate, lay a soft blanket or a small pillow. This creates a comfy spot for your dog to relax while sitting pretty under the glass tabletop. It’s like a little hideaway they didn’t even know they wanted.
- Final Inspect: Give the whole setup a quick once-over for any rough spots, sharp edges, or loose screws. Your pup’s safety and comfort is paramount here, after all.
Optional Add-ons/Variations:
- Use Decorative Glass: Consider choosing frosted glass or even colored glass to give a unique twist to your coffee table. It can really stand out as a centerpiece of your living space.
- Stenciled Designs: If you’re feeling creative, you can stencil on the sides of the crate to add a design or your dog’s name. It’s a fun way to make it totally yours.
Pro Tip:
When working with glass, always handle it with care. This can save you from injury and a major cleanup.
Also, if you’re looking to save a penny or two—try visiting local glass shops or using reclaimed glass! You’ll find great deals and the chance to personalize it even further.
There you go! A beautiful glass-top coffee table that serves as both art and a cozy spot for your furry friend. Enjoy showing it off in your home, and brace for the compliments to roll in. Plus, now your dog has a stylish place to keep an eye on all the action!
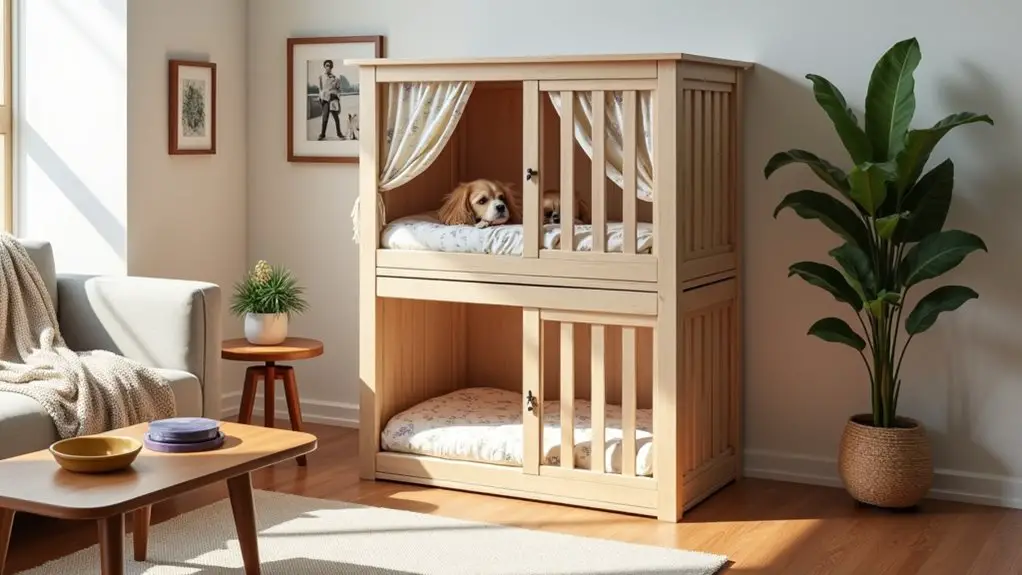
7. Customizable Modular Crate System
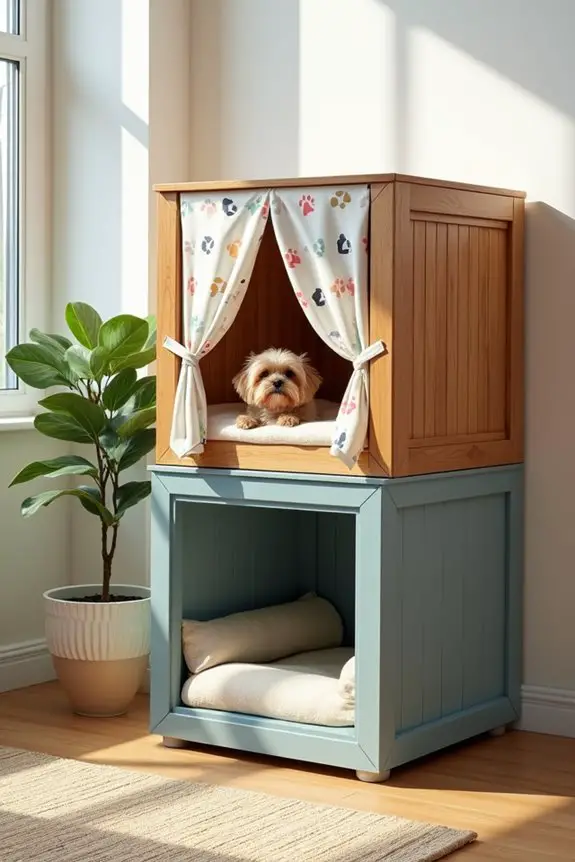
Looking for a way to give your pup a stylish, comfy space in your home while also keeping things tidy? The customizable modular crate system is a fantastic DIY project that not only saves you some bucks but also allows you to design a cozy, personal area for your furry or feathery friend.
With a bit of creativity, you can create a crate that complements your home decor while guaranteeing your pet feels right at home.
Materials Needed:
- Wooden crates (various sizes, depending on your needs)
- Wood screws
- Screwdriver or drill
- Sandpaper (medium and fine grit)
- Non-toxic paint or wood stain
- Measuring tape
- Corner brackets (for added stability)
- Soft bedding or blanket (choose something cozy)
- Optional: Decorative fabric (for a cover or curtain)
Step-by-Step Instructions:
1. Choose Your Crates: Decide how many crates you want to use and what sizes fit your home best. Feel free to mix and match, depending on your pet’s needs and your style.
2. Sand Away: Grab that sandpaper and smooth out any rough edges on the crates. You don’t want your pup scratching themselves on some jagged wood, do you?
3. Get Creative With Paint: Once the crates are feeling nice and smooth, go ahead and apply some non-toxic paint or stain in colors that make you happy (and match your living room, of course).
Maybe something calming like a cool blue or warm like a soft tan.
4. Stack and Secure: If you’re going for a stacked look, carefully position your crates and use corner brackets to secure them. This is super important for stability, especially if your dog is a jumper.
5. Measure for Bedding: After your crates are assembled, measure inside to fit the soft bedding or blanket you’ve chosen. Make sure it’s cushy—no one likes a hard floor, right?
6. Add Personal Touches****: Now here’s where the fun happens. You can add decorative fabric as a cover, or even little curtains to make it a cute hideaway. Go wild with patterns that make your heart sing!
7. Final Check: Inspect the whole setup for any sharp edges or loose screws. You want to guarantee your pup feels safe and cozy in their new stylish hangout.
Optional Add-ons/Variations:
- Experiment with Colors: Instead of just one color, think of a fun ombre effect or even geometric patterns if you’re feeling crafty. The sky’s the limit!
- Create a Multi-Pet Space: If you have more than one pet, consider making a bigger crate with separate compartments, so everyone has their own cozy nook to curl up in.
Pro Tip:
While you’re working, make sure to use non-toxic materials—your dog might give the crates a little nibble now and then.
Plus, don’t rush it. Take your time with painting and assembling. A project done with love and care often translates to happier pets (and happier humans too).
Extra Tips & Ideas
Creating a cozy dog crate that doubles as stylish furniture is a fun project, but there are a few extra tips and ideas that can really elevate your design.
First, consider adding a removable, washable cushion. Trust me, your pup will thank you, and it makes cleaning much easier.
You might also want to paint or stain the wood, adding some flair. Ever think about using decorative vents? They’re not just for looks—they keep air flowing.
If you’re feeling adventurous, add a side table or shelf for storage. You can hide treats or toys behind a stylish curtain.
Finally, don’t be afraid to personalize it with your dog’s name. It gives your space that extra touch, and it’s just plain adorable.
Frequently Asked Questions
What Materials Are Best for a DIY Dog Crate?
Plywood, welded wire, and non-toxic paint are great materials for your DIY dog crate. Consider using strong hinges and latches for durability. Make certain the design has proper ventilation and safety features for your pet’s comfort.
How Can I Ensure My Dog Feels Safe Inside?
To guarantee your dog feels safe inside, use soft bedding, maintain a calm environment, and gradually acclimate them. Consider covering the crate partially for privacy, and always reward them for entering willingly. They’ll appreciate it.
Are There Specific Dimensions for Different Dog Breeds?
Every dog’s like a puzzle; their perfect crate size depends on breed. Measure your pup when sitting and standing. Generally, provide about 2-4 inches of space above their head and lengthened by a couple of inches.
Can I Modify a Store-Bought Crate Into Furniture?
Yes, you can modify a store-bought crate into furniture. Just guarantee the alterations maintain your dog’s safety and comfort while integrating it into your home design. Adding wood, cushions, or decorative elements can enhance its functionality.
How Do I Train My Dog to Use the Crate Comfortably?
Imagine your dog’s crate as a cozy cave. To help your pup feel at home, gradually introduce treats, toys, and short, positive stays. Reinforce calm behavior, and soon it’ll be their favorite retreat.
Conclusion
With these DIY designs, your pet’s crate can transform into the centerpiece of your living room rather than an eyesore in the corner. Who knew a simple dog crate could rival the elegance of a fine piece of furniture? So, grab your tools, release your creativity, and make a stylish haven for your furry friend. Remember, your pup deserves a throne as fantastic as their personality—even if they sometimes drool like a leaky faucet.

Hi, I’m Ali Tarek, the founder of Animalsman. I’ve always been passionate about pets, especially dogs and cats, and I created this website to share practical tips, easy recipes, and helpful care advice for fellow pet lovers. My goal is to make pet care simple, enjoyable, and accessible for everyone. When I’m not writing or curating content, you’ll usually find me spending time with my furry friends or learning new ways to keep them happy and healthy.

