Looking for creative dog diaper designs for your female pup? You’re in for a treat. Imagine your furry friend strutting around in a trendy floral pattern or a sassy leopard print. It’s not just about function—it’s style too. Maybe you’ve tried the plain old white ones, but let’s face it, those are like boiled potatoes at a gourmet feast. Curious about which vibrant designs can make your dog the talk of the park? Stick around, and I’ll spill all the fun details.
Trendy Floral Patterns
When it comes to choosing dog diapers, you might think style doesn’t matter much, but have you seen those trendy floral patterns? They’re adorable, and why shouldn’t your furry friend strut in style?
If you’re diving into dog diapers DIY female projects, consider vibrant florals—they catch the eye and lift your spirits. Plus, making them yourself means you can tailor the fit for your pup, which can save you headaches later.
Grab some fabric, elastic, and maybe even some cute embellishments! Honestly, who wouldn’t want to see their dog prancing around like a little fashionista?
It’s fun, easy, and trust me, your canine companion will thank you with wags and snuggles, or, well, a treat (gotta negotiate everything, right?).
Our Collection
When it comes to our collection, you’ll find a delightful mix that’ll make your furry friend the talk of the dog park.
From the fierce leopard print design that adds sass, to the playful polka dot style and bright pink stripes that scream fun, there’s something for every pup’s personality.
And don’t forget those adorable cartoon prints and classic tartan checkered options; aren’t they just begging for a photo op?
1. Leopard Print Design
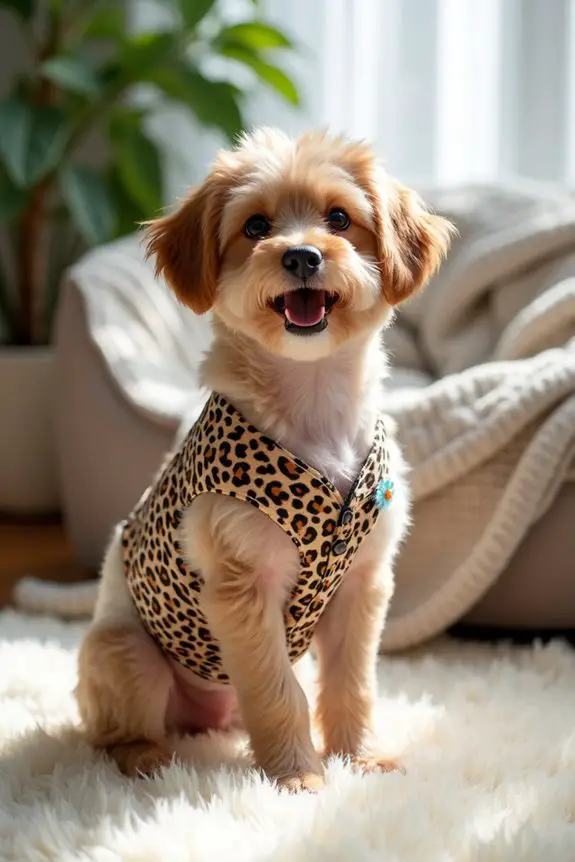
Is your fur baby in need of a little extra support during her monthly cycle? Making your own DIY leopard print dog diaper isn’t only a fun project but also a budget-friendly solution that guarantees your home stays clean and your pup feels comfortable.
Plus, because you’re crafting it yourself, you can customize it to fit her perfectly. Let’s plunge into this adorable and practical venture!
Materials Needed:
- Fabric (1 yard of leopard print cotton)
- Soft flannel fabric (1 yard for comfort)
- Velcro strips (2 pairs)
- Scissors
- Measuring tape
- Sewing machine or needle and thread
- Pins
- Fabric chalk or marker
Step-by-Step Instructions:
1. Measure Your Dog: First, measure around your dog’s waist and between her legs to get the right dimensions for a snug fit. Add a couple of inches for seam allowance.
2. Cut the Fabric: Using your measurements, cut out two pieces of the leopard print fabric and two pieces of the soft flannel fabric. Each piece should be shaped like a wide ‘V’ to fit comfortably around her behind.
3. Pin the Flannel to the Leopard Fabric: Lay one piece of leopard fabric right side down, then lay one piece of flannel on top, keeping the right sides facing each other. Pin them in place around the edges.
4. Sew the Edges: Sew along the edges, leaving a small opening at the top for turning it inside out. Make sure to use a tight stitch for durability, because we recognize our pups can be wiggly!
5. Turn and Press: Turn the diaper inside out so the flannel is on the outside, then gently press it flat with your hands. This is the moment you get to see those lovely leopard spots.
Feel free to show it off to your dog; she mightn’t care, but hey, it’s cute!
6. Attach Velcro: Cut your Velcro strips to size, and sew them to the top edges so that you can easily secure the diaper around your dog’s waist.
7. Fit and Adjust: Slip the diaper on your pup for a final fit. Make any necessary adjustments to guarantee it’s snug but not too tight. Remember, she should be comfortable enough to strut her stuff in style!
Optional Add-ons/Variations:
- Add a Bow or Flower: Sew on a cute bow or fabric flower on the side for extra flair. Who said dog diapers can’t be fashionable?
- Different Prints: If leopard isn’t her style, try fabric in her favorite color or a fun pattern like polka dots or stripes. You can even have a rotating collection for those days when she’s feeling extra sassy.
Pro Tip:
When sewing, avoid using too much tension on the fabric, as it might pucker.
And remember, the softer the inner fabric (like flannel), the more comfortable she’ll be! Want to save on fabric? Consider using old clothes or fabric scraps you have lying around.
It’s an eco-friendly way to create something wonderful.
2. Polka Dot Style
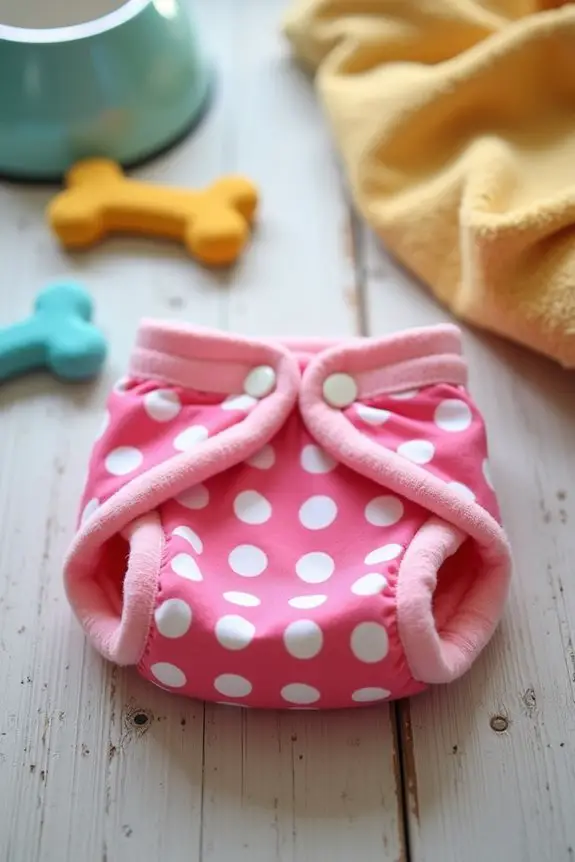
If your furry friend could use some extra comfort and a sprinkle of cuteness during her monthly cycle, making a DIY polka dot dog diaper is just the project for you! Not only will this save you some cash, but it also keeps your pup cozy while making your home look even more fabulous. Plus, you can choose the perfect polka dot fabric to match her personality. Let’s plunge into this enjoyable and crafty adventure! Using a premium dog treat maker can also provide delightful snacks for your pup as you craft, contributing to a well-rounded diet. Choosing quality materials, such as premium dog chew toys, can also ensure your pup enjoys something durable and safe to play with during the day.
Materials Needed:
- Fabric (1 yard of polka dot cotton)
- Soft flannel fabric (1 yard for added comfort)
- Velcro strips (2 pairs)
- Scissors
- Measuring tape
- Sewing machine or needle and thread
- Pins
- Fabric chalk or marker
Step-by-Step Instructions:
- Measure Your Pup: Grab a measuring tape and measure around your dog’s waist and between her legs. Make sure to add a couple of inches for a seam allowance to keep it comfy!
- Cut the Fabric: Use your measurements to cut out two pieces of the polka dot fabric and two pieces of soft flannel fabric. Shape them like a wide ‘V’ that will fit snugly around her backside.
- Pin It Together: Start with one piece of polka dot fabric right side down. Then, place a piece of flannel on top, confirming that the right sides are facing each other. Pin the edges to keep everything in place.
- Sew the Edges: With your chosen needle and thread (or sewing machine), stitch along the pinned edges, leaving a small opening at the top for turning. Don’t worry; a few wobbly seams from excitement are totally acceptable!
- Turn and Flatten: Carefully turn the diaper inside out so that the flannel is on the outside. Give it a gentle press with your hands — voilà! Say hello to a stylish new accessory for your pup.
- Secure with Velcro: Trim your Velcro strips to the right size and sew them onto the top edges. This makes putting it on and taking it off a breeze, just like a quick doggy wardrobe change!
- Fit for Fashion: Try the diaper on your dog to verify it fits perfectly. Adjust as needed so it’s snug but not too tight. After all, she should be confident strutting her polka-dotted stuff around the house!
Optional Add-ons/Variations:
- Add Ribbons or Jean Patches: Jazz it up with some fun ribbons or even a cute fabric patch that reflects her personality. Whether she’s a sassy princess or a playful adventurer, make it hers.
- Mix It Up: Instead of polka dots, consider using stripes, floral designs, or even her favorite superhero pattern for a one-of-a-kind look.
Pro Tip:
Before you start sewing, always remember to pre-wash your fabric. It may help avoid unexpected shrinkage later and guarantees everything stays comfy after a few washes. No one wants a surprise diaper that shrank in the wash, right? Additionally, consider installing an invisible dog fence system to ensure your pup can roam freely while staying safe in your yard.
Now, roll up those sleeves. Your imaginative and practical polka dot dog diaper project awaits, and your pup will thank you with lots of tail wags!
3. Bright Pink Stripes
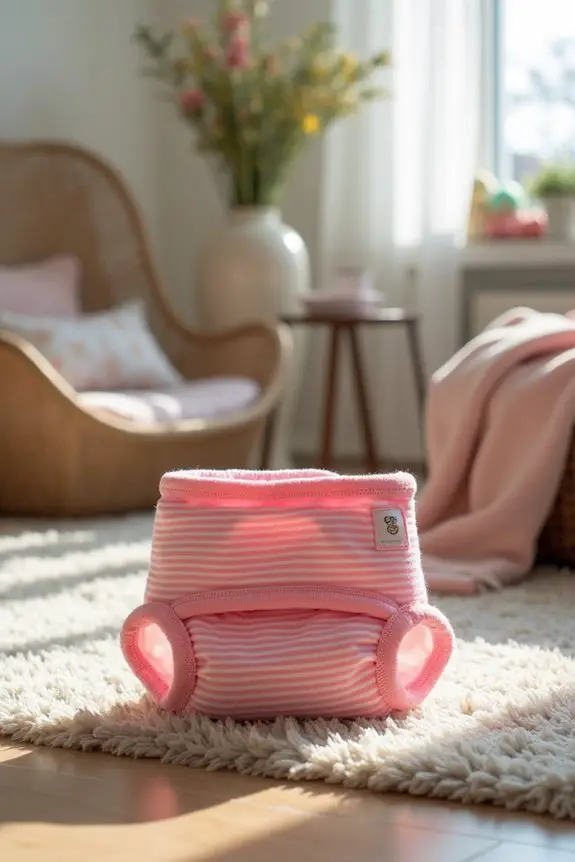
If your lovely lady pup could use a little something special during her time of the month, a DIY bright pink striped dog diaper is just the ticket! Not only is this project a money-saver, but it also brings comfort to her daily routine while adding vibrant flair to your home. Trust me, your dog will strut around with confidence, her new accessory causing quite the stir. Plus, it complements her look with luxurious dog accessories that elevate her style.
Materials Needed:
- Bright pink striped fabric (1 yard of cotton)
- Soft flannel fabric (1 yard for added comfort)
- Velcro strips (2 pairs)
- Scissors
- Measuring tape
- Sewing machine or needle and thread
- Pins
- Fabric chalk or marker
Step-by-Step Instructions:
- Measure Your Pup: Grab that measuring tape and wrap it around your dog’s waist and measure between her legs. Adding an inch or two for seams is a must. We want cozy, not constricting!
- Cut the Fabric: Based on your measurements, cut out two triangular pieces of the bright pink striped fabric and two matching pieces from the soft flannel. Aim for a wide ‘V’ shape that will fit comfortably around her backside.
- Pin It Together: Lay one piece of striped fabric right side down, then stack one piece of flannel on top with the right sides facing each other. Pin those edges tight as a drum to keep everything secure.
- Sew the Edges: Now’s the time to sew! Using either your sewing machine or needle and thread, stitch along those pinned edges. Just leave a little opening at the top for turning it. Perfectly imperfect seams, here we come!
- Turn and Flatten: Flip the diaper inside out so that the plush flannel is now on the outside. Gently press it down with your hands to smooth things out — your masterpiece is taking shape.
- Secure with Velcro: Trim your Velcro strips to size and sew them to the top edges. This makes getting the diaper on and off as easy as pie – no one loves a wardrobe struggle.
- Fit for Fashion: Pop the diaper on your pup to see how it fits. Adjust as necessary so she feels snug but not squished. Remember, she’s got to show off those stripes in style.
Optional Add-ons/Variations:
- Ribbons or Appliques: Why not gussy it up with some funky ribbons, or add an adorable applique that reflects her style? Whether she’s rocking a punk rock vibe or a sweet charm, make it special.
- Mix Patterns: Feeling adventurous? Instead of solid bright pink, consider mixing it up with other colors or patterns. Perhaps some polka dots or even animal prints to keep things fun and unique!
Pro Tip:
When sewing, always finish the seams for extra durability. Not only does it prevent fraying, but it also keeps your dog diaper looking cute and intact through all her zoomies and naps. Plus, a little extra thought here means less time fixing things later.
4. Tartan Checkered Print
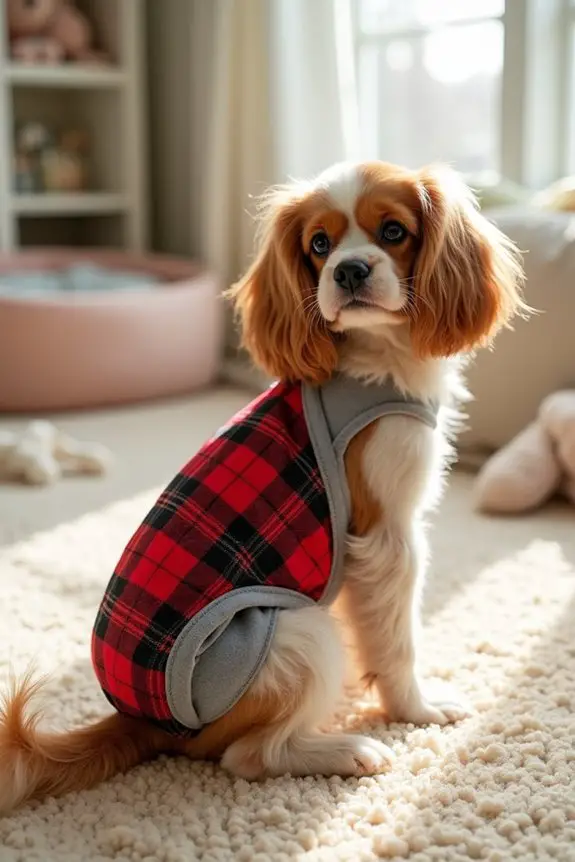
If your furry friend is having a tough time managing her monthly messes, why not create something snazzy yet practical? A DIY tartan checkered print dog diaper not only keeps things tidy but also gives your adorable pooch a stylish twist. Plus, it’s a fun way to show off your sewing skills while keeping costs low.
Ready to begin this lively crafting adventure together?
Materials Needed:
- Tartan checkered fabric (1 yard)
- Soft flannel fabric (1 yard for comfort)
- Velcro strips (2 pairs)
- Scissors
- Measuring tape
- Sewing machine or needle and thread
- Pins
- Fabric chalk or marker
Step-by-Step Instructions:
- Measure Your Pup: First, grab that measuring tape and wrap it around your dog’s waist and between her legs. Remember to add an extra inch or two for seams. Comfort is key, my friend, not a squeeze-fest.
- Cut the Fabric: With the measurements in mind, cut two triangular pieces from the tartan fabric and two matching pieces from the soft flannel. Aim for a comfortable ‘V’ shape for that perfect fit!
- Pin It Together: Take one piece of tartan fabric, placing it right side down. Stack one piece of flannel on top, making sure the right sides are facing each other. Pin those edges so they stay together nicely as you sew.
- Sew the Edges: Time to work your sewing magic! Use your sewing machine or needle and thread to stitch along the pinned edges, but leave a little gap at the top for turning. Don’t worry about being a perfectionist; it adds character.
- Turn and Flatten: Carefully flip the diaper inside out, so the plush flannel is now on the outside. Give it a solid press with your hands to make sure everything is smooth. Look at you creating a masterpiece!
- Secure with Velcro: Trim your Velcro to size and sew it onto the top edges. This handy attachment makes it super easy to get the diaper on and off — no more wrestling with your pup.
- Fit for Fashion: Slip the diaper onto your pup to check the fit. Adjust it as needed; you want a snug fit for her to feel secure, but not so tight it cuts off circulation. She’s got to strut her stuff in style after all.
Optional Add-ons/Variations:
- Personalized Labels: Get creative and add a fun label or tag with your pup’s name, or even a cheeky phrase like “Queen of Stripes.” It’s a little touch that makes the diaper feel extra special.
- Mix Fabrics: If you’re feeling adventurous, combine the tartan with a block color or another fun pattern! It’s a great way to infuse some of your dog’s personality into her wardrobe.
Pro Tip:
When working with fabrics, always prewash them to prevent any shrinkage later on. It’s a quick step that saves time and heartache when you realize your lovingly crafted diaper has shrunk in the wash.
Now you’re all set to create a stylish tartan checkered diaper for your darling companion. She’ll feel comfortable, look adorable, and you’ll bask in the glory of your crafting skills.
Happy sewing!
5. Cute Cartoon Prints
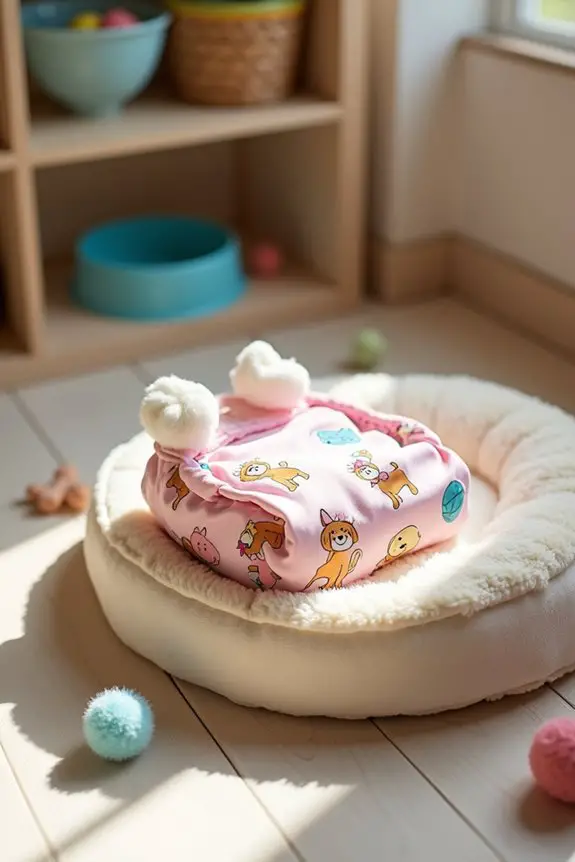
If your furry lady is having a tough time during her cycle, why not give her a little flair with a DIY dog diaper featuring cute cartoon prints? Not only does it keep your home clean, but it also adds a dash of whimsy to your pup’s wardrobe. Plus, making your own saves money and lets you tailor the comfort precisely to your pooch!
Materials Needed:
- Cartoon-print fabric (1 yard, your favorite design)
- Soft cotton fabric (1 yard for the interior—comfort is key)
- Elastic band (around 1 yard for a snug fit)
- Velcro strips (2 pairs for easy closure)
- Scissors
- Measuring tape
- Sewing machine or needle and thread
- Pins
- Fabric chalk or marker
Step-by-Step Instructions:
- Measure Your Pup: Grab that measuring tape, and wrap it around your dog’s waist and between her legs. Be sure to add an inch or two for seam allowances. After all, we want her to feel comfy, not squeezed like a sausage.
- Cut the Fabric: Using the measurements, cut two triangular pieces from the cartoon fabric and two matching pieces from the soft cotton fabric. Aim for a nice ‘V’ shape — just think of it as giving her a super cute cape.
- Pin it Together: Start with one piece of the cartoon fabric right-side down. Layer a piece of cotton fabric on top, with the right sides facing each other, then pin those edges together to keep it all nice and stable while you sew.
- Sew the Edges: Time to channel your inner sewing guru. Stitch along the pinned edges, but leave a gap at the top for turning it right-side out later. Remember, it doesn’t have to be perfect; those little quirks just prove you made it with love.
- Turn and Flatten: Carefully flip the diaper inside out, making sure that soft cotton fabric is now on the outside. Give it a gentle press with your hands to smooth everything out—appreciate the little masterpiece you’re crafting.
- Add Elastic and Velcro: Measure and cut the elastic band to fit around your pup’s waist, then sew it into place at the top edges of the diaper to give that snug fit. Next, attach the Velcro strips for easy wear and tear. This will save you from any wrestling matches every time you put it on.
- Final Fit Check: Slip it onto your pup to make sure everything fits nicely. Adjust as needed; you want it snug enough but with enough wiggle room, so she can prance about without any discomfort. Dog fashion is serious business, after all.
Optional Add-ons/Variations:
- Add Pockets: Consider sewing a little pocket on the back for storing treats or waste bags. Practical and cute.
- Mix Fabrics: Use different types of cartoon prints. Think superheroes, adorable animals, or even vibrant florals. Let your imagination run wild.
Pro Tip:
For an extra comfort boost, consider pre-washing your fabrics to soften them up before you start sewing. Also, check for any potential scratching spots by carefully inspecting your seams; we want your furry friend to strut her stuff without any discomfort.
6. Whimsical Butterfly Motif

If you’re looking to add a touch of charm to your pup’s wardrobe during her cycle, this whimsical butterfly motif dog diaper is perfect. Not only does it keep your home looking tidy, but it also provides comfort and style for your furry friend. Plus, say goodbye to expensive store-bought options and hello to a smart DIY solution that fits her just right.
Materials Needed:
- Butterfly-print fabric (1 yard, pick a colorful pattern)
- Soft cotton fabric (1 yard for the interior)
- Elastic band (around 1 yard for a comfy fit)
- Velcro strips (2 pairs for easy closure)
- Scissors
- Measuring tape
- Sewing machine or needle and thread
- Pins
- Fabric chalk or marker
Step-by-Step Instructions:
- Measure Your Pup: Use the measuring tape to get your dog’s waist and the gap between her legs. Add an inch or two for seam allowances—no one wants a tight squeeze when they’re trying to strut their stuff.
- Cut the Fabric: Cut two triangular pieces of the butterfly fabric and two from the soft cotton. Aim for a ‘V’ shape, which is both adorable and functional. It’s like giving your pup a stylish cape that helps keep things tidy.
- Pin it Together: Start with one butterfly fabric piece right-side down. Layer the corresponding cotton fabric on top, right sides facing in. Pin those edges together to keep them secure—think of it as a messy bun for fabric, it needs to stay together while you sew!
- Sew the Edges: Channel your inner sewing artist and sew along the pinned edges, leaving a gap at the top for turning it right-side out. It’s okay if it’s not perfect; those little imperfections give it character (trust me, I’ve had my fair share of sewing mishaps).
- Turn and Flatten: Flip the diaper inside out so that the soft cotton is now on the outside. Give it a gentle press with your hands to smooth everything out. Voilà! You’re creating something special for your furry friend.
- Add Elastic and Velcro: Measure and cut the elastic band to fit around your pup’s waist and sew it to the top edges. Attach the velcro strips for easy closure, saving you from a wrestling match every time you need to put it on her.
- Final Fit Check: Slip the diaper onto your pup to check the fit. It should be snug but comfy, allowing her to roam around and be fabulous without feeling constrained. Every princess deserves to feel like one.
Optional Add-ons/Variations:
- Consider using fabric with flowers or stars if butterflies aren’t your vibe. Each pattern can change up the mood entirely.
- If you’re feeling super creative, add some lace trim or a matching bow for an extra touch of flair. A little embellishment can go a long way toward making something ordinary truly special.
Pro Tip:
When you’re sewing, it’s worth investing in quality elastic. It’ll keep everything in place better and last longer through all your pup’s playful antics.
And, keep a lint roller handy. Just trust me—I learned that the hard way after a doggie hair explosion while sewing.
Now roll up those sleeves and get to sewing! Your pup will thank you for the comfort, and you’ll have a unique, budget-friendly piece in her wardrobe.
7. Nautical Anchor Design
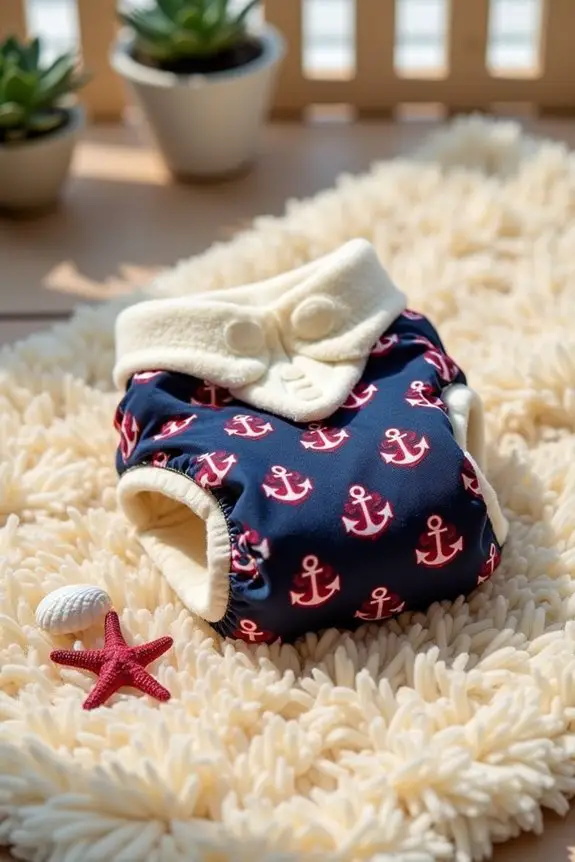
Ahoy there, dog lovers! If you’re ready to set sail into the adorable DIY domain, this Nautical Anchor Design dog diaper is your ticket. Not only does it keep your furry friend stylish and comfortable during her cycle, but it also adds a splash of sea-inspired charm to your home. Plus, you’ll save some bucks while creating something uniquely yours—way better than the plain and pricey store options.
Materials Needed:
- Anchor-print fabric (1 yard, think reds, whites, and blues for a classic look)
- Soft fleece or cotton fabric (1 yard for added comfort)
- Equally cute elastic band (around 1 yard for a snug fit)
- Velcro strips (2 pairs for a quick and easy closure)
- Scissors
- Measuring tape
- Sewing machine or needle and thread
- Pins
- Fabric chalk or marker
Step-by-Step Instructions:
- Measure Your Pup: Grab that measuring tape and get the waist size, also measure the space between her legs. Remember to add an inch or two for seam allowances. Trust me, you don’t want a tight fit when she’s trying to show off her anchor style.
- Cut the Fabric: Cut out two triangular pieces from the anchor fabric and two from the soft fleece or cotton. Keep that ‘V’ shape in mind—it’s cute and functional. Plus, it gives her that “I’m ready for a beach day” vibe.
- Pin It Together: Place one anchor fabric piece right-side down, then layer the corresponding fleece piece on top, right sides facing. Pin those edges like you’re securing the map to your treasure. This step keeps everything nice and tidy while you sew.
- Sew the Edges: Channel your inner seamstress and sew along the pinned edges, leaving a little gap at the top so you can flip it inside out. If it’s not perfect, that’s okay—every experienced sewer has a few “unique” stitches under their belt.
- Turn and Flatten: Flip your diaper inside out, so the fleece is outside and oh-so-soft for your dog. Give it a gentle press against a flat surface; no need for an iron here unless you’re feeling fancy.
- Add Elastic and Velcro: Measure a piece of elastic to fit around your pup’s waist, then sew it to top edges of your diaper. Attach those Velcro strips to create an easy opening and closing system. Getting dressed should be a breeze, not a wrestling match!
- Final Fit Check: Slip the diaper onto your dog to ascertain it fits snugly but comfortably. Adjust if necessary—nobody wants a cranky pup when she could be strutting her stuff by the seaside.
Optional Add-ons/Variations:
Want to add even more charm? Try switching up the fabric colors—how about a bright yellow anchor print paired with pink fleece? Or add some adorable nautical-themed patches like little sailboats or starfish for extra pizzazz.
Pro Tip:
If you want to make this diaper last through countless adventures, consider double-stitching those edges. It’s like giving your creation a security blanket. Plus, who doesn’t love a project that’s built to endure?
Now that you have the blueprint for the cutest dog diaper on the block, grab those materials and let your creativity flow like the tide. Your pup will thank you, and who knows, you might just become the reigning champion of DIY dog fashion in your neighborhood.
Extra Tips & Ideas
Have you ever found yourself staring at your pup, wondering how to make her diaper experience more comfortable and cute?
You can try adding soft liners—not too thick, just enough to keep her cozy. Consider some entertaining patterns that reflect her personality; is she quirky or sophisticated? Maybe mix and match colors to show off her fun side.
Don’t forget about treats for positive reinforcement; after all, who doesn’t love a little reward? If she seems hesitant, take it slow—like introducing a new toy, right?
And hey, if your sewing skills are less “Project Runway” and more “oops,” there are plenty of adorable ready-made options. Dogs deserve style, too, even when nature calls.
Frequently Asked Questions
Are Dog Diapers Safe for Long-Term Use?
Yes, dog diapers can be safe for long-term use if you choose high-quality materials and guarantee proper hygiene. Regularly check for irritation and give your dog breaks to avoid discomfort and promote healthy skin.
How Do I Choose the Right Size for My Dog?
Choose the right size for your dog by measuring their waist like you’re preparing a grand feast! Use their girth measurement to find the perfect fit in the size chart—comfort is key for ultimate happiness!
Can These Diapers Be Machine-Washed?
Yes, most dog diapers can be machine-washed. Just check the care label for specific instructions. You’ll want to wash them in cold water to maintain their shape and effectiveness while ensuring a thorough clean.
Are There Eco-Friendly Options Available?
Yes, there are eco-friendly options available for dog diapers. Many brands offer biodegradable materials and sustainable designs. You can easily find these alternatives, ensuring your pet stays comfortable while being kind to the planet.
How Often Should I Change My Dog’s Diaper?
You should change your dog’s diaper every 4 to 6 hours, or sooner if it’s soiled. Regular checks help keep your pet comfortable and prevent any skin irritation from prolonged moisture.
Conclusion
So there you have it—ten creative dog diaper designs that blend style with functionality. Whether you’re channeling your inner floral queen or going for some playful polka dots, your pup can strut her stuff in style. Think of it like dressing up for a party; why shouldn’t our furry friends get to join the fun? A cute diaper might just steal the show. After all, happiness is a well-dressed dog, right? Who wouldn’t want that?

Hi, I’m Ali Tarek, the founder of Animalsman. I’ve always been passionate about pets, especially dogs and cats, and I created this website to share practical tips, easy recipes, and helpful care advice for fellow pet lovers. My goal is to make pet care simple, enjoyable, and accessible for everyone. When I’m not writing or curating content, you’ll usually find me spending time with my furry friends or learning new ways to keep them happy and healthy.