Your golden girl is so close to getting on the bed — and then the scrambling starts.
Those little nails scratching at the frame, her doing that whole dramatic hop-fail thing, and you just watching, half-laughing, half-dying inside. I’ve been there with my dog Maple so many times. She’d claw at my bed like she was summiting Everest every single night.
And honestly? The mess after didn’t help. Muddy paw prints across your white duvet. Every. Single. Morning.
Keep this in mind: a good set of dog steps doesn’t just save your pup’s joints — it saves your sanity and your Pinterest-worthy bedroom setup.
That’s exactly why I pulled together these 7 dog steps for bed DIY ideas — builds that are actually cute enough to leave out and sturdy enough for your girl to use without a second thought.
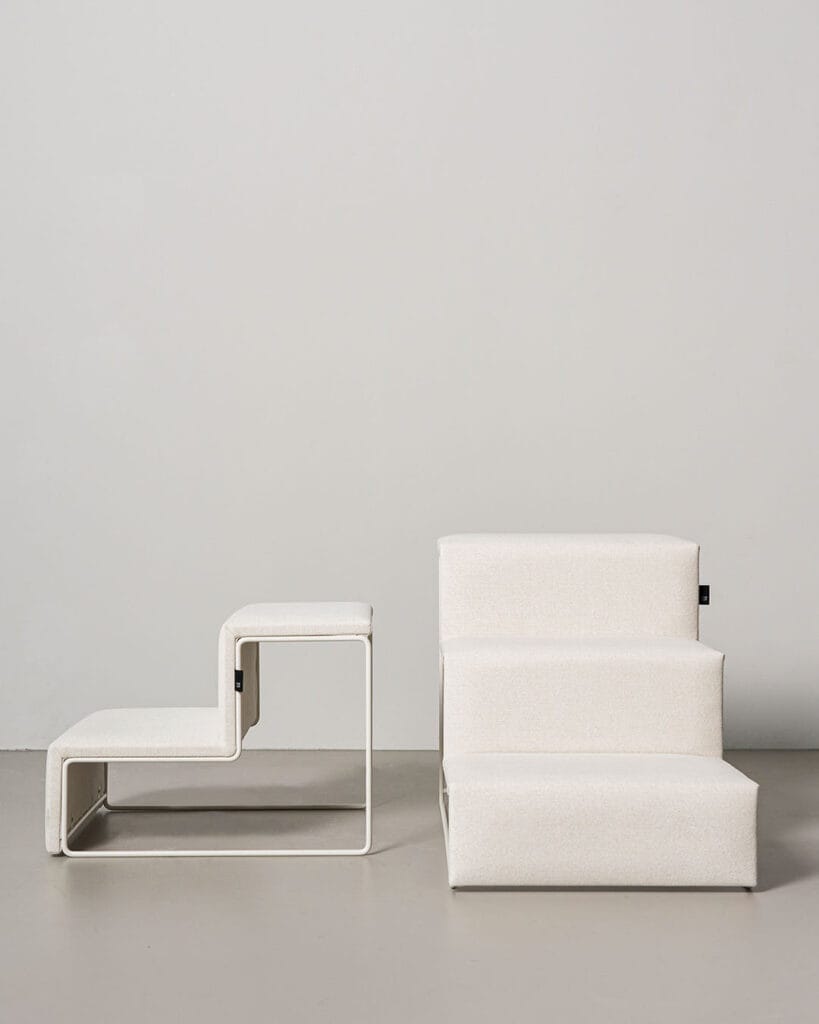
#1: The Bouclé Pet Stairs That Look Better Than Your Actual Furniture
Your golden retriever does this thing every single night — she circles the bed three times, whines a little, and then just stares at you with those big brown eyes like you personally built the bed too high.
And honestly? Same, girl. Same.
I used to just lift her up every time, but my back started staging a protest around month two. That’s when I went full Pinterest spiral and found this — a bouclé-wrapped pet stair build that looks so good it actually made my bedroom look more put-together.
Materials & Tools You’ll Need:
– ¾-inch plywood (cut into three stair-step pieces)
– 2-inch thick foam padding (high-density, for joint support)
– Bouclé fabric — cream or off-white works best for that clean, minimal look
– White powder-coated steel rod (optional, for the open-frame version on the left)
– Staple gun + ½-inch staples
– Spray adhesive
– Scissors and a fabric marker
– Sandpaper (120-grit)
Instructions
Start by cutting your plywood into three graduated pieces — your bottom step sits widest, your top step narrowest. Sand every edge smooth because rough corners will snag your bouclé and ruin the whole vibe.
Spray adhesive goes on the plywood face first. Press your foam down firm and let it set for a full ten minutes — don’t rush this part, or the foam shifts when your dog lands on it.
Here’s the trick: cut your bouclé 3 inches larger than each piece on every side. That extra allowance lets you pull the fabric taut underneath and staple it clean without bunching at the corners.
Wrap each step individually. Pull the fabric to the underside, staple the long sides first, then fold and staple the corners like you’re wrapping a gift. Stacking the steps and securing them with L-brackets underneath keeps the whole structure locked in place — no wobbling, which matters a lot for a nervous dog learning to trust stairs for the first time.
The three-step height — roughly 24 inches total — gives your golden enough gradual elevation that her hips and joints aren’t straining on the climb. That cushioned bouclé surface also grips her paws better than bare wood, so she builds confidence fast.
If you love the open-frame look from the left side of the image, a local metal shop can bend ½-inch steel rod into that U-shaped base for about $30. Wrap just the step surfaces in bouclé and leave the frame exposed — it reads more like furniture than a pet product.
This build pairs beautifully with other cozy DIY projects. If you’re already making over your bedroom for her, 7 Cozy DIY Dog Bed Frame Ideas for Pups has some seriously good inspo to keep the aesthetic going.
The bouclé is also surprisingly easy to spot-clean with a damp cloth — golden retriever owners, you know why that matters.
Prep Time: 20 minutes | Active Project Time: 2–3 hours | Difficulty Level: Beginner–Intermediate
Bouclé frays at the cut edges if you let it sit too long before stapling. Cut one piece, wrap it, done — then move to the next. Working fast keeps the edges clean without needing a serger.
📸 Photo credit: Instagram @designforpets.co
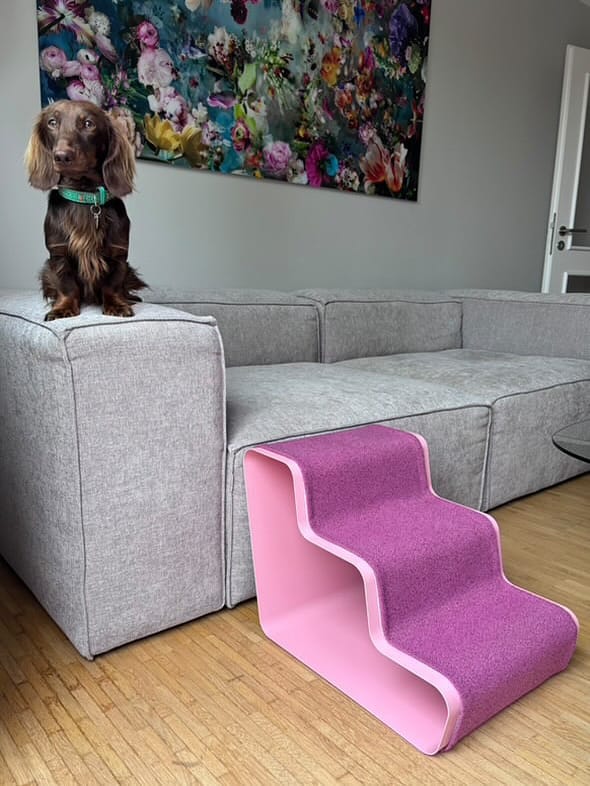
#2: DIY Foam Pet Stairs (The Pink Dream Your Dog Deserves)
Your golden keeps jumping off the bed and you keep hearing that thud. Every single morning. My dog did the same thing and I swear my heart dropped each time.
These stairs? Total game-changer.
Prep Time: 30 min | Active Project Time: 2–3 hours | Difficulty Level: Beginner-Friendly
Materials & Tools:
– High-density foam block (at least 24″ H x 18″ W x 18″ D)
– Pink bouclé or carpet fabric (approximately 2 yards)
– Light pink foam sheet (½” thick) for side panels
– Sharp electric carving knife or serrated bread knife
– Spray adhesive
– Fabric scissors
– Measuring tape
Instructions
Start by sketching three stair steps directly onto your foam block — each step roughly 6″ tall x 6″ deep. Cut along those lines with your electric knife using slow, steady strokes. Jagged cuts happen when you rush, so take your time here.
Once your foam staircase shape is clean, cut your light pink foam sheet into two matching side panels and spray-glue them onto both sides. This gives those smooth, curved edges you see in the photo.
Now wrap the entire top surface with your bouclé fabric, pulling it tight around each step before pressing it down. The textured fabric grip — paired with that firm foam core — means your dog plants her paws without sliding, which protects her joints on every single climb.
And honestly, it looks so good next to a grey sofa that guests ask where you bought it.
If your golden is already having joint discomfort, pairing these stairs with one of the 15 best dog beds for every dog size and need makes a real difference.
Glue a non-slip felt sheet underneath the base. It keeps the stairs from shifting when your dog hits them at full speed — because she will.
📸 Photo credit: Instagram @dogbeam.de
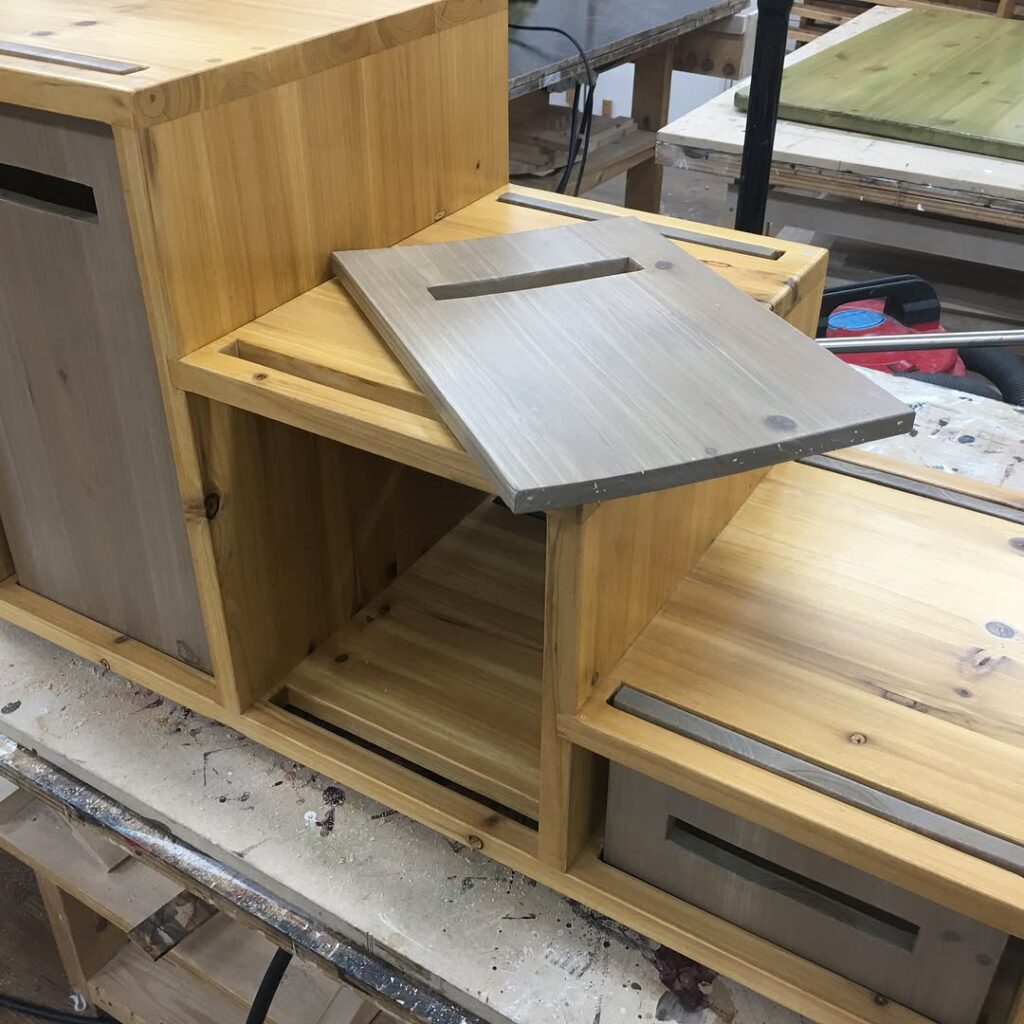
#3: Cedar Cube Stair Steps (The Hidden Storage Hack Your Dog Will Love)
Your golden girl sees the bed. She wants the bed. And every single morning, she does that little hop-and-scramble thing that makes your heart sink a little — you can basically hear her joints working overtime.
These cedar cube steps are the answer.
Prep Time: 30 min | Active Project Time: 3–4 hours | Difficulty Level: Intermediate
Materials & Tools:
– Clear pine or cedar boards (roughly ¾ inch thick)
– Wood stain (the gray-washed tone you see here is a driftwood stain)
– Wood glue + 2-inch screws
– Sandpaper (120-grit then 220-grit)
– Drill, measuring tape, clamps
– Slot router bit (for the drawer pull grooves)
Instructions
Start by cutting your boards into 12×12 inch panels — each cube needs four sides, a top, and a bottom. Sand everything with 120-grit first, then finish with 220-grit so the surface feels smooth under your hands.
Assemble each box using wood glue along the edges, then reinforce every corner with screws. Let it cure fully before stacking — this is the step people rush and regret.
Route the drawer-pull slots into each lid panel before attaching them. That slot detail keeps the lids lift-able, meaning each cube doubles as hidden storage — dog treats, leashes, whatever’s cluttering your nightstand. Built-in storage cuts bedroom clutter, which means your space stays Pinterest-clean even with a 70-pound retriever sharing the room.
Stack two cubes as a base, one on top as the landing step. The staircase rise feels gradual enough that older dogs climb without hesitation.
Apply your driftwood stain in long, even strokes and let it dry fully between coats. The gray tone photographs beautifully next to natural wood floors — just saying.
My cousin built a similar version for her lab mix last winter and texted me like three times about how the dog figured it out in ten minutes flat. That almost never happens.
If you love the raw wood aesthetic here, 10 Creative Pallet Dog Bed Ideas for Your Furry Friend pairs so well with this project for a cohesive bedroom corner setup.
Cut the lid panels slightly smaller than the box opening — about ⅛ inch of clearance on each side — so they don’t jam in humid weather.
📸 Photo credit: Instagram @sorinuri
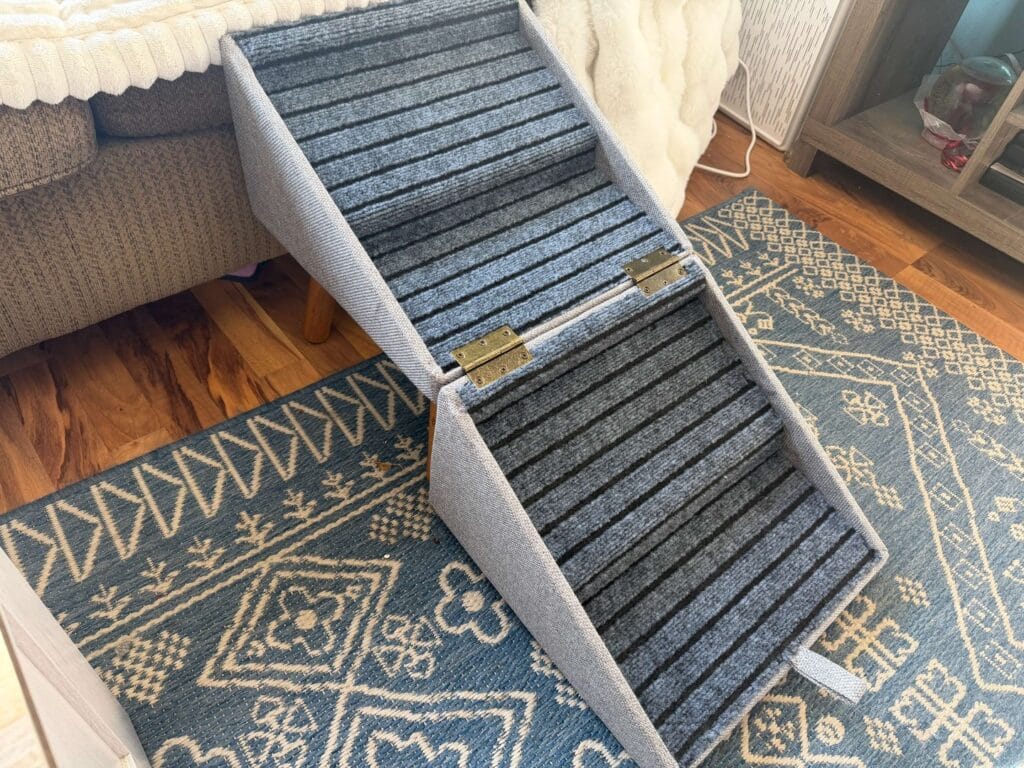
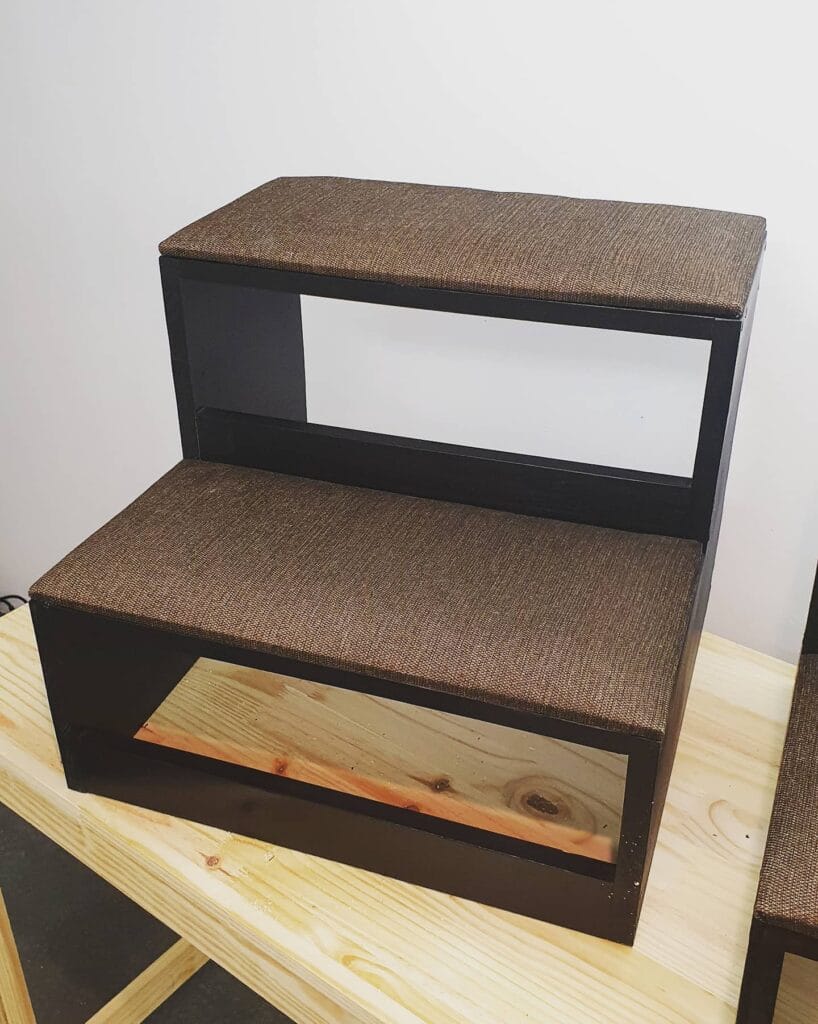
#4: Two-Tier Upholstered Dog Steps — Clean Look, Zero Ugly Bulk
You know that moment when your golden is just standing there, staring at the bed, doing that little whine? And you feel guilty but also… the bed is tall and she’s not a puppy anymore.
These steps fix that.
Materials & Tools:
– ¾-inch plywood or MDF board (painted black)
– Brown textured upholstery fabric (burlap-weave style)
– High-density foam padding (cut to step size)
– Staple gun + staples
– Wood glue + finishing nails
– Sandpaper (medium grit)
– Black paint + foam roller
Instructions
Cut your MDF into the box frames first — two open-front cubes that stack into a stair shape. The bottom box sits bigger and wider, the top box sits centered on top of it. Sand every edge before you do anything else. Rough edges are the enemy of clean fabric work.
Paint all exposed wood surfaces black. Two coats.
Once dry, cut your foam to match each step top. Lay your fabric face-down, place the foam, then the wood panel on top, and staple the fabric tight around the back. Pull it taut as you go — loose fabric bunches under paw weight fast.
Attach the upholstered tops to each box. Secure the two tiers together with wood glue and finishing nails from inside the frame.
The black frame with brown upholstery combo keeps it looking like actual furniture — not a pet store afterthought. And because the steps are open underneath, they feel lighter visually and tuck right against any bed frame without crowding the space.
If you love a coordinated pup space, pairing these with pieces from 11 stylish wooden dog beds your pup will love makes the whole room feel intentional.
Screw a small L-bracket between the two tiers on the inside — it keeps the top box from shifting when your girl takes those landings at full golden-retriever enthusiasm.
Prep Time: 30 min | Active Project Time: 3–4 hours | Difficulty Level: Intermediate
📸 Photo credit: Instagram @mcd_woodworks
#5: DIY Foam Pet Stairs for High Beds (The Couch Cushion Method)
You know that moment when your golden is doing that little hop-and-scramble at the foot of the bed? Front paws up, back legs pushing, tail going crazy — and she still can’t make it up. My dog did that every single night until I built these.
Prep Time: 30 min | Active Project Time: 2–3 hours | Difficulty Level: Beginner
Materials & Tools:
– High-density foam (at least 4-inch thick) — two blocks cut to stair dimensions
– Gray corduroy or microsuede fabric (the image shows a warm charcoal gray that hides dog hair like a dream)
– Fabric scissors and a serrated knife for foam cutting
– Heavy-duty upholstery staple gun
– Non-slip furniture gripper mat cut to fit the base
– Measuring tape and fabric marker
### Instructions
Start by measuring your bed’s height — this one sits against a dark espresso four-poster bed, so the stairs reach about 24 inches at the top step. Cut your foam into two pieces: a wide base layer and a smaller top block. The base piece creates that long bottom step you see in the image, which gives dogs a real running start before the final jump.
Stack the smaller block on top of the base and wrap the whole structure together in one continuous piece of fabric — no visible seams between steps. Pull the fabric tight on each side and staple it underneath. Wrap corners like you’re doing a gift, folding the fabric flat before stapling.
The corduroy fabric grips paws without slipping — that traction means your girl won’t hesitate at the first step, which pays off in zero joint stress over time.
Tuck the finished stairs flush against the footboard the way you see here. That snug positioning keeps them from sliding when she launches herself up.
Cut the non-slip mat slightly smaller than your base and press it against the carpet. It locks everything in place even on thick pile rugs.
A slightly rounded top edge on your foam blocks (use scissors to bevel it gently) makes the stairs feel softer under paws and gives that polished, store-bought look you’d totally pin on Pinterest.
For more creative pet projects like this one, 13 Genius DIY Dog Stuff Every Pet Parent Needs to Try Today! has some seriously good inspiration.
📸 Photo credit: Instagram @johngstevens
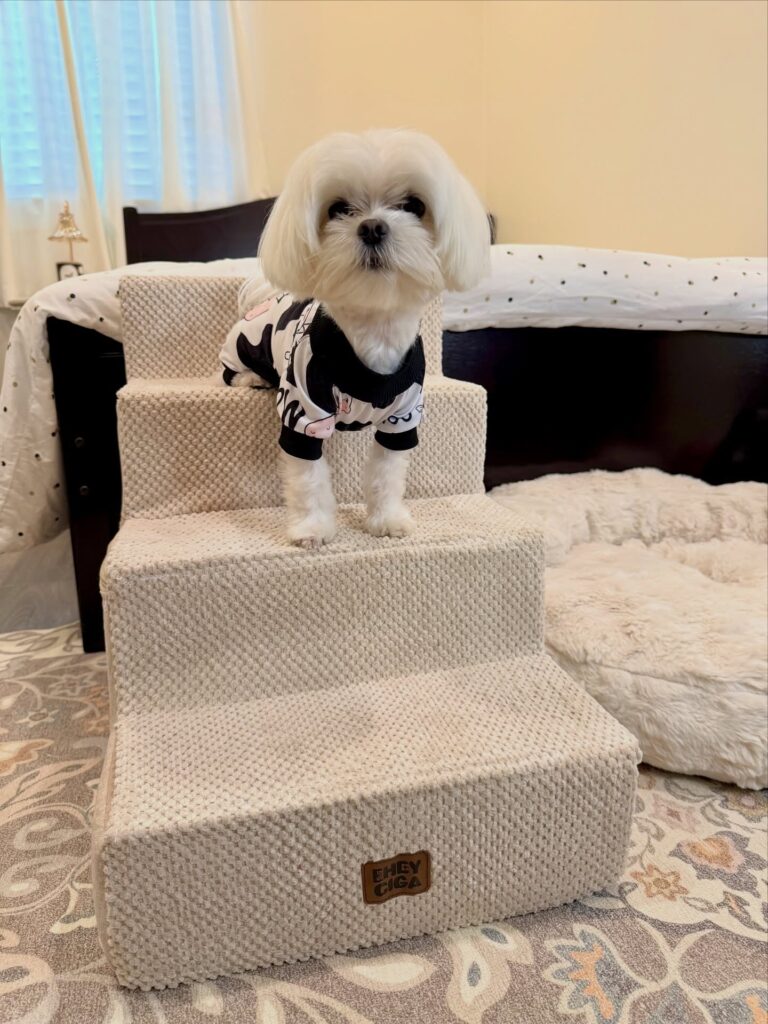
#6: DIY Foam Pet Stairs — The Cozy, Covered Steps Your Dog Will Actually Use
Your golden is standing at the edge of the bed every single night, looking up at you with those eyes. You know the ones. And every time she tries to jump up, your stomach drops a little.
That moment is exactly why these DIY foam stairs exist.
Prep Time: 30 min | Active Project Time: 2–3 hours | Difficulty Level: Beginner-Friendly
Materials & Tools:
– High-density foam blocks (3 graduated sizes — approx. 12″W x 8″H x 16″D each step)
– Cream boucle or waffle-knit fabric (about 2 yards for full coverage)
– Fabric adhesive or staple gun
– Scissors and measuring tape
– Non-slip rubber mat sheet (cut to fit each step surface)
– Leather label patch (optional, adds that Pinterest finish)
– Hot glue gun
Instructions
Stack your three foam blocks in descending height — tallest at the back, shortest at the front. I did this exact build for my dog last winter and honestly the stacking part took me like four minutes.
Cut your fabric into separate panels for each block, leaving 3–4 inches of extra fabric on every edge for wrapping. Wrap each foam block like a gift, pulling the fabric taut and securing underneath with your staple gun or fabric adhesive. Press firmly into corners so there’s no bunching.
Once each step is wrapped, glue your non-slip rubber mat directly onto each step surface. This is the part people skip — and then their dog slides right off the first time. The rubber grip keeps every paw planted, which means less joint stress on every single climb up.
Stack the wrapped blocks again, then hot-glue them together at the back edges for stability. Press and hold for 60 seconds per joint.
Now here’s where it gets fun — press your leather label onto the front face of the bottom step. That little detail makes this look like something you bought, not built.
The waffle-knit fabric wicks light fur and wipes clean with a damp cloth, so your room stays looking the way it looks in your head. And because the foam absorbs impact, your dog’s hips and knees aren’t taking that repeated bed-jump shock anymore.
I once saw someone use mismatched fabric scraps for each step, and it turned into the cutest thing — very DIY dog accessories energy if that’s your vibe.
Check that the full stair unit doesn’t wobble before letting your pup use it. A small felt pad under each bottom corner fixes any rocking on hardwood floors.
📸 Photo credit: Instagram @maltesechico
#7: The “Noah & Paw” Inspired Velvet Pet Stairs (DIY Version That Looks Just as Good)
Your golden has finally figured out the couch. You turn around and there she is — half on, half off, scrambling with her back legs while her muddy paws leave streaks across the leather cushion. Every. Single. Time.
This DIY recreation of the Noah & Paw pet stairs is the fix you didn’t know you needed.
Materials & Tools:
– High-density foam block (approximately 20″L x 12″W x 14″H, 3-step staircase shape)
– Teal/slate velvet fabric (about 2 yards)
– Staple gun + ½” staples
– Sharp serrated knife or electric foam cutter
– Fabric glue or sewing machine
– Iron-on velvet ribbon for edging
– Non-slip rubber mat sheet for the base
Instructions
Cut your foam block into three descending steps — each step rising 4-5 inches higher than the last. A serrated knife works, but an electric cutter gives you cleaner edges your dog won’t slip on. Wrap each step individually in velvet before assembling them, because trying to wrap a finished staircase is a nightmare (trust me, I learned this the hard way).
Staple the velvet tight at the underside seams, pulling the fabric toward the back so the front face stays smooth. Attach your rubber mat sheet to the bottom — non-slip base means joint protection, which pays off years down the road for a bigger breed like a golden.
Stack and glue your steps together with heavy-duty foam adhesive. Let it cure a full 24 hours.
Cut your sofa clearance? Zero scrambling, zero leather scratches.
Prep Time: 20 min | Active Project Time: 1.5 hours | Difficulty Level: Beginner-Friendly
Velvet wrinkles if you pull unevenly, so work from the center outward on each panel. And if you want to add a personal touch, grab iron-on letters to monogram your pup’s name on the front panel — just like the embroidered logo on the original.
📸 Photo credit: Instagram @noah_and_paw
The One Measurement Mistake That’ll Make Your Dog Steps Wobble Forever
Okay, so here’s the thing nobody tells you before you start cutting wood — the angle of your steps matters more than the height.
Most people measure the total bed height and divide it evenly. Done and done, right? Wrong. That gives you steps that are too steep for a golden retriever’s joints, especially as she gets older.
Real talk: you want each step rise to be no more than 7 inches, and the tread depth needs to be at least 10 inches so her whole paw lands flat. This reduces joint strain every single time she climbs up.
My neighbor built her first set without checking this and her dog just… jumped anyway and ignored the whole thing.
Also — always dry-fit your cuts before adding any screws. Wood shifts, gaps appear, and a wobbly step is genuinely dangerous for a heavy dog.
Sand every edge until it feels smooth against your palm. Not just the top surfaces. Every. Single. Edge.
Your girl deserves steps that feel solid under her paws, not something that shifts and scares her off the first week.
Your Dog-Proof Living Room Is One Purchase Away
Okay, real talk — you’ve been tolerating muddy paw prints and sofa drool way too long. Your home deserves better. Pick one product from this list and just try it. That’s it.
Start small. Maybe it’s a washable slipcover for that couch your golden has basically claimed as his throne. Once you see how good clean looks, you’ll want more of it.
This is the key: your space can be both dog-friendly and Pinterest-worthy — those two things aren’t fighting each other anymore. And honestly? Your home should feel like yours again.
So tell me — which product are you grabbing first?

Amr Mohsen is a software engineer who traded his keyboard for a leash — at least on weekends. His love for dogs inspired him to share what he learns as a dog owner and enthusiast, bringing a detail-oriented, research-driven perspective to every article he writes. If it’s about dogs, he’s probably already looked it up twice.

