Okay so you KNOW how it is with golden retrievers.
One second your living room looks straight off Pinterest, and the next — muddy paw prints on the white rug, your dog doing zoomies through the kitchen while you’re cooking, and somehow he’s already on the couch again.
My cousin has a golden named Biscuit, and honestly watching her chase him out of her freshly decorated sitting room gave me secondhand stress.
Here’s the thing — most dog gates are just… ugly. Like, why does keeping your dog out of a room have to ruin your whole vibe?
That’s exactly why these 12 creative DIY dog gate ideas are kind of a game changer. They actually work AND they look good doing it — no eyesore plastic contraptions required.
Your home stays cute. Your dog stays safe. Win-win, honestly.
#1: DIY Horizontal Slat Baby Gate That Actually Looks Good (And Keeps Your Pup Safe)

You know that moment when your golden retriever bolts toward the stairs the second your back is turned? My heart drops every time.
Prep Time: 30 min | Active Project Time: 3–4 hours | Difficulty Level: Intermediate
Materials & Tools:
– 1×2 inch poplar or pine wood slats
– 2×4 inch lumber for the frame
– White semi-gloss paint + primer
– Wood screws and wood glue
– Measuring tape, drill, saw, sandpaper
Instructions
Cut your 2×4 frame pieces to match your stairway opening width. Sand every edge — your dog’s nose will find the rough spots. Build the outer rectangle frame first, then attach your 1×2 horizontal slats with equal spacing, roughly 2 inches apart. This spacing blocks dogs but keeps sightlines open, so your pup doesn’t feel trapped.
Paint two coats of white semi-gloss for that clean, Pinterest-worthy finish.
Mount it between the newel post and wall using heavy-duty hinges. Add a latch at adult height.
Want an easy win? Pre-drill all slat holes before assembly — it keeps everything straight and cuts your build time in half.
And honestly? The horizontal slat design means your golden can see through without scratching at it constantly.
📸 Photo credit: Instagram @bbybatandbarbell
#2: DIY Barn Door Dog Gate (That Actually Looks Good in Your Home)
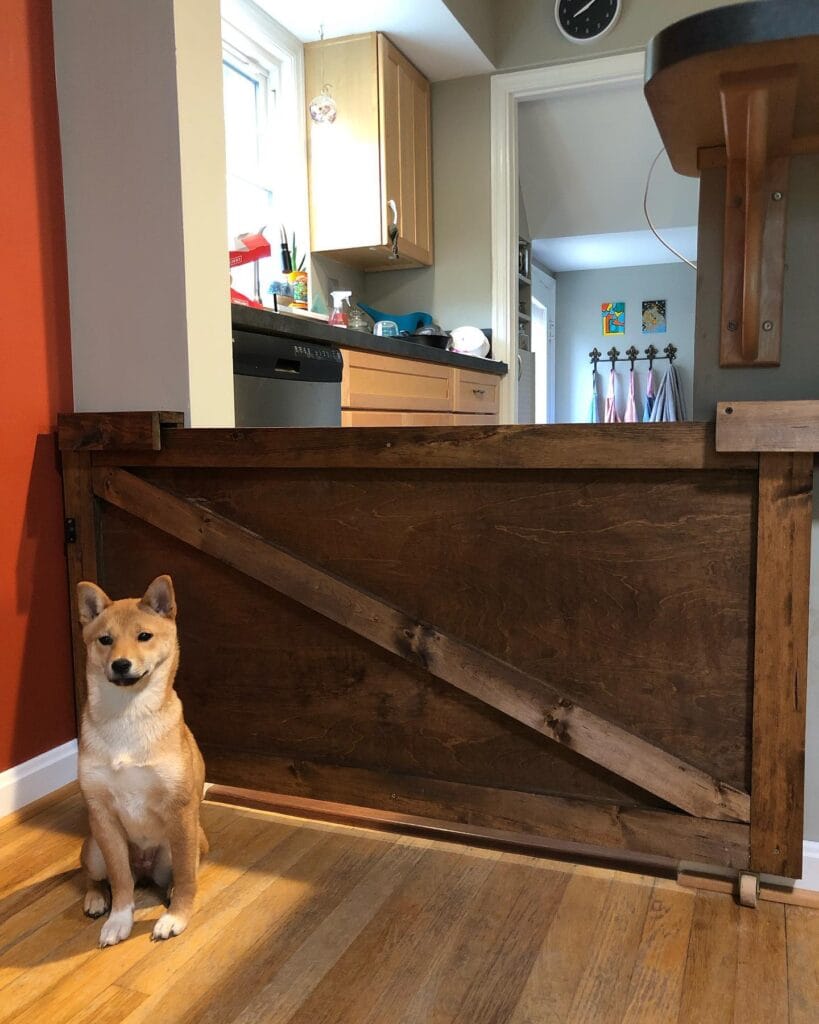
Okay, you know that moment when your golden retriever bolts into the kitchen right as you’re unloading groceries? Mine did that constantly — muddy paws on the tile, nose in every bag. This gate changed everything.
Materials & Tools:
– ¾-inch plywood panel (stained dark walnut)
– 2×4 pine boards for the frame
– Z-brace diagonal boards (barn door style)
– Heavy-duty gate hinges + floor bolt
– Wood stain, screws, drill
### Instructions
Cut your 2×4 pine into a rectangular frame matching your doorway width. Attach the plywood panel flush inside. Add two diagonal Z-brace boards across the front — this is what gives it that Pinterest barn door look everyone loses their mind over.
Stain everything in dark walnut. Mount using two heavy-duty hinges on one side and a floor-pivot bolt on the opposite end.
Sand the edges smooth — splinter-free wood means your pup won’t catch a paw mid-zoom.
Prep Time: 30 min | Active Project Time: 3–4 hours | Difficulty: Intermediate
A solid gate keeps your dog safe and doubles as a design piece — that payoff means zero kitchen chaos without sacrificing your aesthetic.
📸 Photo credit: Instagram @bethany_rescues
#3: Rolling Barn-Style Dog Gate That Blocks Doorways and Looks Stunning
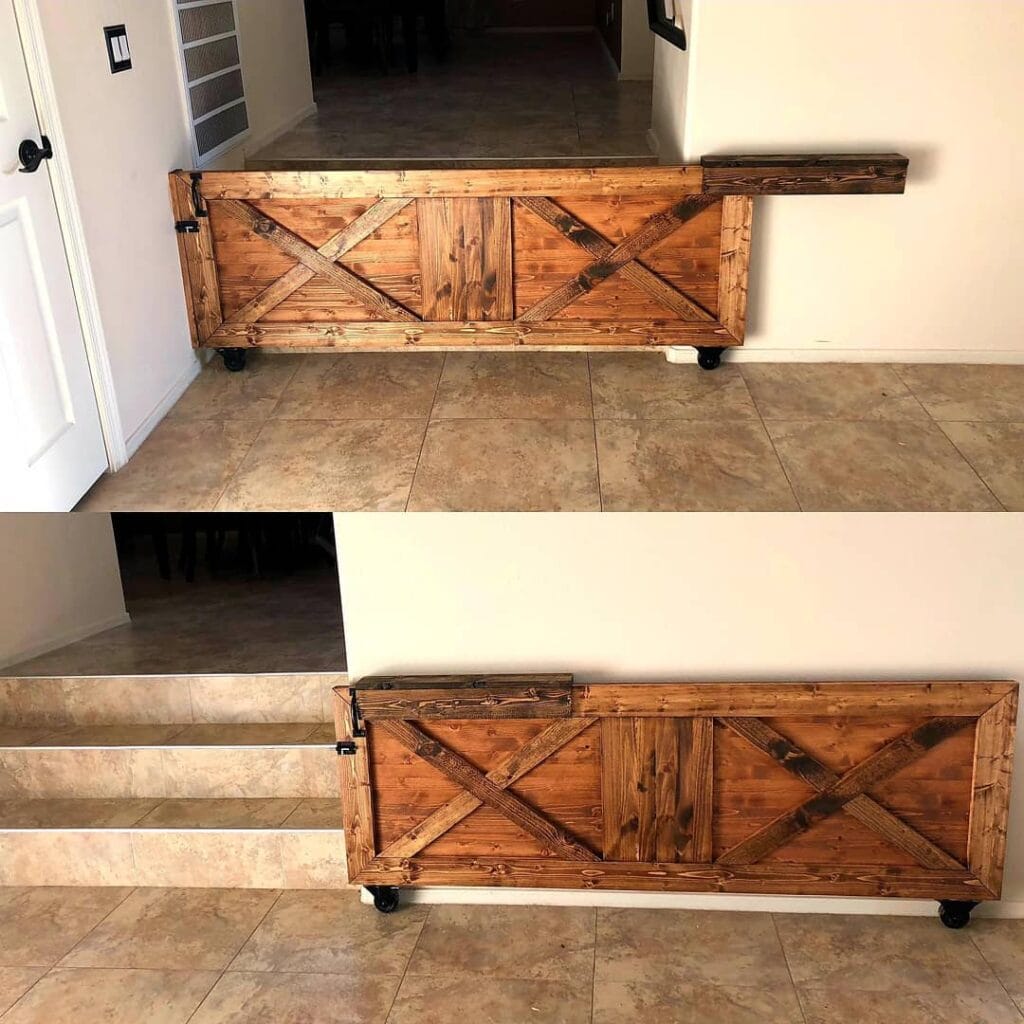
Your golden is that dog — the one who charges the kitchen the second you turn your back. Muddy paws on the freshly mopped tile. Again.
This cedar wood rolling barn gate is the fix you didn’t know you needed.
Materials & Tools:
– 2×6 cedar planks (stained dark walnut)
– Diagonal X-brace boards (cut at 45°)
– Black metal latch hardware
– 4 heavy-duty swivel casters
– Wood stain + brush
– Miter saw, drill, screws
Instructions
Build your outer rectangle frame first using 2×6 planks. Cut your diagonal boards and attach them in an X-pattern across each panel section — two panels total. Sandwich the horizontal slats behind the X-bracing. Attach casters to the bottom corners. Mount the metal latch on the left side. The extending top beam slots against your wall, holding everything exactly in place without drilling a single hole.
The casters mean you roll it aside fast — no lifting, no wrestling.
Stain a shade darker than your floors so muddy paw prints disappear between cleanings.
Prep Time: 30 min | Active Project Time: 4–5 hours | Difficulty Level: Intermediate
📸 Photo credit: Instagram @cedar_accents
#4: The “I Give Up” Drill Bit Organizer That Doubles as a Dog Gate Distraction Station
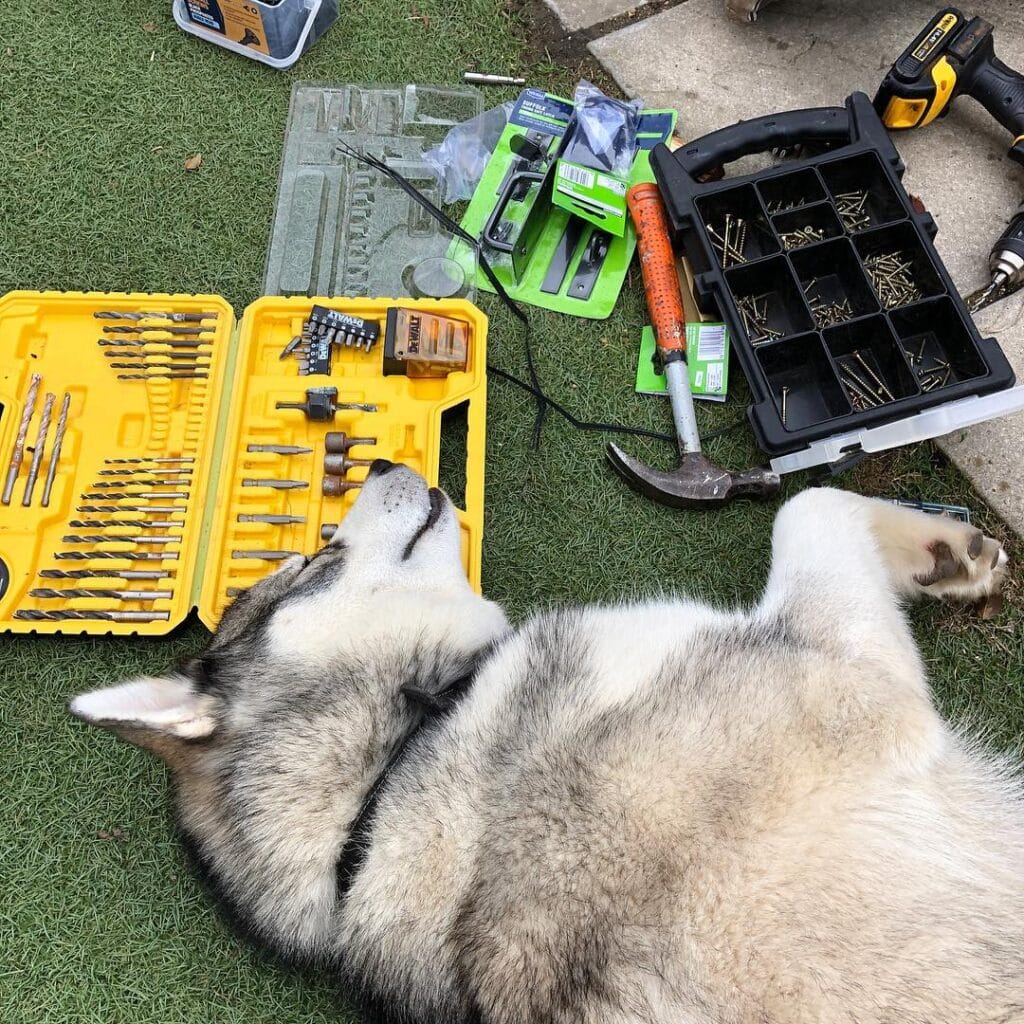
Prep Time: 15 min | Active Project Time: 45 min | Difficulty Level: Beginner
You know that moment your golden decides your lap is more important than your project? Yeah. Tools everywhere, dog flopped right in the middle of it all.
This setup uses a DeWalt drill bit case, a black multi-compartment screw organizer, and a claw hammer — all laid out on grass before mounting.
Materials & Tools:
– DeWalt 100-piece drill bit set (yellow case)
– Black Stanley-style screw organizer (brass screws, multiple sizes)
– Claw hammer with worn grip
– Power drill (DeWalt 20V)
– Gate hardware kit (green Suffolk packaging)
Instructions
Sort your screws by size into the organizer compartments first — this saves so much backtracking mid-build. Pre-drill pilot holes using the 1/4 inch twist bits before driving screws. The pilot holes prevent wood splitting, meaning your gate stays sturdy for years.
Keep this in mind: mounting hardware flush against the frame is what gives your gate that clean, Pinterest-worthy finish.
Secure the gate hardware at 36 inches high to keep even big dogs safely contained.
Having your bits pre-organized means you grab what you need without losing momentum — and your dog stops stealing drill bits.
📸 Photo credit: Instagram @boethehusky
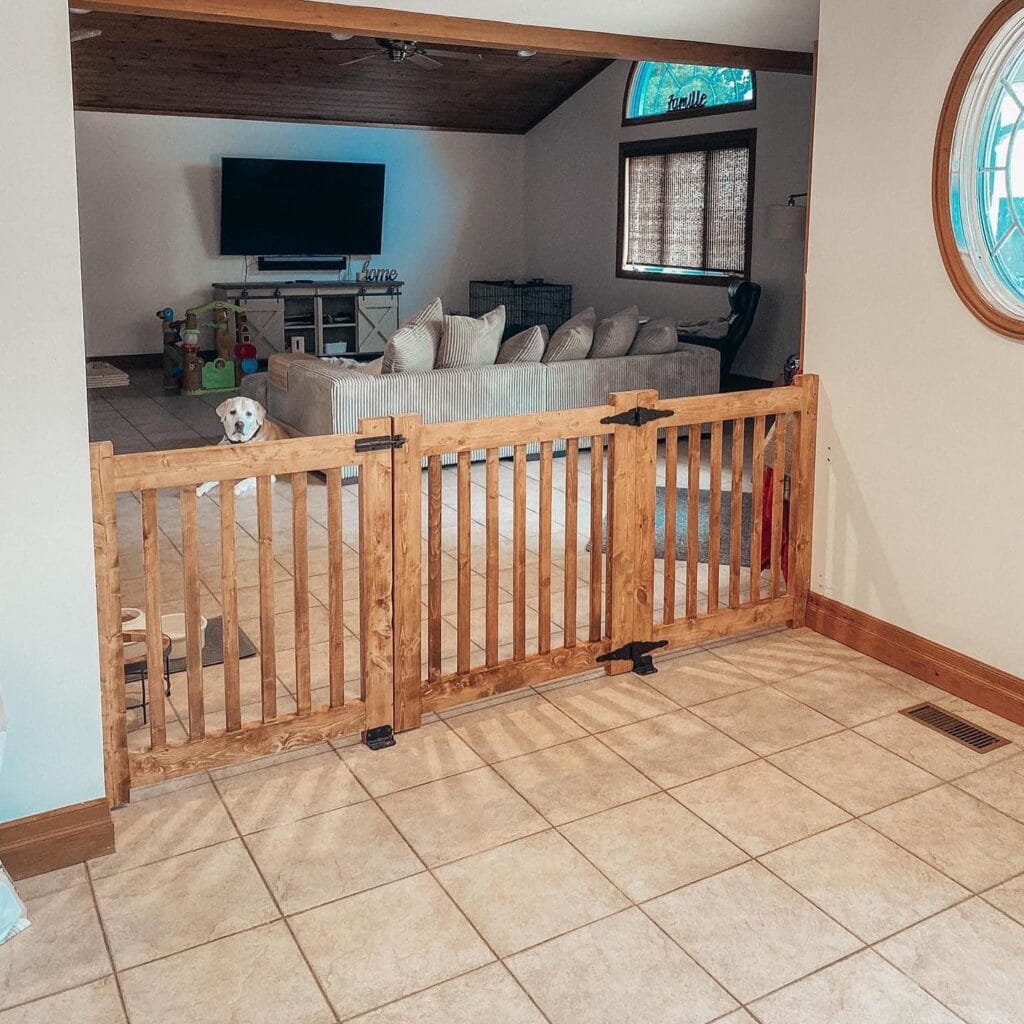
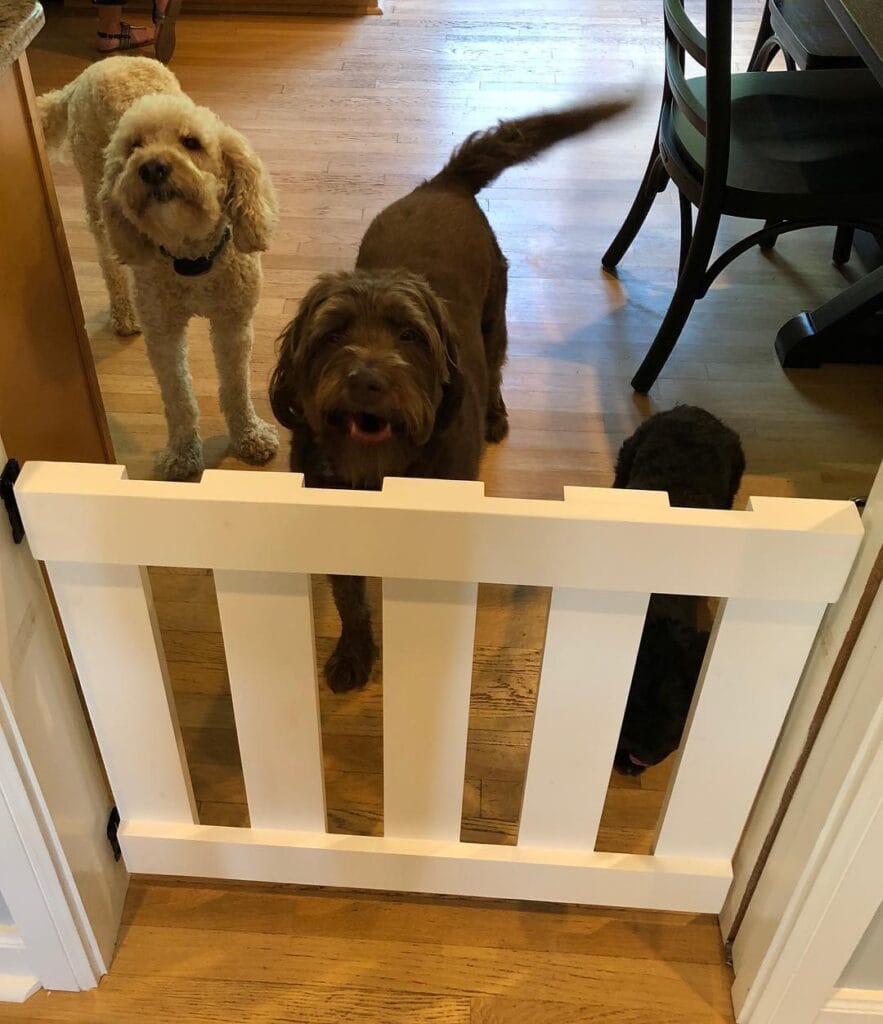
#5: DIY Triple-Panel Wooden Dog Gate (With a Walk-Through Door!)
Prep Time: 30 min | Active Project Time: 4–6 hours | Difficulty Level: Intermediate
You know that moment your golden bolts past you into the living room right after a muddy walk? Yeah. The couch doesn’t stand a chance.
This three-panel cedar gate is the fix. It spans a wide entryway opening — we’re talking 60–72 inches wide — and it includes a center walk-through door with black metal hinges and a floor latch. Finally, a gate that looks like it belongs in the house.
Materials & Tools:
– 2×2 cedar boards (vertical slats)
– 2×4 pine (frame rails)
– Black metal hinges, door latch, floor bolt
– Wood stain (warm honey oak)
– Drill, saw, sandpaper, wood glue
Instructions
Cut your 2×4 frame pieces first — two horizontal rails per panel. Then cut 2×2 slats at 24 inches each and space them 2.5 inches apart for that clean, airy look your dog can’t squeeze through.
Assemble each panel with glue and screws. Sand everything smooth — your dog rubs against this daily.
Attach panels together using heavy-duty hinges. The center panel gets a swinging door. Mount a floor bolt latch so it stays shut without you thinking about it.
The honey oak stain pulls the whole room together, and the walk-through door means you’re not climbing over anything ever again.
Stain before final assembly — it’s so much easier that way.
📸 Photo credit: Instagram @camlachie_carpentry_co
#6: DIY Expandable Wood & Mesh Dog Gate (The One That Actually Looks Good)
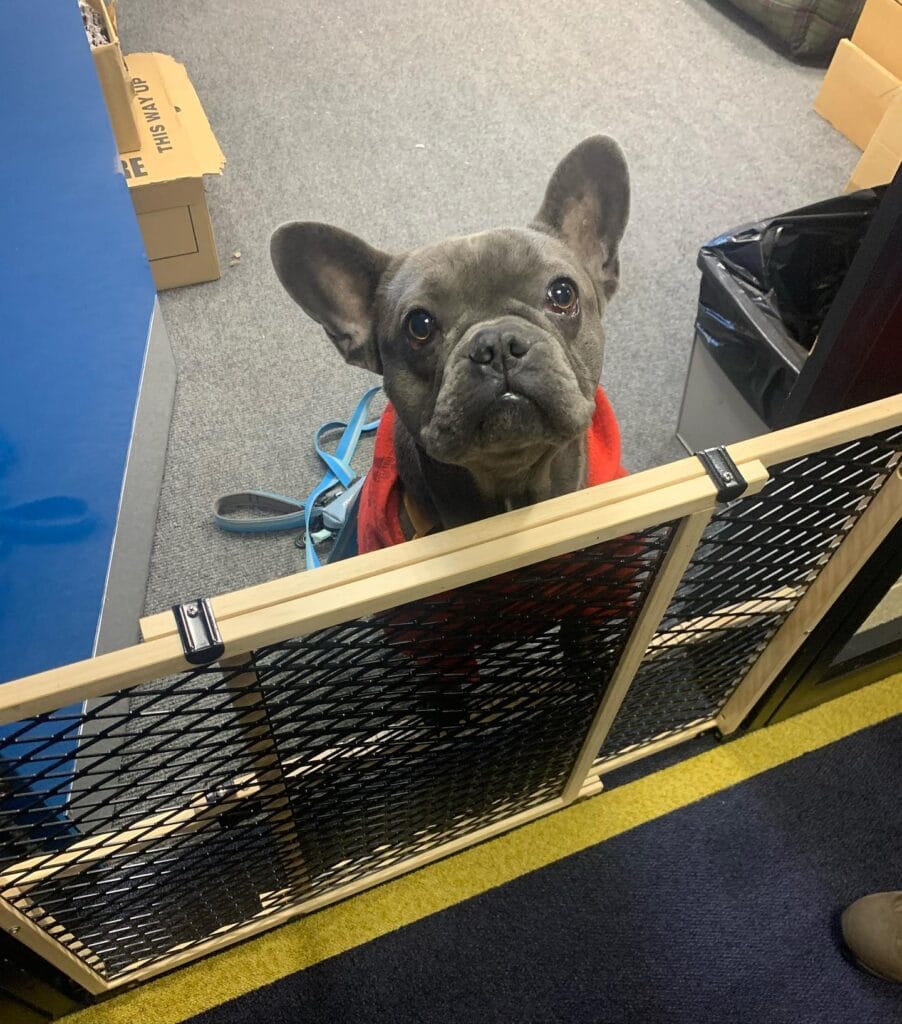
Your golden just bolted past the baby gate again — the cheap plastic one that wobbles every time she breathes on it. Girl, I’ve been there.
Prep Time: 15 min | Active Project Time: 1–2 hours | Difficulty: Beginner
Materials & Tools:
– Natural wood slat frames (pre-cut, connected with black metal hinge clips)
– Black diamond-pattern mesh panels
– Screwdriver + measuring tape
– Optional: sandpaper for smooth edges
### Instructions
Start by laying your three wood-framed mesh panels flat on the floor. Connect each panel using the black metal bracket clips at the top and bottom joints — these let the gate fold accordion-style so you can angle it around corners.
Stand the gate upright and press the outer panels outward to create a stable, self-supporting curve. No wall mounting needed.
And here’s the magic — mesh panels keep sightlines open, so your dog sees you and stays calm instead of panicking behind a solid barrier. Calm dog, zero scratching on your baseboards. That’s the payoff.
Sand any rough wood edges before assembly. Your pup’s face rests right on that top rail — smooth wood protects their skin.
📸 Photo credit: Instagram @bolt_frenchie_life
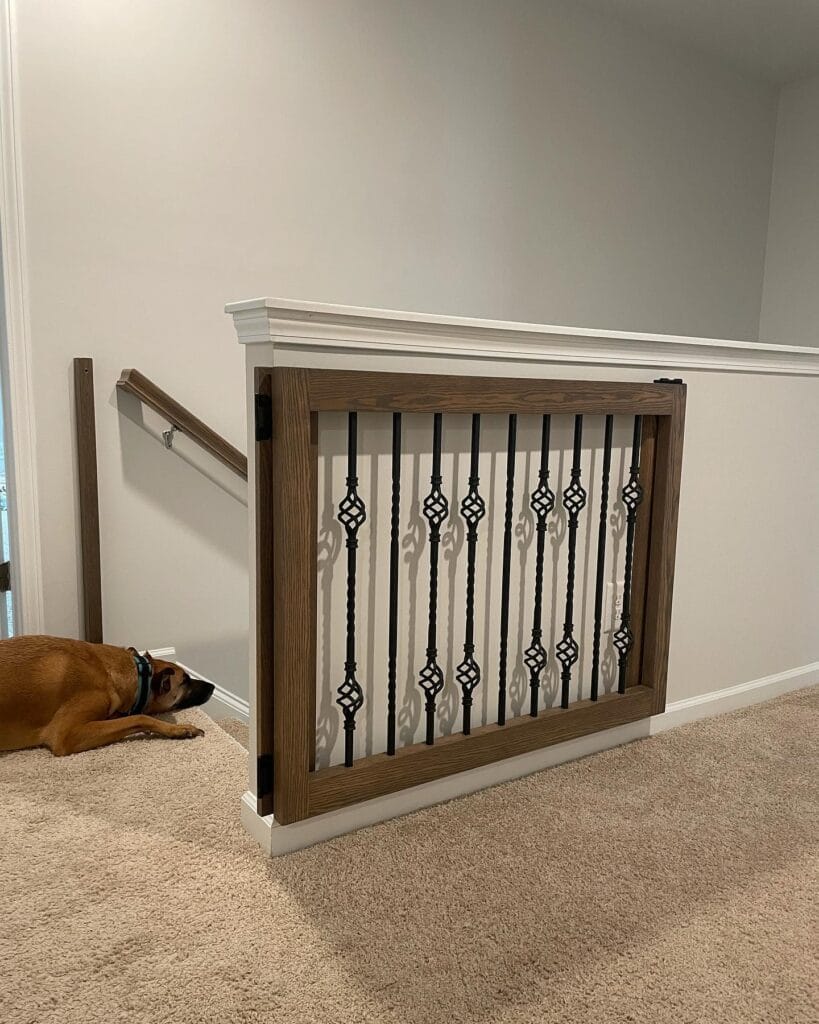
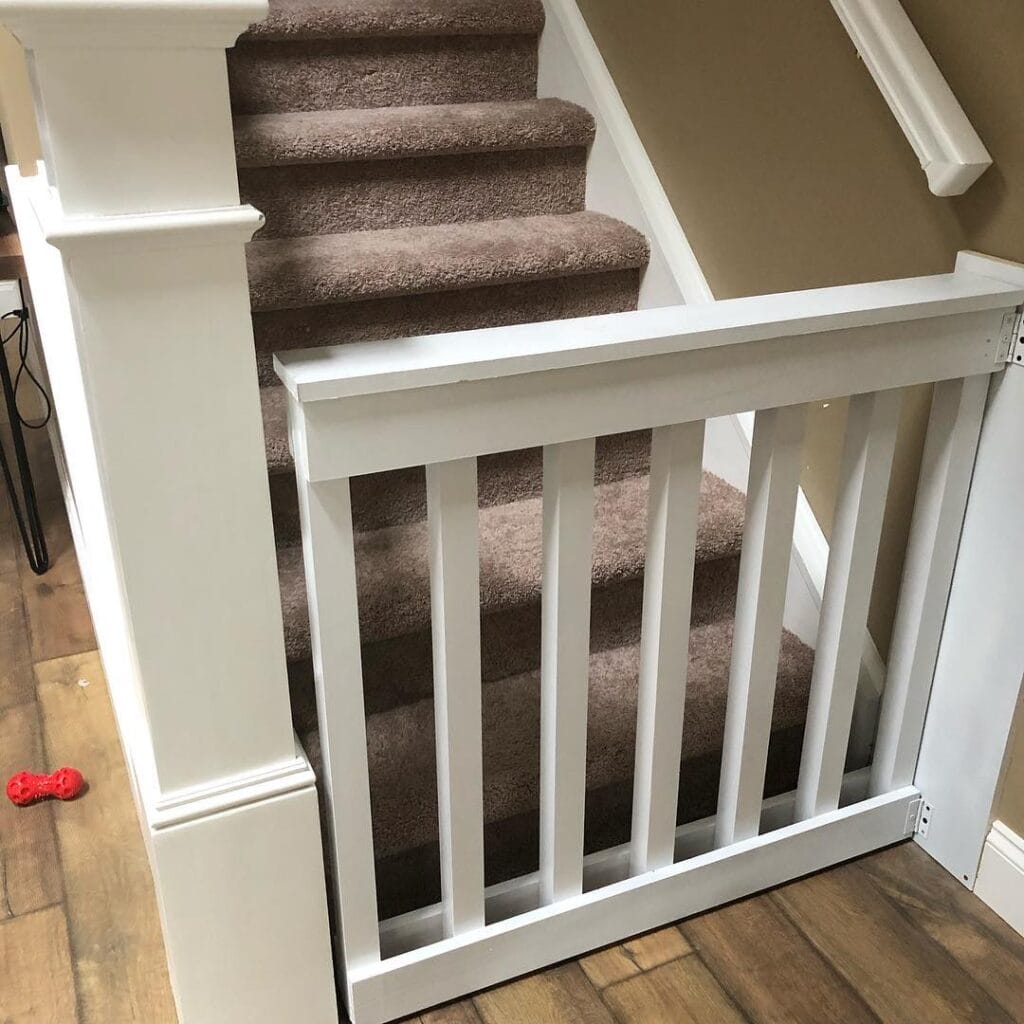
#7: DIY Craftsman-Style Stair Gate (With Spindles That Actually Match Your Trim)
You know that moment when you’re carrying laundry upstairs and your golden somehow rockets past you straight down the steps? Yeah. My heart drops every single time.
Prep Time: 30 min | Active Project Time: 4–5 hours | Difficulty: Intermediate
Materials & Tools:
– 2×4 pine boards (frame)
– 1×2 poplar spindles (x6)
– White semi-gloss paint
– Heavy-duty hinges + latch hardware
– Pocket hole jig, drill, sandpaper
### Instructions
Cut your 2×4 frame pieces — two 36-inch vertical sides, one 28-inch top rail, one 28-inch bottom rail. Use pocket hole joinery to assemble the rectangle. Space your 1×2 spindles evenly inside — roughly 3.5 inches apart — keeping gaps small enough your dog can’t squeeze through.
Sand everything smooth, then paint two coats of white semi-gloss. Mount with heavy-duty hinges into the newel post. Add a slide-bolt latch at the top.
Built-in spindles mean your pup stays safely off the stairs, your staircase looks Pinterest-perfect, and guests never even notice it’s a dog gate.
Quick note: Pre-drill every hole before screwing — pine splits easily under pressure.
📸 Photo credit: Instagram @dagwood_designs
#8: DIY Diagonal Pallet Wood Gate — The Backyard Upgrade That Actually Looks Good

Okay, you know that moment when your golden bolts past you into the alley again and you’re standing there in your slippers going “seriously?!” Yeah. This gate fixes that.
Prep Time: 1 hour | Active Project Time: 6–8 hours | Difficulty Level: Intermediate
Materials & Tools:
– Reclaimed cedar shims or pallet wood strips (mixed tones)
– 2×4 pressure-treated lumber for framing
– Black metal angle brackets and strap hinges
– Wood stain (dark walnut + natural cedar)
– Exterior wood glue + 3-inch deck screws
– Miter saw, drill, measuring tape
Instructions
Build two black steel-framed rectangular panels first. Then lay your wood strips at 45-degree angles, alternating light and dark stains to create that herringbone-style diamond pattern. Glue and screw each strip down. Mount panels between your posts using heavy-duty strap hinges.
The diagonal pattern isn’t just gorgeous — it adds structural rigidity, meaning your dog can’t flex the gate open by pushing against it.
Seal everything with exterior polyurethane. That’s what keeps it looking Pinterest-worthy through mud season.
Leave a 2-inch gap at the bottom so the gate swings freely over uneven ground without dragging.
And honestly? This is the kind of project your golden will never appreciate — but every neighbor will stop to ask about.
📸 Photo credit: Instagram @fuugswoodworking
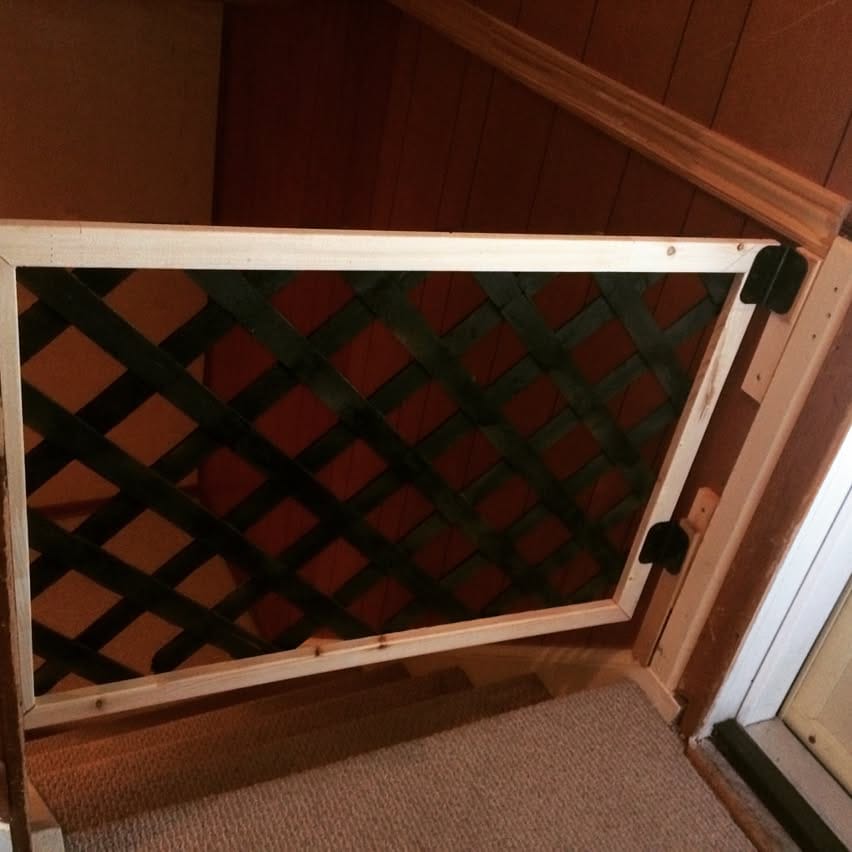
#9: DIY Lattice Panel Stair Gate — The One That Actually Looks Good
Girl, you know that moment when Buddy bolts up the stairs again and you hear that telltale thud? Yeah. This gate fixes that.
Prep Time: 20 min | Active Project Time: 2–3 hours | Difficulty: Beginner-Friendly
Materials & Tools:
– 1×3 pine boards (cut to your stair opening width)
– Black vinyl lattice panel (cut to fit frame interior)
– 2 black metal hinges
– 1 black metal latch
– Wood screws + drill
– Sandpaper (120-grit)
– Wood glue
### Instructions
Sand your pine boards smooth first — splinters are not it. Build a rectangle frame using wood glue, then reinforce every corner with screws. Slide the black lattice panel inside and staple it tight to the frame back.
Mount two hinges flush against your stair post. The lattice openings are small enough that Buddy can’t squeeze through, but wide enough that he can see you — which honestly keeps him calmer and less whiny.
And the latch? Position it at your hand height, not dog-nose height.
Stain the frame to match your wood paneling and it looks like it was always there.
One coat of matching stain pulls this whole thing together so it stops looking like a project and starts looking like a feature.
📸 Photo credit: Instagram @goodman1494
#10: DIY Chevron Baby Gate That Actually Looks Good in Your Entryway
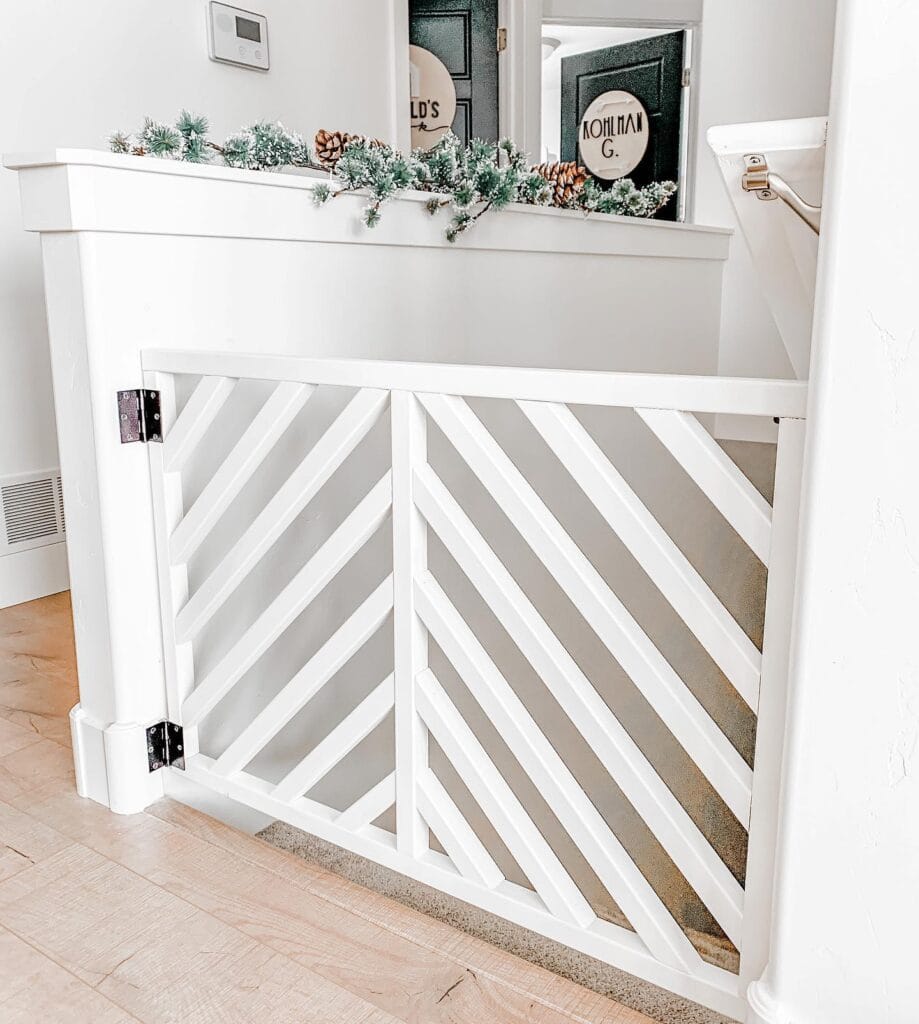
Your golden just bolted past you down the stairs again. Heart. In. Throat.
This white wood chevron gate is the one. It’s built into the entryway wall with a top cap rail and swings open on black metal hinges — so you’re not tripping over some plastic accordion thing every morning.
Materials & Tools:
– 1×3 pine boards (for diagonal slats)
– 2×4 lumber (frame and posts)
– Wood screws and wood glue
– White semi-gloss paint
– 2 heavy-duty black butt hinges
– Miter saw, drill, measuring tape
Instructions
Build a rectangular frame using your 2x4s, sized to your doorway width. Cut 1×3 slats at 45-degree angles on your miter saw — mirror them toward the center to create the chevron shape. Screw slats into the frame, spacing them 2 inches apart. Attach your top cap flush across the top. Mount hinges to your wall post, hang the gate, and paint two coats of white semi-gloss.
The diagonal slat design keeps gaps narrow enough that your pup can’t squeeze through — and you get a gate that actually looks intentional in your home.
Prep Time: 30 min | Active Project Time: 4-5 hours | Difficulty Level: Intermediate
Sand lightly between paint coats for that smooth, built-in finish that makes it look custom rather than DIY.
📸 Photo credit: Instagram @just_courtney_slight
#11: DIY White Wooden Slat Dog Gate (The One That Actually Looks Good in Your Home)
Okay, so you know that moment when your golden comes barreling toward the kitchen while you’re cooking, and suddenly there’s fur everywhere near the food? Yeah. This gate is the answer.
Prep Time: 30 min | Active Project Time: 3–4 hours | Difficulty: Intermediate
Materials & Tools:
– 1×4 pine boards (white-painted)
– Black iron hinges and latch hardware
– Wood glue + screws
– Sandpaper, measuring tape, drill, miter saw
Instructions
Cut your 1×4 boards to match your doorframe width. Build a rectangular frame first — two horizontal rails top and bottom. Then attach five vertical slats evenly spaced inside the frame, securing each with glue and screws. Sand everything smooth. Apply two coats of white paint. Mount using black iron hinges directly into the doorframe.
The slatted design lets your dog see you from the other side — no anxious scratching, no whining.
That gap at the bottom of the gate? Leave it intentional. Smaller pets can pass under while bigger dogs stay back.
And because it looks like actual built-in millwork, your guests won’t even clock it as a dog gate.
📸 Photo credit: Instagram @metrodetroitcraftsman
#12: DIY Geometric Wood Dog Gate (The Pinterest-Worthy Kind That Actually Works)

Your golden just launched herself at the kitchen trash again. You saw it coming and still couldn’t stop it.
This solid pine geometric gate is the answer. Those diagonal cross-pattern slats aren’t just pretty — they create gaps too narrow for a determined snout to squeeze through, which means your dog stays out without you sacrificing your aesthetic.
Materials & Tools:
– 1×2 pine boards (approximately 8-10 linear feet)
– Wood glue + brad nails
– Sandpaper (120-grit)
– Small caster wheels
– Wood stain or sealant (optional)
– Miter saw, measuring tape, drill
Instructions
Cut your outer frame first from 1×2 pine. Attach horizontal rails at equal spacing. Cut diagonal pieces at 45-degree angles and nail them into an X-pattern — center first, then work outward. Add vertical posts on both ends. Attach small caster wheels at the base so the gate rolls instead of scrapes.
Sand everything to 120-grit smoothness before your dog gets curious with her mouth.
Prep Time: 20 min | Active Project Time: 3-4 hours | Difficulty: Intermediate
Finishing with a clear sealant protects the wood from drool and paw scratches — meaning this gate stays beautiful way longer than a store-bought plastic one.
📸 Photo credit: Instagram @trulydeeply23
The One Measurement Most DIY Dog Gates Get Wrong (And How to Fix It Before You Cut Anything)
Okay, real talk — the biggest mistake I see people make is measuring the opening width and stopping there. That’s how you end up with a gate that technically fits but wobbles like crazy or pops out the second your golden leans against it.
Here’s what actually matters: measure the depth of your doorframe or hallway, not just the width.
When I built my first gate, I cut everything for the opening and completely ignored how shallow my trim was. The mounting hardware had zero solid wood to grip. The whole thing collapsed on day two. Embarrassing.
The pro move? Your pressure-mount brackets need at least 2 inches of flat surface to bite into. If your trim is skinnier than that, add a small wooden spacer block first. Glue it, screw it, then mount your gate hardware into that.
This one fix stops 90% of the “my gate keeps falling” complaints.
Also — golden retrievers are notorious for leaning into barriers rather than jumping. Build for lateral pressure, not just height. A taller gate won’t help if the frame flexes sideways.
Your Dog’s Space Deserves a Little Love Too
Okay, so here’s the thing — your home is already adorable. But Biscuit’s corner? That’s the one spot still giving “afterthought energy.”
Picking the right dog bed doesn’t have to be stressful. Measure your space, think about how she actually sleeps, and grab something that holds up to real golden retriever chaos — the fur, the mud, the full-body flops.
If you’re feeling crafty, DIY dog bed frame ideas are a genuinely fun weekend project. Either way, she deserves a spot that feels intentional.
So tell me — does your girl have a dedicated sleep spot, or is she fully taking over your couch? 😄

Amr Mohsen is a software engineer who traded his keyboard for a leash — at least on weekends. His love for dogs inspired him to share what he learns as a dog owner and enthusiast, bringing a detail-oriented, research-driven perspective to every article he writes. If it’s about dogs, he’s probably already looked it up twice.

